Back in March, I wrote a detailed review of ThirdReality’s Soil Moisture sensor, a Zigbee device that works with ZHA and Z2M. It’s powered by a single AA battery and uses a capacitive probe to measure soil temperature and moisture.
For a comprehensive comparison, I pitted the ThirdReality sensor against the Apollo PLT-1, a highly versatile, ESPHome-based soil sensor. The PLT-1 stands out over other devices of this type with its array of extra sensors and an external Dallas probe for ambient temperature. I recommend checking out both reviews, as each device has unique strengths that could be a perfect fit for your needs.
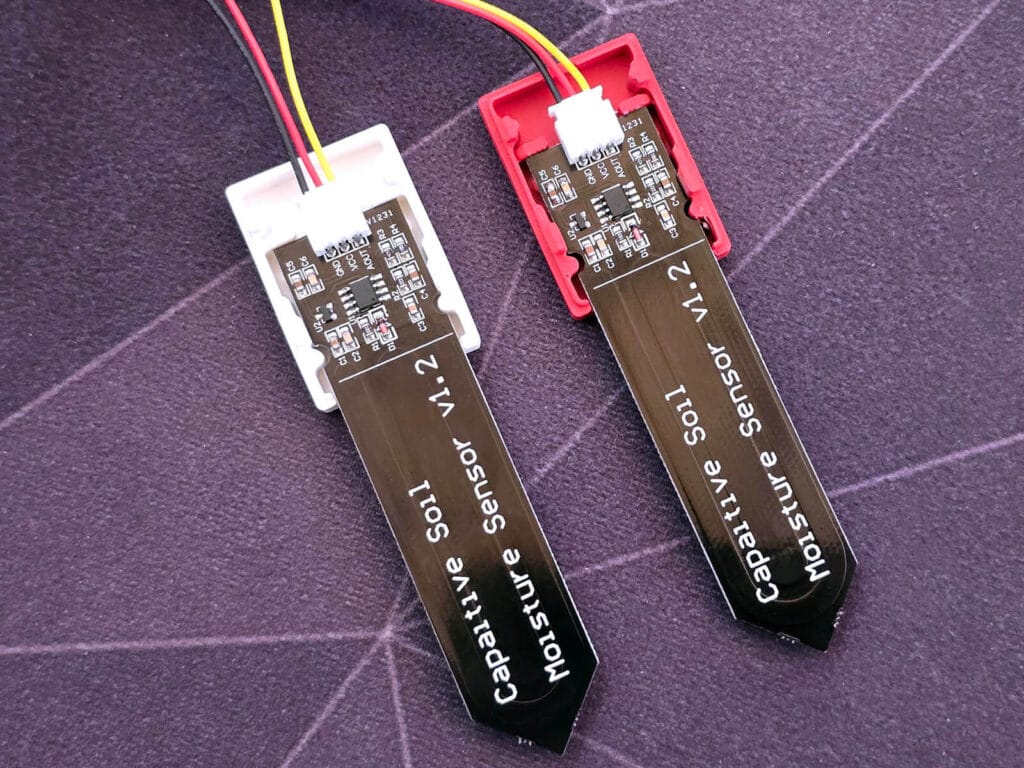
In this article, I’m sharing a guide for creating your own soil moisture sensor with ESPHome. It’s based on the capacitive soil moisture probe v1.2, an ESP32 board and a 3D printed enclosure. This DIY device is very affordable and you can use more than one probe with a single ESP board.
DIY Soil Moisture Sensor Requirements
This project uses ESPHome’s ADC component and can be done with almost any ESP32 or ESP8266 board out there. If you are using an ESP8266 board like the Wemos D1 Mini, note that only pin A0 (GPIO17) can be used, which means only a single soil moisture probe can be attached to one board.
On the other hand, ESP32 boards have several ADC pins which can be used with more sensors, usually available at pins GPIO32 to GPIO39. In my guide, I’m recycling an ESP32 from an old project. Here is a shopping list of what you will need:
🛒 ESP32 Version
- ESP32
- Capacitive Soil Moisture Sensor v1.2
- JST to Dupont Connectors OR
- Wires and a soldering iron
- USB Cable
🛒 ESP8266 Version
- ESP8266
- Capacitive Soil Moisture Sensor v1.2
- JST to Dupont Connectors OR
- Wires and a soldering iron
- USB Cable
The capacitive soil moisture sensor (v1.2) I use in this DIY project comes with a 3-pin JST to Dupont connector, allowing you to connect it to your board without any soldering. For a neater and more permanent connection, you can simply cut the Dupont connectors off and solder the wires directly to the board.
Wiring and attaching the sensor
The wiring of this DIY soil sensor is fairly easy. Only three wires need to be connected between the ESP32 board and capacitive soil sensor, without adding any additional things like resistors. Although I highly recommend soldering for the final device, how you connect the two is entirely up to you. Here is a simple wiring diagram:
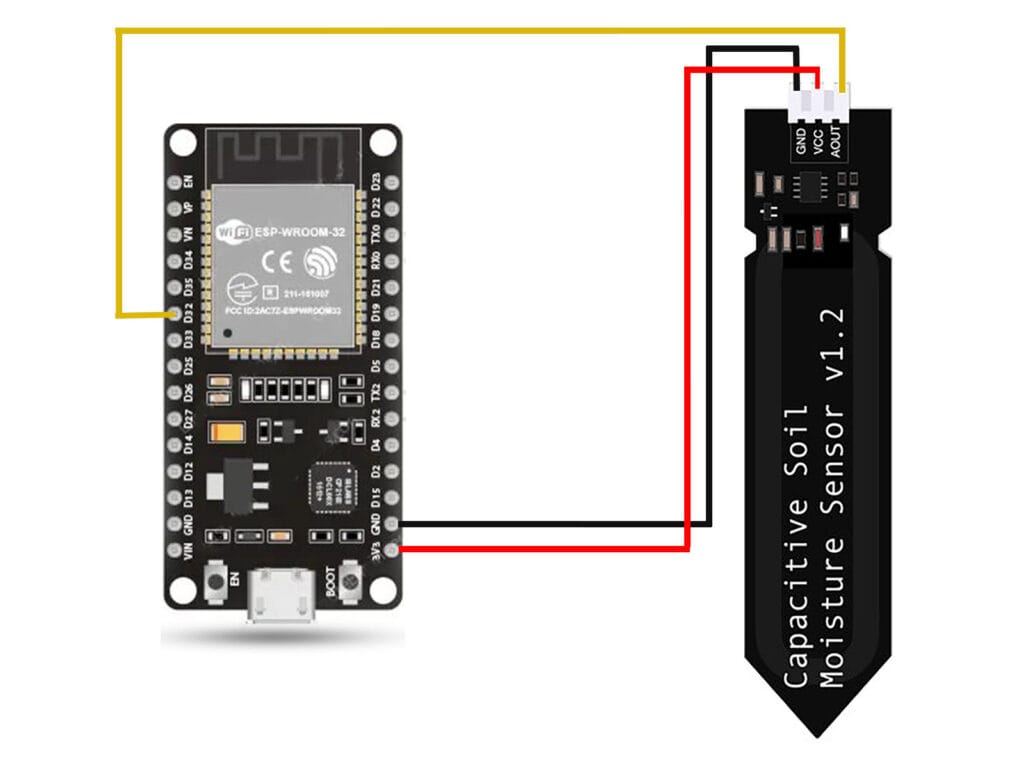
Depending on the board, you can use any ADC (Analog-to-Digital) GPIO pin available. For the ESP32-WROOM, I am using the first ADC pin, which is GPIO32. To make it perfectly clear, these are the connections you need to make:
- 3V3 > VCC
- GND > GND
- D32 (GPIO32) > AOUT
3D Printed Enclosure
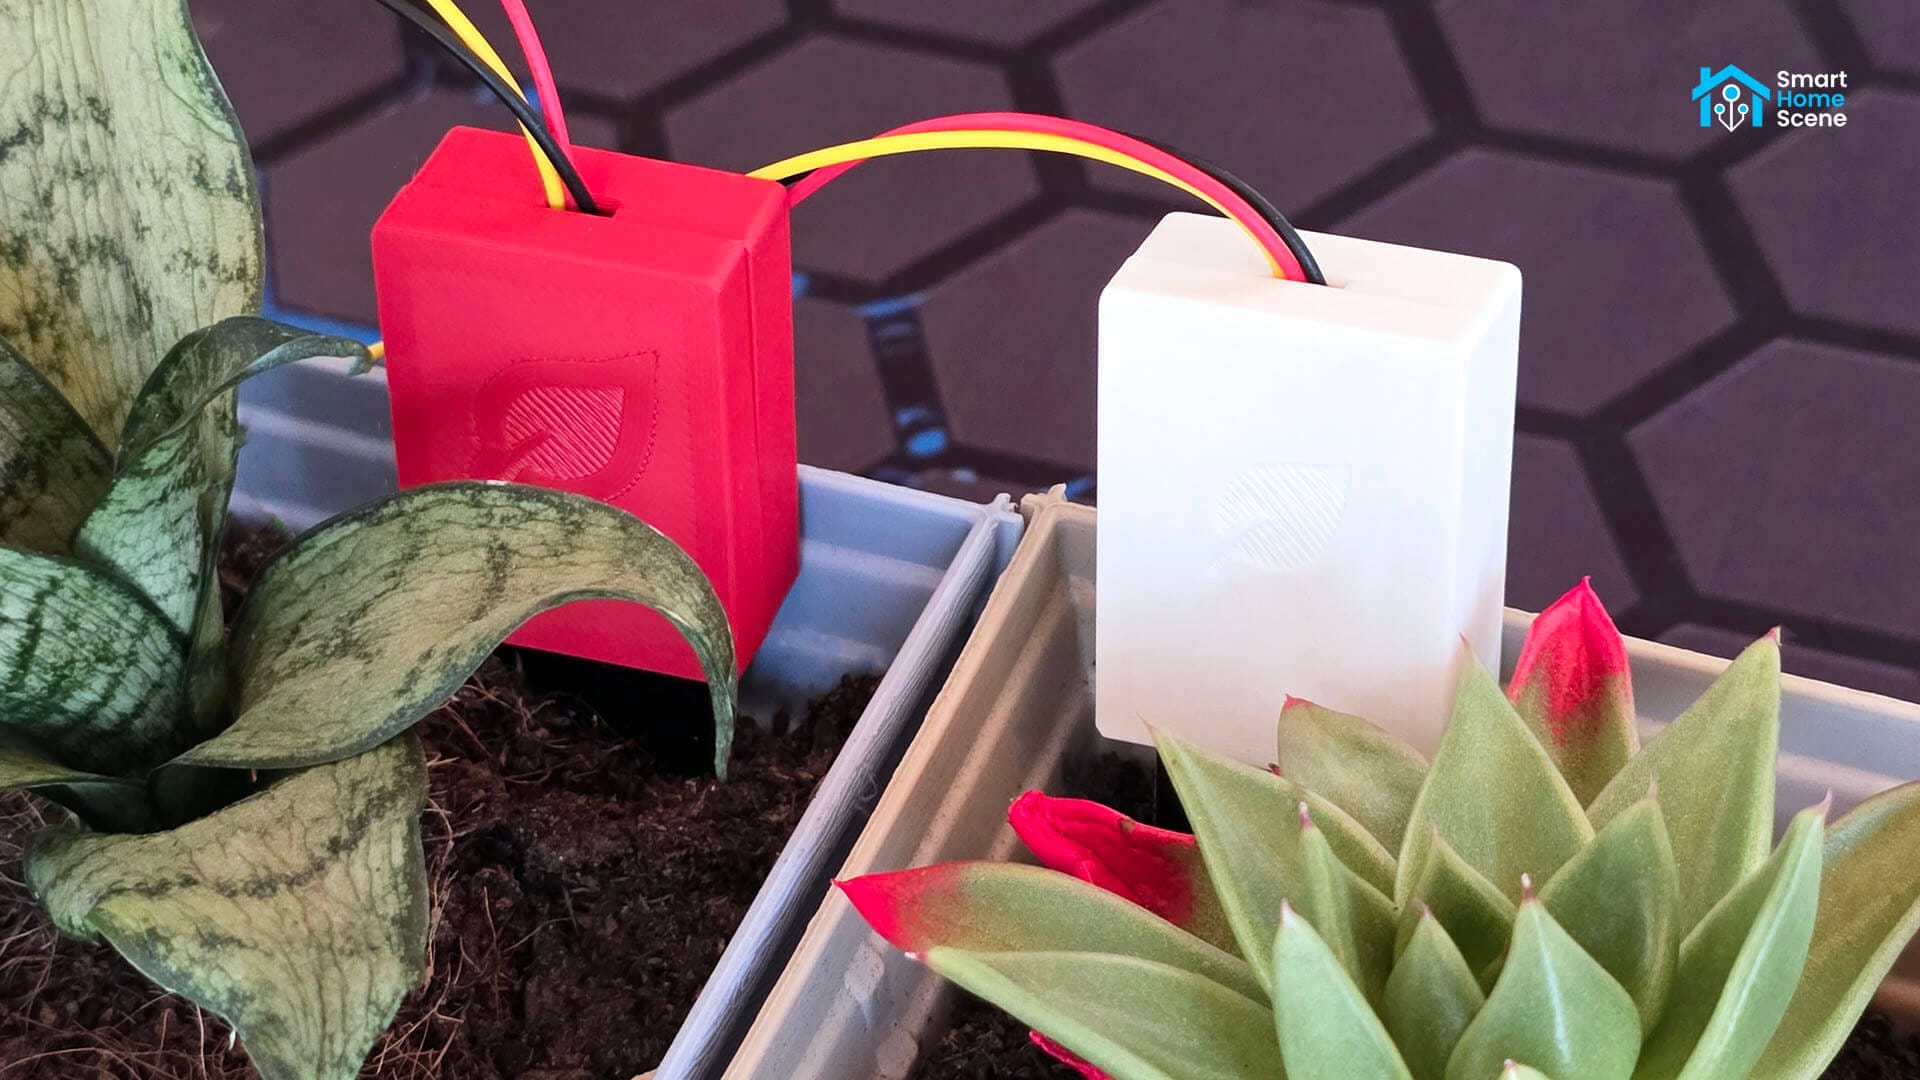
The great thing about these capacitive soil probes is that many people are using them and there are a lot of 3D printed enclosures available. You can check MakerWorld or Printables for some example. In my case, I 3D printed two of these enclosures which worked great!
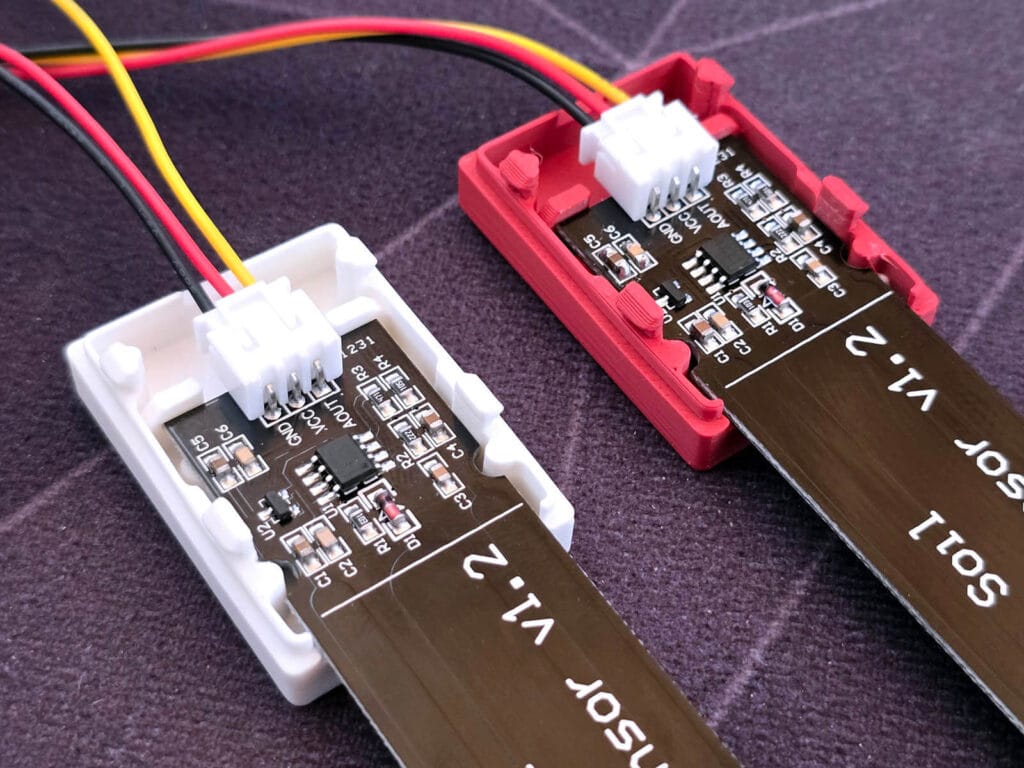
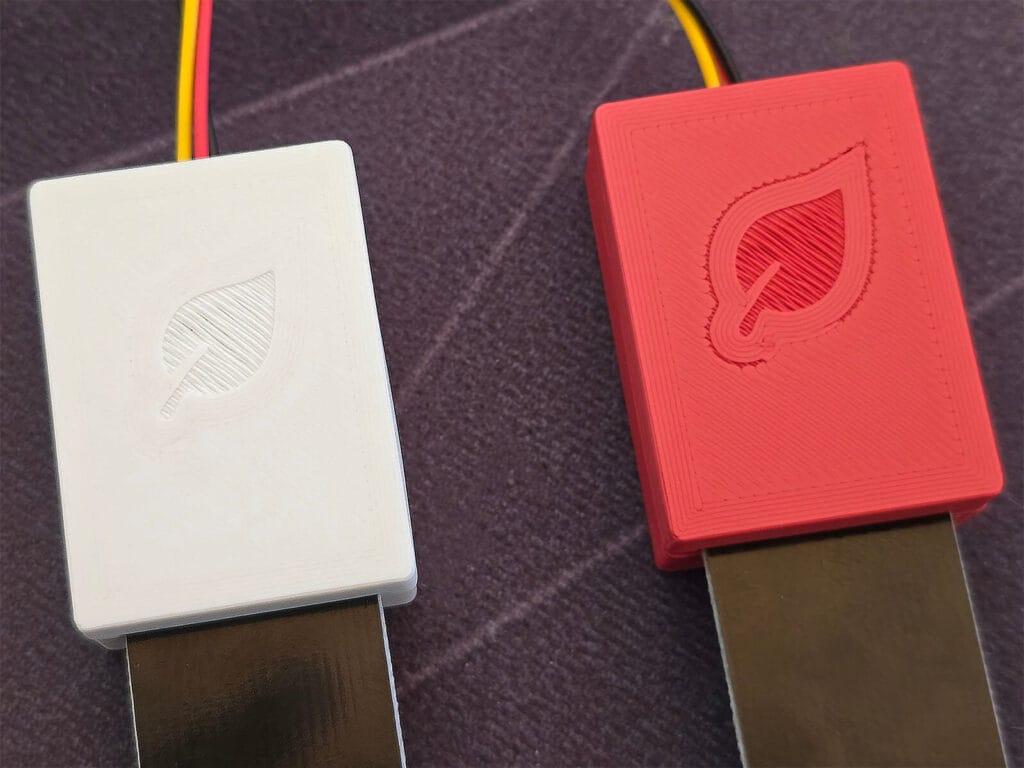
The 3D printed cases are a very snug fit, preventing the sensor from moving or wiggling. They snap in place and allow the cable to exit at the top. It’s worth noting that these cases are not waterproof.
Preparing the ESP32 Board (Initial flash)
As with any DIY ESPHome project, the first step is to flash the board with a basic configuration to connect it to your home network. I also recommend adding a static IP address to your configuration, since ESPHome’s mDNS discovery isn’t always reliable for wireless updates.
Navigate to the ESPHome builder addon in Home Assistant, create a new device, name it however you like and flash it. You will need to use an USB connection for the initial flash, either plugged into the same machine running HA or plugged into your PC and using ESPHome’s web flasher.
Obtaining Raw Voltage Values
The first step after your board is online is to flash a small piece of code and obtain the minimum (wet) and maximum (dry) voltage readings. As there will always be slight variations in the readings between different ESP32 models and the v1.2 sensor, this final code cannot be simply copy-pasted to your config. Instead, you must flash the raw voltage code first and obtain your own values!
To get these values, we’ll use a temporary ESPHome configuration that reports the raw voltage from the sensor without any calibration. This lets us see exactly what the ESP32’s ADC (Analog-to-Digital Converter) is reading. Add this to your ESPHome configuration and re-flash:
sensor:
- platform: adc
pin: GPIO32
name: "Raw Moisture Voltage"
unit_of_measurement: "V"
update_interval: 5s
attenuation: 12db
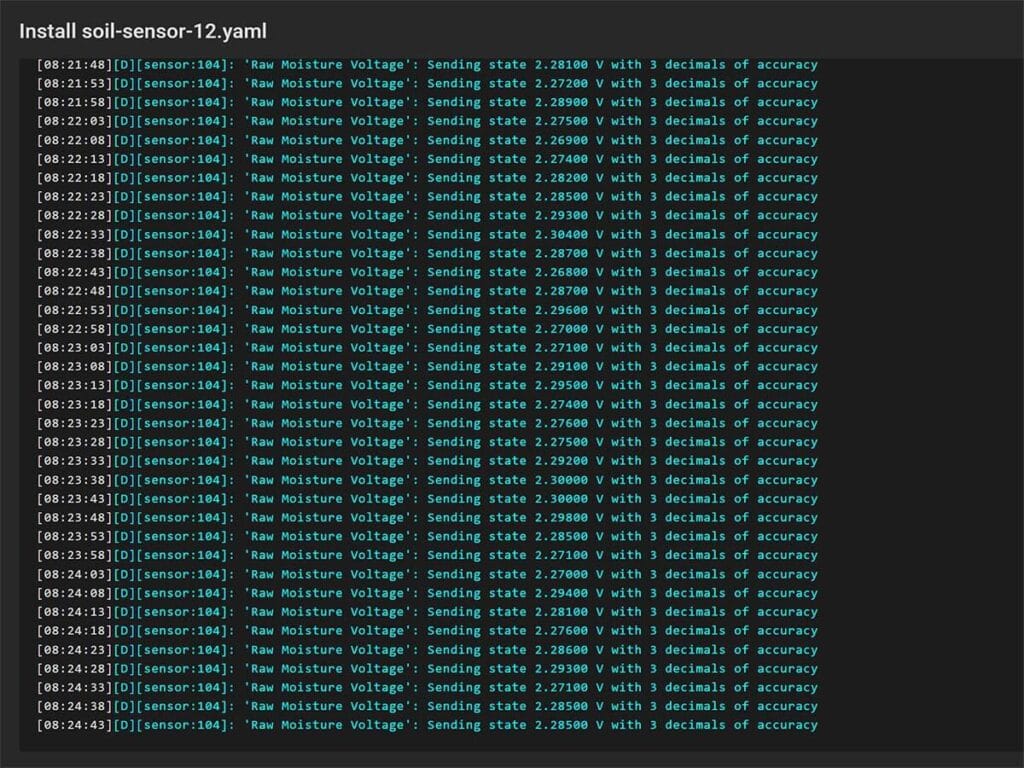
accuracy_decimals: 3The most important parameter in this simple configuration is attenuation. The ESP32’s Analog-to-Digital Converter (ADC) has a default internal reference voltage of about 1.1V. By default, the sensing range is set to 0db which allows it to measure voltages up to approximately 1.1V. To measure higher voltages, you must set the attenuation to one of the following values: 2.5db, 6db, or 12db.
ESPHome also allows you to set the attenuation to auto. This feature combines all available ranges to provide the best possible resolution across a wider voltage range, preventing you from having to compromise on a specific attenuation setting.
For this specific project, you need to set the attenuation to either auto or 12db because the capacitive soil moisture sensor outputs a voltage between approximately 1V and 3.3V. The 12db setting is the only one that can measure this entire range, as its maximum sensing voltage is about 3.9V.
Now, this part is critical. Once the device boots back up, hold the capacitive soil sensor upright in the air without touching anything. Monitor the ESPHome logs and note the highest, most repetitive value appearing when the sensor is dry. This value represents 0% moisture. In my case, this floats around 2.300V.
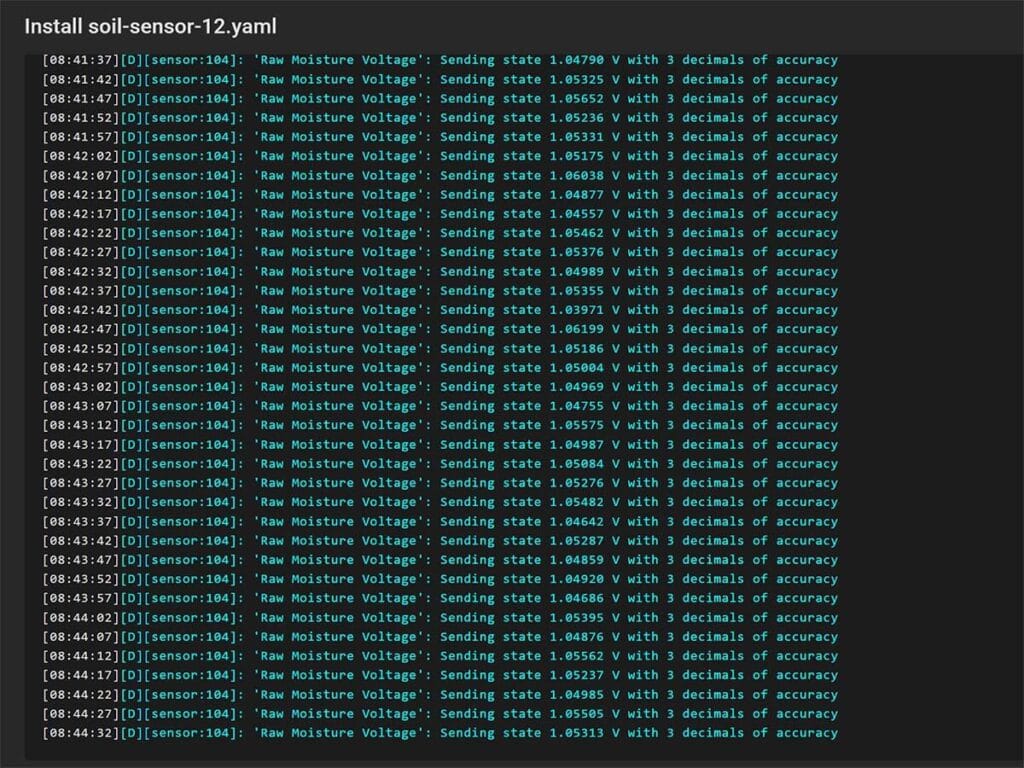
To get the voltage value when the sensor is completely wet, we need to do the opposite. Fill up a glass of water and dip the capacitive soil moisture sensor completely, up to the limit line. Monitor the reading in the ESPHome logs again and note it. This value represents 100% moisture. In my case, this floats around 1.050V.
Converting to moisture and applying filters
Once you have the minimum (wet) and maximum (dry) readings from your board and sensor, you can flash the final code to your device. This configuration uses a linear calibration filter to convert your raw voltage values into a moisture percentage. It also applies a median filter to smooth out any noisy readings and uses a separate clamp filter to ensure the final output is always between 0% and 100%.
Here’s how this code looks like:
sensor:
  - platform: adc
    pin: GPIO32
    name: "Soil Moisture"
    unit_of_measurement: "%"
    device_class: moisture
    update_interval: 3s
    attenuation: 12db
    filters:
      # Use a median filter to smooth out noisy readings
      - median:
          window_size: 7
          send_every: 4
          send_first_at: 1
      # Calibrate the sensor with your own measured values
      - calibrate_linear:
          # Dry voltage (high value) -> 0%
          - 2.30 -> 0.0
          # Wet voltage (low value) -> 100%
          - 1.05 -> 100.0
      # Ensure the final output is clamped to the 0-100% range
      - clamp:
          min_value: 0
          max_value: 100
The important bit here is to replace the values with your own under the calibrate_linear parameter. Simply replace 2.30 with your dry and 1.05 with your own wet reading. Reflash the board with the new configuration and you are done, the sensor can be added to Home Assistant.
Adding a second soil sensor
The ADC component allows you to add as many sensors as you want, as long as your hardware supports it. It’s worth noting that ESP8266 boards can handle only one sensor, using the A0 or VCC pins, but not both simultaneously. ESP32s can handle more sensors, depending on the actual model of the board.
Specifically, a standard ESP32-WROOM-32 board has two separate ADC units. The first unit, ADC1, has 8 analog input channels on pins GPIO32, 33, 34, 35, 36, and 39. These pins can be used for analog readings at any time. The second unit, ADC2, has 10 channels on a different set of pins. However, there’s a crucial limitation: ADC2 cannot be used for analog readings while the Wi-Fi stack is running.
Since most ESPHome projects rely on Wi-Fi for communication, this effectively limits the number of usable analog pins for sensors to the 8 channels of ADC1. Therefore, you can theoretically connect and use up to 8 of these sensors simultaneously on a single ESP32-WROOM-32 with Wi-Fi enabled. You would need an external power supply, but it’s doable. Other boards have different ADC1 and ADC2 configuration, refer to this table for more information.
To add a second sensor, simply connect its data pin to any of the available ADC pins on the ESP32. You can split and connect the voltage (VCC) and ground (GND) pins from the first sensor to power the second one.
Naturally, you would need to repeat the procedure from above and obtain the raw voltage readings for the second sensor. Once you have the dry and wet values, map the values to the linear scale in ESPHome and you’re done.
Here’s an example of the code configuration with two sensors:
sensor:
  - platform: adc
    pin: GPIO32
    name: "Soil Moisture 1"
    unit_of_measurement: "%"
    device_class: moisture
    update_interval: 5s
    attenuation: 12db
    filters:
      - median:
          window_size: 7
          send_every: 4
          send_first_at: 1
      - calibrate_linear:
          - 2.91 -> 0.0
          - 1.03 -> 100.0
      - clamp:
          min_value: 0
          max_value: 100
  - platform: adc
    pin: GPIO33
    name: "Soil Moisture 2"
    unit_of_measurement: "%"
    device_class: moisture
    update_interval: 5s
    attenuation: 12db
    filters:
      - median:
          window_size: 7
          send_every: 4
          send_first_at: 1
      - calibrate_linear:
          - 2.85 -> 0.0
          - 1.09 -> 100.0
      - clamp:
          min_value: 0
          max_value: 100
Some boards, like the Firebeetle ESP32-E, have an internal voltage divider which requires multiplying the value to get the true voltage. This can be solved by simply adding multiply: 2.0 parameter under filters.
Testing the sensor
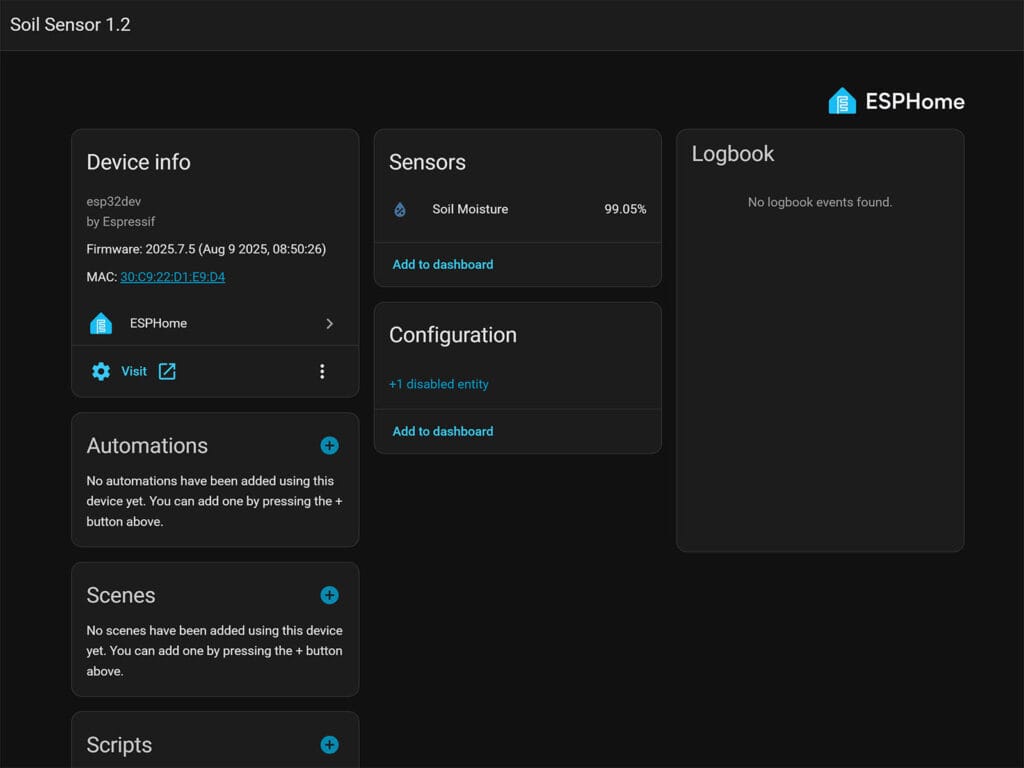
To test the accuracy of my DIY capacitive soil sensor, I dipped it in water next to the Apollo PLT-1 Plant Sensor. The PLT-1 is an accurate soil moisture reader and I’ve been using it ever since my review. With both probes fully submerged, here’s the first reading I got in Home Assistant:
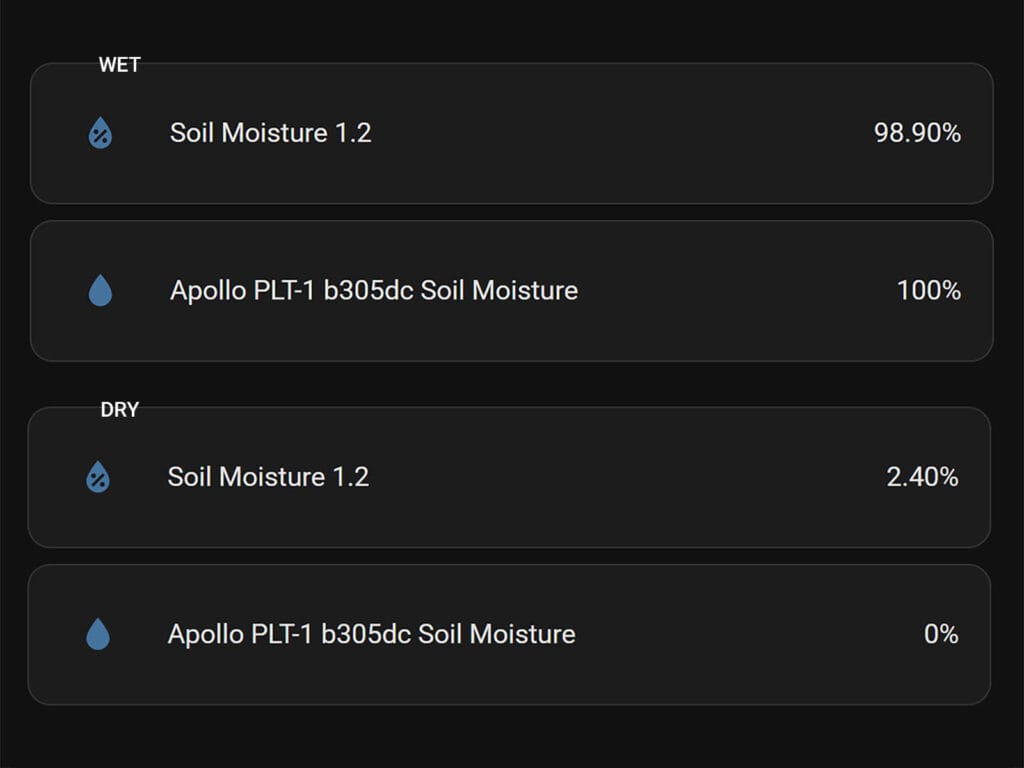
The Apollo PLT-1 immediately reported a reading of a 100%, while my DIY soil sensor floated around 98-99%. It was a great start, which meant my raw voltage values were correct.
Once I removed both sensor from the cup and let them dry out, I got similar results. The Apollo PLT-1 went to 0% while my DIY soil sensor floated around 2.5%.
Those offsets are a result of several factors, including the inherent non-linearity of the ESP32’s ADC and the simple, direct-mapping approach of the code.
The raw voltage output of the sensor doesn’t perfectly correspond to a linear 0-100% scale. When you use a calibrate_linear filter in ESPHome, it simply draws a straight line between your two defined points (dry = 0% and wet = 100%). It’s a highly effective and simple solution, but it can’t account for the subtle curves in the sensor’s real-world response. This is why a fully submerged sensor might show 99% instead of a perfect 100%.
To get the sensor to consistently report 100% when submerged, you would need to adjust the wet voltage value in your configuration slightly until the output reads 100%. To get it to 0%, adjust the dry voltage. To round the value to the nearest whole number, set the accuracy_decimals parameter to zero (0).
Final Thoughts
This DIY Capacitive Soil Sensor is an accurate, reliable and quite affordable ESPHome-based device. It costs less than $10, if you are not adding a battery. You can also turn it into a multisensor if you want to, much like the Apollo PLT-1.

But the really great thing is you can expand the device with several probes on a single ESP32 board, saving even more. I am currently using it with two v1.2 probes without issues. It’s accurate and does what it needs to do.
I have not had these probes long enough to vouch for their longevity and corrosion resistance. I want to think they will stand the test of time, but this needs to be verified. I will update this article in 6 months with my full experience.
If you want a hassle-free, capable soil sensor that just works consider the ThirdReality 3RSM0147Z as an alternative. It’s local by design (Zigbee), waterproof and works on a single AA battery. If you want your soil sensor to do much more than just measure soil moisture, than the Apollo PLT-1 is a great pick. Here’s where you can get both:


I wish this was out when I got my plt-1, would have been such a great project! I’d love to try one but I already have 2 plt-1’s and I don’t think I have anymore plans
I like the minimal hardware requirements and easily realizable instructions in this project writeup. I’ve found the soil moisture sensors to last more than a year (so far) in my projects so far on indoor plants. I built a version (https://selectiveappeal.org/projects/plant133/) that uses an esp32 and waters up to 4 plants using these same sensors and also some cheap aquarium pumps, and the pumps are the parts I keep needing to replace.
Just when I was about to order $200 worth of ecowitt gear from Aliexpress. A great article.
One observation: the product at Aliexpress does not say “1.2” in its label. I am assuming its the same as the one on Amazon which states the version number. Are you able to shed any light on this? Aliexpress is 50% cheaper, but not worth it if it is an inferior product.
Thank you.
Great catch, I’ve updated the link.
this is 1.2
https://s.click.aliexpress.com/e/_c4KZe3hN