Browser Mod recently received a major overhaul and has been rewritten completely from the ground up. This update makes it more stable, less resource intensive, easier to setup and introduced some new features.
In this beginner friendly tutorial, we are going to integrate Browser Mod 2.0 in Home Assistant, set it up with examples and explain its capabilities. You can install Browser Mod 2.0 manually or from the Home Assistant Community Store (HACS).
Installation
HACS
- Open HACS
- Click + Explore and Download Repositories
- Under Integrations, search for Browser Mod
- Select the latest version
- Click on Download
- Restart Home Assistant
- Open Settings > Devices & Services > click + Add Integration
- Search for Browser Mod and add it
Manual
- Download the browser_mod folder from the github repo
- Copy the contents of custom_components/browser_mod/ to <your config dir>/custom_components/browser_mod/
- Restart Home Assistant
- Open Settings > Devices & Services > click + Add Integration
- Search for Browser Mod and add it
Migrating from Browser Mod 1.0 to 2.0
Updating Browser Mod from version 1.xx to 2.xx will break your existing setup and service calls. The dev rewrote the integration completely, rendering the 1.xx version obsolete. However, Browser Mod 2.0 is more powerful and versatile, much lighter on your servers resources and includes a easy to use UI for most settings.
In order to upgrade, you need to install Browser Mod 2.0 and adjust your existing service calls accordingly. For example, to adjust the popup service call:
action: fire-dom-event
browser_mod:
  command: popup
  title: Title
  card:
    type: ....

#BROWSER MOD 1.0
action: fire-dom-event
browser_mod:
service: browser_mod.popup
data:
title: Title
content:
type: ...
#BROWSER MOD 2.0The rest of the features and service calls you can follow through from this tutorial or the Github repository.
Features
Existing users already know the capabilities of this great integration. It was developed by thomasloven with the purpose or turning any browser into a controllable entity in Home Assistant, specifically as a media_player. Eventually it developed into a full feature set, with many useful settings.
For easier understanding, these can be split in two categories: Browser Control and Frontend Settings. Another great side feature is the popup card and popup service call, which is used to replace the more-info dialog window for a specific entity or create a custom popup on any device with a BrowserID.
Browser Control
Once a browser is registered in Browser Mod, it will create a Home Assistant Device associated with that browser, with a unique BrowserID and add entities which can be used to control the added browser, read its sensor values or fire some automations.
To register a browser, open your Home Assistant instance in the browser you wish to integrate. Click the Browser Mod item from the sidebar menu:
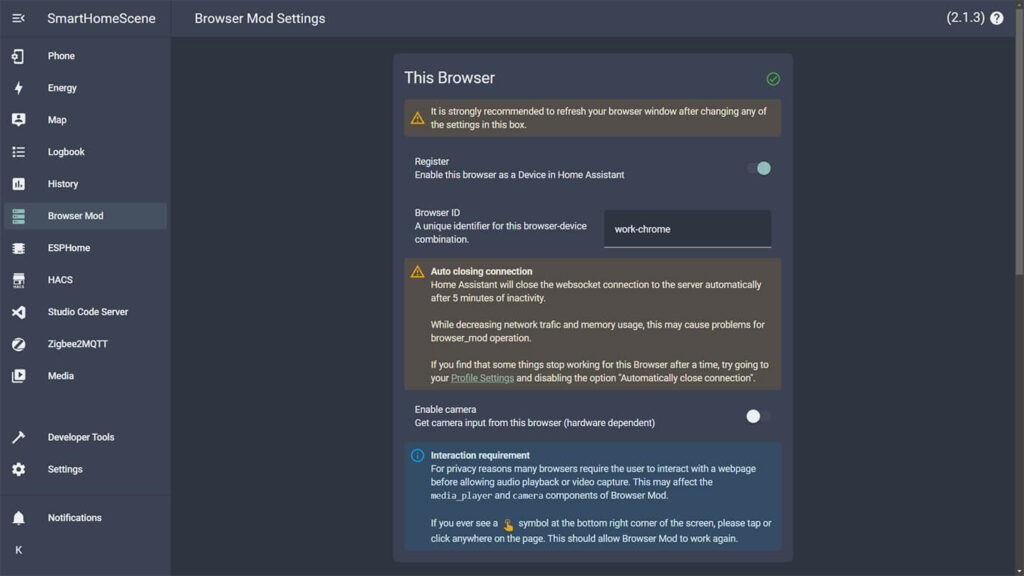
You will notice a toggle at the top, labeled Register. Before toggling this on, you can set a custom Browser ID for this particular browser, in our case, work-chrome. You can also toggle the Enable camera setting, if your device has a camera browser mod can utilize (eg. tablet).
After the browser has been registered, we need to clear the cache for browser mod to enable the available sensors and entities. You can do this quickly by pressing CTRL + F5 on Chrome Windows. For clearing cache on other devices and operating systems, see this guide.
Once the page has refreshed, you will notice your browser is listed under Registered Browsers. If you are using Home Assistant Cast to display a Lovelace view on a Chromecast device it will get a BrowserID of “CAST“. Since you can’t access the Browser Mod config panel from the device, clicking the Register Cast Browser button will register the CAST browser. Most Browser Mod services will work under Home Assistant Cast.
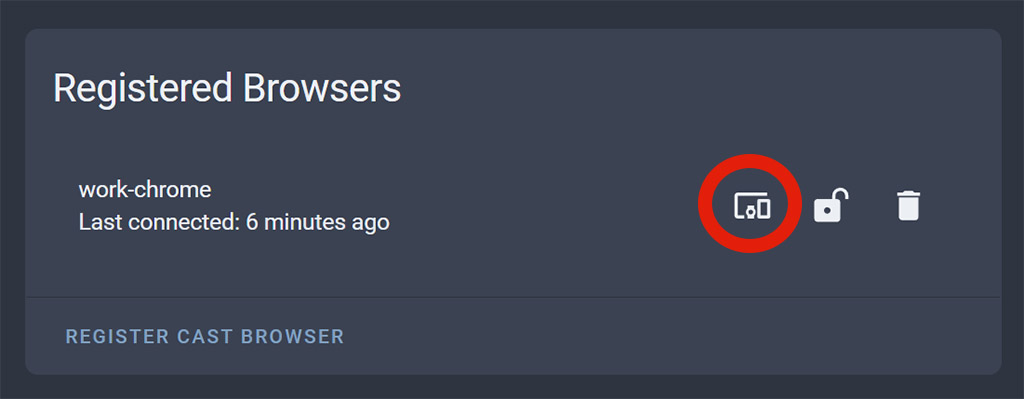
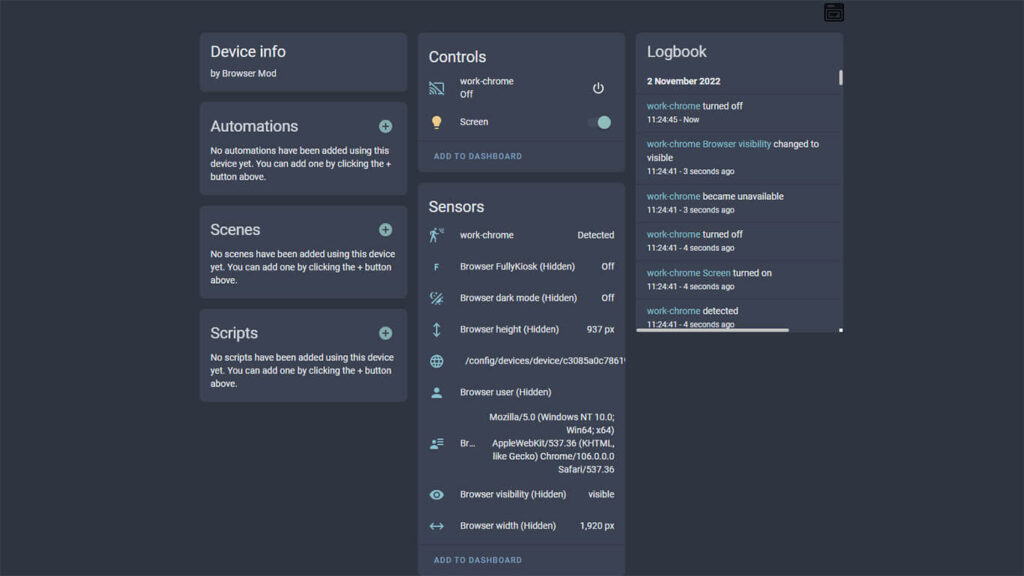
If you click the small settings icon next to it, it will take you to the page containing all the available entities.
- media_player: Used to play sound and video through the browser
- light: Used to turn off/on the screen of the device
- If you are using Fully Kiosk Browser, the light entity can also control the screen brightness
- If you are not using Fully Kiosk Browser, the turn off toggle will cover the screen with a black (or semitransparent) box
- binary_sensor:
- Motion detection by moving a mouse or pressing button on a keyboard
- If you are using Fully Kiosk Browser, motion can be detected through the devices camera (eg. tablet)
- dark_mode: Is the browser using dark mode or not
- fully_kiosk: Is the browser Fully Kiosk Browser or not
- Motion detection by moving a mouse or pressing button on a keyboard
- camera: If you device has a camera (eg. tablet), it will be controllable with this entity
- sensor:
- height: The resolution height of the browser
- width: The resolution width of the browser
- browser_path: The current URL of the browser
- browser_user: Logged in HA user in the browser
- browser_useragent: Browser software
- browser_visibility: Whether or not the browser is viewing a HA page/dashboard
You can use the media_player entity to cast audio or video to the devices directly from Home Assistant. The light entity is especially useful, as it can toggle the screen on/off, preferably with an automation when no motion is detected. The camera entity can provide video feedback from the device, so you can use it as a security camera if needed. The sensor and binary_sensor entities provide various information about the device, which can be also used in automations as conditions.
Frontend Settings
In version 2.0, Browser Mod introduced an easy to use UI for changing the default behavior of the Home Assistant Frontend. This is a set of features, which can be used to configure how Home Assistant looks for a specific user or device (browser). Most settings are pretty self explanatory and easy to adjust:
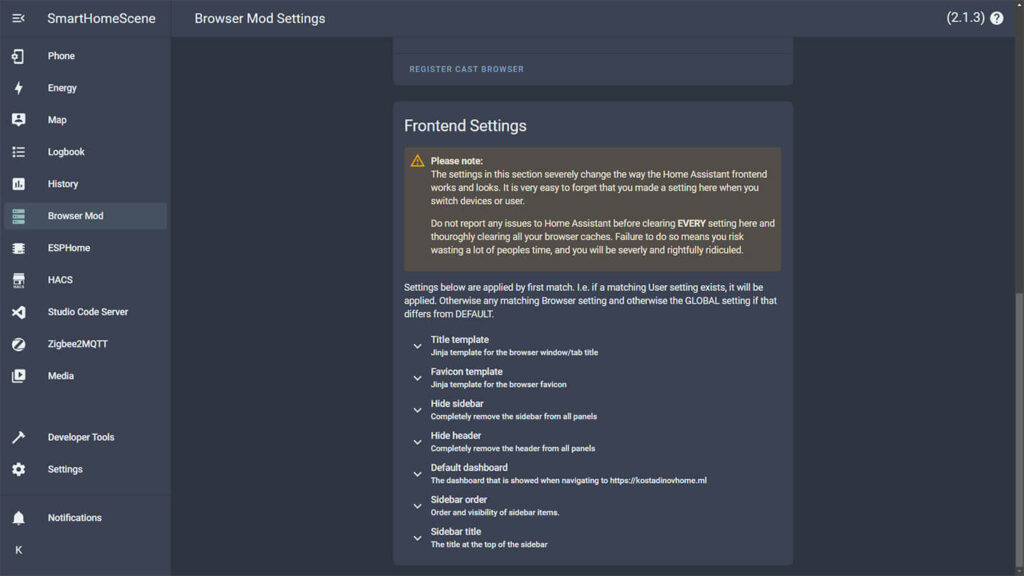
- Title template: Used to change the tab/window title in a browser. Supports Jinja templating
- Favicon template: Used to change the browser favicon. Support Jinja templating
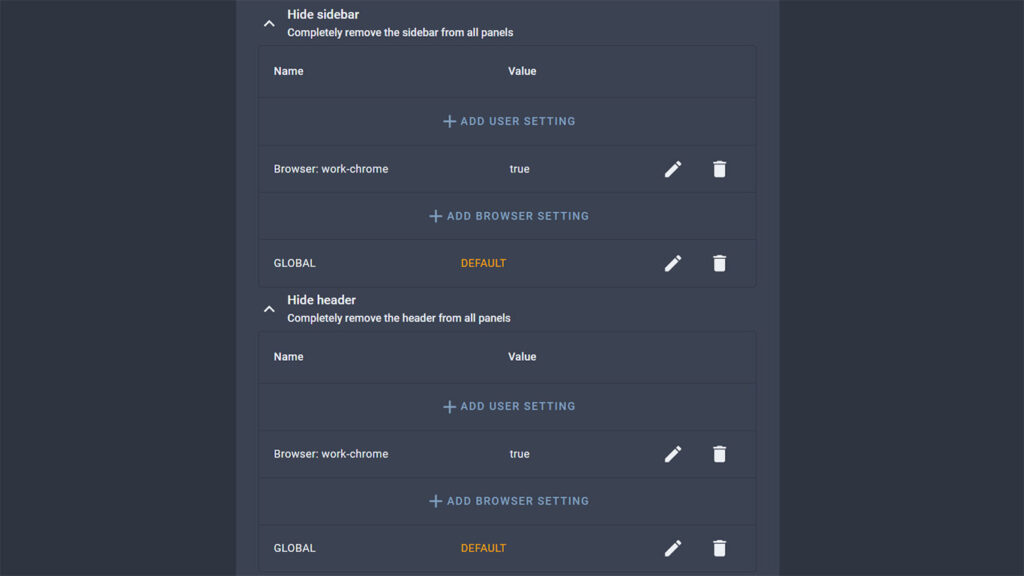
- Hide sidebar: Used to hide the sidebar
- Hide header: Used to hide the header
- Default dashboard: Used to set a default dashboard
- Sidebar order: Used to rearrange the sidebar
- Sidebar title: Used to set the sidebar title. Supports Jinja templating
Each of these frontend settings can be configured for a specific user, device or globally. For example, let’s say I want to hide the sidebar and header for a particular browser (work-chrome):
- Expand the Hide Sidebar setting
- Click + Add Browser Setting
- Select your browser and click next
- Toggle the Hide Sidebar option and click OK
If we repeat the same simple steps for the header also, whenever this particular browser opens any Home Assistant dashboard the sidebar and header will be hidden.
For the Title and Sidebar title, jinja templates can be used for dynamic content to be shown. For example, you could set a template to show current notifications count:
My Home - {{ states.persistent_notification | list | count}}The Favicon field also supports templating and will replace the browser tab/window icon at the top. Icons should be in .ico or .png format and uploaded to your config/www folder.
{% if is_state("light.living_room", "on") %}
  /local/smarthomescene-orange.ico
{% else %}
  /local/smarthomescene-green.ico
{% endif %}
Popup Card
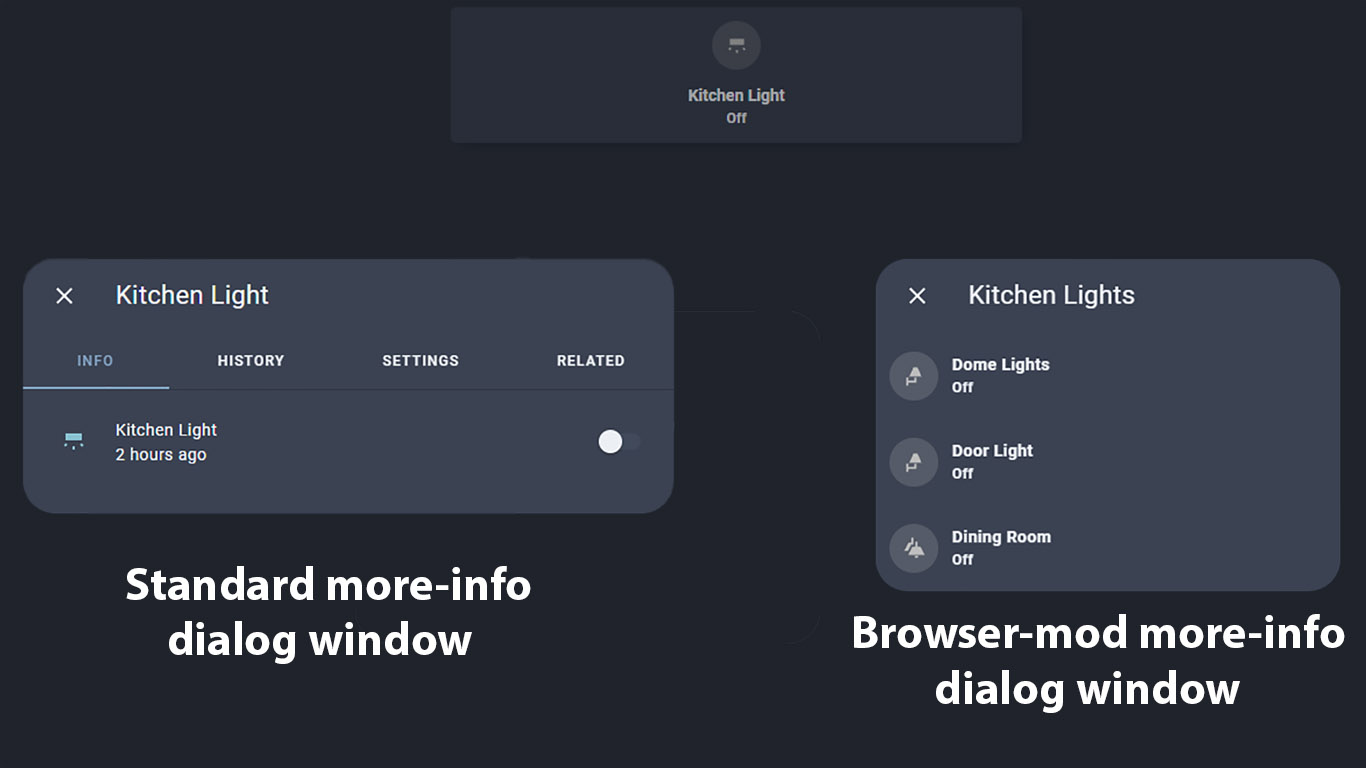
Perhaps one of the most useful features of Browser Mod is the ability to change the popup more-info dialog window of any entity. This can be used to create a custom card and have it shown whenever you call for the more-info window for that particular entity, whether through the dashboard or through a service call.
For example, lets say you have a light entity on your dashboard. When held, normally it would open the standard more-info dialog window but you want it to open a list of other light entities for quick toggling.
- Open your dashboard, click the three dots in the top corner and click Edit dashboard
- Press + Add Card and create the following card
type: custom:popup-card
entity: light.kitchen
card:
  type: vertical-stack
  cards:
    - type: custom:mushroom-light-card
      entity: light.dome_lights
    - type: custom:mushroom-light-card
      entity: light.door_light
    - type: custom:mushroom-light-card
      entity: light.dining_room
This will create an invisible card in your dashboard view, which will be accessible only in edit mode. When held, instead of the normal more-info dialog window, it will show the list of entities we placed in the vertical stack. You can edit the cards within the vertical stack like you normally would in your dashboard.
The custom popup card can be heavily customized and adjusted for your dashboard.
Services
Browser Mod comes packed with a variety of services used to supercharge its functionality. Service calls are usually used in scripts, automations or dashboard actions. The dev defines two types of services for browser mod 2.0: server call and browser call.
- Server call is used when a specific service is called from a script or automation, from the dev-services panel or from a dashboard call-service action.
- Browser call is used when the service is called from a dashboard fire-dom-event action, as a part of a browser_mod.sequence call or as a browser_mod.popup _action.
The notable difference between the two is when no target (browser_id) is specified, in which case:
- A server call will perform the service on ALL REGISTERED BROWSERS.
- A browser call will perform the service on THE CURRENT BROWSER, i.e. the browser it was called from.
browser_mod.navigate
This service is used to navigate the corresponding to browser to a specific path.
service: browser_mod.navigate
data:
  path: /lovelace/
  browser_id: work-chrome #Replace BrowserID
browser_mod.refresh
The refresh service call is simply used to reload the current page shown in the browser.
service: browser_mod.refresh
data:
  browser_id: work-chrome #Replace BrowserID
browser_mod.more_info
The more_info service call can be used to display a popup more_info dialog window for a specific entity on the browser.
service: browser_mod.more_info
data:
  entity: light.living_room
  large: false #Optional
  ignore_popup_card: false #Optional, true/false
  browser_id: work-chrome #Replace BrowserID
If a default popup card is set for the specific entity, it will show that instead. You can override this behavior with the ignore_popup_card variable. If you set the large variable to true, the dialog window will be stretched.
browser_mod.popup
The popup service call is highly versatile and adjustable, used to display a customized popup window in the browser. You could create a popup containing a list of entities or cards, html content, form content, actionable popups and adjust size and styling. For a full list of examples, see the official repo: Anatomy of a Popup. As an example, you can service-call a popup window on your browser containing a list of lights and two actionable buttons for turning all of them on/off.
service: browser_mod.popup
data:
  title: Lights
  content:
    type: entities
    entities:
      - light.kitchen
      - light.living_room
      - light.dining_room
  right_button: All OFF
  left_button: All ON
  right_button_action:
    service: light.turn_off
    data:
      entity_id:
        - light.kitchen
        - light.living_room
        - light.dining_room
  left_button_action:
    service: light.turn_on
    data:
      entity_id:
        - light.kitchen
        - light.living_room
        - light.dining_room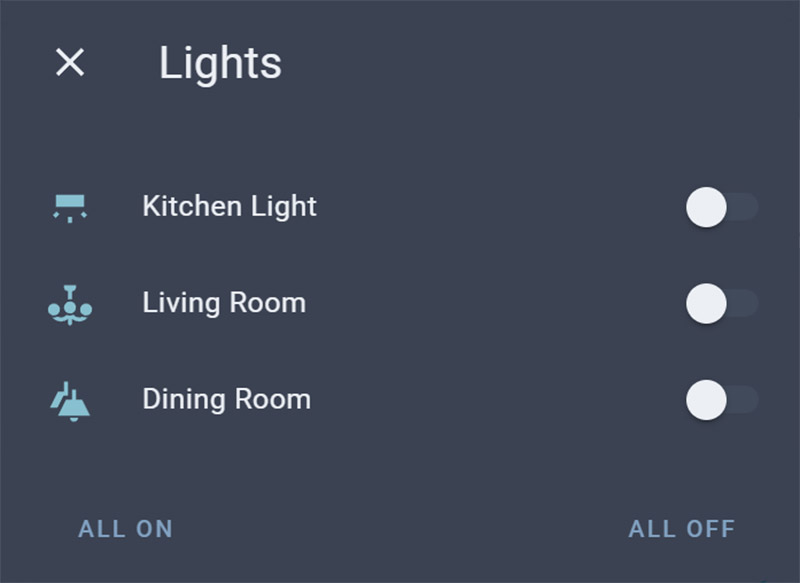
browser_mod.close_popup
The close_popup service call is used to close a more-info or popup dialog window.
service: browser_mod.close_popup
data:
  browser_id: work-chrome #Replace BrowserID
browser_mod.notification
This service call is used to show a popup notification and optionally assign an action to it.
service: browser_mod.notification
data:
  message: Hello, World!
  duration: 5000
  action_text: Open Lovelace
  action:
    service: browser_mod.navigate
    data:
      path: /lovelace/
      browser_id: work-chrome #Replace BrowserID
This will create an actionable notification in the Home Assistant frontend, with a button that will take you to your Lovelace dashboard.
browser_mod.set_theme
Themes can be changed effortlessly with the service call set_theme. You can provide a theme name, or specify primary and accent colors:
service: browser_mod.set_theme
data:
  theme: waves #Optional, theme name
  dark: auto #Optional, auto, dark, light
  primaryColor:  [0, 128, 128] #Optional, RGB color
  accentColor: "#800080" #Optional, RGB color
Color can be either a list of three RGB values 0-255 (ex: [0, 128, 128]) or a six digit hex color value (ex: “#800080”).
browser_mod.sequence
A sequence can be used to fire one service call after another. If the BrowserID is omitted in the succeeding service calls, the sequence will be fired in the browser that’s active. Example:
service: browser_mod.sequence
data:
  sequence:
    - service: browser_mod.more_info
      data:
        entity: light.living_room
    - service: browser_mod.delay
      data:
        time: 12500 #Number in miliseconds
    - service: browser_mod.close_popup
      data:
        browser_id: work-chrome #Replace BrowserID
  browser_id: work-chrome
browser_mod.delay
The delay service call is used to wait for a specific period of time before executing another service call. It is most useful when developing more complex sequence service calls
service: browser_mod.delay
data:
  time: 200 #Number in miliseconds
  browser_id: work-chrome #Replace BrowserID
browser_mod.console
Console service call is used to print a message to the browsers JavaScript console.
service: browser_mod.console
data:
  message: "Hello, World!"
  browser_id: work-chrome #Replace BrowserID
browser_mod.javascript
Used to run arbitrary JavaScript code in the browser
service: browser_mod.javascript
data:
  code: <string>
  browser_id: work-chrome #Replace BrowserID
Using Service Calls
We will setup a few service calls to be executed from a dashboard card, script and automation. Hopefully, this will enable users to better understand the capabilities of Browser Mod 2.0.
Example 1: Service Calls from a card
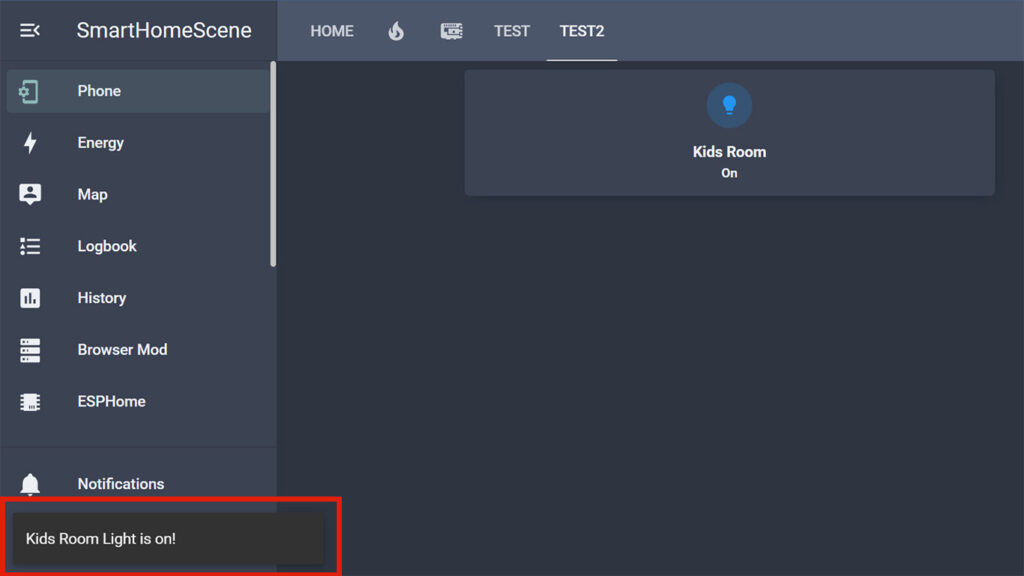
Let’s say you have a light entity on your dashboard. When clicked, you want the light to toggle as usual. But you also like a popup notification announcing the lights’ state on your wall mounted tablet.
type: custom:mushroom-entity-card
entity: light.kids_room
tap_action:
  action: fire-dom-event
  browser_mod:
    service: browser_mod.sequence
    data:
      sequence:
        - service: light.turn_on
          data:
            entity_id: light.kids_room
        - service: browser_mod.notification
          data:
            message: Kids Room Light is on!
            duration: 10000
We use a fire-dom-event action, to trigger the popup notification only on the browser in question. We setup the subsequent service calls within a sequence call, to be executed one after another. Additionally, you can add an action button with custom text, for example, to turn the light off.
Example 2: Service Calls from a script
You can setup service calls in a script and execute them from the dashboard. Lets say you want to change the theme on your wall mounted tablet:
alias: Set Tablet Theme
sequence:
  - service: browser_mod.set_theme
    data:
      theme: waves
      browser-id: work-chrome
mode: single
icon: mdi:palette
This will create a script.set_table_theme entity which can be added in a dashboard or used in an automation. Executing this script will change the theme for browser with id work-chrome.
Example 2: Service Calls from an automation
You can also execute Browser Mod service calls from automations. Let’s say you want your wall mounted tablet to navigate to a specific dashboard view: one during the day and another during the night. We can streamline this process by creating the following automations:
alias: "Tablet View: Day"
description: Change View to Day when the sun rises
trigger:
  - platform: sun
    event: sunrise
action:
  - service: browser_mod.navigate
    data:
      path: /smarthomescene/day
      browser_id: work-chrome
mode: single
alias: "Tablet View: Night"
description: Change View to Night when the sun rises
trigger:
- platform: sun
event: sunset
action:
- service: browser_mod.navigate
data:
path: /smarthomescene/night
browser_id: work-chrome
mode: singleWhen the sun rises, the tablet will shift to you day dashboard view, maybe containing some media_player entities and vacuum cleaner map for example. When the sun sets, the tablet will display your night dashboard, containing all your lights.
Summary
Browser Mod 2.0 is a supercharged set of features packed in a custom integration for controlling your Home Assistant server and applicable browsers. If you apply a little logic, many cool things can be achieved. For example, this integration is very useful when controlling a wall mounted tablet. You can fine-tune its operation and besides being a wall mounted dashboard, you can turn it into a security camera and motion sensor.
With version 2.0, the main settings and integration are a streamlined process. Everything can be setup through the easy to use user interface as opposed to YAML in version 1.0. If you have any questions or suggestions, feel free to leave them bellow. Developer thomasloven did an excellent job with this integration and as an intro, he left the following questions in the repository:
thomasloven
- What if that tablet you have on your wall could open up a live feed from your front door camera when someone rings the bell?
- And what if you could use it as an extra security camera?
- Or what if you could use it to play music and videos from your Home Assistant media library?
- What if you could permanently hide that sidebar from your kids and lock them into a single dashboard?
- What if you could change the icon of the Home Assistant tab so it doesn’t look the same as the forum?
- What if you could change the more-info dialog for some entity to a dashboard card of your own design?
- What if you could tap a button and have Home Assistant ask you which rooms you want the roomba to vacuum?


Thanks for this article. I did not know about browser mode even if I’ve ran my home on homeassistant for quite a while. Will definitely check it out!
great WORK boys and girls !
but : wall mounted tablet i will use – cant use teh camera entity, not showing in HA…
anyway GREAT WORK BOYS & GIRLS !!!
THANK YOU
I am not able to register as browser mod devices the android companion app i use on my mobile.
I always get a blank screen when trying to enter the browser mod options.
Is there a way to get my companion app registered as device?
Hello Maurozio,
You are probably having cache issues with the Companion app. On your device, navigate to Apps > Home Assistant Companion App > Storage > Clear Cache.
Then you should be able to enter Browser mod Settings and add your device.
Cheers
Hi, would you be so kind to provide a little bit more guidance on browser_mod.close_popup ?
Is it possible, for example to call a popup and have it closed after 30sec? And where would you put this? In the original page calling to open the popup or inside the card code of the popup itself? Thanks!
Hello Llyod,
The browser_mod.close_popup is a service.
You can call on this service from many places in Home Assistant. A card, script, automation etc.
For example, lets say you want to create an automation which will close the popup on a given screen after 30 seconds.
description: ""

mode: single

trigger: []

condition: []

action:

- delay:

hours: 0

minutes: 0

seconds: 30

milliseconds: 0

- service: browser_mod.close_popup

data:

browser-id: work-chrome
You can reuse this action for cards as a tap, double tap or hold action.
Hope I’m being clear
Cheers,
SHS
Thank you for your answer (and speed!) If I may – I’m trying to simply find a way to auto close any popup let’s say 10 secs after opening. I don’t seem to find an example to make this work – this doesn’t react on my side:
tap_action:action: fire-dom-event
browser_mod:
service: browser_mod.popup
data:
title: Quick Links
size: wide
content:
type: grid
square: false
columns: 2
autoclose: true
timeout: 10000
cards:
- type: entities
entities:
- entity: cover.blindleft
Nevermind.. it was an identation error on my side. autoclose needs to be at data level. Thanks.
Hi!
Fantastic article!
Do you mind if I add a link to the readme on github?
Hello Thomas,
Thank you so much for showing up. Feel free to add a link wherever you want!
And absolutely thank you for developing Browser Mod, it’s awesome!
Cheers!
Maybe an explanation of using a device (tablet) as a media device, for instance, when I turn my alarm on, using the alarm automation to send a voice to the tablet saying “Alarm Armed in Home Mode”.
Thank you
I use Docker in Home Assistant. When I install browser_mod there, there is no error message. However, the entry in the sidebar is missing and the mod does not seem to be installed. The service, for example, cannot be found either.
The logs are your best bet to find out what’s happening.
Share them if you need to.
so lets say a custom person imsel card has a script to find my phone. How does one make the button work?
I would like to ask that to control the media player, after loading the page, you have to press the small icon in the lower right corner. periodically (this changes) The page is updated/reloaded and the media player becomes unavailable, then the radio start or the TTS message does not work. Can it be fixed so that it always works? don’t you have to press that icon? Allow permanent permission or setting. Thanks for the reply.
HI SHS
Have you noticed the issue where all the browser mod entities become completely unavailable? Not sure what going on. There have been issues filed with the dev but no response.
In my case, this prevents the camera from being a motion sensor and waking up the HA app on my tablet.
https://github.com/thomasloven/hass-browser_mod/issues/452
Any ideas?
Thanks
No, not really. This is the first time I’m hearing this.
The dev is awesome though, I believe he will fix it in time.