Status Log (February 2026):
✅ Hardware: Validated on Intel N150 and N305 Mini PCs.
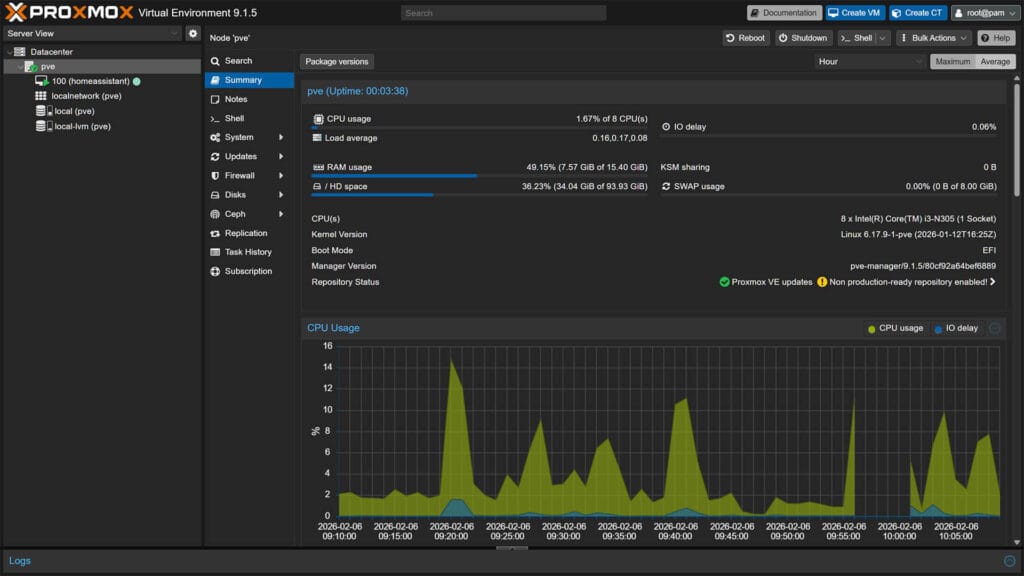
✅ Proxmox Version: Verified working on Proxmox 9.1.5 (Latest).
✅ Script Source: Updated to the new community-maintained repository.
You’ve outgrown the Raspberry Pi and upgraded to a more powerful Intel NUC, Beelink Mini PC or Dell OptiPlex. To get the most out of your hardware, the best approach is running Home Assistant on Proxmox. This setup not only offers superior stability but allows you to utilize your Mini PC’s full potential, ensuring your powerful new server isn’t sitting idle just running a single application.
You might be hesitant, thinking that Proxmox is too complicated to setup and maintain compared to a simple Pi. While virtualization can be complex, it doesn’t have to be. Using this method also opens the door to advanced setups, like running Zigbee2MQTT in a separate container. This keeps your Zigbee network live and functional even while you are restarting your Home Assistant instance.
In this guide, we will use the famous “Proxmox Helper Scripts” to streamline the entire process. Originally created by the late developer tteck, these scripts are now actively maintained by a dedicated community team. They allow us to spin up a production-ready Home Assistant OS VM with a single command, automatically handling storage, RAM, and CPU allocation without any manual configuration.
If you already have Proxmox installed on your machine, you can jump directly to the Installing Home Assistant on Proxmox section.
Why Choose Proxmox for Home Assistant?
Proxmox VE is a complete, open-source server management platform for enterprise virtualization. It tightly integrates the KVM hypervisor and Linux Containers (LXC), software-defined storage and networking functionality, on a single platform. With the integrated web-based user interface you can manage VMs and containers, high availability for clusters, or the integrated disaster recovery tools with ease.
Proxmox VE is a “bare-metal” hypervisor, meaning it installs directly on your hardware, completely replacing the standard operating system like Windows or macOS. While wiping your computer might sound drastic, it offers three massive advantages that make it the gold standard for Smart Home enthusiasts:
- The “Undo” Button (Snapshots): This is the single biggest reason to use Proxmox. Before you update Home Assistant or make a risky configuration change, you can take a Snapshot of your VM. If the update breaks your smart home, you can “roll back” to the exact state before the update in seconds.
- Total Isolation: In Proxmox, Home Assistant runs in its own isolated Virtual Machine. If you decide to run other software (like Frigate NVR) and that software crashes or freezes, it will not affect your Home Assistant instance. Your lights will keep working even if your surveillance server goes down.
- Efficiency: Modern Mini PCs (like the N150 or i5 NUCs) are far too powerful to run just Home Assistant. Proxmox allows you to slice up that power, letting you run Pi-hole (AdBlocking), a NAS, and Home Assistant all on the same low-power box without them interfering with each other.
For a smart home use case, we can utilize Proxmox and it’s capabilities to deploy different VMs and LXCs for Home Assistant, Zigbee2MQTT, ESPHome, MQTT Broker or maybe Plex Servers and similar. This will allow you to really utilize the mini PC you just bought.
Installing Proxmox VE on Mini PC
Before we dive into installing Proxmox, we need to prepare your hardware. This process involves preparing a bootable Proxmox USB drive, configuring BIOS power loss and virtualization settings and turning your generic Mini PC into a dedicated server.
⚠️ Warning: Installing Proxmox is a “bare metal” installation. This means it will completely wipe Windows and any data currently on the Mini PC’s hard drive. Ensure you have backed up any important files before proceeding.
Creating a Proxmox Bootable Drive
To install Proxmox VE to your mini PC, you need to create a bootable USB drive first. You will need a flash drive with at least 4GB of storage and a computer to flash it with. My guide is based on Balena Etcher, but you can use Rufus with similar steps:
- Download the Proxmox VE ISO:
Visit the Proxmox Downloads page and download the latest Proxmox VE 9.x ISO - Download a Flashing Tool:
Get Balena Etcher (simplest, shown in this guide) or Rufus (for Windows power users). - Insert the USB drive in your PC
- Open Balena Etcher and click Flash from file
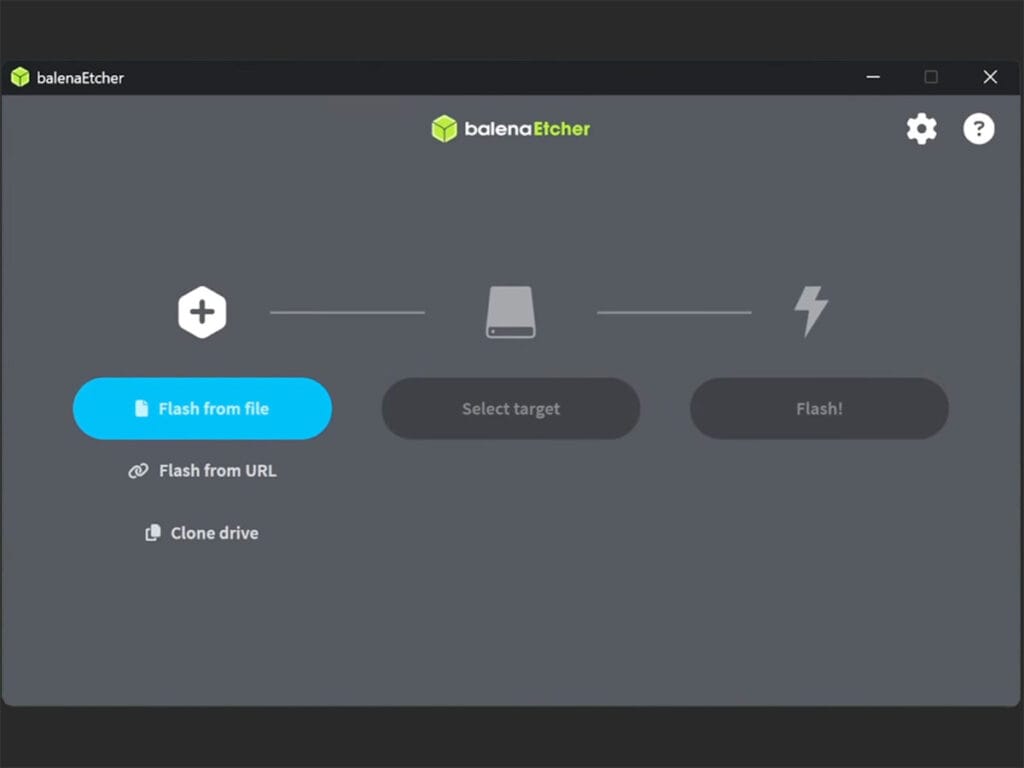
- Select the Proxmox ISO file you just downloaded
- Click Select target and choose your USB Drive
- Click Flash! and wait for the process to finish
- You will get a Flash Completed! confirmation
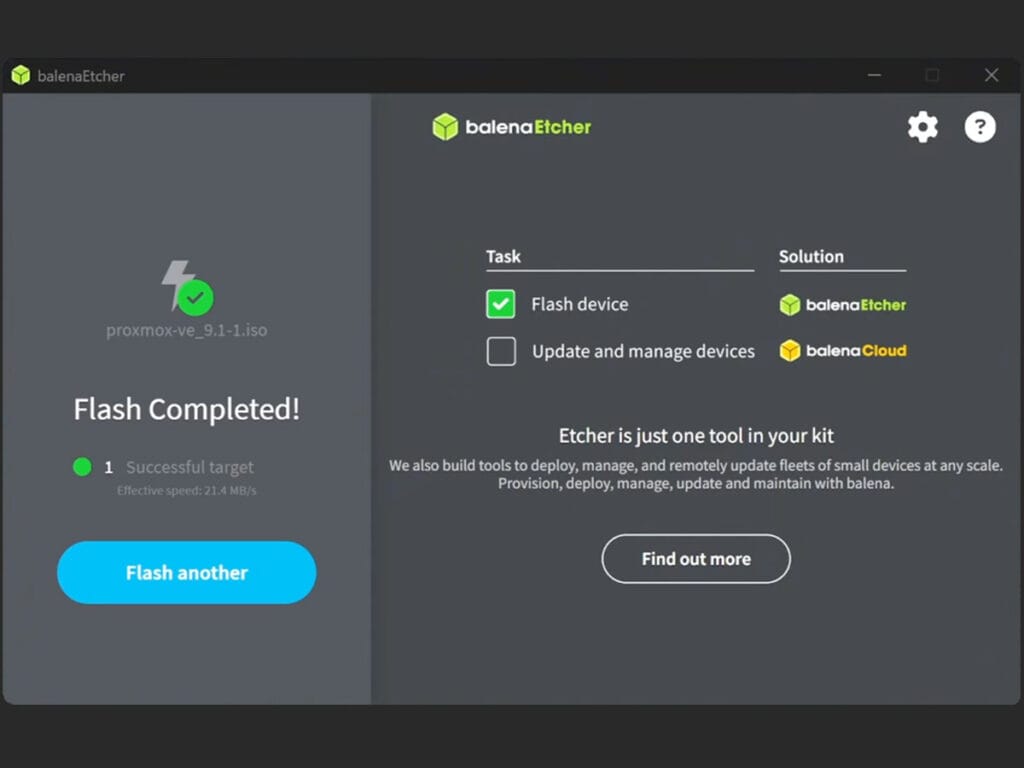
- Close Balena Etcher
- Safely remove hardware (USB)
- Done!
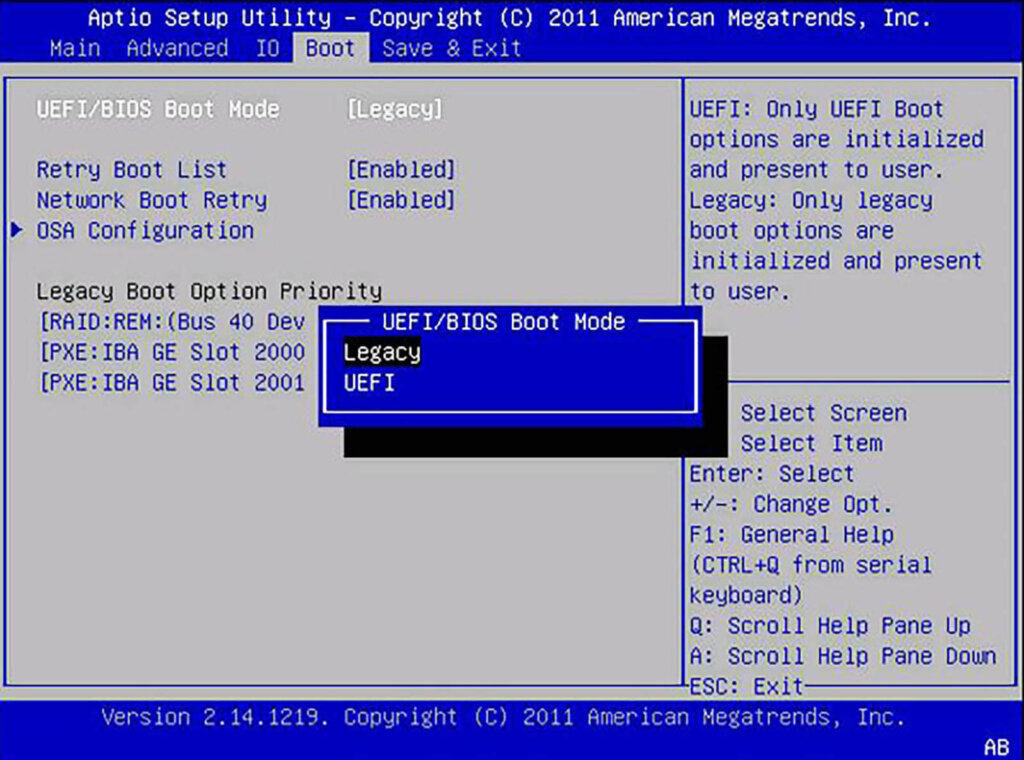
Configuring BIOS Settings
Before installing Proxmox, you must configure your Mini PC’s BIOS. This is the step most beginners skip, leading to errors later on. Power on your Mini PC and immediately press the setup key (usually DEL, F2, or F10) repeatedly until you enter the BIOS menu. Change the following settings:
- Virtualization Technology: Look for Intel VT-x / AMD-V and VT-d. These must be set to ENABLED. Proxmox requires these extensions to run Virtual Machines efficiently.
- Secure Boot: Navigate to the Boot or Security tab and DISABLE Secure Boot. While Proxmox 9 supports Secure Boot, disabling it eliminates potential driver compatibility headaches during installation.
- Restore on AC/Power Loss: Look for a setting named “State After Power Loss,” “AC Recovery,” or “Restore AC Power Loss.” Change this to POWER ON or LAST STATE.
Here are some screenshots of how these look might look like, depending on your machine:
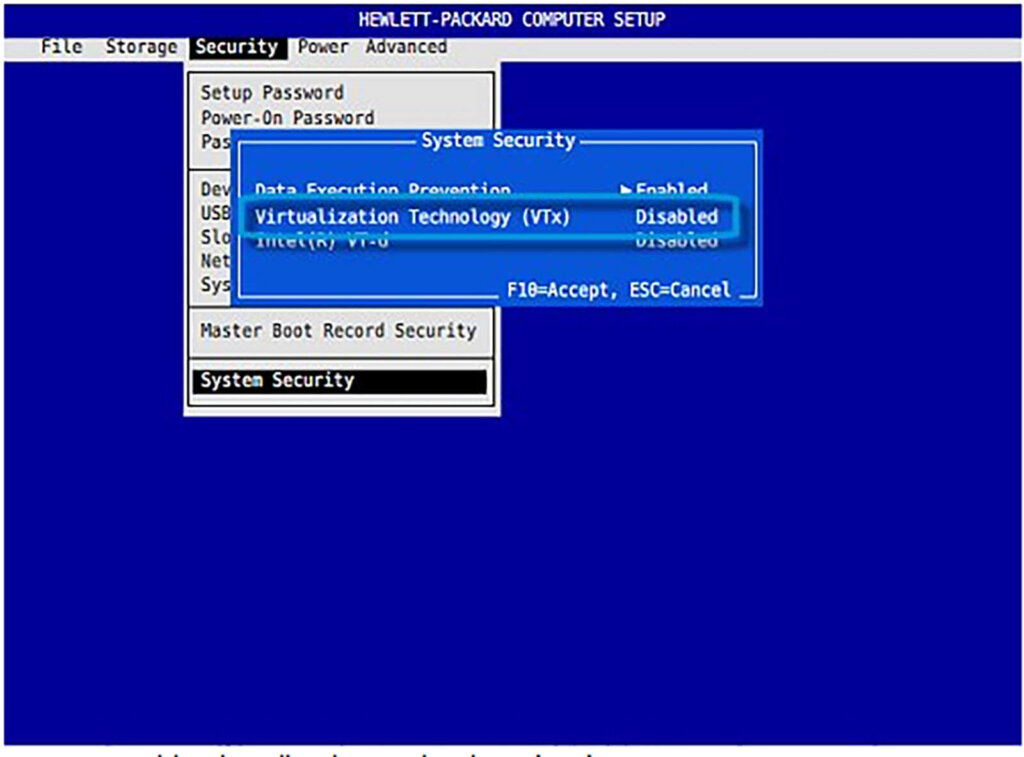
Why enable power-loss feature? Well, if your home or server loses electricity, this setting ensures your Home Assistant server automatically turns back on when the power returns, keeping your smart home online without you needing to manually press a button.
Running the Graphical Proxmox Installer
Once you have configured your BIOS, save the settings and reboot. Insert the USB drive into your Mini PC and enter the boot menu of the mini PC (usually by pressing F8). Select your USB drive from the list and wait until your computer boots into the Proxmox Welcome Screen.
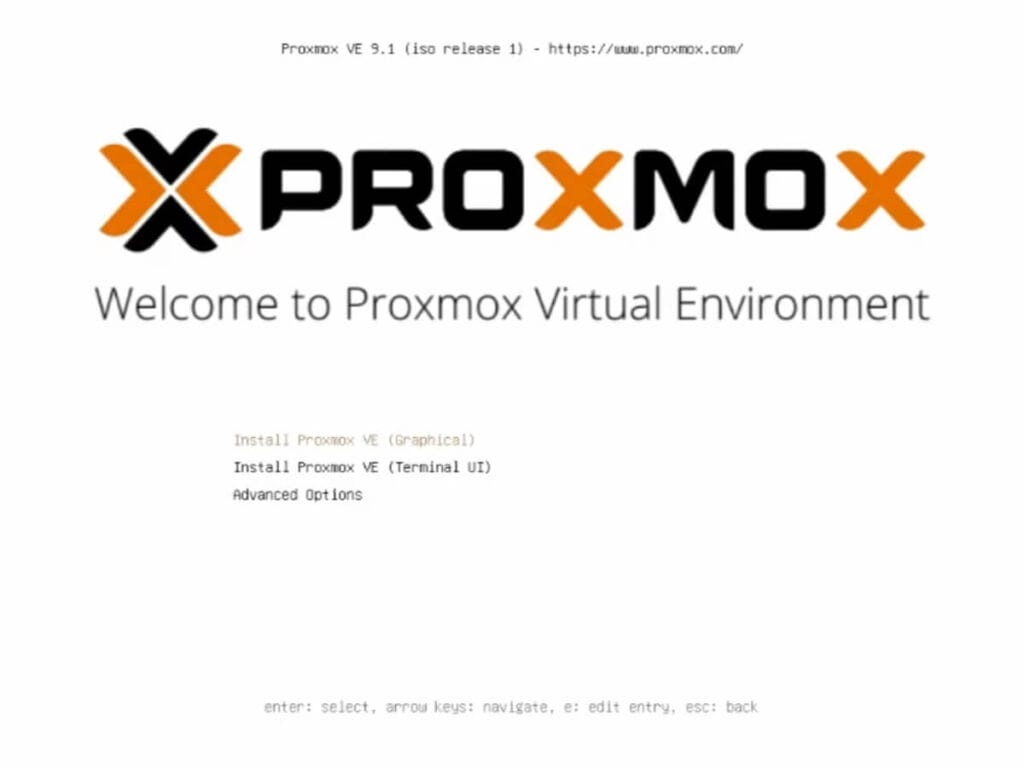
- Select Install Proxmox VE (Graphical)
- Accept the License Agreement by pressing I Agree
- Select the Hard Drive from the list and hit Next
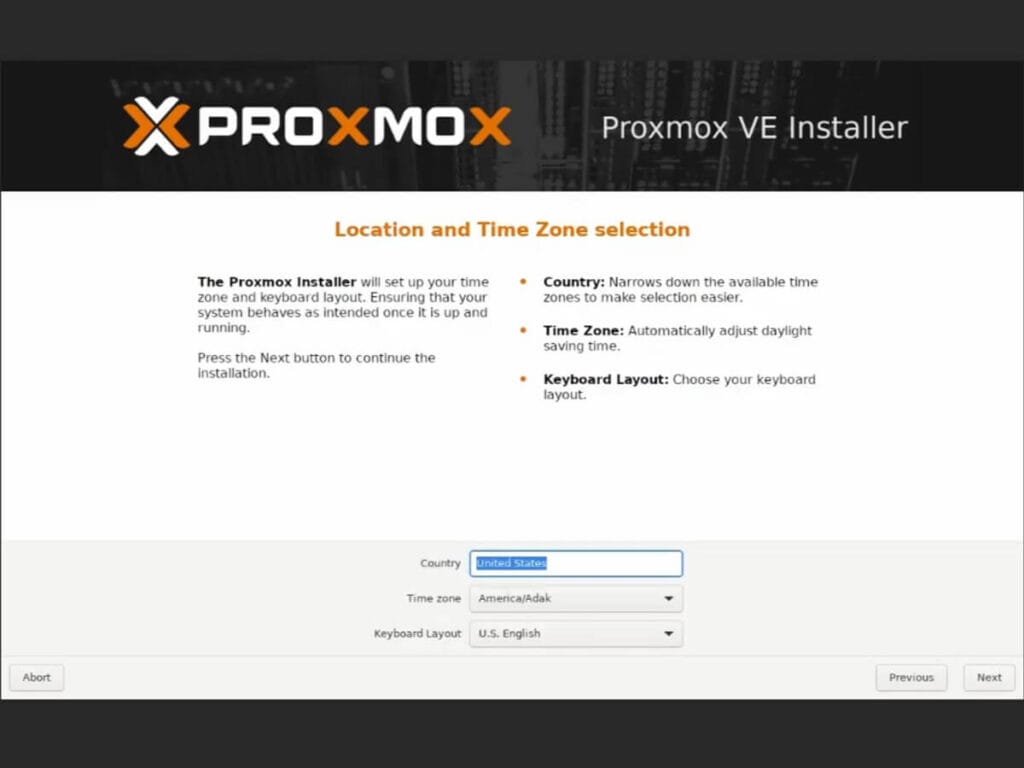
- Select your Country, Time zone and Keyboard layout
Make sure select the correct information, as Proxmox is heavily reliant on the time zone to synchronize everything
- Set a password and e-mail and click Next
- Password needs to be at least 8 characters, containing letters and numbers
- You will use this password for the initial Proxmox login
- E-mail is used for alert notifications (backup failures etc.)
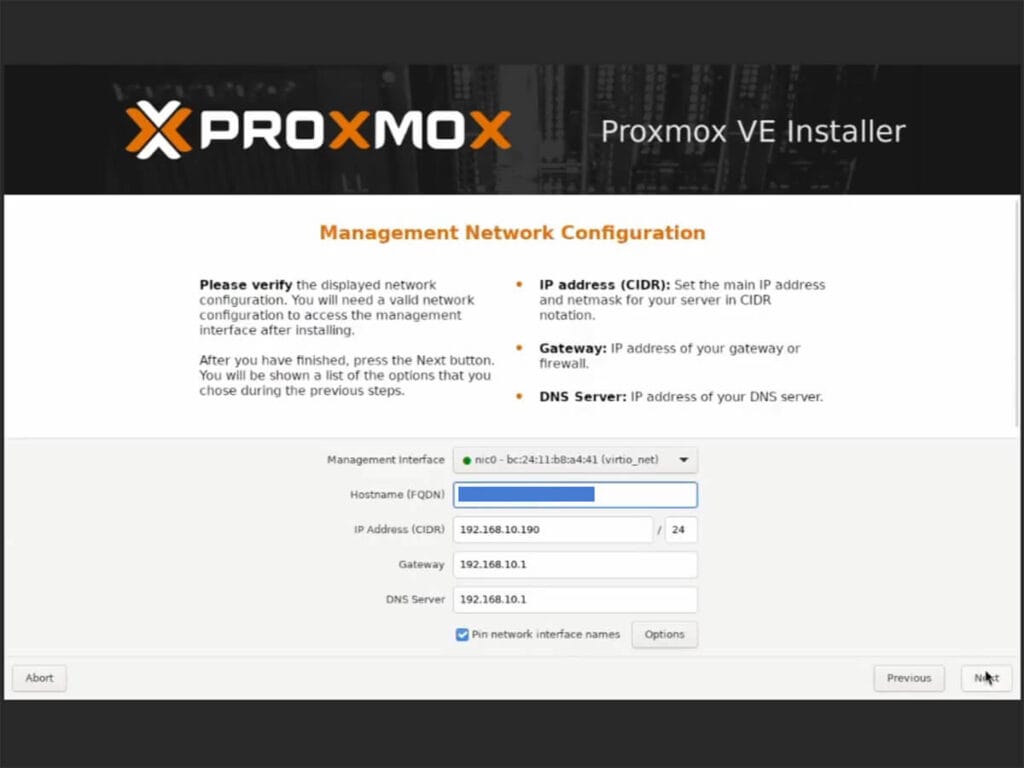
- Setup your Network configuration and click Next
- Set Hostname (e.g. pve.proxmox or pve.smarthomescene)
- IP Address, Gateway and DNS Settings should automatically populate if you have the Mini PC plugged to your home network
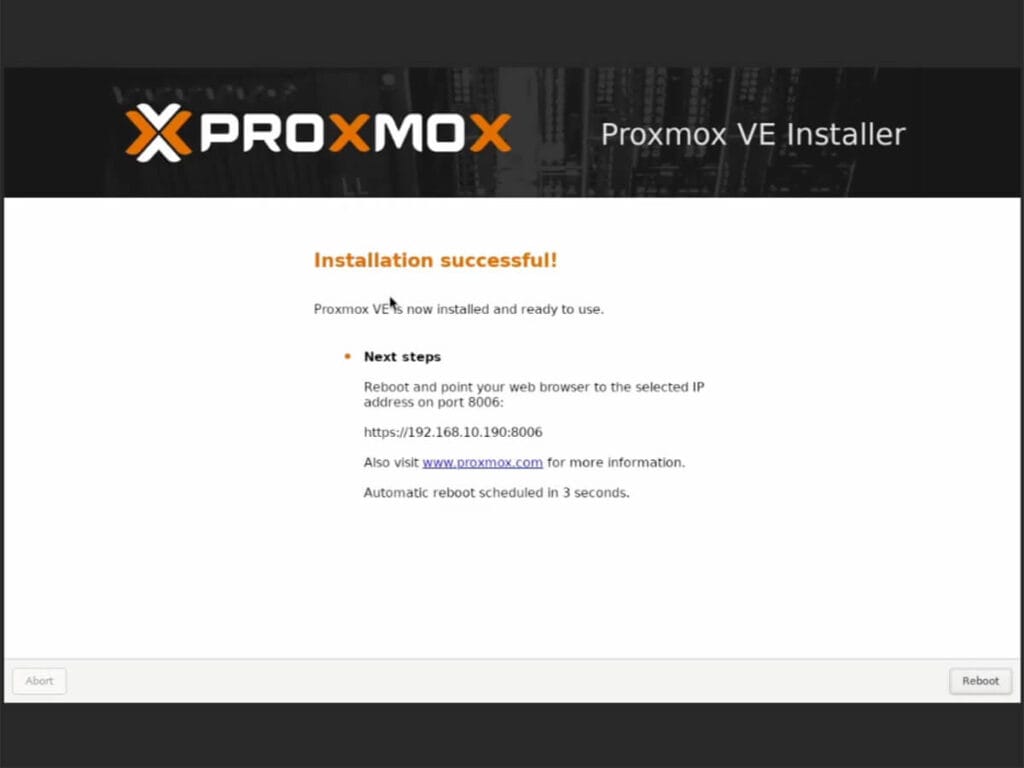
- Wait for the installation process to finish
- Installation successful should appear on the screen
- Click Reboot
- Done!
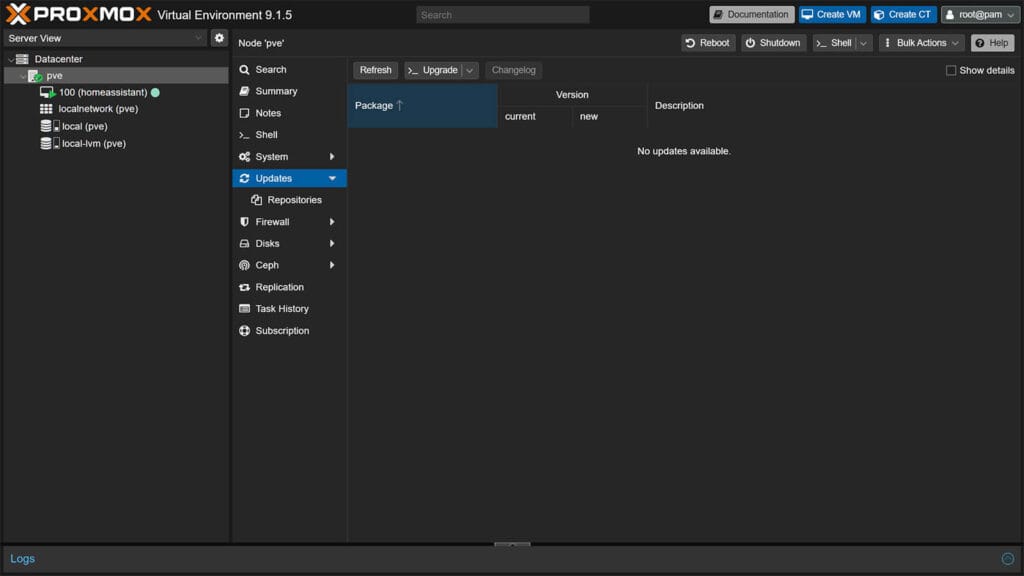
Running Post-Install Script and Updating Packages
Once Proxmox is up and running, it’s best to run the post-install cleanup script and check for package updates. This script provides options for managing Proxmox VE repositories, including disabling the Enterprise Repo, adding or correcting PVE sources, enabling the No-Subscription Repo, adding the test Repo, disabling the subscription nag, updating Proxmox VE, and finally rebooting the system.
Follow this guide:
- Open your Proxmox instance by navigating to
IP_Address:8006from your main PC - You will get a warning message that Your connection is not private
- Click Advanced and click Proceed to
IP_Address - On the Proxmox VE Login enter your credentials:
- Username: root
- Password: password you set during installation

- You will get a message saying you do not have a valid subscription
This message is showing up because you don’t have a valid enterprise license, but we can use the post-install script to remove it. - Click your Node in the left menu.
- Click Shell in the middle menu.
- Copy the following command and Paste it into the console using
CTRL+SHIFT+V (Windows) or CMD+V (Mac):
bash -c "$(curl -fsSL https://raw.githubusercontent.com/community-scripts/ProxmoxVE/main/tools/pve/post-pve-install.sh)"- Follow the prompts of the script:
- The script will ask to “Disable Enterprise Repo?” -> Press Yes.
- It will ask to “Add/Correct PVE Sources?” -> Press Yes.
- It will ask to “Update Proxmox VE?” -> Press yes.
- Confirm to reboot Proxmox
- In the middle menu, click Updates and click Refresh at the top
- You should see No updates available.
- Done!
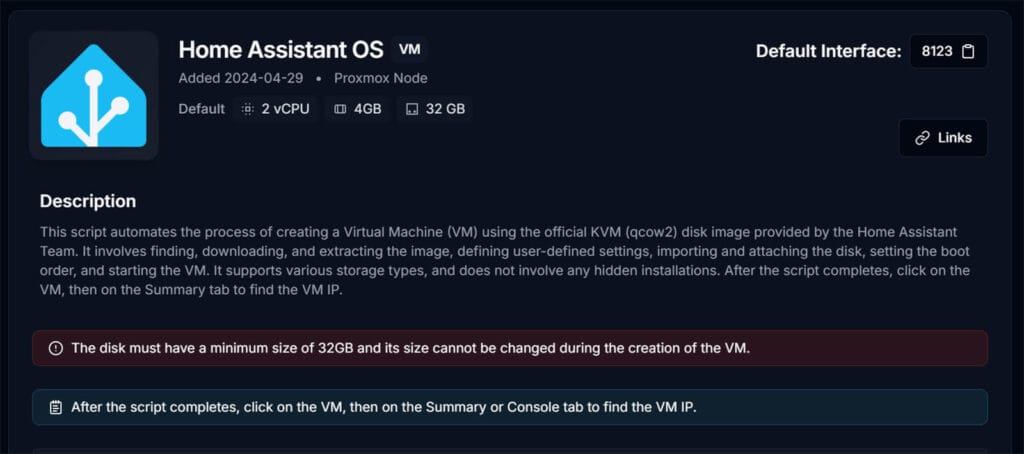
Installing Home Assistant on Proxmox
To Install Home Assistant OS, we are going to use a script which will fully automate the process. This script is tweakable, so there is no need to deploy the VM manually. Running this script will:
- Find, download and extract the official KVM (qcow2) Home Assistant OS image
- Define user settings, import and attach disk, set boot order and start the VM automatically
- Install the VM with Default Settings: 4GB RAM, 32GB Storage and 2vCPU cores
- Settings can be tweaked during installation
Running the HAOS Auto-Install Script
- Click your Proxmox VE host on the left and select Shell
- Copy the following command to run the script and hit enter:
bash -c "$(curl -fsSL https://raw.githubusercontent.com/community-scripts/ProxmoxVE/main/vm/haos-vm.sh)"
- The wizard will ask you to confirm that you want to create a Home Assistant OS VM
- Select Yes and click confirm
- On the next screen, choose either Default or Advanced
Default is suitable for 95% of setups. It provides plenty of power for a standard Home Assistant installation with dozens of add-ons. The installation will proceed automatically from here. - If you choose Advanced Settings, you will be prompted to choose:
- Home Assistant OS Version (Stable, Beta)
- Hostname (cannot contain underscore ‘_’)
- VM Machine ID
- Machine type
- Allocated CPU Cores
- Allocated RAM Memory
- Select the final Yes to confirm
- Wait for the script to download, extract and install the latest KVM image of HA OS
- Once you get a Completed Successfully message, HA is installed
- Done!

Finding Your IP and Restoring a Backup
To check the IP address your router assigned to your Home Assistant VM instance, click your node on the left and select your newly created Home Assistant VM. The IP address will be displayed in the middle, use it to access Home Assistant in your web browser at the default IP address e.g. 192.168.xxx.xxx:8123.
Finished, you just installed Home Assistant OS on Proxmox!

In the wizard, you can click Restore from Backup if you have one and have your Home Assistant instance up and running in no time. If are starting fresh, simply click Create my smart home which will guide you through creating a user and auto-adding your devices.
Post-Installation Configuration and Optimization
With Home Assistant OS successfully installed, your server is live, but it’s not yet fully production-ready. To ensure long-term stability and connectivity, you need to configure a few key settings. In this section, we will enable USB Passthrough for your Zigbee/Matter dongles, lock down a Static IP address to prevent connection drops, and optimize your CPU to reduce power consumption.
USB Passthrough for Zigbee and Z-Wave Dongles
If you use a Zigbee or a Z-Wave dongle, there is one additional step you must do in order to allow the Home Assistant VM to read your attached USB device. Follow this guide:
- Plug in your USB Device (Zigbee dongle) to your Mini PC
- Select your Home Assistant VM on the left
- Select Hardware from the Menu
- Click Add at the top bar
- Select USB Device
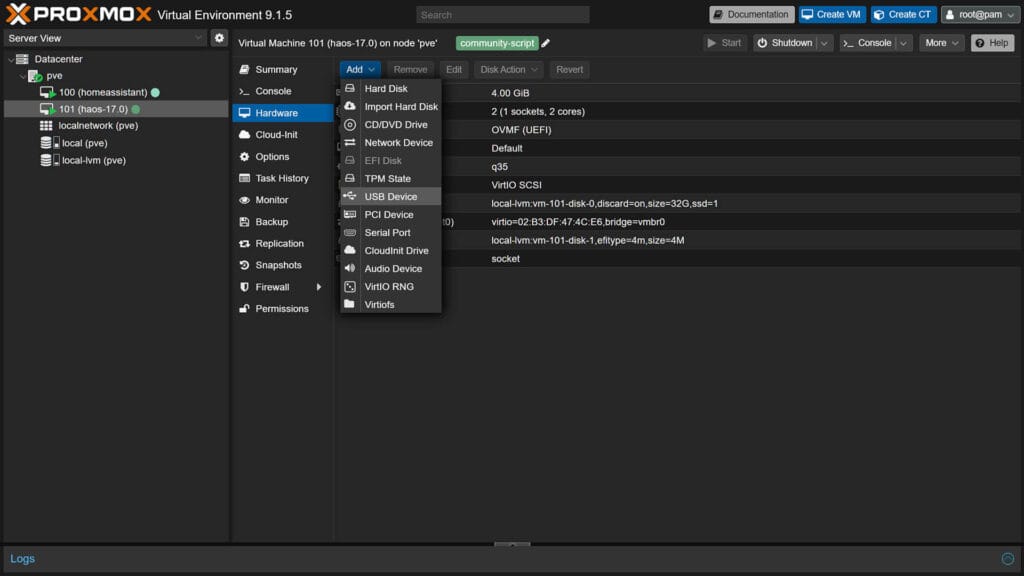
- Select Use USB Vendor/Device ID from the menu
- Select your USB Device (Zigbee/Z-Wave Dongle)
- Click Add
- At the top corner, press the small arrow next to Shutdown
- Choose Reboot and confirm to restart the VM
If you navigate to Home Assistant, you USB dongle will be auto-discovered and you can continue to setup your integrations. If you are having issues, read more of how to properly Passthrough USB Devices To Home Assistant.
Setting CPU scaling governor
The CPU scaling governor controls how fast the CPU works depending on what it’s doing, aiming to save power or boost performance. By changing the speed of the CPU, the computer can use less energy when it’s not working hard. To set the CPU governor, open the Proxmox Shell and run the script bellow:
bash -c "$(curl -fsSL https://raw.githubusercontent.com/community-scripts/ProxmoxVE/main/tools/pve/scaling-governor.sh)"The script will show you what the current scaling governor is, and depending on your hardware and how concerned you are about saving energy, you can set it to powersave:
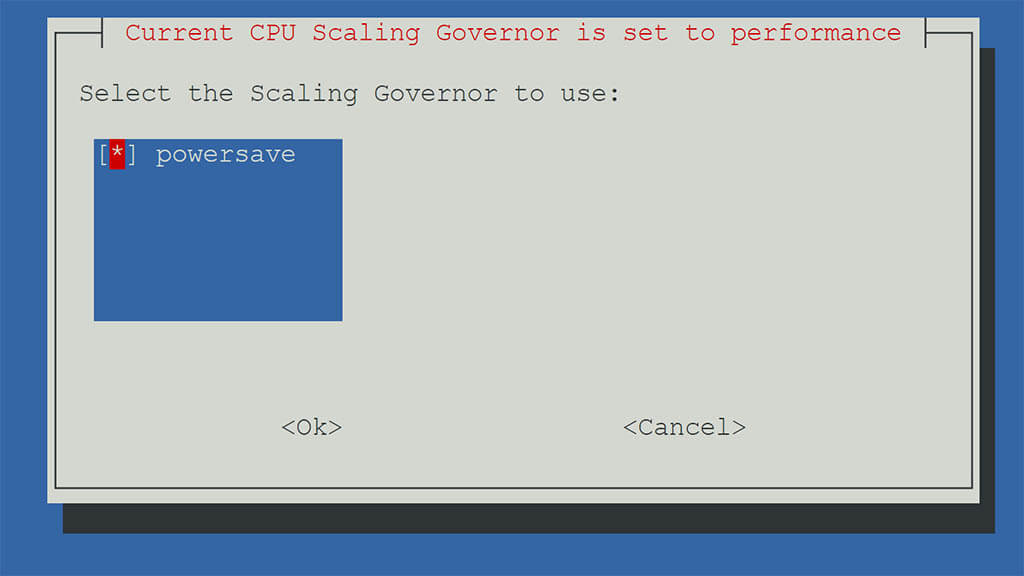
Make sure to also setup a cronjob on the next screen, so the CPU scaling governor configuration is persistent across reboots. Select yes, followed by ok and finally reboot Proxmox.
Setting a static IP Address
It’s highly recommended to set a static address for Home Assistant OS in router’s DHCP settings. This will allow the VM to be able always reachable to the same IP address, preventing access issues in the future. If you don’t know how, google your router model + static IP address. You can also do this in Home Assistant too:
- Open your Home Assistant instance
- Navigate to Settings > System > Network
- Click IPv4 and select Static
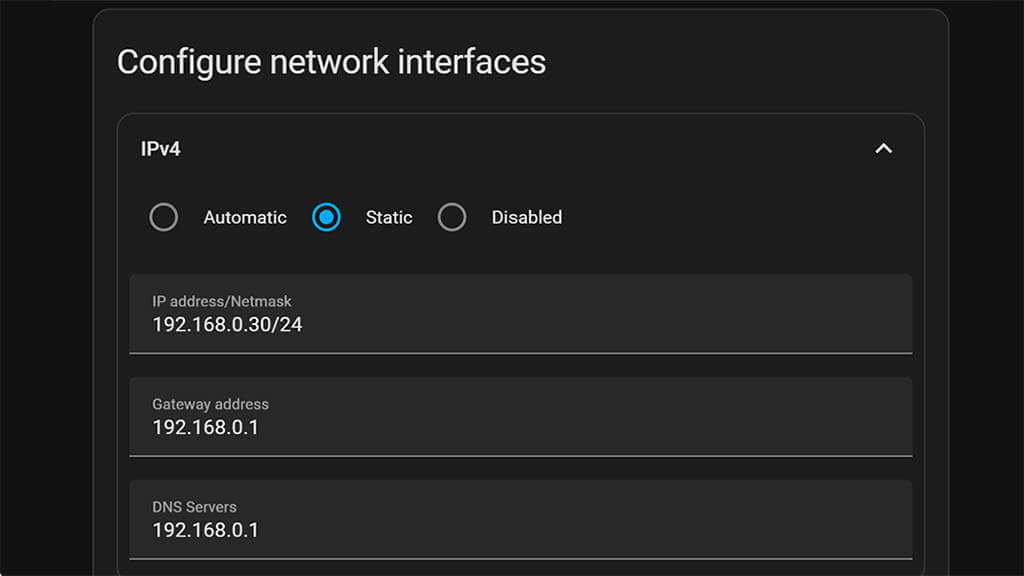
- Set the IP, Gateway and DNS
- Click Save
Troubleshooting: Manual Installation Method
If the automated script fails or is blocked by your firewall, you can install Home Assistant manually using the official disk image.
- Get the Latest Home Assistant Release:
- Go to the official Home Assistant GitHub Releases page.
- Scroll to the latest release (top of the page).
- Find the file ending in
.qcow2.xz(e.g.,haos_ova-17.1.rc1.qcow2.xz). - Right-click the file and select Copy Link Address.
- Download the Image:
Open the Proxmox Shell (Host > Shell) and typewgetfollowed by the link you just copied. Example:
wget https://github.com/home-assistant/operating-system/releases/download/17.1.rc1/haos_ova-17.1.rc1.qcow2.xz- Extract the Image:
Run the following command to unzip the file.
unxz haos_ova-17.1.rc1.qcow2.xz- Create a VM:
Create a new VM in the Proxmox GUI. Note the VM ID (e.g.,100).- OS Tab: Select “Do not use any media.”
- Disks Tab: Delete the default disk created by the wizard.
- Import the Disk:
Back in the Shell, run this command to import the disk into your new VM. Replace100with your VM ID and use TAB to auto-complete the filename.
qm importdisk 100 haos_ova-17.1.rc1.qcow2 local-lvm - Attach & Boot:
- Go to your VM > Hardware. Double-click the “Unused Disk” and click Add.
- Go to Options > Boot Order. Enable the new disk and drag it to the top.
- Start the VM.
- Done!
Summary
Deploying Home Assistant on a Proxmox Virtual Environment using these scripts is a breeze. Developer tteck made it a seamless process that even the non-technical can follow. Since his passing, these scripts are getting some community love. Consider donating to tteck’s family and help them throw this hardship. If you want to support the development of the new community effort, click here.
For example, here’s what these scripts can do for you:
- Install Zigbee2MQTT as a separate LXC
- Install MQTT Mosquitto Broker as separate LXC
- Install ESPHome as a separate LXC
- Install MariaDB as a separate LXC
- Install InfluxDB as a separate LXC
- Deploy AdGuard or Pi-Hole for system-wide ad blocking
- Deploy Tailscale for easy remote access
The advantage of deploying these Home Assistant add-ons separately is they will be independent of Home Assistant and it’s current state (installing, rebooting, breaking changes etc). You can connect them together and setup HA to read data from each one, operating as it should. If you are looking to replace that old Raspberry Pi, this is the way to go, especially if you are not familiar with virtual machines and Linux environments.
FAQs
Is Proxmox better than running Home Assistant Bare-Metal?
Installing Home Assistant OS directly on your Mini PC (“Bare-Metal”) wipes the entire computer and dedicates 100% of its resources to a single app. Since a modern N150 chip is far more powerful than a Raspberry Pi, this is a massive waste of hardware. Proxmox allows you to use that extra power to run other tools (like AdGuard, Plex, or a NAS) alongside Home Assistant, while also giving you “Snapshots” (the ability to backup and restore your entire system in seconds before making risky updates).
Should I run Home Assistant as a VM or LXC?
For the vast majority of users, you should absolutely run Home Assistant as a VM (Virtual Machine). Using a VM provides the full Home Assistant OS (HAOS), which includes the Supervisor and Add-on Store (now App Store), allowing you to install essential tools like Z2M or Mosquitto with a single click. While an LXC container is more lightweight and uses slightly less RAM, it strips away these features, forcing you to manually install and maintain every add-on yourself.
How much RAM do I need for Home Assistant on Proxmox?
For a standard installation, 4GB is recommended. However, Home Assistant is very efficient and can run on as little as 2GB of RAM. If you plan to run memory-hungry applications like Frigate (NVR) or a Media Server alongside it, you should aim for a Mini PC with 8GB or 16GB of RAM.
Can I run Windows or Linux on the same Mini PC?
Yes! This is the main advantage of using Proxmox. You can install Windows 11 or Ubuntu in a separate Virtual Machine (VM) and use it for daily tasks or file sharing, all while Home Assistant runs silently in the background. They act as two completely separate computers sharing the same hardware.
Why is my Zigbee stick not showing up in Home Assistant?
If your Zigbee or Z-Wave dongle isn’t detected, you likely skipped the USB Passthrough step. Proxmox does not automatically give VMs access to USB devices. You must go to your VM > Hardware > Add > USB Device and map your specific dongle to the Home Assistant VM, then reboot.
Can I use a Google Coral for Frigate NVR on Proxmox?
Yes. Just like the Zigbee stick, you can pass through almost any USB device.


Amazing and useful post
Thank you!
Going forward, versioning will no longer be utilized in order to avoid breaking web-links in blogs and YouTube videos (for the final time). So, as a result, the name of the shell script has been updated from `haos-vm-v5.sh` to `haos-vm.sh` .
Hey,
Thank you for stopping by.
I will update the code and thanks again for creating these awesome scripts!
Cheers!
Databases can be very sensitive to sudden power loss. This is less of an issue on bare metal, but is a big concern in virtual environments. The hypervisor may do caching/buffering that the DB is not expecting and can result in irrecoverable DB corruption. I would strongly urge Proxmox users to set the disk cache option on the HAOS VM to “writethrough” to greatly lessen the chance of lost writes that cause corruption.
Thank you for the tips Derek, I will add them to the post.
Cheers!
where do i find that option ?
I would also suggest adding an optional step to opt-in to the latest 6.x kernel that Promox offers. This can really help with hardware compatibility/drivers, particularly on newer Intel platforms.
Me getting to the end and there is no zigbee2mqtt instructions :.(
Hey, I decided to write a dedicated tutorial for separating Zigbee2MQTT from Home Assistant in Proxmox.
It involves covering and fixing a lot of potential issues.
Stay tuned, will release it in a couple of days.
Cheers!
Hey Jezza,
Here it is:
https://smarthomescene.com/guides/how-to-separate-zigbee2mqtt-from-home-assistant-in-proxmox/
Cheers!
The script produces an error on Proxmox 7.4-3:
Using Default Settings
Using HAOS Version: 9.5
Using Virtual Machine ID:
Using Machine Type: i440fx
Using Disk Cache: Default
Using Hostname: haos9.5
Using CPU Model: Default
Allocated Cores: 2
Allocated RAM: 4096
Using Bridge: vmbr0
Using MAC Address: 02:63:F2:9B:5E:DE
Using VLAN: Default
Using Interface MTU Size: Default
Start VM when completed: yes
Creating a HAOS VM using the above default settings
– Validating Storage…bash: line 362: pvesm: command not found
numfmt: invalid number: ‘\033[01;31m362\033[m:’
[ERROR] in line 355: exit code 2: while executing command FREE=$(echo $line | numfmt –field 4-6 –from-unit=K –to=iec –format %.2f | awk ‘{printf( “%9sB”, $6)}’)
My error – the script ran fine once I used root on Proxmox
Thanks for this guide and thanks to the Dev for the scripts.
Can I ask I’m wanting to do this mainly for
HassOS,
ZigBee2Mqtt & Node red.
But there’s about another 4 on that list I would like also and each ones shows default ram and CPU cores,
so say I want 8 small VMs that say they need 1gb ram each and 1-2 CPU cores would that mean I need a system with 8gb Ram and 8-16 CPU cores 😲
Or are you not meant to add them together like that.
No, no need. All containers share the kernel and resources of the PC, so you can get away with less.
It largely depends on what you intend to run though
The final script did not work. I put it in (3x – copied twice and then typed a third) – system just went to the next line. No evidence anything happened. Ideas??
Which script are you reffering to?
I believe he is referring to the wget command bash -c “$(wget -qLO – https://github.com/tteck/Proxmox/raw/main/vm/haos-vm.sh)”.
I am also having the same issue. In the shell entering the above command does nothing.
Hello,
The command is correct, I’ve just tested it. Are you sure you are pasting it correctly?
Try typing it out manually and let me know.
Awesome stuff. Thank you.
What a great tutorial and script. Saved me sooo much time on my rebuild compared to my first implementation.
The only thing I’m having an issue with is the USB device config.
I’ve config’d the proxmox vm as you did for USB vendor/Device ID and rebooted.
HAS does auto discover the Conbee II and I can see it in integrations but when I try to configure it I get an error “Failed to probe the usb device” then it disappears from the integrations page until I reboot and it’s auto discovered again. I tried a few different ways, incl usb as a passthrough port but same error.
Any advice ?
Thanks
Gav
HAS 2023.4.4
Proxmox 7.3-6
Hello,
Did the Conbee worked before? Seems like a firmware issues, have you tried flashing it with the latest firmware?
I had similar problems with a Sonoff ZBDongle-E which I fixed by flashing the latest firm.
Let me know.
It did work previously but it was a few yrs ago when I set it up.
Other research found there were problems with the conbee after a firmware update.
I did flash a few different firmware versions but no joy so I’ve now bought a SkyConnect and it’s chugging along nicely.
I have the same issue, the command does nothing. I tried to copy/paste and tried to type it… Any idea why it is not executing? I’m running it as a root user.
Are you sure you are pasting it correctly? If a letter or two is missing, it won’t do anything.
Use Shift + Insert to paste the script, I am saying it again: It is correct.
I had the same issue. I followed the http link to the script and did a copy of the code. Then I opened the console command and navigated to the location of where the script was supposed to reside and nano created the .sh script with a paste. I then had to make it executable and manually ran the script from the cli. It worked and was a bit of a fudge. I’m not sure why me and others can’t run the script from the wget code.
“UPDATE 29.03.2023: A pro tip for setting the disk cache option on HAOS to writethrough greatly lowers the chance of a corrupted database on Proxmox. Thanks Derek!”
How? LOL
Got it!
HAOS
– Hardware
– Hard Disk (double click to open option window)
– Cache dropdown
– Write through
Hello. First I want to say I appreciate the work you have done. I have just completed proxmox with the intent of learning virtualization and especially home assistant, and many other things. I started researching installing HA and found your guide which seems to make it easy.
However, I like others I have experienced the issue where using the command does nothing. There were no available updates on my fresh install (not sure if that’s weird or convenient)
At first I was like ‘well, lets make sure I can reach the outside world’ so I used traceroute (after getting irate that shell wouldn’t recognize tracert until I remembered I was using linux) and that was successful. I rebeooted the machine (step 1, just in case, right).
I copied and pasted the link several times, copied it to notepad to make sure there are no extra spaces at the beginning or end, and typed it carefully several times and am still experiencing the issue others have had where the command does nothing.
I’m sure your script does work in 99 percent of the cases and don’t expect you to cater to me (especially because you are doing this out of the kindness of your heart and to help people) but it does seem to be more than an isolated issue. Do you have any suggestions to any configuration issues that may be causing a few of us to experience difficulties?
Either way, thank you for your contributions, I am excited to start the fun!
Okay, this is such a well-written comment that I would to thank you for providing your feedback.
The shell command has been working without issues for me, BUT there might really be something going on since so many people reported it. I will dig deeper and post a video tommorow of EXACTLY the steps I take to install the VM using the script.
Cheers
Thank you! In reading through your instructions to set up HA I skipped the ProxMox install as I already had it installed. I went back and read and the only difference in my install is I used a fake FQDN as that’s what the install suggested. I don’t know if that will affect this situation, but wanted to give you any info I have.
If I understand the problem, I ran in to the same. When I copied the script and pasted it into the Proxmox Shell, then hit “Enter”, nothing happened. Tried several times with same result; it just returns immediately to the command line. I then typed in the script manually and hit Enter and it ran just fine. I later ran into the same problem with copying and pasting scripts into the Shell where nothing happened. But, if I manually type in the script it runs fine. Not sure what the problem is, but it is repeatable and I have not yet resolved the problem with pasted-in scripts.
Your traceroute worked? I’m not sure if that’s what you said. (Forget how to traceroute in Linux.)
It wasn’t working for me either. I ran it several times and thought it was to work silently. LOL.
After a few hours I came back to check and no change. Then I decided to ping something. I found out that internet wasn’t working. Fixed that and ran the script again.
IT WAS A THING OF BEAUTY!
Thanks!!!
You have NO IDEA how much pain you saved me!
My Traceroute did work (On linux its traceroute, on Windows its Tracert). My trace route did work and I still am having the same issue, but I can’t help but wonder if I’m having some sort of connection issue to the outside because I do get an error trying to find the Debian repositories, but it’s weird that I can ping, trace route and still get nothing.
To anyone saying the script does nothing: It’s almost certainly a connection issue, double check your internet connection.
https://imgur.com/a/oB3HceJ
I mucked up DNS and got these symptoms, i.e. script wouldn’t work, but it wouldn’t without DNS would it! All worked well for me – thanks.
I’ve racked my brain all day at work, and then I had an epiphany and I solved my issue (and I think everyone elses issue) with the script not working. I still had the 127.0.0.1 which was the default example for the DNS- I only ever pinged and traced the DNS, but never tried a domain. I switched my DNS to the google 8.8.8.8 and sure enough, the script worked.
Not bad for a car salesman who just dabbles in computers for fun, right?
Awesome, just upgraded from Virtualbox running on a windows 10 PC with a script to auto start that was having issues after an internet outage requiring the host to be rebooted to regain access. TY TY!
So helpful, thank you for taking the time to do this.
You are welcome, cheers!
great guide!
maybe you can add on step 23 Hostname cannot consist _
script will fail, got the info from the home assistant forum
Thank you, noted.
Hello.
I added another hard drive in the HA vm.
But HA can’t use it… How can I do it?
Thanks
“
You can attach it as a network drive using Samba NAS addon
Question,
Is there a reason why the HA is build as a VM and not as a container?
Just wondering, since I had the option to go through Docker on an Ubuntu OS, but I read Proxmox can also handle both.
I’m using now Proxmox on an HP elite desk 8GRam and i5 7Gen.
Thanks for a reply.
Well, HAOS in this case deployed as a VM benefits greatly from the supervisor. It can run addons natively, without setting up each one separately.
But if you want, you can deploy it as an LXC too, or just run HA Core as an LXC.
See all the different methods of installation before you decide.
https://www.home-assistant.io/installation/
Count me as a successfully deployed Proxmox+HA+Zigbee in a Lenovo M93p
So easy and straight forward. Thank you so much!
You are welcome! Cheers
Ok, thanks. I’ll give it another look before deciding.
Thank you very much for this. I successfully migrated my HA to a Proxmox VM 🙂
I installed Proxmox using this method on a NUC which was running Windows 11. Is there any way of reversing the Proxmox installation so that I go back to Windows 11 and all the apps that were previously running?
No, you formatted the drive when you installed Proxmox. You can run Win11 in Proxmox too though!
Hi,
Thank you for your extensive guide. I’ve got it up and running but I’m struggling to reach certain port from an addons. In my case I would like port 81 to be accessible in order to acces the Nginx Proxy Manager UI, is this something that I need to configure on the VM in Proxmox?
Thank you
By default, Nginx is accessible from the IP:81
See here for 443
https://pve.proxmox.com/wiki/Web_Interface_Via_Nginx_Proxy
Hi,
if you have problem with download HA from script, just change DNS in Proxmox on 8.8.8
Thank you for this tool. It worked for me the first time, however I decided to “blow up” my HA setup and start over – and now having issues.
I successfully removed/deleted my original VM containing HA.
Running the script again – getting some of the same issues listed above – cutting and pasting the script command the first time results in nothing happening. Typing it didn’t help either.
I simply get a next line with a “>” displayed.
If I past it AGAIN, then it will run – seems to run successfully. I can see it create a new VM which appears under the PVE for a few seconds …. then it disappears and I get this error:
bash: -c: option requires an argument
[ERROR] in line 431: exit code 2: while executing command bash -c
Any suggestions here?
See the other comments bellow, you need to check your DNS settings.
The second error is most likely because you are not pasting the command correctly. Use CTRL + SHIFT + V
I screwed up my copy paste and got this behavior. I got it to go making sure the command had the trailing quote and tossed semicolon on for good measure.
Does the cleanup script work with proxmox ve 8?
Hi there, you mention that there’s a script to get rid of the subscription error message. Can you provide that?
Yes, it’s the post install cleanup script:
https://smarthomescene.com/guides/how-to-install-home-assistant-on-proxmox-the-easy-way/#optional-post-install-proxmox-ve-7-script
Hi, I’m getting an error after install.
Using google DNS and its working. Did cntr shift v to paste
Any ideas?
Using HAOS Version: 11.0
Using Virtual Machine ID: 101
Using Machine Type: i440fx
Using Disk Cache: Write Through
Using Hostname: haos11.0
Using CPU Model: Host
Allocated Cores: 2
Allocated RAM: 4096
Using Bridge: vmbr0
Using MAC Address: 02:AD:74:67:39:03
Using VLAN: Default
Using Interface MTU Size: Default
Start VM when completed: yes
Creating a HAOS VM using the above default settings
✓ Using local-lvm for Storage Location.
✓ Virtual Machine ID is 101.
✓ https://github.com/home-assistant/operating-system/releases/download/11.0/haos_ova-11.0.qcow2.xz
✓ Downloaded haos_ova-11.0.qcow2.xz
✓ Extracted KVM Disk Image
✓ Created HAOS VM (haos11.0)
✓ Started Home Assistant OS VM
✓ Completed Successfully!
bash: -c: option requires an argument
[ERROR] in line 442: exit code 2: while executing command bash -c
You are either pasting wrong or pasting at the wrong space.
In any case, update Proxmox packages.
Reboot the host.
Paste the command.
Let me know how it goes
Thank you for your reply.
I ran update, nothing new was found. Rebooted.
This is what I pasted into the shell:
bash -c “$(wget -qLO – https://github.com/tteck/Proxmox/raw/main/vm/haos-vm.sh)
I see the VM being created, then deleted after the same error message:
bash: -c: option requires an argument
[ERROR] in line 442: exit code 2: while executing command bash -c
you forget the ” at the end
you pasted:
bash -c “$(wget -qLO – https://github.com/tteck/Proxmox/raw/main/vm/haos-vm.sh)
it has to be:
bash -c “$(wget -qLO – https://github.com/tteck/Proxmox/raw/main/vm/haos-vm.sh)”
Hello from France !
Many thanks for this very effective tutorial. A very nice job.
I followed it by directly installing version 8 of Promox on a NUC N95 / 8GB DDR5 3200MHz / 256GB nvme SSD for €135. Faster and cheaper than a Raspberry Pi 4 (which I love) with power supply + sdd + case
Congratulations
Fred
Simplified things. Is it possible to get the scripts. I do like to review the scripts to verify security and malicious activity possibilities.
Hi,
I succesfully installed PVE and HA as you suggested. I read your article on Zigbee, MQTT. If I understand it correctly PVE has to be in a container, not a VM. Can the VM be converted to a LXC container? If not how do you create the HA container? Thanks for your help.
Steve
Hello Stephen,
PVE stands for Proxmox Virtual Environment and it’s just that – an Debian-based virtual environment that you use a base and install applications (containers) or virtual machines (operating system) on to it.
You cannot convert a VM to an LXC, you would have to reinstall it.
Please tell me, ultimately, what are you trying to achieve?
First time proxmox and HA user so excuse my ignorance. I’ve followed the guide no problem and have HA running. I read there is different types of HA installs, (full install, hass.io, supervised etc) which one is this or what do these terms mean? I was searching for the Myenergi integration but it doesn’t show up and supposedly it may not be available depending on the type of install. If i want to manually add an integration how can I get to the folder directorys in my HA instance on proxmox? It’s probably staring me in the face but I can’t find it anywhere. All help greatly appreciated.
If you followed the article, you installed HAOS (Home Assistant Operating System) which is the full version capable of using containers as add-ons.
Assuming you have installed HACS (Home Assistant Community Store), you can search Myenergi within HACS and install it.
See more here: https://github.com/CJNE/ha-myenergi
i have Lidl zigbee hub and Skyconnect, and i want to use both at the same time. how can i emigrate from lidl to ha?
You can simply ditch the hub and re-pair everything to SkyConnect in Home Assistant.
You cannot use both at the same time
Hi!
I’m trying to install HA with bash -c “$(wget -qLO https://github.com/tteck/Proxmox/raw/main/vm/haos-vm.sh)” command but nothing happen. Circle in Status ir rolling…
Are you pasting it correctly in the Shell?
Use right click or Ctrl+Shift+V
bash -c "$(wget -qLO - https://github.com/tteck/Proxmox/raw/main/vm/haos-vm.sh)"Wow, a big thank you from Switzerland 🙏🙏🙏. Was “fighting” around with several installations over several days and then found this and… IT’S WORKING 🍾!!!
You’re welcome friend.
Rock on.
With regards to the issue many people have written about, where running the command does ‘nothing’… I think I might have a fix.
Add -4 after the wget (e.g. XXX wget -4 -qLO XXX )
On my recently installed PVE, when I manually ran just the ‘wget’ part of the full command, I noticed it was trying to use IPv6 and (‘quietly’ thanks to the -q) failing to connect.
HTH… D 🤓
Hey SHS, just wondering have you done the same for Esphome as LXC? thanks
Yes, you can install ESPHome with a one-liner too.
Run this in the shell:
bash -c "$(wget -qLO - https://github.com/community-scripts/ProxmoxVE/raw/main/ct/esphome.sh)"That’s one great guide! Thank you. Installed Proxmox and Home Assistant in a flash using this on my new Beelink EQ14. Proceeded to restoring Home Assistant from a backup from the old system, a HA Green. The backup is only 49 Mb, but it’s been in the process for at least four hours, starting to suspect something’s wrong. Any tips?
It should have restored in that time. Reboot the VM in Proxmox, you ain’t losing anything. You can try again if it fails.
Thanks! Turns out the restore was finished long time but it seems forever in progress with the circle that keeps spinning. Reloading the browser window and adding https:// to the url did it. Up and running now, thanks again for this guide.
A few questions-
1) If I want to install ha and z2m to be independent (meaning when ha restarts, z2m continues to run) does that mean it has to be lxc? And lxc means have to manually maintain its upgrades right?
2) i previously install into VMware with a specific linux version (based off a guide). When I tried to restore, I faced a linux wrong version. Apparently the new machine I selected the wrong linux version. For this promox install, will I be facing this issue?
1.No, you do not have to install Z2M as an LXC. Whenever you restart HA, you are restarting core, so the add-on keep working without issues.
Even when installing core updates. Just like a Proxmox VE.
2. If you make a proper backup within Home Assistant, it doesn’t matter what you are restoring it onto.
It should just work without issues. This probably happened (wrong linux ver) cause you ran HA supervised instead of HA OS, which you should run on Proxmox.
I followed your google drive backup method. I think my installation was a haos. Something I forgot to mention is that the The wrong linux error is not an error for the os – but more so the error for z2m which was unable to start : exec /sbin/tini: exec format error
The new pc I setup was using a newer linux kernel version when setting up the vm.
Once I corrected the version of the kernel, z2m can start correctly.
My point/concern is, how do I avoid this with promox?
You are right, that error means the binary was compiled for a different CPU architecture than what the VM was providing.
If it happens again, do a partial restore when you upload your backup. Select HA core but don’t select Z2M addon.
Instead, create a separate backup in Z2M and simply restore the data after freshly installing Z2M onto the new instance.
Also, make sure the VM’s processor is set to host. Go to VM > Hardware > Processors > Edit and set Type to
host.That should give you no errors when Z2M is starting.
Hello and congratulations on the efficient work! Before migrating to a DIY NAS next week, and with my HAOS installation running directly on a NIPOGI MiniPC, I’d like to know if I can also migrate RFXCOM RFXtrx to PROXMOX?
Thank you in advance.
You are running HAOS on bare metal, so all you need to do is create a full backup which you can restore in your Proxmox VM, regardless of where you run it.
Make sure you install HAOS VM as well, and not Supervised or Core. Restore the backup and than you need to make sure you do proper passthrough in Proxmox:
https://smarthomescene.com/guides/how-to-passthrough-usb-devices-to-home-assistant-in-proxmox/
Avoid USB 3.0 ports and use a shielded extension cable.
Thank you for this information, it will be very useful. However, I still have doubts about the possibility of installing RFXCOM RFXtrx under Proxmox…
How can I upgrade a previous v8 install?
Follow the guide here, should apply to 9
https://smarthomescene.com/guides/easy-upgrade-to-proxmox-8-0-without-losing-data/
There is a nasty typo in section “Running the HAOS Auto-Install Script” in topic 1:
It should read “Click your Proxmox VE host on the left and select Shell”.
Beside that, you have created a marvellous and very useful guide.
Thanks a lot for your effort.
You are right. Thank you, fixed it!