Apollo Automation, a fan-favorite brand in the Home Assistant community, has released a new multisensor with PoE (Power-over-Ethernet) support, labelled as the Apollo R PRO-1. This device uses two mmWave radar modules instead of one for detecting presence and is equipped with a lot of extra sensors, transforming into an all-in-one indoor environmental monitor.
If you are familiar with Apollo Automation, you might have noticed that their devices are always labelled as multisensors. This is because every device Apollo releases does much more than its primary purpose. For example, the Apollo MSR-2 and Apollo MTR-1 measure temperature, humidity, air pressure, illuminance, UV index, and optionally CO2. The devices are very feature-rich, providing true multisensor functionality in a very small form factor.
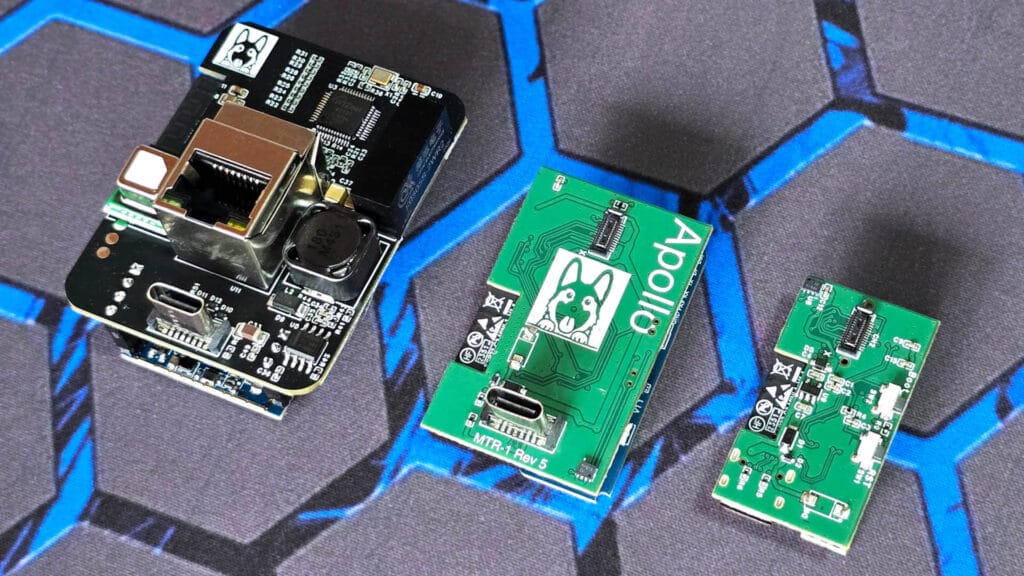
In this review, I’m testing the new Apollo Automation R PRO-1 Multisensor. This device is Apollo’s most advanced presence multisensor, designed for high-accuracy presence detection and environmental monitoring. It’s equipped with dual mmWave radar modules and has an Ethernet port with PoE support.
You can get it on the Apollo Webstore (US) and Domadoo (EU).
Apollo R PRO-1 Overview and Disassembly
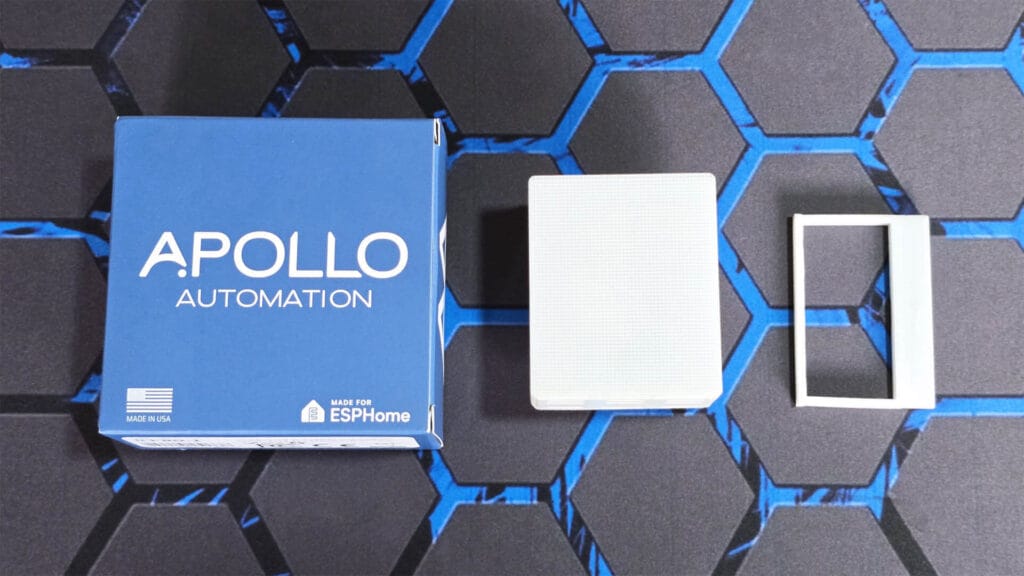
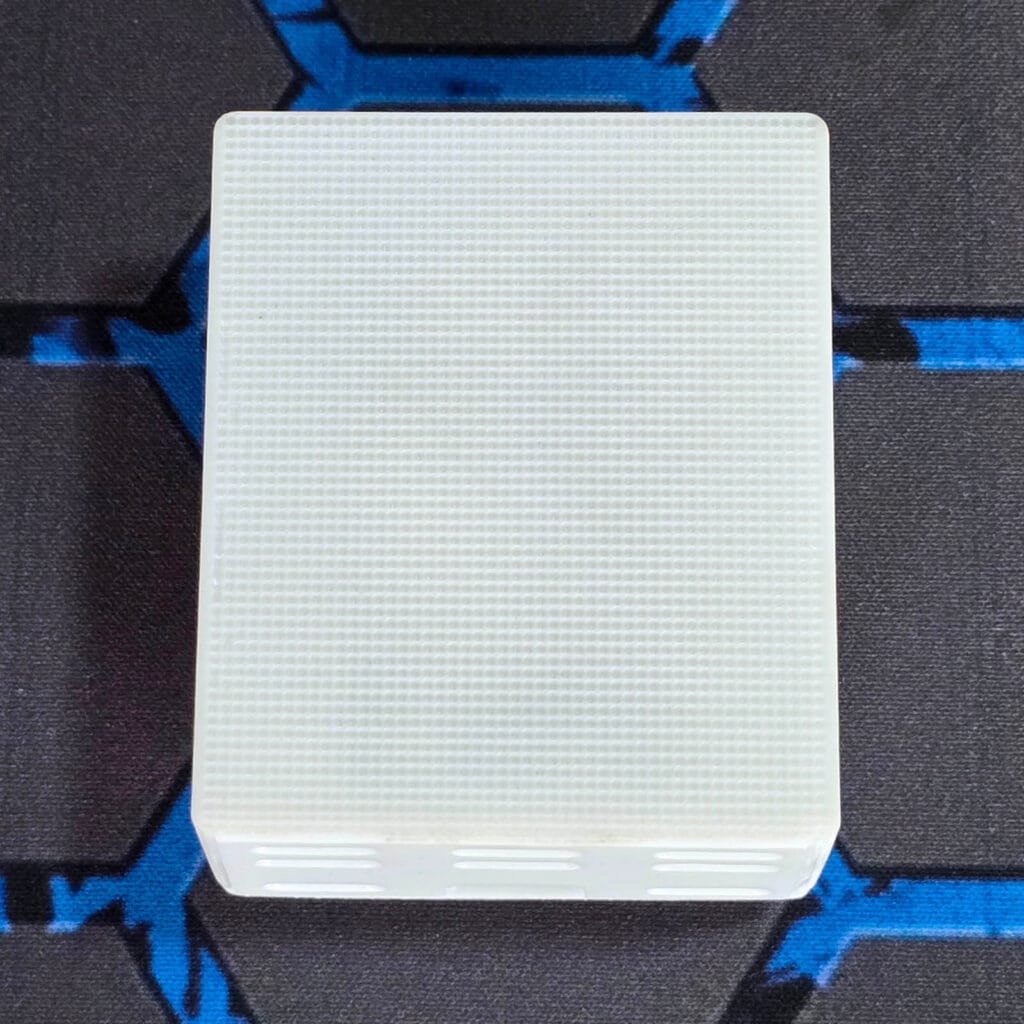
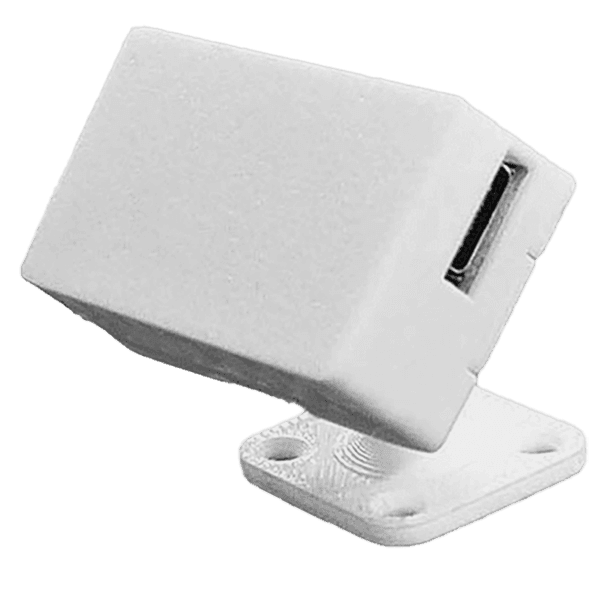
The Apollo R PRO-1 ships in a branded box containing the assembled sensor and a standing bracket. Optionally, you can order a USB-C cable, Front-facing USB-C Wall Charger, 3D Printed Gang Box Mount, Gang Box Kit or a Ceiling Mount Kit. Furthermore, the HLK-LD2412 sensor is optional, just like the Sensirion SCD40 CO2 detector.
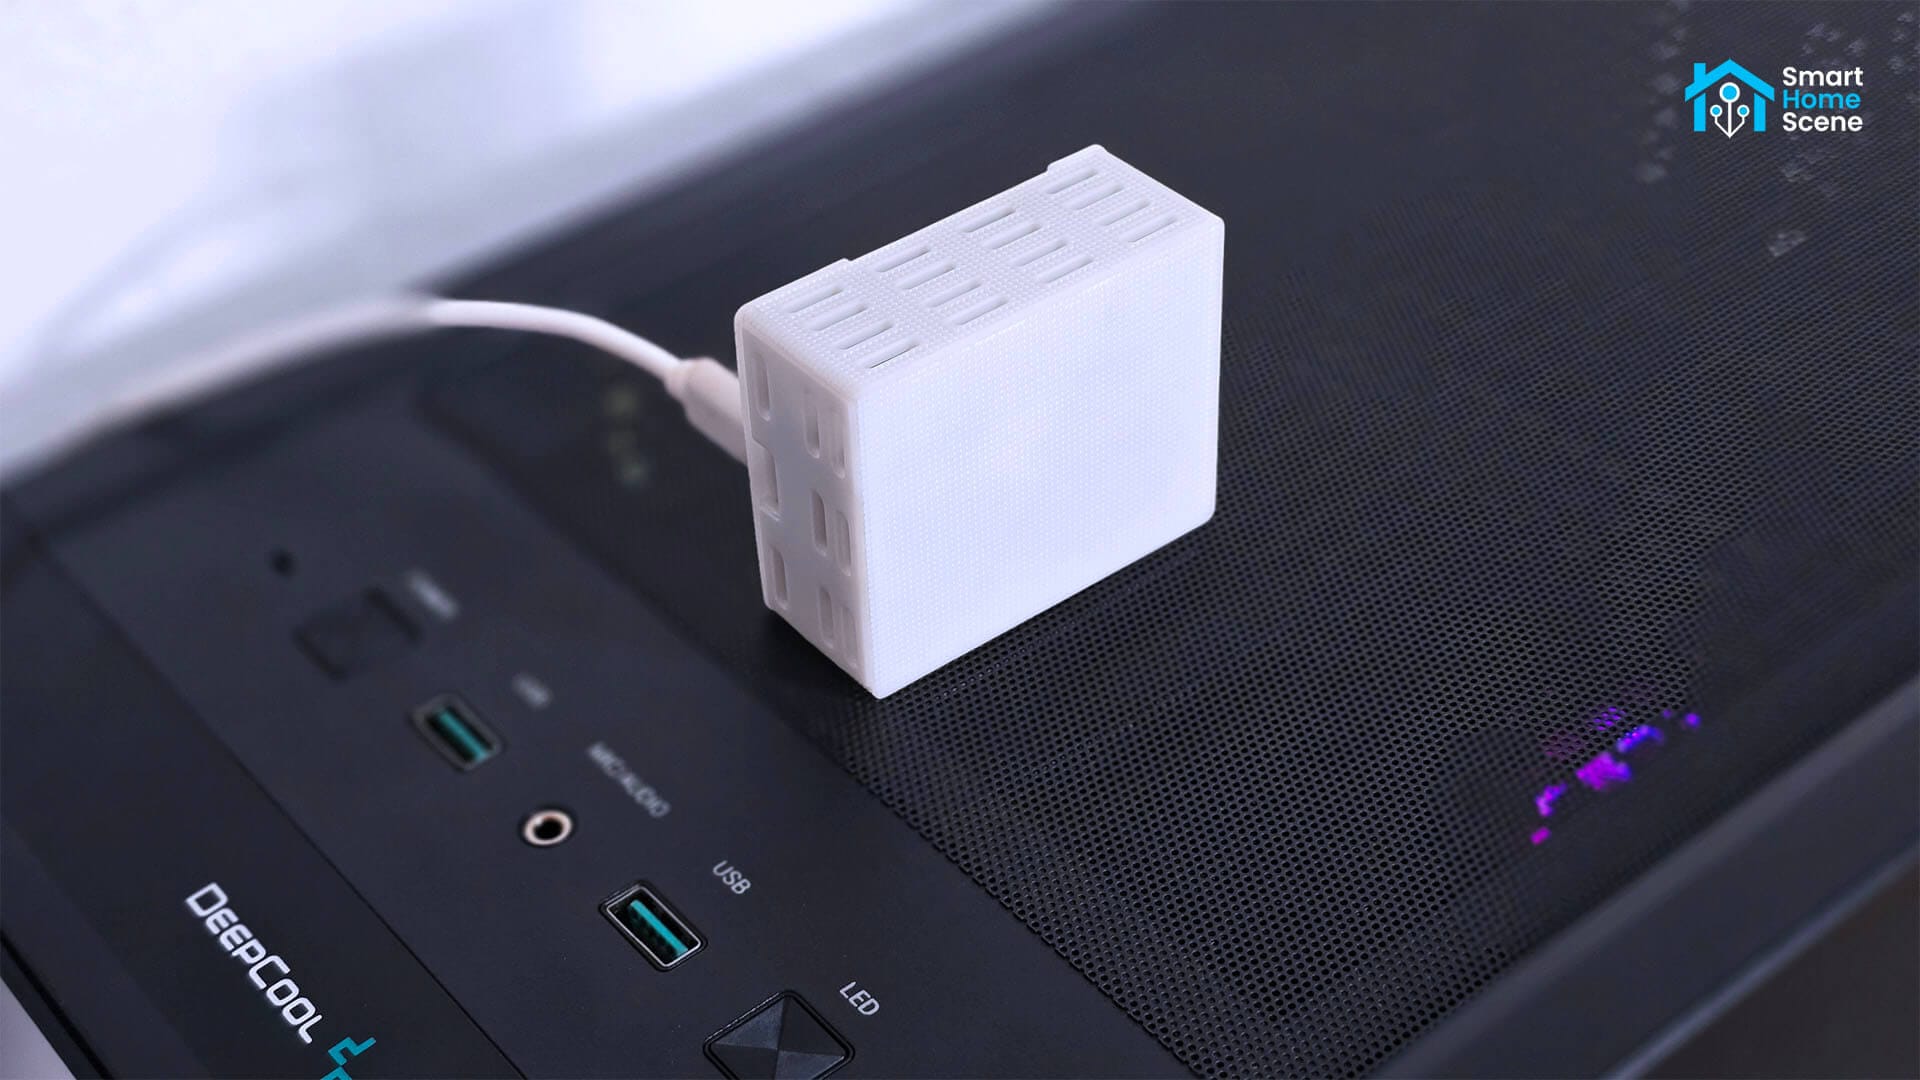
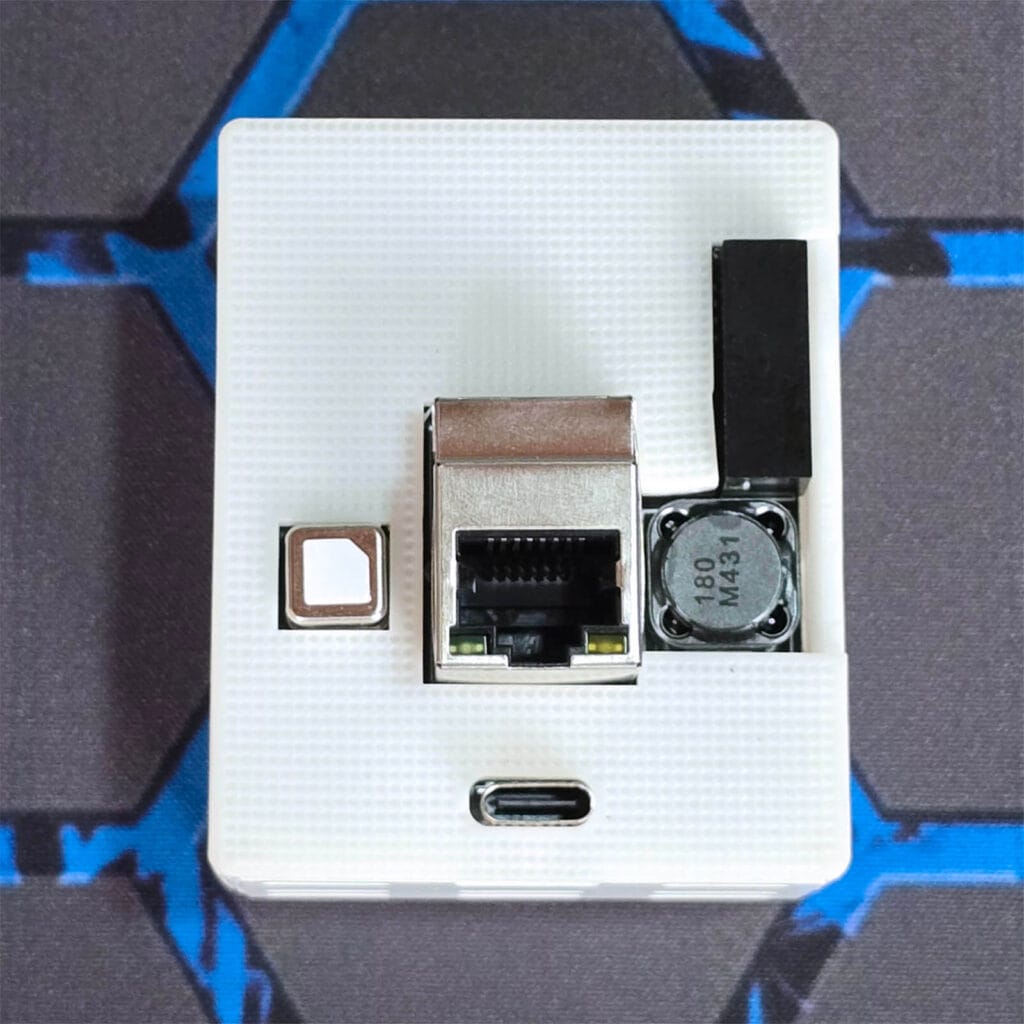
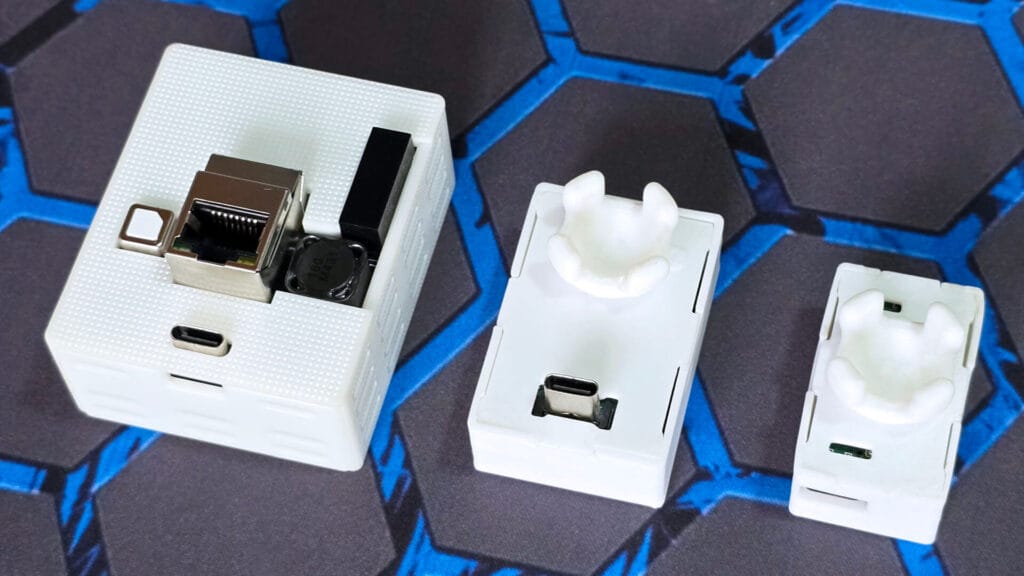
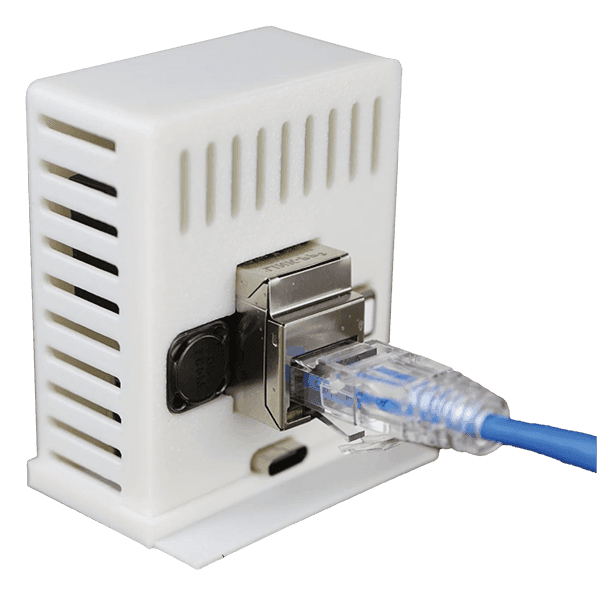
On the rear of the R PRO-1, the Ethernet PoE connector is centrally located, with a USB-C port directly beneath it. This dual input allows the device to be powered either via 802.3 PoE or USB-C. The Sensirion SCD40 environmental sensor, along with the power inductor and DC-DC converter (F0505S-2WR2) are positioned to protrude slightly from the enclosure. This design choice serves a dual purpose: it helps with heat dissipation and minimizes their thermal impact on the temperature sensor, preventing the reading from skewing too much.
The Apollo R PRO-1 is powered by the ESP32-S3-MINI-1 [Datasheet] board, which handles the ESPHome firmware and smart connectivity of the device. This board is powerful enough to handle two mmWave radars instead of one, which is a key feature of this multisensor.
Out of the box, the Apollo R PRO-1 ships with the HLK-LD2450 [Datasheet] radar module. This sensor is great at tracking multiple targets in separate detection zones, but falls short in reliably detecting static presence beyond a few meters. The optional HLK-LD2412 [Datasheet] radar module, however, is excellent at detecting static occupancy up to 9 meters away. Combining both in a single device makes the Apollo R PRO-1 the best of both worlds.
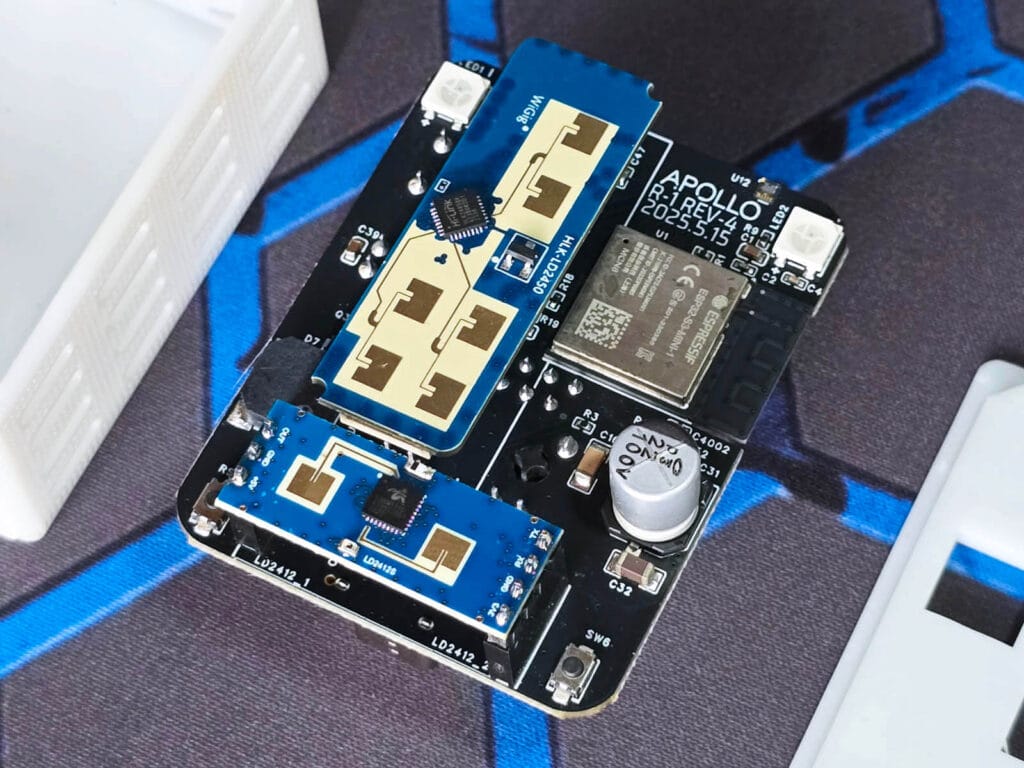
Besides the mmWave radar modules which provide the core functionality of the Apollo R PRO-1, the device is also equipped with some familiar Apollo peripherals. It has two pixel LED matrices which can be used for visual notifications, and a piezo buzzer which can be used for audible notifications.
Apollo R PRO-1 vs MSR-2 vs MTR-1
I’ve been using the Apollo MSR-2 and MTR-1 presence sensors as daily drivers in my own smart home since their release. Although I always favor deploying Zigbee devices over Wi-Fi, Zigbee just doesn’t offer the same level of flexibility and adjustability as ESPHome-based sensors like these do. While Zigbee can be better in certain scenarios, deploying presence sensors isn’t a one-size-fits-all situation.
Check out the Best Presence Sensors for Home Assistant list to find good devices.
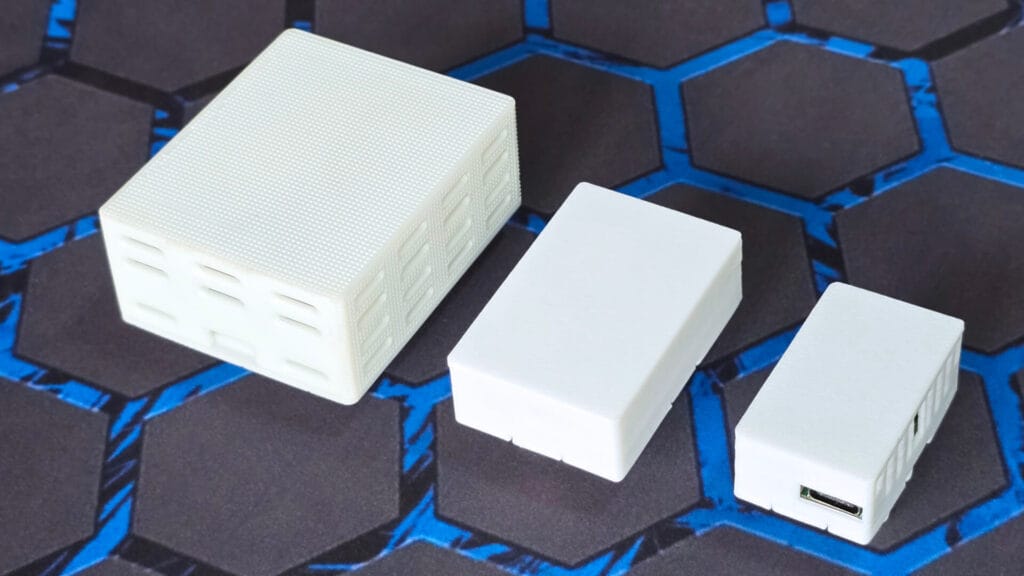
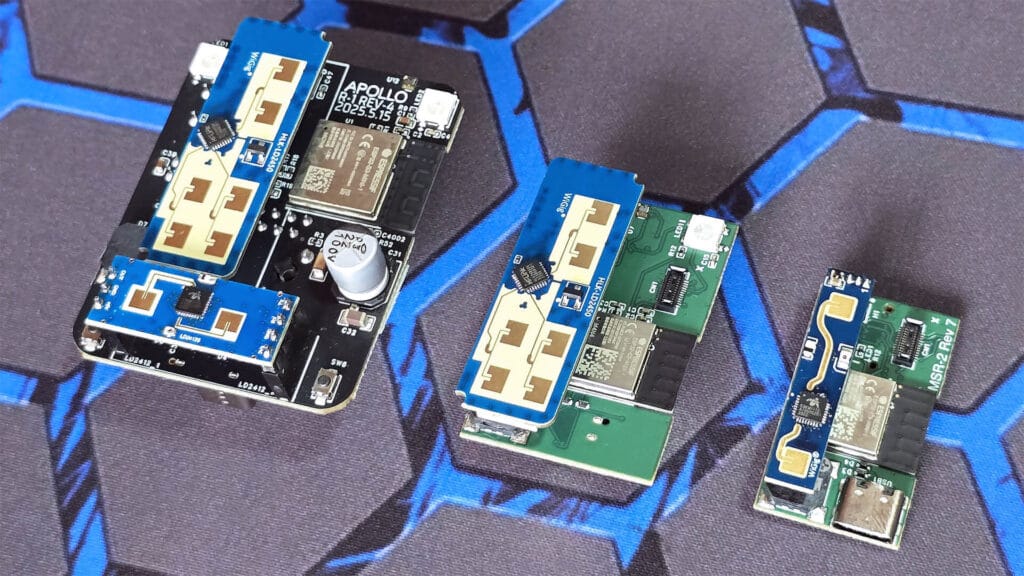
While very similar at first glance, there are differences between the Apollo R PRO-1, MTR-1 and MSR-2 presence multisensors. The new R PRO-1 is noticeably larger than the MTR-1 or the tiny MSR-2, which is expected because of the PoE connector on the back. Furthermore, it’s designed to accommodate two mmWave radar modules instead of one, which obviously requires more space.
In terms of radar performance, the Apollo MSR-2 is a highly capable presence sensor. It uses the HLK-LD2410 as its main mmWave radar module to detect occupancy at a distance of 6 meters and an angle of 60°. Once fine-tuned properly, the MSR-2 never skips a beat and detects presence very reliably. However, the LD2410 does not support defining 3D detection zones, a feature frequently requested by automation enthusiasts.
This is where the Apollo MTR-1 comes in. It uses the HLK-LD2450 mmWave radar module to detect occupancy, track multiple targets and allow the user to split the room into several detection zones. It’s very efficient at knowing exactly where you are in the room, allowing you to trigger different automations based on this information. However, the LD2450 radar has a weaker static detection performance compared to the LD2410 and can introduce false negatives after a few meters.
The new Apollo R PRO-1 is the best of both worlds. It relies on the HLK-LD2450 for multi-target tracking and zone definition, while optionally utilizing the brand new HLK-LD2412 mmWave sensor for reliable static presence detection. The HLK-LD2412 has an improved range of 9 meters at an angle of 75°, making it better than the LD2410 used in the MSR-2. On top of that, the device supports extra peripheral sensors like CO2 and an 802.3 compliant PoE connection.
Here are the technical differences of the MSR-2, MTR-1 and R PRO-1:
 |  | ||
|---|---|---|---|
| Model | Apollo MSR-2 | Apollo MTR-1 | Apollo R PRO-1 |
| Connectivity | Wi-Fi, Bluetooth | Wi-Fi, Bluetooth | Wi-Fi, Bluetooth, LAN |
| Power | USB-C | USB-C | PoE (802.3af) or USB-C |
| Main Module | ESP32-C3-Mini | ESP32-C3-Mini | ESP32-S3-Mini |
| mmWave Radar | HLK-LD2410 | HLK-LD2450 | HLK-LD2450, HLK-LD2412 |
| mmWave Angle | 120° | 120° | 120°, 150° |
| mmWave Distance | 6 meters | 6 meters | 6 meters, 9 meters |
| Illuminance and UV | LTR-390UV | LTR-390UV | LTR-390UV |
| Temperature and Pressure | Infineon DPS310 | Infineon DPS310 | Sensirion SCD-40 |
| Carbon Dioxide (CO2) | Sensirion SCD-40 | Sensirion SCD-40 | Sensirion SCD-40 |
| RGB Pixel LED | ✓ | ✓ | ✓ (two) |
| Piezo Buzzer | ✓ | ✓ | ✓ |
| Dimensions | 40x24x15mm | 49x32x15mm | 62x50x25mm |
| Price | From $37.99 | From $39.99 | From $69.99 |
Apollo R PRO-1 Home Assistant Integration
Just like all other Apollo devices, the R PRO-1 runs custom ESPHome firmware which gets auto-discovered in Home Assistant. Once paired, it exposes a total of 148 entities for presence state, environmental status, configuration parameters and diagnostics data. It’s hard to put into words the amount of data this device captures and records in Home Assistant.
I managed to capture and edit a screenshot with every entity added to HA, you be the judge:
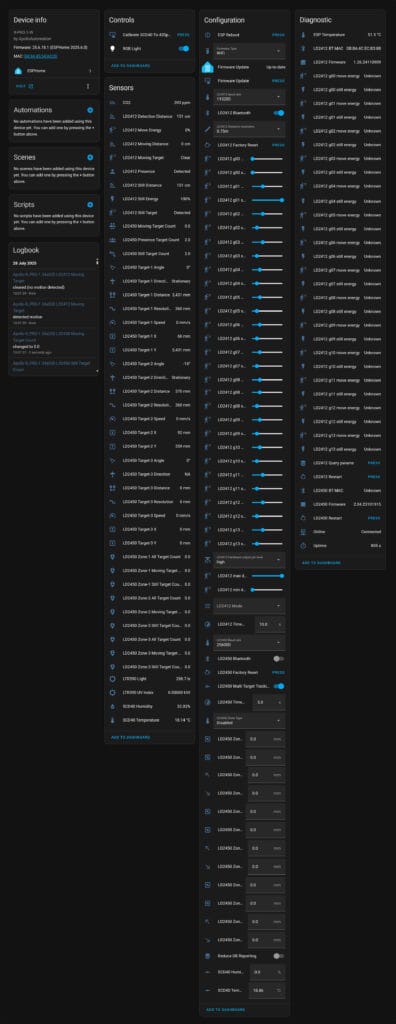
Firstly, a significant portion of the entities obviously relate to presence and motion detection, powered by its dual mmWave radars (LD2412 and LD2450). This includes sensors like moving target, still target, moving distance, still distance, moving target count, still target count, moving energy, angle direction, and much more. This category of sensors is mostly self-explanatory and can be used in different automations.
Secondly, there’s a collection of environmental sensors that provide data about the surrounding conditions. These are dependent on the optional Sensirion SCD40 module, which provides the CO2 reading, as well as temperature and humidity. This category also includes the light level and UV index measured by the built-in Liteon LTR390 sensor.
Lastly, the final category of entities is related to diagnostics and configuration features of the Apollo R PRO-1. These are used to fine-tune the operation of the mmWave radars, calibrate and offset environmental sensors, update firmware, define detection zones, change operating modes, enable Bluetooth functionality and query or reboot the device on demand.
Changing Firmware
Depending on your connection type (Ethernet or Wi-Fi), you will need to flash the correct firmware to the Apollo R PRO-1. Once the device is added to Home Assistant, regardless of which connection method you are using, you will be able to change the firmware from HA directly.
In the device page, scroll down and find the entity labelled as Firmware Type. Select either Wi-Fi or Ethernet from the list and click Firmware Update, a separate button entity below it. The new firmware will download from Github, flash the device and prepare it for configuration. If the Apollo R PRO-1 does not have internet access, this method will not work and you will need to flash it manually.
Defining LD2450 detection zones
The Apollo R PRO-1 supports defining up to 3 detection zones which will track presence individually and change state accordingly. The LD2450 supports Bluetooth, so this can be done through the HLKRadarTool app or by simply entering the X and Y coordinates manually in Home Assistant. Using the app is much easier, as the configuration is a simple drag and drop procedure.
The Apollo documentation does a great job of explaining the process, so there is no need to go over it here. Furthermore, they offer a YAML generator which will give you a full YAML configuration for the Plotly card, which is used to visualize the detection zones and targets detected by the Apollo R PRO-1. Whichever method you use, you can create the same result.
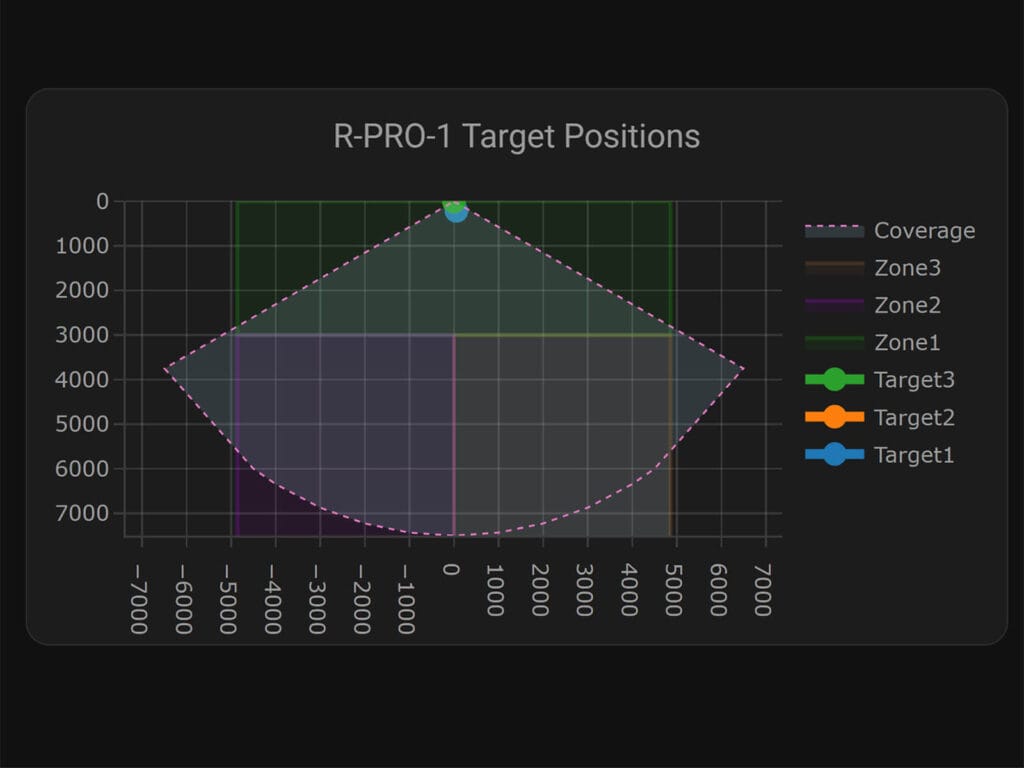
It’s important to note that the LD2450 can operate in three different modes. Depending on what you are trying to achieve, one will be more suited than the others. The modes are:
- Detection: Detects targets within each of the three zones. Default.
- Disabled: Disables multi-zone area detection and just tracks one big area.
- Filter: Excludes a zone from detection and detects presence everywhere else.
Obviously, using the LD2450 in disabled mode without detection zones is pointless, as it negates this main feature of the sensor. For reliable static detection, you would ideally use the LD2412 sensor and just rely on the LD2450 for target tracking within your predefined areas.
Fine-tuning the LD2412 sensor
The LD2412 sensor in the Apollo R PRO-1 can be fine tuned by a feature called Gates. Gates are energy thresholds for different detection distances of the HLK-LD2410b sensor. Each gate represents a set distance from the sensor, allowing you to adjust move and still energy thresholds to eliminate false positive or negative triggers.
For example, if you need specific areas in its field of view to be less sensitive, you can lower the gate thresholds. If you need them to be more sensitive, you can increase them. The LD2412 has the following thresholds by default:
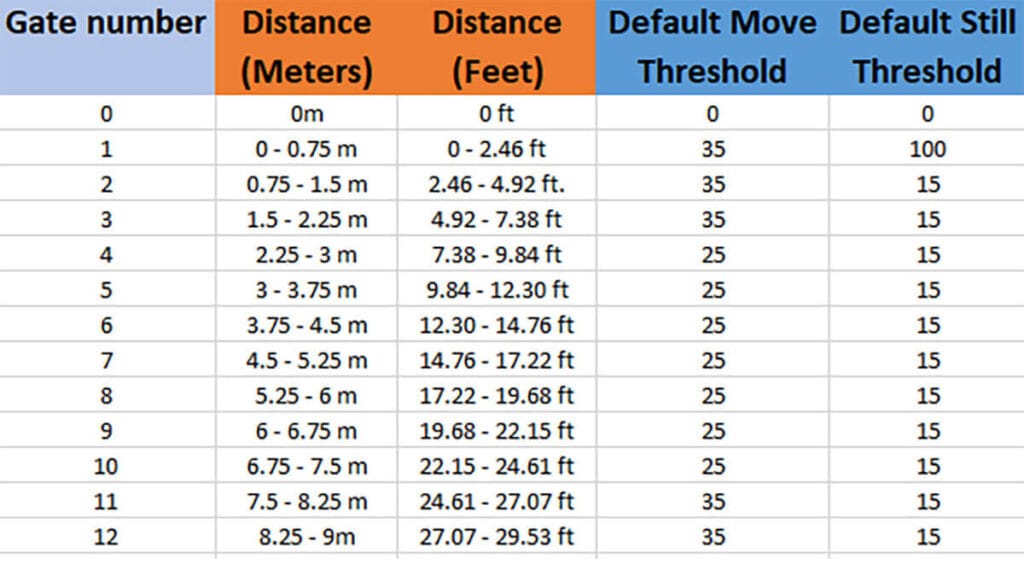
For example, let’s say I have a cooling fan in the corner of my room falsely triggering the sensor. It sits at about 4 meters from the Apollo R PRO-1, which means I need to fine-tune Gate number 6. First, I need to change the LD2412 Mode to Engineering in Home Assistant, which will allow me to change and record the values.
Since this is a moving target, I need to increase the Gate 06 move threshold above the default value of 25%. I can try 35 or 40, until I get the desired result. This process needs to be repeated for any Gate that is causing any kind of false triggers, fine-tuning the sensor to work reliably in my space. Once done, Engineering mode needs to be turned off and set back to Normal mode.
Calibrating the SCD40 CO2 Sensor
The Sensirion SCD40 CO2 sensor has a long lifetime (over 10 years) and comes pre-calibrated from the factory. However, it requires re-calibration after 1-2 years back to a 420 ppm baseline level. To calibrate the SCD40, take the Apollo R PRO-1 outside and leave it plugged in for about 30 minutes.
In Home Assistant, navigate to the device page of the Apollo R PRO-1. Find the button at the top labelled as Calibrate SCD40 To 420ppm and press it. The value will be recorded and you can bring the R PRO-1 back inside.
Automating the RGB LED and Piezo Buzzer
You can automate the onboard RGB LEDs and Piezo buzzer of the Apollo R PRO-1 to act as helpful visual and audible indicators. For instance, the LEDs can shift colors to reflect changes in temperature. The buzzer could play a distinct tune if CO2 levels climb too high, giving you an immediate heads-up to open a window.
While controlling the RGB LED is as straightforward as any other light in Home Assistant, the buzzer needs RTTTL (Ring Tone Text Transfer Language) to play melodies. Below are a few tunes you can incorporate into your automations to get started with the piezo buzzer (more here).
Mission Impossible
action: esphome.apollo_r_pro_1_w_34a020_play_buzzer
data:
  song_str: >-

mission_imp:d=16,o=6,b=95:32d,32d#,32d,32d#,32d,32d#,32d,32d#,32d,32d,32d#,32e,32f,32f#,32g,g,8p,g,8p,a#,p,c7,p,g,8p,g,8p,f,p,f#,p,g,8p,g,8p,a#,p,c7,p,g,8p,g,8p,f,p,f#,p,a#,g,2d,32p,a#,g,2c#,32p,a#,g,2c,a#5,8c,2p,32p,a#5,g5,2f#,32p,a#5,g5,2f,32p,a#5,g5,2e,d#,8d
Super Mario Bros
action: esphome.apollo_r_pro_1_w_34a020_play_buzzer
data:
  song_str: >-
    smb:d=4,o=5,b=100:16e6,16e6,32p,8e6,16c6,8e6,8g6,8p,8g,8p,8c6,16p,8g,16p,8e,16p,8a,8b,16a#,8a,16g.,16e6,16g6,8a6,16f6,8g6,8e6,16c6,16d6,8b,16p,8c6,16p,8g,16p,8e,16p,8a,8b,16a#,8a,16g.,16e6,16g6,8a6,16f6,8g6,8e6,16c6,16d6,8b,8p,16g6,16f#6,16f6,16d#6,16p,16e6,16p,16g#,16a,16c6,16p,16a,16c6,16d6,8p,16g6,16f#6,16f6,16d#6,16p,16e6,16p,16c7,16p,16c7,16c7,p,16g6,16f#6,16f6,16d#6,16p,16e6,16p,16g#,16a,16c6,16p,16a,16c6,16d6,8p,16d#6,8p,16d6,8p,16c6
mode: single
Star Wars
action: esphome.apollo_r_pro_1_w_34a020_play_buzzer
data:
  song_str: >-
    star_wars:d=16,o=5,b=100:4e,4e,4e,8c,p,g,4e,8c,p,g,4e,4p,4b,4b,4b,8c6,p,g,4d#,8c,p,g,4e,8p
The Good, The Bad and the Ugly
action: esphome.apollo_r_pro_1_w_34a020_play_buzzer
data:
  song_str: >-
    GoodBad:d=4,o=5,b=56:32p,32a#,32d#6,32a#,32d#6,8a#.,16f#.,16g#.,d#,32a#,32d#6,32a#,32d#6,8a#.,16f#.,16g#.,c#6,32a#,32d#6,32a#,32d#6,8a#.,16f#.,32f.,32d#.,c#,32a#,32d#6,32a#,32d#6,8a#.,16g#.,d#'
Indiana Jones
action: esphome.apollo_r_pro_1_w_34a020_play_buzzer
data:
  song_str: >-
    'Indiana:d=4,o=5,b=250:e,8p,8f,8g,8p,1c6,8p.,d,8p,8e,1f,p.,g,8p,8a,8b,8p,1f6,p,a,8p,8b,2c6,2d6,2e6,e,8p,8f,8g,8p,1c6,p,d6,8p,8e6,1f.6,g,8p,8g,e.6,8p,d6,8p,8g,e.6,8p,d6,8p,8g,f.6,8p,e6,8p,8d6,2c6'
Here’s how it sounds like in the Apollo MSR-2:
Reduce Database Reporting
The Apollo R PRO-1 (and the MSR-2 and MTR-1) have a setting with their latest firmware called Reduce DB reporting. It’s a simple toggle which removes the energy level sensors and reduces Wi-Fi and HA database spam.
While you are setting up and fine-tuning the sensor (detection zones and gate thresholds), keep this setting disabled. Once you are done and confident the R PRO-1 operates well, enable the toggle to prevent useless data from being saved in the HA database. Alternatively, eliminate sensors you don’t need from the recorder completely!
Relevant: Understanding Home Assistant’s Database and Statistics Model
Which Sensors to use in Automations?
Since the Apollo R PRO-1 exposes so many entities in Home Assistant, it can get overwhelming to decide which sensors to use in automations. Some of them serve very similar functions, but there are small variations that can result in large differences.
To simplify things, I made a list of the sensors useful for different automations:
- Fastest for initial triggers without zones (e.g. turning on lights):
- LD2412 Moving Target
- Fastest for initial triggers with zones (e.g. turning on lights):
- LD2450 Zone-1/2/3 Moving Target Count (moving targets only) OR
- LD2450 Zone-1/2/3 All Target Count (moving or static targets) OR
- Best for static presence without zones (e.g. keeping lights on)
- LD2412 Presence (moving or static targets)
- LD2412 Still Target (static target only)
- Best for static presence with zones (e.g. keeping lights on)
- LD2450 Zone-1/2/3 All Target Count (moving or static targets) OR
- LD2450 Zone-1/2/3 Still Target Count (static target only)
Please remember, there are many ways to use the Apollo R PRO-1 multisensor and this is just my opinion. The detection distance and target angle sensors are also accurate enough to be used as triggers in more advanced automations.
Apollo R PRO-1 Performance and Testing
Just like every other presence sensor I review, I mounted the Apollo R PRO-1 in my office, on top of my PC case. This gives the device a large field of view and I was able to test it properly. The LD2450 multi-target tracking radar was of no interest to me this time, since I have been using it for a long time in the MTR-1 and I’m aware of its capabilities. My main interest was finding out if there was a measurable difference between the LD2410, used in the Apollo MSR-2, and the LD2412, used in the Apollo R PRO-1.
Hi-Link, the company that produces these mmWave radar modules, clearly states on their website that the LD2412 is an upgrade over the LD2410 in several ways. On paper, the LD2412 has a wider detection angle (-75° to 75°) and a farther detection distance (up to 9m). Compared to the LD2410 (-60° to 60°, up to 6m) this is about 25% difference in detection angle and a 50% difference in detection distance.
I tinkered with the LD2412 and LD2410 for a full day and was able to conclude the following:
- Both sensors are excellent at detecting static presence quite reliably. The LD2410 max distance, in my experience, floats around 5 meters, while the new LD2412 peaks at about 7 meters. This performance requires tweaking each individual Gate of the sensors, especially the end ones.
- Both sensors are very fast at detecting initial triggers (motion). There is no difference between the two in performance terms; the only difference being the distance. The LD2410 triggers at about 6 meters while the LD2412 picks me up at about 8-8.5 meters.
- In my space, there was a very small difference between the detection angle (cone) of the two sensors. I was unable to replicate the 20% percent difference from their spec sheets in real-life usage, as both performed very similarly when benchmarking at about 4-meter distance.
In summary, the LD2410 and LD2412 are both great at doing what they are meant to do: static presence detection. If you have a large room, the LD2412 (Apollo R PRO-1) will be a better match. If you have a smaller room, the LD2410 (Apollo MSR-2) will do perfectly fine.
Summary
The Apollo R PRO-1 is an excellent presence multi-sensor with dual mmWave radar modules that does it all. It tracks multiple targets in three detection zones (LD2450) and monitors for static presence (LD2412), covering every possible use case you would ever need.
Just like other Apollo sensors, its CO2 sensor, UV and light sensor, temperature and humidity sensor, RGB LEDs, and Piezo buzzer make the R PRO-1 a very feature-rich device beyond just detecting occupancy in a room. The ceiling and gang box kits open up a lot of mounting possibilities too, and by including a PoE connector, the Apollo R PRO-1 becomes a great all-rounder.
In summary, if you need to track multiple targets in several detection zones, get the MTR-1. If you need to track a single target without zones, get the MSR-2. If you need both, go for the R PRO-1. Here’s where you can get them:


Alternative links:
Apollo R PRO-1 Domadoo (EU)
Apollo MSR-2 Domadoo (EU)
Apollo MTR-1 Domadoo (EU)


Did you receive a free review copy? You didn’t discuss the price, the PRO-1 is very expensive.
My reviews focus on the technical side of things. I rarely discuss price because it’s a personal threshold. What might be expensive for you, might not be for someone else.
Yes, the R PRO-1 is a review sample, which does not change things one bit.
Thanks for the feedback!
The Apollo R PRO-1’s price is primarily due to the PoE components and the multisensor package. Beyond the mmWave functionality, you’re also getting USB-C, Ethernet, Wi-Fi, addressable RGB LED, piezo buzzer, LUX sensor, UV sensor, and Bluetooth tracking. It’s really a multisensor device rather than just an mmWave sensor.
As a small team of community members who handle all the design, engineering, and final assembly in-house, we’re competing in a pretty niche space. There are only two other PoE mmWave sensors we’re aware of. One is a few dollars cheaper but only does mmWave sensing, and it does not fit in a gang box or ceiling mount. The second option is actually more expensive than ours, and can only be ceiling mounted.
We are happy to answer any questions!
Best,
Justin
I agree that the purchase price for Apollo’s devices initially made me pause especially given the less-than-appealing colour and design of the cases. (Note to Justin@Apollo re ‘niche’ – if you want to improve sales to home automation users other than nerds like me, some non-beige, non-boxy designs might work wonders, along with recessed and right-angled connectors and cable routing. You might try asking your significant others who are not smart home geeks whether they’d like to have that living on the coffee table as well!)
On the other hand, while I could create the same functionality on vero or short-run custom PCB and either write my own ESPHome configuration or mooch Apollo’s, once I factor in the cost of sourcing all the components (and the PCBs if going that way) and the time and effort for the layout, assembly & BBU not to mention the 3D model and the 3D-printer consumables (assuming I had access to a 3D printer which I don’t yet) then the extra 10-30 bucks/quid/euros starts to look like a reasonable sum to save hours of my time and layers of skin on my fingers. (Despite decades in the embedded design game, I’m still terrible at soldering & SMT (re)work!)
As a bonus, because it’s ESPHome, you know it’s is immune from the manufacturer dropping support & upgrades in favour of the next new thing.
NB While I don’t always agree with SHS about everything, his reviews appear to me to be unbiased and accurate. My deep jealousy of all the free stuff he gets is another matter! 😉
Why wouldn’t you just use the “Presence” property to detect presence rather than all the ones specificed? is this property slower?
It’s a hybrid between the two, changing state only when both are clear. There are instances when you need a moving target automation, others when you need static one.
Man your site rocks!,
Have you seen the Everything Presence software update?, I’m really struggling between Apollo and Everything Presence, which do you think is the most complete in terms of zones, accuracy or best overall? (pricing apart)
Keep it up! big fan!
Hey man,
That update from Lewis is incredible! Really boosts up the EP1/EPL.
You can achieve the same thing with Apollo’s sensors, but that UI does make things easier. Perhaps you can use it with either sensor with som tweaking?
In terms of performance, they are both great and work really well. If you like PoE, the PRO-1 can’t be beat. It’s also a combo sensor, great for static presence and zones/tracking.
You can’t go wrong with either one.
Hi, is it possible to buy a square mounting kit?
Any chance that the reviews could include presence detection differences for humans and pets?
Still on the fence of investing because of constant triggers due to the cats walking about…
Hey Glenn,
I don’t have any pets, so I can’t truly test this in a real-world scenario.
My feedback would be irrelevant.
With that said, you can try to work your way around pets by adjusting the sensitivity, creating zones, mounting the device aimed away from the floor etc.
It’s a highly scenario-specific thing that you have to test and set up yourself.
Cheers!
Ok, thanks for the details though 🙂
This product is not ready for prime time. The LD2450 sensor consistently has ghost targets when in target tracking mode. I worked for day on settings trying to eliminate them. Had to turn off target tracking. The readings fluctuate significantly and will turn off presence every few minutes. Thus the need for LD2412 to be working correctly.
The Bluetooth configuration tools are useless for finding no occupancy energy levels. You have to be within about 6 ft of the sensor with your phone. Hard to be out of the room and still within 6 ft.
The LD2412 is even more useless. It has lots of settings for all the gates, but the noise in the readings excessive. The average difference in energy reading between when I am sitting in the room and out of it is at most a few percentage point. The random changes in reading for many of the gates is 20%-40% if not more. Makes it next to impossible to find settings that will turn off presence within several minutes, let alone my target of 30 seconds.
While LD2412 documentation is lengthy it is still incomplete. How many gates need to be over/ under threshold to trigger presence/not present. What do the total energy reading for moving and still need to reach? How is that total calculated from the individual gates?
This product is not ready for prime time
Update on things. The problems with LD2412 turned out to because the one I had was defective. Apollo support suspected it was defective and supplied a new one. Once received it me less than 90 minutes to properly tune it to my environment. Random changes were gone. Still energy readings were 100% at the appropriate gates. It was quit easy to tune it. Now both sensors detect when I am in the office and both detect when I am out. Using both of them I have not had any false alerts in the last two days.
Apollo automation support was actually helpful, quite a bit different from what I typically find. They responded to my e-mail ticket in a timely manner. Responses were also timely. I was not asked to jump through a lot useless hoops. I gave them complete and detailed answers. They did not treat me like uneducated idiot, as many support staffs do. I think they knew there stuff, rather than mindless reading off scripts. So a big thumbs up for the Apollo support team.
Glad you had it resolved!
And to be perfectly honest, I don’t expect anything less from Apollo.
Those guys are very down to earth, very consumer friendly, HA enthusiasts like you or me.
They devices are great and as you experienced, their support as well.
Which is why I keep recommending them to SmartHomeScene readers.
Cheers!
It is a fast sensor, but when using poe it becomes very hot: 70-78°C. I decided to use external Poe splitter to Ethernet and usb-c and now temperature is about 55°C and consumes 2,4 watt instead of 3.2Wt.