Alarmo is a custom integration developed by dev nielsfaber capable of creating a DIY alarm system out of your existing sensors in Home Assistant, featuring an easy-to-use user interface. The built-in UI is the main trait setting it apart from the Manual Alarm Control Panel integration, which works only with YAML.
Alarmo consists of 3 main components:
- Alarmo Component: a custom component for HA that controls the states of the alarm panel entities
- Alarmo UI: a GUI for configuring the settings of your alarm (sensors, delays, actions etc.)
- Alarmo Custom Card: a custom card for arming / disarming the alarm.
Alarmo features
Besides a built-in UI, Alarmo has several other features which make it a powerful custom component for securing your premises with Home Assistant.
- Supports splitting up your house security system into multiple areas which can be armed independently.
- Setting up multiple users with individual pin codes and permission levels.
- Can set up to 5 arm modes (armed_away, armed_home, armed_night, armed_vacation, armed_custom_bypass), each with configurable delays and security perimeter.
- Built-in actions: receive push notifications when anything changes in the alarm, activate a siren when the alarm is triggered, etc.
- Alarm Master entity meant for operating your areas synchronously.
Your eligible binary_sensors entities are automatically added in the Alarmo control panel.
Prerequisites
In order to create an alarm control panel system with Alarmo, you need to have a few things already setup with Home Assistant:
- Working HA instance
- binary_sensor sensor entity (Door and Window sensor, Motion sensor etc.)
- (Optional) Speaker, phone, siren to sound the alarm when triggered
Installation
- HACS:
In the HACS panel, go to integrations and click the big orange ‘+ Explore and download repositories’ button. Search for ‘Alarmo’ and click ‘Download this repository with HACS’. - Manual:
Download the latest release (https://github.com/nielsfaber/alarmo/releases) as a zip file and extract it into the ‘custom_components’ folder in your HA installation.
Creating an Alarm Control Panel
Once you have installed the Alarmo custom component, we can continue in creating our first alarm system. Open the Alarmo control panel from the HA sidebar. You will be greeted with an UI organized in 4 tabs:
- General
- Sensors
- Codes
- Actions
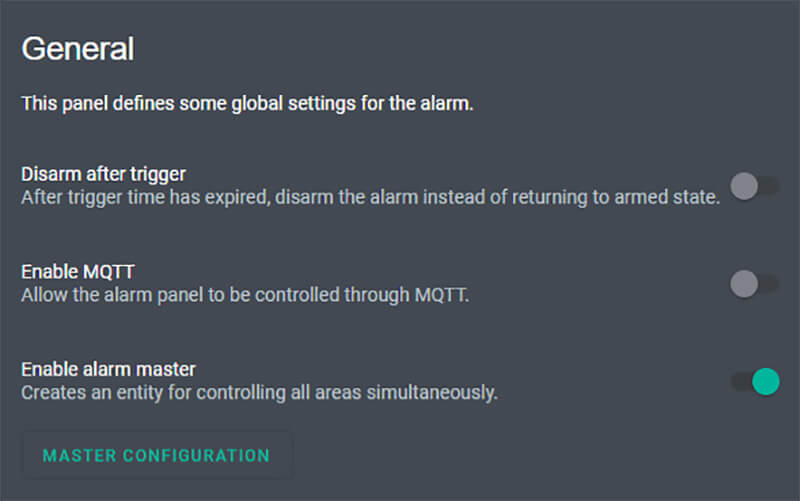
General Tab
Within the General Tab, you can toggle the Disarm after trigger option to disarm the alarm instead of returning to armed state once the timer has expired. The next toggle is to enable MQTT control of your alarm entity, for users who want to publish MQTT topics for arming/disarming the alarm system. If you toggle Enable alarm master, you are configuring the master control panel for all your alarm control panel entities. You define its name by clicking Master Configuration.
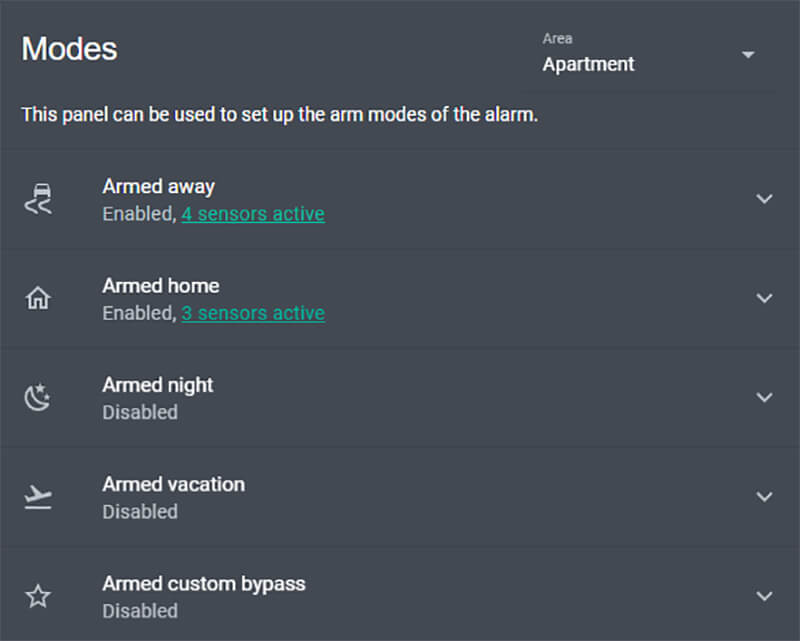
In the Modes section, you can fine tune each of the available arm modes of the alarm. For the 5 available modes (armed_away, armed_home, armed_night, armed_vacation, armed_custom_bypass) you set the following parameters:
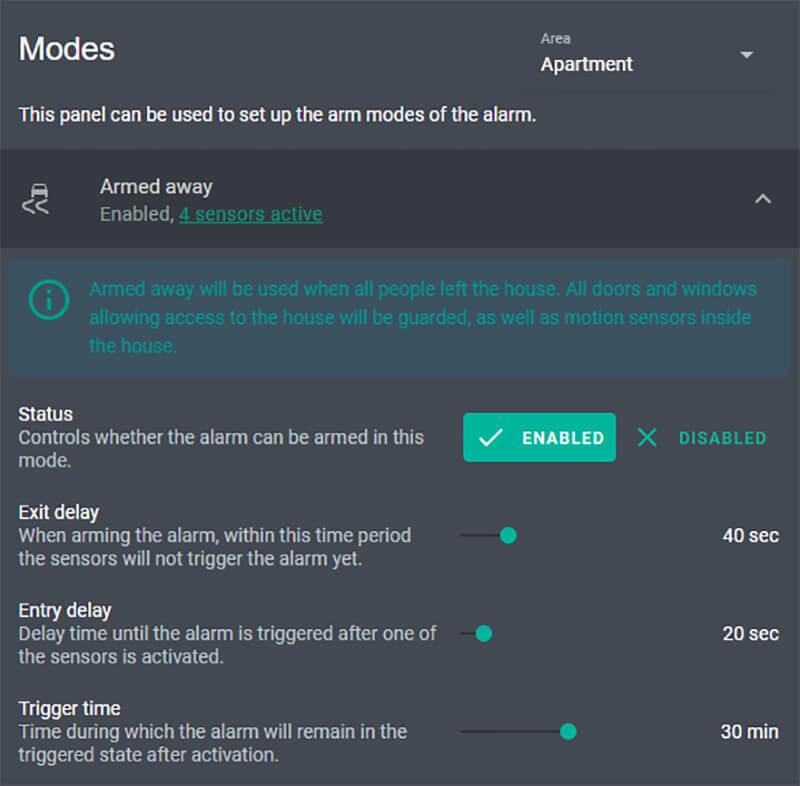
- Status: Enable of Disable the Mode
- Exit delay: Set a delay when you arm the alarm, allowing you to exit the area without triggering the sensors
- Entry delay: Set a delay when the alarm is triggered, so you can enter and disarm the alarm without triggering the siren/speaker
- Trigger time: Set a time for the alarm to remain in triggered state or until disarmed
You can fine tune each of these modes, or completely create your own using the armed_custom_bypass mode.
Further down, you will see an Area section. Here, you can define different sections and assign them different sensors. For example, Apartment, Entryway, Garage etc.
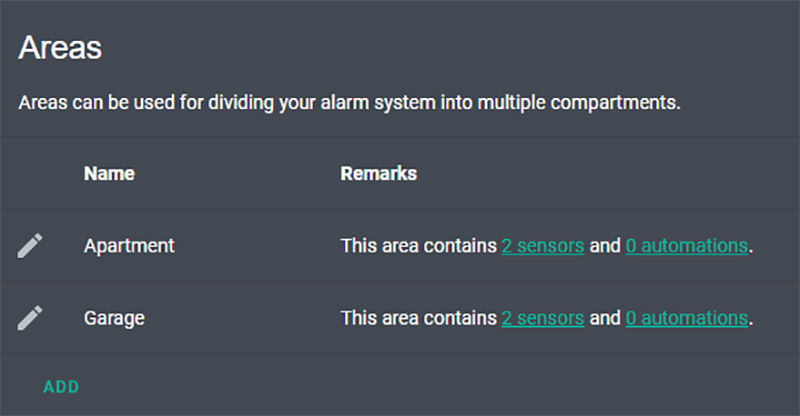
For the purpose of this tutorial, we created two areas: Apartment and Garage
Sensors Tab
By default, Alarmo adds all your sensors from the binary_sensor domain and lists them in this tab. You can use the toggle to completely enable/disable an individual sensor.
Once you click on a sensor, you can set its availability for individual areas, enable it for a specific mode or add it in a group for combined triggering. If you expand the Advanced settings dropdown menu, you will see some additional options:
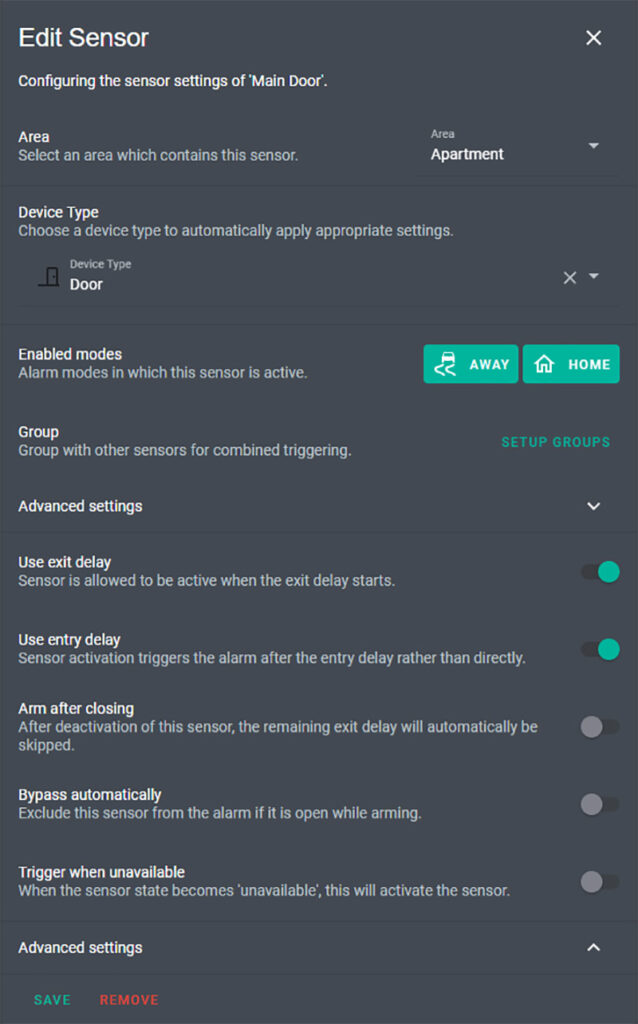
- Use exit delay: Sensor is allowed to be active when the exit delay starts.
- Use entry delay: Sensor activation triggers the alarm after the entry delay rather than directly.
- Arm after closing: After deactivation of this sensor, the remaining exit delay will automatically be skipped.
- Bypass automatically: Exclude this sensor from the alarm if it is open while arming.
- Trigger when unavailable: Prevent tampering of the sensor and trigger if it becomes unavailable
Codes Tab
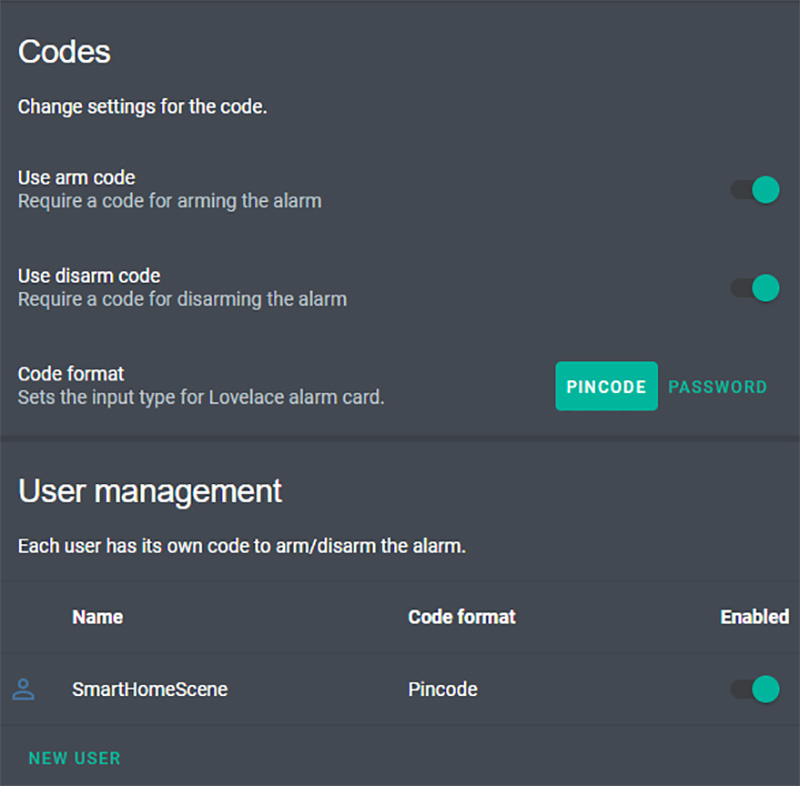
In this tab, you can create and manages Arm/Disarm codes for your alarm control panel. You can set if a code is required when arming, disarming or not at all. Two code formats are available: PIN or Password.
Further down, in the User Management section you create new users and fine tune their ability to control the alarm individually. If you click on a user, you will be presented with the following settings:
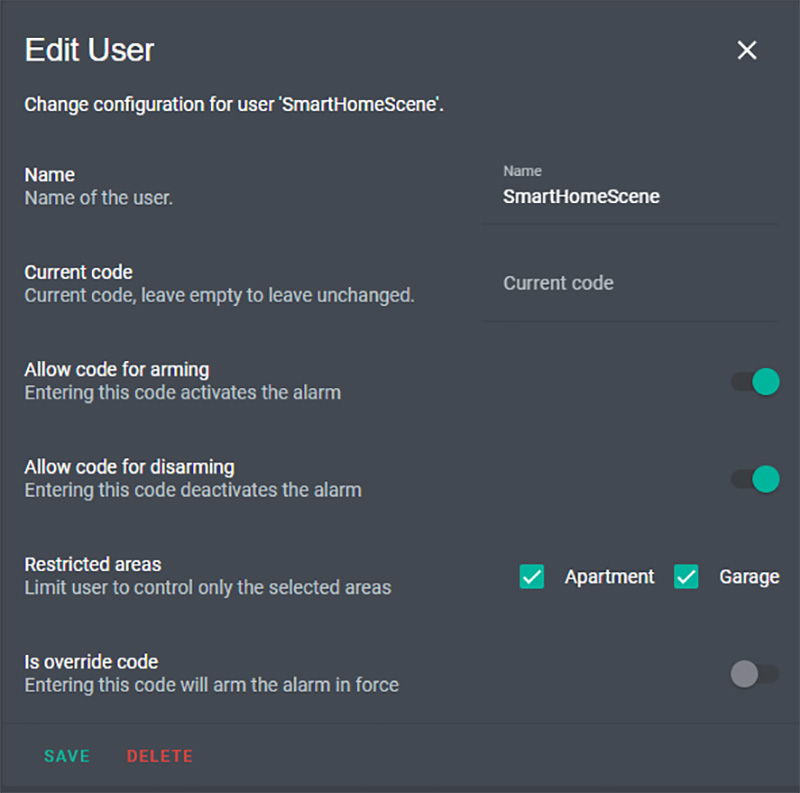
- Name: Name of the user
- Current code: Code of the user
- Allow code for arming
- Allow code for disarming
- Restricted areas: Limit user to control only the selected areas
- Is override code: Entering this code will arm the alarm in force
These settings are pretty much self-explanatory, and allow you to set individual user credentials and level of control in your alarm system.
Actions Tab
The Actions tab is used to create an automation to define what happens when a specific alarm is triggered, armed or disarmed. This tab is divided in two sections:
- Notification: Used to setup notifications for your phone, speaker etc.
- Action: Used to control an entity’s state when the alarm state changes (turn on light etc.)
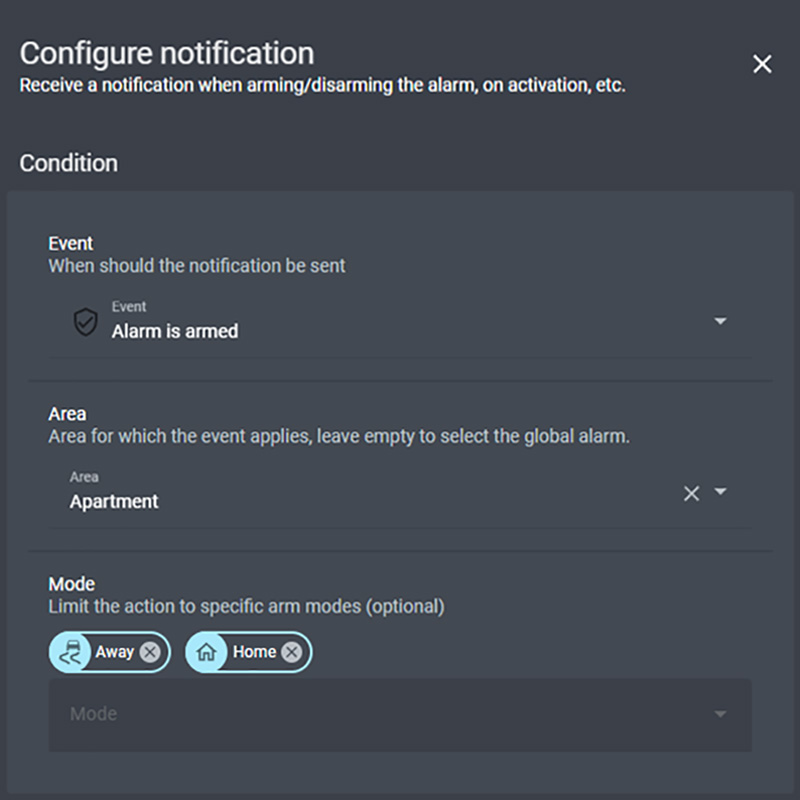
When creating a new notification, first we define when will the notification be sent. When the alarm is triggered, armed, disarmed etc. Than we define our applicable Area and Mode. In the Target section, we select the entity we want the notification delivered to: mobile phone, google speaker and configure it’s body. You can name the notification in the Options section at the bottom.
When creating a new action, the same flow is followed. We define what is the trigger of the notification, applicable Area and Mode. In the Task section, we select the entity we want controlled and select an appropriate action. Turn On/Off, Toggle etc. You can use YAML mode to gain more control over the action performed. You can name the notification in the Options section at the bottom.
Note: The actions tab is specifically designed for an alarm system integrated with Alarmo. If you want more control, you can use Home Assistant’s native automations to gain more flexibility.
TTS Announcements
Using the built-in Alarmo UI, we can easily created TTS announcements to be broadcast when the alarm state changes. You can use any TTS service you have setup with Home Assistant. If you have no TTS service integrated, we have covered the difference between Google Say and Google Cloud in a previous article.
- In the Actions tab, first we select “New Notification”
- Under the Condition section, we input event, area and mode applicable for the notification.
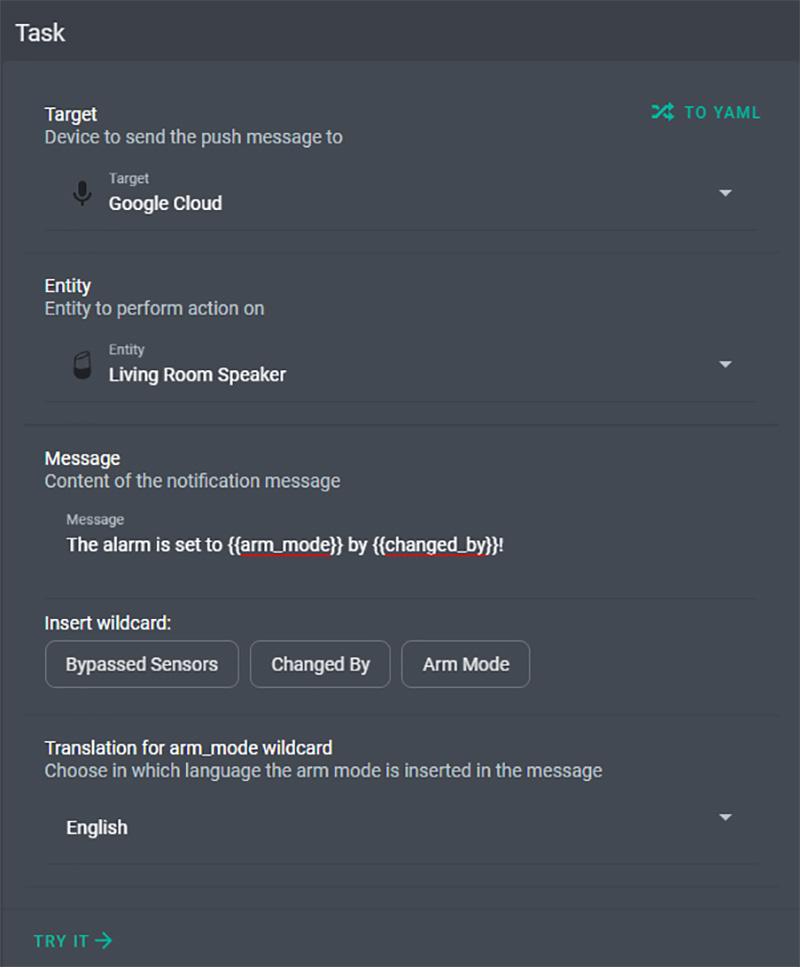
- Under the Task section, for target we select a TTS service to broadcast the message: Google Say, Google Translate etc.
- In the entity field, we select any TTS enabled entity, such as a living room speaker, tv speaker etc.
- In the message field, we type in what we want the speaker to announce: “Alarm disarmed”, “Alarm triggered” etc. You can use wildcards here for dynamic notifications
Optionally, you can add a description to the automation at the bottom and click save.
Entity Actions
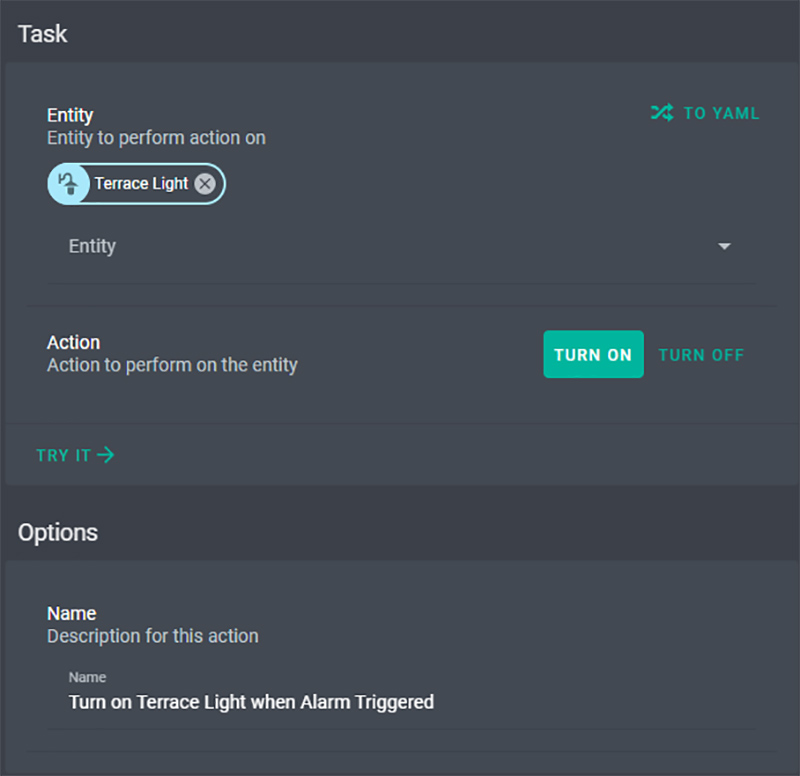
To further add security for our alarm system, we can create some entity actions in the UI, to be executed during alarm events. For example, we can turn on a group of lights when the alarm is triggered:
- In the Actions tab, click on “New Action”
- Under the Condition section, we input event, area and mode applicable for the notification.
- Under the Task section, we select an entity we want to control
- In the Action field, we select which action should be executed when conditions are met

Note: Alarmo currently supports entities from domain group, switch, input_boolean, light, script only. But considering the nature of the script domain, there are many things you can achieve using this method.
For example, in my alarm system I use the Neo Tuya ZigBee 90db siren, which has 10 different sounds and selectable volume for different use cases. I would definitely recommend this siren, as it works perfectly with HA and is loud enough to scare away any trespassers or burglars.
Actionable notifications
Creating basic notifications using the built-in UI in Alarmo is a simple task. Just as the TTS tutorial above, except instead of a TTS service you select your mobile device and style its body.
Actionable notifications are also supported in Alarmo, but require a little bit of YAML added to the task section. Three actions are available for actionable notifications:
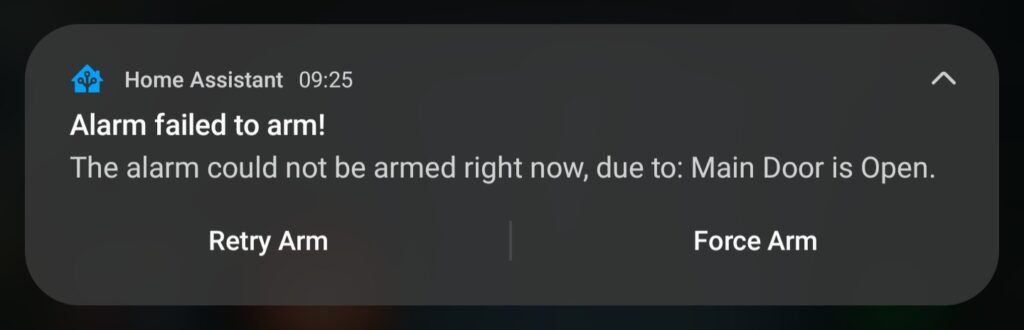
- alarmo_retry_arm: Repeat the same command. Will only arm when the sensors blocking the arming have been cleared
- alarmo_force_arm: Force arm the alarm ignoring any obstructing sensors
- alarmo_disarm: Disarm the alarm
In the Task section, switch to YAML mode. For failed to arm event, add the following code to receive an actionable notification.
service_data:
message: 'The alarm could not be armed right now, due to: {{open_sensors}}.'
title: Alarm failed to arm!
data:
actions:
- action: alarmo_retry_arm
title: Retry Arm #You can change this
- action: alarmo_force_arm
title: Force Arm #You can change this
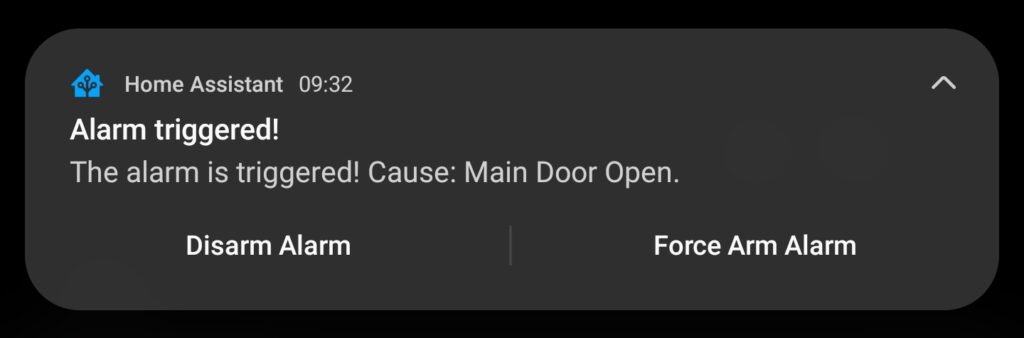
service: notify.mobile_app_s21ultraIf we want to create an actionable notification with a Disarm action, we can add the following code for the Alarm triggered event:
service_data:
  message: 'The alarm is triggered! Cause: {{open_sensors}}.'
  title: Alarm triggered!
  data:
    actions:
      - action: alarmo_disarm
        title: Disarm Alarm #You can change this
      - action: alarmo_force_arm
        title: Force Arm Alarm #You can change this
service: notify.mobile_app_s21ultra
If everything was setup correctly, you should receive two Actionable notifications when the appropriate events are completed:
Third party Integration
The Alarmo custom component can be operated through third-party platforms such as Google Home and Apple HomeKit. There are some limitations, but you will be able to control your alarm system with your voice if setup correctly.
Google Home
If you’ve integrated your Home Assistant with Google’s Home Assistant, you can control Alarmo by exposing it’s entities to the integration. Make sure to configure the google assistant integration to expose the alarm_control_panel domain and set the secure_devices_pin variable to your alarm pin:
google_assistant:
  secure_devices_pin: 1234 #Identical to a user code in Alarmo
  report_state: true
  exposed_domains:
    - alarm_control_panel
  entity_config: #Or expose only a specific entity
    alarm_control_panel.apartment:
      expose: true
      room: Home
If you cannot see your alarm in the Google Home app, you need to issue a “Sync my devices” voice command to Google Assistant. You can use voice commands to arm/disarm the alarm. In case you use a PIN, google will ask you to spell it before issuing the command. On some devices, such as a Nest Hub, a keyboard will appear to enter the code by hand. You can also set routines in the Google Home app, for automatic arming/disarming of the alarm.
Apple Homekit
If you’ve integrated your Home Assistant with Apple’s Home Kit, you can control Alarmo by exposing the alarm entities to the integration. Alarmo entities are of type alarm_control_panel, so make sure to configure the homekit gateway in HA to have these included. The alarm should now automatically become visible in Homekit, with the current state visible together with the possibility to arm and disarm. If you use a code for your alarm, you need to setup Home Kit in YAML mode. See instructions HERE.
homekit:
  - filter:
      include_domains:
        - alarm_control_panel
    entity_config:
      alarm_control_panel.apartment:
        code: 1234 #Identical to a user code in Alarmo
The Homekit gateway has the following limitations:
- The arm modes custom and vacation are not visible in Homekit.
- Alarmo allows enabling/disabling arm modes ‘on the fly’, however it is needed to restart HA (or reconfigure Homekit via HA) before this becomes effective in Homekit.
- In case arming fails, the alarm tile in Homekit will stay in ‘arming…’ state indefinitely.
- Homekit will not show the pending state, so it is not possible to identify when the entry delay is effective.
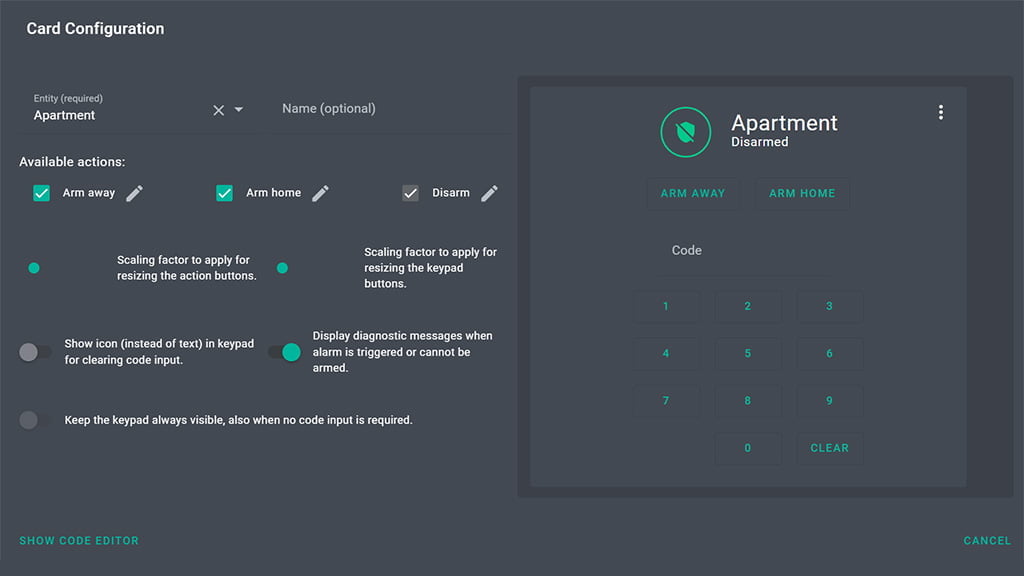
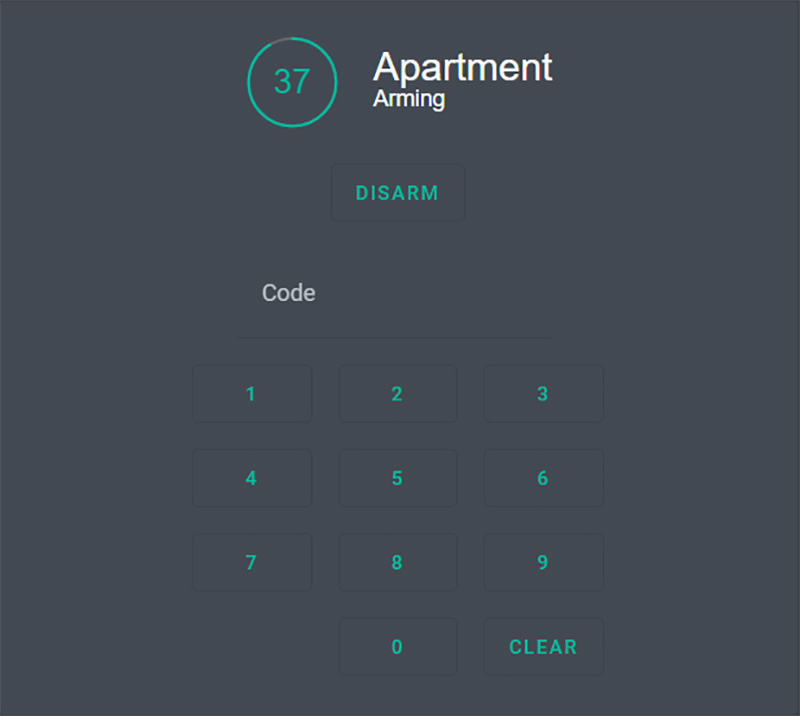
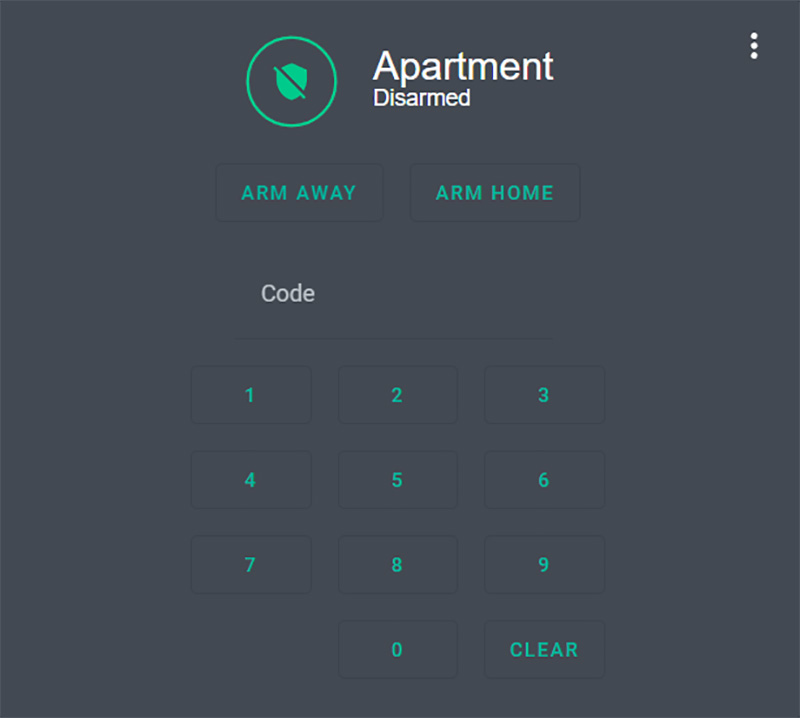
Alarmo Card
Alarmo offers a special alarm control panel custom card, which you can install via HACS to customize your dashboard for easy access. This is an optional step, but is recommended because it offers some extra functionality on top of the standard alarm panel card, such as countdown timer for exit / entry delay and feedback messages with sensor(s) causing the alarm to be triggered or unable to arm.


Is it possible to use mine and my wife iPhones as presence sensors to arm/disarm the alarm? New users, coming from SmartThings. In ST I was able to set up an alarm that would arm when both our phones were away, then disarm if one or both returned home, and not arm if we both left but there remained motion on certain motion sensors, in case we had guests.
Thanks!
Yes, you can create an alarm that would arm this way. You need to setup a conditional automation, in which you would define an absolute condition which unless satisfied, whill not trigger the automation.
The two phones beeing home is the condition.
You can setup a wi-fi based presence detection, bluetooth or gps (area).
In general, if you can do it in smart things, you can do it in Home Assistant.
Cheers and thanks for reading!
can I use a physical keypad along with the alarm keypad card? I have a ZigBee one that I’d like to add into it
Yes, you can use it to input your arming code and setup other automations to respond to the buttons!
What’s the make/model please? Did you use it with Alarmo? Would you still recommend the keypad?
I have a eufy security keyless entry – I’ve got it integrated into HA with an integration/addon from fuatakgun. it seems to let me see the lock/unlock state of the door, but not the key presses. Safe to assume THOSE buttons wouldn’t work as a trigger?
Hello Ben,
I’m not sure what kind of entities your integration exposes to HA. I can see from the github page it has its own service calls, which can be used as a trigger:
– alarm_arm_home / alarm_arm_away / alarm_disarm / alarm_guard_schedule (requires configuration on eufy app) / alarm_guard_geo (requires configuration on eufy app)
Send me an email with some screenshots of the entities and what you are trying to achieve, I will try to help you.
Cheers,
admin@smarthomescene.com
Just now saw this reply (sorry for the delay!) … I haven’t yet fully set up alarmo (this webpage has remained open in my browser for going on a month now). I’m not yet sure what I’m trying to do, to be honest. I’ve got a Eufy doorbell camera, and at the same door, their wifi keyless entry. That door also has a contact sensor, as do the two nearby windows. The only other entry/exit points on that floor are in the kitchen: the backdoor and a window (both with contact sensors). There’s also another Eufy camera (floodlight variety) out the backdoor.
Upstairs is still a work in progress – there’s 4 windows that I need to put contact sensors on (I have the sensors, I just haven’t gotten around to putting them in place). There’s an impossibly small window in the basement that I’m not sure I can even reach, let alone figure out how to put a sensor on, but that would be the only other spot.
I’ve got a wall-mounted tablet near the front door, and though it’s not currently configured to have the alarmo card, I imagine I could probably do that as a conditional card in it’s own view.
I guess I’m just trying to figure out how to best utilize this. Do I invest in a zigbee siren (gogo AliExpress!)? Do I need indoor security cameras (even despite hating their app, I picked up 2 indoor blink cameras dirt cheap on Woot.)? Any suggestions or guidance would be most appreciated.
Thanks for taking the time to read this.
Hello Ben,
Seems like you have a lot of devices in place to start off designing your own security system.
I would recommend the following for your case:
1. Use Alarmo, it will significantly streamline the process and make it easier
2. Use all contact sensors as security triggers
3. Develop different automations for each point of entry (minimize the point of failure)
4. Have the security cameras rolling all the time, but don’t rely on their object detection as a trigger unless you have Google Coral and use Frigate NVR
5. Invest in a good ZigBee siren (WAIT on this I got a great review coming)
6. Add a few motion sensors to critical spots and use those as a trigger as well (doubles your security)
7. IMPORTANT: Solidify your ZigBee mesh network! You don’t want your entire system failing because you have a weak ZigBee network, so add as many routers as possible (cheap plugs)
Thats all I can think of for now,
If you want to continue this conversation please send me an e-mail admin@smarthomescene.com
Cheers!
Tossed you an email. 🙂
Hi there,
I have two questions about actions:
-Getting this errors pasting the code above on action/trigers – required key not provided @ data[‘message’]
-How can I make a script that runs in actions?
I have the following script that turns off two lights but can’t make it work on tasks. Anithing wrong with it?
alias: CONTROLO Lamp Baixo OFF
sequence:
– type: turn_off
device_id: xxxx
entity_id: light.l_cozinha_grande
domain: light
– type: turn_off
device_id: xxxx
entity_id: light.l_cozinha_pequena
domain: light
mode: single
Hello AT,
You have structured your automation wrong. The data key is required when defining an action:
description: ""mode: single
trigger: []
condition: []
action:
- service: light.turn_off
data: {}
target:
entity_id: light.dining_room
Cheers
Hello,
What is the procedure to follow to integrate Visonic detectors with Alarmo?
Thanks.
Hello Jose,
Alarmo does not care where you sensors come from. So, if you integrate Visonic detectors into Home Assistant, you can use them in Alarmo without any issues as triggers.
See this site: https://github.com/davesmeghead/visonic
Cheers,
Shs
One of the best blogs have I read. Thanks for giving us such a great blog
Thank you for the feedback!
Nicely written blog. Any idea on how to expose the “user” (from Alarmo User Management) in a pyscript trigger action for the alarmo alarm control panel? I can see the user listed in the HA log, but it isn’t directly available in the kwargs that are passed to my python function. It might be in the context object somewhere but I’m not sure where.
Figured it out. The entity attributes (state variables) are exposed via the state.get method in pyscript. So, for example to get the user its state.get with the specific variable (in this case alarm_control_panel.alarmo.changed_by)
I do wonder the potential safety concerns using this as a solution apposed to a DIY security system such as abode or ring? I am currently pondering this at the moment.
If you develop a way of ensuring Home Assistant runs without hiccups, don’t update at initial releases, turn off auto-updates, Alarmo can be very stable.
However, it is still a DIY solution. It will still require some maintenance and setup.
Devices in the system will have to be checked often to ensure their correct operation.
Try it and see, doesn’t cost a thing 🙂
Alarmo is case-sensitive, which is why the notification does not work when you press force alarm. Instead, you have to write the actions in capital letters like this:
actions:
– action: ALARMO_RETRY_ARM
title: Retry Arm #You can change this
– action: ALARMO_FORCE_ARM
title: Force Arm #You can change this
The rest of this tutorial worked perfectly. Thank you very much
Hello. Tell me how to configure the configuration correctly. I use a dimmed light bulb as a light signal. When switching to the security mode, the light bulb is lit at 100%. How to make the light bulb burn at 5%.
The second problem. After disabling the security mode, the light bulb continues to burn!
Hello,
You need to send me some screenshots and code so I can help you.
admin@smarthomescene.com
Hi, just wanted to say thanks for the blog!
I also wanted to pick your brain, I currently have alarmo set up and running with one slightly concerning issue, I’m using a android tablet by the front door displaying the alarmo card on my dashboard.
So whenever the alarm is armed using a code, the code stays in the text box and then the next person to come through the front door (housemate or a potential robber 😅) can just press disarm and the alarm will disarm as the previous code is still there and wasn’t cleared after the arm.
I have searched online to see if anyone else has faced this issue but haven’t seemed to come across anyone. Any ideas on how to fix this would be really appreciated!
Hey,
Weirdest issues someone has ever described :)))
The first thing that comes to mind is caching issues. Are u using the Companion App? Are u using Fully Kiosk?
Clear the cache or reinstall the app completely and test again.
If the problem persists, try creating a popup card with the control panel using Browser Mod.
Let me know how it goes.
Cheers.
of course, just my luck haha.
I’m currently using the wall panel app
I’ll try and mess around with it tonight when I get home and let you know how I go
How do I have Alarmo notify multiple devices?
data:
message: “{{changed_by}} has Disarmed the Alarm.”
title: Alarm Mode.
service: notify.mobile_app_sm_g988u1
If you are using it’s editor, create a second action with the same service call but different device.
If you are using HA’s automation editor, list the devices in an array by selecting the notify service call.
There maybe other, better ways, this is off the top of my head.
Hi
I have a problem that alarmo panel is loading… all the time
Can I get your help to solve it. I am using the latest alamo and the latest HA
Thanks
Avi
Hello,
What do you mean loading all the time exactly?
the alarmo page doesn’t load and the only message a have is loading…
What theme are you using in those screenshots? I love the simplicity and contrast for a wall mount? Thanks!
Hey, it’s the Dark Teal Theme: https://github.com/aFFekopp/dark_teal