The Home Assistant ChatGPT integration connects GPT models directly to your smart home, turning Assist into a natural language interface for controlling devices, answering questions about your home, and running AI-powered automations. This guide walks through the full setup from getting your API key to putting ChatGPT to work inside Home Assistant.
What is the Home Assistant OpenAI Integration
The ChatGPT integration is officially called OpenAI in Home Assistant. That distinction matters because it sets expectations correctly. You are not connecting the ChatGPT app or your ChatGPT Plus subscription to Home Assistant. You are using the OpenAI API to bring GPT models into Home Assistant as a conversation agent, meaning the AI lives inside Assist and can see and control the devices you expose to it.
Once it is set up, you can talk to your home in plain language. Instead of building a specific automation for every scenario, you can say “turn off everything downstairs except the hallway light” and the model figures it out. You can also ask it what your sensors are reporting, request a status update on your home, or use it inside automations to generate context-aware notifications.
It works through the Assist API. Whatever entities you expose to it, those are what it can read and control. Nothing outside that scope is visible to the model.
What Can ChatGPT Do in Home Assistant
Before you commit to the setup, it is worth knowing exactly what this integration is capable of and where it stops. There are four distinct ways GPT models can work inside Home Assistant once the official integration is active.
Conversation agent
This is the primary use case. ChatGPT becomes the brain behind Assist. You type or speak a command, it processes the intent using the full capability of the GPT model, and it acts on your exposed devices. It handles requests well, understands context across a conversation, and can explain what it did and why. This is what most people install the integration for.
I have been testing it alongside Gemini to handle the kinds of requests that built-in Assist would reject or require sentences for. For instance, “Make the bedroom feel cozy” is not something local Assist can parse. With ChatGPT as the agent, it dims the lights, turns on the bedside lamp, and shuts off the ceiling light in one response.
AI Tasks
AI Tasks are a newer feature that lets your automations call GPT directly without going through Assist. You configure an automation action that sends a prompt to the model and uses the response as data inside the automation. The practical uses are things like analyzing a camera snapshot and generating a notification message that describes what the camera saw, or processing sensor data into a formatted summary.
This is meaningfully different from the conversation agent. AI Tasks run silently in the background as part of your automation logic, not as a back-and-forth conversation. The doorbell camera example is the one I use most: when motion triggers, a snapshot goes to GPT with the prompt “Briefly describe what you see, focus on people and vehicles,” and the response becomes the notification body. It takes a few seconds longer than a static notification, but the output is actually useful.
Speech-to-text
The OpenAI integration includes a Whisper STT subentry. If you add this to your voice pipeline, OpenAI handles the transcription of your voice commands instead of a local Whisper model. The cloud version is faster and more accurate on accented speech and unusual device names. The trade-off is that your voice audio leaves your local network with every command.
For most setups, local Whisper running on the same machine as Home Assistant is accurate enough and free. But if you are running into transcription errors on specific words, switching to OpenAI Whisper is worth trying.
Text-to-speech
The TTS subentry gives you access to OpenAI’s voice generation models for responses spoken back to you. The voices are significantly more natural than Piper, which is the default local option. If you have a Home Assistant Voice PE or any speaker set up as a voice assistant output, swapping in OpenAI TTS will make the spoken responses sound considerably better.
Again, every response is generated in the cloud, which has both cost and privacy implications.
Getting an OpenAI API Key and Setting Spending Limits
The integration requires a paid OpenAI API account. This is separate from a ChatGPT Plus subscription you use as a chatbot. You need an account on platform.openai.com, not chat.openai.com. Follow these steps:
- Go to platform.openai.com and create an account or log in
- Navigate to Settings > Billing and add a payment method to enable API access
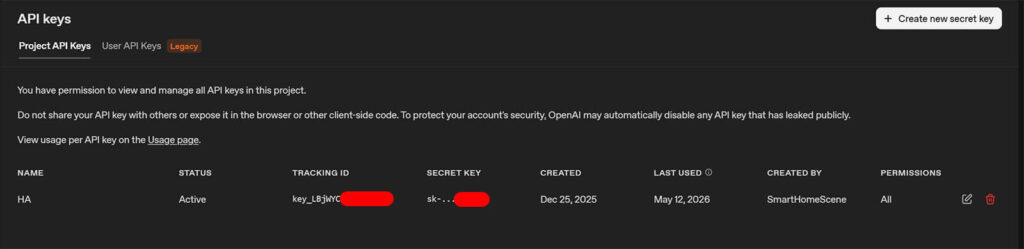
- Once billing is active, go to the API Keys page and click Create new secret key
- Copy the key immediately. You will not be able to see it again after closing the page
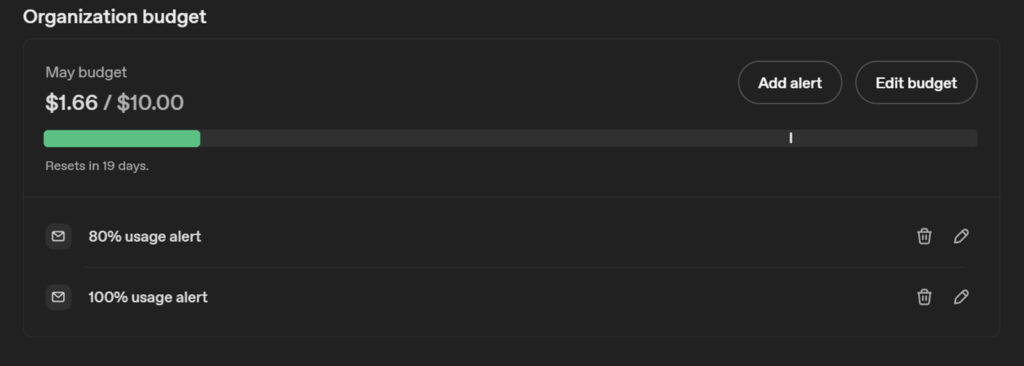
Before you move on, set a monthly usage limit in the Billing section of the OpenAI portal. A few dollars is enough to test the integration thoroughly and you can raise it once you have a feel for your actual usage.
The integration stops sending requests when the limit is hit rather than accumulating charges, which matters if you plan to run AI Tasks on frequently triggered automations. You can also set email reminders at different points to let you know how much you are using.
How to Install the Home Assistant ChatGPT Integration
Installing the official OpenAI integration in Home Assistant is simple and straightforward:
- Go to Settings, then Devices and Services
- Click Add Integration in the bottom right corner
- Search for OpenAI and select it from the list
- Paste your API key when prompted and click Submit
- Home Assistant will verify the key and complete the setup
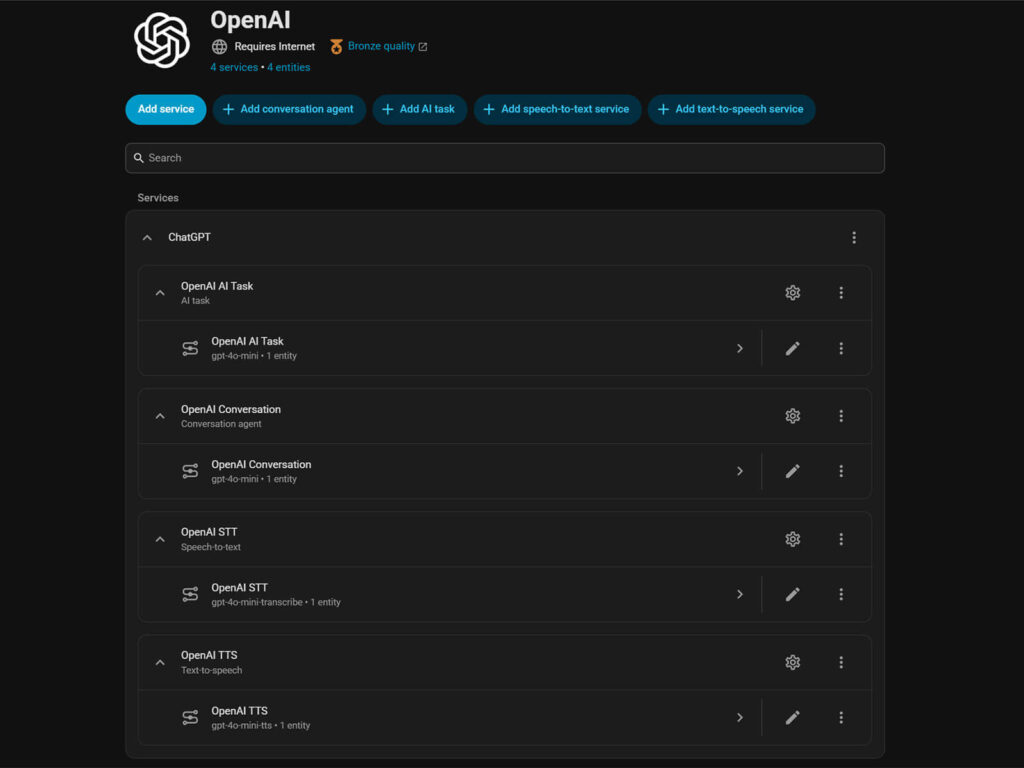
Once the integration is added, you will see it listed under Devices and Services with all four subentries already created: OpenAI Conversation, OpenAI AI Task, OpenAI STT, and OpenAI TTS. You do not need to add these manually.
How to Set Up ChatGPT as a Voice Assistant
The OpenAI integration is now installed, but ChatGPT is not your Assist agent yet. That requires one more step: creating a voice assistant pipeline that uses it. Follow these steps:
- Go to Settings, then Voice Assistants
- Click Add Assistant in the top corner
- Give it a name, something like “ChatGPT” or “OpenAI Assistant“
- Under Conversation Agent, select the OpenAI entry you just created
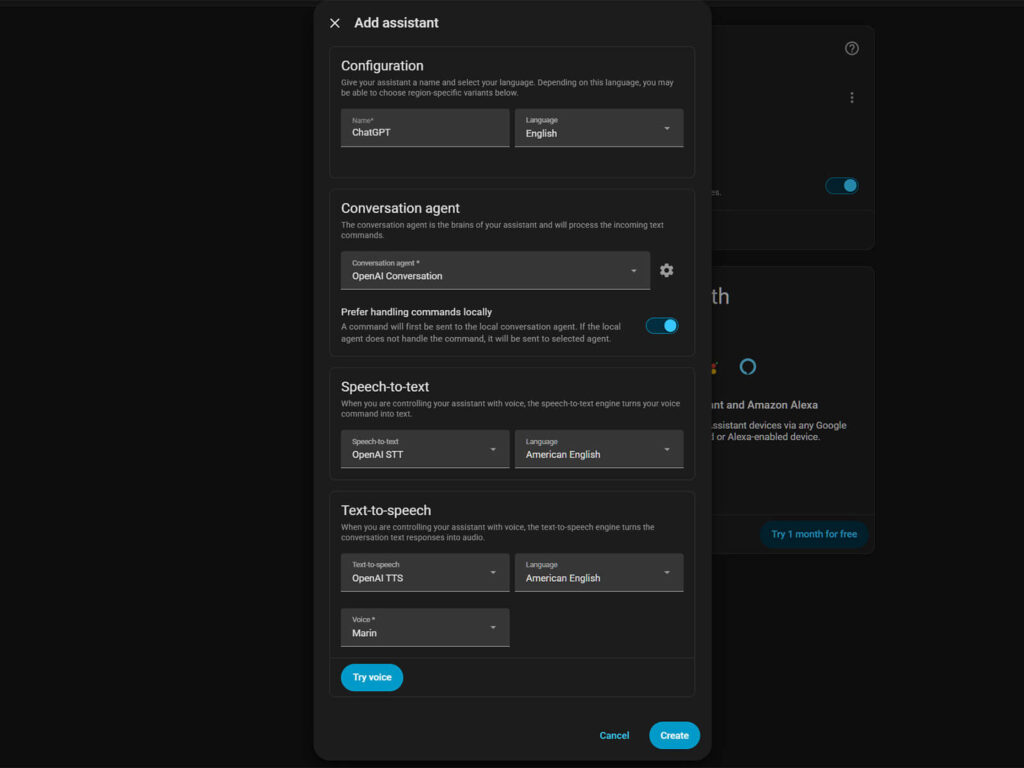
The Conversation Agent is the core setting here. This is what routes your commands through ChatGPT instead of the built-in Assist engine. Below that you will see options for Speech-to-text and Text-to-speech. These control how your voice is transcribed and how responses are spoken back to you.
You can use your existing STT and TTS setup, whether that is local Whisper and Piper or Home Assistant Cloud via Nabu Casa. This keeps voice processing costs completely separate from your OpenAI API usage. I run Nabu Casa for both STT and TTS and use OpenAI only as the conversation agent, which makes costs easy to predict.
Alternatively, you can select OpenAI STT and OpenAI TTS from the dropdowns, which uses the Whisper transcription model and OpenAI’s voice generation models respectively. The transcription is marginally more accurate on unusual device names and accented speech, and the TTS voices are noticeably more natural than Piper. The trade-off is that every voice interaction adds STT and TTS API calls on top of the conversation agent call, which increases your OpenAI bill with each spoken command.
Click Create. You now have an Assist pipeline powered by ChatGPT. To use it, open Assist from any dashboard and select your new assistant from the dropdown at the top of the Assist panel. Alternatively, set it as preferred in the Voice Assistant menu so it’s always the default.

What “Prefer Handling Commands Locally” Actually Does
When you create the assistant, you will see an option called “Prefer handling commands locally.” It is worth understanding what this actually does before you decide whether to leave it on.
With it enabled, Home Assistant attempts to process your command through its built-in intent recognition first. Simple commands like “turn on the kitchen lights” are handled instantly without any API call. Only requests that local Assist cannot resolve get forwarded to ChatGPT. This keeps costs down and response times fast for routine commands.
With it disabled, every single command routes through OpenAI regardless of how simple it is. The upside is consistent ChatGPT responses every time. The downside is that every interaction now depends on an API round trip, which introduces latency. On a fast connection this is usually a second or two, but on slower hardware or a congested network it can stretch to 10 seconds or more, which makes voice control feel sluggish.
For most setups, leaving it enabled is the right call. You get the speed and cost benefits of local processing for simple commands, and ChatGPT handles everything else.
Which Entities to Expose to ChatGPT in Home Assistant
If you navigate to Settings then Voice Assistant and click Exposes at the top, you will see the full list of everything ChatGPT can see and control. By default, common entities like lights and switches are already exposed.
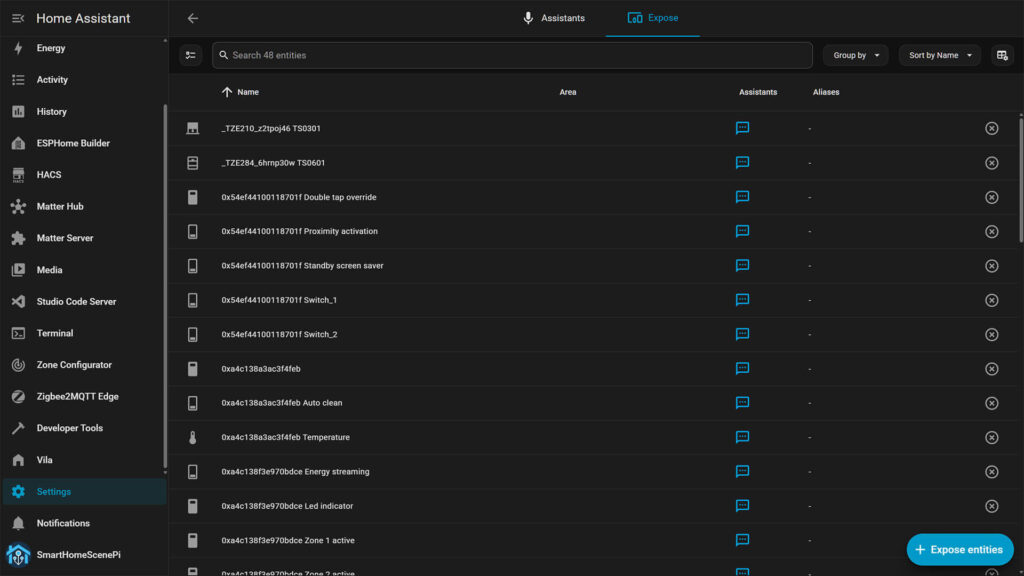
The temptation is to expose everything. Do not do this. Every exposed entity adds tokens to the context that gets sent to OpenAI with each request. A setup with 300 exposed entities sends a considerably larger payload than one with 50, which means slower responses and higher costs.
Be deliberate about what you expose. Include the devices you actually want to control by voice or conversation. Exclude sensors that are informational only if you do not need ChatGPT to reference them. Exclude anything you do not want an AI model to be able to act on, locks and alarm panels being the obvious examples.
A practical approach is to start with lights, switches, media players, and climate devices. Add sensors you actively want to query. Revisit the list after a week of use and trim anything you have not actually asked about.
How to Customize ChatGPT’s Instructions in Home Assistant
The Instructions field in the integration settings is a system prompt that runs with every conversation. It tells the model how to behave, what context it has, and what tone to use. However, note that this is not about personality. It is about giving the model the vocabulary of your specific home so it does not have to guess what “the front room” or “the main bedroom” means.
The default prompt is rather minimal. You can make it significantly more useful by being specific about your home. A prompt that includes your home’s layout, the names you use for rooms, and any preferences you have for how devices should behave gives ChatGPT the context it needs to interpret commands correctly.
A practical example of a useful prompt:
“You are a home assistant for a two-story house. Ground floor rooms are kitchen, living room, hallway, and office. Upstairs rooms are master bedroom, kids room, and bathroom. When I say ‘downstairs’ I mean all ground floor rooms. Always confirm what you did in one short sentence.”
Home Assistant ChatGPT API Cost: What to Expect
The OpenAI integration is a paid service billed per token, where tokens are roughly chunks of text, covering both what you send to the model and what it sends back. A typical home control interaction, your command plus the exposed entity context plus the response, uses roughly 500 to 1500 tokens.
The default model at the moment is gpt-4o-mini, which is the right choice for almost everyone. It is fast, accurate for home control tasks, and cheap enough that a household issuing 20 to 30 voice commands a day will realistically spend under a few dollars a month.
gpt-4o is the more capable model and costs considerably more per token, but the response quality for controlling lights and reading sensor states is not meaningfully better. Where gpt-4o earns its cost is image analysis in AI Tasks, where the accuracy difference is noticeable. For everything else, gpt-4o-mini is the better starting point. I’d also advise to avoid o-series models for this integration. They are reasoning models built for complex multi-step problems and are substantially slower and more expensive for the quick back-and-forth that home control requires.
In my experience, the number of exposed entities is the biggest variable in your costs regardless of which model you use. Each entity adds context tokens to every single request, so a lean exposed entity list has a direct impact on your bill.
How to Reduce ChatGPT API Usage in Home Assistant
I have been running this integration alongside Google Generative AI for a while now and my monthly bill has never exceeded a couple of dollars, even with AI Tasks running in automations. These are my tips and habits that keep it that way.
- Prefer Handling Commands Locally.
This toggle routes simple device commands through built-in Assist first, without touching the OpenAI API at all, and it is the single biggest lever for reducing unnecessary API calls. - Set a spending limit early.
Before you do anything else, configure a monthly usage cap in the OpenAI portal so unexpected automation loops cannot run up a surprise bill. - Trim your exposed entities.
Every exposed entity is sent as context with each request, so a leaner list means smaller payloads and lower costs on every single interaction. - Shorten your system prompt.
A long Instructions field adds tokens to every conversation turn, so keep it focused on what the model actually needs to know about your home. - Cap the maximum response tokens.
The integration lets you set a limit on how long the model’s response can be. Home control responses are short by nature, so setting a low cap avoids paying for verbose replies you did not ask for. - Throttle AI Task automations.
Any automation that calls GPT on a frequent trigger like motion or door sensors should have a cooldown condition to prevent token accumulation. - Stick with gpt-4o-mini by default.
It handles home control accurately at a fraction of the cost of gpt-4o, which is only worth using for image analysis in AI Tasks.
Taking the Home Assistant ChatGPT Integration Further
The official OpenAI integration is a solid starting point, but it operates within the boundaries of the Assist API. It can control exposed entities and answer questions about your home, but it cannot write automations to your configuration, edit your dashboards, or make structural changes to your setup.
If you want ChatGPT to go further and work on your Home Assistant configuration directly, the Community MCP Server supports external AI clients including ChatGPT via HTTP. That is a different setup with a different scope that I already covered in the Home Assistant MCP Server guide.
For users who want more function calling capability within Home Assistant itself, Extended OpenAI Conversation is another HACS integration that builds on the official integration and adds the ability to call services, create automations via conversation, and define custom functions the model can invoke. If you find yourself hitting the ceiling of what the native integration can do, that is the natural next step.
Related resources:
Home Assistant MCP Server: The Complete Guide
Home Assistant AI: Everything You Need to Know


can i get an Ai that I can install on my phone which can help me to perform some specified tasks on a site or platform?