AI has made its way into just about every corner of tech, and Home Assistant is no exception. Over the past couple of years, the HA community has been building out a genuinely interesting set of AI-powered features, from local voice assistants that run entirely on your own hardware, to conversation agents that can control your devices, write automations, and answer questions about your home.
Relevant: Home Assistant MCP Server Set Up Guide
I have been using AI features in Home Assistant since the Voice Preview launched, and my honest take is that it has come a long way. It is not magic, and it will not replace a well-built automation setup overnight. But for voice control, YAML debugging, and for letting your less tech-savvy household members actually interact with your smart home, it delivers.
This is a full breakdown of everything AI in Home Assistant can do, which integrations are worth setting up, and how to get started without overcomplicating it.
What Is Home Assistant AI?
AI in Home Assistant is a layered set of features that work together, where each layer serves a different purpose tailored to how you choose to interact with your home. It can be very helpful and useful, but also destructive if not used right.
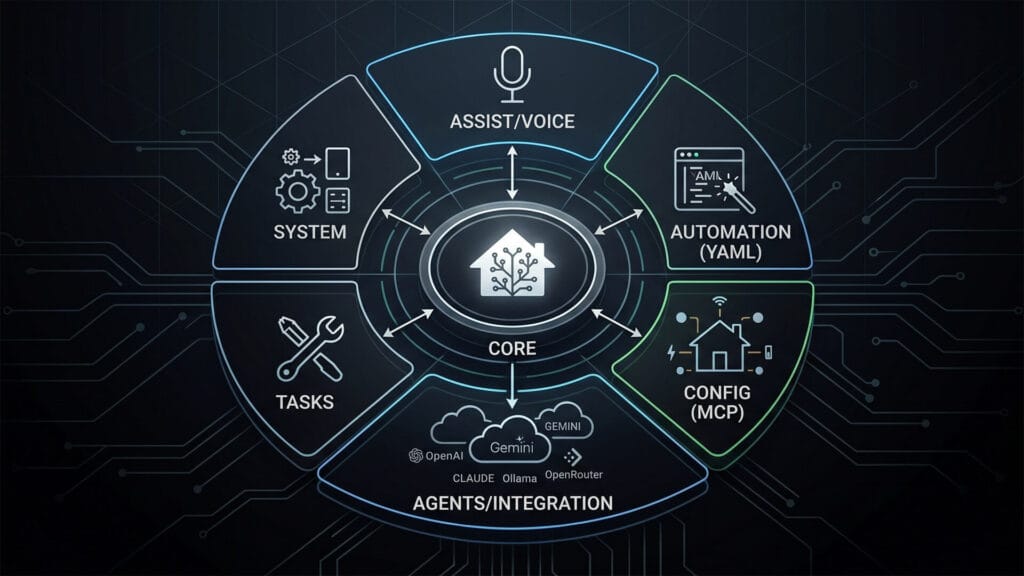
- The voice layer is the Assist pipeline. This handles wake words, speech-to-text, intent processing, and text-to-speech responses. It is what makes hands-free voice control work, and it can run entirely on your local hardware.
- The integration layer is where conversation agents live. These are AI models, cloud or local, that you connect to Home Assistant and use to control devices, answer questions, and generate automations. OpenAI, Gemini, Claude, and Ollama all plug in here.
- The automation layer is what most people actually use AI for. AI can help you write, debug, and refine your YAML directly, either through a connected conversation agent inside HA or through any external AI tool you paste your config into.
- The AI Tasks layer is a newer native HA feature that lets your automations call AI models directly. You can do things like analyze a camera snapshot, generate a notification message, process sensor data into structured output. No manual prompting required.
- The configuration layer is the deepest level. Emerging tools like the Home Assistant MCP server let external AI agents read and write your HA setup with full context of your devices, areas, and state history.
These layers can be used independently. For instance, you can use Gemini as a conversation agent without ever setting up a voice pipeline. You can run Whisper locally for voice without connecting any cloud AI. Knowing which layer you actually want is the most useful first step.
What Can You Actually Do with AI in Home Assistant?
Before getting into which model to use and how to set it up, it is worth understanding what you are actually getting. AI in Home Assistant is not just for turning lights on and off. The scope is much wider than most guides let on.
Voice Commands and Device Control
This is the most obvious use case. Say a command, your home responds. With a well-configured Assist pipeline you can control any exposed entity, ask about device states, trigger scenes, and run scripts. Natural language means you are not stuck with rigid syntax. “Turn off everything in the bedroom except the fan” is a valid command if your conversation agent is set up properly.
Managing Automations, Scripts and Dashboards
This is where AI earns its place for power users. A conversation agent connected to Home Assistant can create automations from a natural language description, add new dashboard cards, build scripts for complex sequences, and help you manage helpers and input entities. Ask it to create a “movie mode” automation that dims the lights, closes the blinds, and turns on the TV, and a capable model will produce working YAML ready to apply. The automation editor still exists, but I’d say the AI shortcut is real at this point.
Monitoring And Querying Your Home with AI
Beyond control, connected AI models can query the state of your home and give you useful summaries. What devices are currently active? Which lights have been on for more than two hours? Is there human presence in the living room at the moment? These are questions a conversation agent can answer if it has read access to your entities. Some users also pipe camera snapshots into multimodal models like Gemini to get natural language descriptions of what the camera sees, which opens up some interesting notification automation possibilities.
System Management and Configuration
At the deeper end, AI can help you manage the configuration layer of Home Assistant itself. Creating areas and zones, registering new devices, managing the device registry, reviewing automation traces for debugging, checking Home Assistant add-on health, and handling backups. This level of capability is where the Home Assistant MCP server comes in, which exposes a much more comprehensive interface for AI agents to read and write your HA configuration directly.
In short, it turns your Home Assistant instance into an MCP (Model Context Protocol) server, allowing external AI clients like Claude Desktop to connect directly to your home, query device states, and trigger actions. That is a topic worth its own dedicated article, but worth knowing exists.
Home Assistant Voice Pipeline Explained
The Home Assistant Assist pipeline handles the brain side of voice control. The satellite hardware handles the ears and mouth. These are the two physical components you need for hands-free voice in any room.
Before getting into Whisper and external AI models, it is worth knowing that Home Assistant voice works out of the box without any of them. Assist has a built-in local intent recognition engine based on sentences and patterns. You say “turn off the kitchen lights” and HA matches that phrase to the correct action locally, with zero cloud dependency and zero AI model required.
It covers the most common commands reliably and is what most people should start with. The AI conversation agents described earlier in this article only come into play when you want to go beyond fixed sentence patterns, asking complex questions, generating automations, or handling commands the built-in engine does not recognize.
Whisper and Piper for Local Voice Processing
Whisper handles speech-to-text. It is OpenAI’s open source model, available as a Home Assistant add-on, and it runs entirely on your server. Piper handles text-to-speech, generating the voice response your satellite plays back. Both communicate with Home Assistant through the Wyoming protocol, a lightweight local API that connects voice components together.
I run Home Assistant on a Beelink Mini PC with an Intel N305, and the entire pipeline runs locally without any noticeable lag once it is properly configured. Whisper model size is the main tradeoff. Larger models are more accurate but slower to process. On the N305, the faster models work well for simple commands. If you are on a Raspberry Pi, stay on the tiny or base Whisper model and accept some accuracy loss on complex phrasing.
Home Assistant Cloud Voice Processing
If you prefer not to run Whisper locally, Home Assistant Cloud through Nabu Casa includes cloud-based speech-to-text and text-to-speech as part of the subscription. Quality is noticeably better than local Whisper on modest hardware, and the setup is the easiest possible path. The tradeoff is that your voice commands leave your network.
The same subscription also gives you easy two-click integration with Google Assistant and Amazon Alexa if you are already in those ecosystems, though most HA users are moving away from big tech voice rather than toward it.
Home Assistant Custom Wake Words
Wake words are what trigger your voice assistant to start listening. Out of the box, Home Assistant ships with a handful of built-in options including “Okay Nabu”, “Hey Jarvis”, and “Hey Mycroft”. They work, but if you want something that actually feels like yours, Home Assistant lets you train and deploy a completely custom wake word. It is one of the more underrated features in the whole voice stack.
Training a Custom Wake Word with openWakeWord
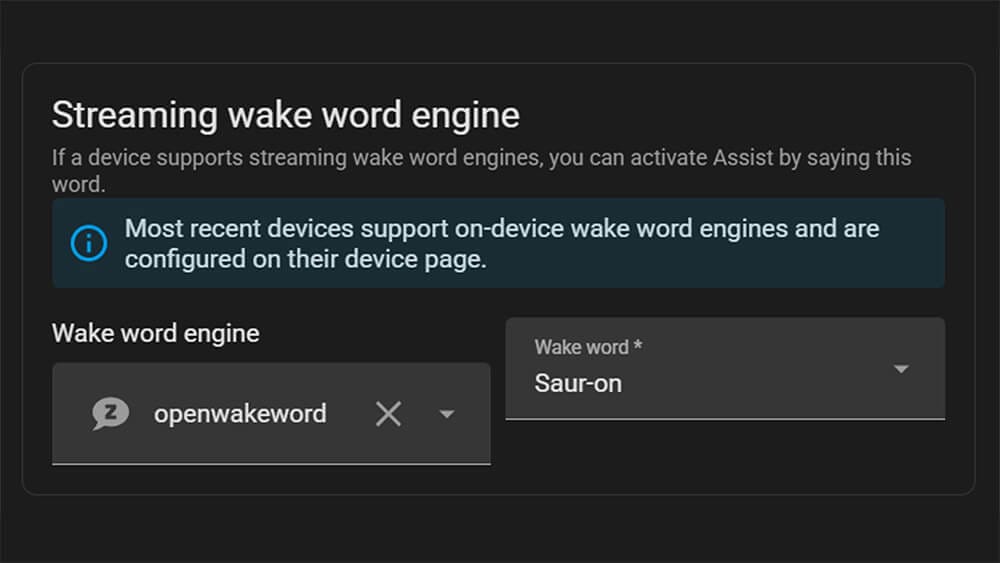
By default, Home Assistant uses openWakeWord as its wake word engine. What makes it clever is the training approach. Instead of requiring you to record hundreds of voice samples yourself, it generates thousands of synthetic audio clips using Piper, then runs them through Google’s audio embedding model to build the detection model. The whole training process runs on Google Colab using free compute resources. You do not need a powerful local machine or any machine learning experience.

As some of you might already know, I am a massive Lord of the Rings fan. I have 3D printed LOTR figures around my desk and my voice PE custom wake word is Sauron. As in the Dark Lord himself.
I pronounce it deliberately as “saur-on” with a clear pause between syllables, and it works every time. Saying “Sauron, turn off the living room lights” never gets old. The sad thing is, it appears I’m the only one who enjoys it.
The catch is that it needs to be pronounced correctly and with some conviction. Nobody else in my household can reliably trigger it, which is either a bug or a feature depending on how you look at it. There are zero false triggers, which is more than you can say for “Hey Google.”
In practice, you open the Colab notebook, type in your wake word, test how it sounds, wait about an hour, and download a model file. Drop it into Home Assistant, assign it to your voice assistant, and you are done. My first version still has room for improvement, and there is an option to fine-tune it further by recording your own voice through the satellite. That is on my to-do list.
Using microWakeWord as an On-Device Alternative
microWakeWord is a lighter model based on Google’s Inception neural network architecture. Because it is smaller, it can run directly on ESP32-S3 hardware like the S3-BOX-3, doing wake word detection on the device rather than streaming audio to the server. This reduces network traffic and CPU load on your Home Assistant instance. If you are running multiple voice satellites, microWakeWord is worth considering.
The tradeoffs are real though. microWakeWord currently only ships with pre-trained wake words and does not support custom wake word training the way openWakeWord does. Changing the default wake word requires editing your ESPHome configuration and recompiling the firmware. The model is also less accurate than openWakeWord on average, and it requires an ESP32-S3 chip specifically. It’s worth noting that people also successfully run microWakeWord on the Home Assistant Voice PE, though it takes some tinkering.
Home Assistant Voice Satellites and the Voice PE
The satellite hardware is what puts voice control in each room. It handles the microphone input and speaker output, while all the heavy processing happens on your Home Assistant server. Any ESP32-S3 based device flashed with ESPHome voice assistant firmware can act as a satellite, with the ESP32-S3-BOX-3 being the current community favorite for its audio quality and directional microphone array.
The Home Assistant Voice PE is Nabu Casa’s own satellite hardware. It is exactly what the name says, a preview. Nabu Casa has been transparent about that from the start, and you should go in with the right expectations. The audio quality is not premium. It picks up commands, it works reliably once configured properly, but you would not mistake it for an Amazon Echo in terms of microphone quality.
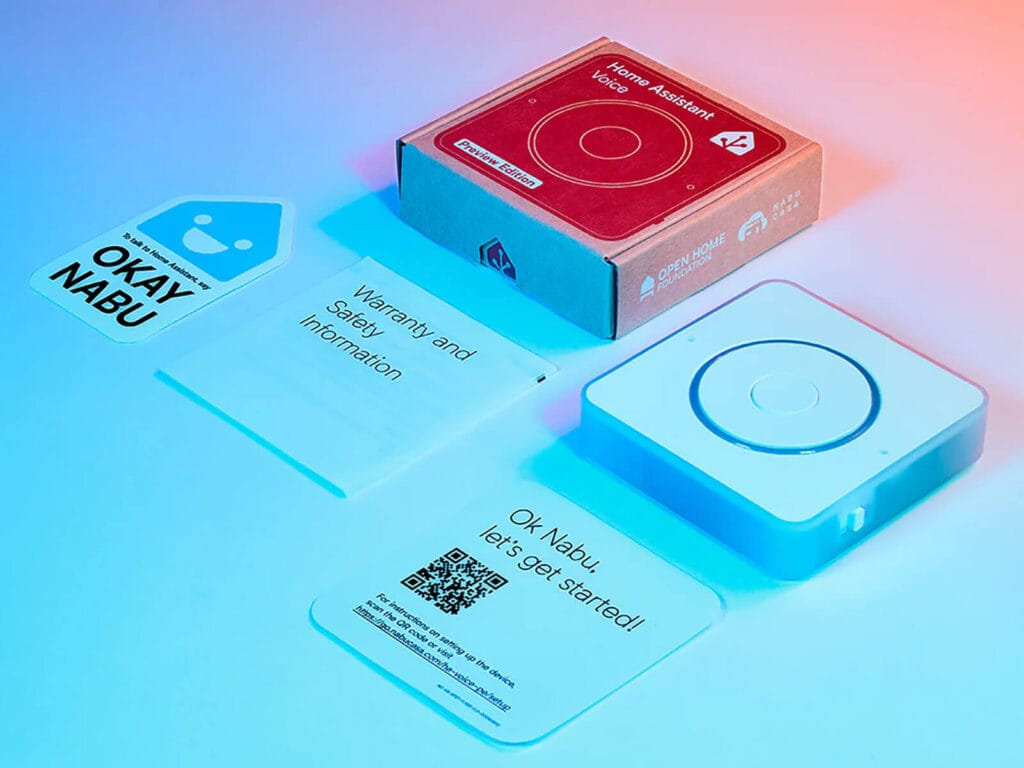
That said, for the price and for what it is designed to do, giving the community a standardized device to test Home Assistant voice features on, it delivers. I have two Voice Preview devices. One in the living area that I use daily, and one on my office desk for testing and tinkering with new features.
Home Assistant AI Integrations
Home Assistant officially supports several AI conversation agents out of the box. Each has different tradeoffs on cost, privacy, and capability. Here is the full picture as of May 2026.
OpenAI | Gemini | Claude | Ollama | OpenRouter | |
|---|---|---|---|---|---|
| Type | Cloud | Cloud | Cloud | Local | Cloud |
| Recommended Model | gpt-4o-mini gpt-4.1-mini | 3 Flash 3.1 Flash-Lite | Haiku 4.5 Sonnet 4.6 | Llama 3.1 8B, Qwen3 4B | 400+ models including free ones |
| Cost per 1M tokens | $0.15 4o-mini, $0.40 4.1-mini | $0.50 3 Flash, $0.25 3.1 Flash-Lite | $1.00 Haiku, $3.00 Sonnet | Free | Varies by model |
| Free Tier | Limited | Yes, rate limited | No | Always free | Yes, some free models |
| Best For | Reliable, battle-tested | Best free starting point | Strong reasoning, nuanced instructions | Privacy-first, no ongoing cost | Maximum model flexibility |
How much is 1 million tokens in practice?
A single interaction, sending a command, asking a question, or requesting an automation, typically uses somewhere between 500 and 2000 tokens including the context sent to the model. To put that in perspective, you could have roughly 500 to 2000 back-and-forth exchanges for every dollar spent. For most people using AI occasionally to control devices or debug automations, a monthly bill of a few cents to a dollar or two is realistic.
That said, actual usage varies a lot depending on how you configure things. For instance, the number of entities you expose to the model is a big factor. A conversation agent with access to 200 entities sends a much larger context with every single request than one scoped to 20. The model itself also matters since some use more tokens internally to reason through a response than others. Start with minimal entity exposure and expand only as needed.
OpenAI in Home Assistant
The OpenAI integration is the oldest and most battle-tested option. The default model in Home Assistant is gpt-4o-mini, which remains one of the most cost-effective options at $0.15 per million input tokens and $0.60 per million output tokens.
gpt-4.1-mini is the newer recommended alternative at $0.40/$1.60, offering better instruction following and a much larger context window. Both work well for home control and automation generation. If you want the absolute cheapest option for simple home control commands, gpt-4.1-nano at $0.10/$0.40 per million tokens is worth considering.
Worth noting: the OpenAI integration only works with the official OpenAI API endpoint. It does not support third-party OpenAI-compatible services. For that, use OpenRouter instead.
Google Gemini in Home Assistant
Gemini is what I used for a long time, set up primarily to see how it holds up in a real HA environment. The honest answer is that it works, with one annoying caveat: occasional delays of up to ten seconds before a response comes through. Not every time, but enough to be noticeable. When it responds quickly it is accurate and rarely misunderstands commands.
The current recommended models are Gemini 3 Flash at $0.50 per million input tokens and Gemini 3.1 Flash-Lite at $0.25, both of which retain a free tier with rate limits. Gemini 2.5 Flash is scheduled for deprecation on June 17, 2026, so avoid setting it as your model in a new integration. The free tier through Google AI Studio remains the easiest zero-cost entry point. Generate a key at ai.google.dev, paste it into the integration, and you are running.
Anthropic Claude in Home Assistant
Claude has an official integration in Home Assistant, listed as “Anthropic” in the integrations list. It supports the full current model family. Haiku 4.5 is the budget option at $1.00 per million input tokens and $5.00 per million output tokens. Sonnet 4.6 at $3.00/$15.00 is the balanced choice. Opus 4.7 at $5.00/$25.00 is the most capable but hard to justify for home control use cases where Sonnet already handles everything well.
There is no Claude free tier. Anthropic requires an API key with billing enabled from the start, though the costs for typical home automation use are low.
Running AI Locally with Ollama
Ollama lets you run large language models entirely on your own hardware. The Home Assistant Ollama integration is built in natively and connects to an Ollama server running on your local network. No data leaves your home.
Popular models for HA use include Llama 3.1 8B, Qwen3 4B, Mistral Small, and Phi-4. The hardware requirement is the real constraint. 8GB of RAM gets you to the smaller 4B-class models, 16GB opens up the 8B range, and anything larger needs considerably more. Home Assistant’s own documentation notes that smaller models may struggle to reliably control devices, so test your chosen model before relying on it for anything critical.
I have not tested Ollama in my own setup, but community results are solid for home control commands on the smaller models.
OpenRouter in Home Assistant
OpenRouter became an official native HA integration in 2025.8 and is arguably the most flexible option on this list. It gives you access to over 400 models through a single API key, with billing handled by OpenRouter. This includes models from OpenAI, Anthropic, Google, Meta, Mistral, and many others, as well as some completely free hosted models.
The main advantage over the individual integrations is that you can switch models without changing your HA setup, and you can access models that do not have their own native HA integration. If you want to experiment with DeepSeek, Qwen, or any number of open models without setting up Ollama locally, OpenRouter is the easiest path. It also supports AI Tasks from day one, the same as the native integrations.
Local vs Cloud AI in Home Assistant: Which Should You Use?
The choice comes down to four things: privacy, cost, response quality, and hardware.
Local AI keeps everything on your network. No voice clips sent to Google, no automation queries logged by OpenAI. For a home system that hears you constantly, that matters to a lot of people. The tradeoff is hardware investment and some loss of quality on modest machines.
On the other side, Cloud AI is easier to set up, generally more accurate, and requires no local resources beyond a network connection. The tradeoff is ongoing cost for API-based services and the fact that your data leaves your home.
My honest take: AI does not replace a well-built automation setup. If you know the HA editor and you have your devices organized, you will not suddenly need an AI agent running constantly. Where it earns its place is shaving time off writing and debugging automations, and making voice control actually usable for people in your household.
How to Get Started with Home Assistant AI
There are really two ways people approach Home Assistant AI. Some want a full voice and conversation layer, a smart home they can actually talk to. Others just want help solving problems, fixing broken automations, or building something more complex than they want to write from scratch. Both are valid, and the setup path is different for each. Here is where to start.
For voice control and conversation agents:
- Pick a voice satellite device. The ESP32-S3-BOX-3 is the current recommended option for better audio quality and on-device wake word support. The Voice Preview is the official Nabu Casa hardware if you want something plug-and-play.
- Connect your device to Home Assistant. Some devices like the Voice Preview are plug-and-play. Others like the ESP32-S3-BOX-3 may require flashing the ESPHome firmware first via the browser-based installer at esphome.io.
- Set up an Assist pipeline. Home Assistant Cloud is the easiest path. For a fully local setup, use the Whisper add-on for speech-to-text and Piper for text-to-speech.
- Choose a conversation agent. By default, Assist handles commands locally using its own built-in intent recognition, which works fine for standard device control. If you want to go beyond fixed commands, Gemini on the free Google AI Studio tier is the easiest addition. OpenAI, Claude, and Ollama all work here too.
- Choose a wake word. Home Assistant ships with “Okay Nabu”, “Hey Jarvis”, and “Hey Mycroft” out of the box. If you want something more personal, you can train a fully custom wake word using openWakeWord and Google Colab in about an hour.
- Test the full pipeline end to end before changing anything else. Speak a command, confirm the satellite picks it up, and verify Home Assistant responds correctly.
For automation help, debugging, and system management:
- Start outside Home Assistant. Copy your automation YAML, paste it into any AI chat tool, describe what you want it to do or what is broken, and paste the result back. This alone covers most use cases and requires zero setup.
- Add a conversation agent if you want AI inside Home Assistant. Go to Settings, Devices and Services, and add your preferred integration. Gemini on the free tier or Claude Haiku are good starting points for cost and quality.
- Limit entity exposure. Give the AI access only to the entities and areas relevant to your use case. Less context to start, not more.
- Go deeper with a MCP server. The Home Assistant MCP server gives external AI agents read and write access to your full HA configuration, including automations, scripts, helpers, dashboards, and the device registry. Treat it like production access and always back up before using it.
Ultimately, Home Assistant AI is not a destination you have to reach just because everyone is talking about it. Think of it as a set of tools you add as you need them. Start with one layer, get comfortable, and build from there. The beautiful Home Assistant community has done most of the hard work already. Before diving into AI, check out the Home Assistant Essentials guide.


Really awesome written article, first time here – appreciate you
Welcome, Chris.
Stick around.
Cheers!