Home Assistant MCP lets you connect an AI assistant like Claude directly to your smart home and give it the ability to read your configuration, write automations, manage devices, edit dashboards, and troubleshoot problems using plain language. This guide covers everything you need to get it running, from understanding what it actually is to connecting Claude Desktop and putting it to work.
Relevant: Home Assistant AI: Everything You Need To Know
What is Home Assistant MCP Server
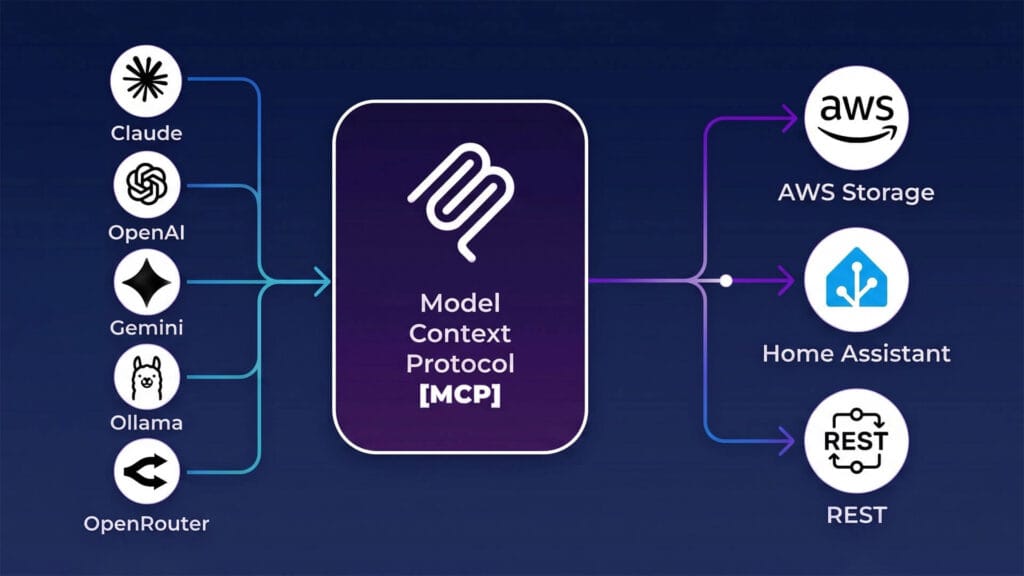
MCP stands for Model Context Protocol, an open standard that defines how AI applications communicate with external tools and data sources. In simple terms, it is a bridge that lets an AI assistant reach into another system and interact with it directly, rather than just responding to text prompts.
There are three distinct MCP implementations in the Home Assistant ecosystem and they are easy to confuse. The first two are official integrations from the Home Assistant core team, called Model Context Protocol and Model Context Protocol Server. The third is a community-built app called The Unofficial and Awesome Home Assistant MCP Server or ha-mcp, an alternative that goes significantly further in what it allows an AI to do. It’s worth understanding what separates them before you install anything.
Official Home Assistant MCP Integrations
The Home Assistant core team ships two separate MCP integrations and they work in opposite directions.
- The MCP Server integration makes Home Assistant act as a server. It exposes your smart home outward through the Assist API so an external AI client like Claude Desktop can connect to it, query device states, and control entities. You decide which entities are visible to the AI using the same exposure settings used for the voice assistant. It is a clean, no-frills setup that requires no extra software and works well for device control.
- The MCP Client integration works in the opposite direction. Instead of an external AI reaching into Home Assistant, this integration lets the conversation agent running inside Home Assistant reach outward to an external MCP server and use its tools. A memory server, a web search tool, a calendar service: any MCP server you point it at becomes available to your in-HA conversation agent. It is not for controlling Home Assistant from outside. It is for making your in-HA AI smarter by giving it access to external capabilities.
Both are standard integrations installed through Settings > Devices and Services. Neither requires an add-on or any command line work. The limitation they share is that both route through the Assist API, which means neither gives an AI access to your configuration, automations editor, dashboards, or entity registry at a structural level.
Community-built Home Assistant MCP Server
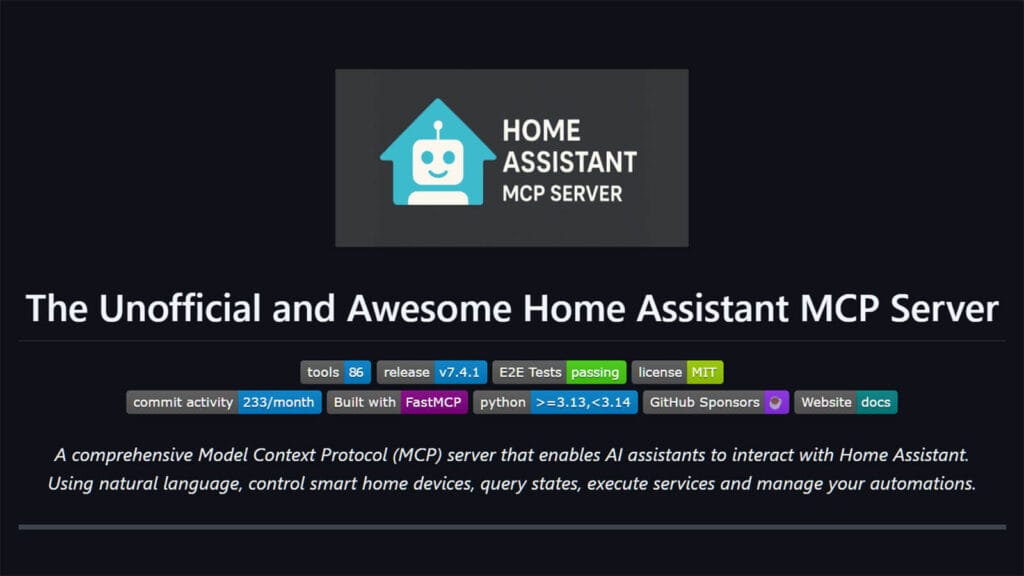
The Unofficial and Awesome Home Assistant MCP Server or ha-mcp is architecturally different from the official integrations. Rather than routing through the Assist API, it connects to Home Assistant directly through the REST API and WebSocket API. That lower-level access is what makes structural operations possible. The AI is not limited to what the voice assistant can see. It can read and write configuration, create and edit automations, manage dashboards, work with the entity registry, install HACS integrations, and pull energy and history data.
At the moment, it provides over 86 tools across 24 categories and installs either as a Home Assistant app or as a standalone application on your computer. It also includes an agent skills system that loads Home Assistant best practices directly into the AI context, so the automations and configurations it produces follow current syntax rather than deprecated patterns.
Where it gets interesting is that ha-mcp can be used in two ways. You can connect an external AI client like Claude Desktop directly to it, which is what this guide covers. Or you can run it as a server and connect Home Assistant to it using the MCP Client integration, making its tools available to your in-HA conversation agent instead. Both approaches work.
Ha-mcp supports a wide range of AI clients including Claude Desktop, Claude Code, ChatGPT, Gemini CLI, Cursor, VS Code, GitHub Copilot, Windsurf, Cline, JetBrains IDEs, Raycast, and more. Claude Desktop is the most straightforward starting point and the one this guide focuses on, but the setup wizard at homeassistant-ai.github.io/ha-mcp covers configuration for every supported client.
Which MCP Version Should You Use
- Choose the built-in MCP Server integration if your goal is conversational device control. Asking an AI to turn off the lights, check whether a door is locked, or tell you the current temperature in a room is exactly what it is designed for. No extra software, no add-ons, just install the integration and connect your AI client.
- Choose the community MCP Server if you want AI to work on your Home Assistant setup rather than just interact with it. Writing automations, editing dashboards, managing entities, installing HACS integrations, and diagnosing configuration problems all require the deeper REST and WebSocket access that only ha-mcp provides. That is the use case this guide is built around.
What Can AI Do in Home Assistant with MCP
Once ha-mcp is connected to Claude, the interaction shifts from giving commands to having a working session. You describe what you want, Claude checks your actual entities and configuration, and then acts on it. The results are applied directly to your Home Assistant instance. Click here to learn everything you need to know about AI in Home Assistant.
AI-Powered Automation & Script Management
This is where ha-mcp becomes useful for most people. Instead of opening the automation editor and building triggers and actions manually, you describe the behavior you want and Claude writes it using your actual entity IDs.
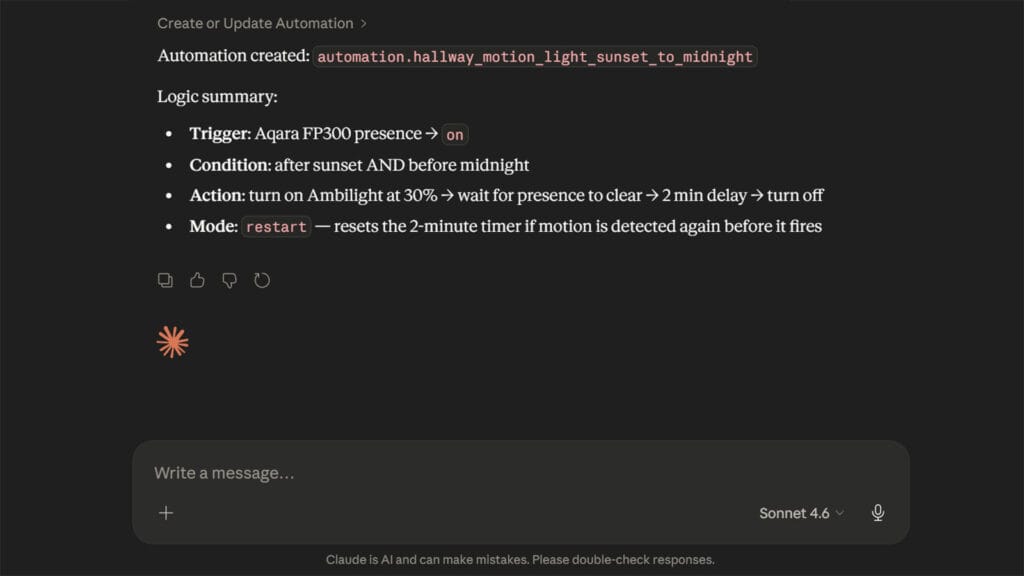
I asked it to create a motion-triggered automation for my hallway that turns on the light at 30 percent brightness between sunset and midnight, and turns it off after two minutes with no further motion detected. Claude fetched my existing entities, confirmed the correct sensor and light IDs, checked whether a similar automation already existed, and created the full automation with proper triggers, conditions, and actions. The whole thing took about 40 seconds.
It can also edit existing automations. I told it to adjust the same automation to increase the brightness to 60 percent on weekends, and it pulled the existing configuration, made the change, and applied it without me touching a single YAML file.
Beyond automations, Claude can work with the full automation stack:
- Get, create, edit, and delete automations using your real entity IDs
- Get, create, edit, and delete scripts
- List installed blueprints and retrieve their full configuration including inputs, triggers, and actions
- Import new blueprints from a URL directly into your Home Assistant instance
- Pull automation traces to review exactly what ran, what triggered it, and where it failed
Direct Device, Entity, and Area Control
Claude has full access to your entity and device registries. You can ask it to control devices directly, query current states, and make structural changes to how entities are organised across your setup.
I used it to audit all the entities in my living room after adding a new device, and it returned a clean list grouped by domain with current states included. Spotting the duplicate sensor I had accidentally added took seconds rather than the usual manual scrolling through the entity registry.
What it can do in this category:
- Call any Home Assistant service on any entity or device, including bulk control across multiple entities at once
- Get, update, and remove devices from the device registry
- Get, update, and remove entities from the entity registry, including managing voice assistant exposure per entity
- Create, update, and remove areas and floors
- Create, update, and remove groups and zones
- Create, update, and remove labels and categories for organising entities
Building and Modifying Dashboards via AI
Ha-mcp gives Claude full access to your Home Assistant dashboards. You can ask it to add a card, rearrange sections, change card types, update icons, or build an entirely new view from scratch. It follows modern dashboard patterns by default, using sections layout and tile cards rather than legacy entity cards.
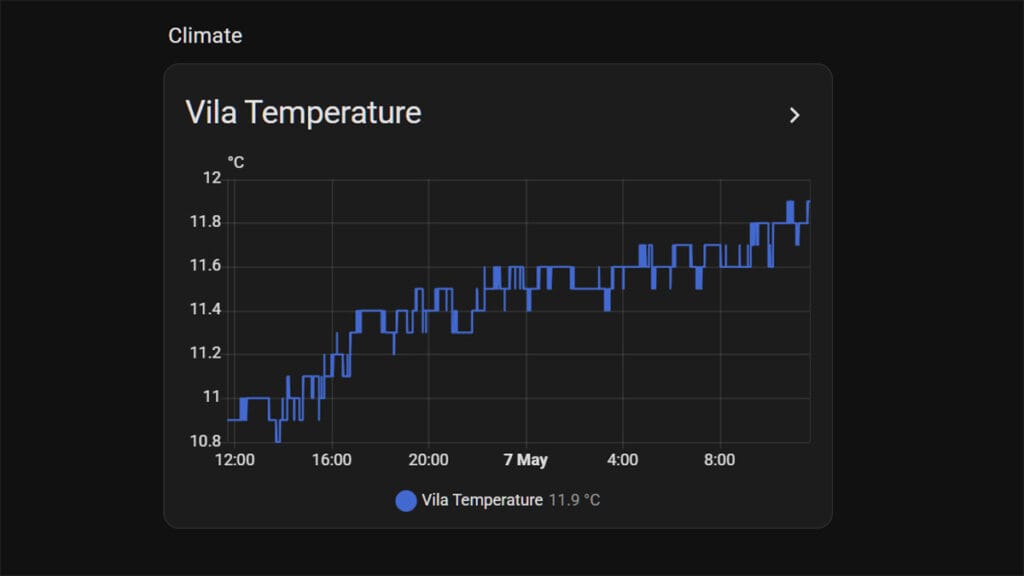
I asked it to create a new custom dashboard and add a temperature sensor in a graph card for in the new dashboard. It did it within 10 seconds, without hallucinating or creating something I didn’t ask:
What it can do in this category:
- Get, create, update, and delete dashboards
- List, add, update, and delete dashboard resources such as custom card JavaScript files
- List, create, update, and delete helper entities including input booleans, input selects, counters, timers, and other helper types
- Read, write, list, and delete files in allowed directories including www, themes, and custom_templates (beta, requires the ha_mcp_tools component)
Browse, Install and Manage Apps and Integrations
If you have HACS installed, Claude can search available repositories, check what is already installed, and install new integrations or themes on your behalf. It can also manage your native integrations and add-ons directly.
What it can do in this category:
- Search HACS repositories by keyword and retrieve detailed repository information
- Add repositories to HACS and download integrations, themes, or frontend resources
- Get details on any installed add-on including its state, options, ports, and ingress configuration
- Update add-on configuration options and manage add-on settings
- Get details on installed native integrations and enable or disable them
Home Monitoring and Data Analysis
Ha-mcp gives Claude read access to a wide range of data sources across your Home Assistant instance. This makes it genuinely useful for understanding what is happening in your home over time, not just what state things are in right now.
What it can do in this category:
- Pull state history for any entity over a specified time range
- Retrieve Home Assistant logs filtered by relevance
- Get and update energy dashboard preferences
- Get, create, update, and delete calendar events across any connected calendar integration
- Get, add, update, and remove items from to-do lists
- Capture a snapshot from any camera entity and include it in the conversation context
- Evaluate any Home Assistant template and return the result
Audit, Diagnose and Troubleshoot Your Setup
One of the more underrated uses is asking Claude to audit your configuration for problems. It can review your automations and flag conflicts, redundancies, deprecated syntax, or potential issues, then fix them in the same session.
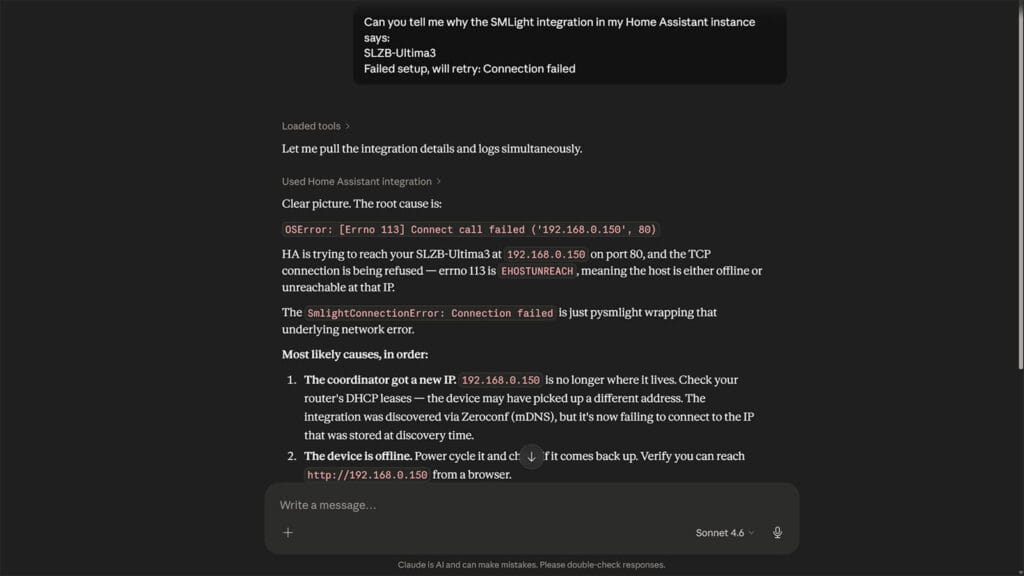
In a testing instance, I purposefully disconnected the SLZB-Ultima I was using as a Thread Border Router. I then asked Claude if it can look through the logs and tell me why is the SMLight integration failing. It immediately identified the issue and gave me ways to fix it.
What it can do in this category:
- Deep search across all automations, scripts, and entities by keyword or pattern
- Get a full system overview of your Home Assistant instance including entities, areas, and devices
- Get the current state of any entity
- Search entities by name, area, domain, or label
- Check system health and retrieve a report of any known issues
- Check for pending updates across Home Assistant, add-ons, and HACS
- Validate your configuration before applying changes
- Create and restore backups
- Reload core configuration and restart Home Assistant
- Submit a bug report with full system context
- Safely edit configuration.yaml and package files including automatic backup and validation (beta, requires the ha_mcp_tools companion component and ENABLE_YAML_CONFIG_EDITING=true)
Using Home Assistant MCP Agent Skills
The Community Home Assistant MCP Server gives an AI the tools to interact with Home Assistant, but tools alone do not guarantee good results. Without domain knowledge, AI agents tend to make predictable mistakes: over-relying on Jinja2 templates where native constructs work better, picking the wrong helper type, or structuring automations in ways that are hard to maintain.
Home Assistant Agent Skills fill that gap. The current skill is called home-assistant-best-practices and covers native HA constructs over templates, correct helper selection, automation modes, Zigbee button patterns, dashboard configuration, and safe refactoring workflows.
Skills are bundled directly into the Community MCP Server and served as MCP resources. Any client that supports MCP resources can discover them automatically. If yours does not, use ha_list_resources and ha_read_resource to load them manually before starting a task.
For coding agents like Claude Code, Cursor, and Gemini CLI, skills can also be installed as persistent local files:
npx skills add homeassistant-ai/skillsFull installation instructions for every client are in the skills repository.
How to Install Home Assistant MCP Server
Before you start, it helps to understand that there are two distinct installation paths and they work differently. Choose one and follow it through. Do not mix them.
The command line method runs the Home Assistant MCP Server (Community) directly on your Mac or Windows PC as a local process. Claude Desktop communicates directly using your Home Assistant URL and a long-lived access token. No app install needed, no mcp-proxy needed.
The app (previously add-on) method runs the Community Home Assistant MCP Server inside Home Assistant itself. Claude Desktop then connects to it via a local URL using mcp-proxy as a bridge. No token needed, but mcp-proxy is required.
Both methods work. The command line method is what most people end up using with Claude Desktop since the installer handles everything automatically. The app method is better if you want ha-mcp running independently of your computer, or if you want to use an HTTP client like ChatGPT or Claude.ai web.
Install MCP via PowerShell on Windows
This method runs the Community Home Assistant MCP Server as a local process on your PC. Claude Desktop talks to it directly, no app install or mcp-proxy required. This is the easiest method to get started.
- Create an account at claude.ai if you do not have one
- Download Claude Desktop, login and make sure it works correctly
- Close Claude Desktop completely from system tray
- Open Windows PowerShell and run the command below.
It installs the required tools and configures Claude Desktop with a demo environment:
irm https://raw.githubusercontent.com/homeassistant-ai/ha-mcp/master/scripts/install-windows.ps1 | iex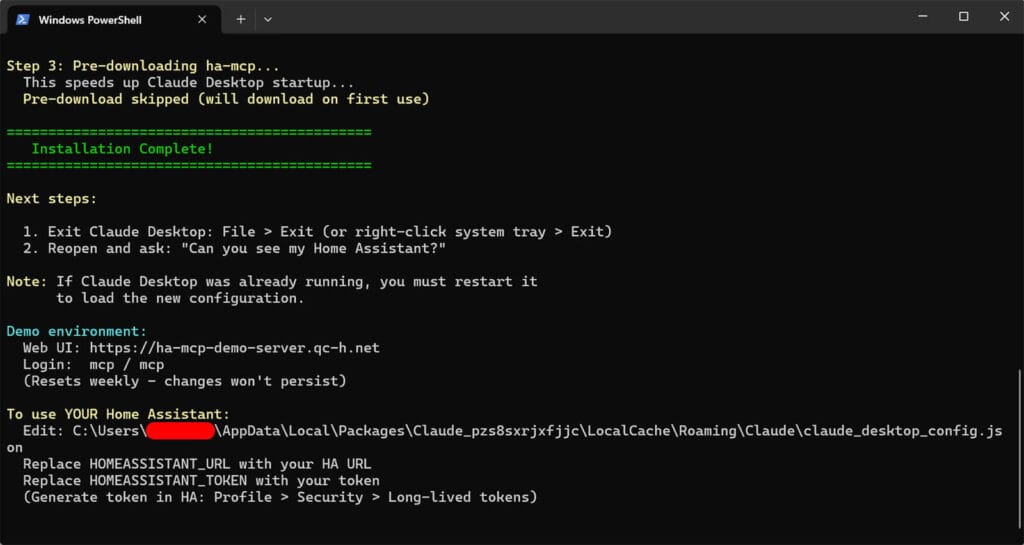
- The Claude config file location will get printed in PowerShell
- Either open it manually with a text editor or run this command:
notepad "$env:APPDATA\Claude\claude_desktop_config.json"- If you installed Claude Desktop from the Microsoft Store, run this in PowerShell to find the correct config path:
$pkg = Get-AppxPackage -Name Claude -ErrorAction SilentlyContinue | Select-Object -First 1; if ($pkg) { "$env:LOCALAPPDATA\Packages\$($pkg.PackageFamilyName)\LocalCache\Roaming\Claude\claude_desktop_config.json" } else { "$env:APPDATA\Claude\claude_desktop_config.json" }- Open Home Assistant, click your username in the bottom left.
- Go to the Security tab, scroll to Long-Lived Access Tokens, and click Create Token
- Copy it immediately since it is only shown once.
- Replace the demo values with your own Home Assistant URL and token:
{
  "mcpServers": {
    "Home Assistant": {
      "command": "uvx",
      "args": ["ha-mcp@latest"],
      "env": {
        "HOMEASSISTANT_URL": "http://homeassistant.local:8123",
        "HOMEASSISTANT_TOKEN": "your_long_lived_token"
      }
    }
  }
}- Restart Claude Desktop via File > Exit and reopen.
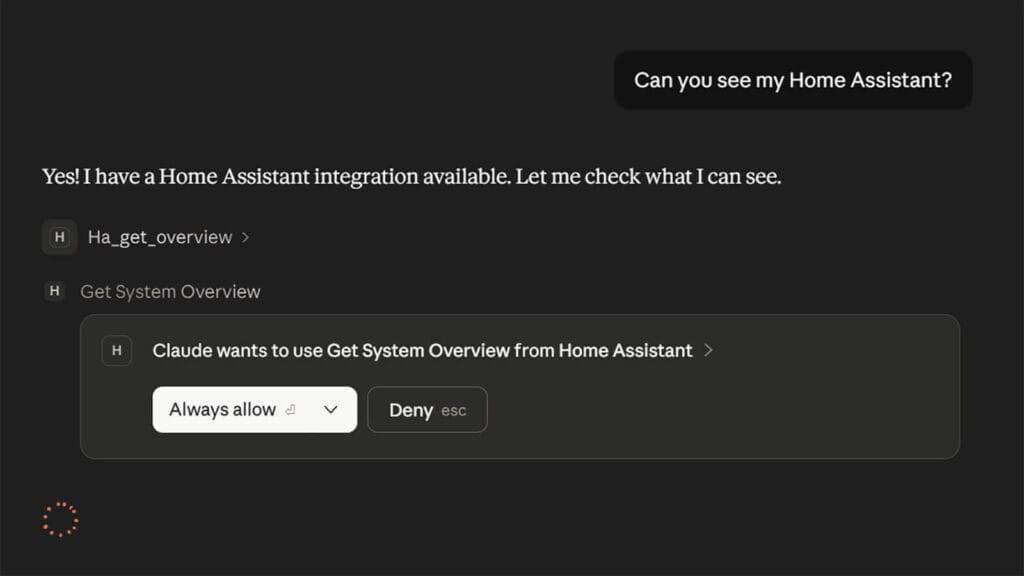
- Ask “Can you see my Home Assistant?” and it should return your own entities instead of the demo.
- Click Always allow
- Done
Install MCP via Terminal on macOS
This method runs the Home Assistant MCP Server (Community) as a local process on your Mac. Claude Desktop talks to it directly, no app install or mcp-proxy required.
- Create an account at claude.ai if you do not have one
- Download Claude Desktop from claude.ai/download, log in and make sure it works
- Quit Claude Desktop completely from the menu bar
- Open Terminal and run the command below. It installs uv and configures Claude Desktop with a demo environment:
curl -LsSf https://raw.githubusercontent.com/homeassistant-ai/ha-mcp/master/scripts/install-macos.sh | sh- Open your Claude Desktop config file by running this in Terminal:
open "$HOME/Library/Application Support/Claude/claude_desktop_config.json"- Open Home Assistant, click your username in the bottom left
- Go to the Security tab, scroll to Long-Lived Access Tokens, and click Create Token
- Copy it immediately since it is only shown once
- Replace the demo values in the config file with your own Home Assistant URL and token:
{
  "mcpServers": {
    "Home Assistant": {
      "command": "uvx",
      "args": ["ha-mcp@latest"],
      "env": {
        "HOMEASSISTANT_URL": "http://homeassistant.local:8123",
        "HOMEASSISTANT_TOKEN": "your_long_lived_token"
      }
    }
  }
}- Restart Claude Desktop via Claude menu > Quit Claude and reopen
- Ask “Can you see my Home Assistant?” and it should return your own entities instead of the demo
- Click Always Allow when prompted
- Done
Install MCP as a Home Assistant App
The app runs the Unofficial and Awesome Home Assistant MCP Server inside Home Assistant itself. This method requires Home Assistant OS or Supervised. Container and Core installs should use the command line method above. The app authenticates automatically through the Supervisor so no token is needed, but Claude Desktop requires mcp-proxy to connect to it.
- Open Home Assistant and go to Settings > Apps > Install app
- Click the three-dot menu in the top right and select Repositories
- Add this repository URL:
https://github.com/homeassistant-ai/ha-mcp
- Search for “Home Assistant MCP Server” in the app store and install it
- Click Start, then open the Logs tab
- Copy your unique MCP URL from the logs:
MCP Server URL (local): http://192.168.x.x:9583/private_xxxxxxxxxxxxxxxx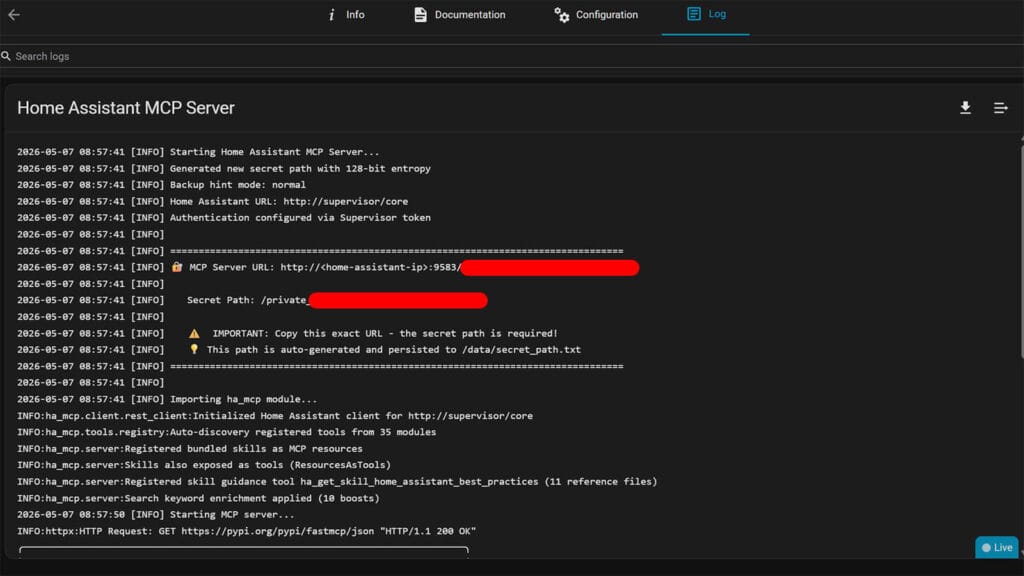
- Install mcp-proxy so Claude Desktop can connect to the app:
uv tool install mcp-proxy- Open your Claude Desktop config file.
#MacOS
open "$HOME/Library/Application Support/Claude/claude_desktop_config.json"

#Windows
notepad "$env:APPDATA\Claude\claude_desktop_config.json"- Add the following, replacing the URL with the one from your app logs:
{
  "mcpServers": {
    "home-assistant": {
      "command": "mcp-proxy",
      "args": ["--transport", "streamablehttp", "http://192.168.x.x:9583/private_xxxxxxxxxxxxxxxx"]
    }
  }
}- Restart Claude Desktop.
- Ask “Can you see my Home Assistant?” and it should return your own entities
- Click Always Allow when prompted
- Done
Remote Access via Nabu Casa
If you use Nabu Casa and want to connect from outside your local network, the Webhook Proxy app routes MCP traffic through your existing Nabu Casa connection without any port forwarding or tunnel setup. This works on top of the app install above.
I use Nabu Casa myself and this is how I have it configured:
- Install the Webhook Proxy app from the same repository you added above
- Start it and restart Home Assistant when prompted
- Check the app logs for your remote URL:
MCP Server URL (remote): https://xxxxx.ui.nabu.casa/api/webhook/mcp_xxxxxxxx- Use this URL in place of the local one in your Claude Desktop mcp-proxy config
- Done
For other remote access methods including Cloudflare Tunnel and custom reverse proxies, the setup wizard at homeassistant-ai.github.io/ha-mcp/setup covers each option.
Connecting Other AI Clients to Home Assistant MCP
The guide above covers Claude Desktop in full since it is the most common starting point. The Community Home Assistant MCP Server works with a wide range of other AI clients too. All of them connect using either the uvx command line method or the app URL, depending on their connection type.
Clients that support stdio run the server as a local process on your machine using the uvx method, the same way Claude Desktop does. Clients that support HTTP connect remotely to the app URL directly without needing mcp-proxy.
The full list of supported clients includes:
- Claude Desktop (stdio)
- Claude Code (stdio and HTTP)
- Cursor (stdio and HTTP)
- VS Code (stdio and HTTP)
- GitHub Copilot Agents (stdio and HTTP)
- Windsurf (stdio and HTTP)
- Cline (stdio and HTTP)
- ChatGPT (HTTP)
- Claude.ai web (HTTP)
- Gemini CLI (stdio)
- JetBrains IDEs (stdio)
- Zed (stdio)
- Continue (stdio and HTTP)
- Raycast (stdio and HTTP)
- Codex (stdio and HTTP)
- Open WebUI (HTTP)
- Copilot CLI (stdio and HTTP)
Home Assistant MCP Server Common Errors and Fixes
These errors apply specifically to the Community Home Assistant MCP Server.
“Failed to start MCP server” in Claude Desktop
The uvx command could not start. Check the following:
- Run
uvx --versionin Terminal or PowerShell to confirm uv is installed - If not found, run the installer again or install uv manually as described in the install section
- Check your config file for JSON syntax errors. A missing quote or bracket will cause this silently
“MCP server disconnected” in Claude Desktop
The server started but cannot reach Home Assistant. Check the following:
- Confirm your HOMEASSISTANT_URL is correct and Home Assistant is running
- If using a local IP address, verify you can reach it in a browser
- On macOS Sequoia 15 or newer, go to System Settings > Privacy and Security > Local Network and confirm Claude Desktop is allowed. A blocked entry fails silently and looks identical to a URL error
Error 404 when using the app URL
The Home Assistant MCP Server app is not running or has not fully started:
- Open the app logs in Home Assistant and confirm it shows as running
- If you recently updated the app, restart it and wait for the logs to show the MCP URL before retrying
Error 401 Unauthorized
Your long-lived access token is incorrect or has been deleted. This applies to the command line method only:
- Generate a new token in your Home Assistant profile under Security > Long-Lived Access Tokens
- Update your Claude Desktop config file with the new token and restart Claude Desktop
uvx is using an old Python version on macOS
The Community Home Assistant MCP Server requires Python 3.13 or newer:
- Run
brew install python@3.13followed byuvx --refresh ha-mcp@latest - If uvx still picks up an older version, add
"--python", "3.13"to the args array in your Claude Desktop config file
Final Thoughts
The Community Home Assistant MCP Server is one of the more practical AI integrations available for Home Assistant right now. It works with your actual configuration rather than a sandboxed version of it, which makes the results immediately useful rather than theoretical.
That said, it is worth being clear about the risk. This is not a voice assistant that turns lights on and off. You are giving an AI direct write access to your automations, dashboards, entity registry, and configuration files. A vague or poorly worded prompt can result in deleted automations, overwritten dashboards, or config changes that are difficult to reverse. Always back up before any session where you plan to make structural changes, and treat every confirmation prompt from Claude as something worth reading rather than clicking through.
Start with a system overview, try a simple automation, and go from there. The more you use it the better you get at prompting it precisely, and that is where the real value shows up.


This is very helpful, but I’d appreciate some detail on alternate interfaces. For whatever reason, while I can use Claude Code (Pro plan) under Windows/terminal, I never got Claude Desktop to authenticate properly.
No thanks. Absolutely not.
For an ecosystem that’s been built to run locally with minimal cloud resources, using a cloud based AI and giving it such powerful access seems counterintuitive to me.
This is pretty much the antithesis of what I’m trying to achieve by using Home Assistant rather proprietary solutions over which I have no control. But it seems like you put in a lot of work producing this, so I hope some find it useful.
This is definitely not for privacy-conscious individuals. I agree.
It’s just an awesome way to make tweaks, control or configure various aspects of your HA instance.