The Sun is automatically tracked in a default Home Assistant installation. The integration creates an entity which has two possible states: above_horizon and bellow_horizon with a few entity attributes, such as elevation, azimuth, next_dawn, next_dusk etc. These states can be used as a base trigger or condtiion for many automations in your smart home. (eg. Turn on porch lights 30 minutes after sunset).
The Moon can also be tracked within Home Assistant. It’s integration creates an entity which gives you the current phase of the moon, such as: new_moon, full_moon, waxing_crescent, waning_crescent etc. Now, whether this information is actually useful to the average user is debatable. Probably not, but there are people out there who may find it useful. For us Home Automation tinkerers, who are not looking to “harvest the energy of the moon”, best we can do is create a beautiful dashboard and maybe trigger a few automations.
Enable Sun Integration
- Browse to your Home Assistant instance.
- In the sidebar click on Settings.
- From the configuration menu select: Devices & Services.
- In the bottom right, click on the Add Integration button.
- From the list, search and select “Sun”.
- Follow the instruction on screen to complete the set up.
Enable Moon Integration
- Browse to your Home Assistant instance.
- In the sidebar click on Settings.
- From the configuration menu select: Devices & Services.
- In the bottom right, click on the Add Integration button.
- From the list, search and select “Moon”.
- Follow the instruction on screen to complete the set up.
Using Sun Integration
The Sun integration is actually quite useful and can be used in a lot of automations in HA as a condition or trigger. For example, we can use it as a condition to turn on terrace lights but only after sunset. We don’t want the lights coming on when we step outside during the day. The trigger itself is an Aqara Door & Window sensor.
alias: Terrace Lights ON
description: 'Turn ON Terrace Lights After Sunset'
trigger:
  - platform: state
    entity_id: binary_sensor.terrace_door
    from: 'off'
    to: 'on'
condition:
  - condition: sun
    after: sunset
    after_offset: '20'
action:
  - service: light.turn_on
    data: {}
    target:
      entity_id: light.terrace_lights
mode: single
Or we can use it directly as a trigger, to turn on walkway lights to our porch after sunset and turn them off at sunrise:
alias: Walkway Lights
description: 'Turn on Porch Lights After Sunset'
mode: single
trigger:
  - platform: sun
    event: sunset
    offset: 0
condition: []
action:
  - service: light.turn_on
    data: {}
    target:
      entity_id: light.porch_lights
alias: Walkway Lights
description: 'Turn Off Porch Lights At Sunrise'
mode: single
trigger:
- platform: sun
event: sunrise
offset: 0
condition: []
action:
- service: light.turn_off
data: {}
target:
entity_id: light.porch_lights
Display The Sun In Your Dashboard
Dev AitorDB has created a beautiful Sun Card based on Google’s Weather Display. We can use it to display the Sun’s position and basic information in our dashboard. You can find the card in HACS.
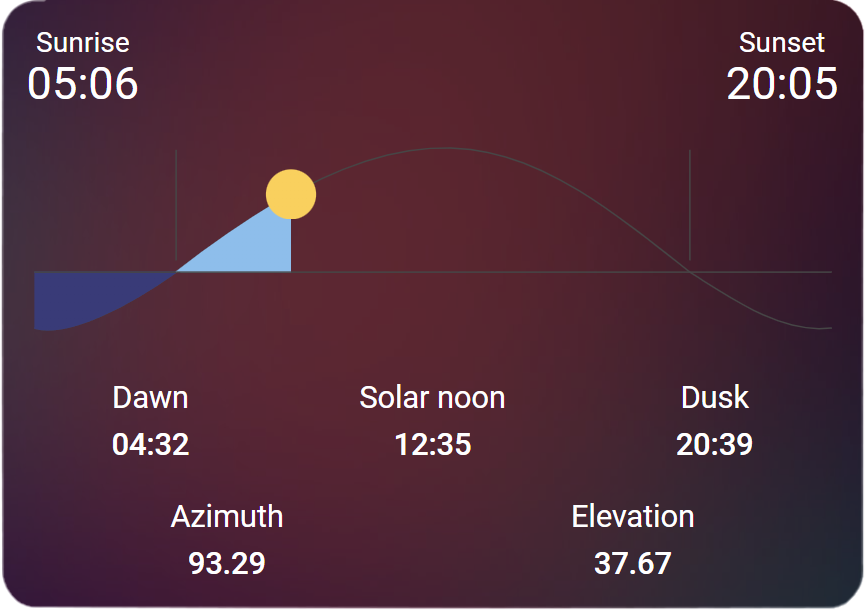
type: custom:sun-card
darkMode: true
showAzimuth: true
showElevation: true
Using Moon Integration
Similarly, the moon phases can also be used to trigger automations. Even though the average user may not find the integration useful, there are people out there who will think of a good use case for it. As an example, we will create an automation to notify us when it’s a Full Moon so we can go outside and enjoy it:
alias: Full Moon
description: 'Notify Me When It`s a Full Moon'
trigger:
  - platform: state
    entity_id:
      - sensor.moon
    to: full_moon
condition: []
action:
  - service: notify.mobile_app_s21ultra
    data:
      title: Full Moon!
      message: It's a Full Moon Outside!
  - service: notify.bravia_tv_notifications
    data:
      title: Full Moon!
      message: It's a Full Moon Outside!
mode: single
This automation will notify us both on our Mobile phone and on TV as a toast notification.
Display The Moon In Your Dashboard
If you are using Mushroom Cards, both the Sun & Moon information can be displayed nicely in Mushrooms native Chips Card. For example:
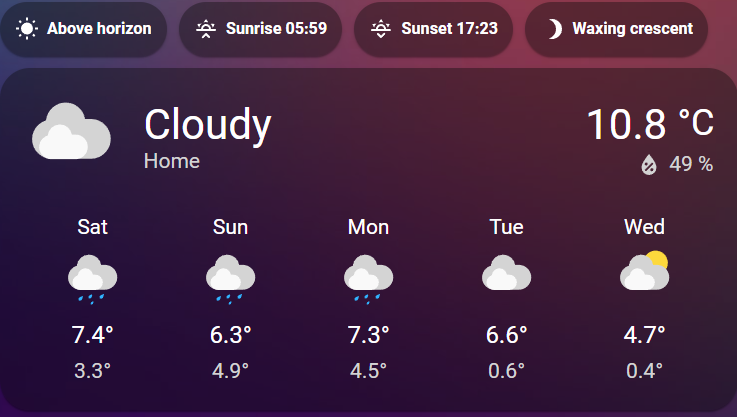
type: vertical-stack
cards:
- type: custom:mushroom-chips-card
chips:
- type: entity
entity: sun.sun
- type: template
content: >-
Sunrise {% if states.sun.sun %} {{
(as_timestamp(states.sun.sun.attributes.next_rising)) |
timestamp_custom(('%H:%M') )}} {% endif %}
icon: mdi:weather-sunset-up
- type: template
content: >-
Sunset {% if states.sun.sun %} {{
(as_timestamp(states.sun.sun.attributes.next_setting)) |
timestamp_custom(('%H:%M') )}} {% endif %}
icon: mdi:weather-sunset-down
- type: entity
entity: sensor.moon
- type: weather-forecast
entity: weather.home
secondary_info_attribute: humidity
show_current: true
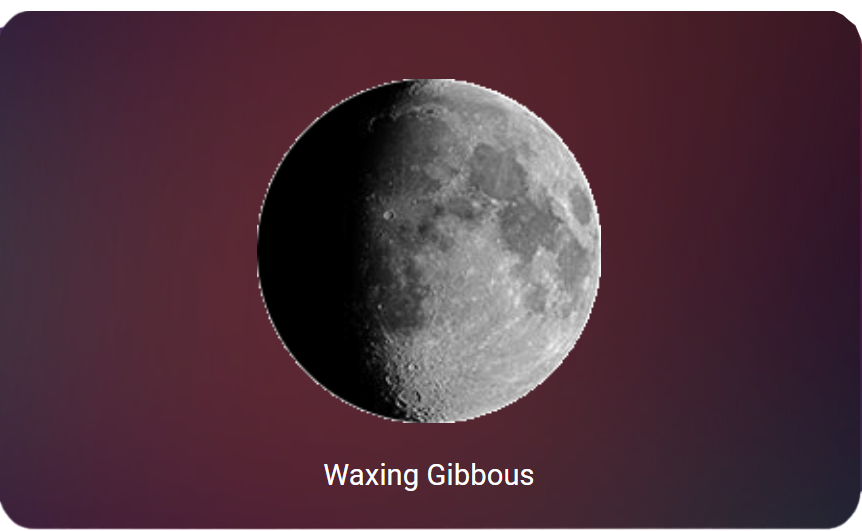
show_forecast: trueTo create a bigger, more visually pleasing card we are going to use JavaScript templating on a custom button card. We are also going to use a few .png images which were shared to the HA community by user bthoven in this thread.
First off, download the .png images from HERE and upload them to your Home Assistant server. In our tutorial, we are going to place them inside www/images/moon which equates to /local/images/moon in our card. You can use Samba Share, Studio Code Server or File Editor to uploaded them to your folder. Than, we create a custom card with an entity picture which will show the appropriate moon image during each phase.
type: custom:button-card
aspect_ratio: 1/0.6
entity: sensor.moon
styles:
  name:
    - color: |
        [[[ if (states['sensor.moon'].state == 'full_moon') return "steelblue";
            else return "white" ]]]
name: |
  [[[ if (states['sensor.moon'].state == 'new_moon') return "New Moon";
      if (states['sensor.moon'].state == 'waxing_crescent') return "Waxing Crescent";
      if (states['sensor.moon'].state == 'first_quarter') return "First Quarter";
      if (states['sensor.moon'].state == 'waxing_gibbous') return "Waxing Gibbous";
      if (states['sensor.moon'].state == 'waning_gibbous') return "Waning Gibbous";
      if (states['sensor.moon'].state == 'last_quarter') return "Last Quarter";
      if (states['sensor.moon'].state == 'waning_crescent') return "Waning Crescent";
      else return "Full Moon" ]]]
entity_picture: >
  [[[ if (states['sensor.moon'].state == 'new_moon') return "/local/images/moon/new_moon.png";
      if (states['sensor.moon'].state == 'waxing_crescent') return "/local/images/moon/waxing_crescent.png";
      if (states['sensor.moon'].state == 'first_quarter') return "/local/images/moon/first_quarter.png";
      if (states['sensor.moon'].state == 'waxing_gibbous') return "/local/images/moon/waxing_gibbous.png";
      if (states['sensor.moon'].state == 'waning_gibbous') return "/local/images/moon/waning_gibbous.png";
      if (states['sensor.moon'].state == 'last_quarter') return "/local/images/moon/last_quarter.png";
      if (states['sensor.moon'].state == 'waning_crescent') return "/local/images/moon/waning_gibbous.png";
      else return "/local/images/moon/full_moon.png"; ]]]
show_entity_picture: true
The end result is a dynamic card, which will show the name of the Moon Phase along with the appropriate image. The name will be colored blue only when Full Moon has occurred.
Bonus: Track Astronomical and Meteorological Seasons
As a bonus, in the nature of this tutorial, we are going to add two more sensor for tracking Astronomical and Meteorological Seasons in Home Assistant. This information can be used to remind you in case, you know, you forget it’s winter. To add the sensors:
- Browse to your Home Assistant instance.
- In the sidebar click on Settings.
- From the configuration menu select: Devices & Services.
- In the bottom right, click on the Add Integration button.
- From the list, search and select “Season”.
- Follow the instruction on screen to complete the set up.
After you are done, two entities will be created: sensor.astronomical and sensor.meteorological. To understand the difference between the two, please see HERE.
Summary
If you are looking to navigate through life using the Moons position, you can do so by staying informed with this integration. If simply you love tinkering with Home Assistant and exploring it’s depths, that’s cool too. Thanks for reading!


Got this error for the moon phases. Seems thee code does not work anymore.
ButtonCardJSTemplateError: TypeError: Cannot read properties of undefined (reading ‘state’) in ‘if (states[‘sensor.moon’].state == ‘new_moon’) return “New Moon”; if (states[‘sensor.moon’].st…’
Hi, it looks like the moon sensor changed a little bit, you need to replace sensor.moon by sensor.moon_phase. Worked for me at least
The sun-card is no longer maintained by the creator. A fork with updates and fixes can be found at:
https://github.com/rejuvenate/lovelace-horizon-card
Thank you for the heads up.