When Apollo approached me about testing their MSR-1 presence sensor, I readily agreed. I have a soft spot for open-source smart devices compatible with Home Assistant. I’ve been using it for about 4 months now and it is easily my favorite device of this type, which is why I keep recommending it to anyone who asks.
The device is actually a multi-sensor, measuring presence, temperature, humidity, illuminance, air pressure, UV index and CO2. On top of all that, it’s equipped with a piezo buzzer used for audible as well as an RGB light for visual notifications. But what impressed me the most about the MSR-1 is its size. How they managed to fit so many sensors inside such a small and compact device is beyond me.
You can imagine my reaction when Apollo sent me an email, informing me they made a 30% smaller device with the same features – the Apollo MSR-2. In this article, I’m reviewing the new MSR-2 multi-sensor, comparing it to the MSR-1 and talking about its Home Assistant setup.
Technical Specification: MSR-1 vs MSR-2
Even though the MSR-1 and MSR-2 are almost identical, there are some small differences that separate the two. Here’s how their technical specification differs:
Apollo MSR-1
- Model: Apollo Automation MSR-1
- Dimensions: 40x32x13mm
- Connectivity: Wi-Fi/Bluetooth
- Main Module: ESP32-C3 Mini
- Interface: USB-C
- mmWave Radar: Hi-Link HLK-LD2410b
- CO₂ Sensor: Sensirion SCD-40 (Optional)
- Illuminance and UV: Liteon LTR-390UV
- Temperature, Humidity and Pressure: Bosch BME280
- ESPHome Support
- RGB Pixel LED
- Piezo Buzzer
- GPIO
Apollo MSR-2
- Model: Apollo Automation MSR-1
- Dimensions: 40x24x15mm
- Connectivity: Wi-Fi/Bluetooth
- Main Module: ESP32-C3 Mini
- Interface: USB-C
- mmWave Radar: Hi-Link HLK-LD2410b
- CO₂ Sensor: Sensirion SCD-40 (Optional)
- Illuminance and UV: Liteon LTR-390UV
- Temperature and Pressure: Infineon DPS310
- ESPHome Support
- RGB Pixel LED
- Piezo Buzzer
- Expansion Slot (Back)
Overview: MSR-1 vs MSR-2
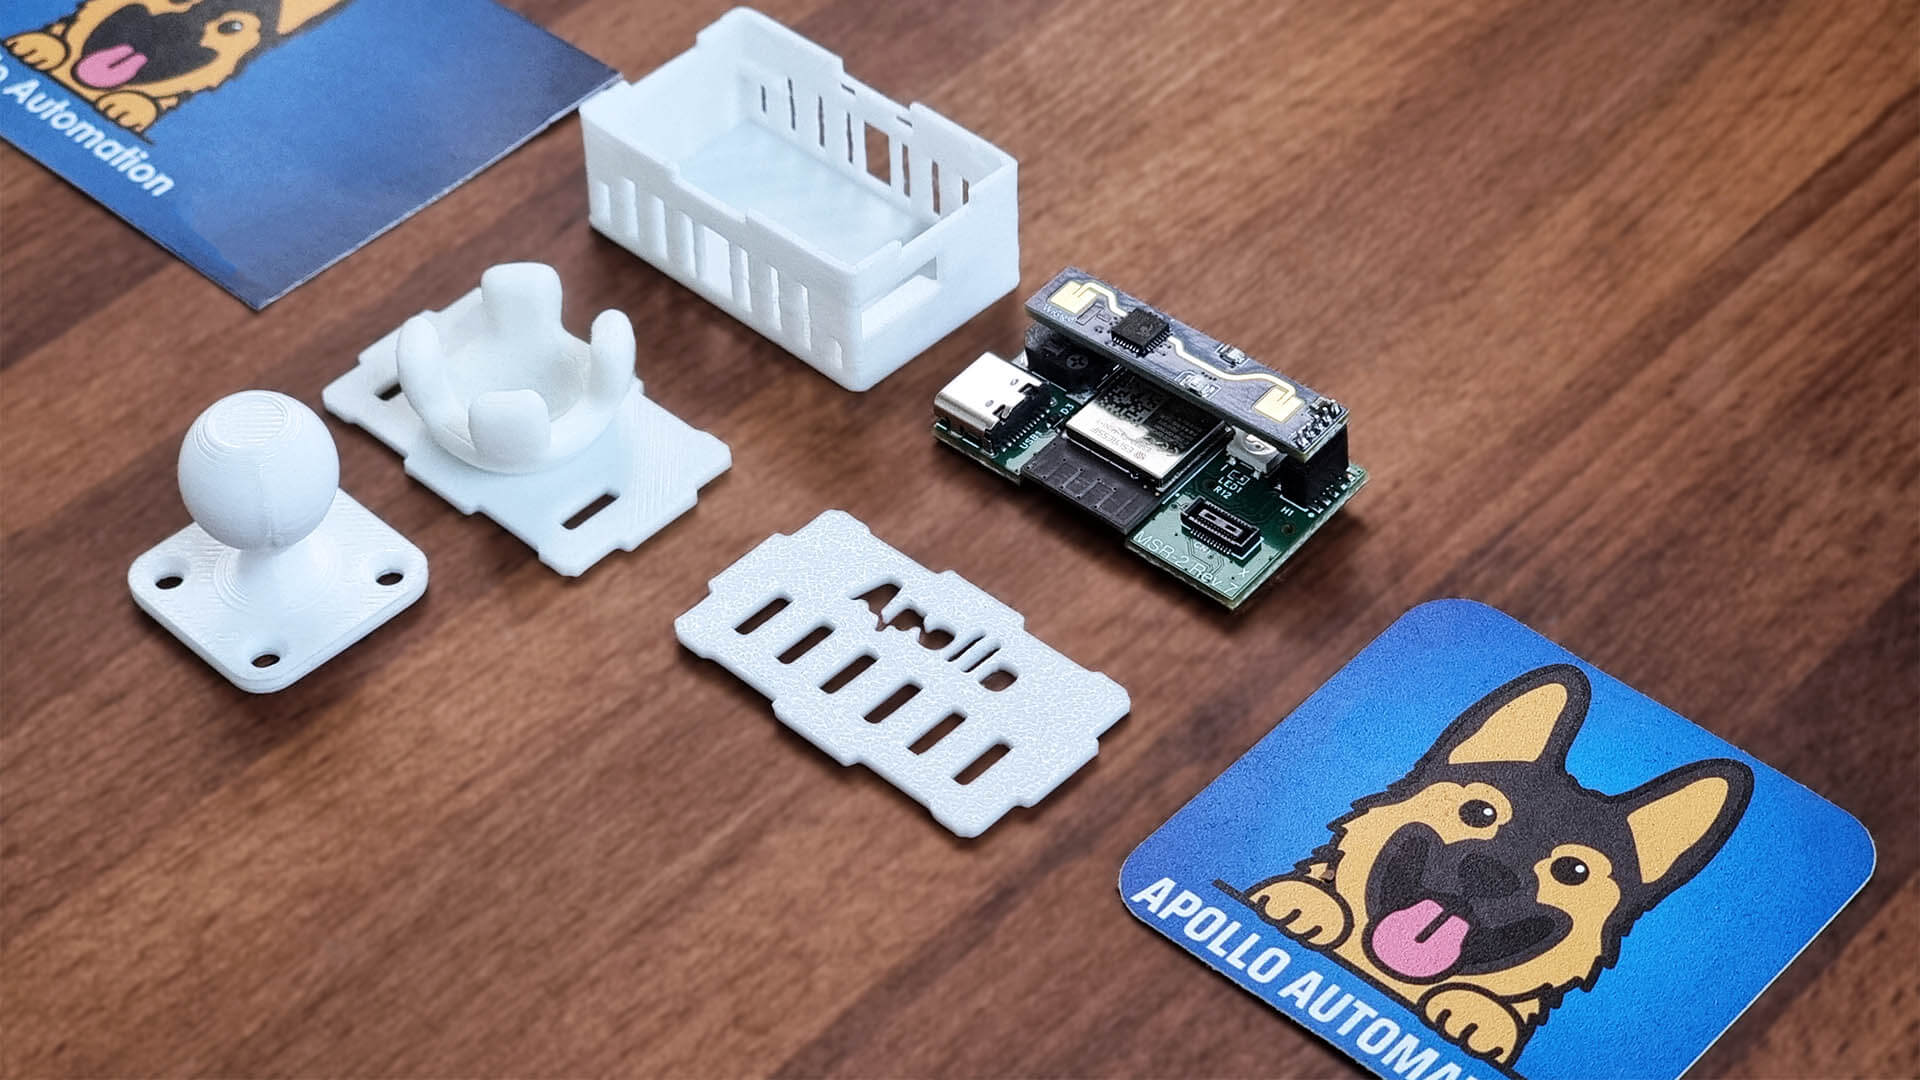
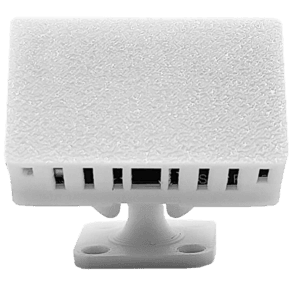
The Apollo MSR-2 is available with some optional addons for improving the installation flexibility. This includes an outlet mount, for installing the device directly on a wall outlet as well as an articulating stand, which allows the device to rotate and face the direction you need it too. Another welcomed addition is a special USB-C adapter for making the port face backwards, so you can hide the cable from sight.
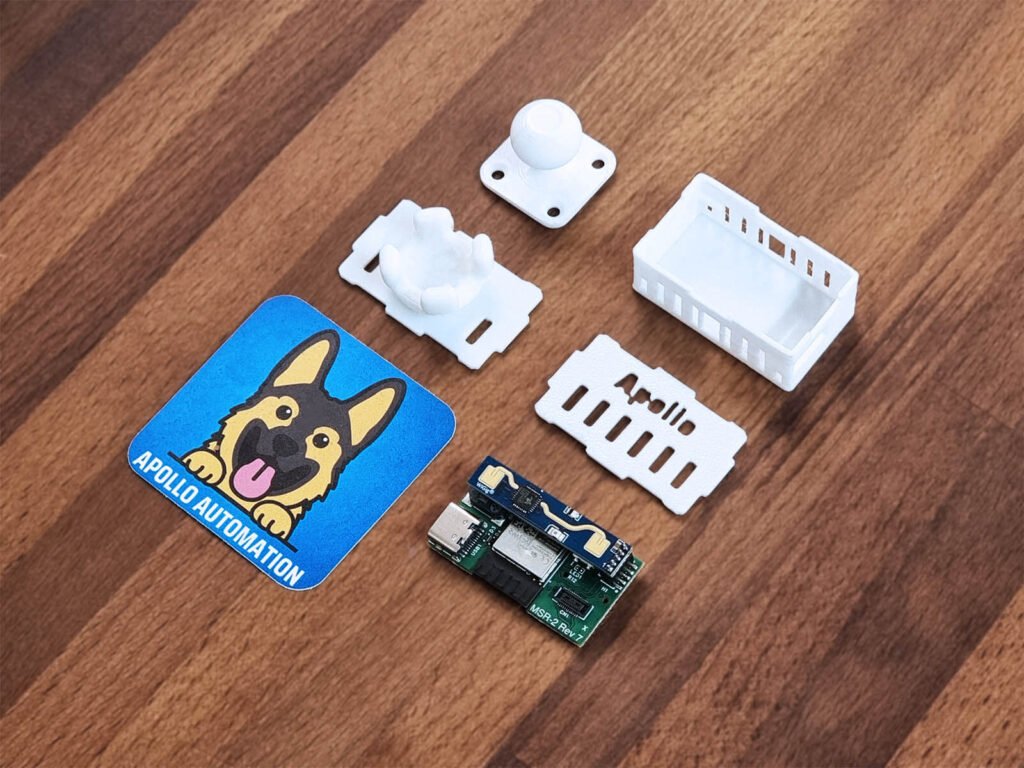
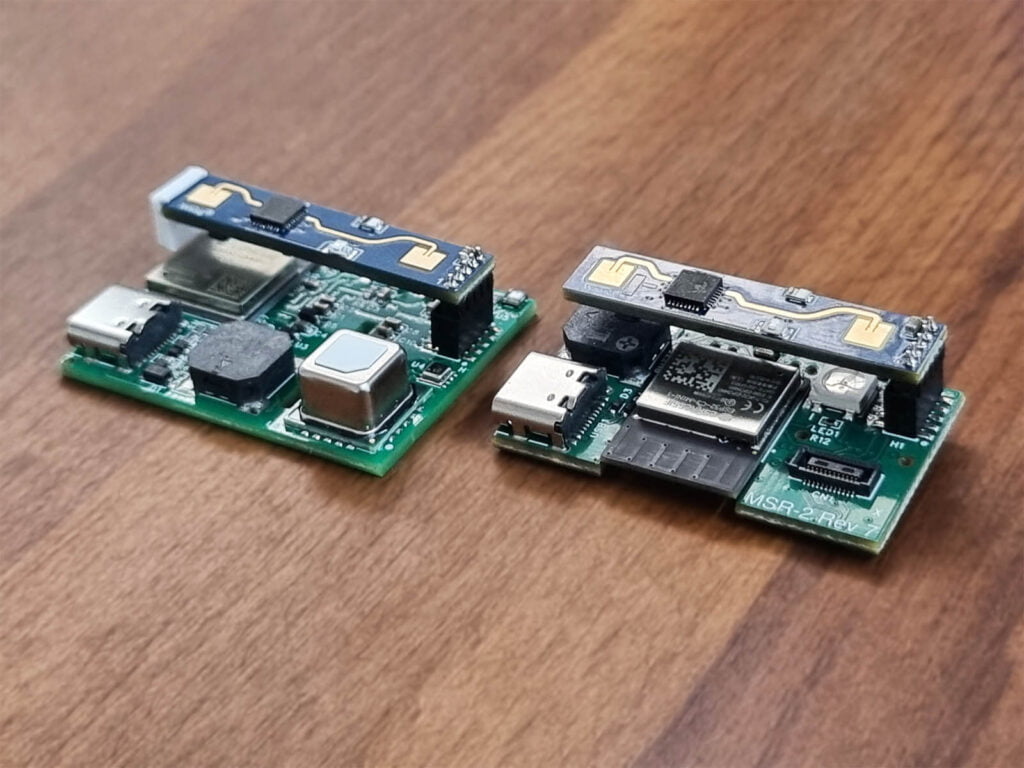
Once I assembled the MSR-2 and set it next to the MSR-1, the size difference becomes very obvious. The MSR-1 measures at 40x32x13mm (WxHxD) while the MSR-2 is slimmed down to 40x24x15mm. While it does add 2mm in thickness, it stands shorter by 8mm – a difference of ~28.5%.
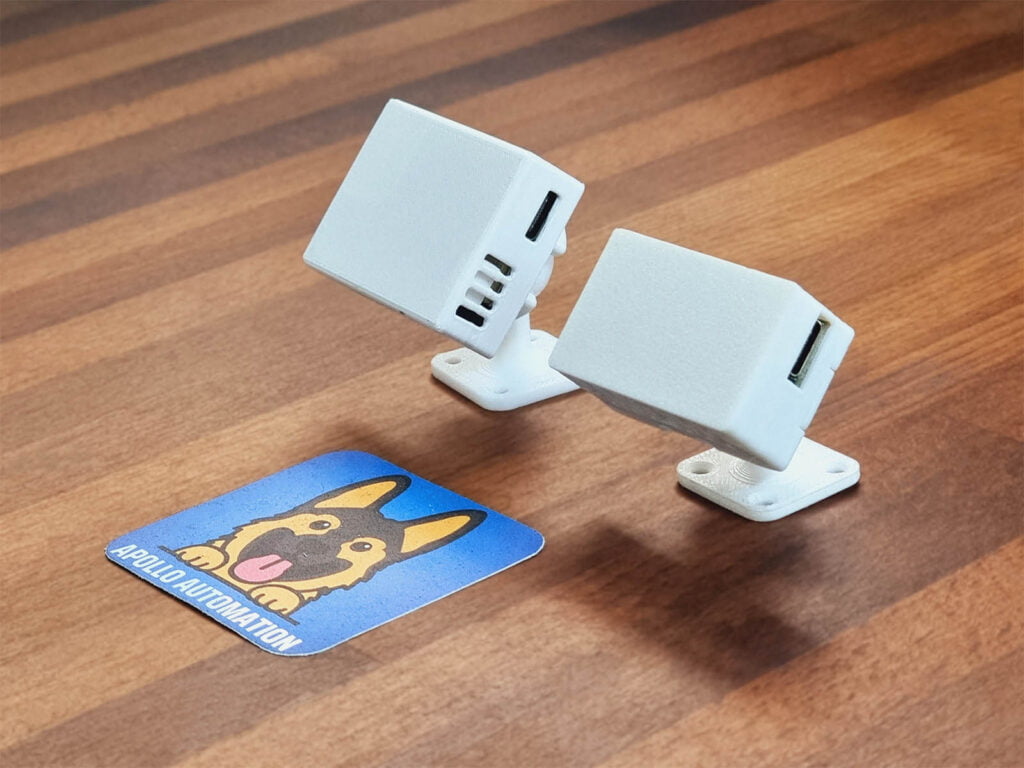
The case of the Apollo sensors is 3D printed and the finish is not super smooth, but a bit grainy. The rotating stand fits nicely inside the holder, but it’s possible it can get worn out and release it’s grip. I simply inserted a small piece of paper inside the holder on the MSR-1 when it happened and fixed it.
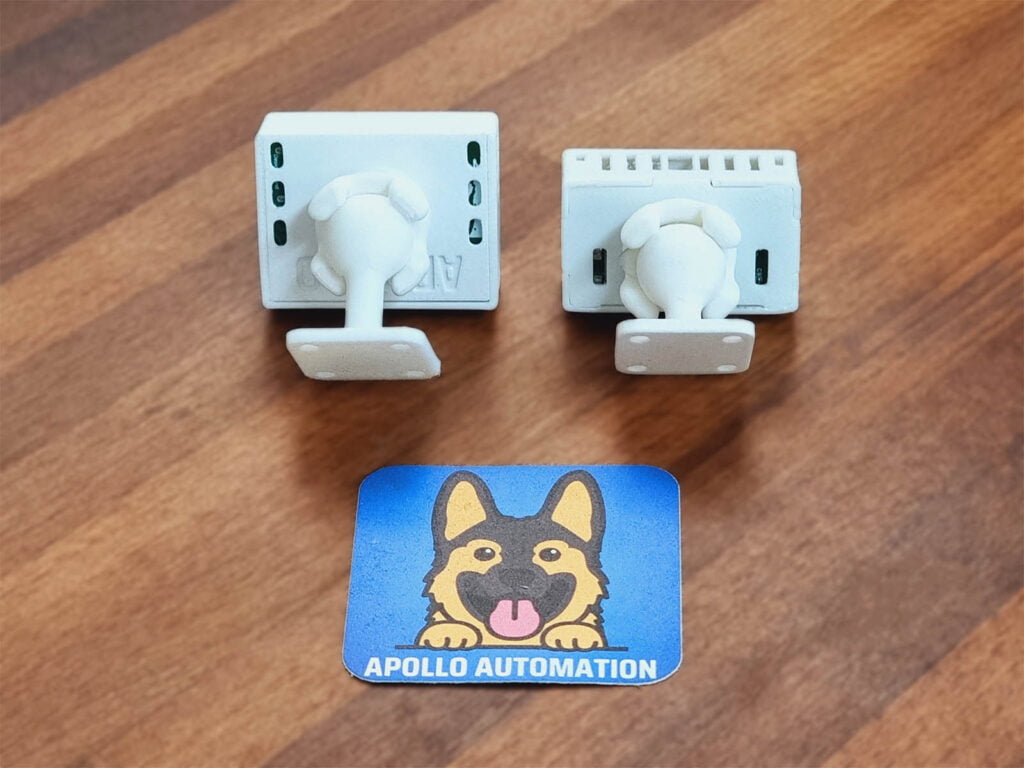
Setting both PCBs next to each other, and the true craftsmanship of these Apollo sensors can be appreciated. The PCB of the MSR-2 is only tall as the ESP32-C3-Mini board. I think they literally cannot make it any smaller with this ESP board model.
Both devices use the Hi-Link LD2410B [Datasheet] as a presence sensor, a well-known mmWave radar module with official ESPHome support. This sensor is one of the best, if not the best models for detecting still presence. I talked about creating a DIY sensor with this sensor yourself.
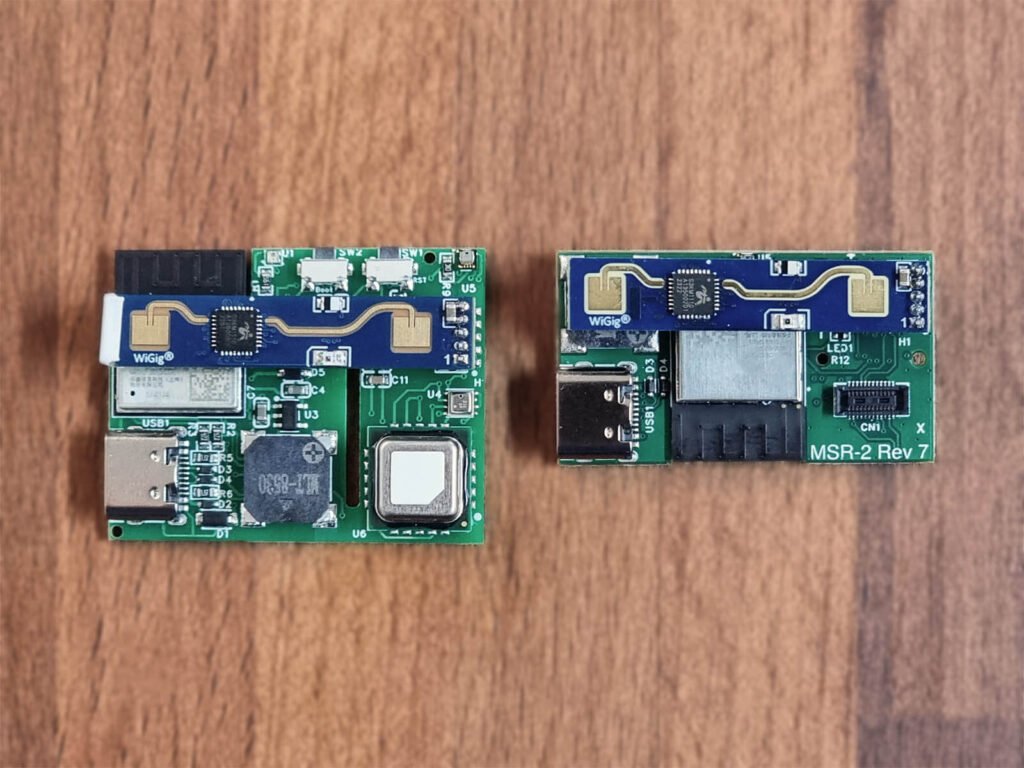
Both devices can optionally use the Sensirion SCD-40 [Datasheet] CO2 sensor, which can also measure temperature and humidity. This is a top tier photoacoustic NDIR sensor from Swiss manufacturer Sensirion. It’s small, accurate and has an average lifespan of over 10 years.
This sensor is also found in their AIR-1 Air Quality Monitor.
It’s worth noting that the MSR-2 does not measure humidity with it’s Infineon DPS310 [Datasheet] sensor. Apollo noted that the humidity measurement was wildly inaccurate on such a small board and they had to remove it. You can get a humidity measurement from the CO2 sensor though, if you decide to get it as an optional addon.
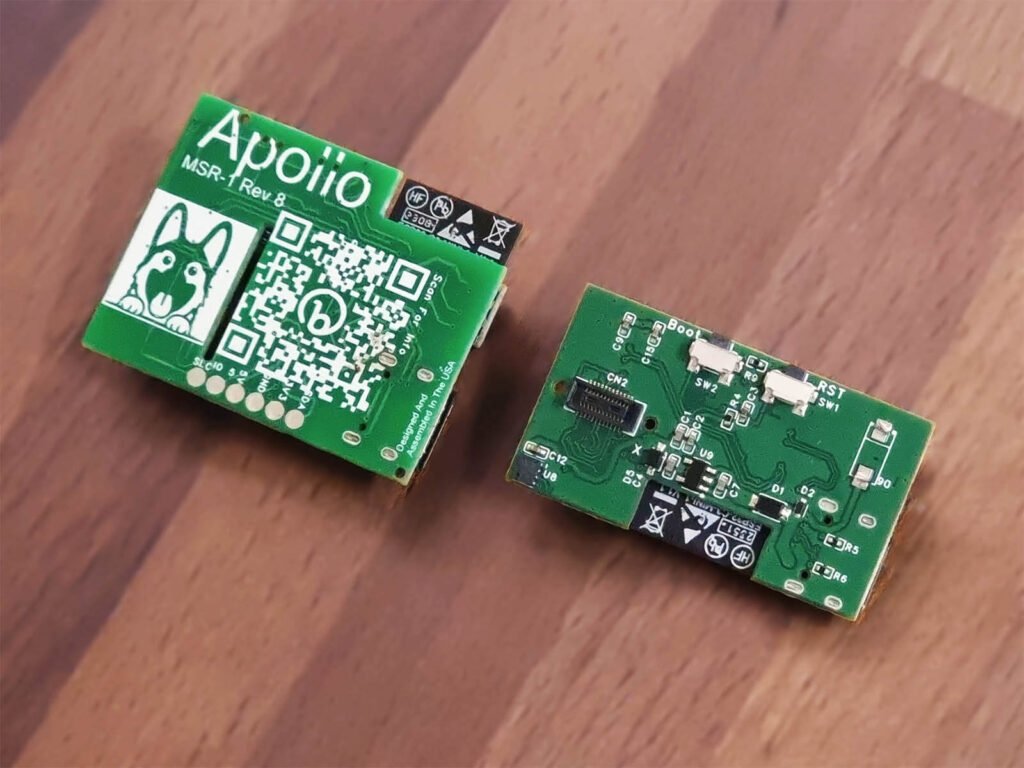
Looking at the PCBs from the back, I noticed it’s a completely redesigned PCB rather than a smaller version of the original. The ESP32 board is oriented differently, the boot and reset buttons are placed on a different position and there is an extra port on the MSR-2 for connecting additional sensors.
This port is used for attaching the back-facing USB-C port addon, which is useful for hiding the cables from sight.
Home Assistant Integration
Just like the MSR-1, the MSR-2 comes pre-flashed and ready to go. You simply need to connect to the Wi-Fi SSID it broadcasts, input your network credentials and add the device to Home Assistant. Once it’s connected to your Wi-Fi, it will get auto-discovered and added via ESPHome. If it doesn’t, all you need to do is add a new ESPHome device and use the IP address of the MSR-2.
Sensors and Entities
Once I got the MSR-2 integrated in Home Assistant, it exposed a total of 77 entities. Most of them are pretty self-explanatory and provide the basic measurements of the sensors. If you read my review of the MSR-1 (or own one), you already understand the operation logic of the LD2410b radar sensor.
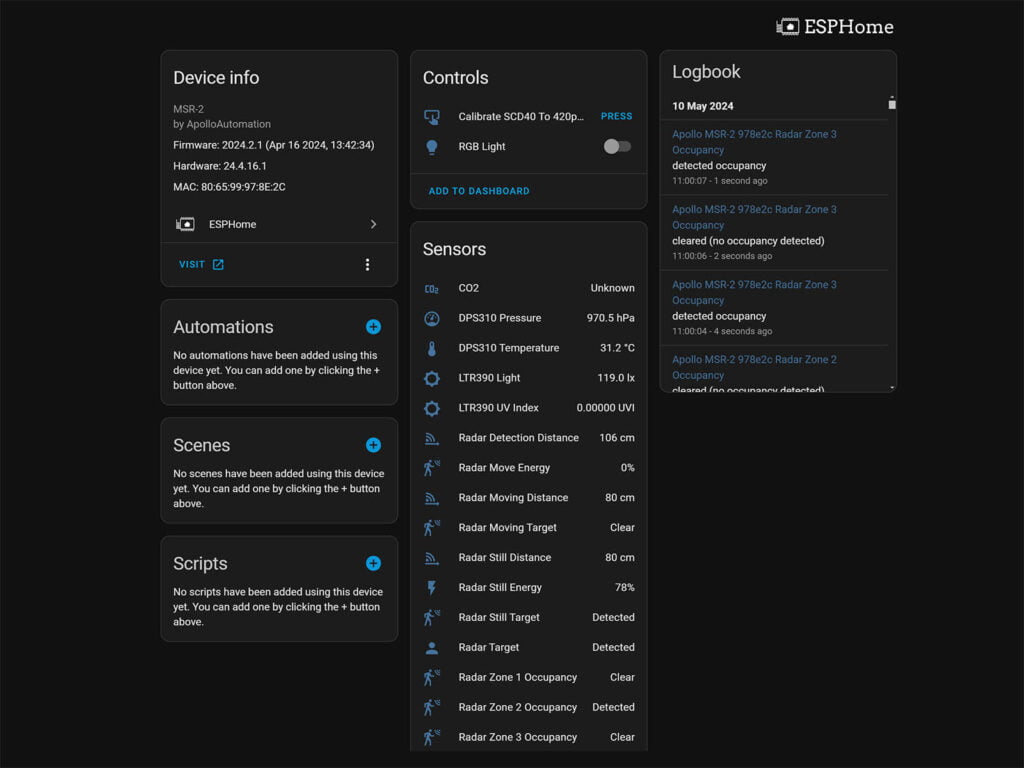
Primarily, the radar distinguishes between still and moving targets, operating independently of each other. Whenever a still or moving target is detected, their respective states change accordingly. These states are integrated into the radar target entity, reflecting both as conditions. For presence to be cleared, both states must be clear. If only one is detecting presence, the state remains as detected.
The radar detection distance and radar moving distance entities provide precise measurements in centimeters to the target. Additionally, radar moving energy and radar still energy measure the energy and speed of the target distance. A higher percentage reading indicates faster movement.
Just like the MSR-1, the MSR-2 is capable of using detection zones. You can set up to three detection zones by specifying distances in centimeters. For example, if Zone 1 is set to 50cm, it detects presence within 0-50cm. Zone 2 starts where Zone 1 ends; if set to 300cm, it detects presence from 50-300cm. I created a small bar for easier visualization for the MSR-1 review which also applies here:

Fine tuning the presence sensor
To fine-tune the MSR-2 and eliminate false triggers, we can use the sensor feature called Gates. These are energy thresholds for different detection distances of the HLK-LD2410b sensor. Each gate represents a set distance from the sensor, allowing you to adjust move and still energy thresholds to eliminate false positive or negative triggers. For example, if you need specific areas in its field of view to be less sensitive, you can lower the gate thresholds. If you need them to be more sensitive, you can increase it. The LD2410b has the following gates and thresholds by default:
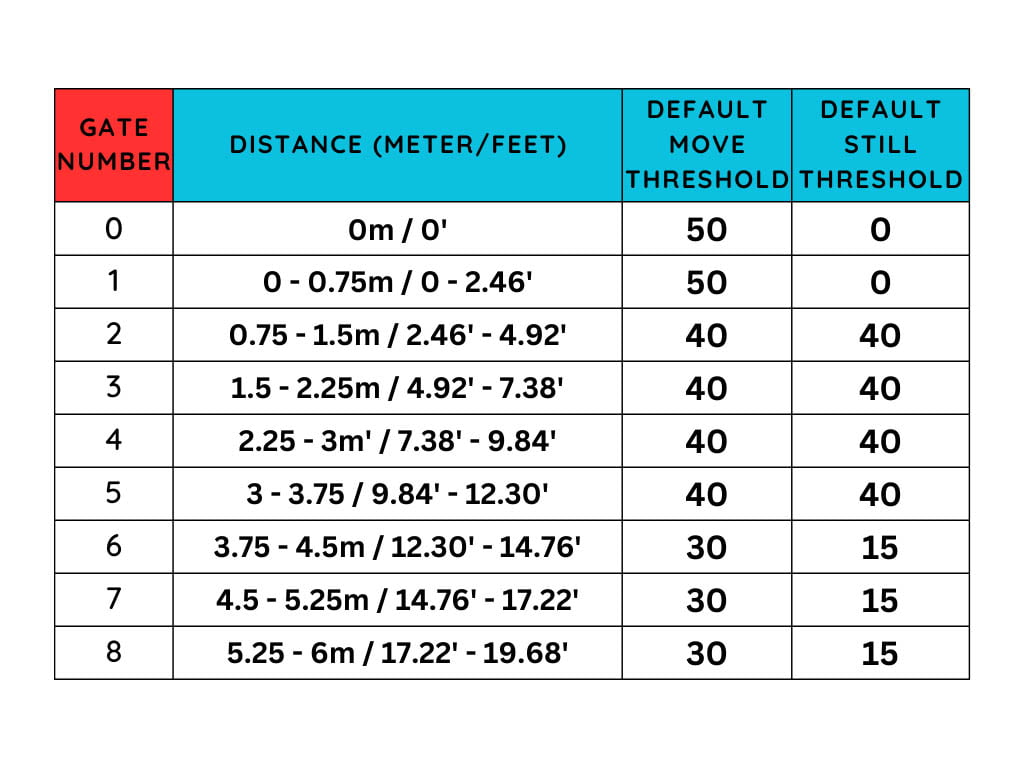
First, enable the Radar Engineering Mode entity under configuration. Identify the gate you want to tweak, for example the third gate measuring movement from 1.5 to 2.25 meters. Adjust the move and still thresholds of the selected gate from low to high. Or start by maxing out the values and gradually lowering them until it detects a person without false triggering from other sources.
You will need to repeat this process to optimally fine tune the radar sensor. Once tuning is complete, remember to turn off Radar Engineering Mode.
Automating the RGB and Piezo Buzzer
The onboard RGB LED and Piezo buzzer can be easily automated and used as visual/audible indicators. For example, the LED can change color based on the temperature reading. Or the audible indicator can play a tune whenever CO2 surpasses a certain threshold, alerting you that you need to open a window.
While the RGB LED can be controlled just like any other light in Home Assistant, the buzzer requires RTTTL (Ring Tone Text Transfer Language) to output melodies. Here’s a few tunes you can add to an automation and play with the piezo buzzer (more here):
Mission Impossible
service: esphome.apollo_msr_2_978e2c_play_buzzer
data:
  song_str: >-

mission_imp:d=16,o=6,b=95:32d,32d#,32d,32d#,32d,32d#,32d,32d#,32d,32d,32d#,32e,32f,32f#,32g,g,8p,g,8p,a#,p,c7,p,g,8p,g,8p,f,p,f#,p,g,8p,g,8p,a#,p,c7,p,g,8p,g,8p,f,p,f#,p,a#,g,2d,32p,a#,g,2c#,32p,a#,g,2c,a#5,8c,2p,32p,a#5,g5,2f#,32p,a#5,g5,2f,32p,a#5,g5,2e,d#,8d
Super Mario Bros
service: esphome.apollo_msr_2_978e2c_play_buzzer
data:
  song_str: >-
    smb:d=4,o=5,b=100:16e6,16e6,32p,8e6,16c6,8e6,8g6,8p,8g,8p,8c6,16p,8g,16p,8e,16p,8a,8b,16a#,8a,16g.,16e6,16g6,8a6,16f6,8g6,8e6,16c6,16d6,8b,16p,8c6,16p,8g,16p,8e,16p,8a,8b,16a#,8a,16g.,16e6,16g6,8a6,16f6,8g6,8e6,16c6,16d6,8b,8p,16g6,16f#6,16f6,16d#6,16p,16e6,16p,16g#,16a,16c6,16p,16a,16c6,16d6,8p,16g6,16f#6,16f6,16d#6,16p,16e6,16p,16c7,16p,16c7,16c7,p,16g6,16f#6,16f6,16d#6,16p,16e6,16p,16g#,16a,16c6,16p,16a,16c6,16d6,8p,16d#6,8p,16d6,8p,16c6
mode: single
Star Wars
service: esphome.apollo_msr_2_978e2c_play_buzzer
data:
  song_str: >-
    star_wars:d=16,o=5,b=100:4e,4e,4e,8c,p,g,4e,8c,p,g,4e,4p,4b,4b,4b,8c6,p,g,4d#,8c,p,g,4e,8p
The Good, The Bad and the Ugly
service: esphome.apollo_msr_2_978e2c_play_buzzer
data:
  song_str: >-
    GoodBad:d=4,o=5,b=56:32p,32a#,32d#6,32a#,32d#6,8a#.,16f#.,16g#.,d#,32a#,32d#6,32a#,32d#6,8a#.,16f#.,16g#.,c#6,32a#,32d#6,32a#,32d#6,8a#.,16f#.,32f.,32d#.,c#,32a#,32d#6,32a#,32d#6,8a#.,16g#.,d#'
Indiana Jones
service: esphome.apollo_msr_2_978e2c_play_buzzer
data:
  song_str: >-
    'Indiana:d=4,o=5,b=250:e,8p,8f,8g,8p,1c6,8p.,d,8p,8e,1f,p.,g,8p,8a,8b,8p,1f6,p,a,8p,8b,2c6,2d6,2e6,e,8p,8f,8g,8p,1c6,p,d6,8p,8e6,1f.6,g,8p,8g,e.6,8p,d6,8p,8g,e.6,8p,d6,8p,8g,f.6,8p,e6,8p,8d6,2c6'
Thermal Camera Test: Apollo MSR-1 vs MSR-2
Recently, I received a professional thermal imaging camera from Kaiweets, model KTI-W01 [Webstore, Amazon]. This will be put to good use by measuring the heat emitted by various smart devices that pass my testing bench. For example, switch modules under load can emit a lot of heat (looking at you Shelly 1PM Mini), so it will be useful to know if they are a potential fire hazard. I intend to write a separate article about this camera, since it’s pretty awesome.
Here’s an image of the Apollo MSR-1 (back) and MSR-2 (front):
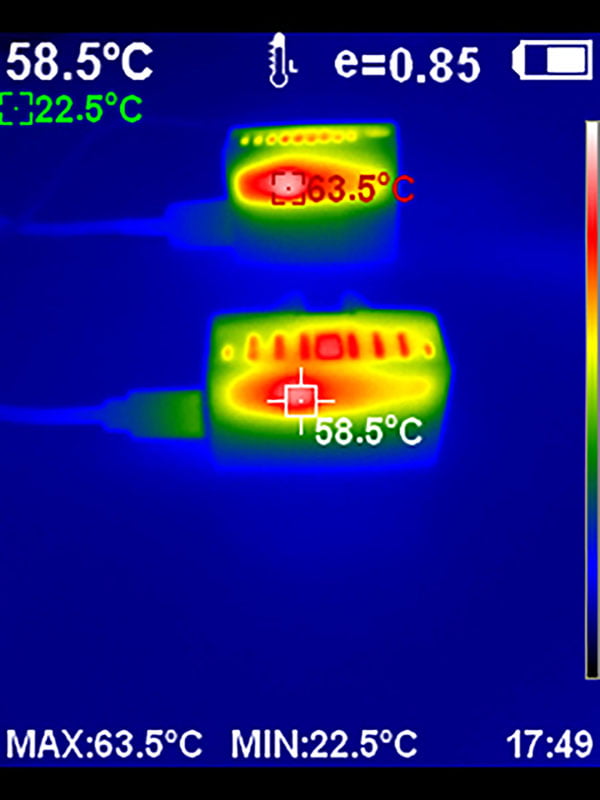
They’ve both been running for several days, in the same room, next to each other. The thermal cam reports a slightly higher temperature on the ESP32-C3-Mini inside the MSR-1. This difference is probably due to the fact because the MSR-2 is meshed top-bottom, while the MSR-1 is open top-sides.
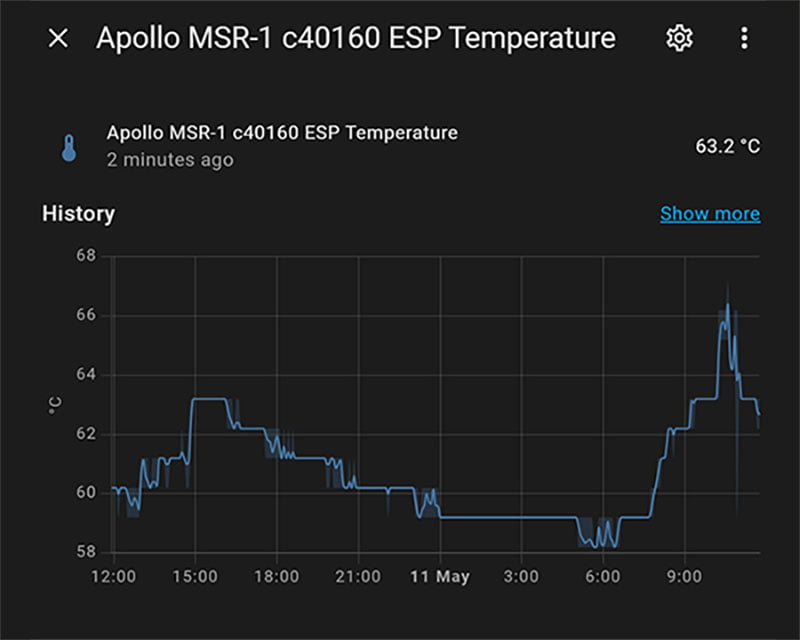
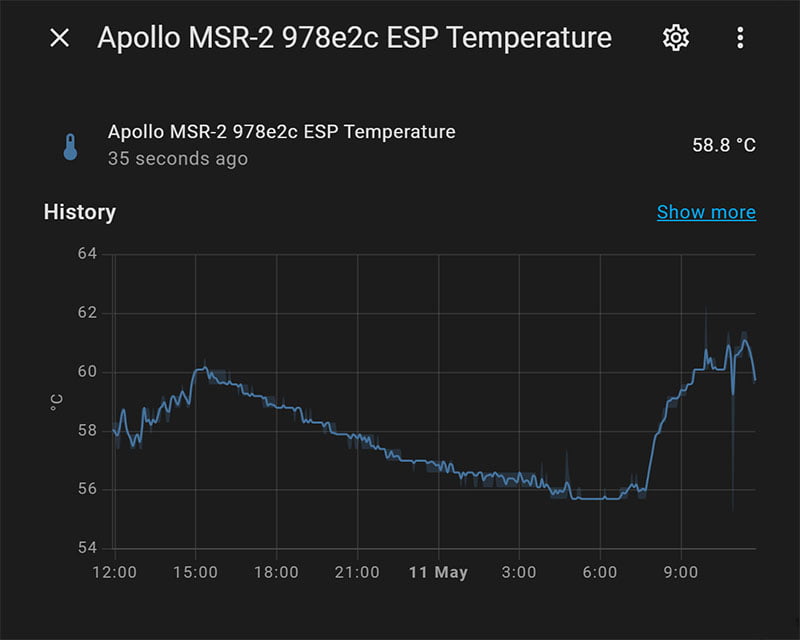
The internal sensor of the ESP board in Home Assistant reported a temperature of 63.2°C on the MSR-1, which is very close to the camera reading of 63.5°C. Similar reading on the MSR-2, 58.8°C in Home Assistant with 58.5°C on the camera. This tells me two things: the ESP boards are within their operational temperature limits (-25°C to 105°C) and the Kaiweets Thermal Imaging Camera appears to be correct!
Side note: My toolset consists of several things from Kaiweets, like their ES20 electric screwdriver set, KM601 digital multimeter and the KETS02 soldering iron kit. Their tools are great for smart home enthusiasts and DIY tinkerers.
Summary: Apollo MSR-1 vs MSR-2
Those who frequent this site, already know that I prefer deploying Zigbee devices in my smart home. Anything that can be Zigbee, must be Zigbee. Even though there are some good Zigbee presence sensors (MTG075-ZB-RL) out there, the flexibility and performance of ESP-based presence sensors is unmatched.
Since it uses the same hardware, the performance of the MSR-2 is identical to the MSR-1. The LD2410 is one of the better radar modules out there, all things considered. I went into detail about it in several posts, including the MSR-1 review.
If you are someone who likes to tinker and do things themselves, than you can assemble a similar device yourself and save a few bucks. You probably won’t be able to implement all the additional sensors in a DIY device, especially not one of this size, but it’s good to know you can. Read my guides to learn more: DIY LD2410 + ESP32 or LD1125H + ESP32.
If you want a presence sensor that works reliably with Home Assistant out of the box, than the Apollo MSR-1 or MSR-2 are for you. Some of the sensors (CO2) and addons are optional, so you can skip them if you don’t feel you need them. You can get Apollo devices on their store:
UPDATE: The MSR-1 was succeeded by the MSR-2 and it’s no longer being sold.


Is Esphome yaml config file available ?
What about support of future version of Esphome ?
Yes, you can view the full code on their official repo:
https://github.com/ApolloAutomation/MSR-2
The device will be supported with any future version of ESPHome.
Could you review the MTR-1 please? Would like to see different use case between the two.
Thanks
Yes, it’s on my to-do list!
Expect it shortly.
Can I set it up the esp32 to act as a Bluetooth proxy?
Yes you can!
Thanks.
Thanks for the great reviews and detailed information, your site has been very informative for learning about different sensors.
I’m interested in an occupancy sensor that I can use in my living room to control the lights based on presence/absence of a person. I would also like to add an automation to pause my TV if someone stands up and walks away from the couch, whether or not others are still on the couch. It’s clear the MTR-1 would do this well, but may struggle with the main purpose of keeping the lights on if someone is there sitting still.
Does the MSR-2 have the capability to do this? I’m still a little unclear on how “single target” tracking works when multiple people are present.
The MSR-2 simply keep the state as “occupied” as long as it’s detecting people present, regardless of how many there are.
It only clears state when the room is completely empty, resulting in a pretty binary way of operation.
It is VERY reliable in doing this and you can also utilize linear zones if that’s what you need. e.g. from 0-3 meters (zone1), from 3-5 meters (zone2) etc.
The MTR-1 counts and tracks targets in the room, but lacks a bit in reliable static detection.