While the Automation Editor in Home Assistant is, in my opinion, one of it’s most powerful assets, it can be a bit tedious setting up automations for simple things. They can stack pretty quickly and keeping track becomes quite a tiring task.
For example, let’s say you have a thermostat you want to control through Home Assistant. You would have to create complex schedules with automations, develop a way to keep them in check and make sure nothing breaks. Further more, editing on the fly becomes a chore if you want to even slightly adjust things.
Developer nieslfaber (Niels Faber) created a custom Scheduler Component & Card combo for creating schedules for any entity of Home Assistant right from your Lovelace dashboard. You can buy him a coffee if you find it useful and appreciate his work.
This tutorial guides you in setting up this awesome component & card combo through examples and use cases.
Installation
HACS
- Open HACS
- Click + Explore and Download Repositories
- Under Integrations, search for Scheduler Component
- Select the latest version
- Click on Download
- Click cancel to Restart prompt
- Click + Explore and Download Repositories again
- Under Frontend, search for Scheduler Card
- Select the latest version
- Click on Download
- Click to Reload Resources
- Restart Home Assistant
Manual
- Clone or download the integration repo https://github.com/nielsfaber/scheduler-component
- Copy the scheduler-component directory to config/custom_components/scheduler-component/…
- Download the latest release of scheduler-card.js here and place it into www/scheduler-card
- If you are using Lovelace in YAML mode, add a resource reference URL:
- Eg:
/local/scheduler-card/scheduler-card.js
- Eg:
- Restart Home Assistant
Adding the Integration
After Home Assistant has restarted, navigate to Settings > Devices & Services > + Add Integration
- Search for “Scheduler“
- Click the integration and click Finish to close the dialog box
- You can continue to setup the card in Lovelace.
Adding the Card
After you’ve setup the Scheduler Component & Card Combo, navigate to a dashboard that you would like to setup a schedule. Add a new card and select the Scheduler Card, from which you will be presented with a UI editor:
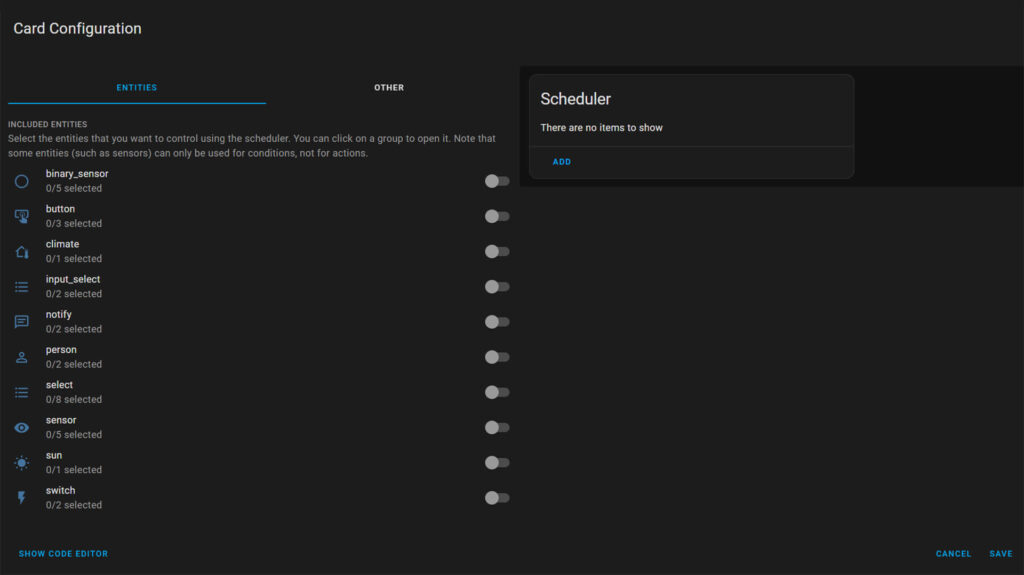
The card automatically groups all your available entities by domain on the left side of the screen. You can use the toggles here to add entities which you intend to control with the Scheduler Component by expanding each domain with a click. Select an entity you wish create schedules for and toggle it on. You can select multiple entities instead of one, they will all be added and controlled individually in the card.
On the second tab of the built-in menu, Other, some settings for the card appearance and behavior can be found. You can preset the title of the card, the time step, primary and secondary info displayed and add some tags for quick toggling between multiple cards. You can also select between two sorting modes: Time remaining until next action or Display the title schedule. If you select to show the Header Toggle, you can disable all schedules with one master switch.

Once you are done, click save and the card will be added to your dashboard. If you open the YAML code for the card, it will look something like this:
#Scheduler Card in Home Assistant
type: custom:scheduler-card
include:
  - climate.living_room
exclude: []
title: Thermostat Schedule
show_header_toggle: true
sort_by:
  - state
  - relative-time
display_options:
  primary_info: default
  secondary_info:
    - relative-time
    - time
    - additional-tasks
  icon: action
Creating Schedules
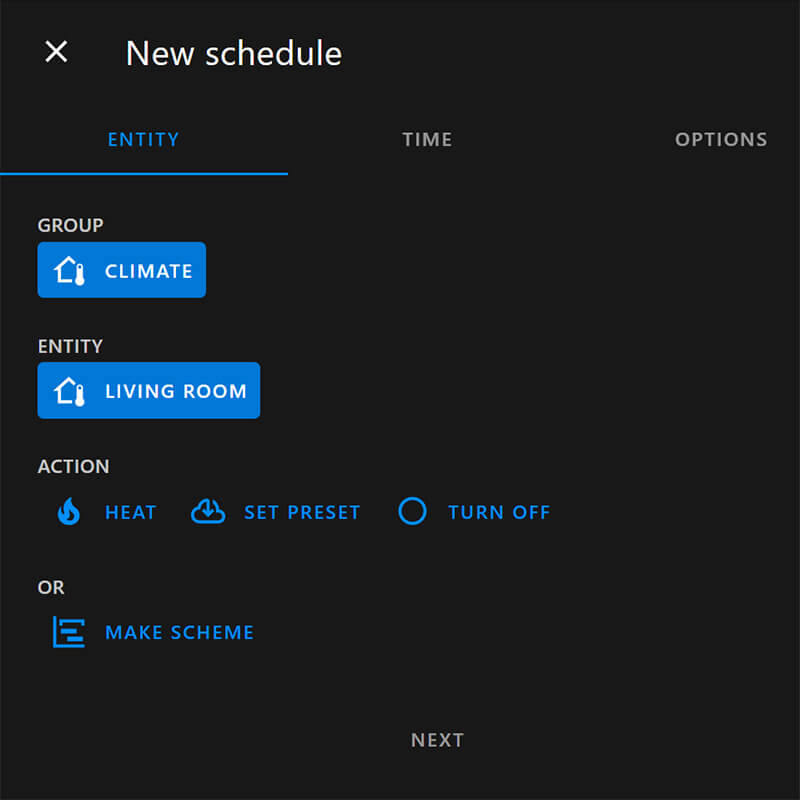
Example 1: Thermostats
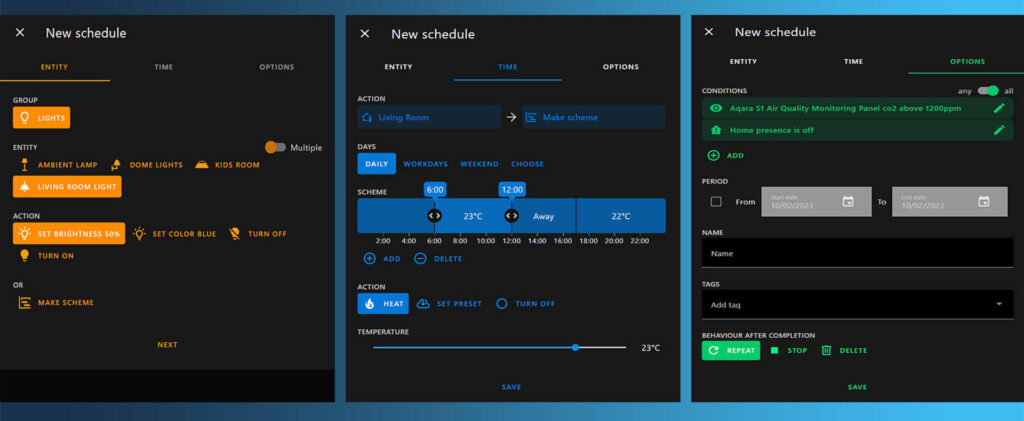
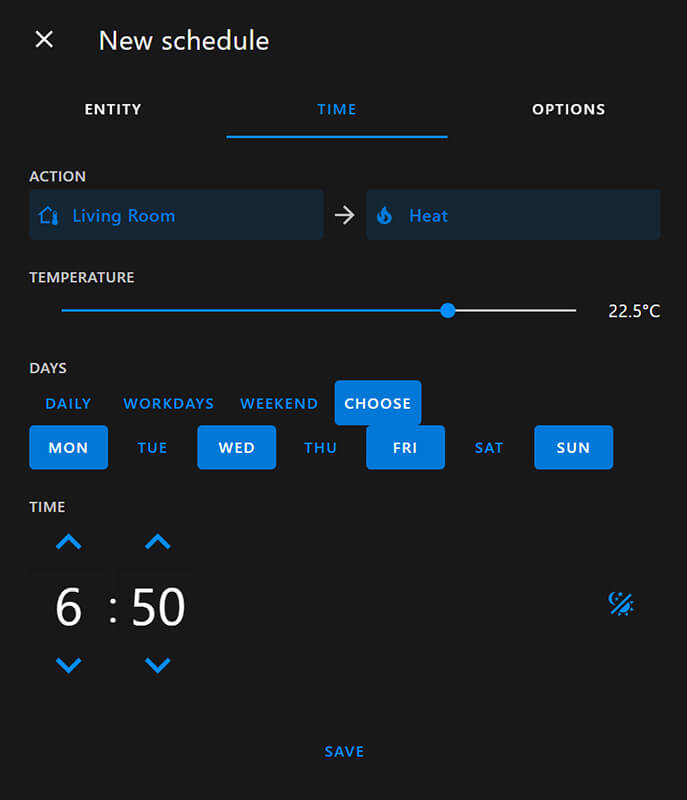
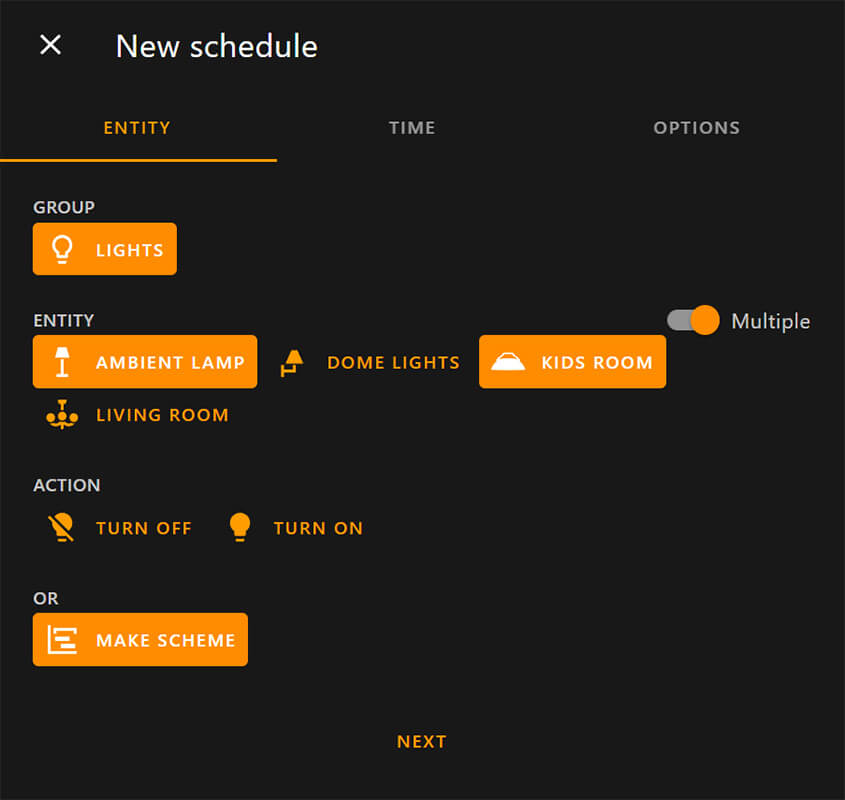
To create a schedule for your preselected entities, click the Add button of the card. You will be presented with a new dialog window to create a “New Schedule for the entities you added. If you’ve added multiple, they will be listed at the top:
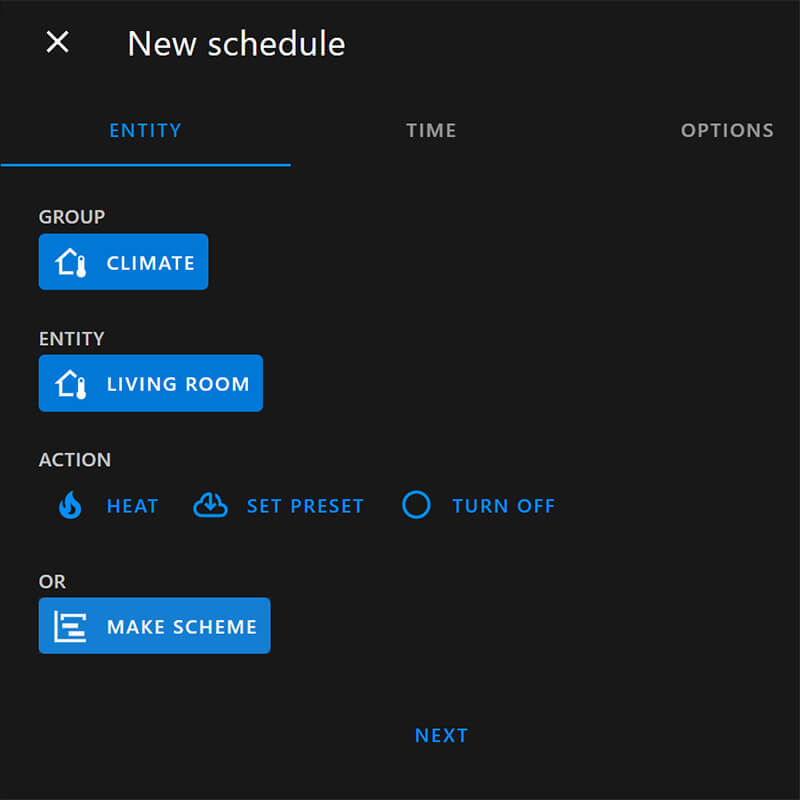
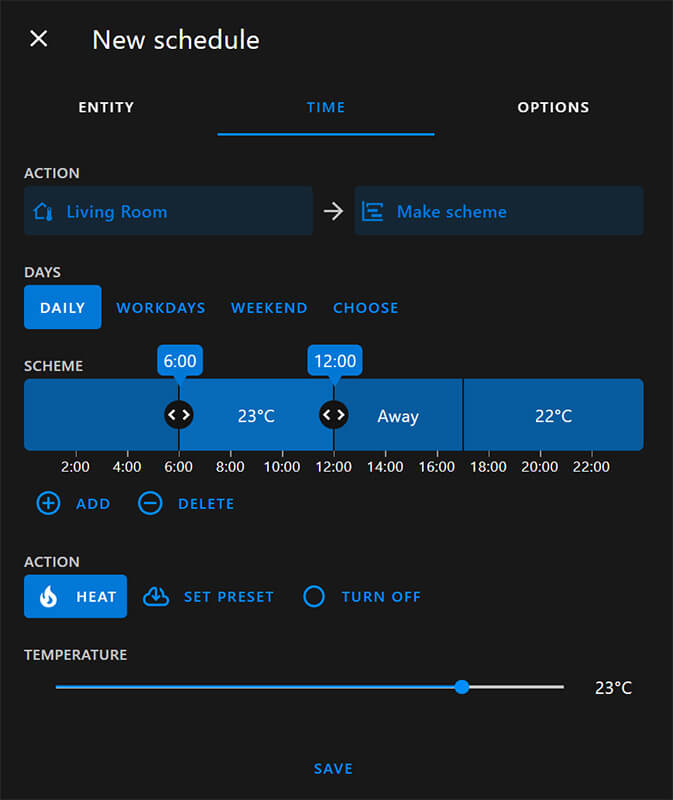
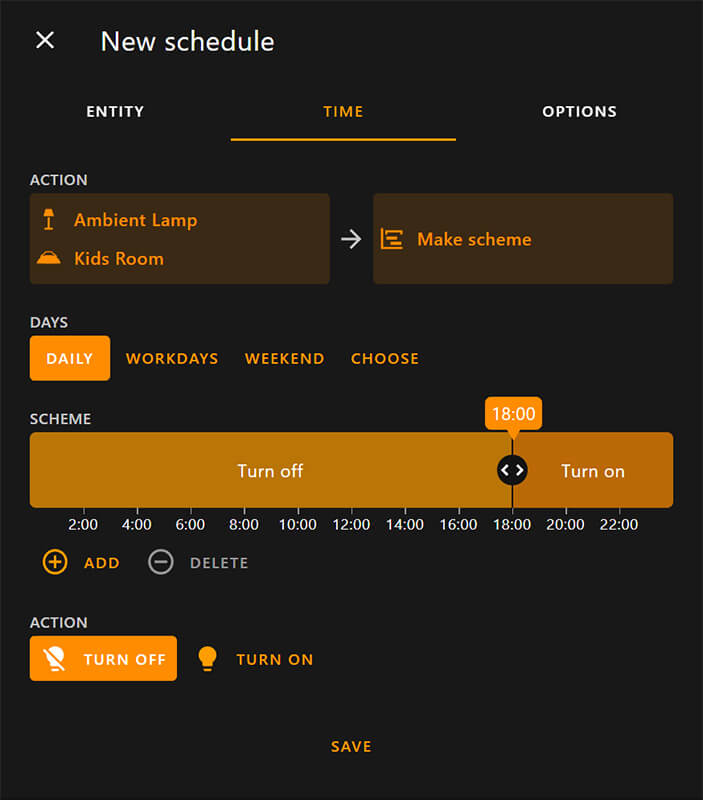
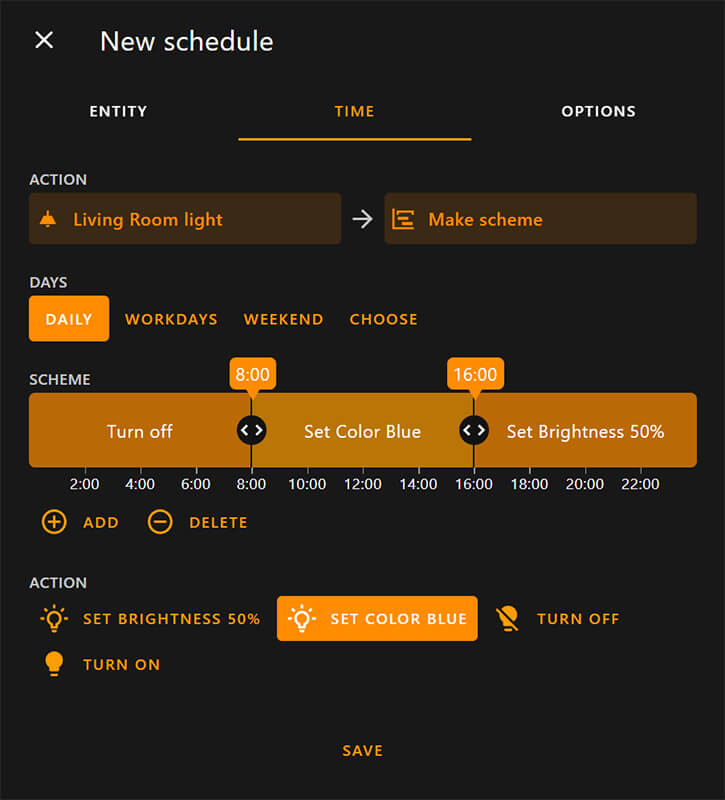
In the Make Scheme dialog window, the timer are draggable for easy adjustments. At the end of the timeslot, there is no action executed. This means that if you turn on a device during a timeslot, you will have to add a second timeslot to turn it off. It is highly recommended (but not required) to assign actions to every timeslot, such that the behavior for the whole day is defined.
If you decide you want to make changes, just click the text of the schedule in the middle of the card. This will open up the dialog window directly and you can make some quick adjustments. Simple, neat and easy.
Example 2: Lights
As another example, let’s create a few schedules for controlling lights in your home. I will create a list of available entities for the scheduler card and set a schedule individually for each.
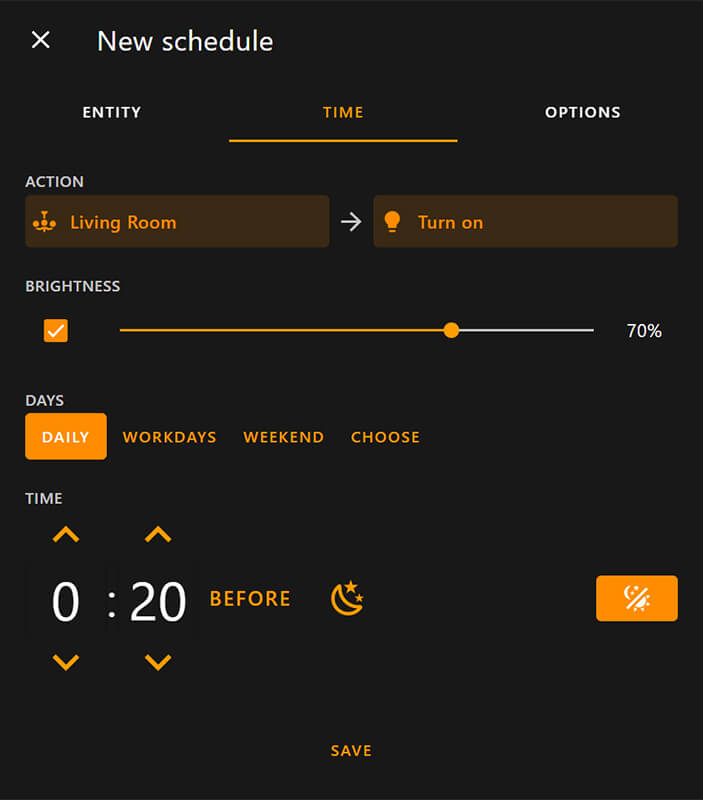
You click save and you schedules will appear on your dashboard again. You can quickly edit them by clicking the descriptive text on the card itself like I mentioned.
Note: The default Sun Integration is required for using sunrise/sunset offsets in the Scheduler card.
Customizing Actions
By default, the Scheduler Card will display all available actions for the selected entity (eg. Heat/Cool/Turn OFF or Light Turn ON/OFF). An Action simply determines what will be executed once the timer expires and conditions are met. It is possible to predefine Actions for your entities and have them available in the UI when creating schedules. To add custom actions, you can predefine them under the customize variable in the YAML code of the card.
A defined action is similar to a service_call in Home Assistant. It requires a service and optionally some parameters given by service_data. Entity ID does not need to be included in the service call when customizing the field because the Scheduler Component ties the action automatically to the selected ID.
Let’s say for example you want to create a Schedule that will turn on your lights to 50% brightness on a preset time. And maybe add another one that will set light color to blue:
#Customizing Actions
type: custom:scheduler-card
include:
  - device_tracker.s21ultra
  - light.dome_lights
  - light.kids_room
  - light.living_room
  - light.living_room_lamp
title: Lights Schedule
show_header_toggle: true
customize:
  light.living_room:
    name: Living Room light
    icon: hass:ceiling-light
    actions:
      - service: turn_on
        service_data:
          brightness_pct: 50
        name: Set Brightness 50%
        icon: hass:lightbulb-on-outline
      - service: turn_on
        service_data:
          rgb_color:
            - 4
            - 0
            - 255
        name: Set Color Blue
        icon: hass:lightbulb-on-outline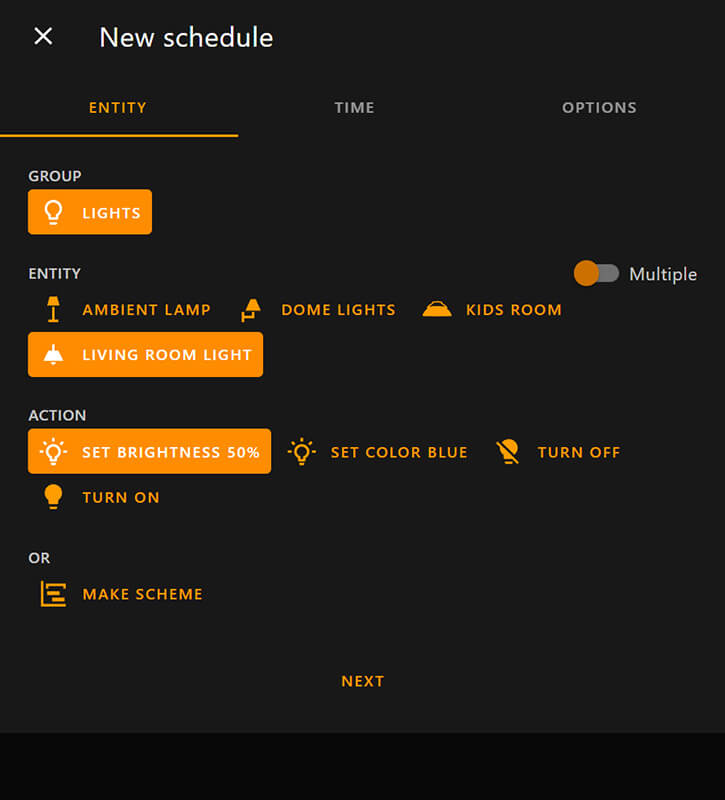
It is also possible to customize the built-in actions for a particular entity. By default, the scheduler component looks up the properties of your HA entities to show the correct actions in the card. This provides the right behavior in most cases, but exceptions are possible. To overcome this, the Scheduler Component allows overwriting the built-in actions with your own defined parameters.
Here’s an example for customizing the Auto mode of a thermostat entity with a preset temperature range and step:
#Customize HVAC Auto Mode
customize:
  climate.living_room:
    exclude_actions:
      - heat       #Hide to avoid duplicates
      - set mode   #Hide to avoid duplicates
    actions:       #Custom Actions
      - service: set_temperature
        service_data:
          hvac_mode: auto
        variables:
          temperature:
            min: 16
            max: 25
            step: 0.5
            unit: '°C'
        icon: 'mdi:fire'
        name: "heat[ to {temperature}]" #Display Name of Action in Card
Customizing Conditions
Similarly, you can use a specific entity as a condition in a schedule, that can be configured by defining it under the customize variable as well. To achieve this, we need to give it the possible states an entity can have from two options:
– Define a list of possible states under the states variable
– Define a numeric range under the states variable
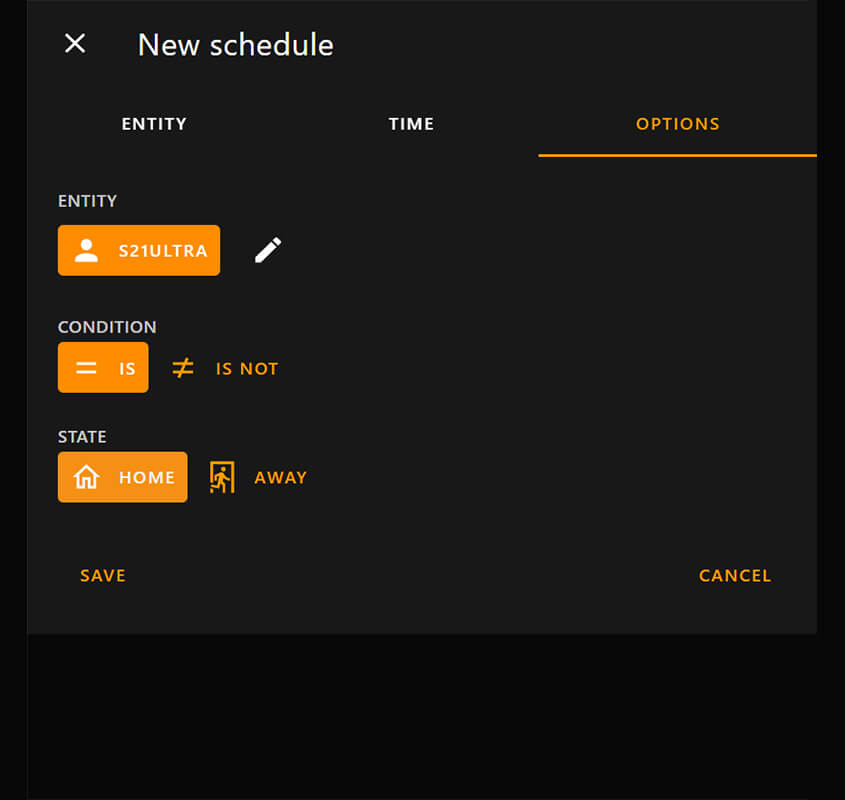
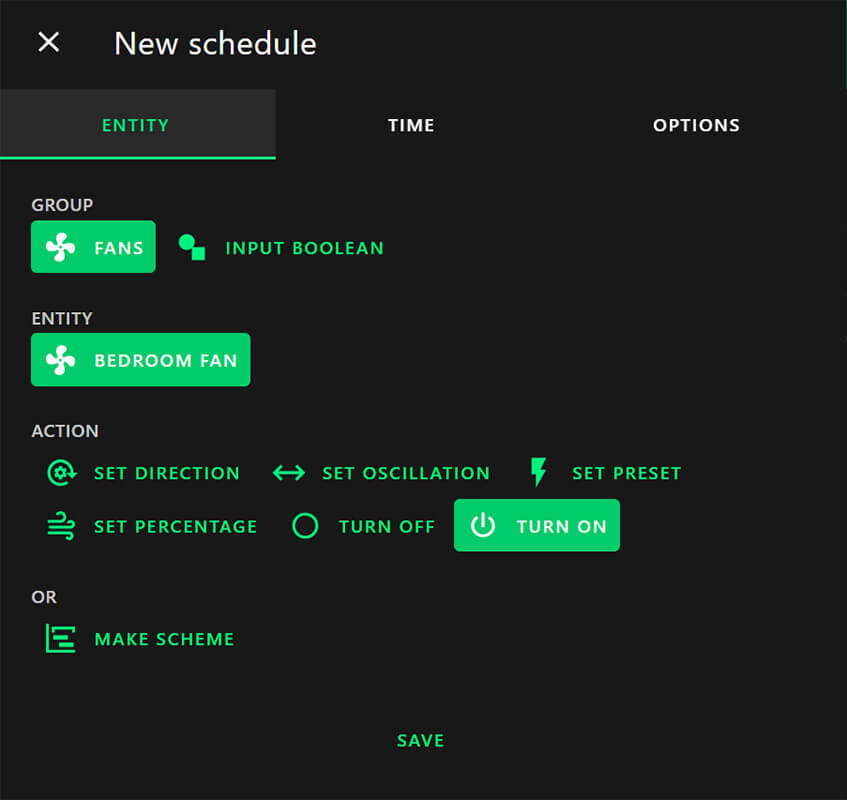
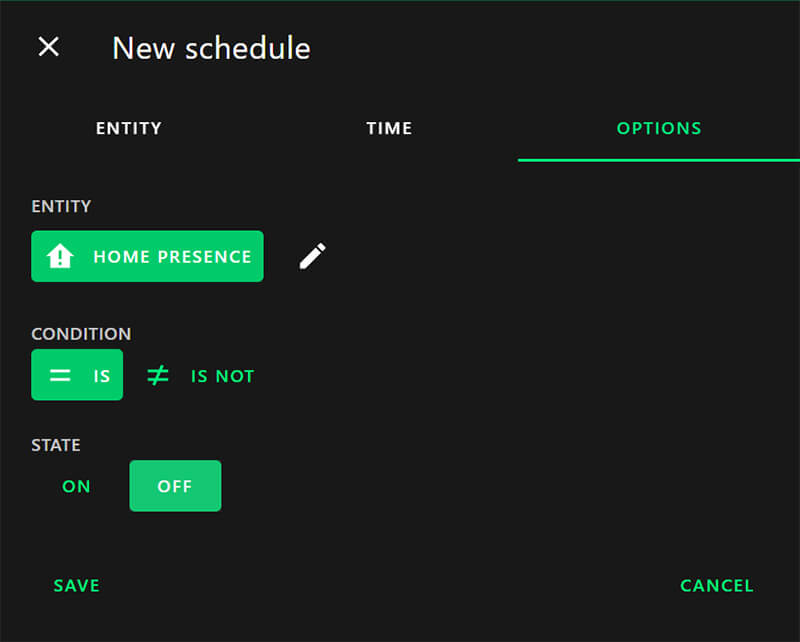
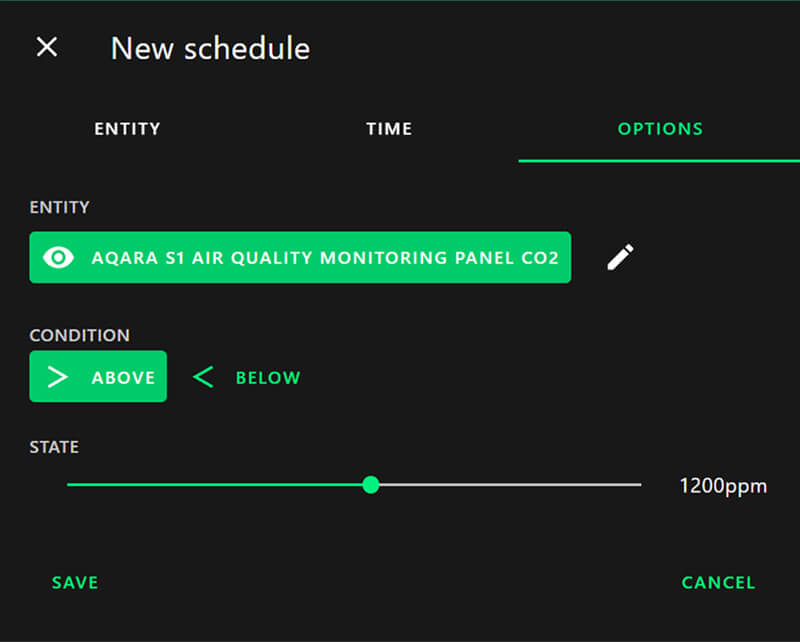
For example, let’s say I want to define two conditions. One is an input boolean that indicates if somewhere is home or not and the other is the current level of CO2 in my home. Subsequently, I want to use both of these as a condition in my schedule:
– If no one is home at 10:00AM and the CO2 range (Provided by Aqara S1) is above 1200ppm, Turn on Fan:
#Possible States
customize:
  input_boolean.home_presence:
    states:
      - 'on'
      - 'off'
#Numeric Range
customize:
  sensor.aqara_s1_air_quality_co2:
    states:
      min: 300
      max: 2000
      step: 50
      unit: ppm
To implement these conditions in the Scheduler Card:
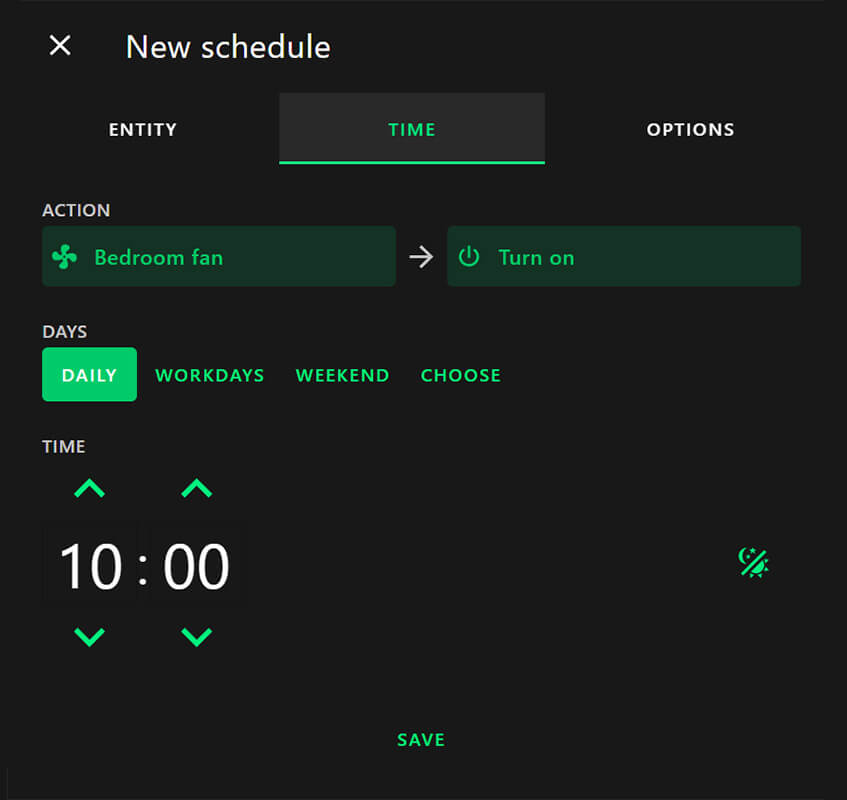
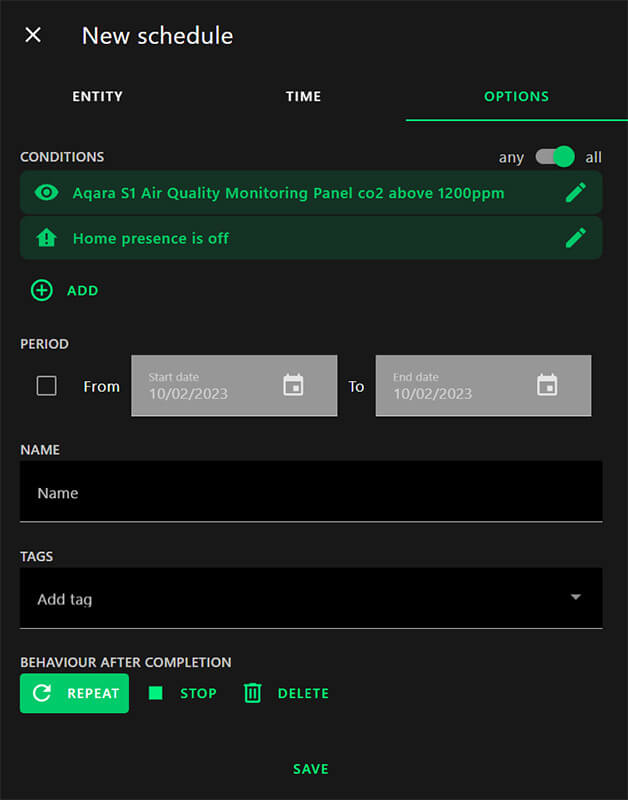
Once both conditions are added, you will notice a small toggle in the top corner which you can use to determine whether both or any of the listed conditions should be met before the schedule runs.
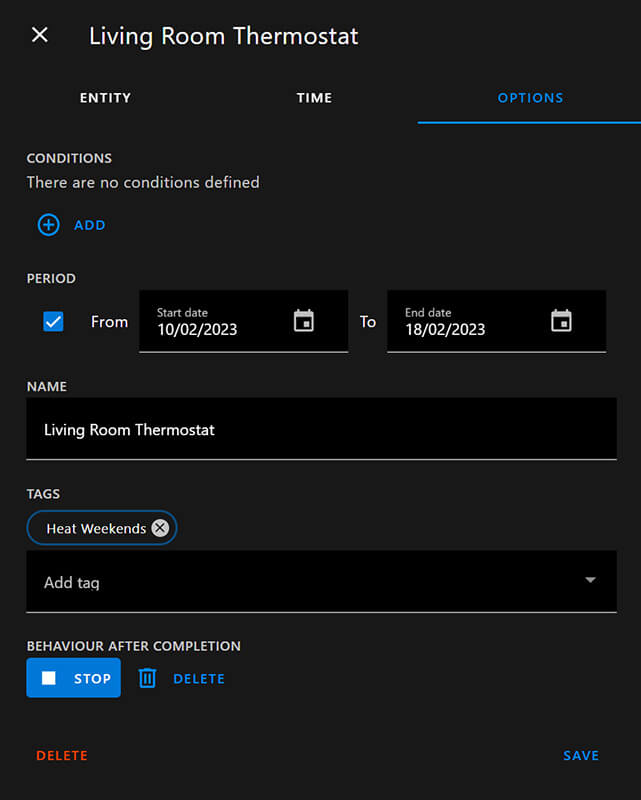
Optionally, you can select the Behavior After Completion (Repeat, Stop, Delete) and Period of the Active Schedule (Date Range).
At the bottom, you will notice a Tags field, which simply groups the schedules in the card’s UI on your dashboard for a more unified appearance. For example, “vacation” can be added to multiple different entities from different domains which will be grouped as one.
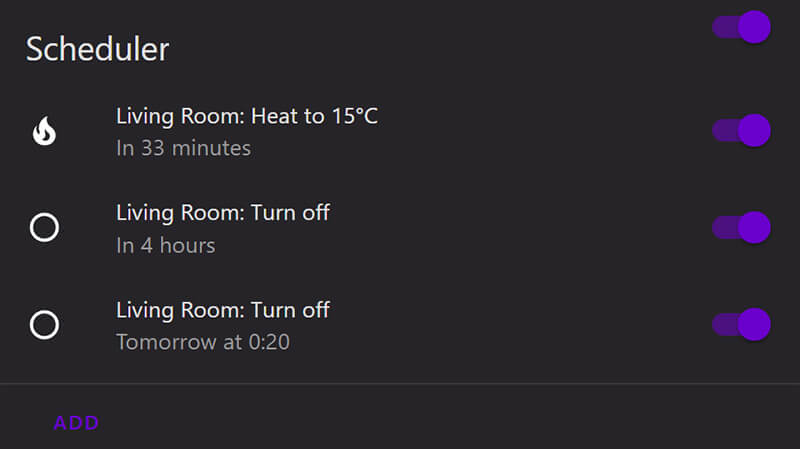
Card Display Options
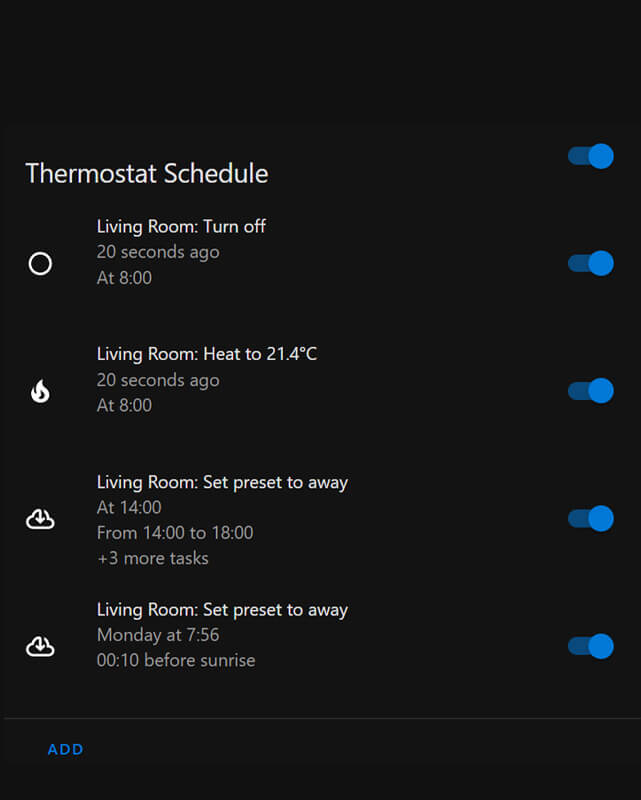
By default, the card displays your added schedules in a standardized list, showing entity and action on the first line, and remaining time until next trigger on the second line. You can customize the appearance of the schedules, by arranging the elements under the display_options variable and some HTML magic:
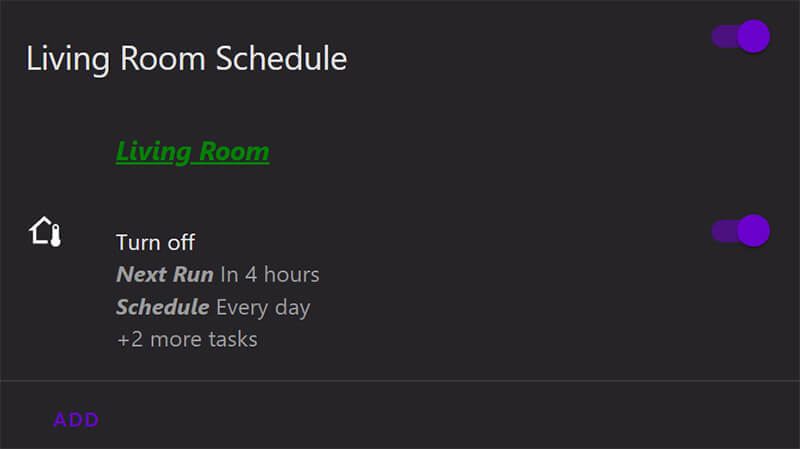
#Customized Appearance of the Scheduler Card
type: custom:scheduler-card
include:
  - climate.living_room
exclude: []
title: Living Room Schedule
sort_by:
  - state
  - relative-time
display_options:
  primary_info:
    - <i><b><u><h3 style=color:green>{entity}</style></b></i></u>
    - action
  secondary_info:
    - <i><b>Next Run</b></i>{relative-time}
    - <i><b>Schedule</b></i> {days}
    - additional-tasks
  icon: entity
show_header_toggle: true
You can experiment with HTML markup to achieve some desired custom effect and inline the appearance with your dashboard.
Summary
The Scheduler Component & Card are an easy way to create simple schedules for your entities right from your dashboard in Home Assistant. Developer nielsfaber went above and beyond in developing this custom integration by adding a bunch of customizability options for actions, conditions, entity states etc.
So, what the difference? Why use the Scheduler component over the built-in Automation Editor in Home Assistant? Naturally, the automation editor remains the most powerful and versatile tool for developing complex automations. But for simple schedules editable quickly in a user-friendly interface I feel like the Scheduler Card can’t be beat.
For example, scheduling a Thermostat properly in the automation editor will require a bunch of different automations relying on complex operation logic that you would have to provide and develop. The more complex your needs are, the more issues you are going to encounter making it work as it should.
With the Scheduler card, it’s quite the opposite. Add the entity, select a direct action or make a scheme of actions, select the time and optionally add a condition. Click save and the schedule is ready, active and displayed on your dashboard.
Whether you want to bother with it, I suggest you try it out and decide for yourself. Consider treating developer nielsfaber with a coffee for developing this awesome integration if you find any use for it. If you like to see more awesome tutorials like these, you can buy us a coffee too.


I grabbed this when you mentioned it during your thermostats review. Fantastic. My “learning” thermostat wasn’t learning properly, so I’ve set up the scheduler to adjust things based on sunset/sunrise. It’s still a range that the power company can override (they’ll drop or raise it by a degree, typically) but it’s better controlled now.
The integration is awesome, I use it with a bunch of things that I do not want to create automations for.
Good thing is it can be as a simple as you want it or as complex as you need it!
Excellent.
I have just set it up to control use of battery and charge from grid on my inverter. Very nice… BUt, as there always is 😉
It would be amazing fantastic if i could have the schedule for more than one entity present at the same time to avoid mistakes when setting these to schedules, another possibility which would make it even easier would not to have to select on/off but one schedule with choice of individual states for each entity…But this will definitely save me a lot of work not needing to change automations manually any longer every day according to the electricity-price, so a big thank you for the brilliant project you made 🙂
I just found this integration and card and testet it successful – thank you so much!
My question (may be a little opposite to the idea of a user friendly configuration with drag&drop):
Would it be possible to set the values of time slots via other input helper? As some guys already mentioned it is hard to nearly impossible to set these values on small screen – I do have a problem setting an interval of 10 minutes on a 27″ monitor 😉
Maybe it is already possible with som YAML code, but I didn’t find it yet.
Thanks for any tip!