About 4 months ago, I reviewed a pretty great Air Quality Monitor from INKBIRD, labelled as IAM-T1. It’s a device with an e-ink screen, measuring temperature, humidity, air pressure and CO2 with a next-gen Senseair HVAC sensor. You can check out the full review here.
At the time, the INKBIRD IAM-T1 could not be integrated in Home Assistant since the device was new and Bluetooth characteristics (UUIDs) were not my thing, I prefer all things Zigbee. Luckily, someone managed to develop the lambda functions in ESPHome for the IAM-T1. All credit goes to ammaraskar for this code.
In this article, I am sharing how to integrate the INKBIRD IAM-T1 with an ESP32 board in Home Assistant via ESPHome.
You can get the IAM-T1 on Amazon US, Amazon DE or Amazon UK.
Getting the IAM-T1 MAC Address
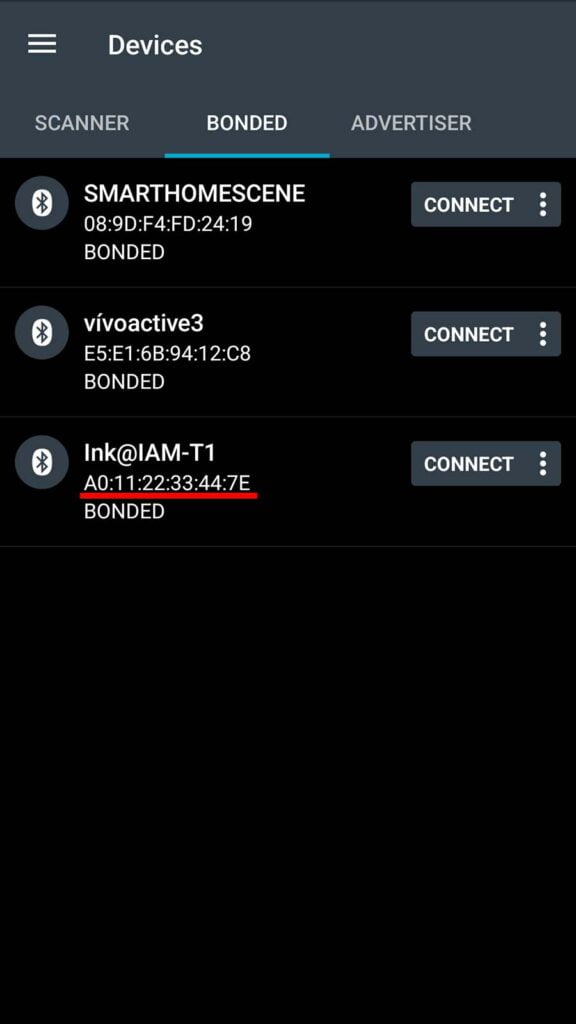
There are several ways to get the MAC Address of a Bluetooth device, some easier than the other. You can always flash an ESP32 board with the ble_client component and scan for devices, which will parse their MACs in the logs. However, I prefer simply using the nRF Connect App on my phone and getting the address that way.
- Make sure Bluetooth is turned on on the IAM-T1 (the button under the battery cap)
- Install the app on your phone
- Turn on Bluetooth on your phone
- Open the app and grant the necessary permissions
- Press the Scan button at the top
- The app will scan for any Bluetooth devices advertising near your phone
- Find the Ink@IAM-T1 and note the MAC Address
- Write it down somewhere
- Done
Flashing an ESP32 Board
You will need an ESP32 board with Bluetooth to connect to the INKBIRD IAM-T1 via the ble_client integration. Any generic board will do, no need to go overboard. You can even add the configuration to an existing board, as long as you are mindful of the RAM usage.
In Home Assistant, open ESPHome and create a new device giving it a name and board type. This will create the initial configuration and you can flash the file either Wirelessly or via USB from the host system. If you are having trouble, check out the ESPHome getting started guide.
Open ESPHome again and click Edit to add the Inkbird IAM-T1 configuration. Add the following code bellow everything else generated by ESPHome, change the MAC Address to your device and flash the ESP32 board again.
esp32_ble_tracker:

ble_client:
  # INKBIRD IAM-T1 MAC Address
  - mac_address: A0:11:22:33:44:7E #CHANGE MAC ADDRESS
    id: inkbird_iam_t1

sensor:
  # Temperature
  - platform: ble_client
    ble_client_id: inkbird_iam_t1
    name: "IAM-T1 Temperature"
    device_class: temperature
    icon: 'mdi:temperature-celsius'
    unit_of_measurement: '°C'
    accuracy_decimals: 1
    service_uuid: 'ffe0'
    characteristic_uuid: 'ffe4'
    notify: true
    type: characteristic
    lambda: |-
      uint8_t is_negative = x[4] & 0xF;
      uint16_t temp = (x[5] << 8) | x[6];
      if (is_negative == 1) {
        return -((float)temp) / 10.0;
      } else {
        return ((float)temp) / 10.0;
      }
  # Humidity
  - platform: ble_client
    ble_client_id: inkbird_iam_t1
    name: "IAM-T1 Humidity"
    device_class: humidity
    icon: 'mdi:water-percent'
    unit_of_measurement: '%'
    accuracy_decimals: 1
    service_uuid: 'ffe0'
    characteristic_uuid: 'ffe4'
    notify: true
    type: characteristic
    lambda: |-
      uint16_t humidity = (x[7] << 8) | x[8];
      return ((float)humidity) / 10.0;
  # Carbon Dioxide CO2
  - platform: ble_client
    ble_client_id: inkbird_iam_t1
    name: "IAM-T1 CO2"
    device_class: carbon_dioxide
    icon: 'mdi:molecule-co2'
    unit_of_measurement: 'ppm'
    accuracy_decimals: 0
    service_uuid: 'ffe0'
    characteristic_uuid: 'ffe4'
    notify: true
    type: characteristic
    lambda: |-
      uint16_t co2 = (x[9] << 8) | x[10];
      return (float)co2;
  # Air Pressure hPa
  - platform: ble_client
    ble_client_id: inkbird_iam_t1
    name: "IAM-T1 Air Pressure"
    device_class: atmospheric_pressure
    unit_of_measurement: 'hPa'
    accuracy_decimals: 0
    icon: 'mdi:gauge'
    service_uuid: 'ffe0'
    characteristic_uuid: 'ffe4'
    notify: true
    type: characteristic
    lambda: |-
      uint16_t pressure = (x[11] << 8) | x[12];
      return (float)pressure;
Adding the IAM-T1 in Home Assistant
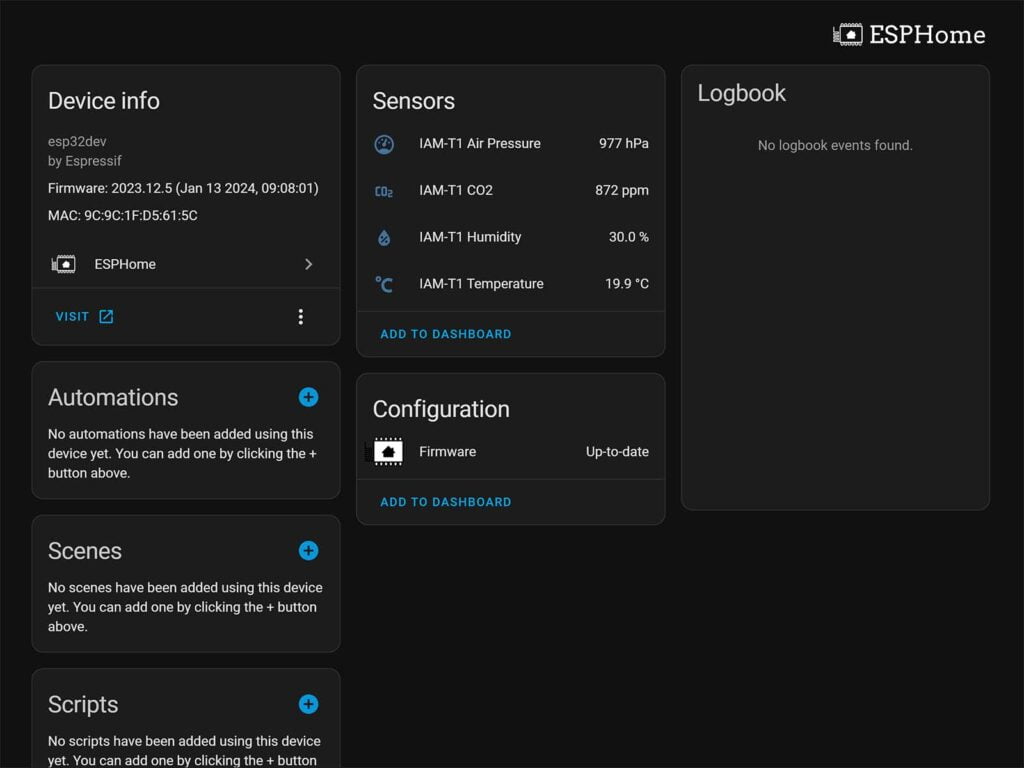
After you’ve flashed the ESP32 board, the device will get auto discovered in Home Assistant. If it doesn’t, you can add it manually by click Settings > Devices & Services > +Add Integration > ESPHome and inputting the IP and encryption key. Here are the sensors this config exposes to Home Assistant via ESPHome:
Changing the Reporting Interval
Since data is pushed and not polled, to change the reporting interval, you will need to use the INKBIRD app on your phone. This is a one time thing and you can freely delete the app afterwards. Open the INKBIRD app and click the IAM-T1:
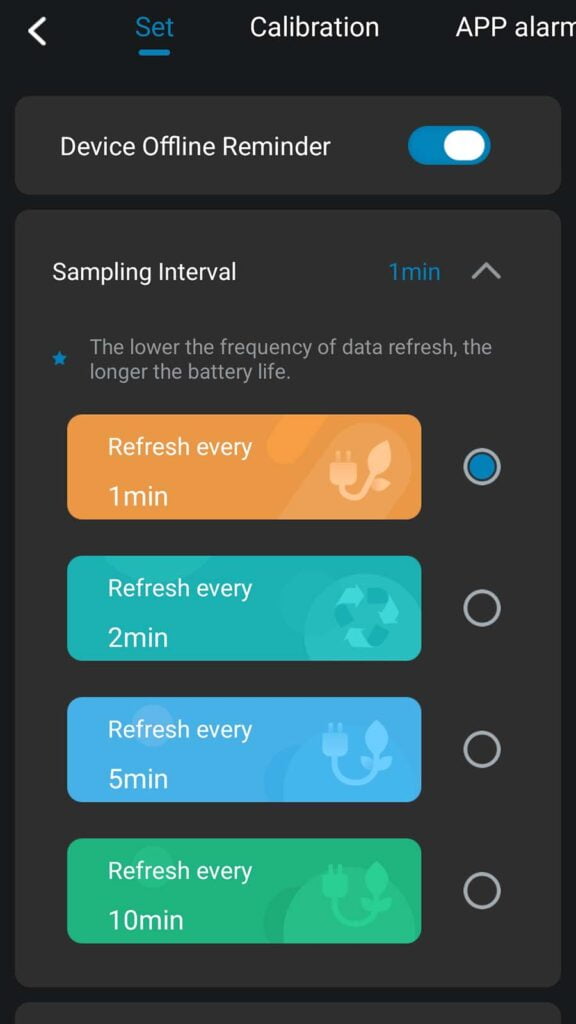
Scroll down to Sampling Interval and pick one of the available options: 1, 2, 5 and 10 minutes.
Important thing to note here is that even though the Inkbird IAM-T1 has a claimed battery life of 4 years, this is measured in lab conditions with a 10 minute sampling interval.
Lowering it will reduce the battery life, but will make the data more usable in Home Assistant and any relevant automations you create.
Another thing to note is the Sampling interval also changes the refresh rate of the display.
Changing to Fahrenheit
If you want to use Fahrenheit instead of Celsius, you need to change two things: First, change to Fahrenheit in the INKBIRD app which will change the unit on the display and second, change the code in ESPHome so it matches the data pushed.
In ESPHome, change the following lines under the Temperature sensor:
sensor:
  # Temperature
  - platform: ble_client
    ble_client_id: inkbird_iam_t1
    name: "IAM-T1 Temperature"
    device_class: temperature
    icon: 'mdi:temperature-fahrenheit' #Change icon
    unit_of_measurement: '°F' #Change unit of measurement
    accuracy_decimals: 1
    service_uuid: 'ffe0'
    characteristic_uuid: 'ffe4'
    notify: true
    type: characteristic
    lambda: |-
      uint8_t is_negative = x[4] & 0xF;
      uint16_t temp = (x[5] << 8) | x[6];
      if (is_negative == 1) {
        return -((float)temp) / 10.0;
      } else {
        return ((float)temp) / 10.0;
      }
Full Configuration
Here’s the full ESPHome configuration for easier understanding, with an added Restart button:
esphome:
  name: inkbird-iam-t1
  friendly_name: INKBIRD IAM-T1

esp32:
  board: esp32dev
  framework:
    type: arduino

# Enable logging
logger:

# Enable Home Assistant API
api:
  encryption:
    key: "XXXXXXX8eAstkcFG4MMz+c9/YFyPDa7m8FW0="

ota:
  password: "XXXXXXX9397436ae85f0c4"

wifi:
  ssid: !secret wifi_ssid
  password: !secret wifi_password

  # Enable fallback hotspot (captive portal) in case wifi connection fails
  ap:
    ssid: "Inkbird-Iam-T1 Fallback Hotspot"
    password: "XXXXXXheAe6Q"

captive_portal:

esp32_ble_tracker:

ble_client:
  # INKBIRD IAM-T1 MAC Address
  - mac_address: A0:11:22:33:44:7E
    id: inkbird_iam_t1

sensor:
  # Temperature
  - platform: ble_client
    ble_client_id: inkbird_iam_t1
    name: "IAM-T1 Temperature"
    device_class: temperature
    icon: 'mdi:temperature-celsius'
    unit_of_measurement: '°C'
    accuracy_decimals: 1
    service_uuid: 'ffe0'
    characteristic_uuid: 'ffe4'
    notify: true
    type: characteristic
    lambda: |-
      uint8_t is_negative = x[4] & 0xF;
      uint16_t temp = (x[5] << 8) | x[6];
      if (is_negative == 1) {
        return -((float)temp) / 10.0;
      } else {
        return ((float)temp) / 10.0;
      }
  # Humidity
  - platform: ble_client
    ble_client_id: inkbird_iam_t1
    name: "IAM-T1 Humidity"
    device_class: humidity
    icon: 'mdi:water-percent'
    unit_of_measurement: '%'
    accuracy_decimals: 1
    service_uuid: 'ffe0'
    characteristic_uuid: 'ffe4'
    notify: true
    type: characteristic
    lambda: |-
      uint16_t humidity = (x[7] << 8) | x[8];
      return ((float)humidity) / 10.0;
  # Carbon Dioxide CO2
  - platform: ble_client
    ble_client_id: inkbird_iam_t1
    name: "IAM-T1 CO2"
    device_class: carbon_dioxide
    icon: 'mdi:molecule-co2'
    unit_of_measurement: 'ppm'
    accuracy_decimals: 0
    service_uuid: 'ffe0'
    characteristic_uuid: 'ffe4'
    notify: true
    type: characteristic
    lambda: |-
      uint16_t co2 = (x[9] << 8) | x[10];
      return (float)co2;
  # Air Pressure hPa
  - platform: ble_client
    ble_client_id: inkbird_iam_t1
    name: "IAM-T1 Air Pressure"
    device_class: atmospheric_pressure
    unit_of_measurement: 'hPa'
    accuracy_decimals: 0
    icon: 'mdi:gauge'
    service_uuid: 'ffe0'
    characteristic_uuid: 'ffe4'
    notify: true
    type: characteristic
    lambda: |-
      uint16_t pressure = (x[11] << 8) | x[12];
      return (float)pressure;
button:
  - platform: restart
    icon: mdi:power-cycle
    name: "ESP Reboot"


Hey there,
Great tutorial and thanks for figuring it out and documenting.
A quick question, you used an esp32 module to connect the sensor. Do you have an idea whether the same could be achieved with a raspberry built in bluetooth module?
Thanks,
Cornelius
Hi,
The whole point of microcontrollers like ESP32 is that they run the binary directly and don’t need an operating system to do that. Which is what ESPHome was designed for.
A full blown computer architecture (Like a Pi) requires a disk-based operating system and process management etc. introducing a whole lot of overhead causing energy waste, a lot of error sources, needs maintenance etc. Which is not what ESPHome is designed for.
You could a Raspberry Pi Pico W though:
https://web.esphome.io/?pico
Although, it’s possible the code to be added to custom Bluetooth integrations for Home Assiatant which would work natively on a Pi4.
Cheers.