If you recently had a newborn, than you are already getting familiar with the amount of effort needed from you, the caregiver. Keeping track of all the things a baby needs is a substantial chore and much of your own free time and hobbies are going to be put on hold.
If you do have a baby, this is the Home Assistant integration for you right now. If you do it right, it will improve the WAF (Wife Acceptance Factor) significantly and make your wife happy. If you do it wrong, and somehow manage to promote it as a chore for her, on top of what she’s already dealing with, bad for you and Home Assistant my dear guy.
My youngest one is a year old, so I’ve been meaning to write this tutorial for a while now. So, here it is, Baby Buddy in Home Assistant.
What’s Baby Buddy?
Baby Buddy is an open source software which helps caregivers track sleep, feedings, diaper changes, tummy time and more to learn about and predict your baby’s needs, without (or as much) guess work.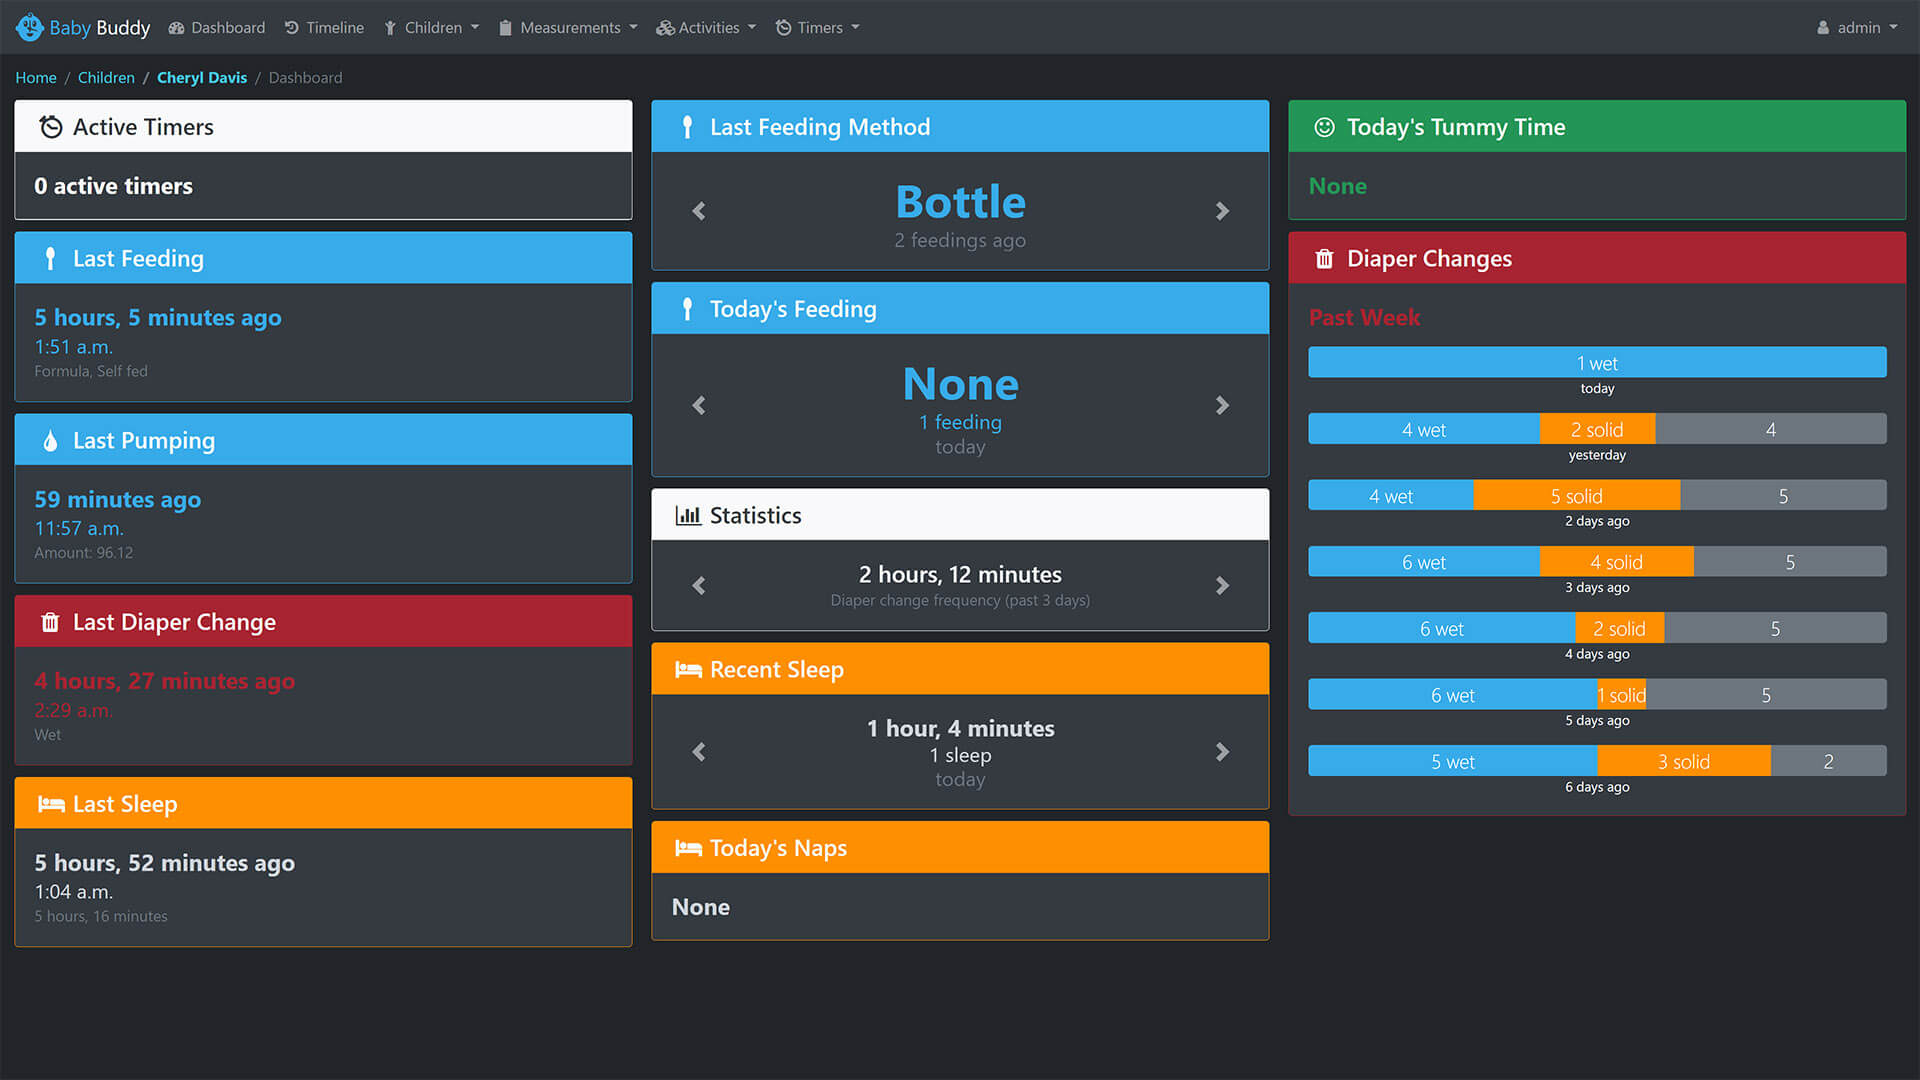
To familiarize yourself with the capabilities and dashboard of Baby Buddy, visit the demo instance and click around. Login with username: admin and password: admin
How it works?
Baby Buddy comes as a Home Assistant Add-on and an Integration and to really utilize it’s features, you are going to want both. The Add-On hosts the Baby Buddy instance directly on your Home Assistant server, while the Integration is used to monitor data, start timers and automate things natively within HA.
Other installation methods are possible for Baby Buddy:
- Docker
- Clever Cloud
- Manual Installation to any Server/VPS
For the purpose of this tutorial, I’m going to install both the Baby Buddy Add-on and Integration on Home Assistant directly and show you how to use it.
Installation
Home Assistant Add-On
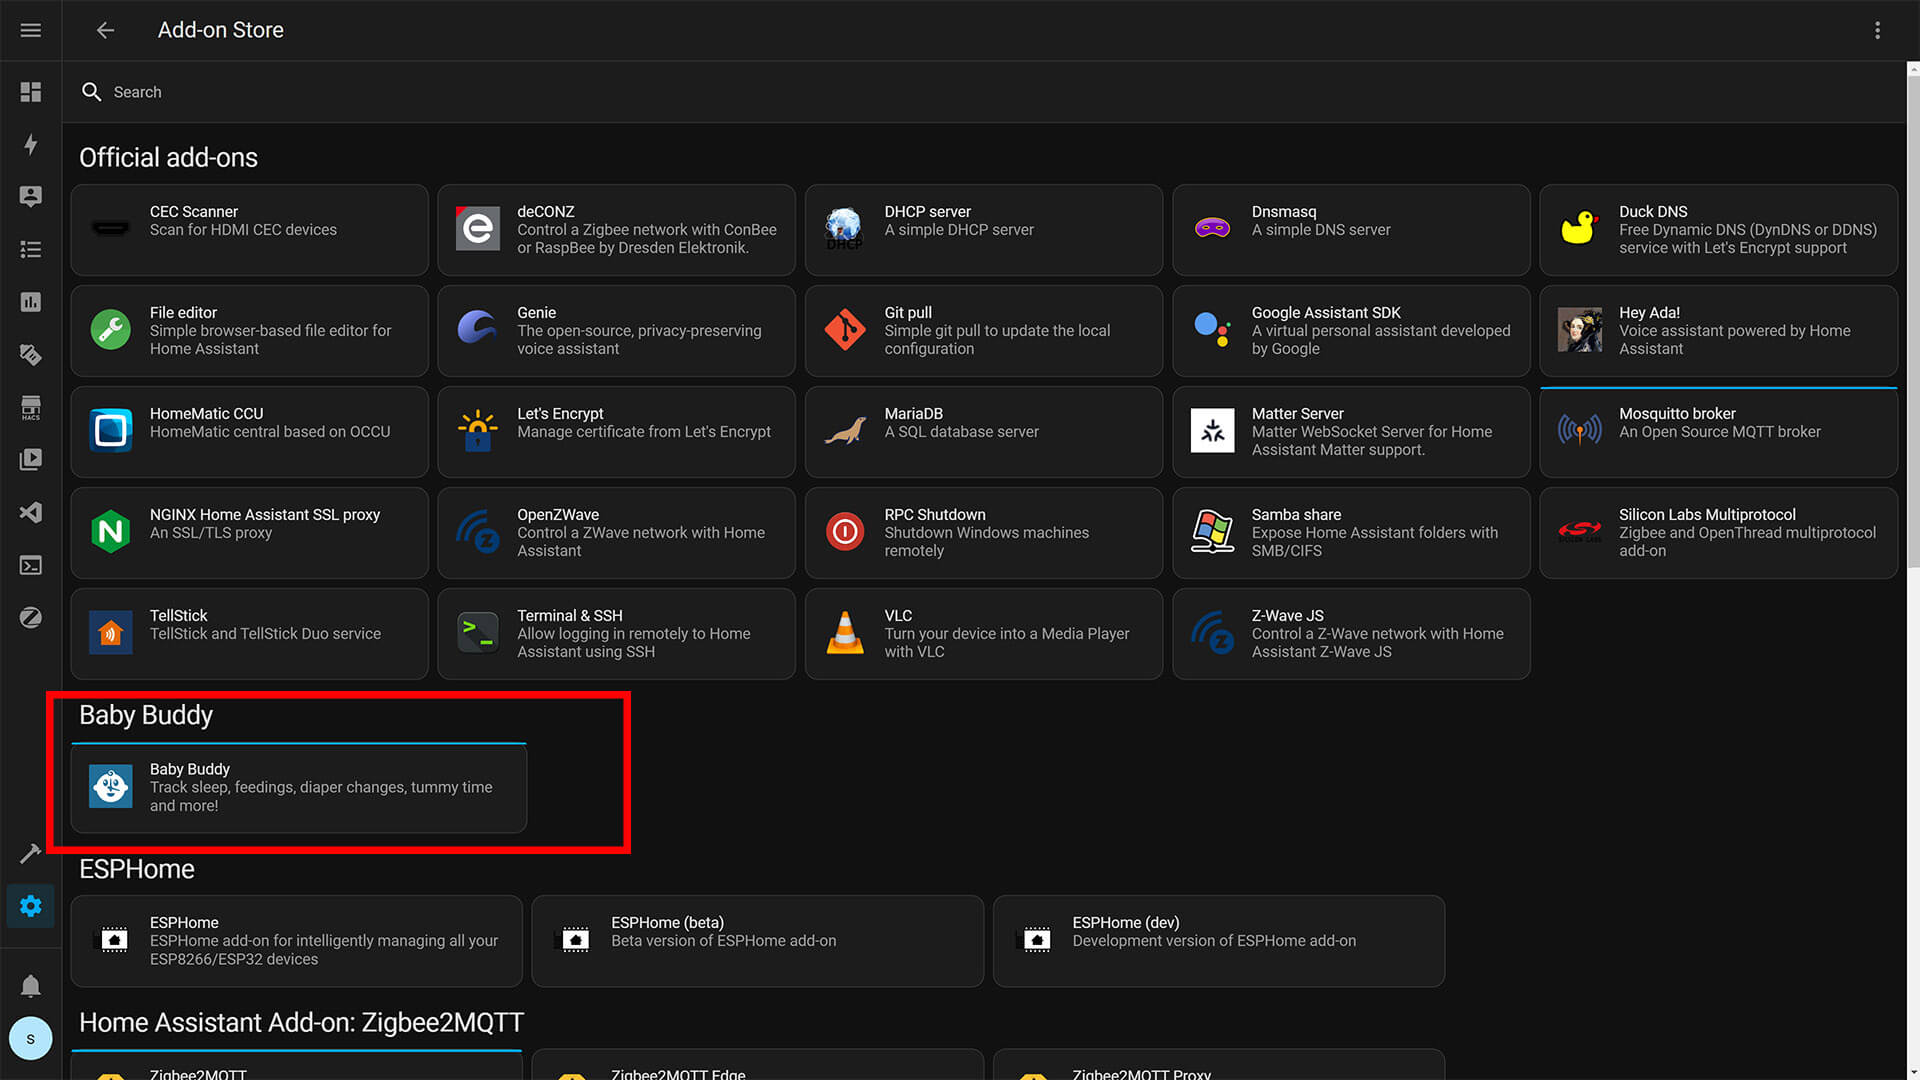
To install the Baby Buddy Add-on, first we need to add the repository to Home Assistant:
- Navigate to Settings > Add-ons > Add-on Store
- Click the three dots in the top right corner
- Click Repositories
- Paste the Repository
https://github.com/OttPeterR/addon-babybuddy - Click Add
- Click the Baby Buddy Add-on and click Install
- Done
After the installation is finished, you can toggle the Start on boot, Watchdog and Show in sidebar settings. In the Configuration tab, some additional settings can be tweaked.
CSRF_TRUSTED_ORIGINS
If you are hosting your baby buddy via another domain (such as babybuddy.mydomain.com) then add this here to be allowed to access it. If you want to use multiple domains, enter them with a comma and no space (e.g. http://baby.mydomain.com,https://babybuddy.myotherdomain.com)
NETWORK PORT
Access Baby Buddy through this port. (ex: homeassistant.local:8889 when set to 8889), be sure to check that this port is not already taken. The port needs to enabled for the Baby Buddy integration to work, so make sure you turn on the Network toggle.
USE_24_HOUR_TIME_FORMAT
Toggle this to use 24 hours format in Baby Buddy’s interface and reporting instead of 12 hours.
The Add-on will appear in your Home Assistant sidebar and you can access it by through Home Assistant Ingress by simply clicking on it. Login with username: admin and password: admin. You will be presented with a Welcome Screen.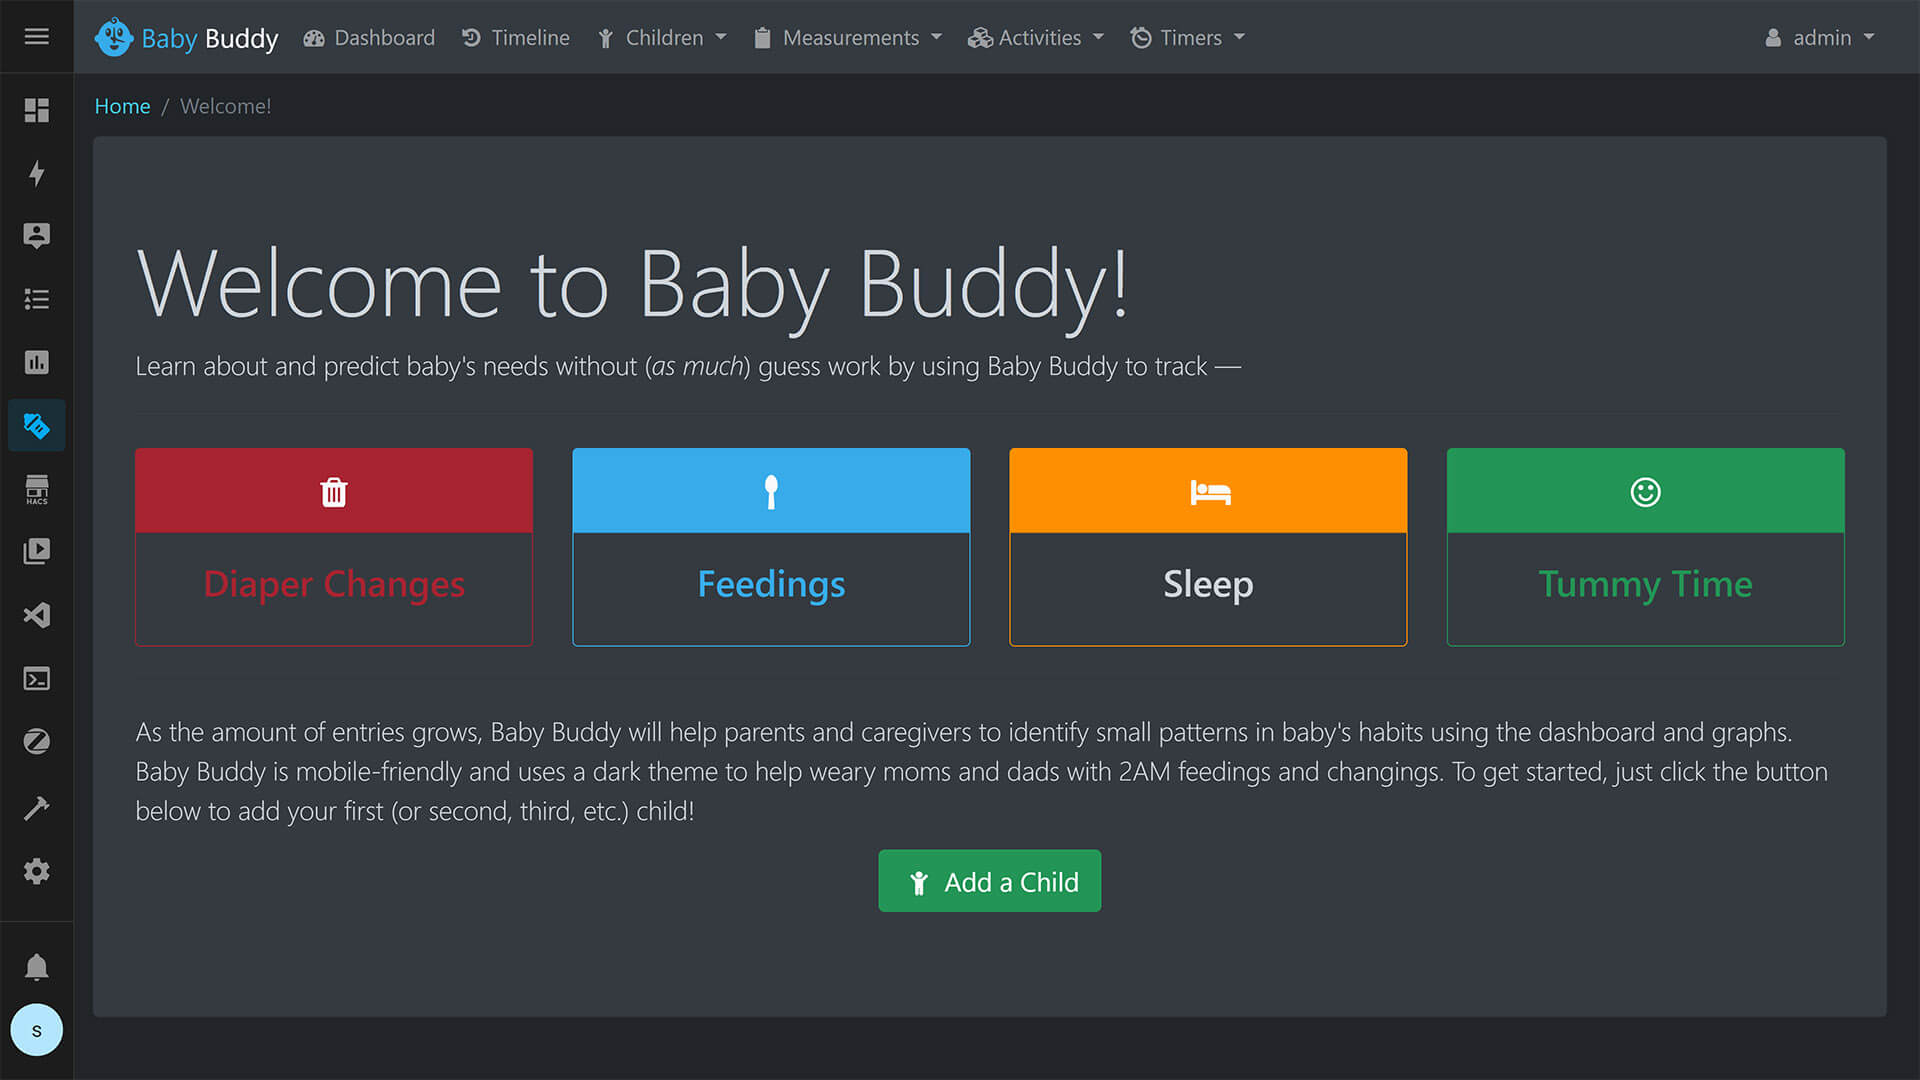
Once you are logged in, we need to obtain the API key, which we will use to enable the Baby Buddy Integration.
- Click your username at the top right corner
- Click Setting
- At the end of the screen, select and copy the API Key
- You can click Regenerate to create a new key
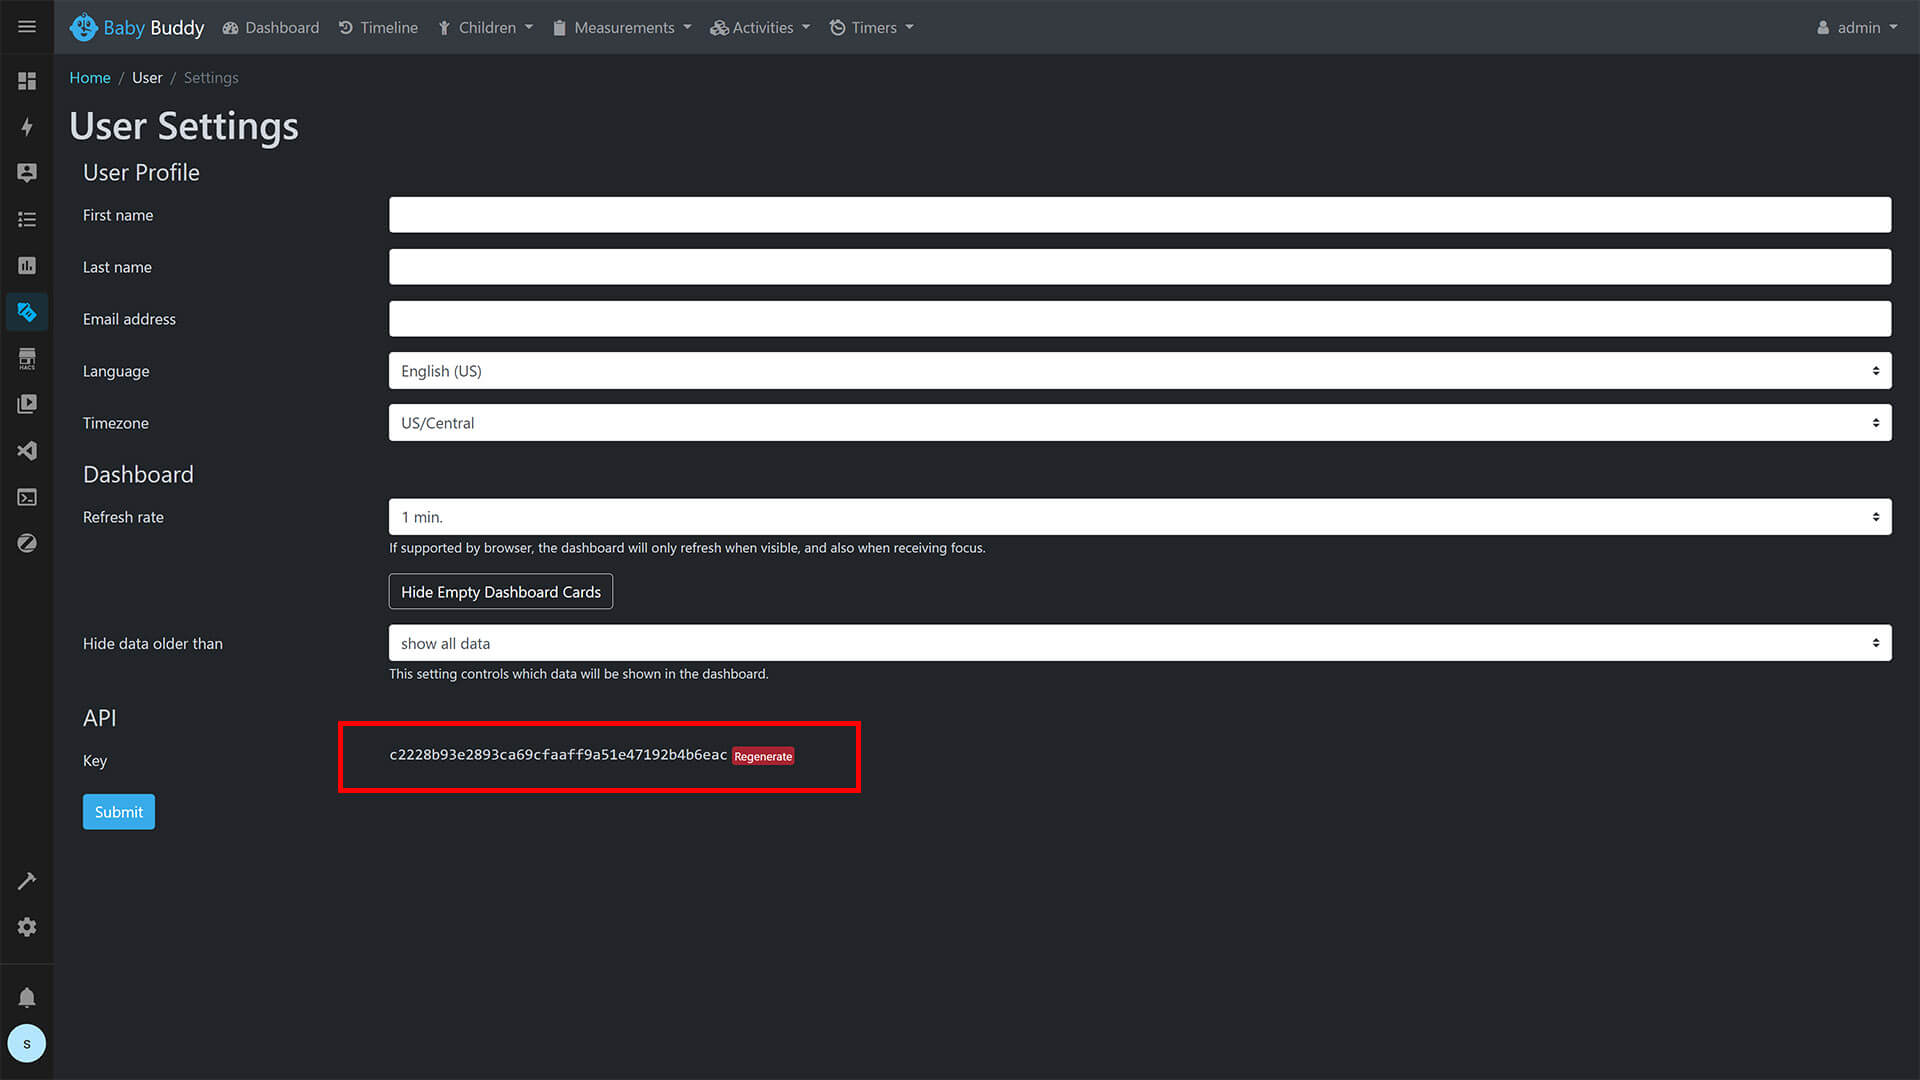
You can also use the Settings menu to change the login credentials from the default admin/admin.
Home Assistant Integration
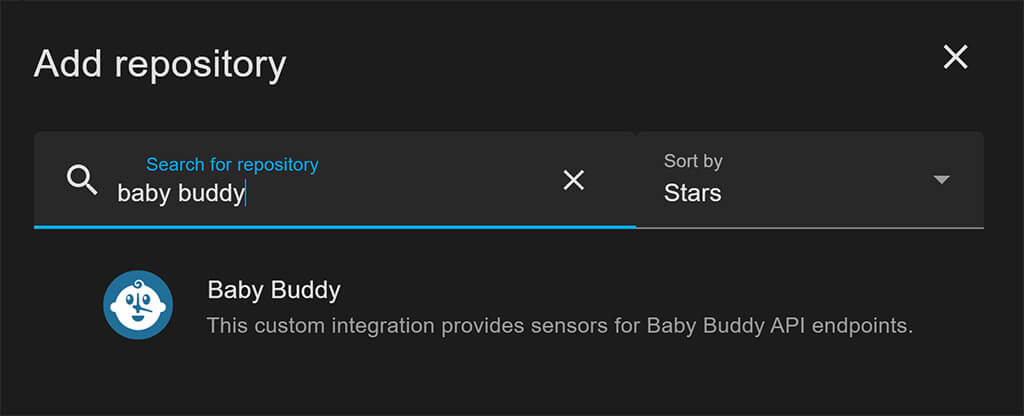
The Baby Buddy Integration is already available in HACS, no need to add a custom repository for it.
- Navigate to HACS > Integrations page
- Click “Explore & Add Repositories” in the bottom right corner
- Search for “Baby Buddy“.
- Click “Install this Repository in HACS“
- Click “Install“
Once the Integration is installed, we need to enable it:
- Navigate to Settings > Devices & Services > + Add Integration
- Search for Baby Buddy
- Input the following information:
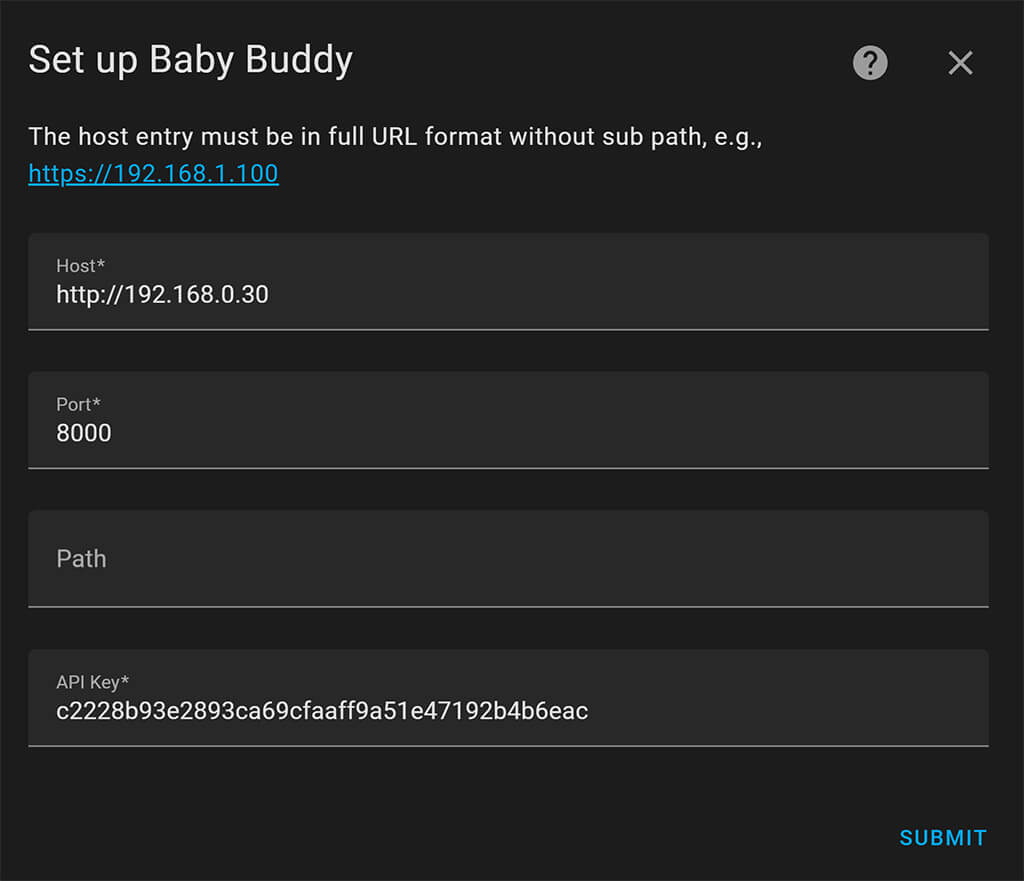
- Host: Host URL for your instance of Baby Buddy, without sub path
- Port: Host port (default = 8000), anything else If you’ve changed it
- Path: Sub path of your Baby Buddy instance (default = “”)
- API Key: The API key from the user settings page on your instance of Baby Buddy
Click submit and you will be greeted with a Success message. If you added your baby details previously, a couple of entities will appear for it from the Baby Buddy Integration. If not, follow along to add some information and see how Baby Buddy works.
Using the Baby Buddy Add-on
Baby Buddy has a very beginner friendly user interface, which makes it a pleasure to work with. To start, first click Add Child in the middle of the Welcome Screen.
Add First name, Last name, Birth date and a Baby picture if you want to.
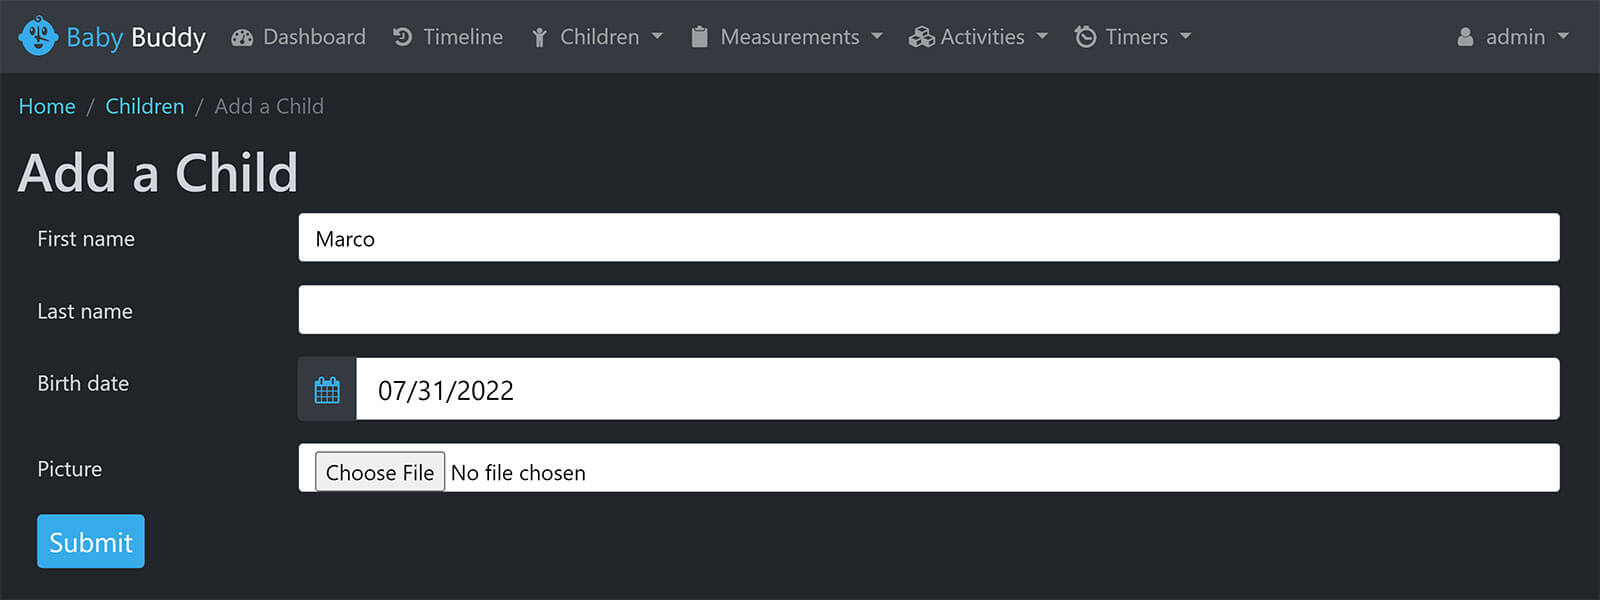
Once you’ve added the information, click Submit. Your baby’s name will appear in a list which you can edit later on. Repeat the process if you have more children.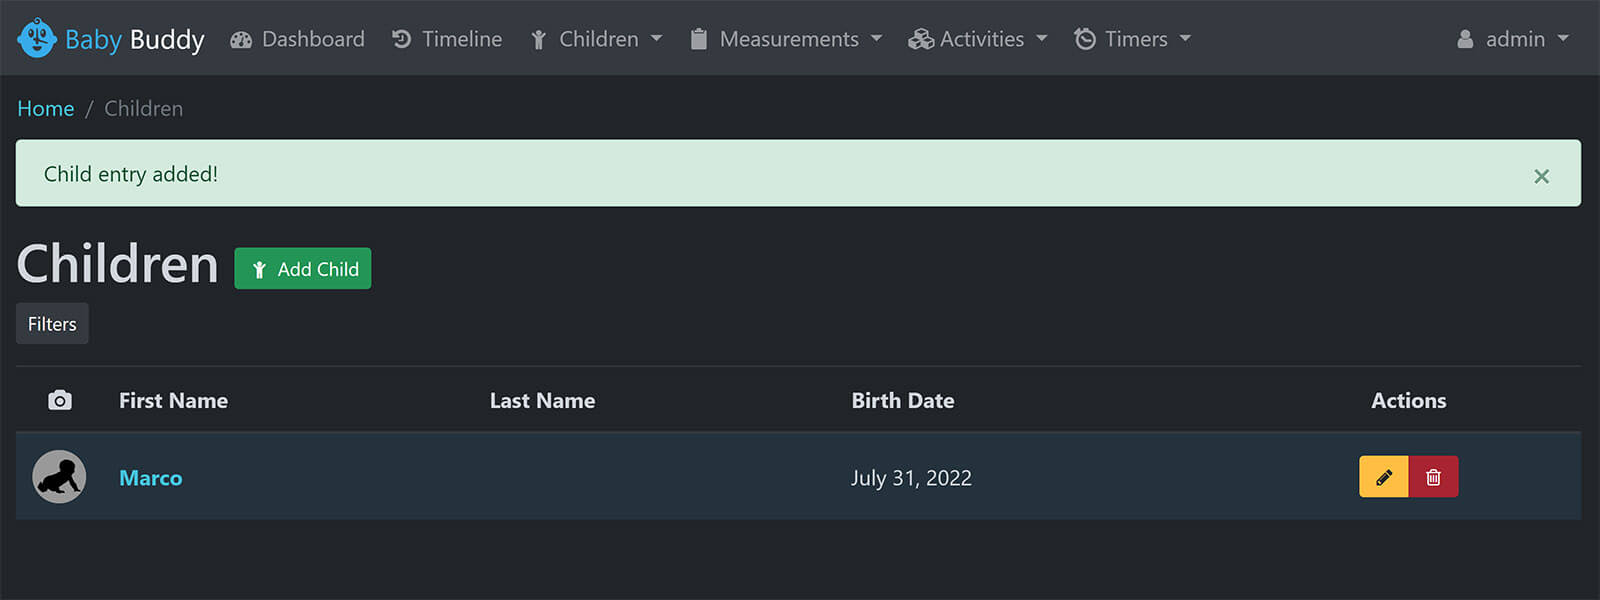
Measurements
The first things you might want to add, is some measurements and general description of your baby. You can occasionally measure you baby and input these values in Baby Buddy, so you can keep track of their growth and progress. You can add the following:
- Height
- Weight
- Temperature
- BMI: Body Mass Index
- Head Circumference
For example, let’s add a height value of the baby. Click Measurements at the top bar, and click + Height entry: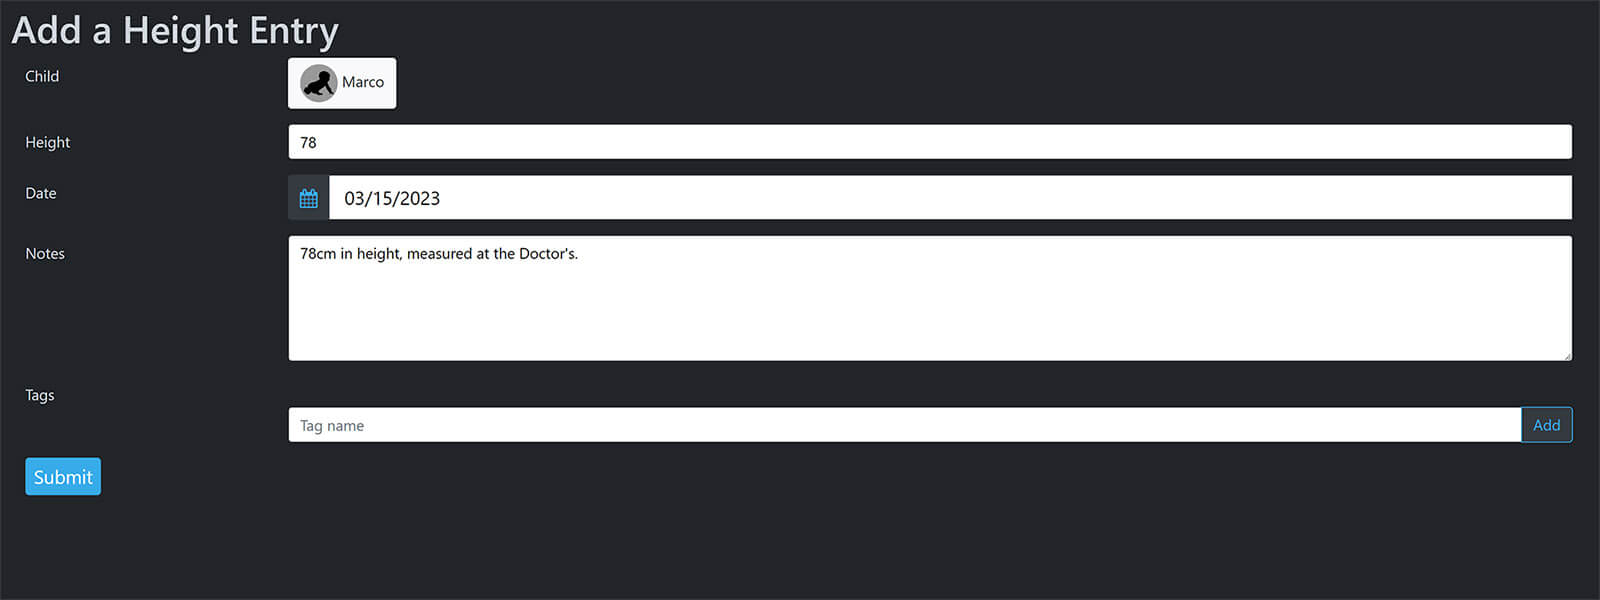
Click Submit and the value will be stored. If you have the Integration enabled, a sensor.babyname_last_height will be created reporting the value in Home Assistant.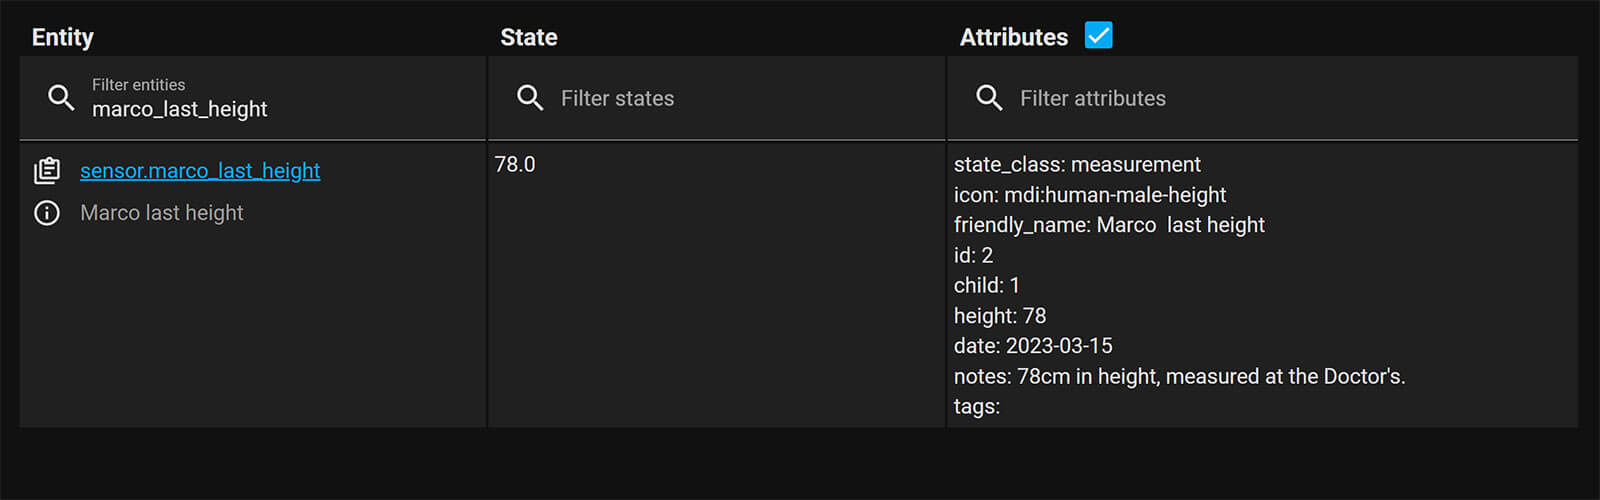
You store as much data as you want under the Measurements section of Baby Buddy. Each will be stored in the database and a sensor created in Home Assistant. Tracking height, weight, temperature is easy and intuitive with this integration.
Activities
To track baby activities, such as sleeping, feeding, diaper changes click on the Activities tab in the top bar. You can add information for the following:
- Diaper changes
- Feeding
- Sleeping
- Pumping
- Tummy time
For example, let’s say you want to log the last feeding time and it’s duration. Click Activities > + Feeding: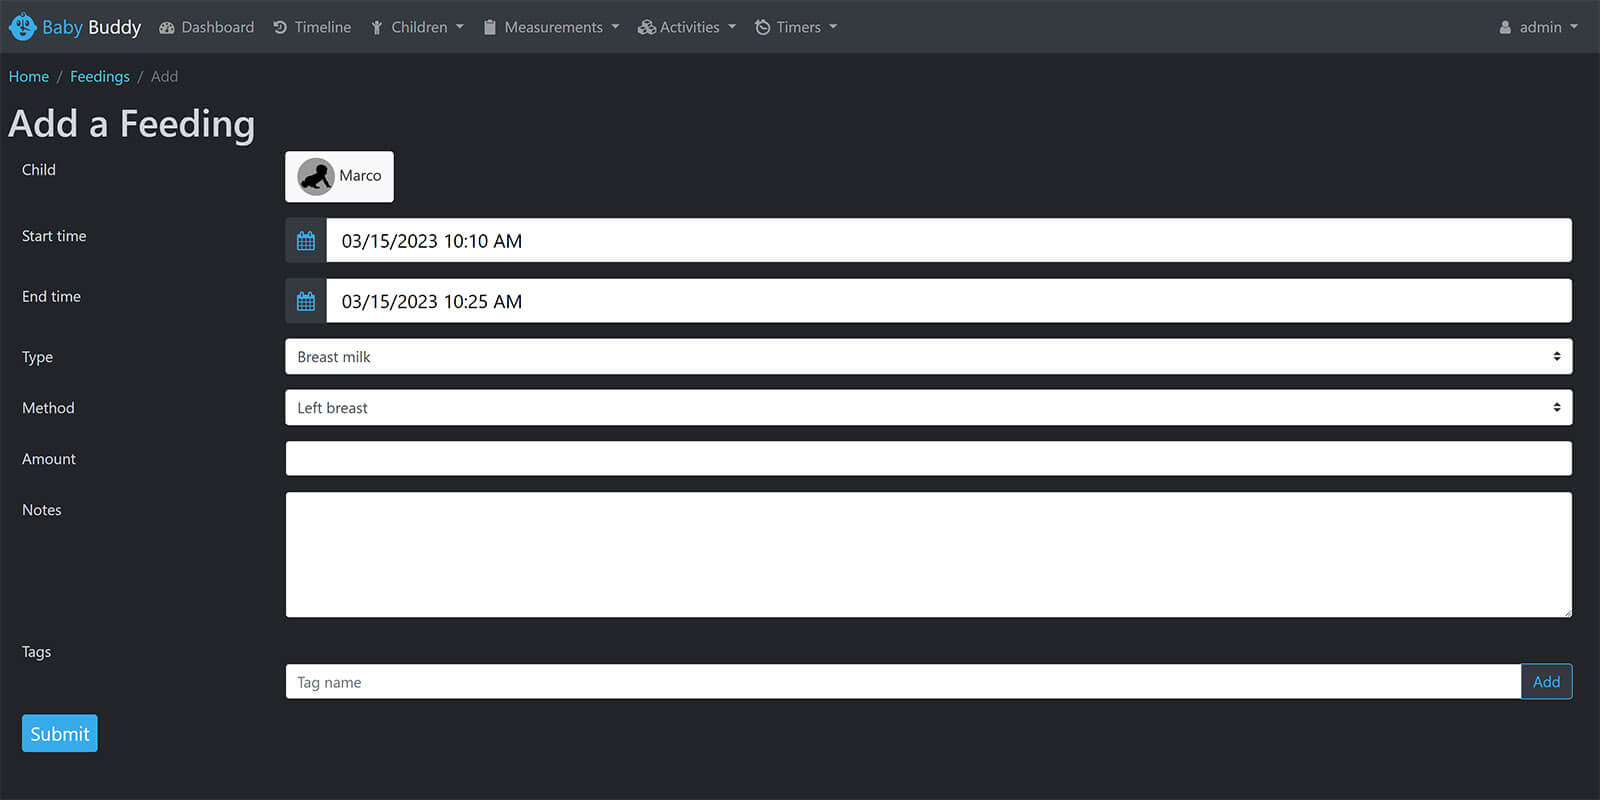
Input the start time, end time, type of feeding and method. Additionally, you can set the amount and add a note. The tag field can be used to create tags, for easier sorting of the available information later on.
As another example, let’s say you want to add the last diaper change of your baby. Click Activities > + Change: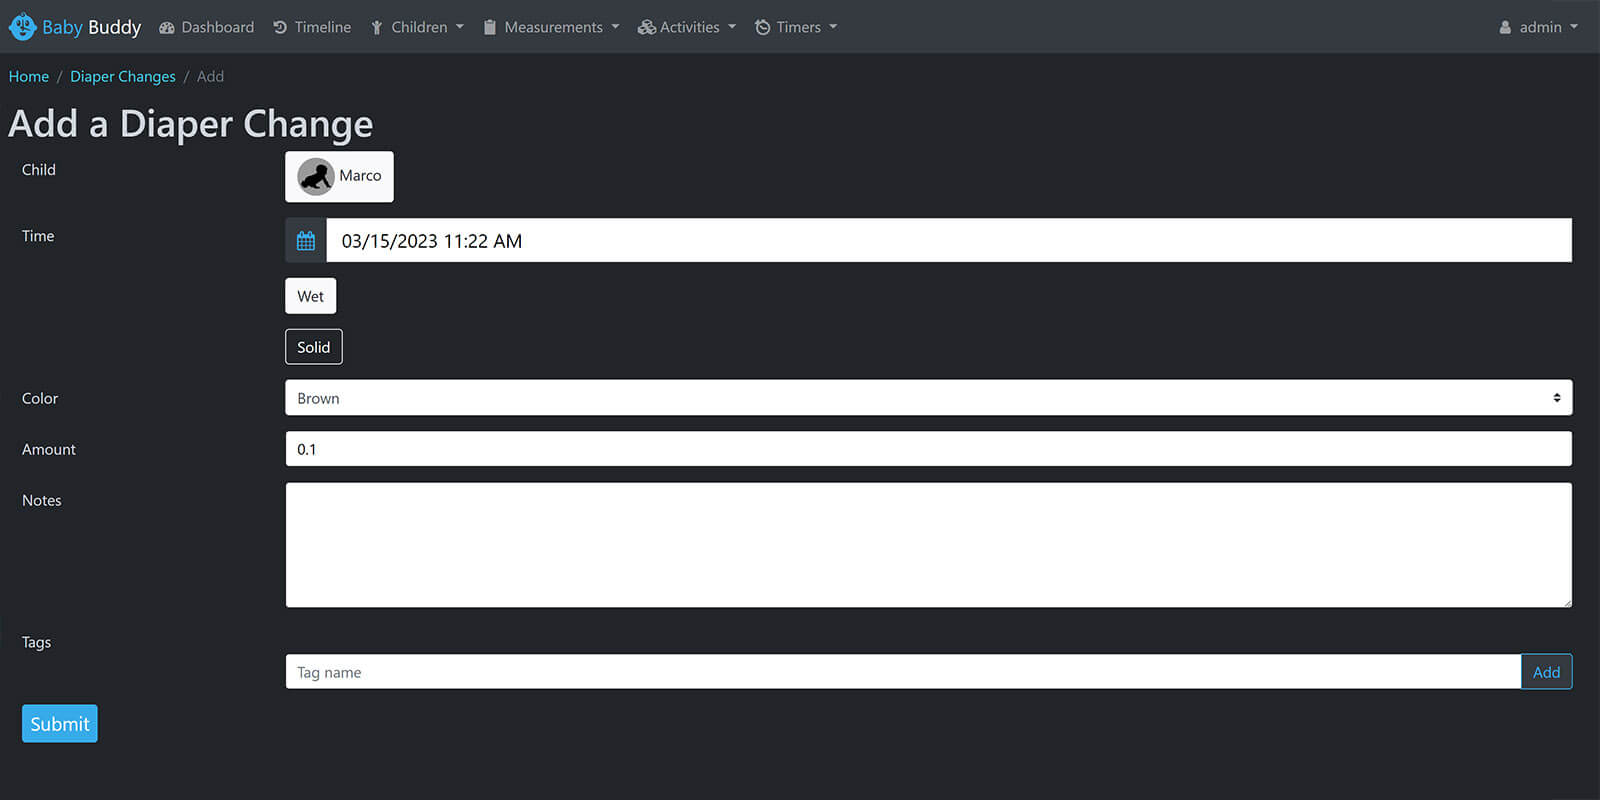
Input the time, type (wet or solid), color, amount and add an optional note.
Dashboard & Timeline
When you add enough information and activity entries, the dashboard will become populated with your baby’s last activities. You can use it quickly glance information about your data, cycle through activities and event and for quick navigation to the logbook.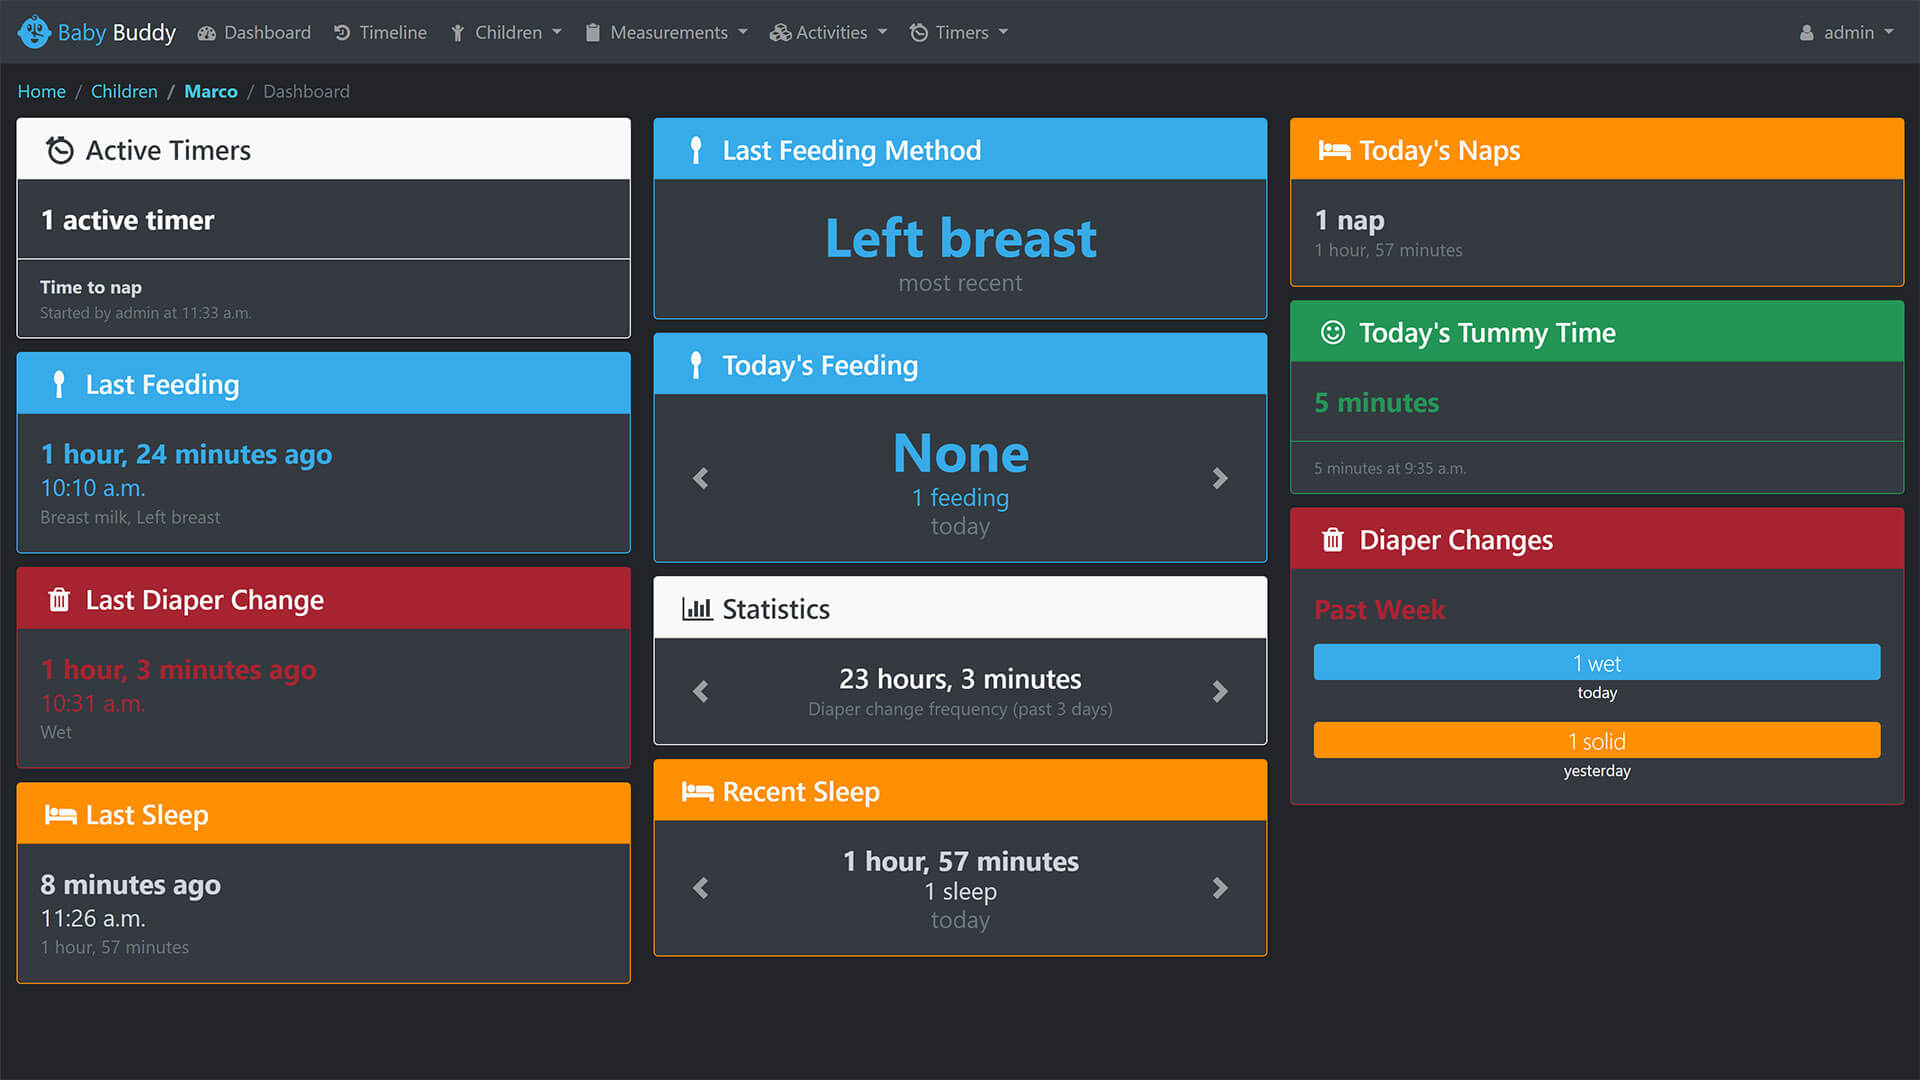
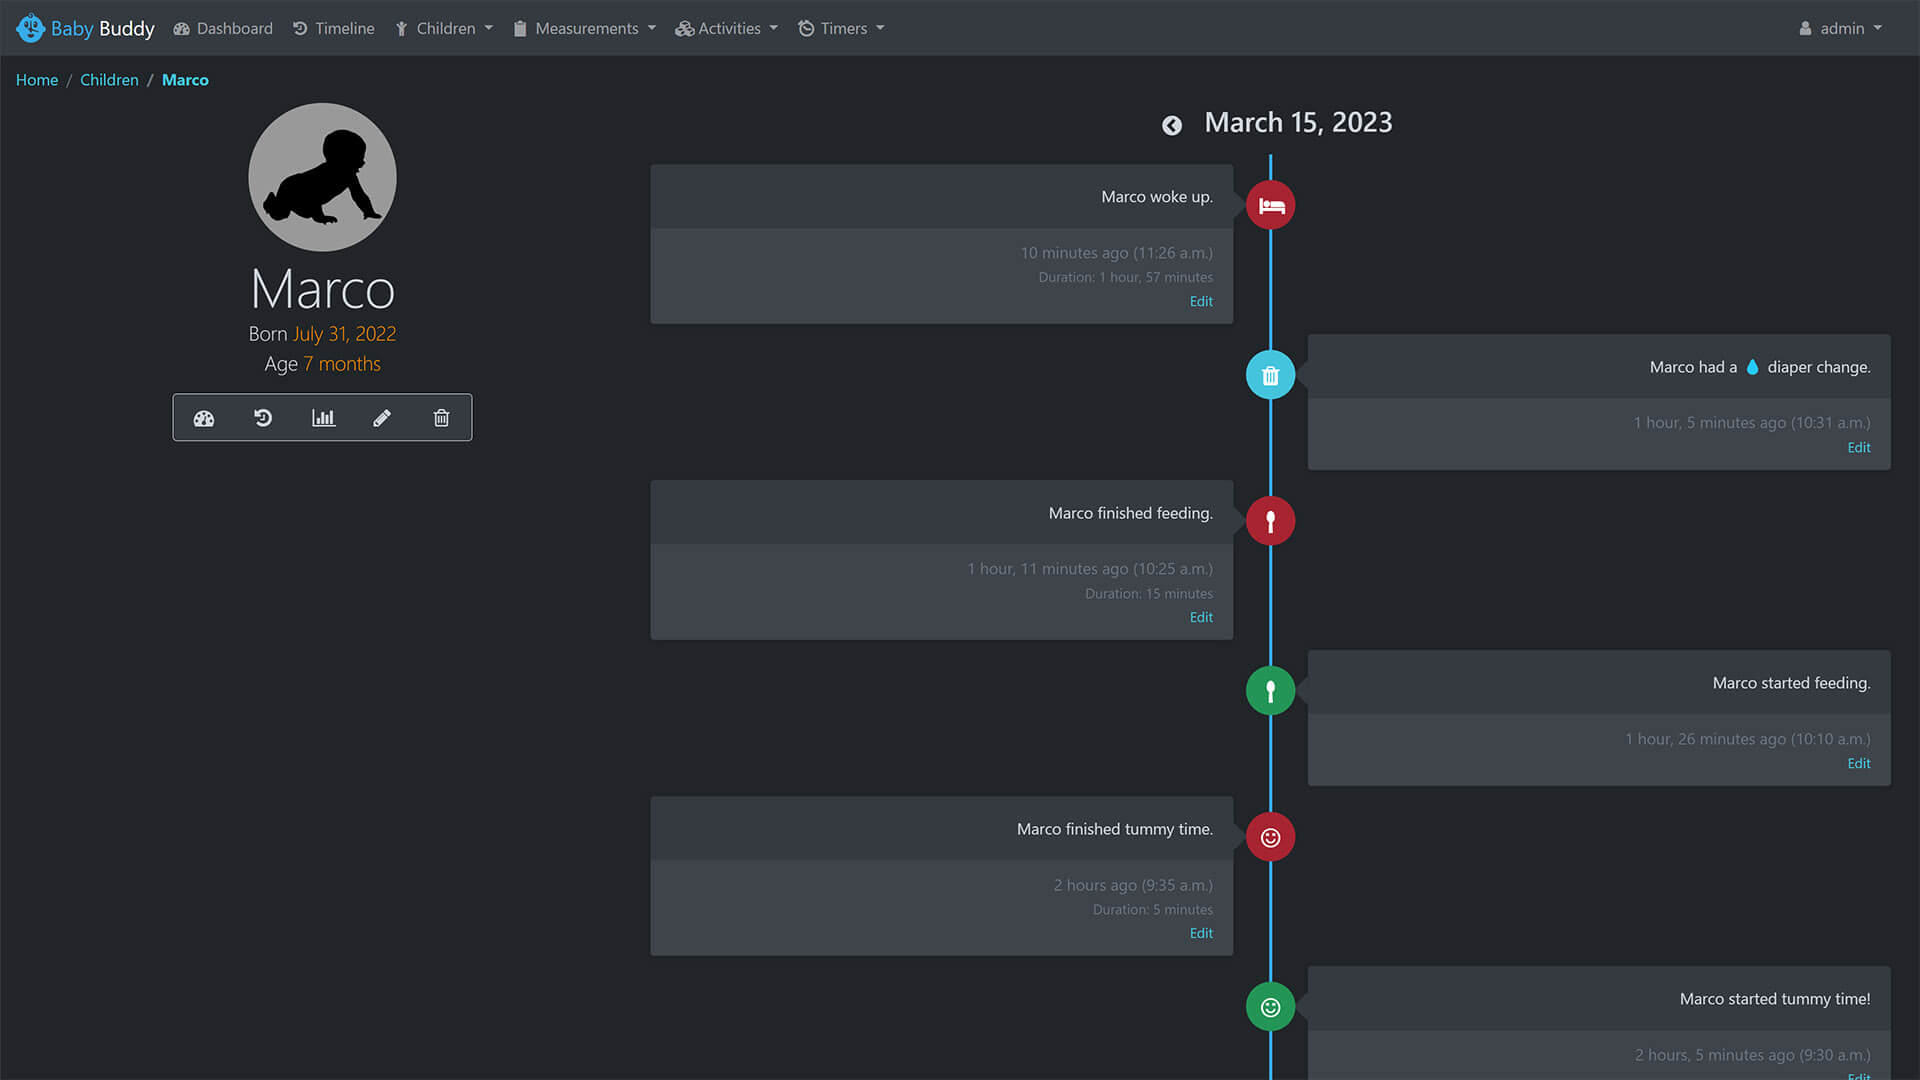
Another very useful asset of Baby Buddy is it’s Timeline feature, which provides the information you provided through activity and measurement entries organized in a timeline tree for easy navigation through data.
Using the Baby Buddy Integration
The Baby Buddy integration provides some really useful information from the data you input in the Add-on and pushes it to Home Assistant in various entities. Organized by domains, it exposes the following information:
- sensor:
- Sensor for each child, with date of birth returned as state
- Sensor for each last data entry
- Last diaper change, feeding, sleep, temperature, height, weight, tummy time and notes
- switch:
- Switch for each child to handle its timer entry.
- Turning on the switch starts a new timer for the linked child
- Turning off the switch deletes the timer
- Feeding, Sleep, and Tummy time can be linked to a timer
- Switch for each child to handle its timer entry.
Service Calls
To use the integration in automations, scripts or dashboards in Home Assistant, the Baby Buddy Integration provides various services which you can use to log some data without using the web interface of the add-on. The following service calls are available for Baby Buddy:
babybuddy.add_child: Adds a new child with a service call.
service: babybuddy.add_child
data:
  first_name: Marco
  last_name: Last Name
birth_date: "2022-03-08"babybuddy.add_bmi: Adds a BMI (Body Mass Index) entry
service: babybuddy.add_bmi
data:
  bmi: 45
  date: "2023-03-15"
  notes: Optimal
target:
entity_id: sensor.baby_marcobabybuddy.add_diaper_change: Adds a new diaper change entry
service: babybuddy.add_diaper_change
data:
  time: "15:00:00"
  type: Solid
  color: Brown
  amount: 1
  notes: Solid
target:
entity_id: sensor.baby_marcobabybuddy.add_feeding: Adds a new feeding entry
service: babybuddy.add_feeding
data:
  start: "15:00:00"
  end: "15:25:00"
  type: Formula
  method: Parent fed
  amount: 100
notes: 100 gramsbabybuddy.add_head_circumference: Adds a new head circumference entry
service: babybuddy.add_head_circumference
data:
  head_circumference: 28
  date: "2023-02-15"
target:
  entity_id: sensor.baby_marco
babybuddy.add_height: Adds a new weight entry
service: babybuddy.add_height
data:
  height: 67
  date: "2023-03-15"
target:
entity_id: sensor.baby_marcobabybuddy.add_weight: Adds a new weight entry
service: babybuddy.add_weight
data:
  weight: 6
  date: "2023-03-15"
target:
entity_id: sensor.baby_marcobabybuddy.add_pumping: Adds a new pumping entry
service: babybuddy.add_pumping
data:
  amount: 45
  time: "15:00:00"
  notes: 45grams
target:
entity_id: sensor.baby_marcobabybuddy.add_sleep: Adds a new sleeping entry on a timer
service: babybuddy.add_sleep
data:
  start: "15:00:00"
  end: "16:00:00"
  notes: 1 hour of uninterupted sleep
  timer: true
target:
entity_id: switch.marco_timerbabybuddy.add_tummy_time: Adds a new tummy time entry on a timer
service: babybuddy.add_tummy_time
data:
  timer: true
  start: "15:00:00"
  end: "15:05:00"
  milestone: 5 minutes done, need 15
target:
entity_id: switch.marco_timerbabybuddy.add_note: Adds a new note entry
service: babybuddy.add_note
data:
  note: Some thing to do or remember
  time: "15:00:00"
target:
entity_id: sensor.baby_marcobabybuddy.add_temperature: Adds a new temperature entry
service: babybuddy.add_temperature
data:
  temperature: 38
  time: "15:00:00"
  notes: Slight fever
target:
entity_id: sensor.baby_marcobabybuddy.start_timer: Starts a baby timer
service: babybuddy.start_timer
data:
  start: "15:00:00"
target:
entity_id: switch.marco_timerbabybuddy.delete_last_entry: Deletes last entry added, can be a list
service: babybuddy.delete_last_entry
data: {}
target:
  entity_id:
    - sensor.marco_last_feeding
    - sensor.marco_last_pumping
Automations
From the available services, we can create automations that will log different data without ever opening the Baby Buddy web interface. This is especially useful if you pair it with a simple remote, and assign actions to the buttons to be triggered whenever you need to.
Let’s say you’ve just finished changing your baby’s diaper and want to quickly log it without taking our phone. As a trigger, I’m going to use a button press on my Loratap Zigbee remote, but you can use anything that’s easier for you.
description: Log Diaper Change
mode: single
trigger:
  - platform: state
    entity_id:
      - sensor.tuya_4_button_remote_ss6400zb_action
    attribute: action
    to: 1_single #Single button click
action:
  - service: babybuddy.add_diaper_change
    data:
      type: Wet #Wet or Solid
    target:
      entity_id: sensor.baby_marco
If you leave the time field empty in the automation, the log will be entered with the current time and date in Baby Buddy. This particular automation logs a wet diaper change on a single click, so you can create a separate automation for logging solids with a double click instead:
description: Log Diaper Change
mode: single
trigger:
  - platform: state
    entity_id:
      - sensor.tuya_4_button_remote_ss6400zb_action
    attribute: action
    to: 1_double #Double button click
action:
  - service: babybuddy.add_diaper_change
    data:
      type: Solid #Wet or Solid
    target:
      entity_id: sensor.baby_marco
Summary
Baby Buddy by itself is a really useful piece of software, but paired with Home Assistant it’s an extremely powerful baby tracking tool. You can track so many things for your newborn, and later analyze things and pattern when needed. If you want to go the extra mile, developer sfage created Baby Buddy ESPHome Bottle Scale as well as a Quick Entry ESPHome Keypad.
The Add-on allows you to run Baby Buddy deployed directly on your Home Assistant instance and access it via Ingress. You can also deploy it manually to any server, docker or Clever Cloud.
The Integration allows you to expose data from the Add-on to Home Assistant, and input activities and measurements directly to the add-on database via it’s numerous service calls. You have to open the web interface once, and log every diaper change with the press of a button.
Once again I remind any new baked fathers, to thread lightly when talking to their spouses about Baby Buddy. Tell her you are going to be doing all this for her, to make it easier on her and keep track of things. Be careful not to promote it as chore, otherwise the WAF is gonna go down and you might get yelled at. Don’t ask me how I know.


Hi there, I am getting an error when clicking on Install in Add-Ons. The error reads: The command ‘/bin/bash -o pipefail -c echo “**** install build packages ****” && apk add –no-cache –virtual=build-dependencies build-base curl jpeg-dev libffi-dev libxml2-dev libxslt-dev postgresql-dev python3-dev zlib-dev’ returned a non-zero code: 15
Any idea what might be causing this?
Height, weight… is good, but what i am missing is: what scale do i have to insert it? i tried grams, because that’s how babies are weighted here, also kg.
You can insert whatever you want, it will displayed like you wrote it.