UPDATE: The pass times API has been removed and can no longer be queried. Position and astronauts still work.
The International Space Station (ISS) is a modular space station in Earth’s low orbit. It is a multinational collaborative project involving five participating space agencies: NASA (United States), Roscosmos (Russia), JAXA (Japan), ESA (Europe), and CSA (Canada). The first ISS component was launched in 1998, and the first long-term residents arrived on 2 November 2000 after being launched on 31 October 2000 from the Russian Baikonur Cosmodrome. The station has since been continuously occupied for 21 years and 125 days.
Because the ISS is frequently visible with the naked eye, this guide will show you how you can track it and get notified when it’s orbiting your location. All within Home Assistant.
How can you track the ISS?
In this tutorial, we will examine two ways to track the International Space Station in Home Assistant. The official HA integration is a simpler, easier way to track the ISS and notify you when it’s orbiting above you. The REST APIs & MQTT integration adds a little more information, can be easily maintained in the future and can track specific data from the ISS.
Both achieve the most important thing: Notify you when the ISS is overhead so you can take a look outside!
Home Assistant Official Integration
To add the official HA ISS integration, navigate to Configuration > Devices & Services. Click + Add Integration and search for “ISS”. Add the integration and confirm the dialog box. To show the ISS station on the map, click Configure and check the box Show on map. That’s it!
The official ISS integration uses the Open Notify API which generates one binary_sensor entity with several attributes. You display the info in a simple entity card in Lovelace, for example:
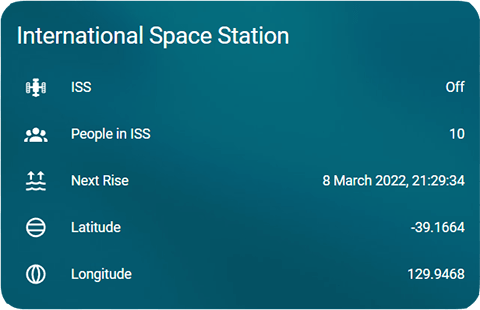
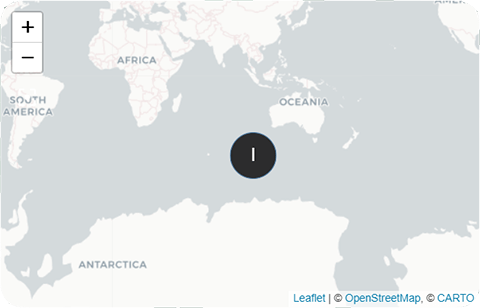
To know when the ISS is above you, we can create an automation to notify you on your phone and announce it on a speaker. For example:
Tip: To setup google TTS properly, click HERE.
alias: ISS Notification
description: Notify me when the ISS station is above me!
mode: single
trigger:
  - platform: state
    entity_id: binary_sensor.iss
    to: 'on'
condition: []
action:
  - service: notify.mobile_app_s21ultra
    data:
      title: The ISS is above you!
      message: Take a look outside
  - service: tts.google_cloud
    data:
      entity_id: media_player.living_room_speaker
      message: Just a heads up, the ISS station is above you!
REST APIs Sensors & MQTT
Using the REST platform pure APIs to track the ISS, we can add several more sensors to display specific data from the station. It’s a solution which is easily maintainable in the future, and can be templated in HA to fit our needs.
We are going to create several sensors from the pure open-notify API:
- ISS Current Coordinates
- ISS Rise times (when the ISS rises on your horizon)
- ISS Crew (number of people in the ISS and their names)
Than, we are going to create a device tracker and a couple of template sensors to get additional rise times of the ISS. Each of these sensors need to be added under sensor in you configuration.yaml file. If you have a more structured configuration, feel free to use includes.
ISS Coordinates
To get the ISS coordinates, we create a sensor which will extract the latitude, longitude and timestamp from the API. We set this to update every 10 seconds, for an accurate representation of a map. You can adjust the scan_interval to get less accurate data.
ISS Rise Times
The open-notify API publishes data for the next 5 rises of the ISS. We are going to import this data by creating a sensor to query latitude and longitude parameters of the ISS and match it with our own. For this sensor, we need to get our correct Longitude and Latitude. You can find out yours by checking https://www.latlong.net/.
#ISS Coordinates
- platform: rest
  name: ISS Coordinates #Latitude & Longitude
  json_attributes:
    - iss_position
    - latitude
    - longitude
    - timestamp
  resource: "http://api.open-notify.org/iss-now.json"
  scan_interval:
    seconds: 30
#ISS Rise Times
- platform: rest
name: ISS Rise times
json_attributes:
- request
- response
value_template: "{{ value_json.message }}"
resource: "http://api.open-notify.org/iss-pass.json?lat=XX.xxxxx&lon=XX.xxxxx"
scan_interval:
seconds: 180Replace XX.xxxx with your corresponding latitude and longitude values. You can use the secrets.yaml file to hide the info. Place the following into the resource field:
resource: !secret iss_rise_times#Secrets.yaml
iss_rise_times: 'http://api.open-notify.org/iss-pass.json?lat=XX.xxxxx&lon=XX.xxxxx'ISS Crew
This sensor will give us the number of people on board the ISS, their names and their current craft.
#ISS Crew
- platform: rest
  name: ISS Crew
  json_attributes:
    - people
    - number
  value_template: "{{ value_json['number'] }}"
  resource: "http://api.open-notify.org/astros.json"
Save everything and restart Home Assistant. If you go into Developer tools, you should already have the entities of the corresponding sensors.
ISS Tracker
To publish the data of the sensors to an MQTT topic, we need to create an automation which will be triggered when the state of the sensors changes. Then we can create a device tracker from the MQTT topic, and track the ISS on a map in Home Assistant. To publish the coordinates of ISS, we create the following automation:
alias: 'ISS Location Publish'
trigger:
  - platform: state
    entity_id: sensor.iss_coordinates
action:
  service: mqtt.publish
  data_template:
    topic: location/iss
    payload_template: '{"longitude": "{{ states.sensor.iss_coordinates.attributes.iss_position.longitude | float }}","latitude": "{{ states.sensor.iss_coordinates.attributes.iss_position.latitude | float }}"}'
    retain: true
#Publish ISS Location data to MQTT Topic
alias: 'ISS Location Publish'
trigger:
- platform: state
entity_id: sensor.iss_coordinates
action:
service: mqtt.publish
data_template:
topic: location/iss
payload_template: '{"longitude": "{{ states.sensor.iss_coordinates.attributes.iss_position.longitude | float }}","latitude": "{{ states.sensor.iss_coordinates.attributes.iss_position.latitude | float }}"}'
retain: trueThen we create the device tracker:
#ISS MQTT Publish Device Tracker
device_tracker:
  - platform: mqtt_json
    devices:
      iss: location/iss
To add an image to the device_tracker to be nicely shown on a map, you can upload any image jpg or png to config/www directory. Since Home Assistant deprecated the Customization menu in a recent update, we need to use customize.yaml to add the image to the tracker. You can download the picture I am using HERE.
#ISS Device Tracker Customization
device_tracker.iss:
  entity_picture: "/local/iss.png"
Or you can simply asign an icon to the entity:
#ISS Device Tracker Customization
device_tracker.iss:
  icon: mdi:space-station
Template Sensors
We can use templates to create sensors of the next 5 rise times of the International Space Station. We condition the value_template by wrapping it in if statements, to parse the correct data for the corresponding risetime:
#ISS Next 5 Rise Times
- platform: template
  sensors:
    iss_risetime_0:
      value_template: '{% if states.sensor.iss_rise_times %}{{ states.sensor.iss_rise_times.attributes["response"][0]["risetime"] | timestamp_custom("%a %d %b %Y %H:%M:%S") }}{% endif %}'
      friendly_name: ISS Next Risetime
    iss_risetime_1:
      value_template: '{% if states.sensor.iss_rise_times %}{{ states.sensor.iss_rise_times.attributes["response"][1]["risetime"] | timestamp_custom("%a %d %b %Y %H:%M:%S") }}{% endif %}'
      friendly_name: ISS 2nd Risetime
    iss_risetime_2:
      value_template: '{% if states.sensor.iss_rise_times %}{{ states.sensor.iss_rise_times.attributes["response"][2]["risetime"] | timestamp_custom("%a %d %b %Y %H:%M:%S") }}{% endif %}'
      friendly_name: ISS 3rd Risetime
    iss_risetime_3:
      value_template: '{% if states.sensor.iss_rise_times %}{{ states.sensor.iss_rise_times.attributes["response"][3]["risetime"] | timestamp_custom("%a %d %b %Y %H:%M:%S") }}{% endif %}'
      friendly_name: ISS 4th Risetime
    iss_risetime_4:
      value_template: '{% if states.sensor.iss_rise_times %}{{ states.sensor.iss_rise_times.attributes["response"][4]["risetime"] | timestamp_custom("%a %d %b %Y %H:%M:%S") }}{% endif %}'
      friendly_name: ISS 5th Risetime
Displaying the Data in Lovelace
From the created sensors, we can create beautiful Lovelace card for an overview of the ISS. There are many ways we can do this, for our example we are going to use the great custom button-card
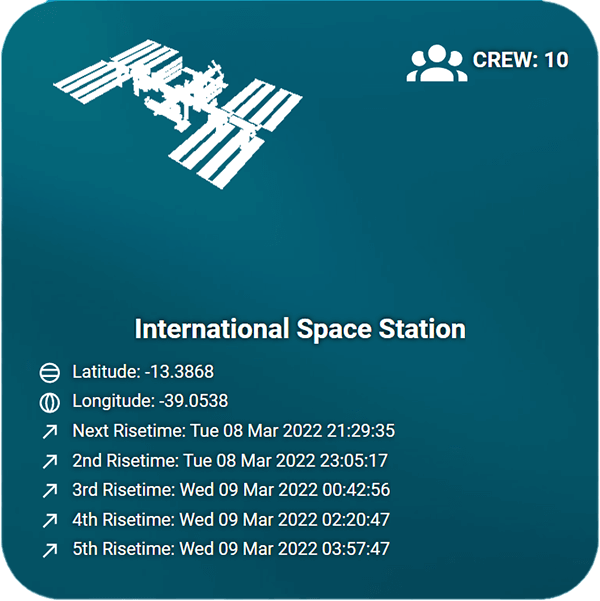
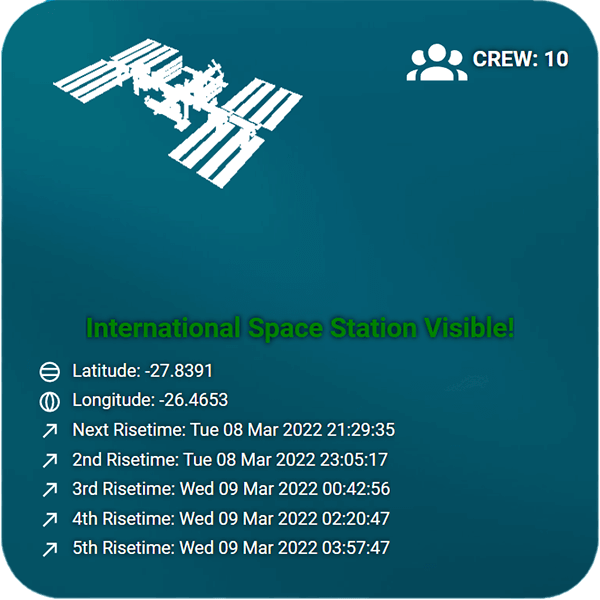
The custom button card is very versatile, and allows for customization of custom fields with JavaScript. We can use this to, for example, change the name and its color shown in the card to alert us when the ISS is passing!
type: custom:button-card
entity: device_tracker.iss
aspect_ratio: 1/1
name: >-
  [[[ if (states['binary_sensor.iss'].state == 'on') return "International Space Station Visible!";
  else return "International Space Station" ]]]
entity_picture: /local/iss2.png
show_entity_picture: true
styles:
  entity_picture:
    - width: 90%
  card:
    - border-radius: 10%
    - padding: 5%
    - font-size: 80%
    - text-shadow: 0px 0px 5px black
  grid:
    - grid-template-areas: >-
        "i state" "n n" "latitude latitude" "longitude longitude" "next next"
        "second second" "third third" "forth forth" "fifth fifth"
    - grid-template-columns: 1fr 1fr
    - grid-template-rows: >-
        1fr min-content min-content min-content min-content min-content
        min-content min-content min-content min-content min-content min-content
        min-content
  name:
    - font-weight: bold
    - font-size: 200%
    - color: >-
        [[[ if (states['binary_sensor.iss'].state == 'on') return "green";
        else return "white" ]]]
    - align-self: middle
    - justify-self: middle
    - padding-bottom: 3%
  img_cell:
    - justify-content: start
    - align-items: start
    - margin: none
    - padding-bottom: 3%
    - padding-top: 3%
    - padding-left: 10%
  icon:
    - width: 70%
  custom_fields:
    state:
      - font-weight: bold
      - text-transform: uppercase
      - align-self: start
      - justify-self: end
      - font-size: 160%
    latitude:
      - align-self: middle
      - padding-bottom: 1%
      - justify-self: start
      - font-size: 130%
    longitude:
      - padding-bottom: 1%
      - align-self: middle
      - justify-self: start
      - font-size: 130%
    next:
      - padding-bottom: 1%
      - align-self: middle
      - justify-self: start
      - font-size: 130%
    second:
      - padding-bottom: 1%
      - align-self: middle
      - justify-self: start
      - font-size: 130%
    third:
      - padding-bottom: 1%
      - align-self: middle
      - justify-self: start
      - font-size: 130%
    forth:
      - padding-bottom: 1%
      - align-self: middle
      - justify-self: start
      - font-size: 130%
    fifth:
      - align-self: middle
      - padding-bottom: 1%
      - justify-self: start
      - font-size: 130%
custom_fields:
  state: |
    [[[
      return `<ha-icon icon="mdi:account-group" style="width: 50px; height: 50px; color: var(--icon-color-sensor);"></ha-icon>
              <span style="color: var(--text-color-sensor);">Crew: ${states['sensor.iss_crew'].attributes.number}</span>`
    ]]]
  latitude: |
    [[[
      return `<ha-icon icon="mdi:latitude" style="width: 30px; height: 20px; color: var(--icon-color-sensor);"></ha-icon>
              <span style="color: var(--name-color-sensor);">Latitude:</span>
              <span style="color: var(--state-color-sensor);"> ${states['device_tracker.iss'].attributes.latitude}</span>`
    ]]]
  longitude: |
    [[[
      return `<ha-icon icon="mdi:longitude" style="width: 30px; height: 20px; color: var(--icon-color-sensor);"></ha-icon>
              <span style="color: var(--name-color-sensor);">Longitude: </span>
              <span style="color: var(--state-color-sensor);"> ${states['device_tracker.iss'].attributes.longitude}</span>`
    ]]]
  next: |
    [[[
      return `<ha-icon icon="mdi:arrow-top-right" style="width: 30px; height: 20px; color: white;"></ha-icon>
              <span>  Next Risetime: <span style="color: var(--text-color-sensor);">${states['sensor.iss_risetime_0'].state}</span></span>`
    ]]]
  second: |
    [[[
      return `<ha-icon icon="mdi:arrow-top-right" style="width: 30px; height: 20px; color: white;"></ha-icon>
              <span>  2nd Risetime: <span style="color: var(--text-color-sensor);">${states['sensor.iss_risetime_1'].state}</span></span>`
    ]]]
  third: |
    [[[
      return `<ha-icon icon="mdi:arrow-top-right" style="width: 30px; height: 20px; color: white;"></ha-icon>
              <span>  3rd Risetime: <span style="color: var(--text-color-sensor);">${states['sensor.iss_risetime_2'].state}</span></span>`
    ]]]
  forth: |
    [[[
      return `<ha-icon icon="mdi:arrow-top-right" style="width: 30px; height: 20px; color: white;"></ha-icon>
              <span>  4th Risetime: <span style="color: var(--text-color-sensor);">${states['sensor.iss_risetime_3'].state}</span></span>`
    ]]]
  fifth: |
    [[[
      return `<ha-icon icon="mdi:arrow-top-right" style="width: 30px; height: 20px; color: white;"></ha-icon>
              <span>  5th Risetime: <span style="color: var(--text-color-sensor);">${states['sensor.iss_risetime_4'].state}</span></span>`
    ]]]


If you use the rest integration rather than the rest sensor platform you won’t need the template sensors. They can all be defined as sensors for the one rise time restful resource call.
Can you share the config for this?
Thanks, we would love to see an example, if you don’t mind.
Please, can you share your iss2.png you have used in the button-card config? Thanks a lot!
Hey, It’s already in the tutorial.
https://smarthomescene.com/wp-content/uploads/2022/03/iss.png
Please.. Not working sensor sensor.iss_risetime anymore
Hi Fabricio,
The API is still online and active. I’m guessing you have an error in your longitude and latitude formatting.
Please compare it to the guide.
The official HASS integration is dead because the API is dead because spaceflight.nasa.gov has been decommissioned and the URL used to scrape is no longer valid.
You are correct. The http://api.open-notify.org/iss-now.json API still works, and info can be queried this way. Thank for the heads up, will update the guide
Hi,
so we can no longer access the pass times?
Unfortunately, yes. That API has been removed.
See here: http://open-notify.org/Open-Notify-API/ISS-Pass-Times/