Whenever MQTT is mentioned in a Home Assistant context, we immediately think of Mosquitto MQTT. It’s widely used as the main broker for Zigbee2MQTT, TasmotaMQTT and a bunch of others integrations and devices communicating over the MQTT protocol. It’s extremely lightweight with almost no hardware footprint while also being easy to install and setup.
I like to tinker and explore alternatives to the mainstream, especially of anything Smart Home related, even when things work perfectly fine such as Mosquitto MQTT. In this article, I’m going to talk about installing EMQX MQTT Broker as an Add-on in Home Assistant, how to configure it and talk about when you should use this add-on instead of Mosquitto.
What is EMQX MQTT Broker?
EMQX MQTT Broker is tag lined as “the most scalable open-source MQTT broker for IoT, IIoT, and connected vehicles“. It’s an Open-source MQTT broker with a high-performance real-time message processing engine, powering event streaming for IoT devices at massive scale. As the most scalable MQTT broker, EMQX can help you connect any device, at any scale, including your smart home.
EMQX is an advanced alternative to the Mosquitto MQTT Broker that’s generally used in Home Assistant, with an useful UI for debugging, access control, manage clients and traffic
Why use EMQX instead of Mosquitto?
Since MQTT is a lightweight communication protocol, Mosquitto is more than adequate for acting as a broker without any issues whatsoever. You can debug problems by listening to topics right from Home Assistant and act accordingly. It just sits in the installed add-ons list in Home Assistant and quietly does it’s job.
EMQX is like Mosquitto on steroids, it has advanced features that are not present in Mosquitto:
- Built-in dashboard
- Advanced Access Control
- Authentication
- Authorization
- Blacklists
- Advanced Data Integration
- Check data flows
- Setup rules
- Advanced MQTT Setup
- You can use single MQTT server for multiple instances of Home Assistant
- Superior diagnosis and debugging features
In summary, Use EMQX is you want to leverage any of it’s advanced features like connections overview, advanced access control and observe live data-flows in a clean and data-rich dashboard. If don’t actually need any of these things, you are perfectly fine with Mosquitto.
Before we can continue to install the EMQX add-on, a few key notes you need to be aware of:
- The EMQX add-on cannot run simultaneously with the Mosquitto add-on.
- You can temporarily stop Mosquitto and test EMQX
- The EMQX add-on uses ports 1883, 8083, 8084, and 8883 by default.
- If any of your existing add-on conflict with these ports, you will need to either change their ports or the listener ports of the EMQX add-on
- Before you can start EMQX and change listener ports, you will need to close the conflicting add-ons because the integration will not start when the port is taken.
- Known conflicting add-ons are WebRTC by AlexxIT as well as anything that uses ports 1883, 8083, 8084, and 8883 by default. Change the ports temporarily before starting EMQX.
Installing EMQX Add-on in Home Assistant
1. In Home Assistant, navigate to Settings > Add-ons > Click Add-on Store and search for EMQX: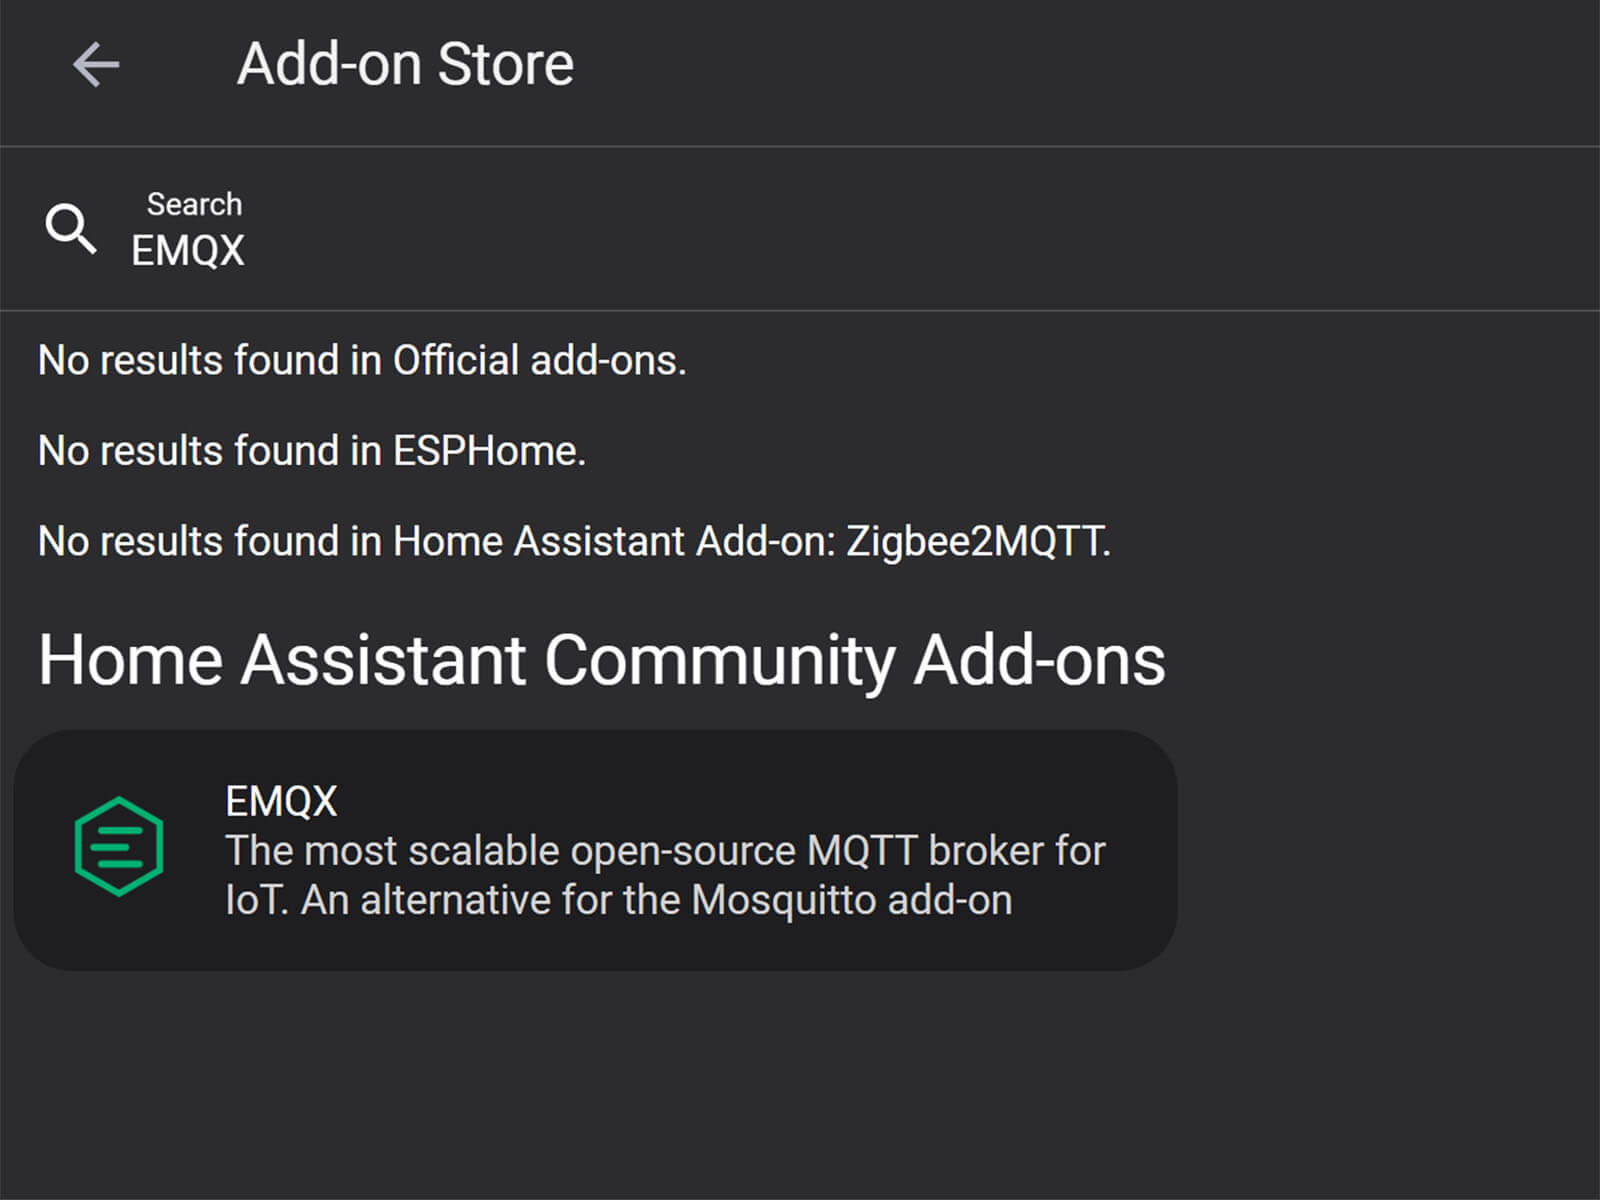
2. Select it and click Install. Let the process finish, you can check the logs for issues during installation
3. Once the EMQX Add-on is installed, turn on the Start on boot, Watchdog and Show in sidebar toggles. Click Start to start EMQX. 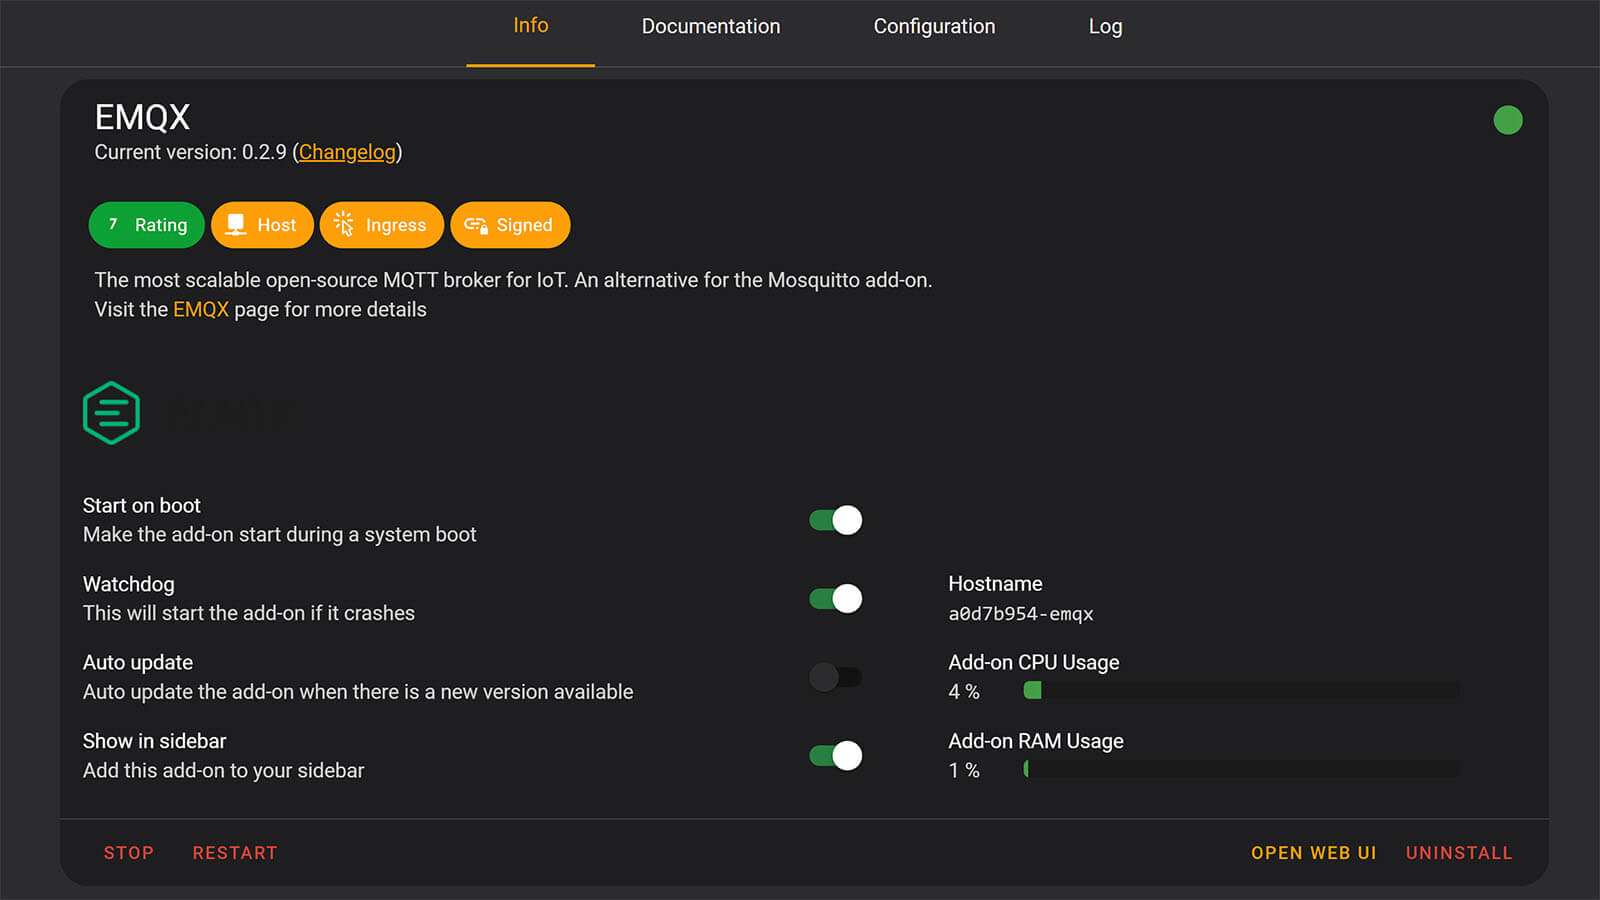
4. Check the logs for confirmation. You should see EMQX (ver) is running now! at the bottom.
Configuring EMQX Add-on in Home Assistant
Once the Add-on is successfully started, click Open Web UI to open it’s dashboard. Login in with the default credentials, username: admin, password: public. You will be prompted to change the password immediately, set a password of your choosing and click Confirm. You will be taken to the dashboard of EMQX.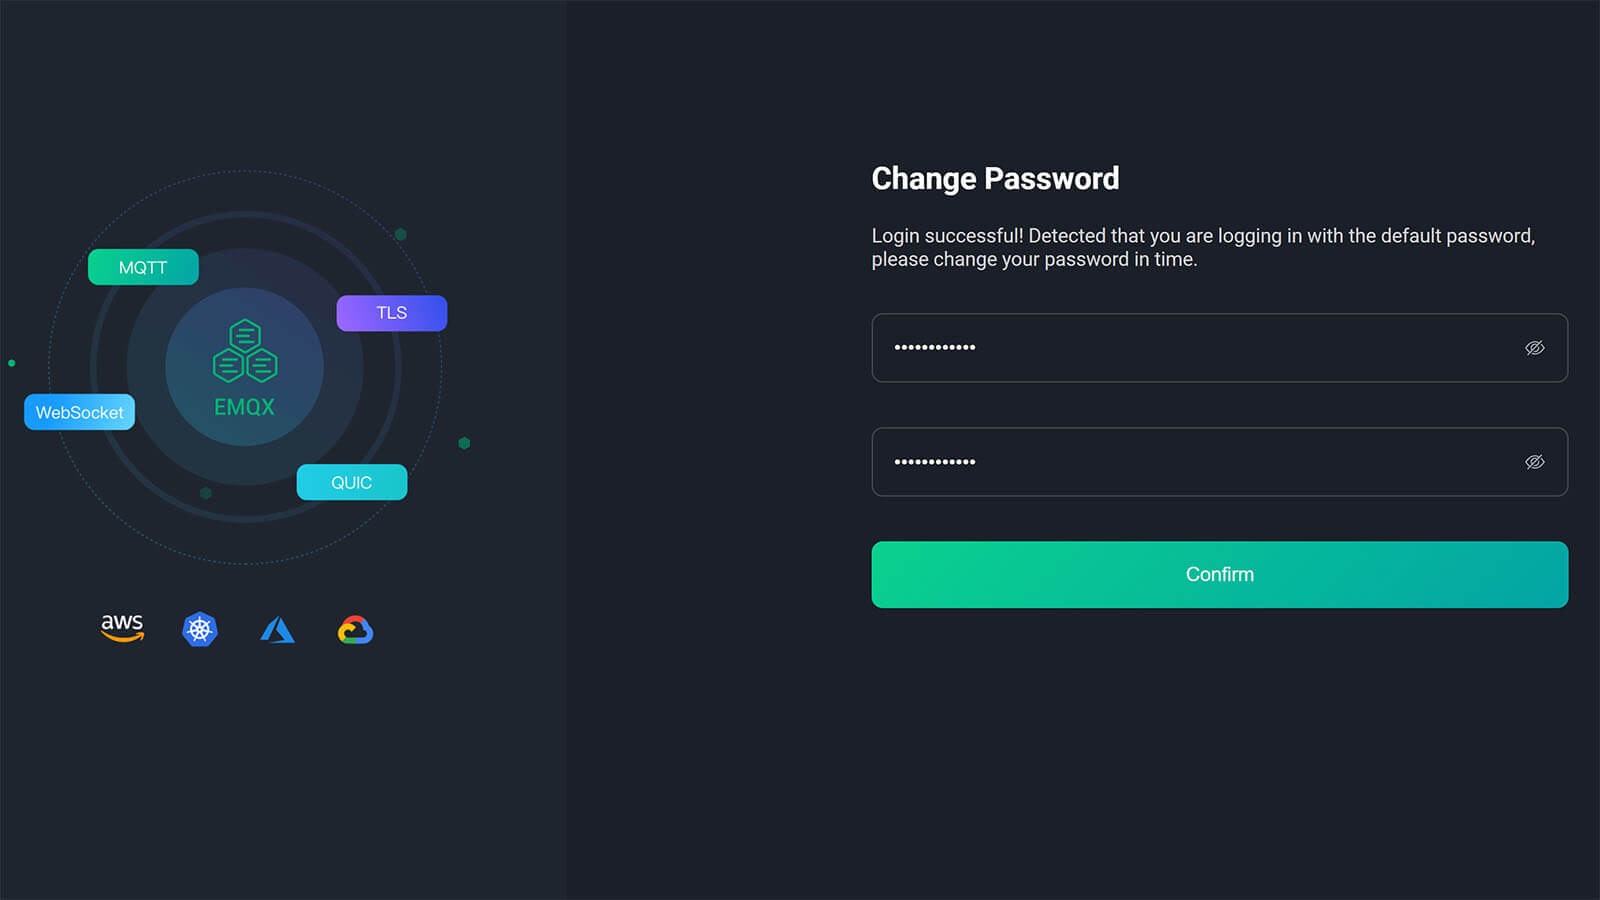
Creating EMQX Authentication Mechanism
The first thing you need to do is setup an authentication mechanism and create a user which your devices will use to login to EMQX. You can create multiple users that you can use for separate MQTT devices or connections. For example, one for Zigbee2MQTT another for ESP devices sending data to MQTT. On the left side of the dashboard, click the shield icon and select Authentication: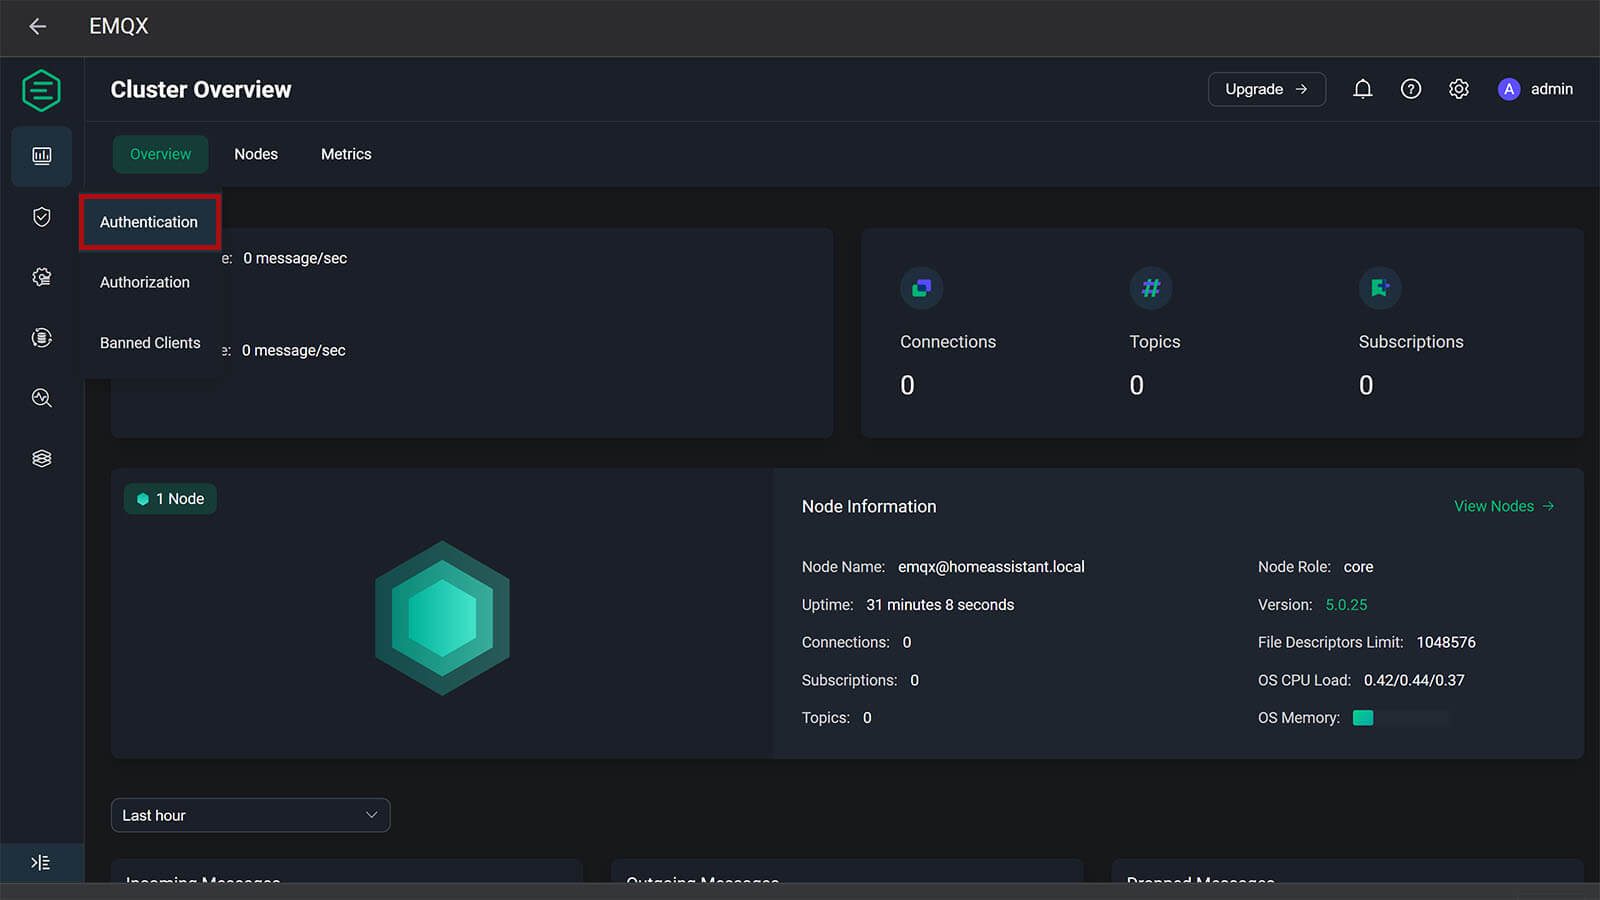
1. In the Authentication window, click the + Create button in the top right corner.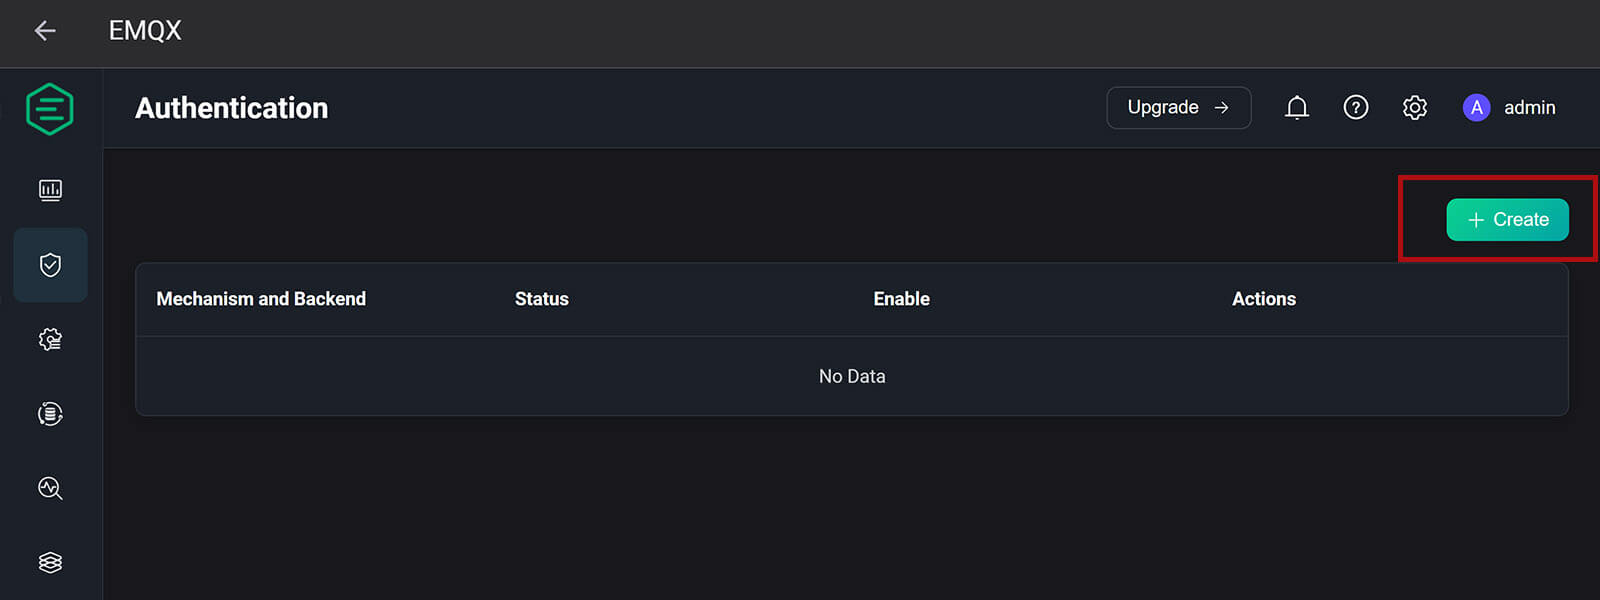
2. In the next window, you need to choose a mechanism method. For Home Assistant needs, we need to select Password-Based Authentication. The other two options, are a bit more advanced.
JWT stands for JSON Web Token, used in authenticating with a digital signature or encryption whose payload holds JSON used to write data or create claims.
SCRAM is a more complicated mechanism than password verification, which requires exchanging additional MQTT packages during connection based on the newer MQTT 5.0 standard.
Select the first one and click Next.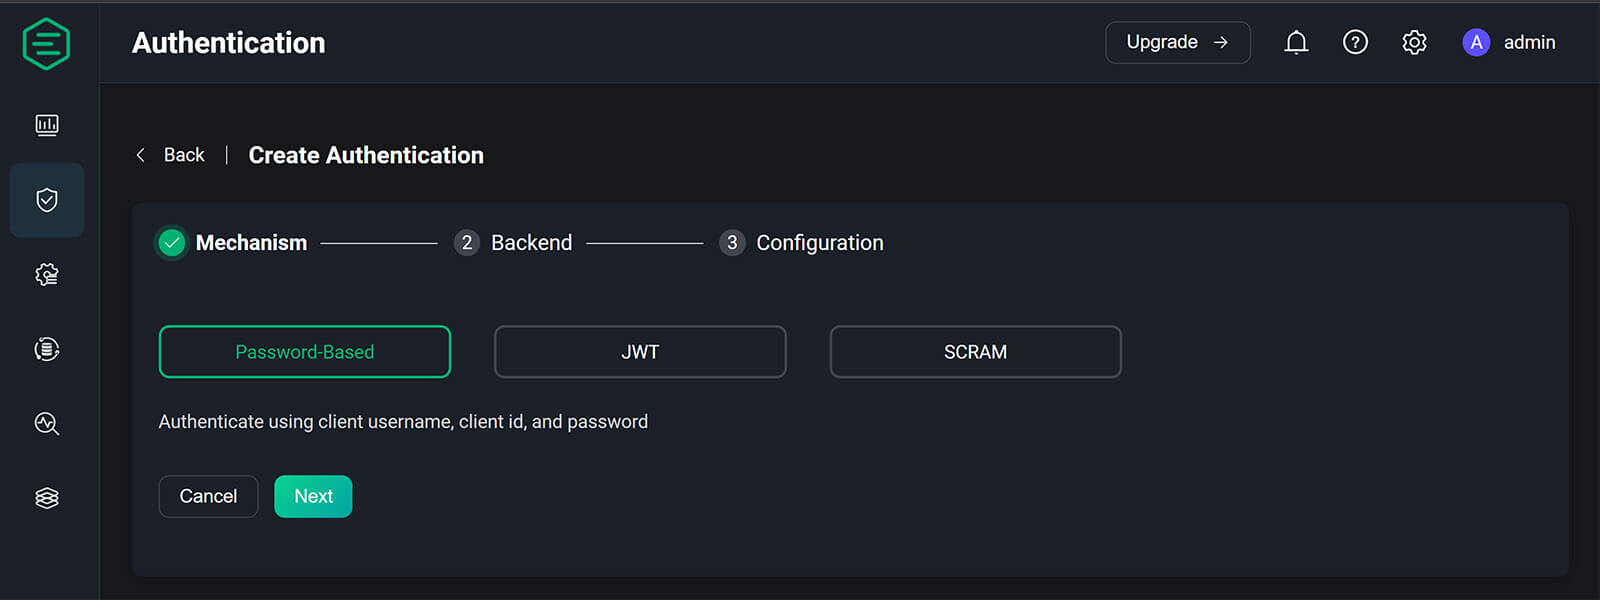
3. In the next menu, EMQX gives you the option to select a database which data will be recorder to. If you have a database running on another server for example, you can configure EMQX to push and store data off your HA server. The available options are MySQL, MongoDB, PostgreSQL, Redis and a HTTP Server.
Select Built-in Database and click Next, which will use Home Assistant’s database for storing MQTT events.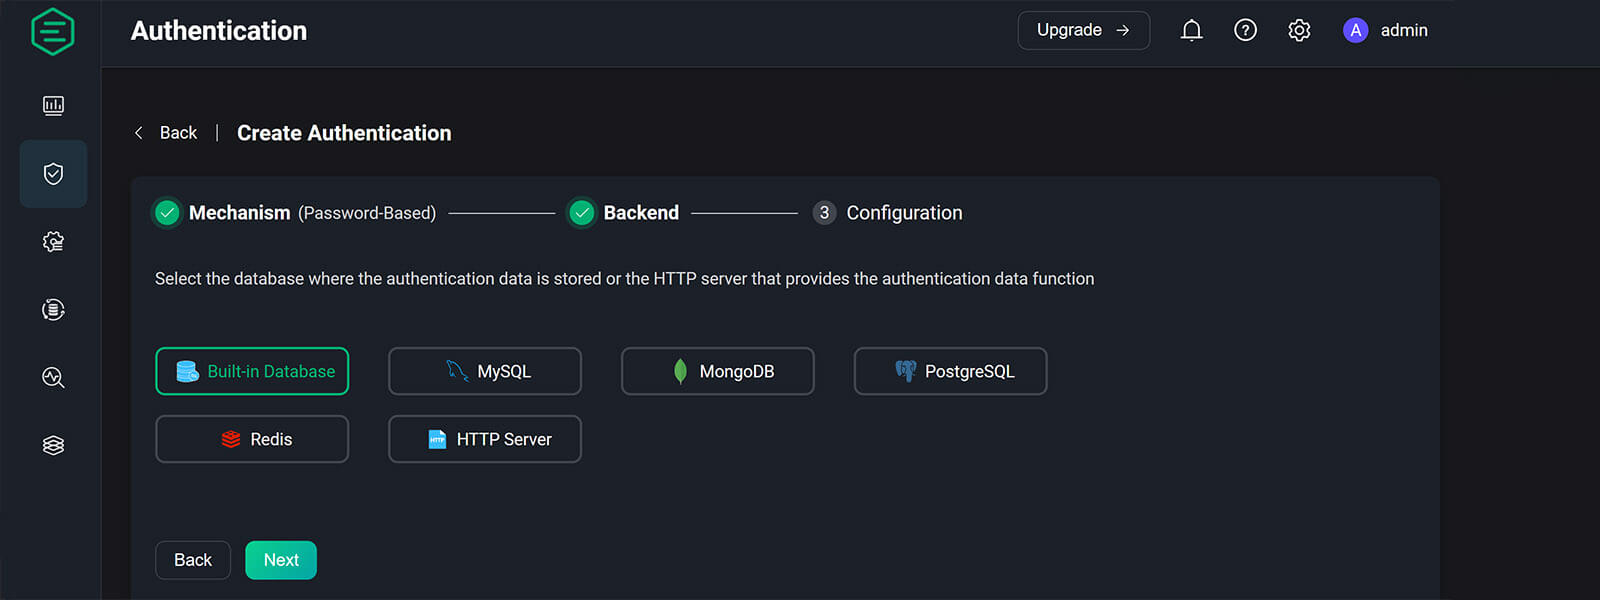
4. At the final dialog window, you can set Password Hash and UserID Type. Leave these settings to their default values and click Create.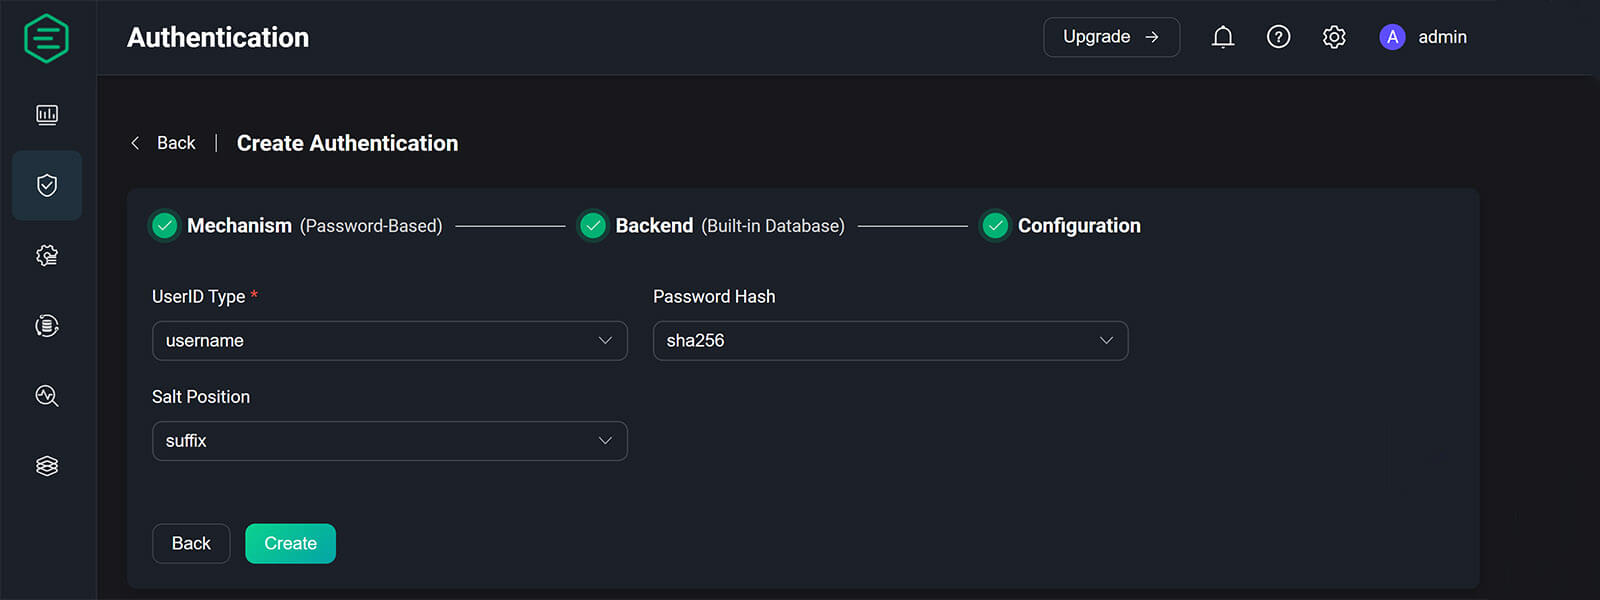
5. You will be presented with a Created Successfully toast notification, which will list the authentication mechanism you’ve just created. Move on to create users for access.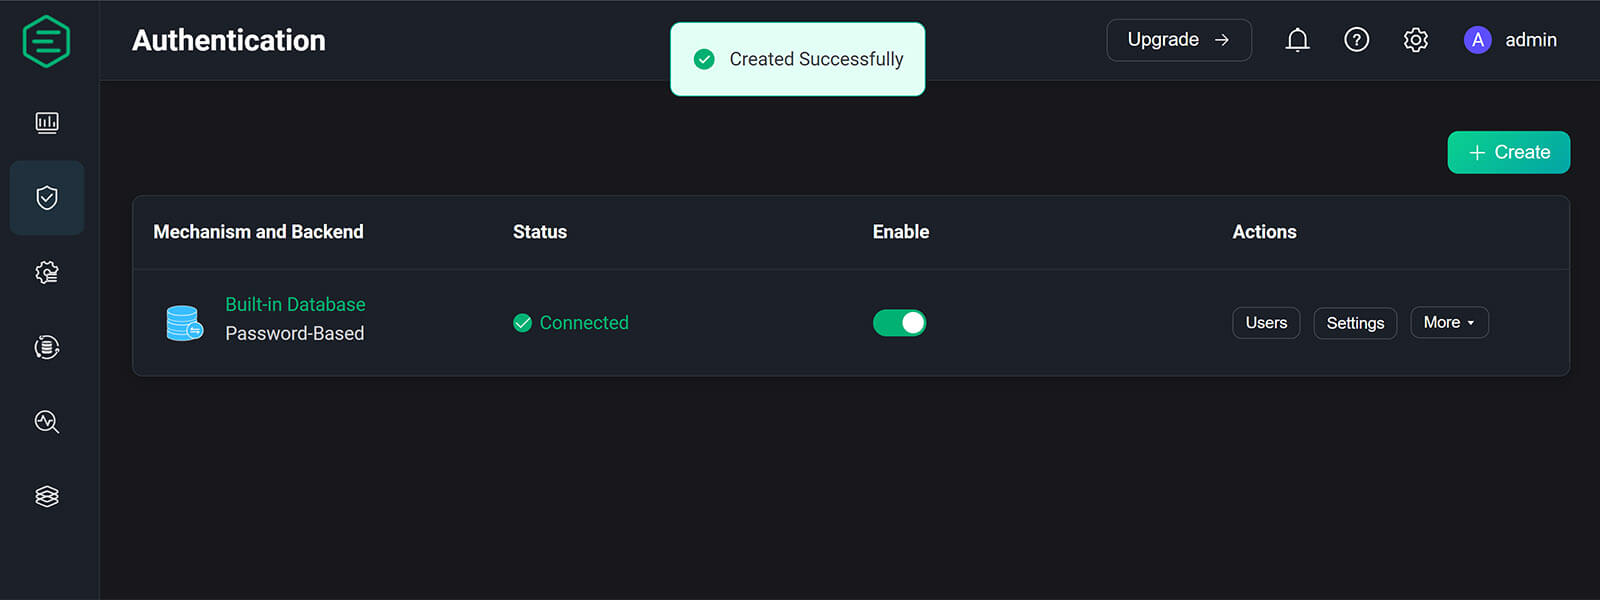
Adding EMQX Users
After you’ve added an authentication mechanism with a connection to the built-in database, you also need to create a user which will allow devices to talk to the EMQX MQTT Broker. In the Authentication menu, click on Users on the right of your selected mechanism: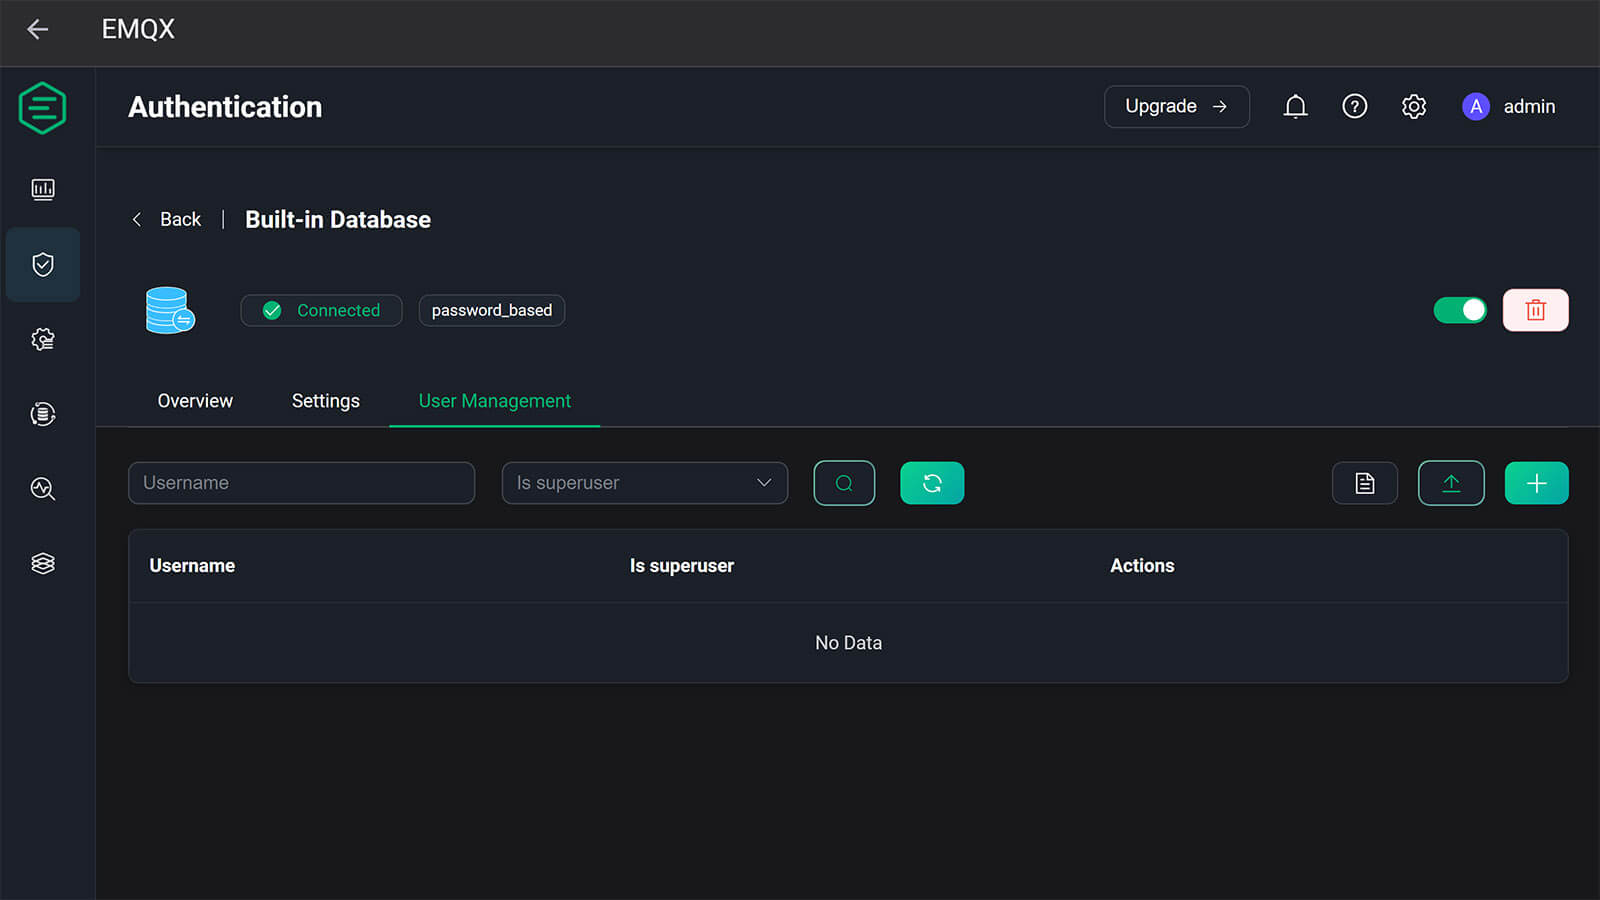
1. In the User Management menu, click the + Button to add a new user. Input a username and password and click Save. Optionally, you can create it as a superuser with elevated privileges, although it is not needed for MQTT in Home Assistant.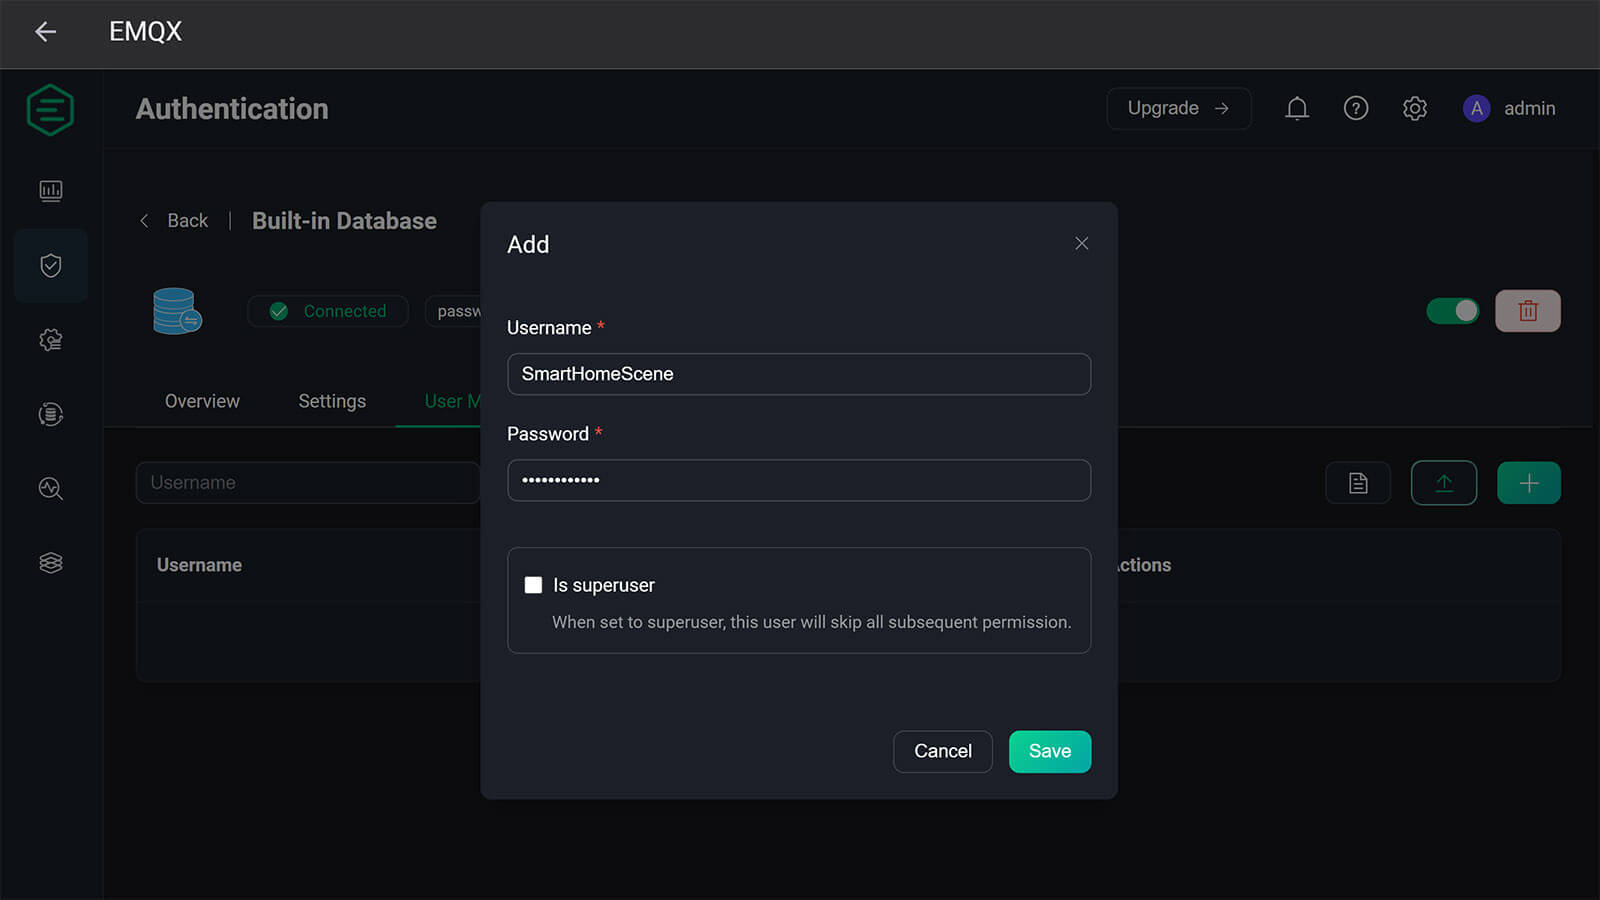
2. You will be greeted again with a toast notification Created Successfully!. If you need too, create a second user for a different set of devices or things communicating with MQTT.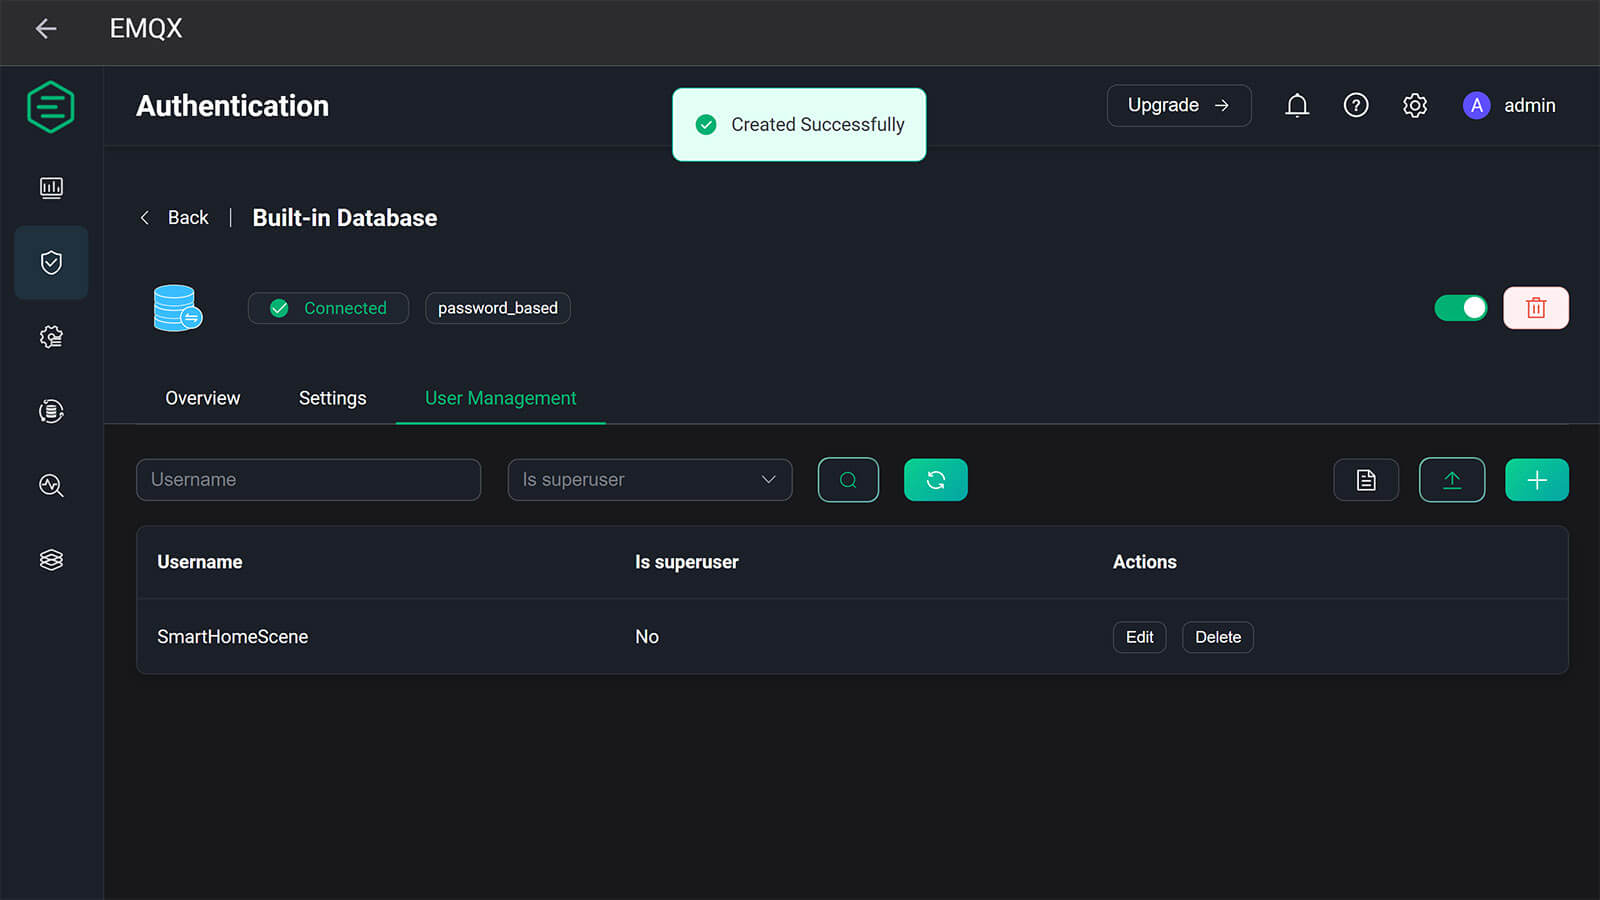
Changing EMQX Listener Ports
If you do have conflicts with other add-ons, you have the ability to change listener ports of the EMQX broker. Keep in mind, this needs to be done within the UI of EMQX. What this means is, in order to successfully start the add-on initially, you need to stop any conflicting add-ons using the same ports. After you are done, you can start everything back again.
To change ports, navigate to Management > Listeners and you will see a list of ports the add-on is currently using. Click the one you want to change (default: TCP 1883) and update it. Alternatively, change the ports of conflicting add-ons before starting EMQX.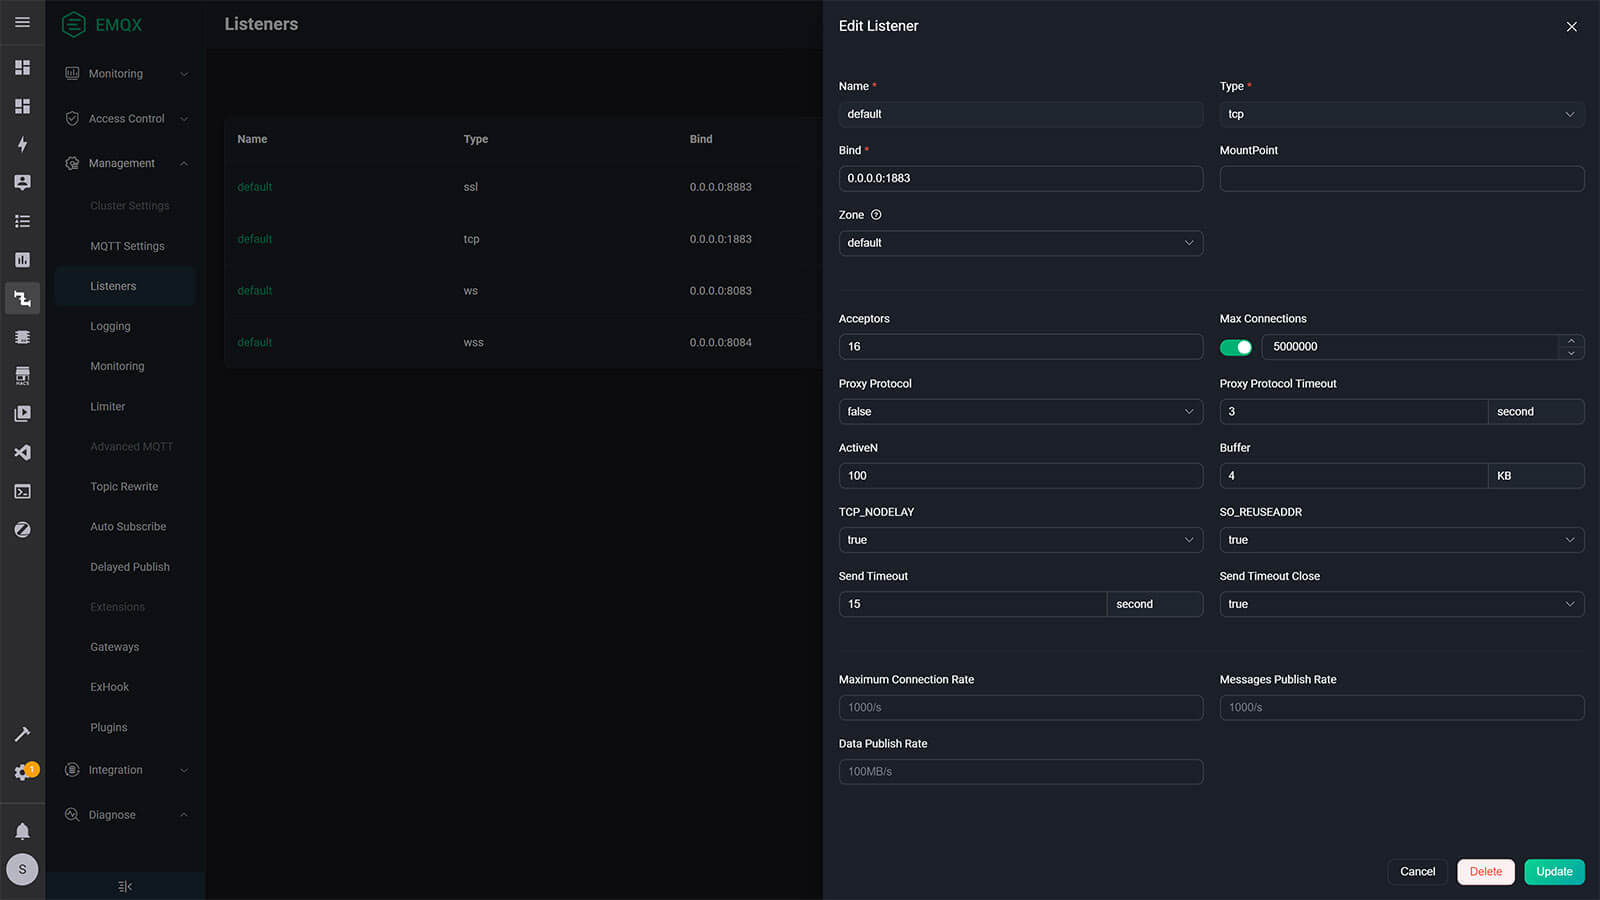
Connecting to EMQX MQTT Broker
Once your EMQX MQTT Broker is up, running and authentication is set you can connect to it from your local network. As an example, I’m going to connect a Zigbee2MQTT instance and start pushing data to feed it’s dashboard with some information.
Before I can migrate my test Zigbee2MQTT instance, I need to stop both the Mosquitto MQTT and Zigbee2MQTT add-ons. This will allow me to edit the configuration and create a new connection to the new EMQX Broker. With both stopped, navigate to Settings > Add-ons > Zigbee2MQTT and click Configuration at the top: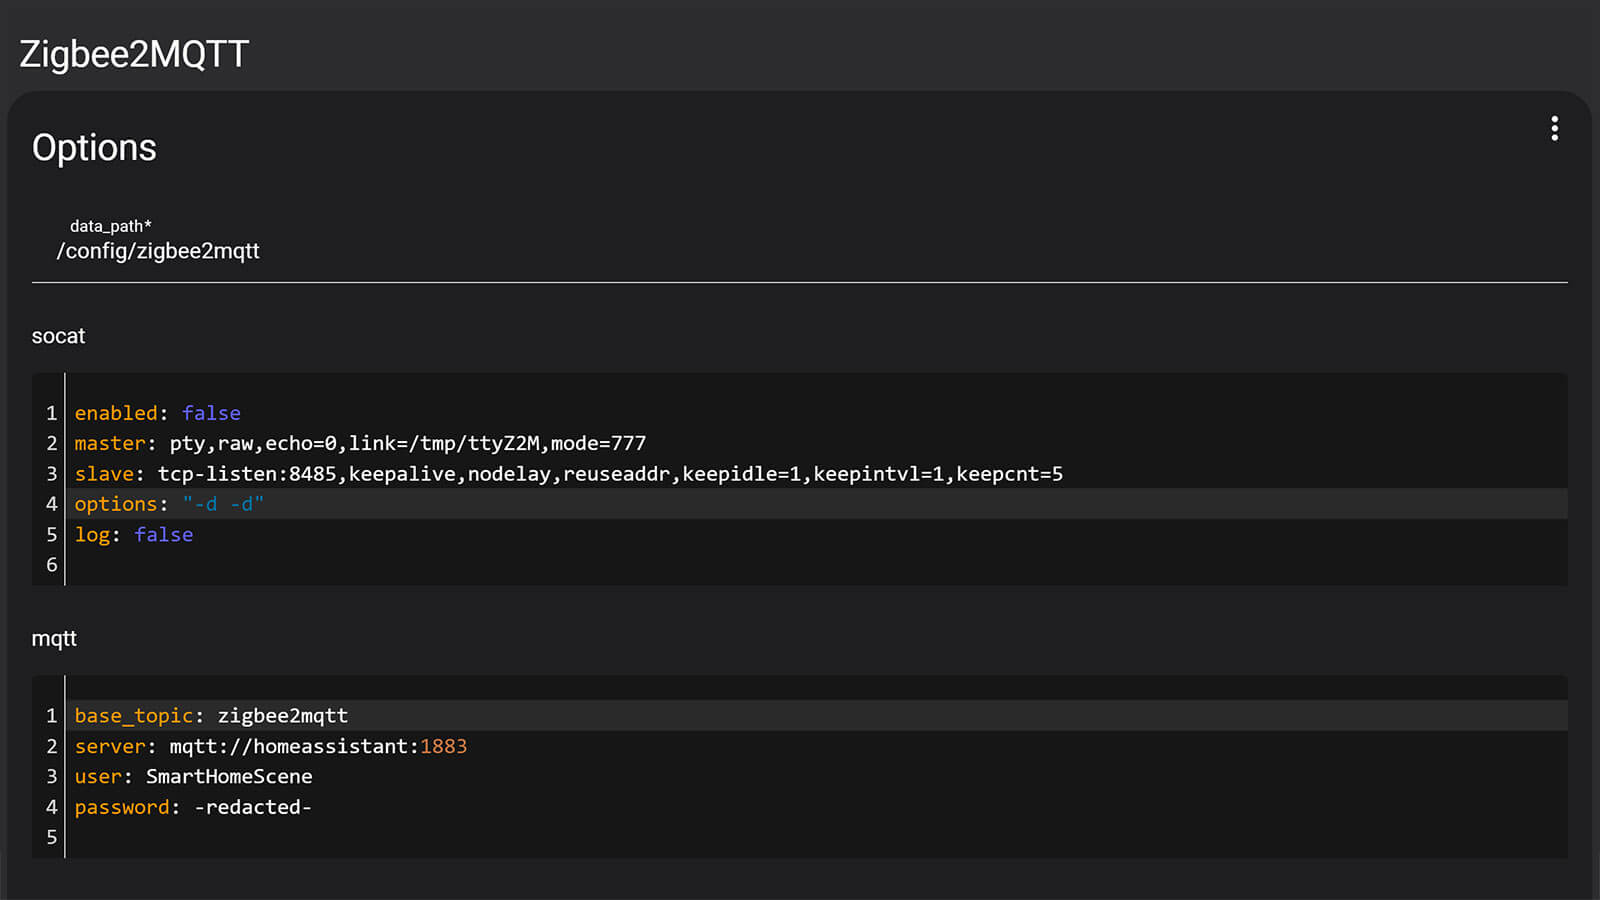
Under the MQTT field, change the server to mqtt://homeassistant:1883 and add your username and password credentials that you’ve created during setup of EMQX. Alternatively, you can use one of the following as server/hostname:
mqtt://homeassistant:1883 #Default configuration the documentation recommends
#OR
mqtt://a0d7b954-emqx:1883 #Using the add-on ID
#OR
mqtt://localhost:1883 #Alternative method, will work in most cases
Click Save at the bottom and start Zigbee2MQTT from the Info tab. To verify everything is working, navigate to the dashboard of EMQX and see the data pouring in.
Back in Home Assistant, under Integrations you will find the MQTT Integration auto-discovered just like with Mosquitto. If it is not showing up, click + Add Integration search for MQTT and input the credentials of the EMQX Broker. You can again use homeassistant, a0d7b954-emqx or locahost here as the broker.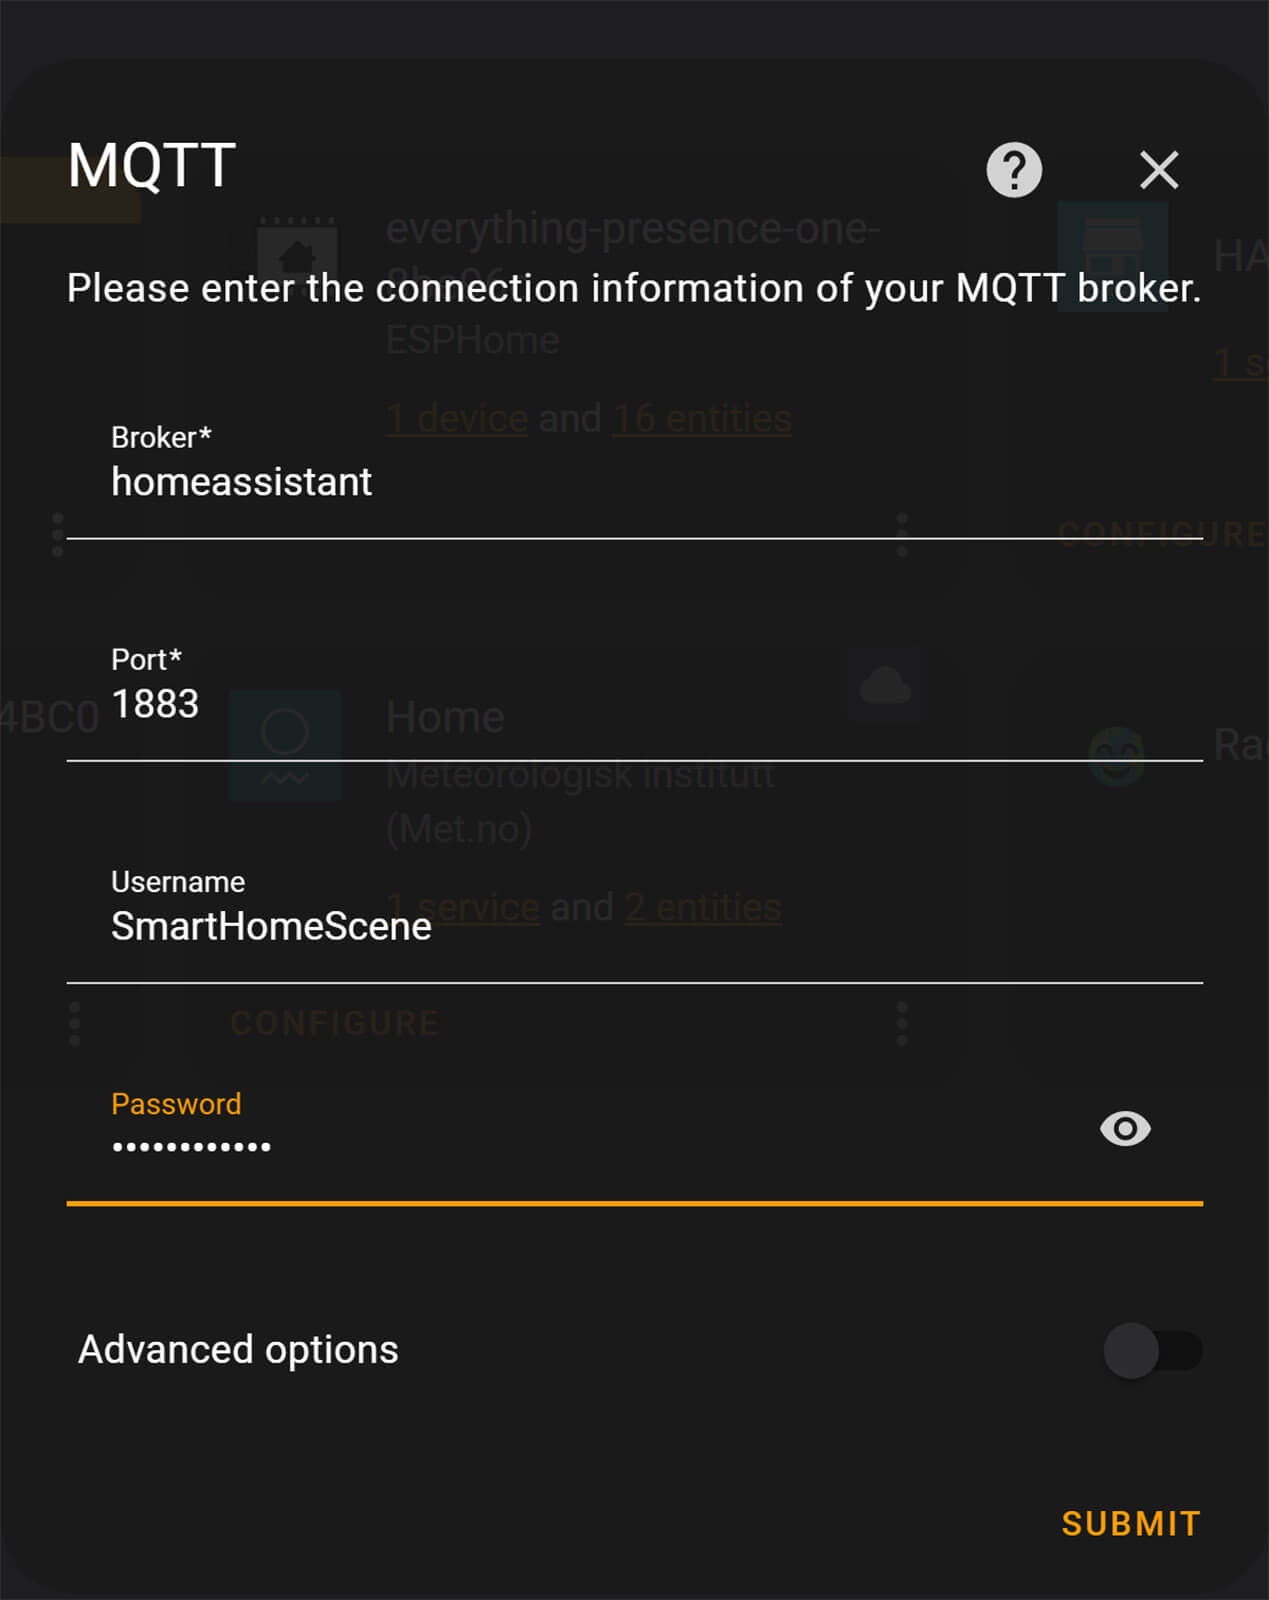
Click Submit and the MQTT Integration will be added to Home Assistant.
Note: When using external devices to connect to your EMQX MQTT Broker, meaning devices that are not running on Home Asssitant as Add-ons or Integrations, use the IP Address of your Home Assistant instance as the broker/hostname instead.
Exploring the EMQX Dashboard
The EMQX dashboard is very data-rich. Starting from the top of the menu going down, you can explore a bunch of different things for your active client connections and MQTT topics.
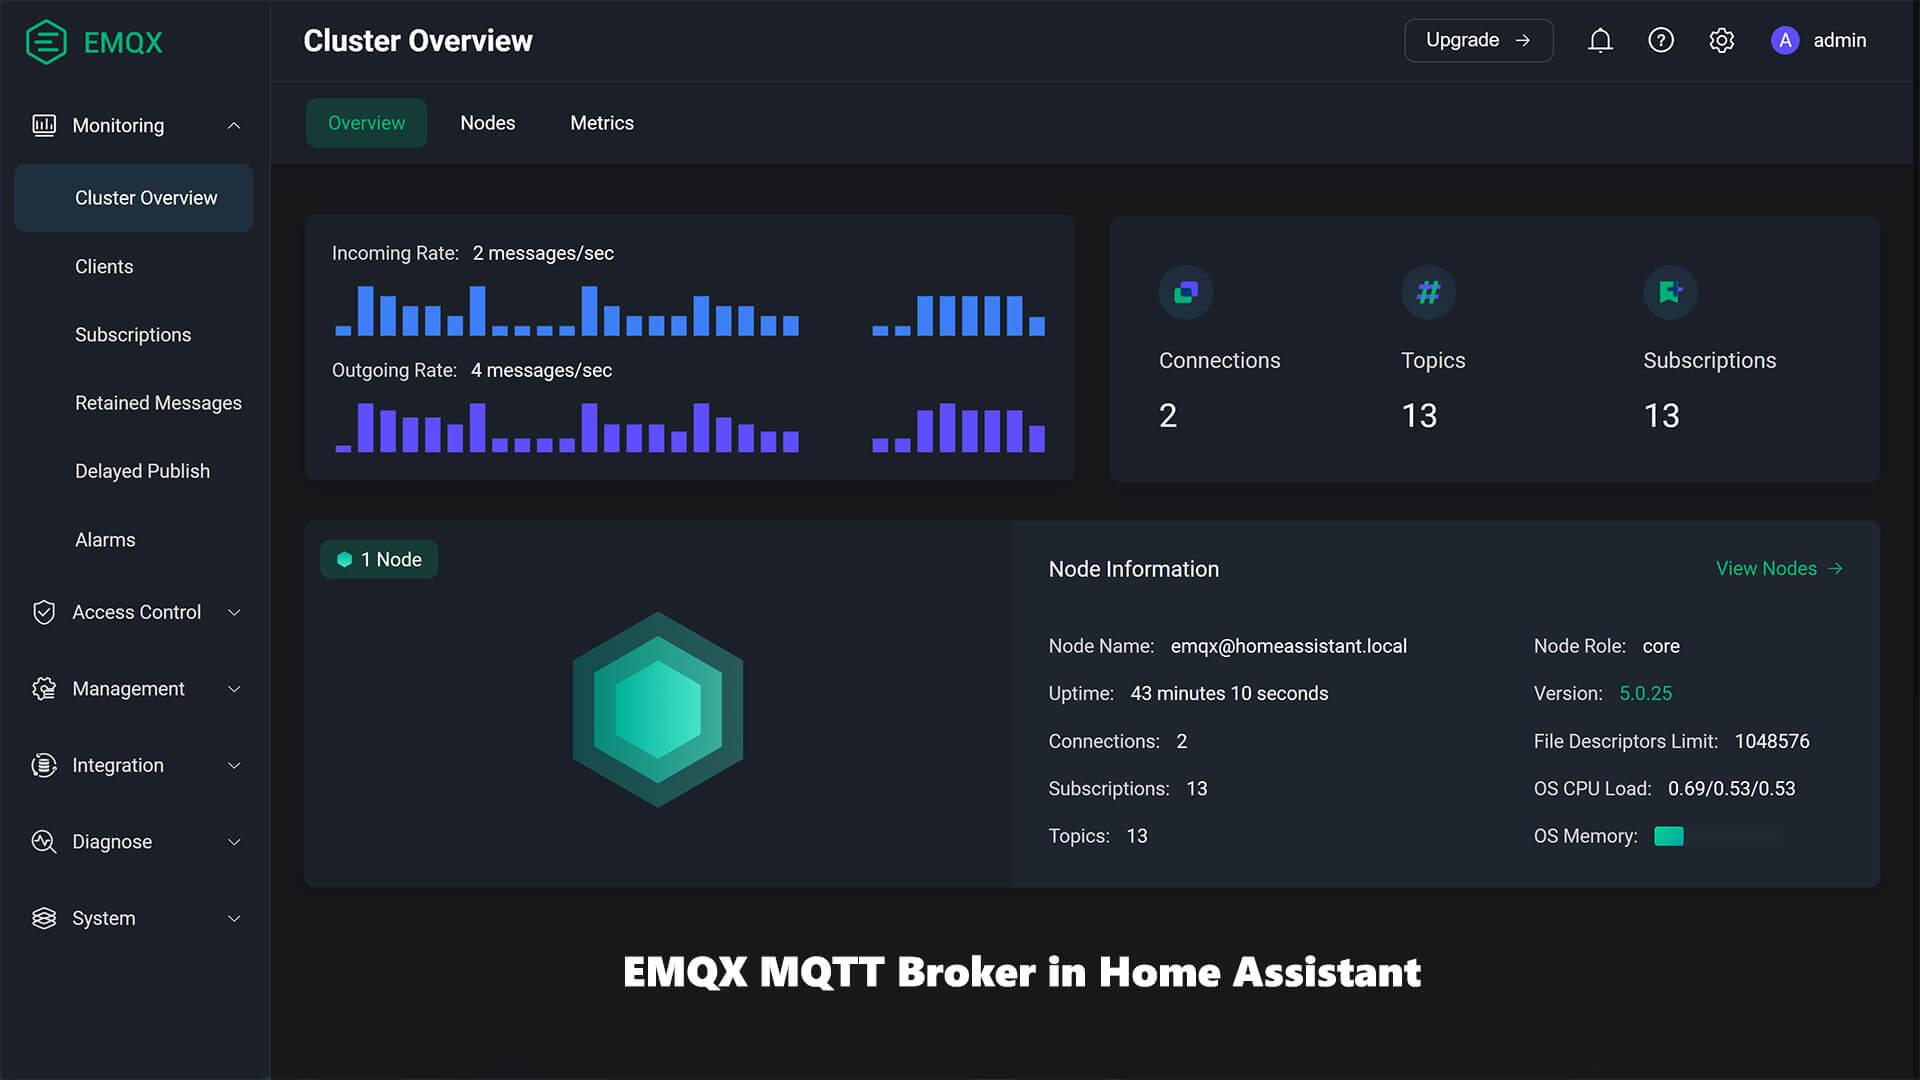
In the Cluster Overview, EMQX gives you the incoming and outgoing rate of messages per second. This can be helpful in giving you a general idea if you Zigbee mesh network is overloaded for example. It lists the number of active connections, topics and subscriptions, which you explore individually and see what’s actively connected to your MQTT Broker.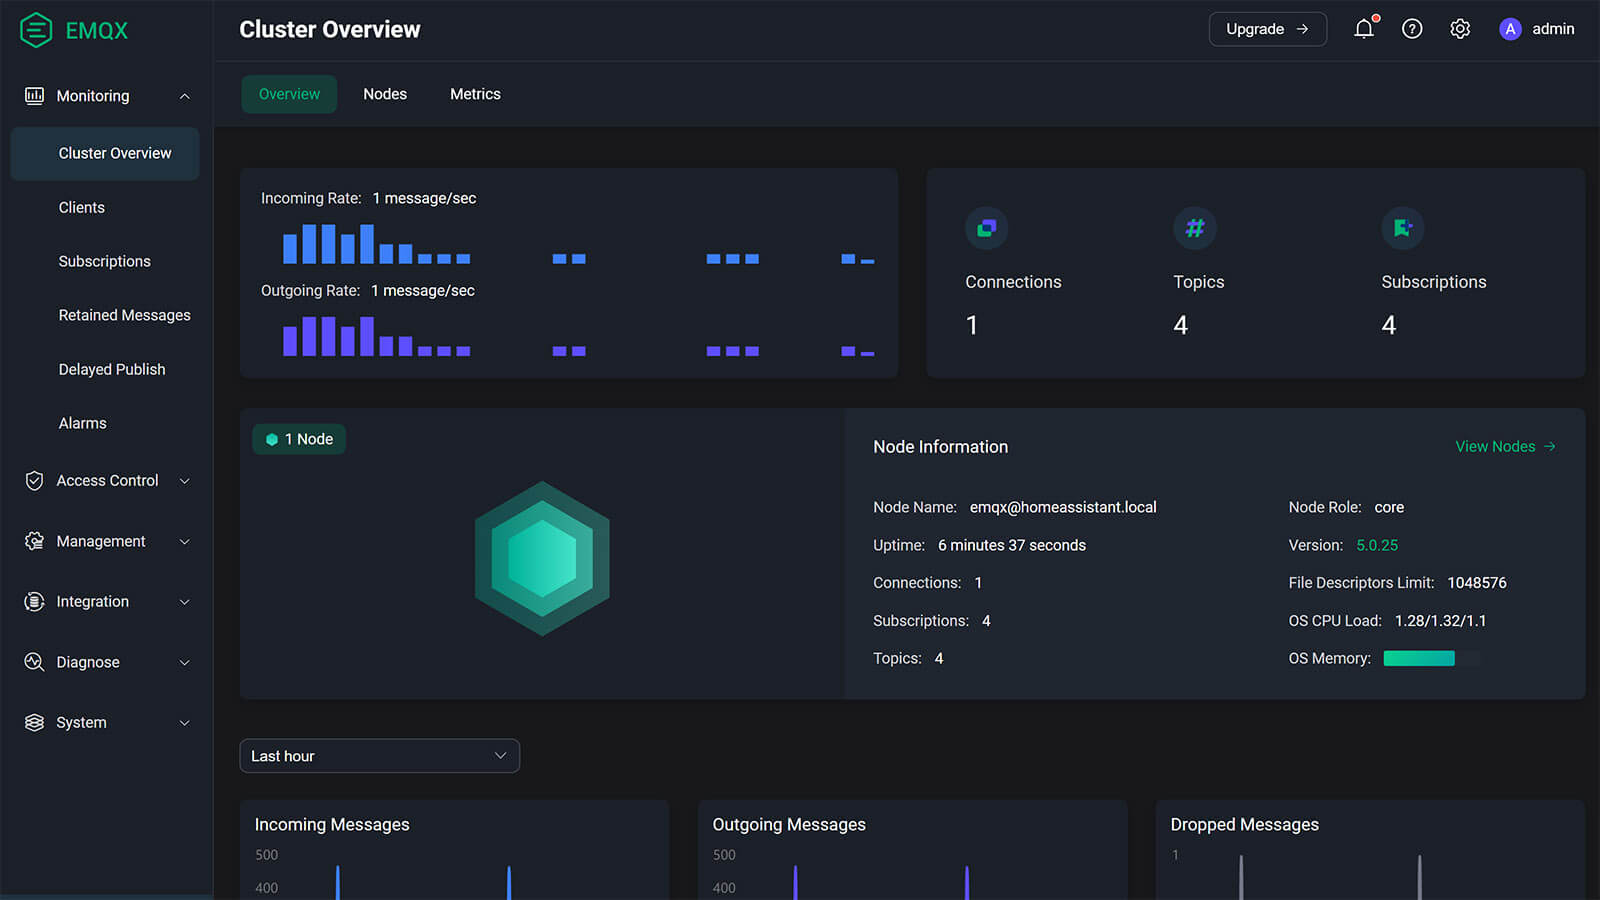
Scrolling further down from the Overview menu, the same data is organized into line charts so you can see the history: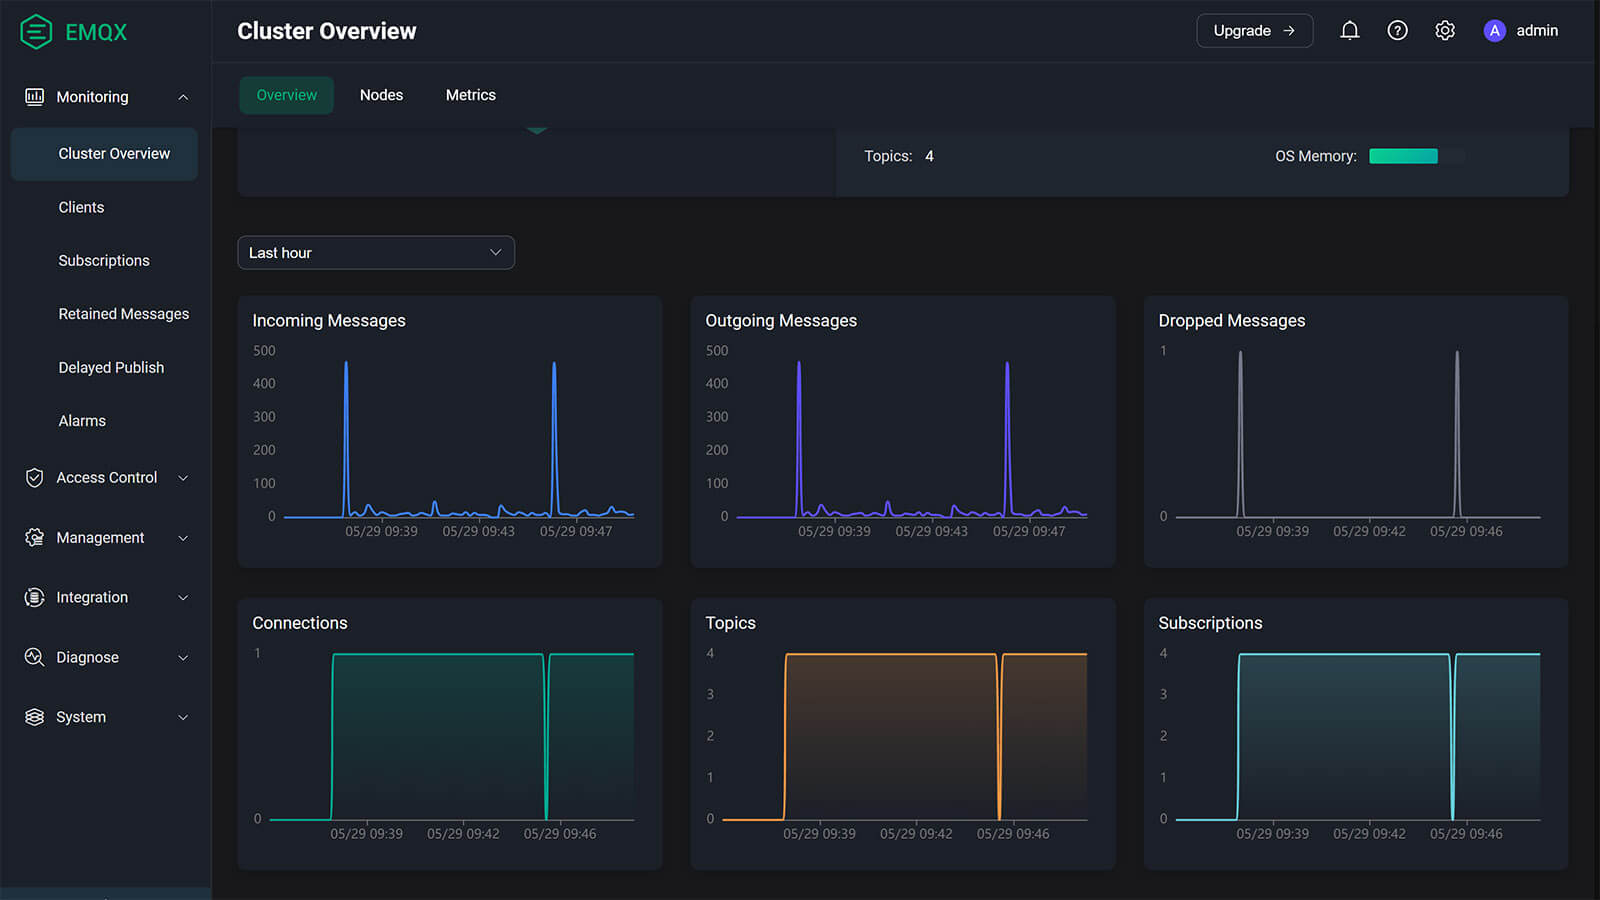
In the Nodes menu, you will find some information and statistics of that particular node. Uptime, CPU load, memory load and active connections to the node can be overviewed here. The Metrics tab, expands this into further details, breaking down things to number of authorizations, bytes received and sent, messages received and sent, messages published and delivered as well as detailed packets info.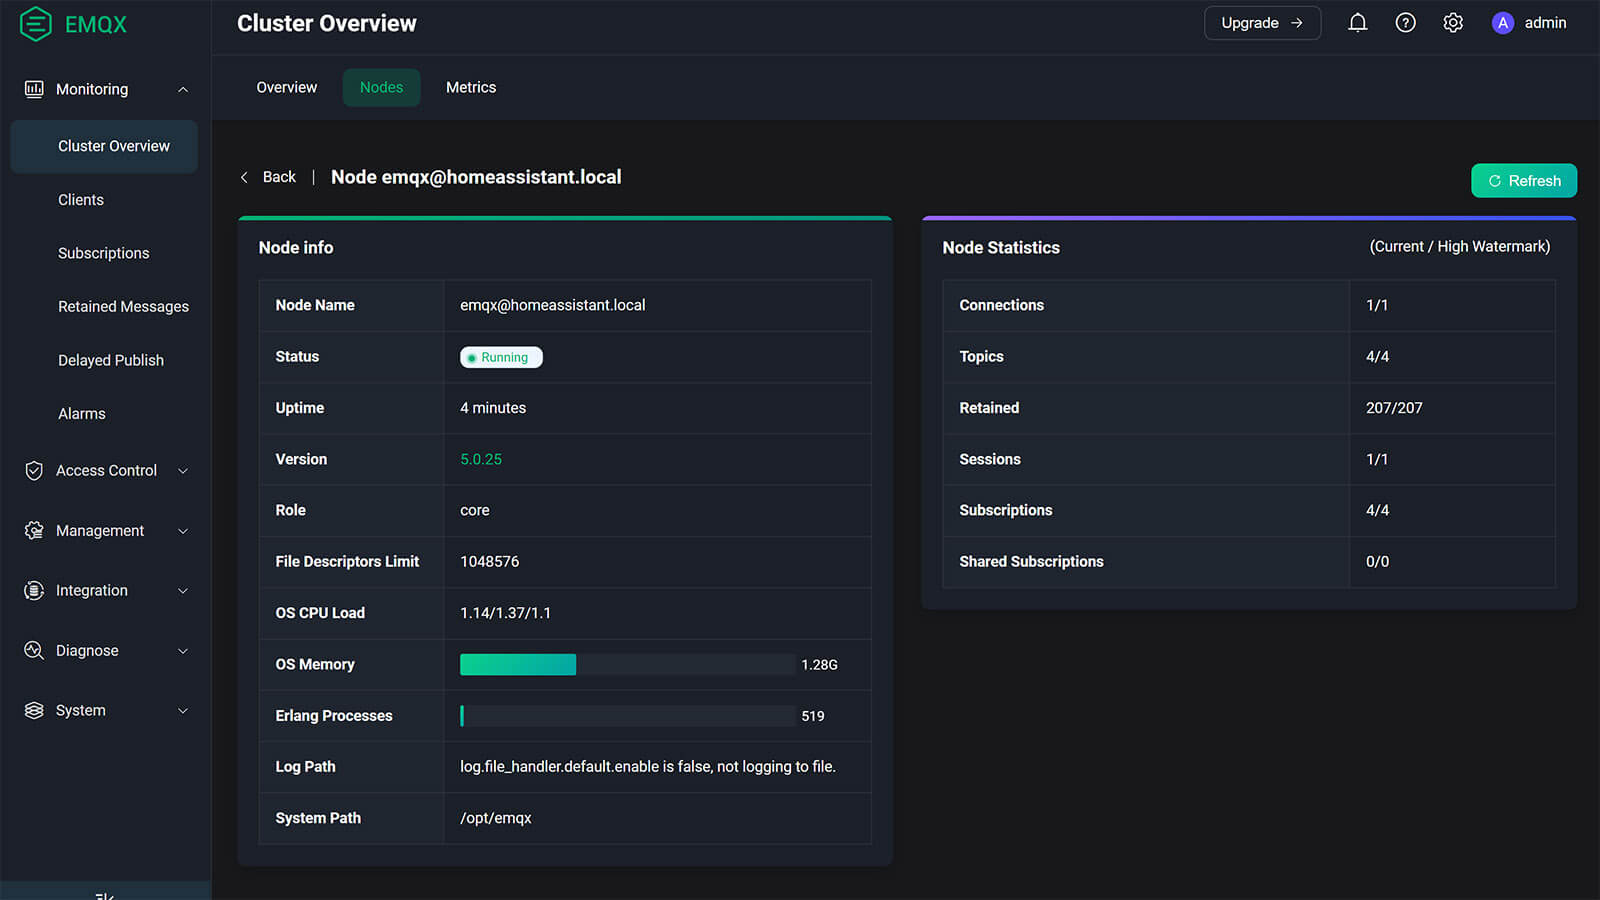
In the Clients list, you will see a list of connected clients to the broker. If you connect a bunch of different devices to EMQX, you will see them in this list. TasmotaMQTT, Frigate, anything that you connect via MQTT to the broker will be listed here. In this development build, I only have an active Zigbee2MQTT connection with a few devices. I can expand it in detail by clicking on the Client ID.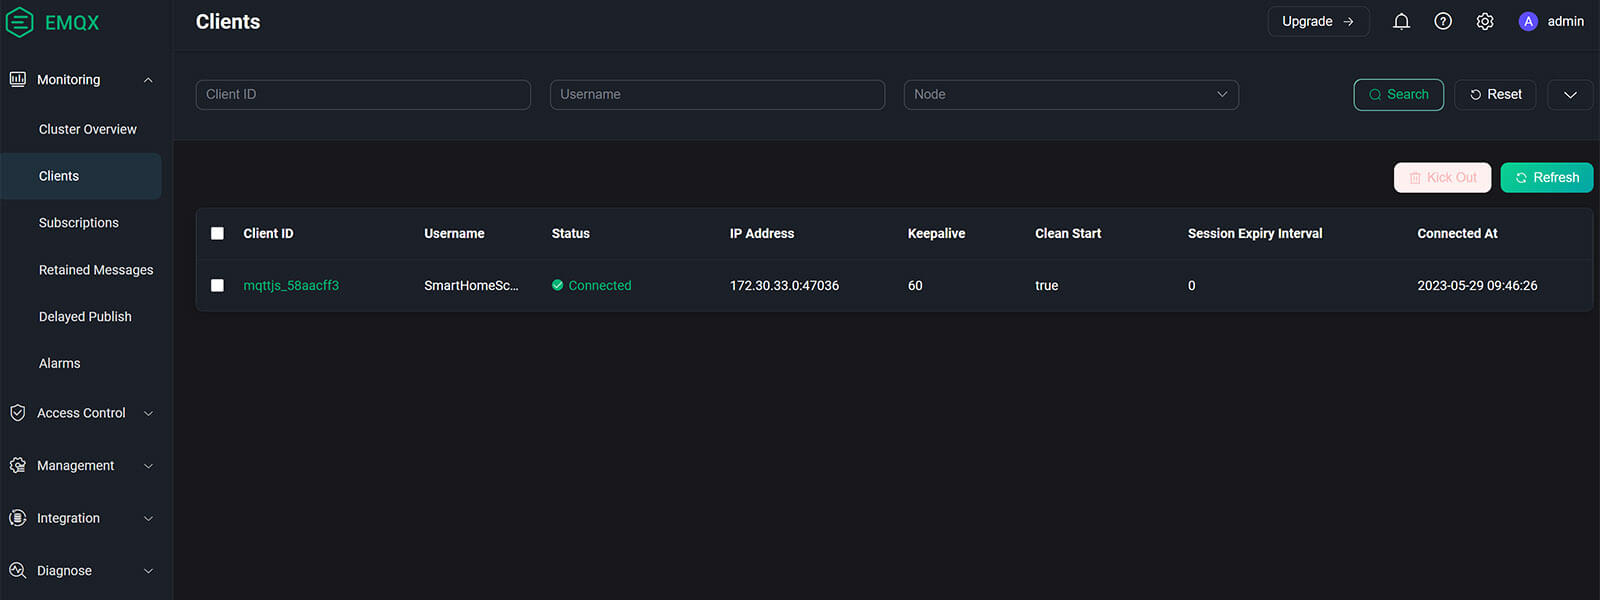
Again, you will see some general information about this particular client like status, IP address, number of subscriptions etc. 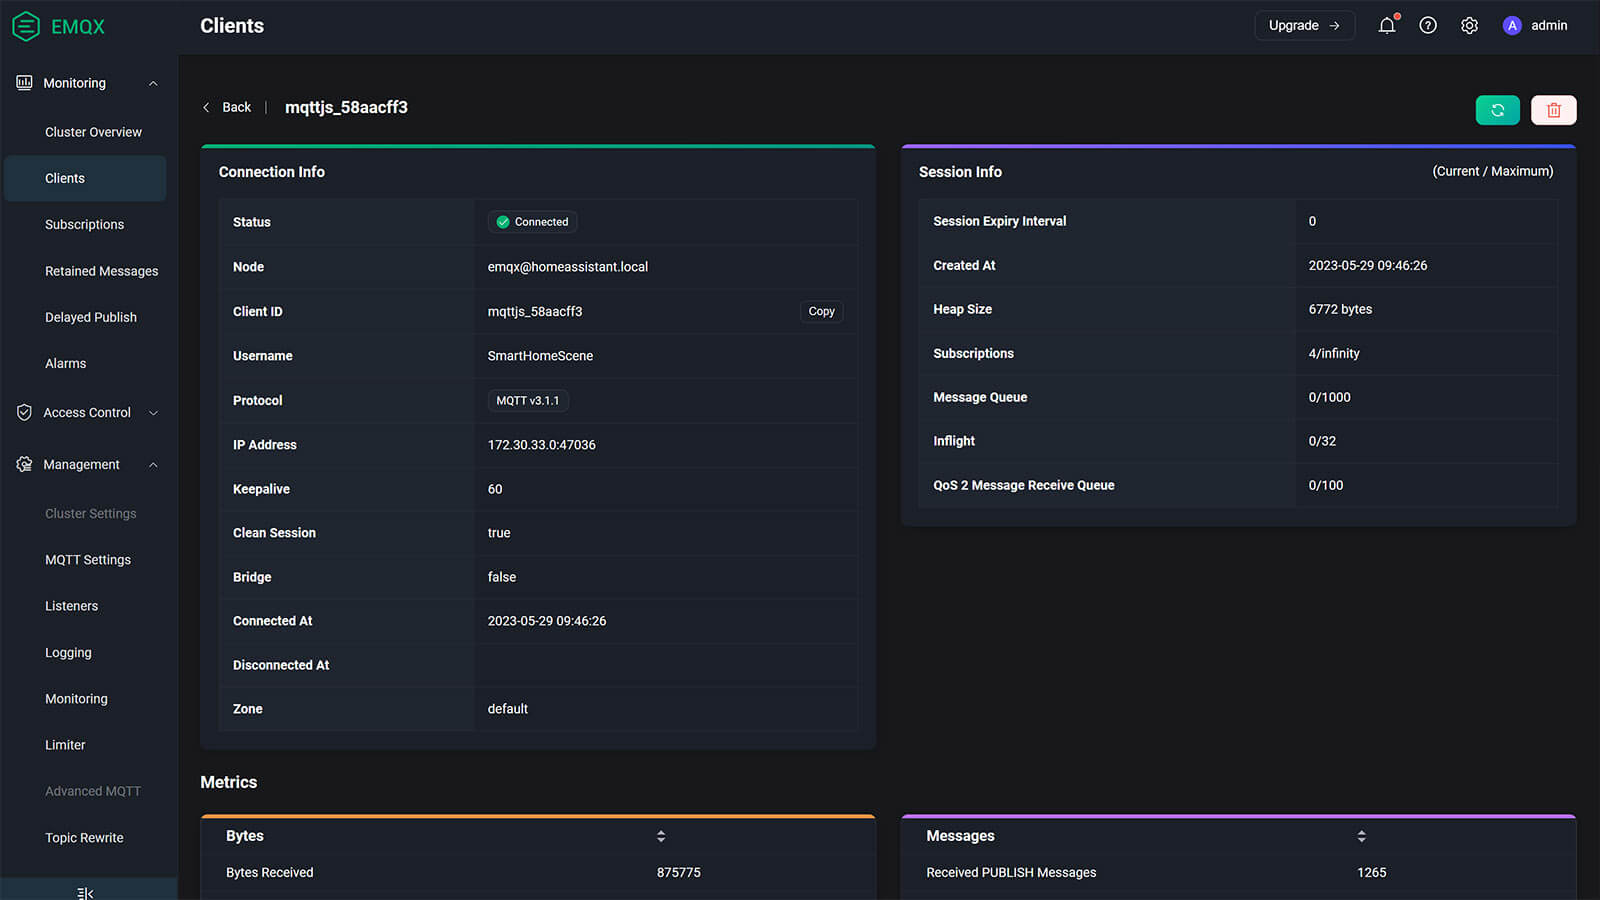
Scrolling further down, you will see the Metrics for the client. Bytes received and sent, packets received and sent and detailed messages information.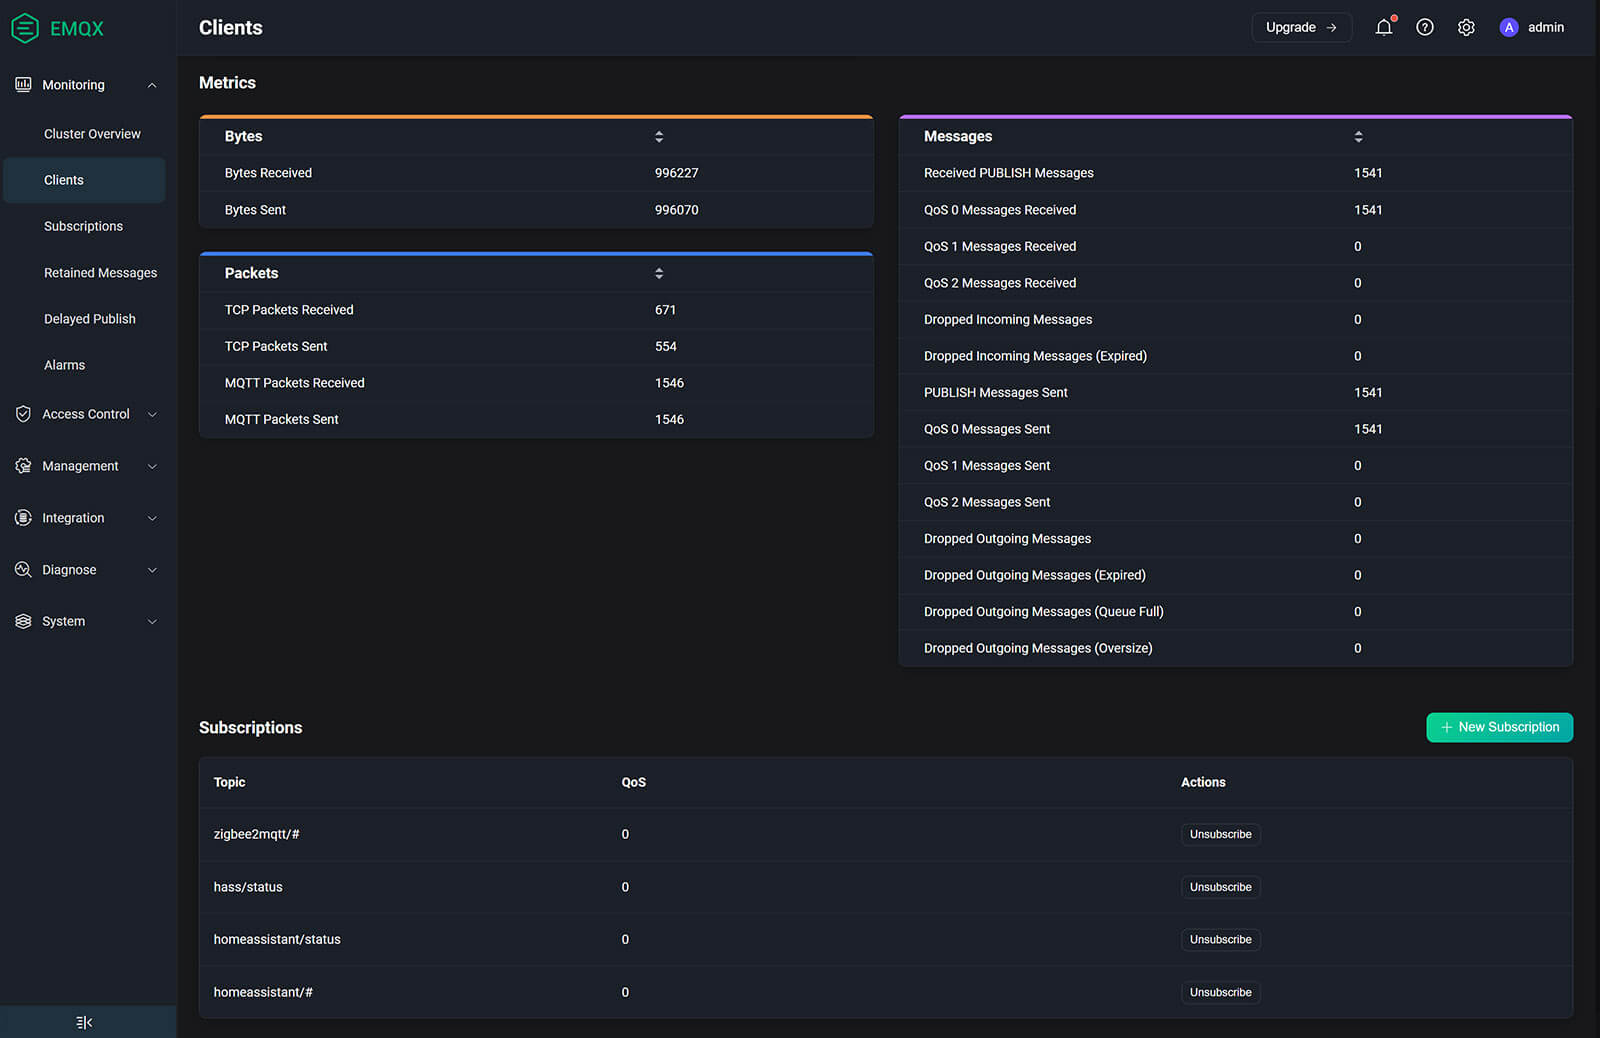
Diagnosing MQTT Connection Issues
Let’s say you have a device that’s acting up. It’s dropping from the network frequently, responds slow to command or maybe doesn’t respond at all. Zigbee2MQTT works, but nothing is pushed via MQTT to Home Assistant. So you want to try and find out what’s going on.
Navigate to Monitoring > Subscriptions > Topics in the top menu. You will see all your devices listed individually as subtopics under the zigbee2mqtt main topic, e.g. zigbee2mqtt/Sonoff SNZB-02D.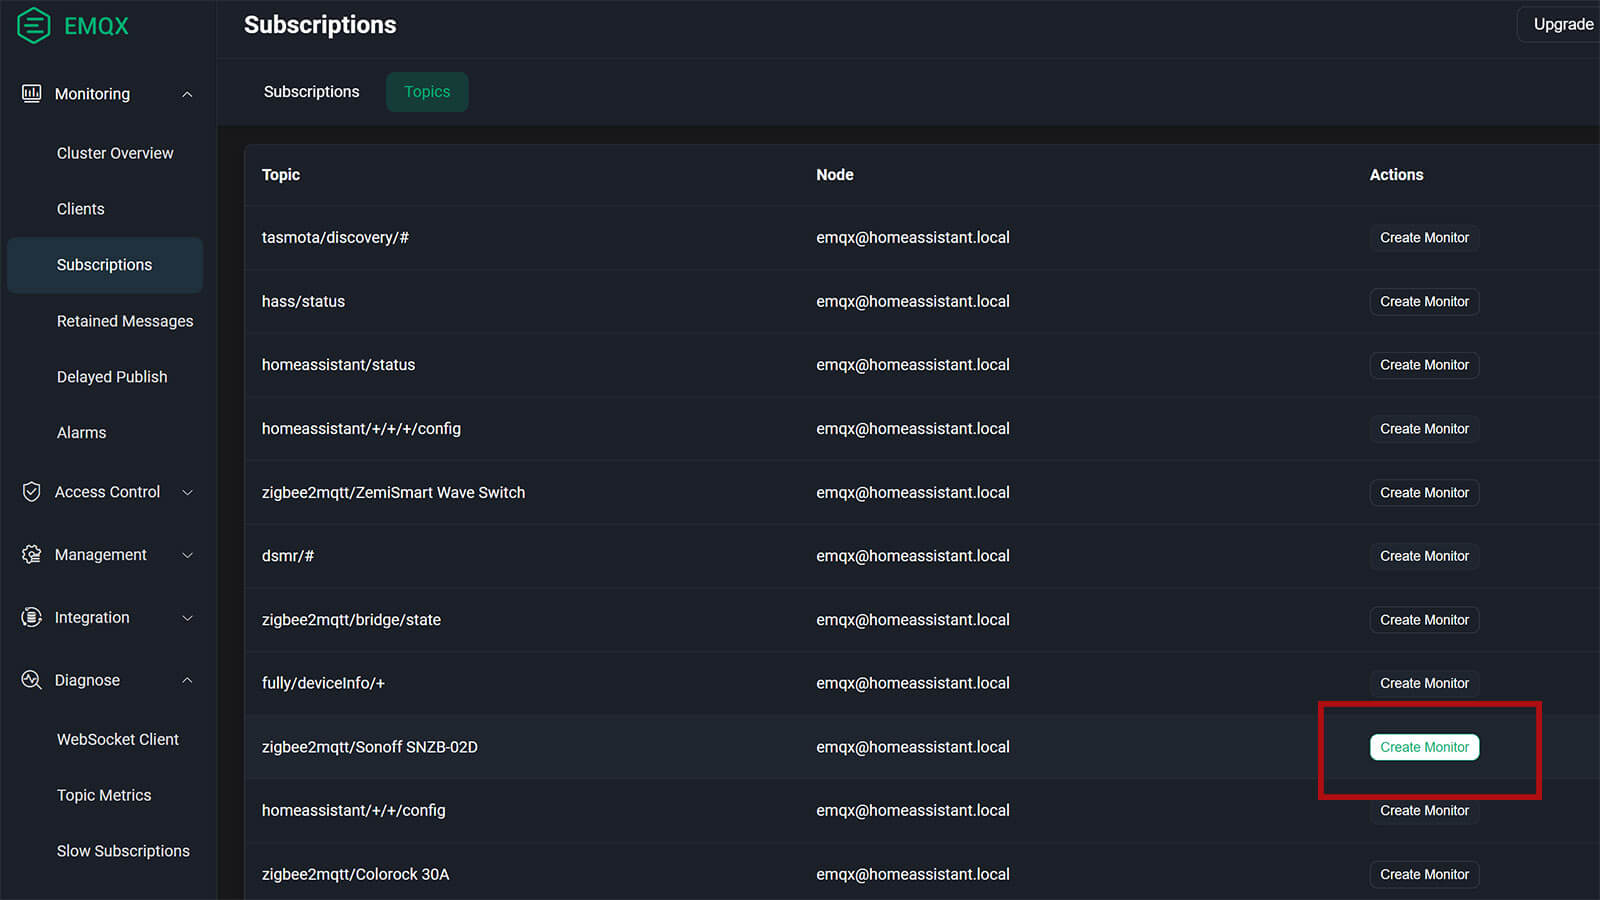
Select your device and click Create Monitor on the right. This will create a diagnosis monitor for that particular device and take your in the Diagnose > Topic Metrics menu of EMQX. You will a list of monitors you’ve added here, select the one in question and click View.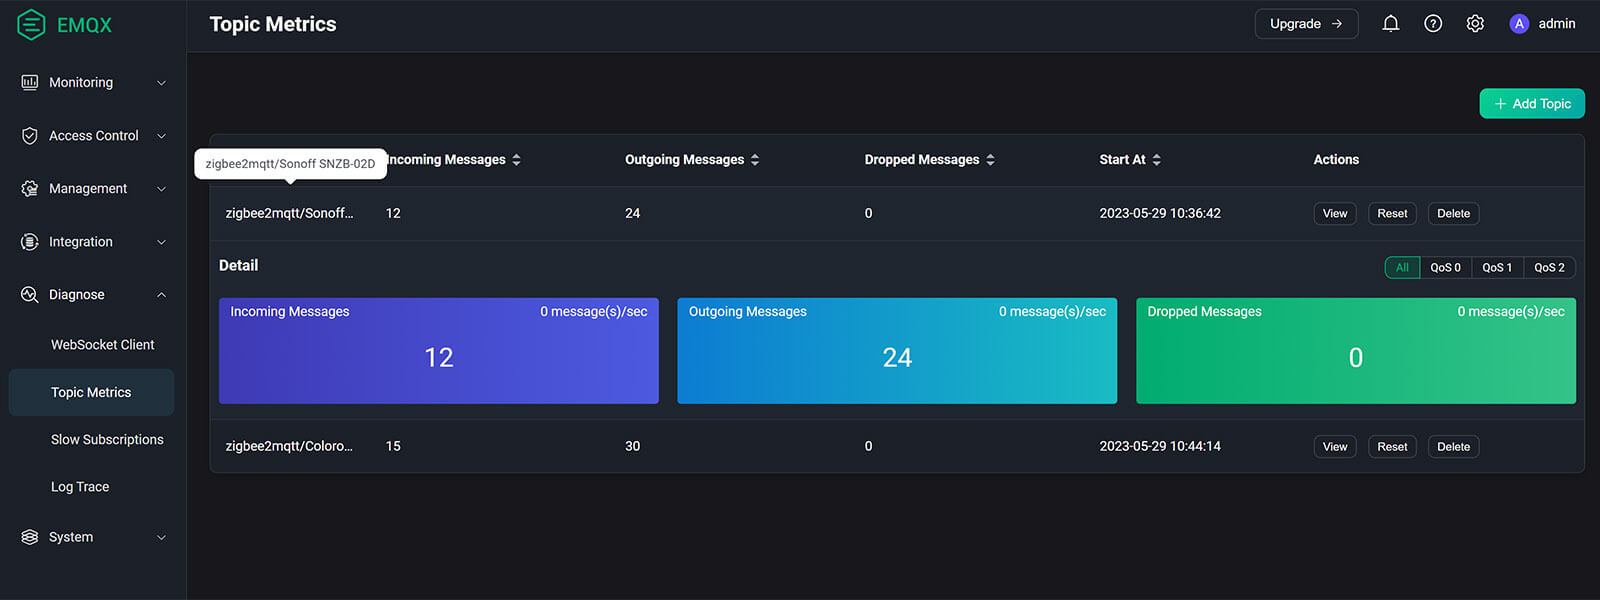
You will see a breakdown or messages related to the device. If you have a number above 0 in dropped messages it means either there is MQTT packet loss somewhere in the connection between Zigbee2MQTT (in my case) and the EMQX broker. The same applies for any Wi-Fi devices you may have, communicating with your MQTT broker.
The diagnosis menu is also useful for identifying if maybe something is spamming your network, e.g. a device is reporting it’s state way to frequently. Additionally, the Slow Subscriptions menu (after being enabled) can give you an overview of devices communicating slow with the broker over a preset threshold.
Summary
The EMQX Add-on for Home Assistant is a full-featured MQTT Broker. It’s like Mosquitto’s big brother, giving the end user superior debugging features as well as different authentication and authorization methods for setting up advanced networks.
The data coming in is well organized in a clean dashboard, you have an overview and control over anything you might possibly need when it comes to MQTT. I especially appreciate the stats it gives you when you create a monitor per topic.
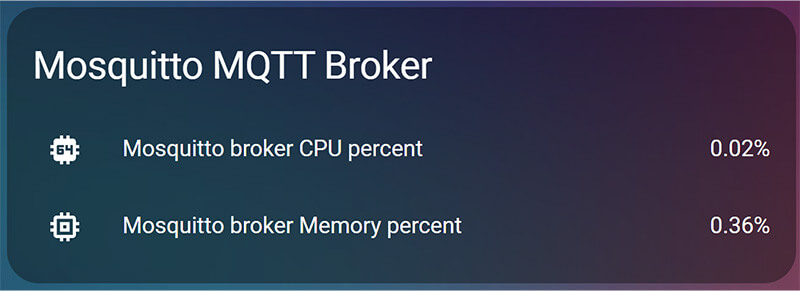
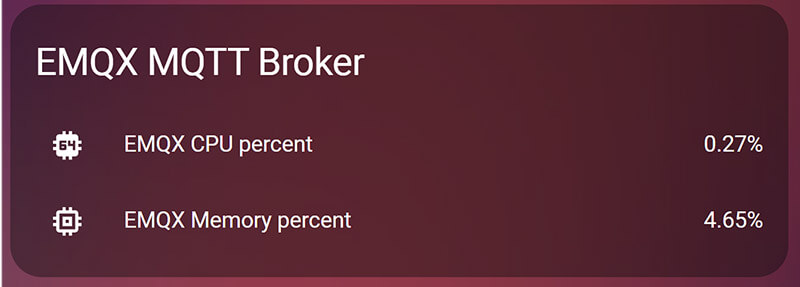
But, these features of EMQX come at a cost. The add-on has a larger footprint on your hardware, so this is an important thing to consider if you do decide to install and run EMQX as your daily MQTT broker. For comparison, here’s an image showing CPU and RAM usage of Mosquitto and EMQX on my thin client Proxmox server after connecting the same test Zigbee2MQTT instance:
Whether you should actually use EMQX instead of Mosquitto comes down to your diagnostic needs in my opinion. If you are having problems with MQTT communication, EMQX can be a powerful tool for pinpointing the issue. That aside, the use case for such an add-on is really thin in a Home Assistant context, because besides a superior MQTT diagnostic tool your experience will not change much.
I feel like the dashboard and live data it provides are not worth the larger hardware footprint it will undoubtedly have, especially if you are running from a Raspberry Pi. If you are into dashboards and data, sure, go ahead it’s a really really capable MQTT broker.
It’s also important to remember, the EMQX Add-on is still in it’s experimental stage of development, so bugs are expected.


My home assistant stopped responding after I’ve started it. Any idea what the cause is?
I can still ping it. Reboot didn’t work.
Not of the top of my head, no. Are you accessing your HA instance on the same ports perhaps?
Try a hard reboot, unplug for 3 minutes.
ok. it did work but it came alive after 20 minutes.
Hello, I already have a separate EMQX cluster and would like to add the installed Homeassistant EMQX Broker Add-On to this cluster using join. Do you have a workaround for me? Thanks!
matthias