Since 2023 was the year of the voice for Home Assistant, new releases have been heavily focused on voice assistants, wake words and local voice control of your smart home. In between, the devs managed to dish out some really awesome core and cosmetic updates too, check out the official release notes for more details.
Even though most of the voice features are still in beta and heavily being developed, there are some interesting things you can do right now – just to scratch that tinkerers itch. One of those things is controlling your smart home with an old analog phone, just by picking it up.

In this article, I am sharing a step by step guide for creating your own local voice assistant in Home Assistant using an old analog phone and some additional hardware. I managed to scrape 3 old analog phones from friends for the purpose of testing the voice pipeline.
Why do this?
You are already able to control device integrated in Home Assistant with your voice, using the Assist feature. This involves exposing your entities to your voice assistant and waking up Assist with a click, tap or wake word. At this moment, wake words are kind of pesky to implement and train a model for, but it’s getting there.
Adding an old analog phone will act as a wake word as soon as you pickup the handset – it will automatically activate Assist so you can say your command and be on your merry way. If everything is setup correctly, Home Assistant will execute the action you called upon after a few seconds.
For the record, I do not consider this to be a viable voice assistant replacement, especially since it involves physically doing an action to trigger an event. But it’s a really fun thing to tinker and experiment with – plus, old phones are cool.
Requirements

- Home Assistant 2023.5 or later
- Configured Home Assistant Voice Pipeline
- Old analog phone with RJ11 socket (example)
- Grandstream HT801 or HT802 analog telephone adapter
- RJ11 phone cable for connecting the phone to the adapter
The only difference between the Grandstream HT801 and HT802 is the number of ports, where the HT801 has only one and the HT802 two. In any case, you will only be able to use a single port on the HT802. Grandstreams are used a lot in offices, so you can recycle if you have the chance.
Setting up Assist Pipeline in Home Assistant
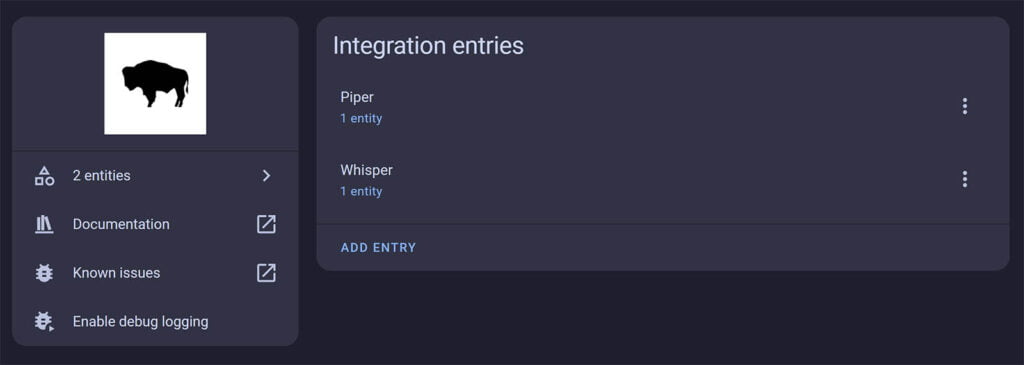
An Assist Pipeline in HA is just a set of components that together form a voice assistant. Once is used for speech-to-text (Whisper), and the other for text-to-speech (Piper). Both are required for creating a voice assistant in HA. You need to install both add-ons in HA before you can configure your assistant.
- Navigate to Settings > Add-ons > Add-on Store
- Search for Whisper and install it
- Search for Piper and install it
- Start both Add-ons
- Navigate to Settings > Devices & Services
- Click Configure on both
- They will be added under the Wyoming protocol
- Navigate to Settings > Voice Assistant
- Click + Add Assistant
- Give it Name and select a Language
- Choose Home Assistant for conversation agent
- Choose faster-whisper for speech-to-text
- Choose piper for text-to-speech
- Leave wake-word as is (don’t need it)
- Click Create
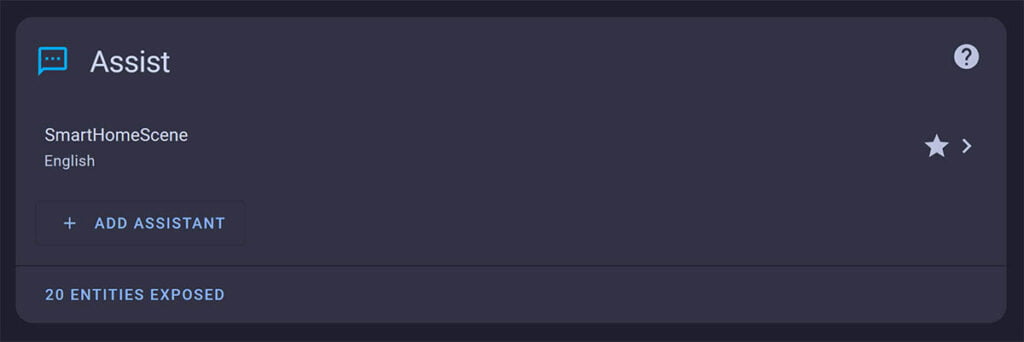
All that remains is to expose your entities to your voice assistant if you haven’t done so already. In the same screen, click the Exposes tab at the top and select an entity you want to control via voice. Toggle the Expose handle and the Assist handle. Optionally, give it an alias so you can call it more easily. You can test if Assist works with your phone. Done.
Setting up the Grandstream HT801
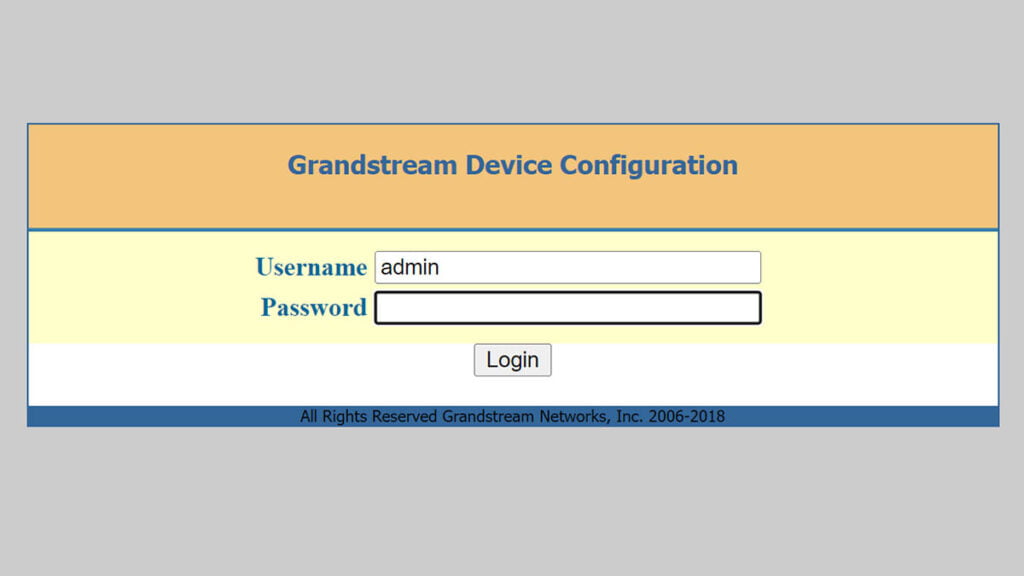
Before configuring the Grandstream adapter, plug in the power supply, the ethernet cable and your phone using the RJ11 jack. The Grandstream HT801 has a web dashboard that you can access by typing the device’s IP address in your browser where you need to set some things.
The HT801 will get a DCHP lease from your router and you can check the IP address there or scan your network with an app. Enter the IP address in your browser to gain access to the web dashboard. Login with the default credentials – username: admin, password: admin.
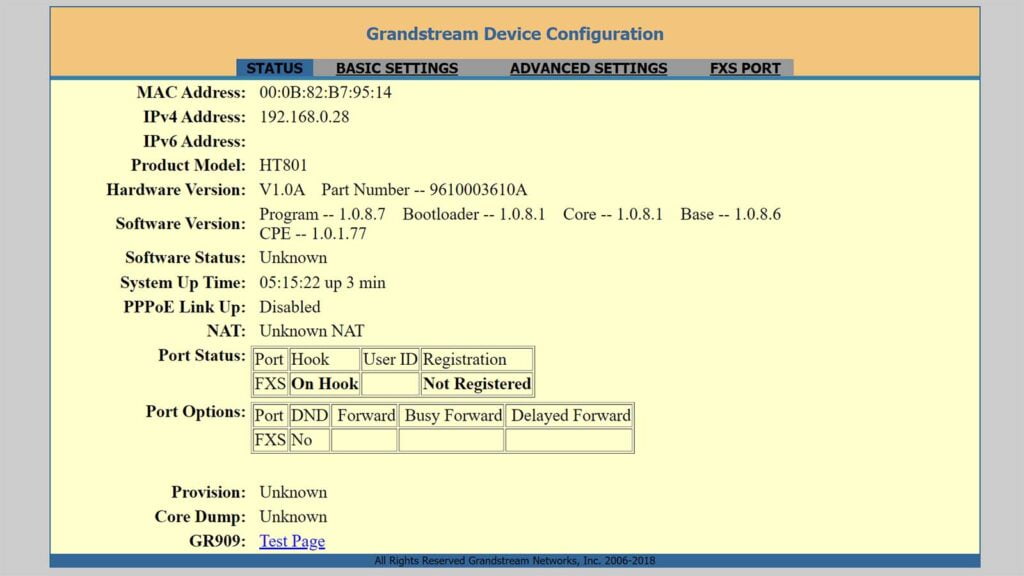
After you’ve logged in, you will be greeted by a dashboard from 1998, maybe even 95. It looks like the worlds first ever webpage, but it’s actually a featured rich configuration panel for the Grandstream HT801. If you click around the menus at the top, you will find a plethora of options for tweaking the HT801.
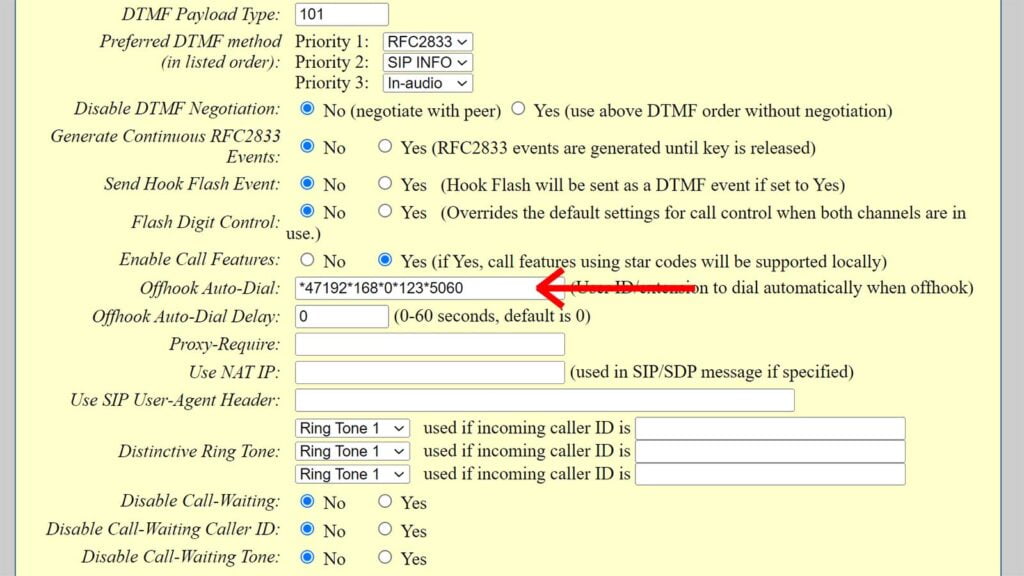
- Click the FXS PORT tab at the top
- Scroll down to find the Offhook Auto-Dial field
- This option means that when you pickup the phone, it automatically calls Home Assistant
- Input your Home Assistant’s IP Address in the following format:
*47192*168*1*100*5060- Replace
192*168*1*100with your own IP address e.g.:- My Home Assistant server is accessible at
192.168.0.123 - My input would be
*47192*168*0*123*5060
- My Home Assistant server is accessible at
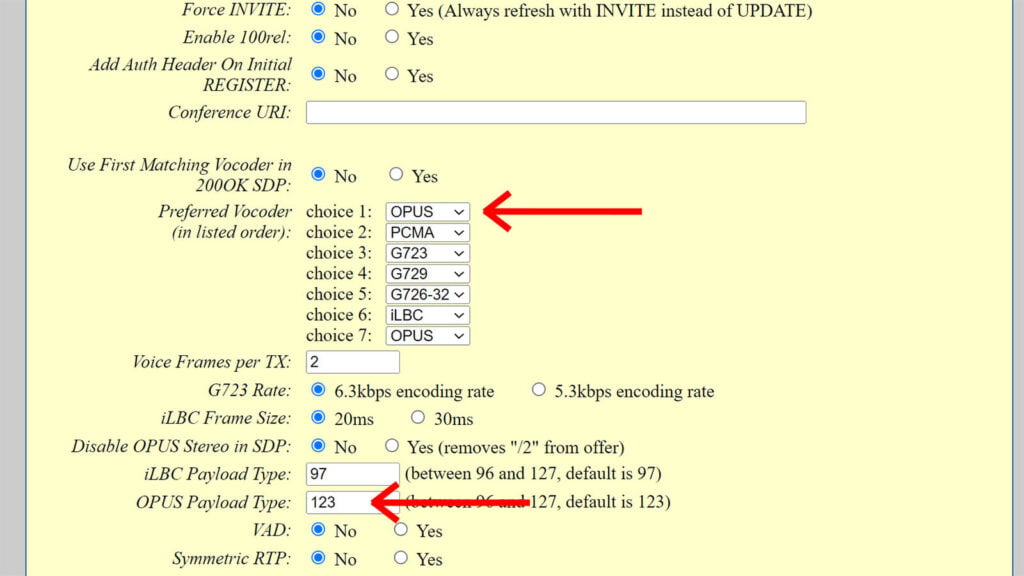
- Scroll and find the Preferred Vocoder list
- Make sure that choice 1 is set to
OPUS - Under OPUS Payload type, make sure the value is
123 - Leave the rest to their default values
- Click Apply at the bottom of the page
- Done
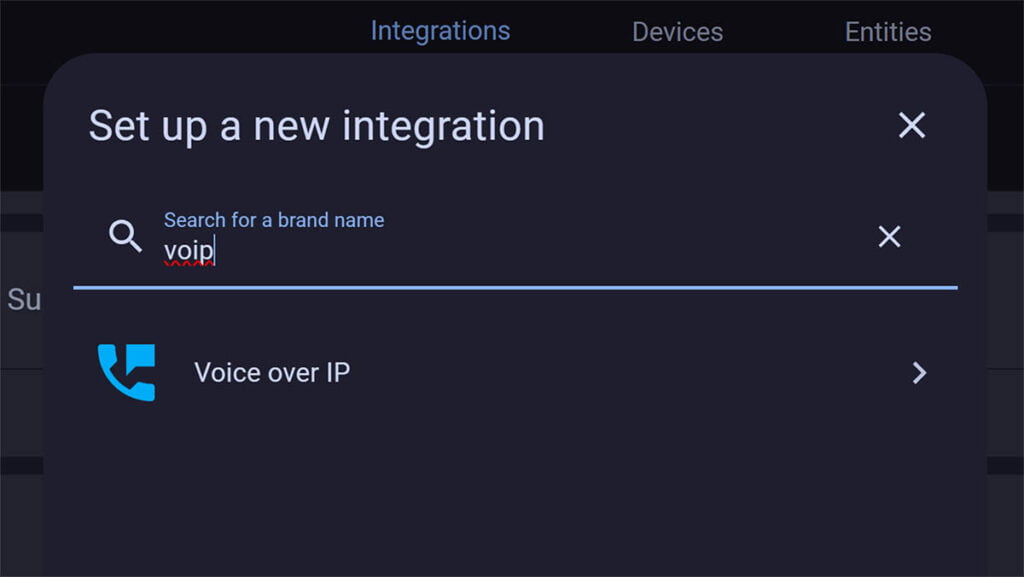
Setting up the VoIP Integration
The final step for configuring your local voice assistant is to actually connect the Grandstream to Home Assistant with the Voice-over-IP Integration. Navigate to Settings > Devices & Services > + Add Integration and search for VoIP:
Select the Integration and confirm the prompts. At this point, pickup the phone and you should hear a message: “This is your smart home speaking. Your phone is connected, but you must configure it within Home Assistant.”
The VoIP Integration will now add a device and a few entities. Toggle the Allow calls switch and select your voice assistant under Assist pipeline. Select the Finished speaking detection profile, I choose Relaxed. Whenever you pickup the phone, you should hear a small confirmation tone that Assist is active and you can talk. The Call in progress entity also changes stated from off to on as soon as you pickup the handset.

Executing default sentences
By default, Home Assistant is capable of executing very basic commands through Assist. These are built-in sentences contributed by the community in a variety of different languages. For example, without configuring anything else, you can:
- Turn entities on and off
- “Turn on the living room light”
- Open and close covers
- “Close the garage door”
- Set the brightness and color of lights
- “Change kitchen lights brightness to 50%”
- Ask about the weather
- “What is the weather”
- Get information about a state
- “What is the battery level of my phone?”
- Activate a scene
- “Turn dinner scene on”
In addition to calling for a single entity, you can execute commands for a group of entities included in an area. For example: “Turn on all lights in the living room” will toggle all lights that you’ve added to the Living Room area. For a full list of built-in sentences, check out Home Assistant’s intents folder on Github.
Executing custom sentences
Home Assistant makes it possible to execute custom, predefined sentences not included in the default configuration. This give you a lot of flexibility to talk to you Home Assistant instance in any way you see fit. To define custom sentences, you need to expand the default Intents or create my own with a custom script.
For example, let’s say I want to turn on my Kitchen lights, but use a different sentence instead of “turn on kitchen lights”. First, add conversation: to your configuration.yaml file.
#Example configuration.yaml
conversation:
Next, create a folder in the config directory with the following structure and create a blank .yaml file:
config/custom_sentences/<language>/<yaml file>
# Example
config/custom_sentences/en/switch.yaml
Next, extend the default HassTurnOn and HassTurnOff intents with your custom sentences by pasting this inside the yaml file you created and reload the configuration or restart Home Assistant:
# Example switch.yaml entry
language: "en"
intents:
  HassTurnOn:
    data:
      - sentences:
          - "tiger tiger burning bright activate [the] {name}"
  HassTurnOff:
    data:
      - sentences:
          - "in the forests of the night deactivate [the] {name}"
Now, whenever I say “Tiger Tiger Burning bright, activate the Kitchen light” it will turn on my Kitchen light. And whenever I say “In the forests of the night, deactivate the Kitchen light” it will turn them off. Here’s a video of these custom sentences in action (voice changed for dramatic effect, props to anyone who recognized the poem):
Final Thoughts
Controlling Home Assistant through an old phone was such a fun thing to do, definitely scratching that tinkering itch. If you have an old phone and would try this, the only thing you would need is the Grandstream HT801 VoIP adapter.
Custom sentences and intents are worth their own article, because there is so much you could do that’s not immediately obvious. They are constantly being developed and added by the community, so there’s still a long way to go. If you want to contribute, check out this page.
It’s important to note that the speed of processing voice commands is largely dependent on your hardware. For example, on a Raspberry Pi 4 it can take up to 8-9 seconds to process and execute a voice command. On an Mini PC with a good CPU, like a Beelink N100 or Intel NUC it takes about 1 second.
I plan to expand on this quite a bit, so bookmark smarthomescene.com and keep visiting. Check out this page for a bunch of awesome examples!


