Anyone who frequents SmartHomeScene, might be familiar with a couple of indoor air quality monitors I’ve tested for our Reviews channel. The Aqara S1 was the first device I dismantled that had dedicated sensors for CO₂ and PM particles, and not rely on estimates such as eCO₂.
More recently, I talked about the Inkbird IAM-T1, a beautiful indoor air quality monitor with an e-ink display. Since the device is BLE, the company claims a 4 year battery life on a good set of AAs. The only downside is that Inkbird used non-standard implementation of services for each of the BLE advertisements broadcasted by the IAM-T1, so Home Assistant integration is going slow.
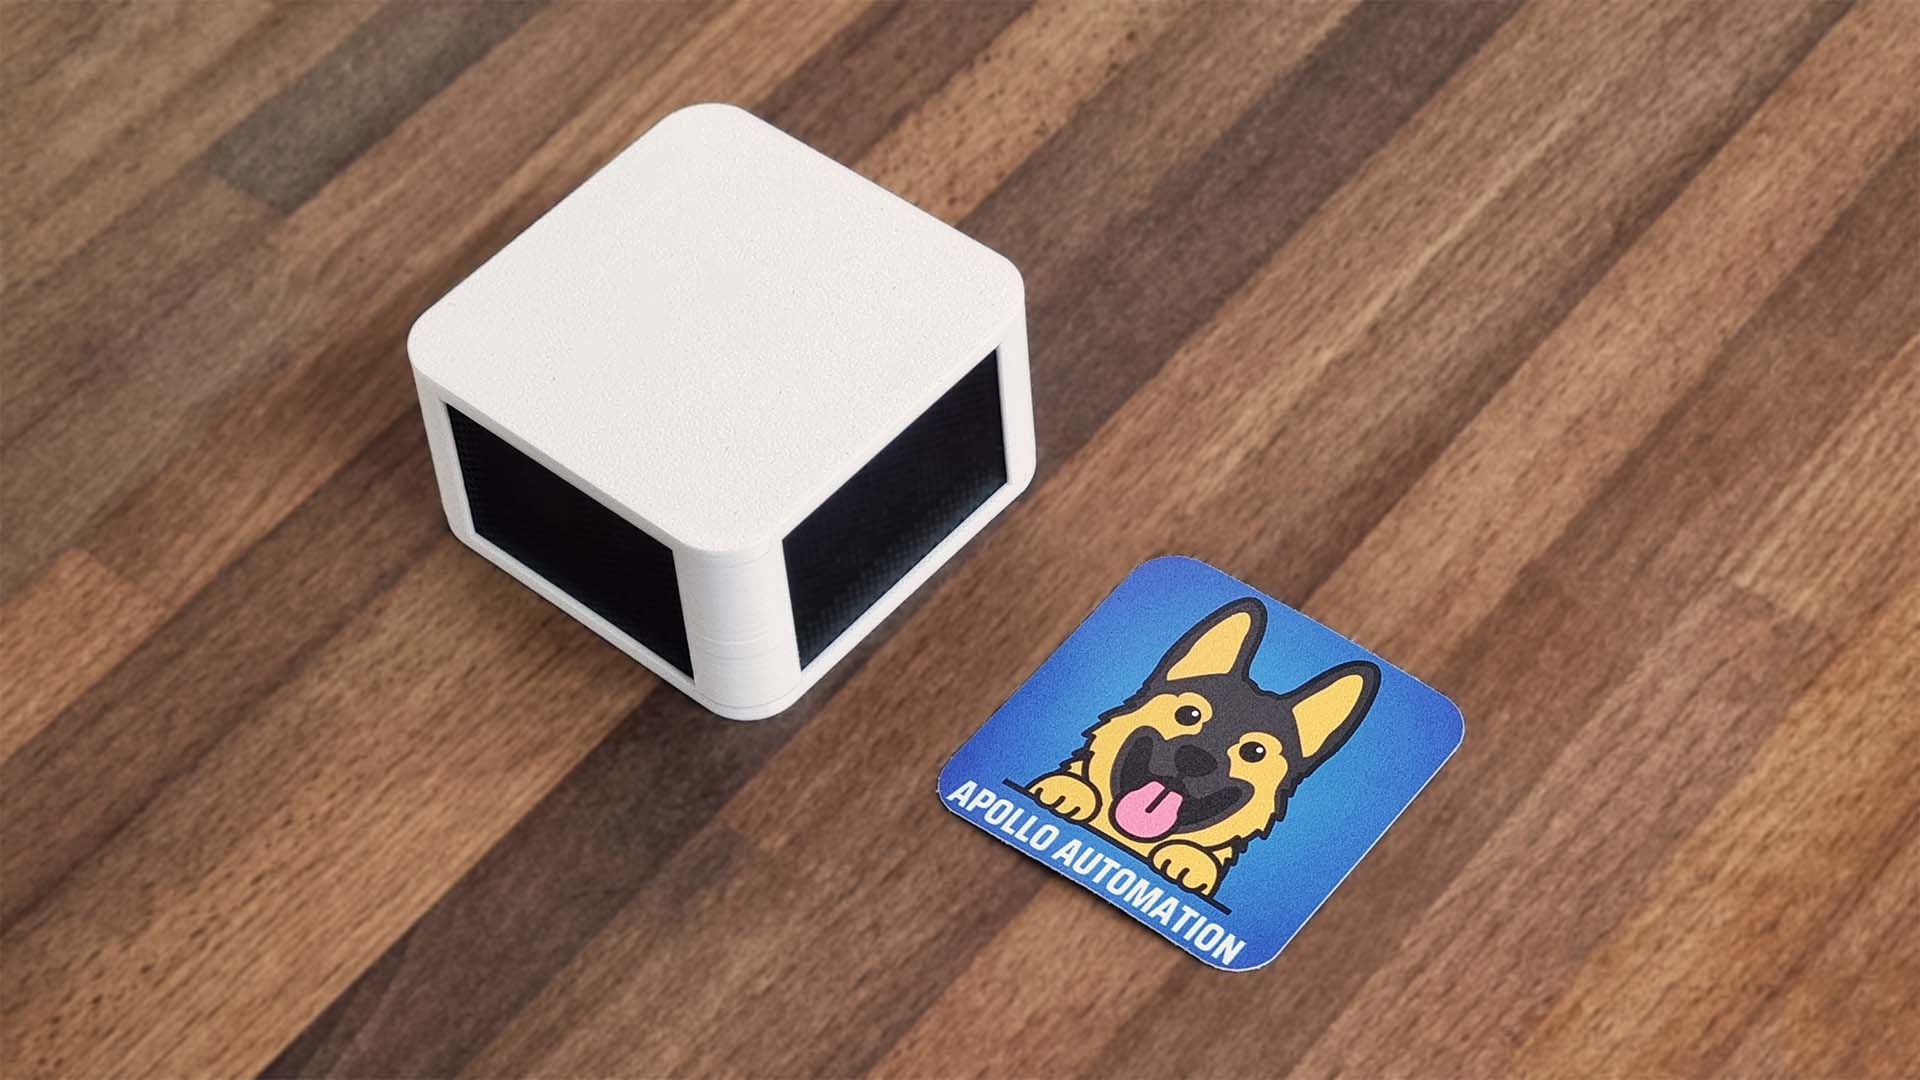
In this article, I am testing the latest air quality monitor by Apollo Automation, labelled the AIR-1. I believe this is the most complete indoor air quality monitor based on ESPHome, which can be effortlessly integrated in Home Assistant. You can get the Apollo AIR-1 on their Official Webstore (US) or Domadoo (EU).
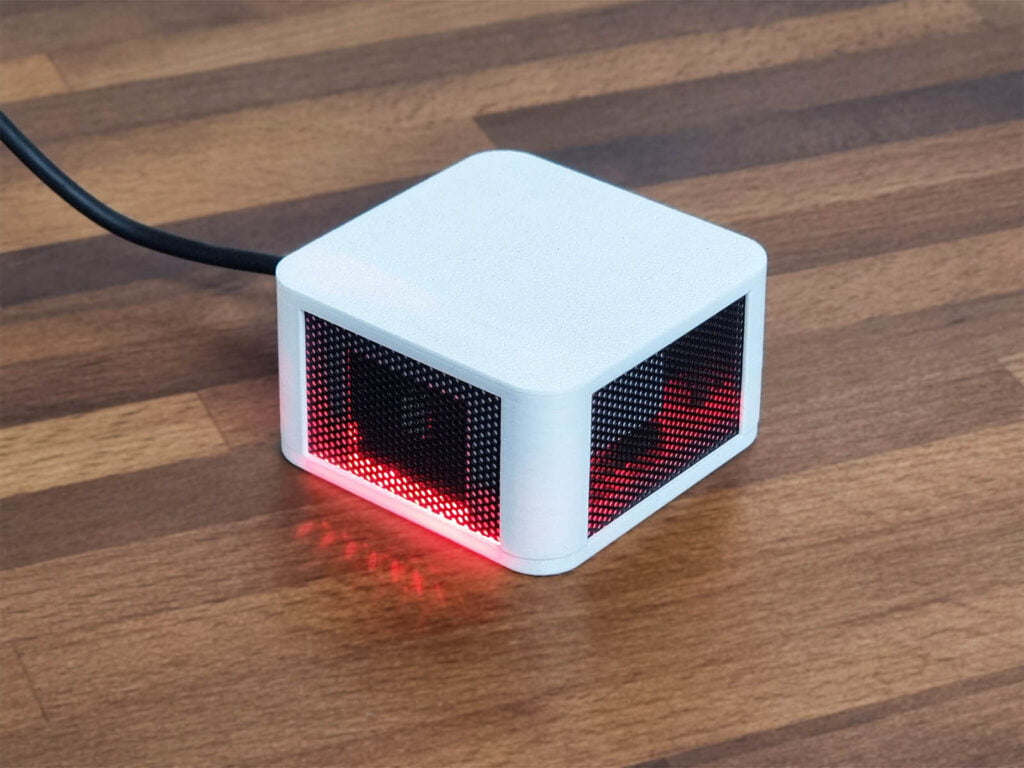
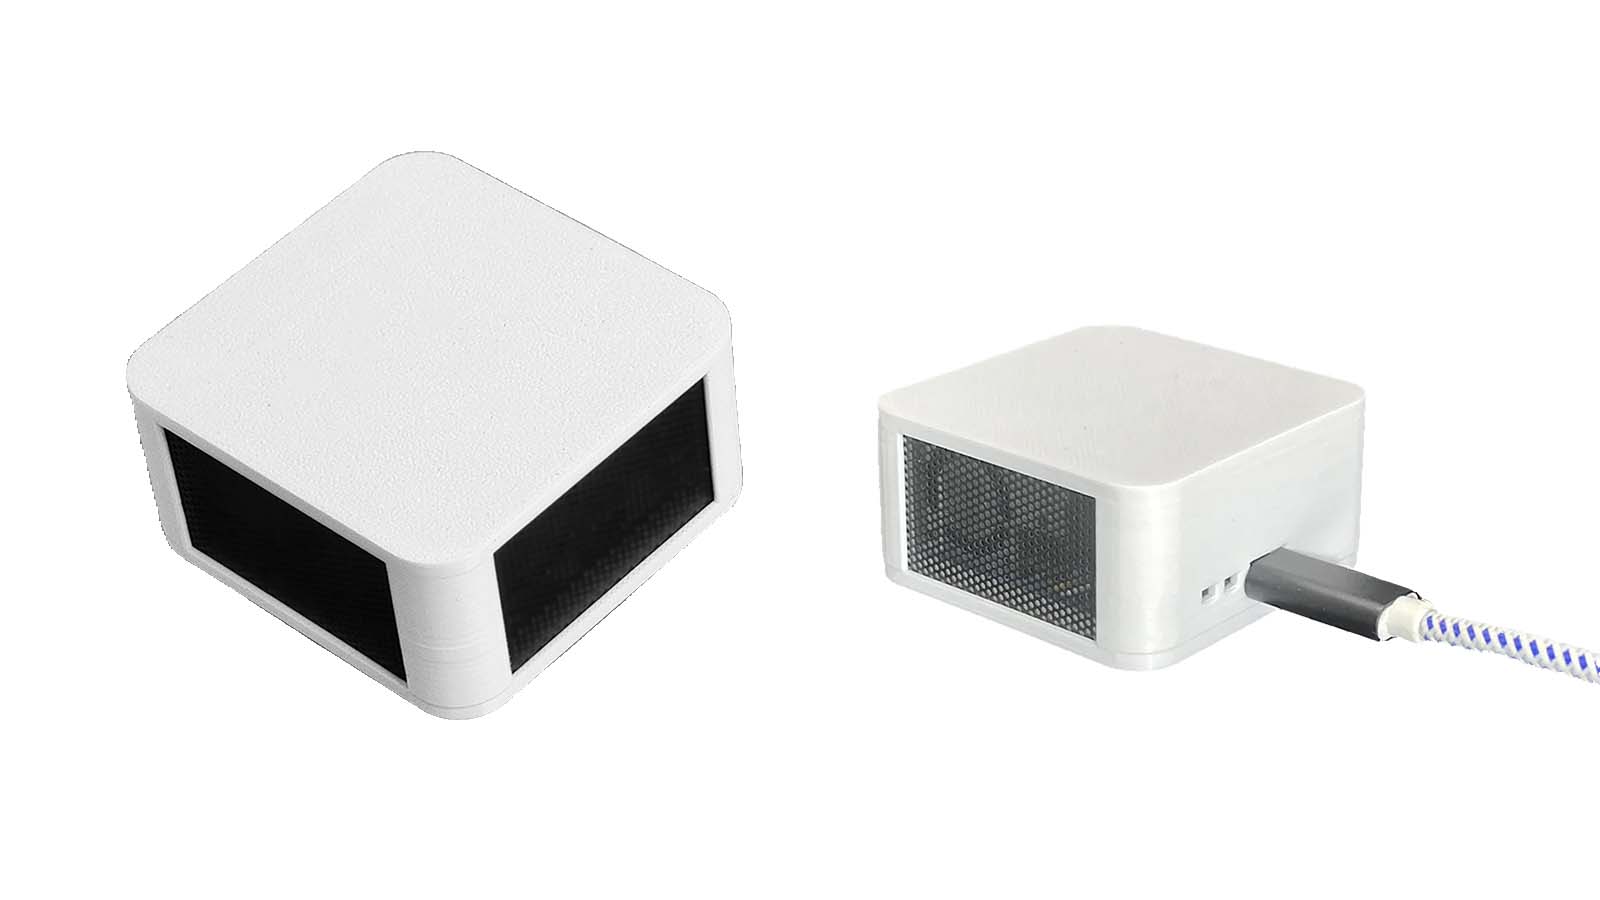
You can also check out my review of the Apollo MSR-1, the smallest presence multi-sensor with optional CO2 monitoring, temperature, humidity, pressure, illuminance, UV, a piezo buzzer and RGB LED matrix for notifications.
DISCLAIMER: Apollo sent me the AIR-1 Air Quality Monitor as a free testing sample for the purpose of a review. This will in no way influence, sway or affect my opinion of the device and will just be my usual observations and unbiased testing approach. I shared my guidelines and principles for collaboration with their PR person, to which they fully agreed.
Technical Specification
- Model: Apollo AIR-1
- Sensirion SEN55
- PM1, PM2.5, PM4, PM10, VOC, NOx, Temperature, Humidity
- Infineon DPS310
- Barometric Pressure
- Sensirion SCD40 (Optional)
- CO₂ (Carbon Dioxide)
- DFRobot MiCS 4514 (Optional)
- CO (Carbon Monoxide), C2H5OH (Alcohol), H2, NO2, NH3
- ESPHome Bluetooth Tracker
- RGB Pixel Lights: 3 x Neopixel
- Power Supply: 5V1A
- Dimensions: 61x61x30mm
Teardown
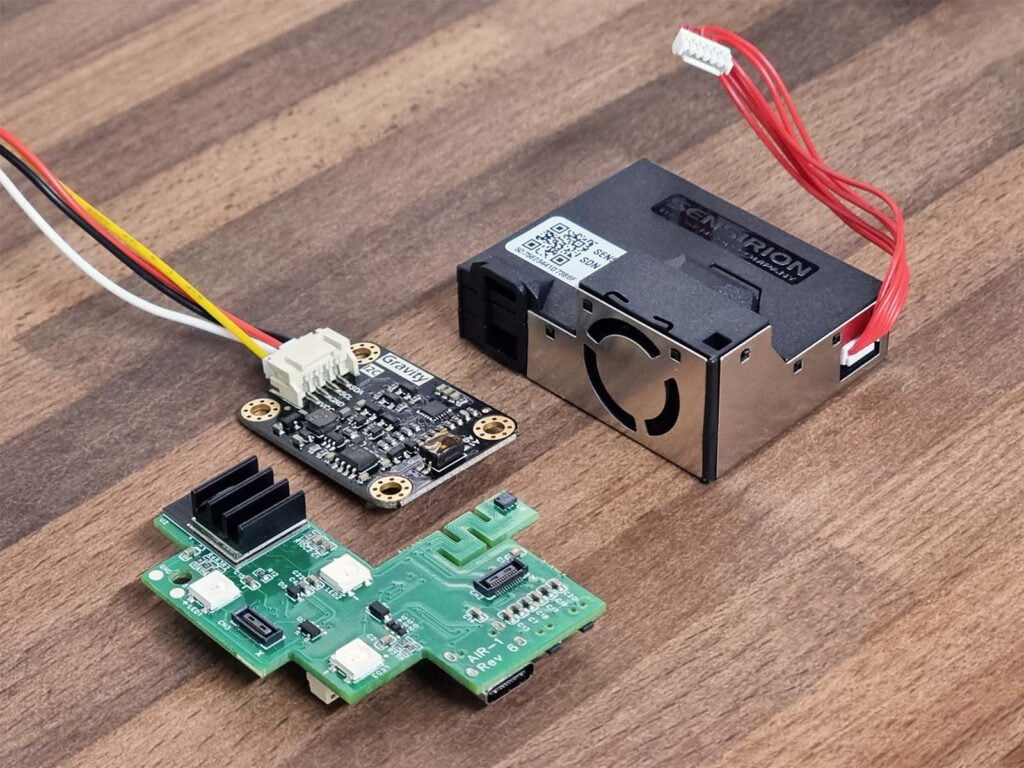
The Apollo AIR-1 Air Quality Monitor is very very small, measuring at 61x61mm and just 30mm in height. How they managed to pack all these sensors inside such a small device is really impressive. The bottom cap is held in place by 3 hex screws, which I easily removed using my Kaiweets ES20 Electric Screwdriver (must-have for DIY tinkerers and enthusiasts!).
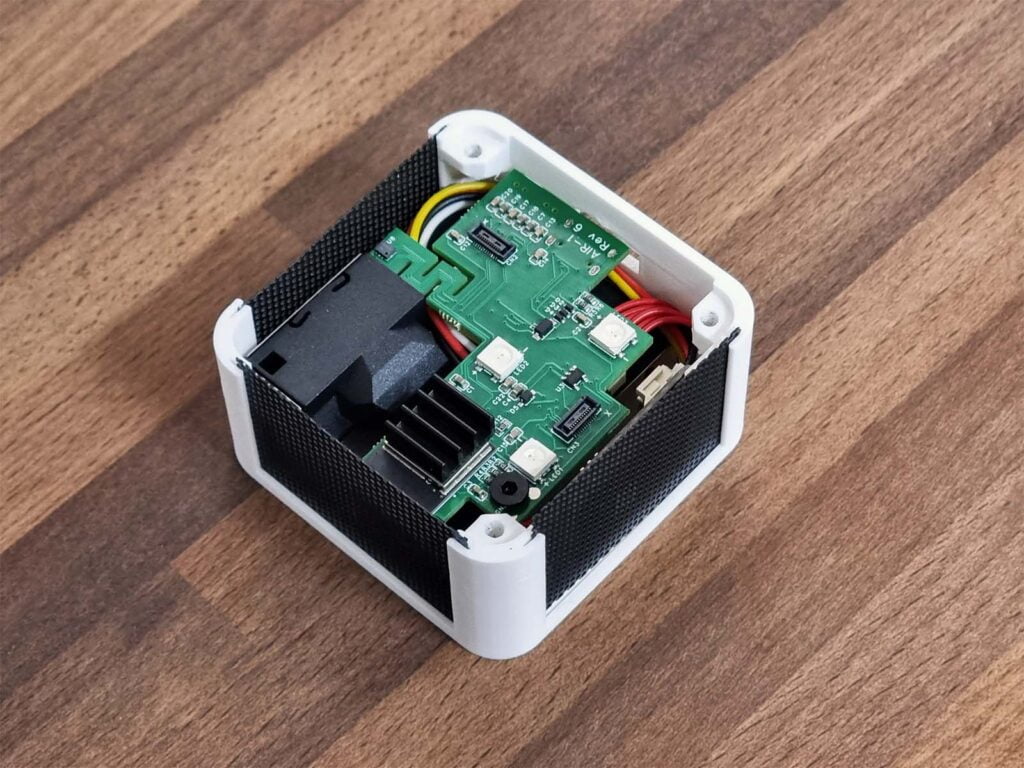
Apollo installed metal mesh screens on 3 sides of the case, to make sure air circulates freely and the readings of the sensors are accurate. These are removed by simply sliding them upwards, and once I did, the first thing that popped into my mind is how the components of this devices are stacked like Lego blocks.
In fact, it’s possible they influence each others measurements, especially temperature reading in such a tight space. The heatsink installed on the ESP32-C3 is probably there to counter just that – heat buildup inside the case.
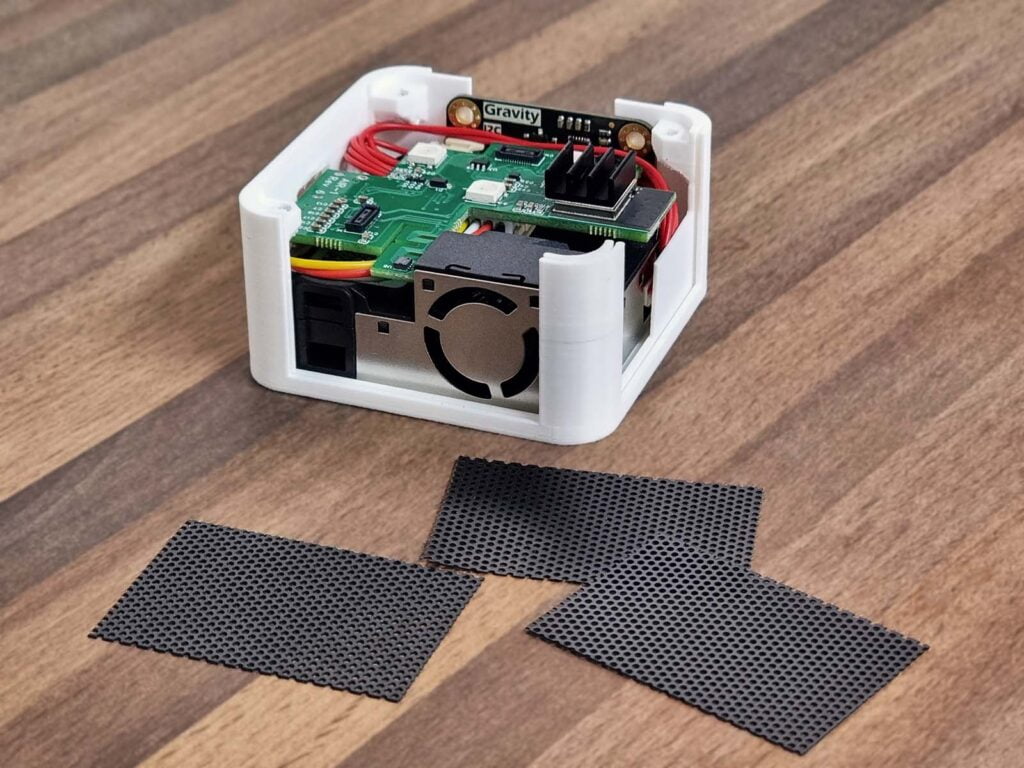
After I removed another hex screw holding the main PCB in place, I was able to take out the sensors from the case. Everything is connected with JST connectors to the PCB and not soldered in, in case something needs replacement or you want to add another sensor.
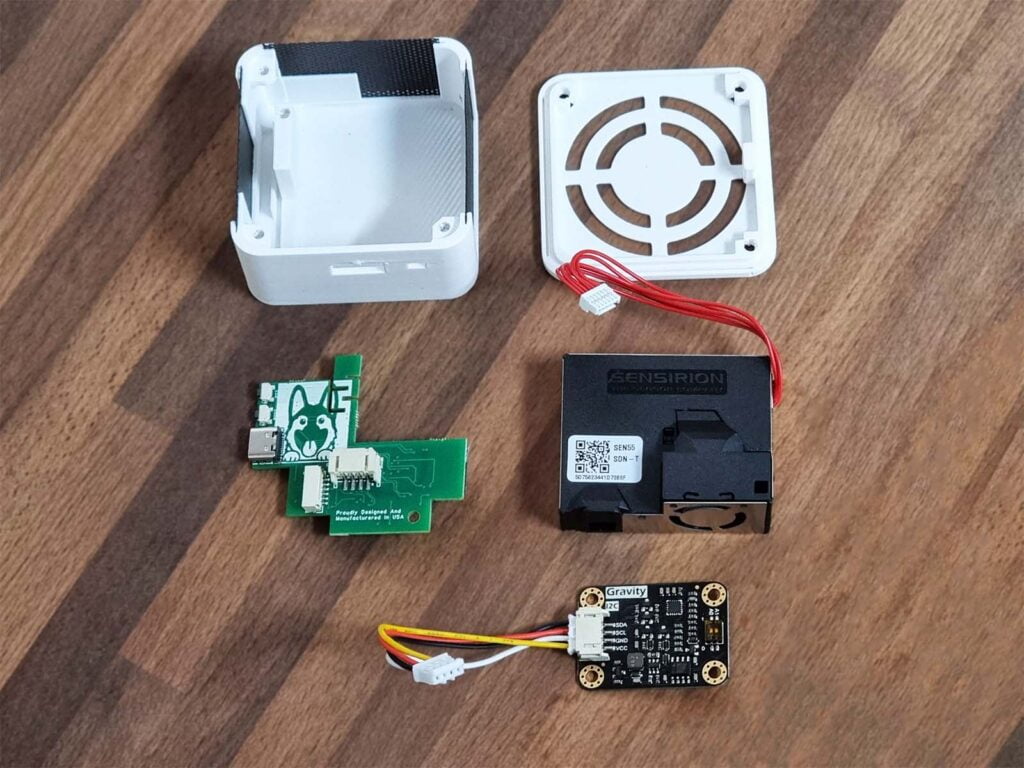
The Sensirion SEN55 [Datasheet] used in the Apollo AIR-1 provides the PM1, PM2.5, PM4, PM10, VOC, NOx, Temperature and Humidity readings. The SEN55 has an expected life of 10 years, which is incredible considering most sensors of this type are rated for 2-3 years.
The DFRobot MiCS-4514 [Datasheet] supports the detection of various gas concentrations like CO (Carbon Monoxide), C2H5OH (Ethanol), H2 (Hydrogen), NO2 (Nitrogen dioxide), NH3 (Ammonia) and CH4 (Methane). The gas sensor is completely optional when ordering the Apollo AIR-1.
The Sensirion SCD40 [Datasheet] is a dedicated sensor for measuring CO2 (Carbon Dioxide) concentration in your environment. This sensor is also optional and missing in my testing sample, since I already have one in the Apollo MSR-1 Presence Sensor.
The Infineon DPS310 [Datasheet] is miniaturized digital barometric air pressure sensor with a high accuracy and low power consumption, which makes it perfect for the Apollo AIR-1. This sensor is soldered to the main PCB, which means it’s not optional.
Home Assistant Integration
Since the Apollo AIR-1 is coded in ESPHome, Home Assistant integration is very simple and automatic. As soon as the device is powered by a 5V1A source, it broadcasts a Wi-Fi hotspot labelled Apollo AIR-1 Hotspot.

I joined the Wi-Fi hotspot and opened the local interface on a web browser using the default IP address 192.168.4.1. If you’re using an Android phone, you can manage the device directly by selecting the network and choosing “Manage router.“
The Apollo AIR-1 automatically finds nearby Wi-Fi networks. Just pick yours, enter the username and password, and click Save. That’s all you need to do.
Once the device joins your network, it will get automatically discovered in Home Assistant. If it doesn’t, you may need to manually input the IP address of the MSR-1, which you can find in your routers DHCP list.
Sensors and Entities
The Apollo AIR-1 exposes a bunch of entities in Home Assistant through ESPHome. Most of these are pretty much self-explanatory: temperature, humidity, pressure, while others are used for diagnostic purposes: ESP temperature, firmware, CPU speed, free memory, uptime, RSSI etc.
Here’s a full screenshot of all entities exposed in Home Assistant by the AIR-1:
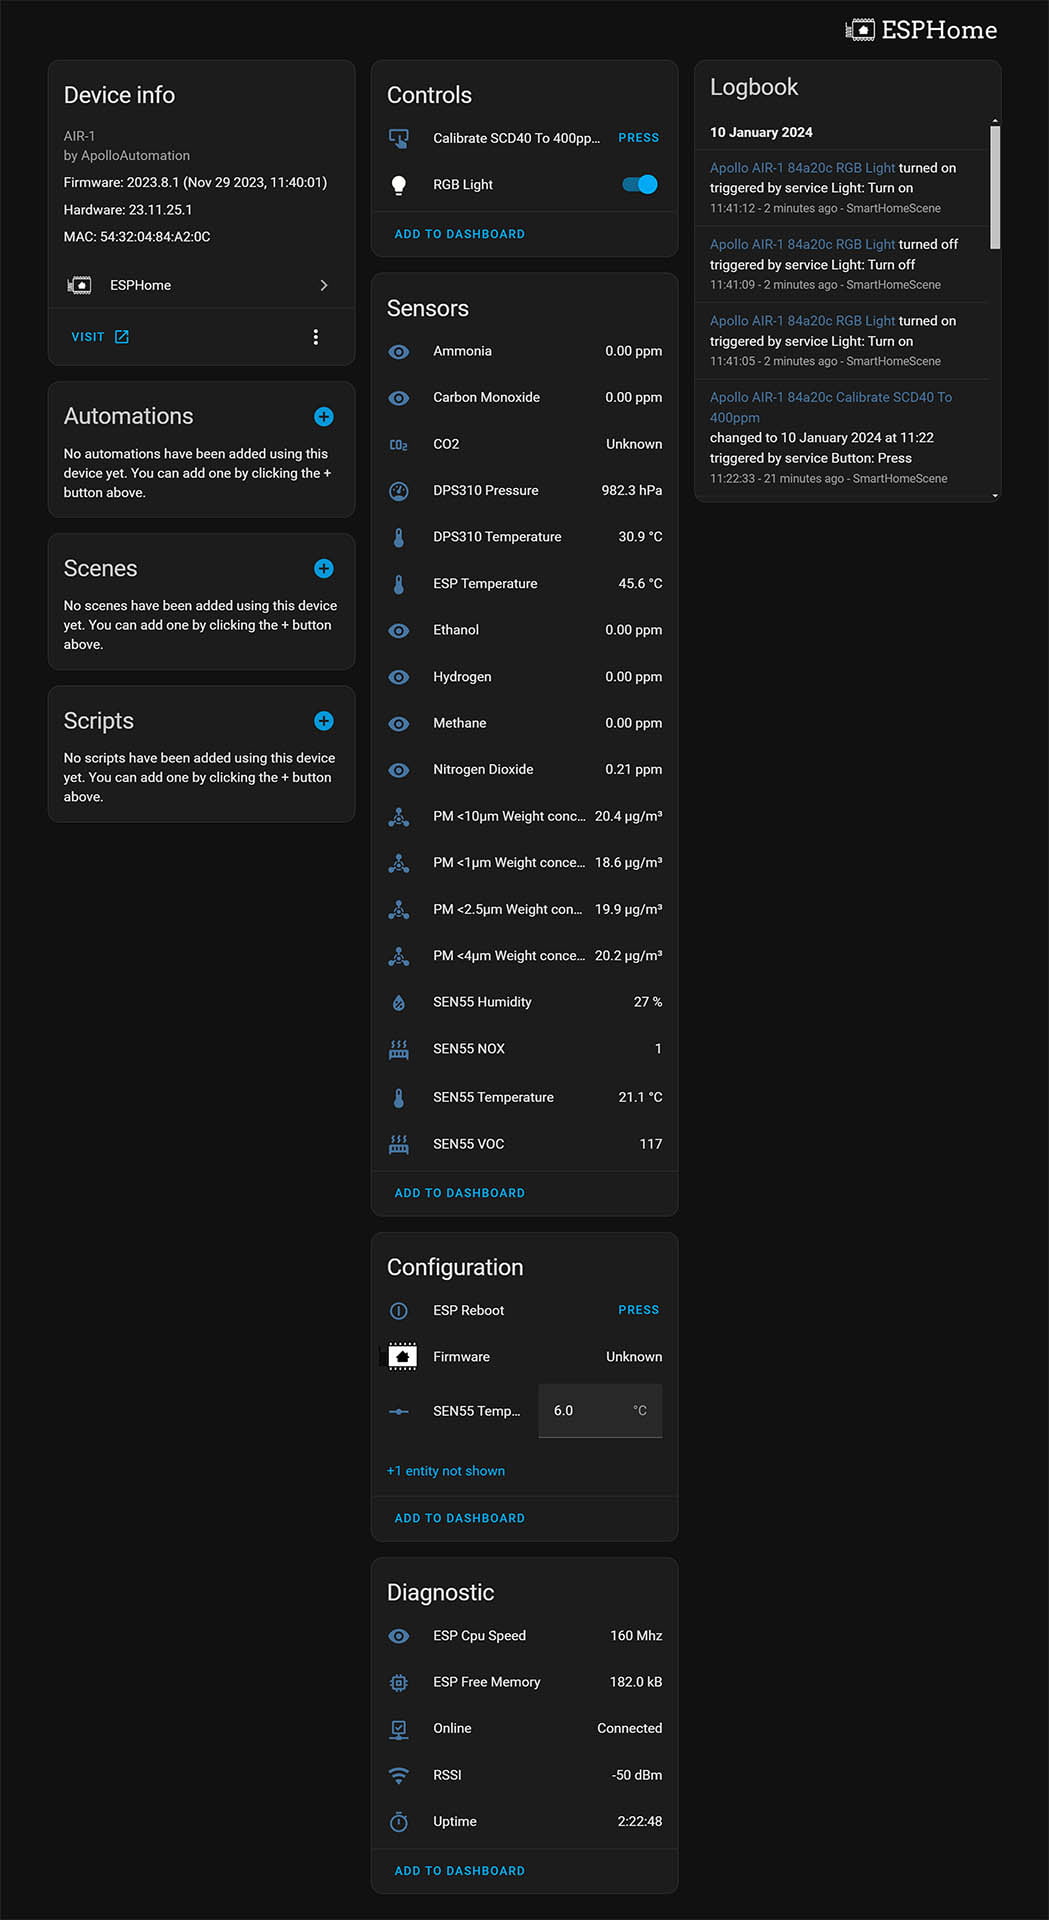
There are two temperature sensors with different measurements added through ESPHome, since their readings come from different sensors. The SEN55 Temperature entity is the one you need and should rely one, since it’s most accurate. The other one, DPS310 Temperature is heavily skewed because of internal heat build up from the ESP32 board. You should ignore this one and disable it.
The DFRobot MiCS-4514 sensor is highly resistant to the environment, capable of operating in temperatures between -30°C to 85°C and humidity of up to 95%. Here are the reference values for each of it’s readings:
- Carbon monoxide CO: 1 – 1000ppm
- Nitrogen dioxide NO2: 0.05 – 10ppm
- Ethanol C2H5OH: 10 – 500ppm
- Hydrogen H2: 1 – 1000ppm
- Ammonia NH3: 1 – 500ppm
- Methane CH4: >1000ppm
The PM Particulate Matter sensors exposed by the Senrison SEN55 sensor are very sensitive to change, constantly fluctuating up and down in my office. I highly suggest you check out this EPA article about Particulate Matter and why it’s harmful to human.
The NOx (Nitrogen Oxides) reading is actually a mixture of (NO) Nitric Oxide and (NO2) Nitrogen Dioxide , which are gases produced from natural sources, motor vehicles and other fuel burning processes. In poorly ventilated situations, indoor domestic appliances such as gas stoves and gas or wood heaters can be significant sources of nitrogen oxides so it’s smart to keep an eye on this reading.
The VOC (Volatile Organic Compounds) Index mimics the human nose’s perception of odors with a relative intensity compared to recent history. Basically, the sensor learns it’s environment through the SEN55 and bases it’s measurement off that. Read more about Sensirion’s official VOC Index and what it means.
The VOC Quality entity is just a template sensor converting the measurement to human readable text for easier understanding. The sensor uses the following scale, per Sensirion:
- 0-79: Improved
- 80-119: Normal
- 120-199: Abnormal
- 200-299: Very abnormal
- 300+: Extremely abnormal
Calibrating the CO2 Sensor
If you get the Apollo AIR-1 with the optional CO2 sensor, you will receive it with a calibrated unit. If you decide the reading is off and you need to recalibrate, the procedure is fairly simple and applies to most photoacoustic NDIR sensors for measuring Carbon Dioxide:
- Take the Apollo AIR-1 outside and power it up
- Make sure it’s still connected to Home Assistant
- Wait 5 minutes for the reading to stabilize
- In Home Assistant, press the button entity labelled as:
button.apollo_air_1_XXXXX_calibrate_scd40_to_400ppm
- Since outside CO2 concentration is always around
400ppm, it will record the default value as400ppm - You can take the Apollo AIR-1 inside
- Done
Cleaning the SEN55 Sensor
The Sensirion SEN55 can be cleaned with a button from the ESPHome integration, although this is not included in the primary firmware of the Apollo AIR-1. You can flash the full firmware from their Github page, which will enable this button and add some additional template entities to Home Assistant.
When you press the button, the SEN55’s fan goes full speed for 10 seconds to push out any dust particles lodged in it’s case/fan. It’s recommended by Sensirion clean the SEN55 once a week, so you can create an automation to do this on a schedule.
Controlling the RGB Pixel Lights
The Apollo MSR-1 has three neo pixel LEDs installed which can be used as visual indicators for the air quality in your home. For example, let’s say I want the the lights to turn red once CO2 passes a certain threshold. I can create the following automation:
description: "Turn Apollo AIR-1 LEDs to red when CO2 is above 800ppm"
mode: single
trigger:
  - platform: numeric_state
    entity_id:
      - sensor.apollo_air_1_84a20c_co2
    for:
      hours: 0
      minutes: 5
      seconds: 0
    above: 800
condition: []
action:
  - service: light.turn_on
    metadata: {}
    data:
      rgb_color:
        - 255
        - 0
        - 0
    target:
      entity_id: light.apollo_air_1_84a20c_rgb_light
You can create more elaborate automations and change color based on other sensors like PM, VOC or any other gas sensor. Great for getting a quick air quality overview in your home.
Adding Bluetooth Tracking
Since the AIR-1 uses an ESP32 Board as the main processing unit, Bluetooth Tracking can be added to the device through the ESP32 Bluetooth Low Energy Component in ESPHome. This allows you to create binary sensor entities which will change state based on the BLE advertisements broadcasted by the device, which the AIR-1 can capture.
For example, to track if your phone is at home, open the Home Assistant Companion app, navigate to Settings > Companion App > Manage Sensors and enable BLE Transmitter. Use the UUID to edit the code bellow and add it to the main firmware code of the Apollo AIR-1:
# Example config.yaml
wifi:
  ssid: !secret wifi_ssid
  password: !secret wifi_password
  power_save_mode: LIGHT #Make sure to add this

esp32_ble_tracker:

binary_sensor:
  - platform: ble_presence
    ibeacon_uuid: '77a6438d-ea95-4522-b46c-cb2b4412076f'
    ibeacon_major: 100
    ibeacon_minor: 1
    name: "SmartHomeScene's Phone"
Final Thoughts
The Apollo AIR-1 is the most complete and feature rich air quality monitor I’ve tested so far. The firmware being open source is a huge plus and definitely offers limitless options for tweaking the code and adjusting the default behavior of the AIR-1.
Regarding the hardware it uses, there are a few important things that need to be noted:
- The DFRobot MiCS-4514 does not meet the requirements for gas safety monitoring per the NBIC, NFPA, or IFC
- The Sensirion SCD40 does not meet the requirements for gas safety monitoring per the NBIC, NFPA, or IFC
These claims are listed on the official AIR-1 listing and they are shared by Apollo for full transparency. I’ve never seen other manufacturers do this, yet they all use the same sensors – especially the Sensirion SCD40. What this essentially means is these sensors are perfectly capable of monitoring your homes air quality, but they do not possess the level of precision found in a laboratory setting.
If you are a DIY person and a true home automation enthusiast, than the Apollo AIR-1 is for you. You should look no further, as there isn’t another open-source, more feature rich air quality monitoring solution right now. AirGradient‘s sensors are up there, but not quite. I’ve asked them to also send me a sample for testing, which I should be getting in the next week or so.
Final note, air quality sensors of this type are not cheap – especially not full featured models like the Apollo AIR-1. Depending on what sensors you actually order, the price can range from $90.77 to $151.97. Here are some links to different stores selling the Apollo AIR-1:
Apollo Automation Store
Apollo AIR-1 Air Quality Sensor
MiCS-4514 Gas Sensor (For retrofit)
SCD40 CO2 Sensor (For retrofit)
Domadoo (EU)
Apollo AIR-1 Air Quality Sensor
*If links fail to open, try disabling your AdBlocker.
Related: The Apollo MSR-2 Presence Sensor: Official Webstore | Domadoo


Thank you for this great review!
I’m missing one aspect that I’ve come aware of when I got the airgradient device: light emissions. The problem with the co2 sensor is that it measures using infrared light which flashes every few moments. Like this it‘s difficult to use it in the bedroom. I’d be very grateful if you could add some more info regarding the Apollo device in terms of light emission mitigation options and how visibly the co2 sensor would emit light through the vents of the device.
Great question, Helge! We use the SCD40 CO2 sensor, which does not emit any light, so you don’t have to worry about it waking you up in your bedroom. Please let us know if you need anything else.
Best,
Justin
Apollo Automation
Thank you for your feedback Justin! I found one very useful article on the Airgradient website that compares the Senseair S8 and the Sensirion SCD40 and also explains how the technology of detecting CO2 differs: https://www.airgradient.com/blog/co2-sensors-photo-acoustic-vs-ndir/
Really good/thorough review. I am using an Air-1 and a number of their MSR devices throughout a multilevel apartment, and once calibrated and running they are really great. This team truly is amazing in their product design and support via discord as well.
I have rolled my own radar sensors using similar sensors, and yeah, it can save a few bucks but I purchased their MSR-1 devices because they are well produced, and simply work … and supporting open source software and hardware companies is a Good Thing™ to do!
I completely agree with you, supporting open source work feels so good man.
You’ve done it again, Smart Home Scene! We really appreciate your honest and in-depth review!
Thanks,
Justin
Apollo Automation