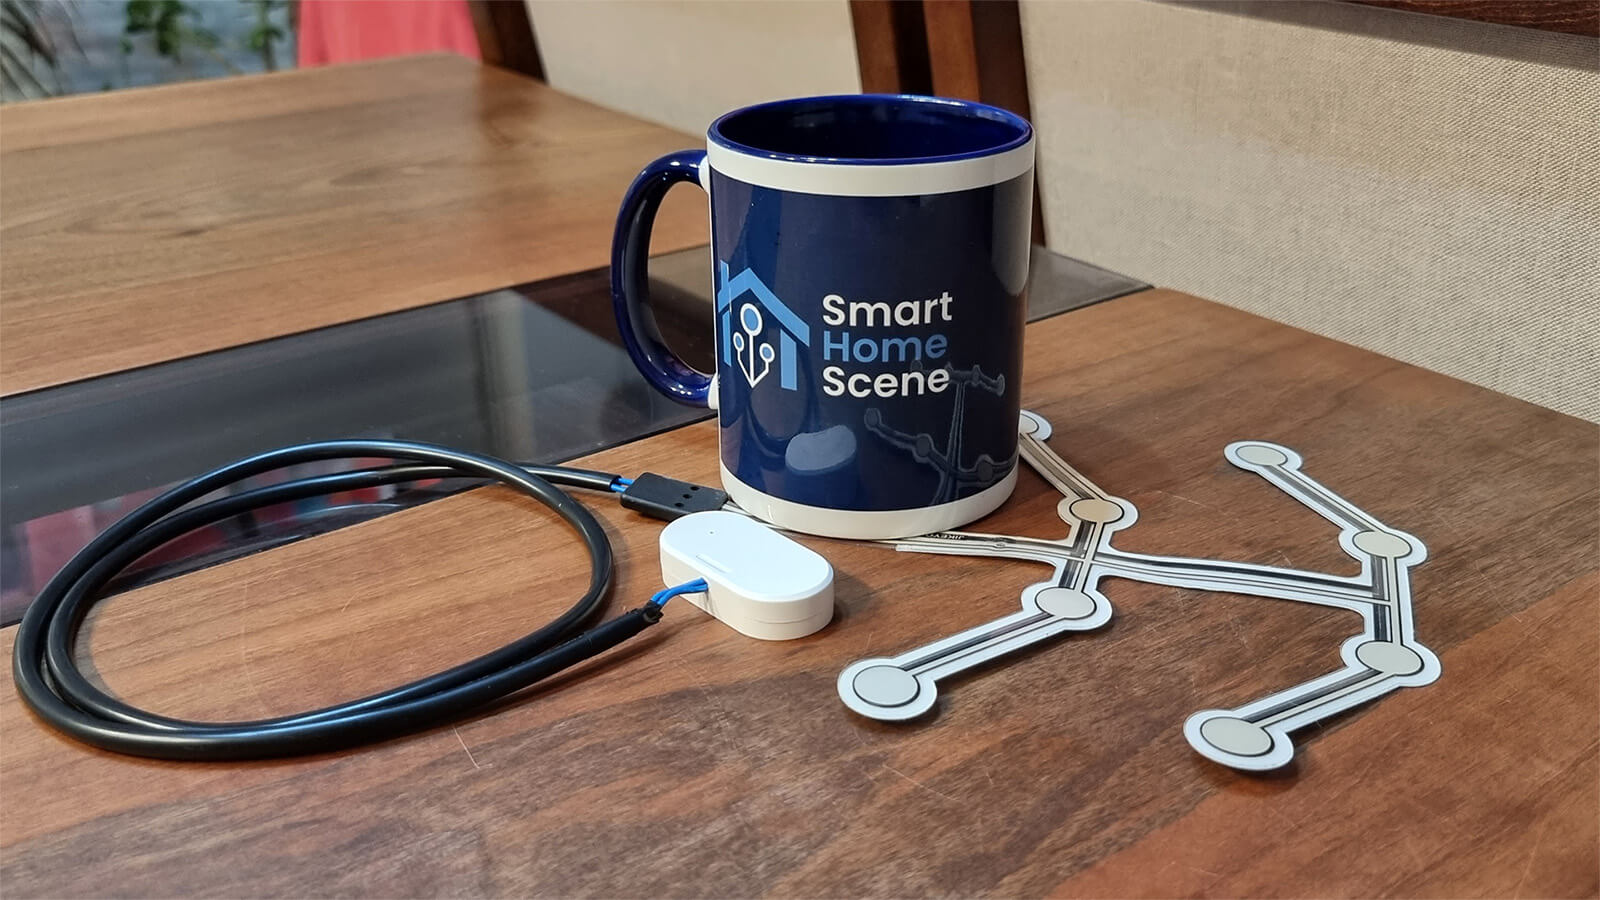
In this short tutorial, we are going to talk about how you can make your own ZigBee pressure contact sensor, using cheap AliExpress components. This kind of device can be placed under your favorite chair, sofa, recliner, bed or under the carpet and be triggered when pressure is applied which in turn will activate a desired automation within Home Assistant.
Prerequisites
To create a sensor of this kind, you will need a couple of things:
- Basic soldering skills
- Basic gadget disassembling and assembling skills
- Up and running Home Assistant server
- Car Seat Pressure Sensor (any kind, from AliExpress)
- Door and Window Contact Sensor (any kind, from AliExpress)
Soldering skills required are minimal, as you need to connect only two wires from the car seat pressure sensor to the door sensor. We listed basic gadget disassembling skills as a requirement, because you would need to open up the door sensor, drill a small hole for the two wires from the pressure sensor to fit inside and assemble it all again.
For the purpose of this tutorial, we are going to be using an extremely cheap Car Seat Pressure sensor from AliExpress and the cheapest ZigBee door sensor you can buy for your Smart Home, the Tuya TS0203 ZigBee Contact Sensor. You can use ANY magnet based contact sensor you have lying around, such as an Aqara, Sonoff, Tuya etc.
And finally, to make the most use of this device, bring it into Home Assistant and create your desired automations based around it as a trigger.
Explaining the hardware
For this tutorial, we are using a contact sensor we recently reviewed, the Tuya TS0203 ZigBee Contact Sensor. Because 99% of door and window contact sensors are triggered with a magnet and a reed switch, you can use any extra contact sensor you have lying around. All of them are suitable for this DIY project. If you do not have a contact sensor, we suggest the following:
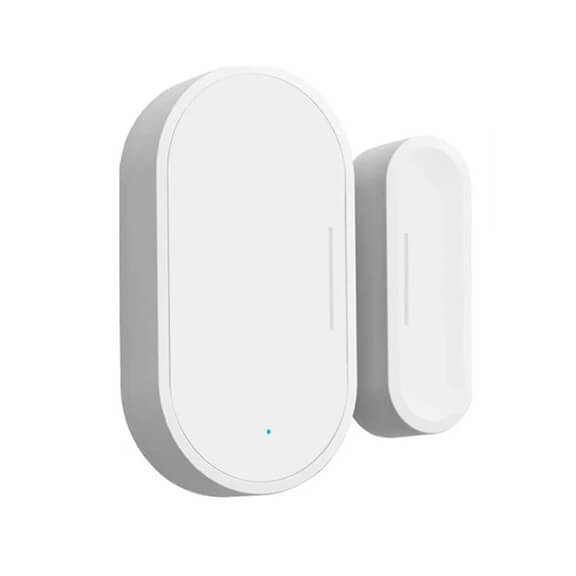
- Tuya TS0203 ZigBee Contact Sensor
- Tuya ZM-CG205 ZigBee Contact Sensor
- Aqara MCCGQ11LM Door and Window Sensor
- Sonoff SNZB-04 Door and Window Sensor
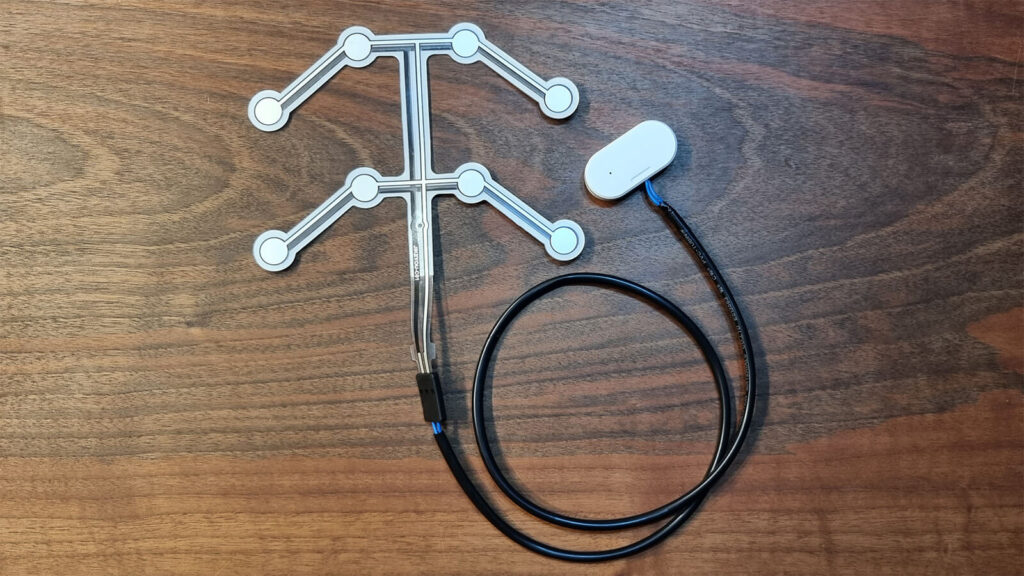
If you are buying a new car (great template for a car bill of sale btw) and have an old one, you can simply take out the pressure sensor under one of the seats. Otherwise, the car seat pressure sensor can be purchased dirt cheap from AliExpress. Its a thin-film contact sensor, which triggers when a certain amount of pressure is applied. If you want to support this blog, consider using our affiliate links bellow:
- Universal Car Seat Pressure Sensor
- Universal Car Seat Pressure Sensor 2
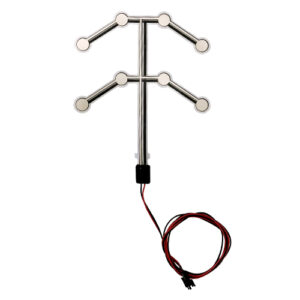
Note: Because the pressure sensor is meant to be mounted under a car seat, a fair amount of pressure is needed to trigger it. This is a good thing, because it will avoid false positives. Each of the round contacts close the circuit independently to trigger the sensor.
Making the DIY sensor
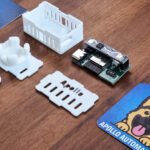
First, we need to disassemble the Tuya TS0203 contact sensor. This particular gadget can be opened with nothing but a small screw driver, for prying the parts apart. Be gentle, to avoid damaging any inside components. You can check out the full review and disassembly of this device HERE.
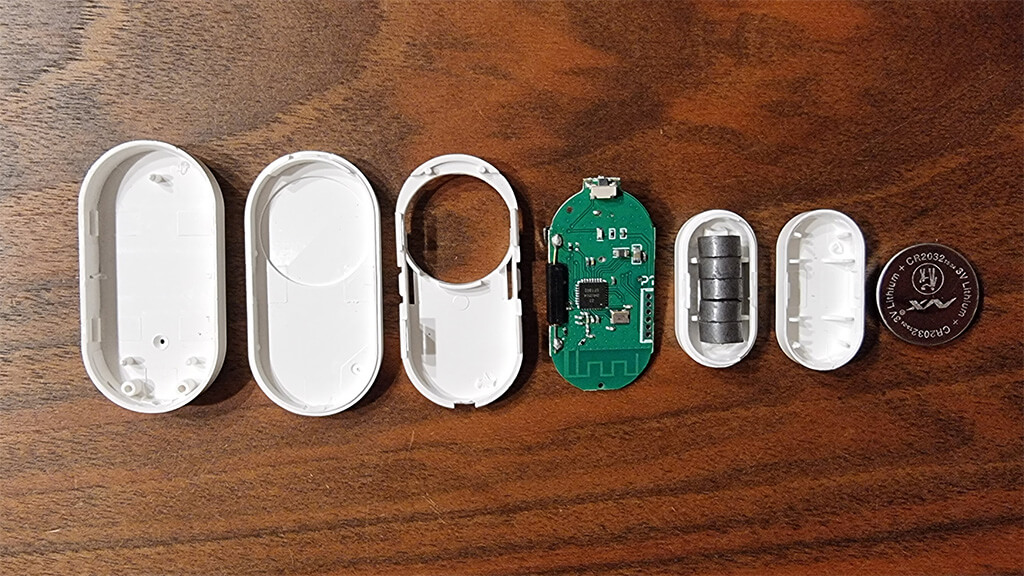
Next, we need to drill a small hole which would be the size of the two wires coming from the pressure sensor and going inside the ZigBee door sensor. Figure out on which side of the shell lies the reed switch when assembled, and make your hole there.
Tip: You do not need to use a drill bit for this, you can simply melt it with your soldering iron and remove any excess with a scalpel.
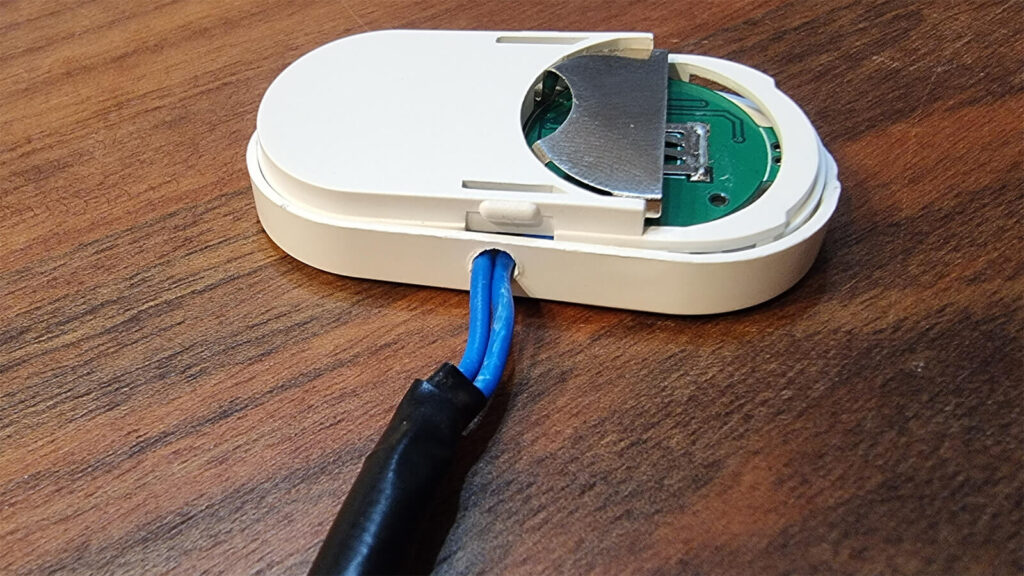
Inside the door sensor, carefully solder the two wires from the car seat pressure sensor to the ends of the reed switch. Because this is a fairly small device, you need to be careful with the soldering iron. You do not want to melt or desolder anything else on the main PCB.
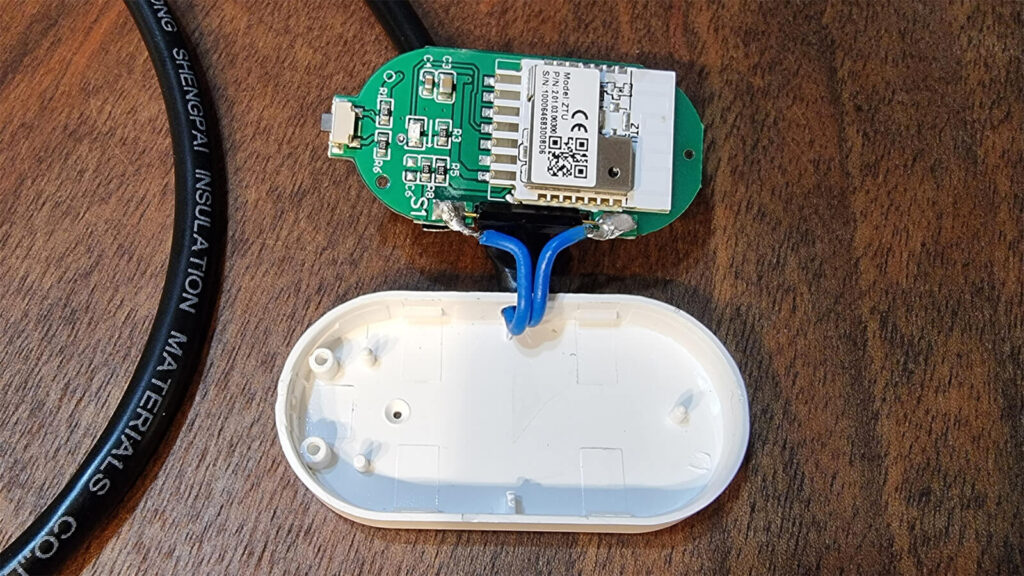
Once the two are connected, carefully assemble the contact sensor again. Because you now have two extra wires you need to fit inside the shell, be careful and try not to break the solder when bending them in position. Once done, your device is ready to be paired to your ZigBee coordinator.
Adding the sensor to Home Assistant
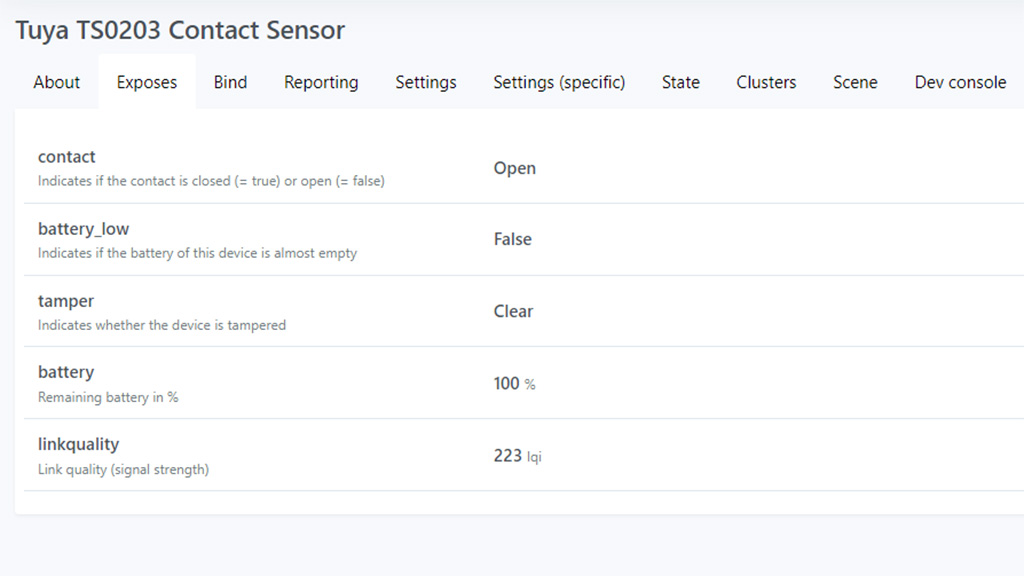
To add our DIY sensor in Home Assistant, you follow the pairing procedure as you normally would with your contact sensor. It will be discovered normally as the type of device it is and its appropriate model.
As a test, we will create a simple automation based on the state of our new DIY sensor:
alias: Living Room Recliner Occupied
description: 'Activate Movie Mode Scene When Someone is Seated in the Living Room Recliner'
mode: single
trigger:
  - platform: state
    entity_id: binary_sensor.tuya_ts0203_contact_sensor_contact
    to: 'on'
condition:
  - condition: time
    after: '18:00:00'
action:
  - service: scene.turn_on
    target:
      entity_id: scene.movie_mode_on
    metadata: {}
Usage Examples & Ideas
After you’ve added your new DIY sensor to your Home Assistant server, you can create any automation based around it as a trigger. Some examples and use cases:
- Installed under your living room recliner
Example: Turn on the TV and dim the lights when seated - Installed under your main bed
Example: Trigged a good night routine - Installed under your bedroom carpet
Example: Trigger a morning routine when you wake up - Installed under you baby mattress
Example: Trigger a ‘baby sleeping’ automation
These are some ideas for the usage of this sensor, in reality you can install it anywhere you can trigger it by applying pressure. Once added in Home Assistant, you can go crazy with automations, scenes and routines.


Hi SHS,
very nice instruction – thx! i will need a pressure sensor which reacts earlier probably about 0-2kg or s.th. like that. My Question: What kind of incoming signal does the pressure sensor require? I am not so much into technical basics but i wonder how the door sensor understands the incoming signal. best regards
When you apply pressure (weight) on the seat pad, the wires touch and the circuit is completed. The pad is connected to the ends of the reed switch, essentially bypassing it.
This triggers a ZigBee payload of “closed” and sent to your network.
Simple and useful.
To answer your question: “how the door sensor understands the incoming signal.”?
The ZigBee door sensor does not care who or what closes the circuit. When you bypass the reed switch, you no longer need a magnet to close the circuit (the small part of any door sensor contains a magnet).
It will send a signal of open or closed anyway.
Hope I’m being clear.
Do you think a new born baby would have enough wight trigger a closed? Looking to put it under the pillow on which the baby get’s the diaper change. Then automate some lights and infrared heater around if the baby is lying on the pillow.
Hey Chris,
I’m not really sure. I think so, yes, but don’t take my word for it.
Your best bet is to just try it, the cost justifies this neat little project + it’s a great learning experience.
Cheers
Thx for the instruction, it’s perfect for my purposes 🙂
my car seat sensor refuse to “bounce” back to open state after a while, how to fix that?
Hello Tam,
It’s possible the contacts are stuck together somewhere around the circuit.
I suggest you check them one by one and try spraying denatured alcohol and clean them.
Another reason I can think of is you door sensor is faulty, doesn’t change state.
You can easily check this with a multimeter.
Cheers
SHS
Hi there, i have the style of sensor but when i open up the and have a look my board seems slightly different. I dont see a reed switch
Hi,
Can you email me a photo to admin@smarthomescene.com?
Cheers
Hi, thanks for this. One quick question please. How do I know which wire from the pressure pad goes to which end of the reed switch please? Thanks.
Hi Ash,
It not important which one goes where, that’s why I didn’t mention it. They only need to complete the circuit, that’s it!
Cheers!
Hi thanks verry interesting,
so you think it would work with a water leak sensor like this one ?
-redacted-
It would be nice as no soldering required 🙂
Yes, it will work!
do you know of exists some zigbee pressure Meter. I Need It to monitor the weight of my hives (family of bees) in the time?
Hey, I just got my pressure sensor last night and did this modification.
It works great, but I did not realize how small the sensor pad actually is. Im testing in a twin bed (smallest bed size) and sometimes it will not register me lying down depending on the combination of where place the sensor and where I am on the bed. I guess this would be worse in a bigger bed. Do you know if it is possible to just wire more sensors in parallel to spread them along the bed, or if there is a term to search for bigger sensors that can cover a bigger area?
It works great for my computer chair, tho!
Hey, you can wire as much as you want to the same wires 🙂
Whichever completes the circuit will trigger the sensor.
Does anyone know of a commercial unit like the hacked door sensor? I’ve done a couple of these but they’re not very robust as the solder pads sometimes come off.
It would be perfect to just have a screw connector input.
I can think of 1000 applications for this device, leaving me wondering why nobody is doing it?
Alternatively, you can use an Aqara Water Leak Sensor and just screw in the wires on the terminals bellow.