UPDATE 01.03.2024: Updated the external converter Zigbee2MQTT with new ZigbeeModel LYWSD03MMC-z. Thanks for the hint Francois.
UPDATE 08.01.2024: I added a guide for flashing the LYWSD03MMC using pvvx’s forked firmware, which is a bit easier and doesn’t require flashing transitional firmware files. As of now, this is the recommended method.
UPDATE 20.12.2023: I documented flashing the Qingping CGDK2 via OTA and UART connection, using pvvx custom firmware.
UPDATE 13.11.2023: The Qingping Temp & RH Monitor LITE CGDK2 [AliExpress] and the MiaoMiaoCe Temp & RH Monitor MHO-C122 [Webstore] have received Zigbee support! Follow the OTA pvvx guide bellow to flash.
As some of you know, I’ve been testing and reviewing Zigbee temperature and humidity devices for a while now, recently culminating in a summary article comparing 10 of these climate sensors with a display. This was an effort towards finding out which ones are worth our money and which are not.
Even though I’ve accumulated more than 15 different models, I never actually used Zigbee-based temperature sensors in my home. I’ve always relied on Xiaomi BLE devices (Especially the LYWSD02 and CGG1), whose packets I capture with ESP32 boards.
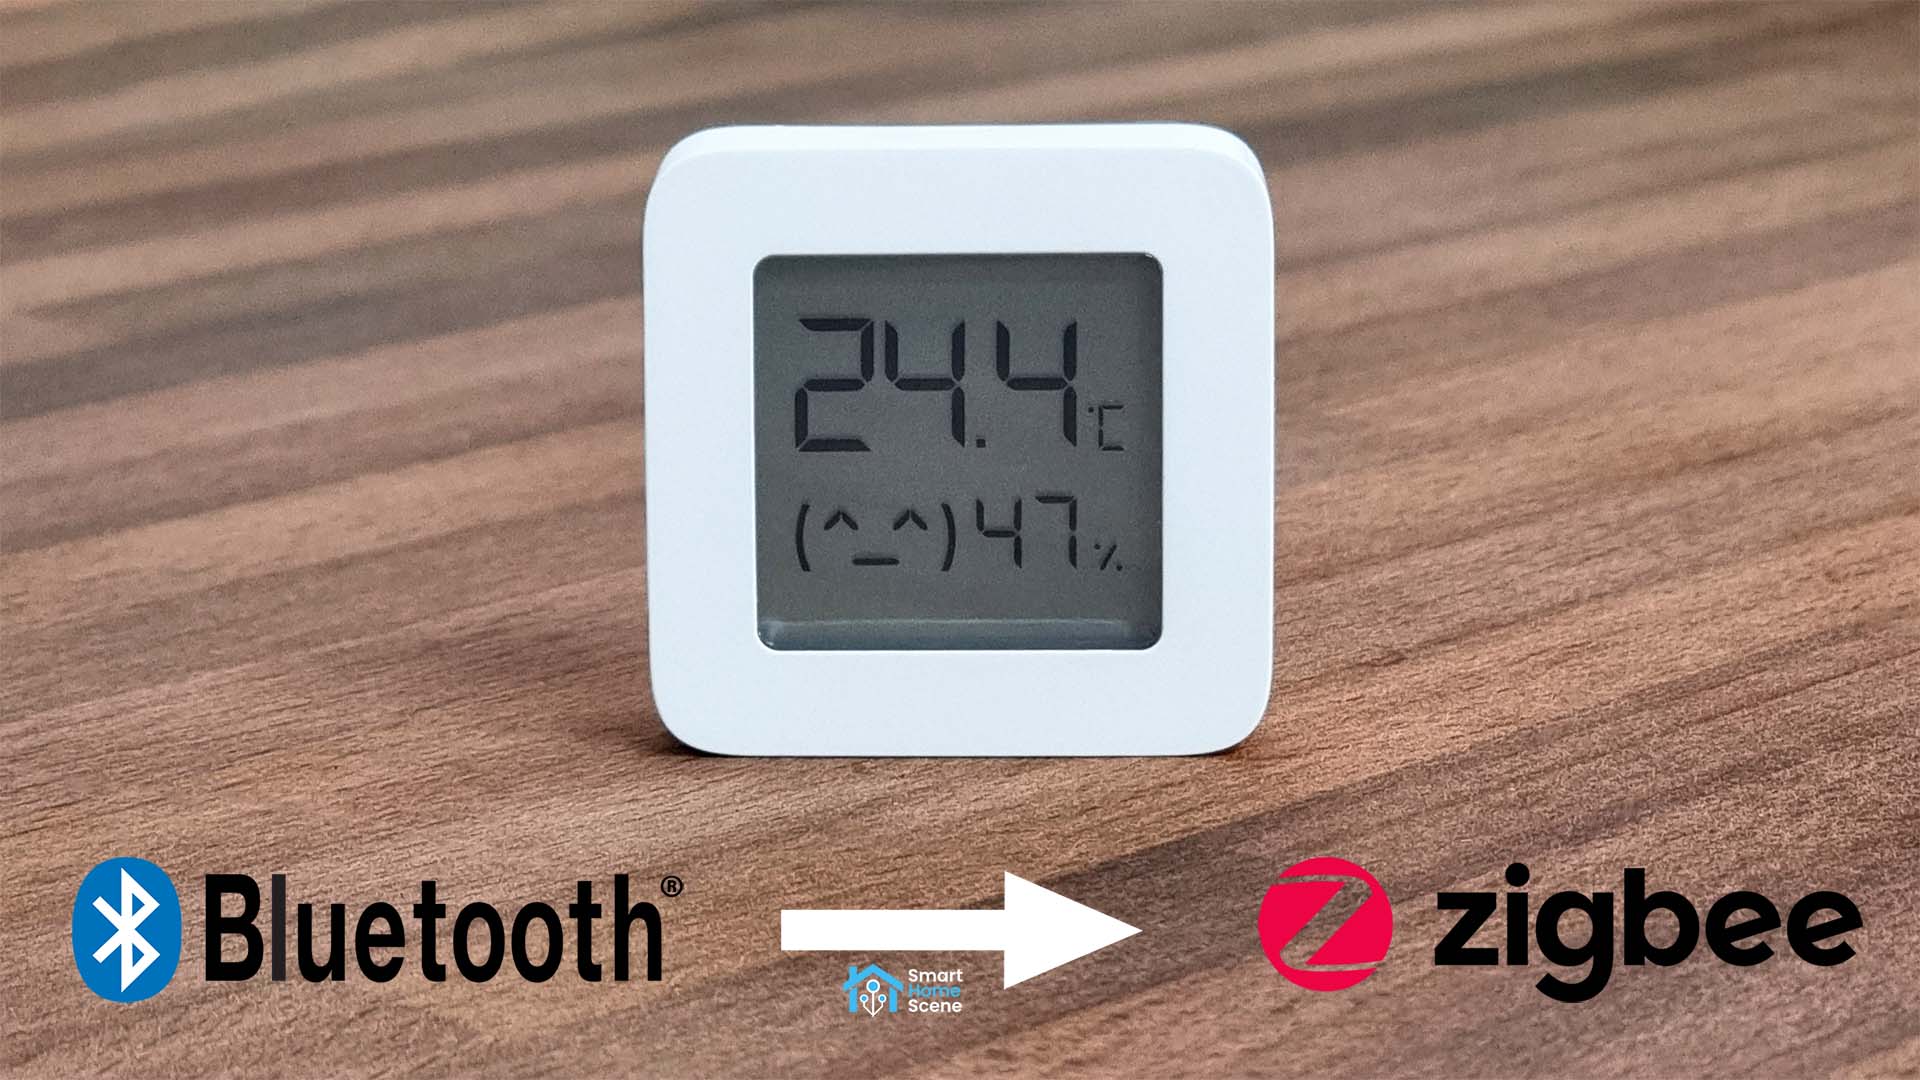
In this article, I’m going through the process of flashing a Xiaomi Sensor (LYWSD03MMC) with Zigbee firmware and integrating the device with Zigbee2MQTT and ZHA in Home Assistant.
About the LYWSD03MMC
The LYWSD03MMC is a BLE (Bluetooth Low Energy Sensor) manufactured by Xiaomi, which relies on the Telink TLSR8258 [Datasheet] MCU. It’s a square model with a small LCD display, powered by a single button cell CR2032 battery.
The Telink chips used in these devices can be flashed with custom firmware which unlocks several customization options, better battery life, better accuracy of measurements and LCD display information looping.
With it’s default firmware, it publishes it’s readings via BLE once every 10 minutes. By using the custom firmware, the interval can be changed to report more frequently. Currently the pvvx custom firmware supports the following models:
- Xiaomi LYWSD03MMC [Zigbee, BLE]
- Xiaomi MJWSD05MMC [BLE]
- Qingping CGG1 [BLE]
- Qingping CGDK2 [Zigbee, BLE]
- Xiaomi MiaoMiaoCe MHO-C401 [Zigbee, BLE]
- Xiaomi MiaMiaoCe MHO-C122 [Zigbee, BLE]
The Zigbee custom firmware for this device was initially developed by Ivan Belokobylskiy (devbis) and can be flashed OTA (Over-the-Air) or with an USB-to-TTL adapter. In this article, I’m going over the OTA method as it’s easier and doesn’t require dismantling the device and soldering wires. Since the firmware was forked by Victor [pvvx], I also included a guide for flashing the Zigbee firmware using his method.
Convert LYWSD03MMC to Zigbee (OTA, devbis)
First, you need to #enable-experimental-web-platform-features in Chrome, Opera or Edge. This is necessary in order to get the MAC Address of the device. Copy the following links for the browser you use and paste it into the address bar:
- Chrome: chrome://flags/#enable-experimental-web-platform-features
- Opera: opera://flags/#enable-experimental-web-platform-features
- Edge: edge://flags/#enable-experimental-web-platform-features
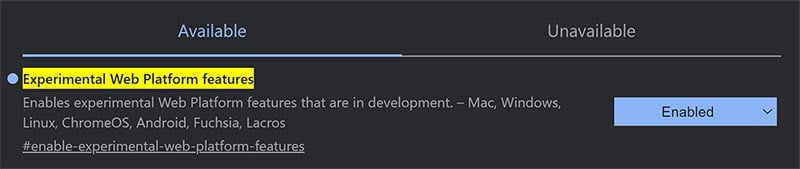
Restart your browser. To flash the LYWSD03MMC, carefully follow the procedure bellow.
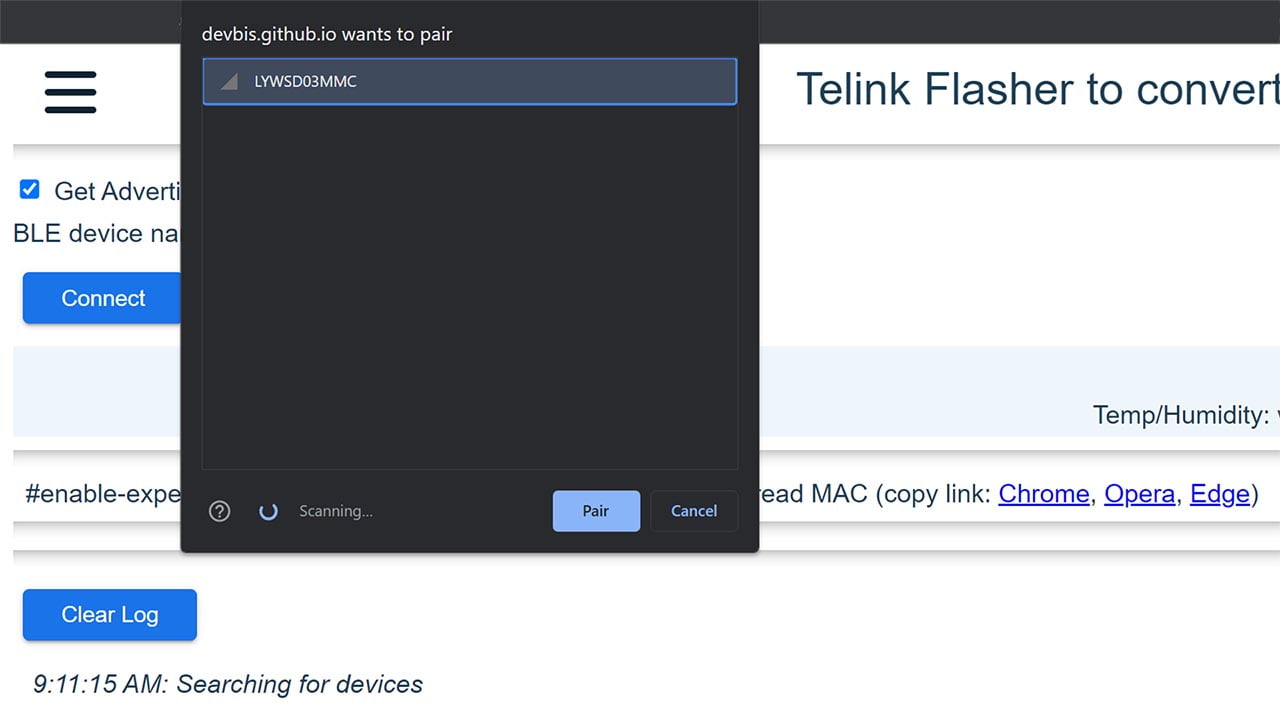
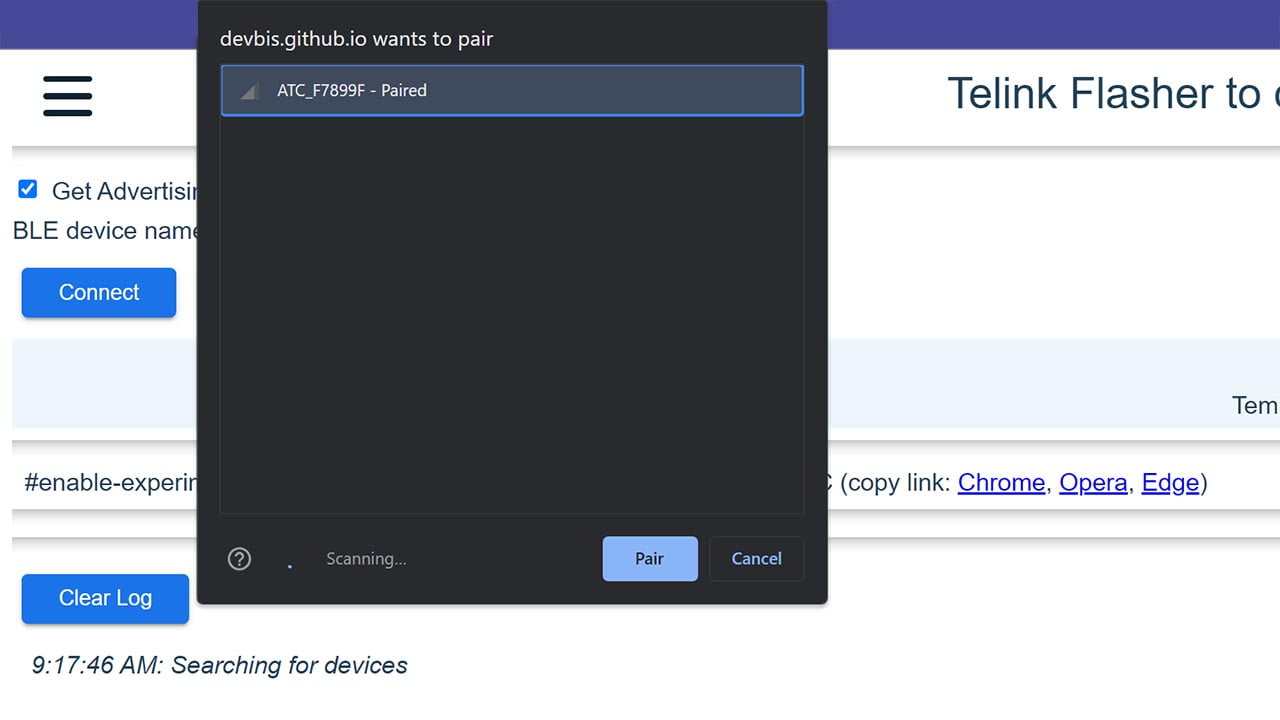
- In your browser, navigate to https://pvvx.github.io/ATC_MiThermometer/TelinkMiFlasher.html
- Check Get Advertising MAC and click Connect
- Select the LYWSD03MMC from the list of Bluetooth devices and click Pair

- Wait for the connection to be established
- Press the Do Activation button and wait
- Download the transitional firmware file
ATC_ota_40000.bin - Select the file by clicking Choose File
- Press Start Flashing and wait for the process to finish.
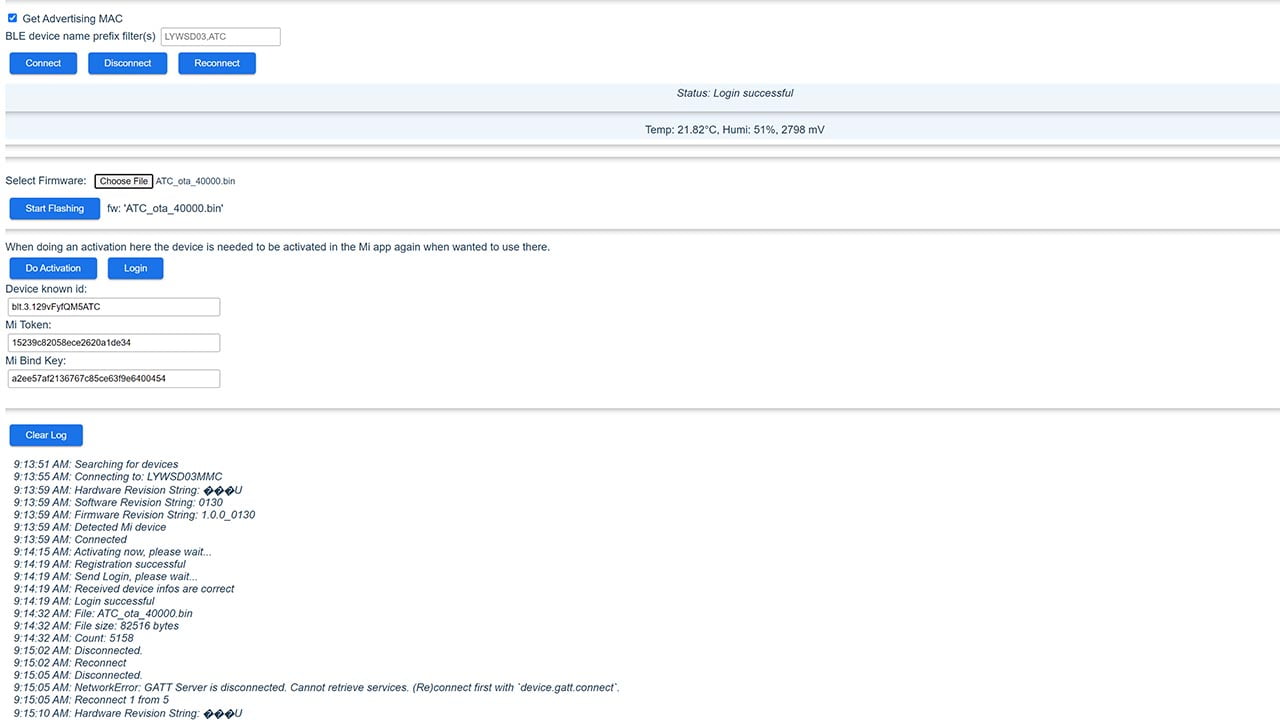
WARNING: Flash the transitional firmware even if you are already on custom firmware! Failure to do so make brick your device and you will need to use USB/UART to re-flash it.
Once the transitional firmware if flashed, take out the battery of the Xiaomi LYWSD03MMC and wait 15-20 seconds. Reinstall the battery and wait for the device to boot up again.
- Navigate to the Zigbee version of the Telink flasher
- Press Connect again only this time the device name will be different (e.g. ATC_XXXXXX)
- Press Pair
- Download the latest
z03mmc.binZigbee Firmware file: - Click Choose File and select the
z03mmc.bin - Press Start Flashing and wait for the process to finish
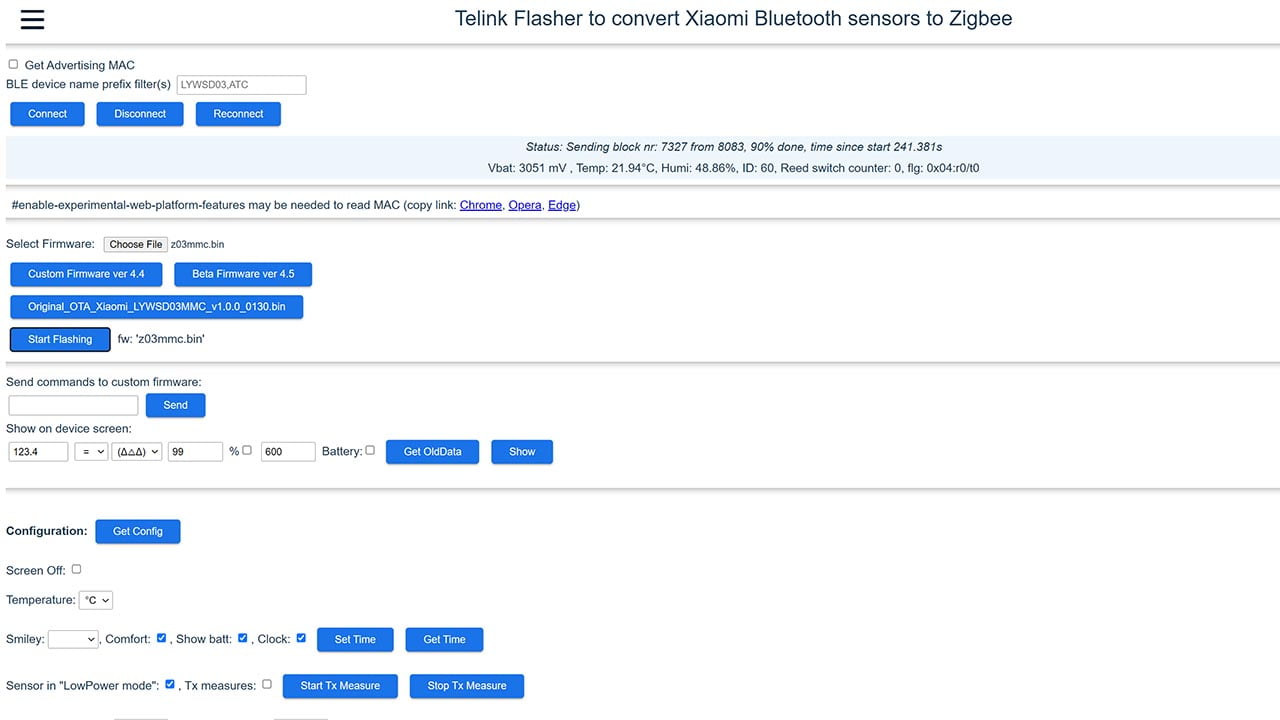
The process can take somewhere between 4-5 minutes and it will log Update done after XXX seconds in the console. Done!
Convert LYWSD03MMC to Zigbee (OTA, pvvx)
Since my release of the flashing guide, pvvx forked the original devbis Zigbee firmware and shared a simpler method of converting the LYWSD03MMC without flashing a transitional firmware. The procedure is more or less the same, with slight differences and fewer steps.
There is no need to download additional files or transitional firmware, however, you may have to flash the Custom Firmware ver 4.6 if you are running stock firmware. This is dependent on your LYWSD03MMC hardware revision version, since Xiaomi firmware versions do not allow flashing files larger than 128kb.
If you are running stock firmware, I suggest you flash the Custom Firmware ver 4.6 in any case, to avoid potential issues and confusion. There is no need to download any files to your PC with this method, the flasher handles everything automatically. Here’s how to do it step by step:
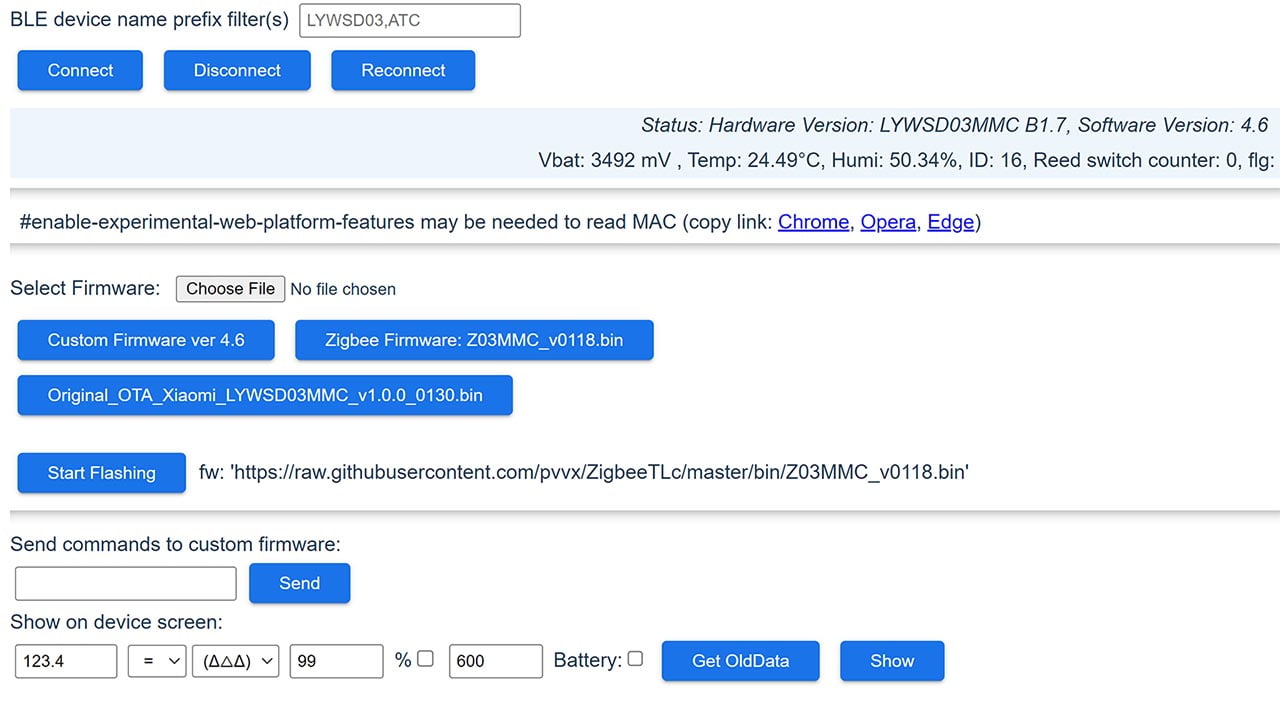
- In your browser, navigate to https://pvvx.github.io/ATC_MiThermometer/TelinkMiFlasher.html
- Check Get Advertising MAC and click Connect
- Select the LYWSD03MMC from the list of Bluetooth devices and click Pair
- Wait for the connection to be established
- If you are running stock firmware:
- Press Do Activation and wait for it to finish
- Press Custom Firmware ver 4.6
- Press Start Flashing
- Reconnect to ATC_FXXXX
- Press Zigbee Firmware: Z03MMC_v0118.bin (latest)
- Press Start Flashing
- If you are running custom firmware
- Press Zigbee Firmware: Z03MMC_v0118.bin (latest) directly
- Press Start Flashing
- Done, continue to pair the LYWSD03MMC to your Zigbee coordinator
Convert LYWSD03MMC to Zigbee (UART)
Wires are always better than wireless, so if you encounter issues while flashing you can always use UART to flash the Xiaomi LYWSD03MMC Sensor. However, the process is a bit more involved and requires soldering. Follow the guide I shared in the CGDK2 flashing guide to covert the LYWSD03MMC via USB to UART.
Pairing the LYWSD03MMC to Zigbee2MQTT
The Xiaomi LYWSD03MMC was added to Zigbee2MQTT with version 1.33.2, so if you do not want to use an external converter make sure you update. Here’s how to use the external converter in case the device is unrecognized:
- Create a new file in zigbee2mqtt folder (next to configuration.yaml)
- Name it
lywsd03mmc.js(make sure it ends with .js) - Open the file and copy the contents from bellow:
const {
    batteryPercentage,
    temperature,
    humidity,
    enumLookup,
    binary,
    numeric,
    quirkAddEndpointCluster,
} = require('zigbee-herdsman-converters/lib/modernExtend');
const reporting = require('zigbee-herdsman-converters/lib/reporting');
const ota = require('zigbee-herdsman-converters/lib/ota');

const dataType = {
    boolean: 0x10,
    uint8: 0x20,
    uint16: 0x21,
    int8: 0x28,
    int16: 0x29,
    enum8: 0x30,
};

const definition = {
    zigbeeModel: ['LYWSD03MMC-z'],
    model: 'LYWSD03MMC',
    vendor: 'Xiaomi',
    description: 'Temperature & humidity sensor with custom firmware',
    extend: [
        quirkAddEndpointCluster({
            endpointID: 1,
            outputClusters: [],
            inputClusters: [
                'genPowerCfg',
                'msTemperatureMeasurement',
                'msRelativeHumidity',
                'hvacUserInterfaceCfg',
            ],
        }),
        batteryPercentage(),
        temperature({reporting: {min: 10, max: 300, change: 10}}),
        humidity({reporting: {min: 10, max: 300, change: 50}}),
        enumLookup({
            name: 'temperature_display_mode',
            lookup: {'celsius': 0, 'fahrenheit': 1},
            cluster: 'hvacUserInterfaceCfg',
            attribute: {ID: 0x0000, type: dataType.enum8},
            description: 'The units of the temperature displayed on the device screen.',
        }),
        binary({
            name: 'show_smiley',
            valueOn: ['SHOW', 0],
            valueOff: ['HIDE', 1],
            cluster: 'hvacUserInterfaceCfg',
            attribute: {ID: 0x0002, type: dataType.enum8},
            description: 'Whether to show a smiley on the device screen.',
        }),
        numeric({
            name: 'temperature_calibration',
            unit: 'ºC',
            cluster: 'hvacUserInterfaceCfg',
            attribute: {ID: 0x0100, type: dataType.int8},
            valueMin: -12.7,
            valueMax: 12.7,
            valueStep: 0.1,
            scale: 10,
            description: 'The temperature calibration, in 0.1° steps.',
        }),
        numeric({
            name: 'humidity_calibration',
            unit: '%',
            cluster: 'hvacUserInterfaceCfg',
            attribute: {ID: 0x0101, type: dataType.int8},
            valueMin: -12.7,
            valueMax: 12.7,
            valueStep: 0.1,
            scale: 10,
            description: 'The humidity offset is set in 0.1 % steps.',
        }),
        numeric({
            name: 'comfort_temperature_min',
            unit: 'ºC',
            cluster: 'hvacUserInterfaceCfg',
            attribute: {ID: 0x0102, type: dataType.int8},
            valueMin: -127.0,
            valueMax: 127.0,
            description: 'Comfort parameters/Temperature minimum, in 1°C steps.',
        }),
        numeric({
            name: 'comfort_temperature_max',
            unit: 'ºC',
            cluster: 'hvacUserInterfaceCfg',
            attribute: {ID: 0x0103, type: dataType.int8},
            valueMin: -127.0,
            valueMax: 127.0,
            description: 'Comfort parameters/Temperature maximum, in 1°C steps.',
        }),
        numeric({
            name: 'comfort_humidity_min',
            unit: '%',
            cluster: 'hvacUserInterfaceCfg',
            attribute: {ID: 0x0104, type: dataType.uint8},
            valueMin: 0.0,
            valueMax: 100.0,
            description: 'Comfort parameters/Humidity minimum, in 1% steps.',
        }),
        numeric({
            name: 'comfort_humidity_max',
            unit: '%',
            cluster: 'hvacUserInterfaceCfg',
            attribute: {ID: 0x0105, type: dataType.uint8},
            valueMin: 0.0,
            valueMax: 100.0,
            description: 'Comfort parameters/Humidity maximum, in 1% steps.',
        }),
    ],
    ota: ota.zigbeeOTA,
    configure: async (device, coordinatorEndpoint, logger) => {
        const endpoint = device.getEndpoint(1);
        const bindClusters = ['msTemperatureMeasurement', 'msRelativeHumidity', 'genPowerCfg'];
        await reporting.bind(endpoint, coordinatorEndpoint, bindClusters);
        await reporting.temperature(endpoint, {min: 10, max: 300, change: 10});
        await reporting.humidity(endpoint, {min: 10, max: 300, change: 50});
        await reporting.batteryPercentageRemaining(endpoint);
        try {
            await endpoint.read('hvacThermostat', [0x0010, 0x0011, 0x0102, 0x0103, 0x0104, 0x0105]);
            await endpoint.read('msTemperatureMeasurement', [0x0010]);
            await endpoint.read('msRelativeHumidity', [0x0010]);
        } catch (e) {
            /* backward compatibility */
        }
    },
};

module.exports = definition;- Save the File
- Open Zigbee2MQTT’s configuration.yaml file (NOT Home Assistant’s)
- Location of the file is zigbee2mqtt/configuration.yaml
- Enable the external converter by adding the following lines:
- Restart Zigbee2MQTT and pair the LYWSD03MMC
external_converters:
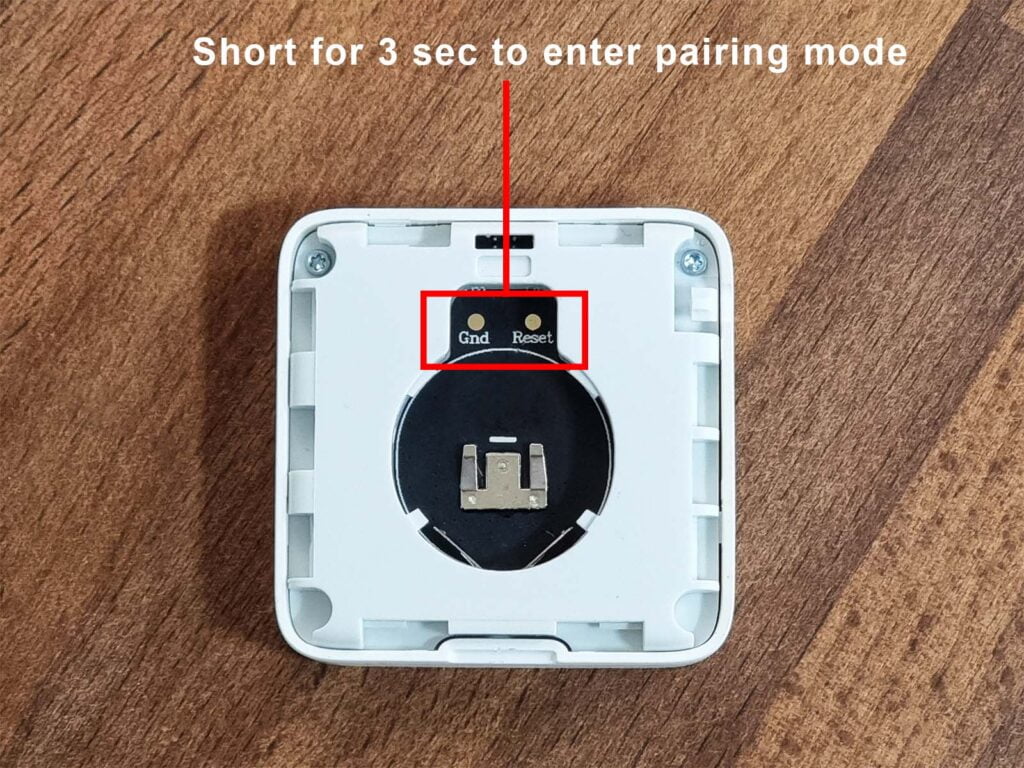
- lywsd03mmc.jsOnce the LYWSD03MMC is powered up initially, it will automatically enter pairing mode. If not, you can use a short piece of wire of something metal to short the RESET and GND contacts for 3 seconds.
Once the device gets discovered and paired in Zigbee2MQTT, it will be identified as an EndDevice by manufacturer Xiaomi and model LYWSD03MMC.
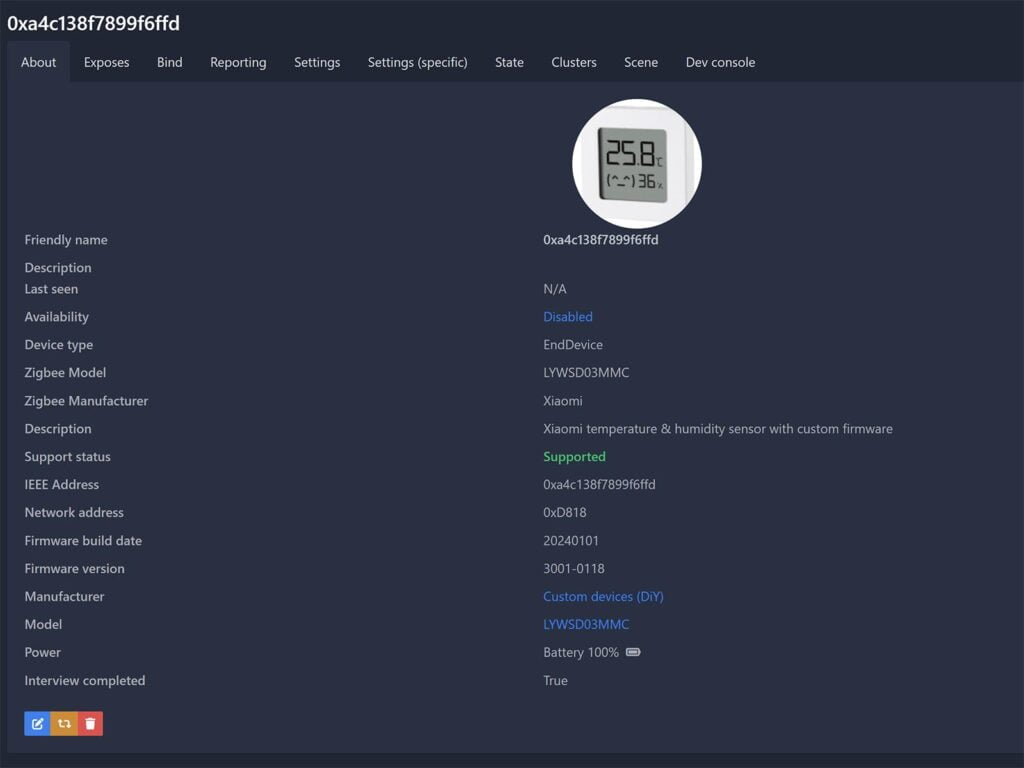
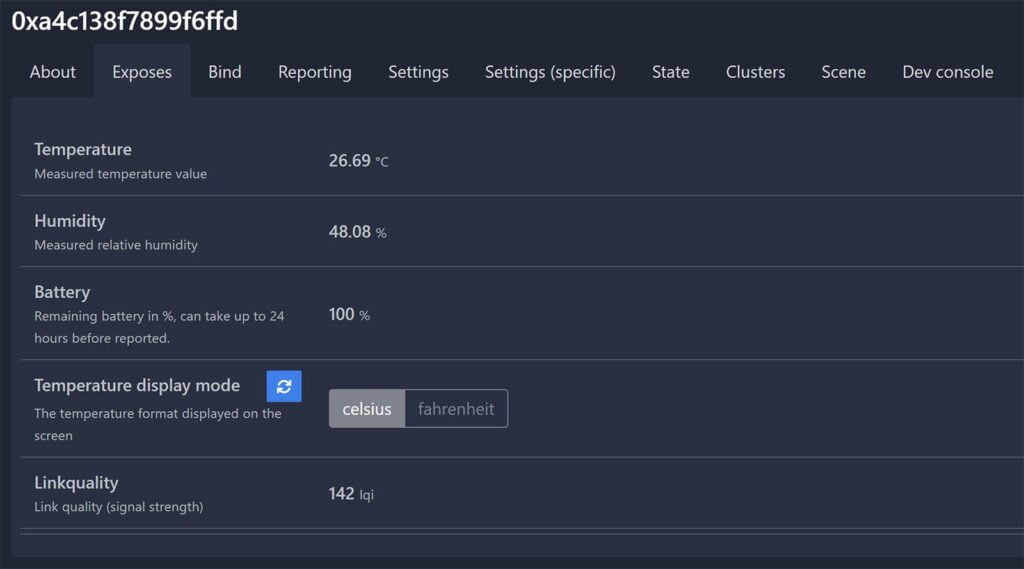
It exposes the following entities in Home Assistant through Zigbee2MQTT:
Pairing the LYWSD03MMC to ZHA
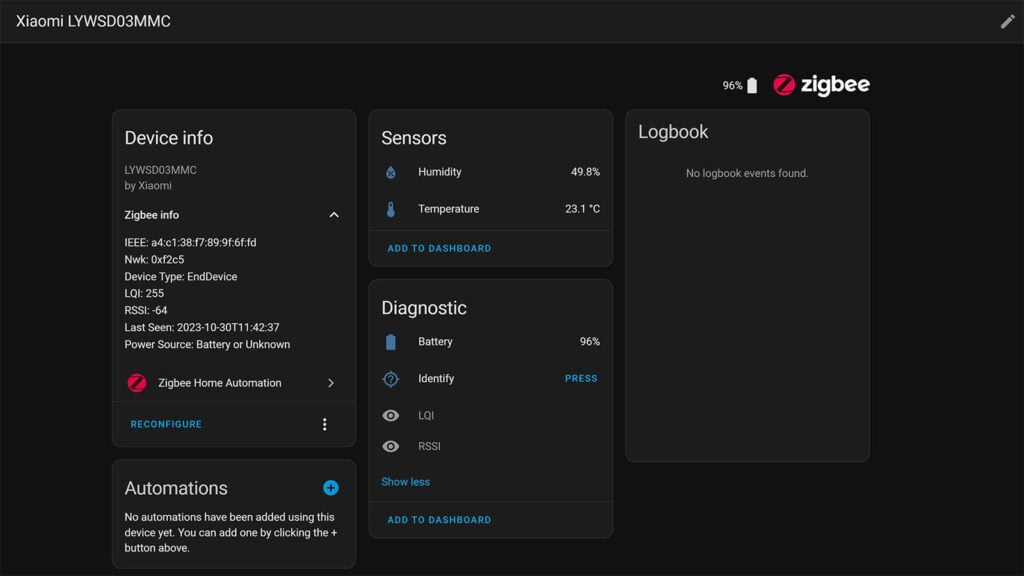
Once flashed, the device works with ZHA in Home Assistant without the need of any custom quirks. Remember to short the RESET and GND contacts for 3 seconds to enable pairing mode. Once paired, it identified as LYWSD03MMC by Xiaomi as an EndDevice.
About Battery Life
Since most people are wondering how battery life is affected on the Zigbee firmware compared to the original BLE firmware, developer pvvx wrote a short paragraph explaining his findings:
“The final average consumption of LYWSD03MC B1.4 when measured from a 3.3V source is from 14 to 26 µA, depending on the dynamics of changes in temperature and humidity. For comparison, the BLE version consumes 14 µA with default settings and constant transmission of all measured values every 10 seconds.”
It’s safe to say that even though battery consumption is higher on the Zigbee firmware, in reality it will be affected very little compared to the default setting of the BLE version.
Final Thoughts
Converting the Xiaomi LYWSD03MMC is useful for people who want to use Zigbee devices exclusively in their smart home. Props to Victor (pvvx) for forking and developing the original ATC Thermometer firmware and Ivan Belokobylskiy (devbis) for developing the Zigbee custom firmware.
The device reports every 5 minutes in Zigbee2MQTT and ZHA, pushing the temperature and humidity reading with a precision of two decimal places. You can create an offset in Zigbee2MQTT if needed and calibrate the measurements.
Remember, you will not be able to reconnect to the device with the Telink flashed since there is no Bluetooth firmware installed anymore. You can use Zigbee2MQTT’s OTA update feature to flash and update the LYWSD03MMC again if you need to.
Fahrenheit support is not yet available with the custom firmware, the dev added a PR on the official repo so it should be coming soon.
For those of you wondering whether this will be possible for other Xiaomi sensors based on the Telink MCU: Yes, in theory it is, although there is no development at the moment.
You can get the Xiaomi LYWSD03MMC on AliExpress and Amazon.


Wow, what a great way to improve the usability of these cheap sensors! The guide worked perfectly, although I did have to create the external converter (even on Zigbee2MQTT 1.33.1), since it first reported as unsupported.
Also, it seems the “interview was not completed”, but I still get temperature and humidity data. To be fair however, I use a very basic CC2531 Zigbee sniffer (using router firmware) and have 46 Zigbee devices, which may be stretching its capabilities quite a bit…
Yeah, It’s almost certainly the coordinator. Glad you got it working, cheers!
I have 3 of these devices but I cannot connect them even to the first page. It sees my MAC Address, i pair with the browse on that page and it tries do connect 5 times and then i get a message “connection Error” and then “Something went wrong, to many reconnects”. I have enable the experimental-web-platform on Chrome. All of them are on custom firmware. I don’t know what i’m doing wrong. But great step by step info. Thanks
Try to take out the battery for 10-15 seconds and use another browser
Try this updater: https://pvvx.github.io/ATC_MiThermometer/TelinkOTA.html to flash ATC_ota_40000.bin. When completed you can continue from step 9.
I tried this updated, but I guess I fried the device. Screen is dead. I guess recovery is not possible.
did I just lose the ability to show the temp on the device in F?
Yes, although there is a fix coming.
The dev added an Enhancement PR for Fahrenheit in the repo
Do you know which pull request? I flashed the zigbee firmware and now stuck with celsius hehe.
See here: https://github.com/devbis/z03mmc/issues/4
New OTA update was just pushed today, https://github.com/devbis/z03mmc/issues/4.
Once the device is updated, you’ll have to use external convert with the file below,
https://github.com/devbis/z03mmc/blob/master/converters/lywsd03mmc.js
Restart z2m and the display can be changed in Exposes section.
Is battery life longer on BLE or ZigBee?
Worked like a charm.
Thanks for the detailed description.
Also had to create the external converter but after that it was smooth sailing.
Do you have any idea about battery life ?
Nice tutorial
Thank you
very well done. any idea of battery life when compared to Bluetooth?
Still early to tell, but going by my experience with Zigbee and BLE Sensors, I would guess about 20-25% lower battery life on the Zigbee firmware.
The custom firmware does bring some battery optimization though
If you live in densely populated areas, I recommend flashing while in the basement/cellar or even going to a park or in the woods.
For me, flashing these thermometers with ATC firmware worked much, much better while in the cellar.
Personally, the only advantage I see for ZigBee is the relaying of the network (my Pi4 could be better hidden away). Otherwise, if the reports are every 5 minutes, irrelevant if the values change, it would make my bathroom fan automation almost useless.
Hi!
Flashing goes well. but when goes my zigbee2mqtt > there shows those are unsupported and can´t see temperature etc
Device type
EndDevice
Zigbee model
LYWSD03MMC
Support status
Unsupported
Made that:
Create a new file in zigbee2mqtt folder (next to configuration.yaml)
Name it lywsd03mmc.js (make sure it ends with .js)
Open the file and copy the contents from bellow:
And configuration.yaml too.
any thoughts?
Make sure you stop Zigbee2MQTT
Open the Zigbee2MQTT folder
You will see configuration.yaml file inside (NOT Home Assistants’s configuration.yaml file)
Add the code. Restart Zigbee2MQTT
Worked like a charm with ZHA. Thank you for detailed guide and great job by the devs
I flashed one to Zigbee and it is added to Z2M with the error “interview was not completed”. What can I do?
Try adding the external converter
Tried with two of mine. Flashing seemed to be completed fine. Ended up with 3 dashes and the little bluetooth icon on the sensor, but seemed stuck. After getting the battery out and in, nothing happens anymore 🙁
So.. i manage to brick my sensor. After the flashing was finished ( step 14.) the sensor turned off and it won’t turn on.. Any suggestions how to bring it to life?
Went as smooth as possible for me.
Can you try a fresh battery?
Did you get the Update done after XXX seconds in the console?
Battery is not a problem ( connected to external DC power supply).
And i did get the “Update done after XXX seconds”..
I got the same problem, I’m using a fresh duracell battery, so it can’t be any issue there. All seemed to go fine, then I got “Update done after 185 seconds”, but the sensor went blank and won’t respond. Maybe latest firmware has issues?
It won’t let you flash if you are on latest firmware, so that not the problem.
You have to flash via UART now, follow this guide on the official repo:
https://github.com/devbis/z03mmc#flashing-firmware-with-usb-to-uart
@Hrvoje
Quite sure now that this is because I had the wrong ‘transition’ firmware in place. I had a more recent version that the version indicated by the documentation, https://github.com/devbis/z03mmc/blob/master/assets/ATC_ota_40000.bin.
I tried again on another device and it worked this time, also it took much longer to flash the zigbee firmware than the first time.
Fantastic work making these brilliant cheap devices even more integrated into my smart home!!
Merci vous êtes un génie bravo cela marche parfaitement
Thank you you are a genius well done it works perfectly
Very nice tutorial! Amazing and straightforward.
Just a little issue at the beginning, because I used ‘Save Link As…’ directly from the link above and downloaded a 352KB binary file, which turned out to be the GitHub HTML saved as a .bin file. I realized there was an issue with the file when the firmware upload tool displayed a popup message saying, ‘Size firmware is more than 131,072 bytes.’ I finally downloaded the file directly from the GitHub repo, and it was 80.6KB, which was correct.
Currently, I have configured one out of my 12 devices for testing this new Zigbee implementation. I’ve placed this test device next to an identical Bluetooth device for comparison. Additionally, I have replaced the batteries in both devices with batteries from the same brand and pack (100% capacity) at the same time to compare the difference in terms of battery consumption over the long run. I will also compare the value reporting to see if they look similar.
I am also benchmarking the battery. Please report back once you have a conclusive result (I would say 10-15 days)
Thanks
Already, after just 3 days, I’ve noticed a significant difference. While my Bluetooth thermometer has dropped to 94% of its battery life, my Zigbee device remains at 100%, which is a bit surprising. Now, the question arises: could there be a difference in the percentage calculation between the Zigbee and Bluetooth implementations? A 6% decrease in 3 days seems quite significant, and I would have expected Zigbee to consume more energy which is the total opposite.
Hey Vincent,
Battery reporting is wildly inaccurate in these types of sensors, no matter the firmware.
It is calculated on voltage and is actually an approximation, it’s not an exact percentage.
Zigbee should and will consume more battery, so just give some time to stabilize.
My estimate suggest around 15-20% shorter battery life on the Zigbee firmware with a 5 minute reporting rate.
Which should still make it last 8+ months on a good battery.
Cheers
I flashed one sensor for testing, work like a charm with zigbee2mqtt.
I’ll compare the measurements with other one in bluetooth.
Thanks for this article !
You know if LYWSDCGQ devices can be converted to zigbee?
Iv got latest firmware on some sensors.. is it possible to update to zigbee then??
iv got firmware 4.4 and this doesnt work then.. Will it be able to be fixed or? Am i doomed ? 🙁
i have installed the firmware on mine, this went ok. But know i can not connect it to zigbee2mqtt. I have created the external converter.
I tried to short it with an copper wire, but it does not like to do anyhting.
What can i try?
1. Take out the battery for 10-15 seconds
2. Click Permit Join in Z2M
3. Put the battery in place
4. Wait for it to pair, if not short the GND and RESET for 3 seconds
Same problem here. First device works like a charm after flashing. Second one device flashed without problems also, but it cannot enter pairing mode. Removing battery and GND + RESET is not working.
Hi Tomas, same here. Were you able to solve the issue? Thanks!
Try new battery. Works to me!
Same problem. Did you solved it ?
Having the same problem…Removing battery and GND + RESET is not working!! Any solutions??
You might have to use UART, seems like OTA flashing soft bricked it.
Possibly due to low battery.
You can use USB-UART and flash it without problems
The new 1.33.2 z2m release has added support for the LYWSD03MMC:
https://github.com/Koenkk/zigbee2mqtt/releases/tag/1.33.2
Hi, Thanks for the detailed steps. Unfortunately, I get the following when trying to flash the transitional firmware – any suggestions?
4:33:30 pm: Get Advertising MAC (Web Experimental Features!)
4:33:30 pm: Connecting to: ATC_AB84E5
4:33:53 pm: MAC: A4C138AB84E5, Bat: 72%, Vbat: 2709 mV , Temp: 26.31°C, Humi: 65.85%, Count: 15, Flg: 5
4:34:00 pm: Hardware Revision String: B1.6
4:34:00 pm: Software Revision String: V3.9
4:34:00 pm: Firmware Revision String: github.com/pvvx
4:34:00 pm: Detected custom Firmware
4:34:00 pm: Hardware Version: LYWSD03MMC B1.6, Software Version: 3.9, Sensor: SHT4x
4:34:00 pm: Custom config HEX string: 55856000002804a97c3104b4000000
4:34:03 pm: Start DFU
4:34:11 pm: Update error: NotSupportedError: GATT operation failed for unknown reason.
4:34:11 pm: Disconnected.
Did you flash the transitional firmware first?
yes, first atc.ota.40000.bin, then zigbee, but it failed, the thermometer disconnected. Unable to pair now. I’ll try the ttl method, but I don’t really understand it
Yes – but have managed by repeatedly reconnecting managed to get devices flashed. It is the transitional firmware that I was having trouble flashing – the zigbee firmware always flashed first time OK. If the transitional firmware failed it was either at block #7, or the block number were increasing very slowly. Once the firmware had got passed block #7 – and the block count increased rapidly it would always work.
I realized that the battery voltage is not exposed from the Zigbee state. To expose the battery voltage, I made a simple modification to the lywsd03mmc.js file :
Original: exposes: [e.temperature(), e.humidity(), e.battery()],
Modified: exposes: [e.temperature(), e.humidity(), e.battery(), e.battery_voltage()],
Useful
I am using Z2M (v1.33.2-1) – do you know if this mod is going to be added to Z2M?
It’s already added, see here: https://github.com/Koenkk/zigbee2mqtt/releases
can we bring the device back to ble firmware ? if yes please write a tutorial for this .
Yes you can, although you need to use UART now.
You can follow https://github.com/devbis/z03mmc#flashing-firmware-with-usb-to-uart
and flash the original firmware.
Thanks for this. Got it working on 2 devices. Battery life is horrible with zigbee. I had a new battery with 100% reporting for a day. Today after around 5 days, it’s at 65%. So going by that it will only last for 12-15days max.
Other sensor had around 60% battery on start, currently at 11% after 5 days. So around 8-10% drain a day. totally not acceptable.
What are other’s findings?
As I mentioned in another comment, Battery reporting is wildly inaccurate in these sensors no matter the firmware.
They calculate the percentage left based on voltage, which can fluctuate.
Give it some time to stabilize and see if it really is draining that much.
My estimate is about 20-25% shorter life span of the battery with the Zigbee version but not what you are suggesting.
Cheers
Hello, I followed the instructions and flashed fw ATC_ota_40000.bin, successfully.
then i wanted to flash fw z03mmc.bin, but it always ended in error
21:46:30: Searching for devices
21:46:34: Get Advertising MAC (Web Experimental Features!)
21:46:34: Connecting to: ATC_3D6CCC
21:46:35: MAC: A4C1383D6CCC, Bat: 100%, Vbat: 3151 mV , Temp: 21.43°C, Humi: 60.91%, Count: 14, Flg: 4
21:46:44: Hardware Revision String: B1.5
21:46:44: Software Revision String: V4.4
21:46:44: Firmware Revision String: github.com/pvvx
21:46:44: Detected custom Firmware
21:46:47: Hardware Version: LYWSD03MMC B1.5, Software Version: 4.4, Sensor: SHTC3 (SHTV3)
21:46:47: Custom config HEX string: 55051000002804a931318ab4
21:46:55: File: z03mmc-1.bin
21:46:55: File size: 129236 bytes
21:46:55: Count: 8078
21:46:57: Start DFU
21:47:03: Update error: NotSupportedError: GATT Error Unknown.
21:47:03: Disconnected.
via HP ntb succeeded and flash started, there were three dashes on the display, but disconnected after 57 seconds, flasher now doesn’t see the thermometer, can’t pair.
You might need to use UART now and flash the device.
Sounds like it’s bricked. https://github.com/devbis/z03mmc#flashing-firmware-with-usb-to-uart
So, I had problems with connecting for the first part, but eventually was able to flash the transition firmware. The device now appears as ATC_0E2D7B, but even after 6-8 reboots, and restarting the browser, etc, I am not really able to get it to connect to the ATC “version”. It shows up as unpaired, but never connects, just:
Status: Connecting to: ATC_0E2D7B …
Temp/Humidity: waiting notify for data after connecting
and in the log:
15.11.58: Searching for devices
15.12.03: Connecting to: ATC_0E2D7B
Any hints from anybody?
Clear the cache or use another browser.
Do you have others BLE devices in close proximity? Eliminate interference for the time being and test.
Hello,
I flashed mi device using UART. After that, I connected it via ZHA, but I only receive information at the time of linking. After that, the device not notifies changes via Zigbee
Hi,
I made a mistake and updated the firmware in the Xiaomi application before realized there was this amazing thing.
Now in Telink, I get this report:
01:46:19: Searching for devices
01:46:48: Get Advertising MAC (Web Experimental Features!)
01:46:48: Connecting to: LYWSD03MMC
01:47:15: MiVer5, DevID: 0x055B-LYWSD03MMC, FnCnt: 214, CtrID: 0x5858 Not bound, Standard certification, MAC: A4C1388BD1A0, Data encrypted
01:48:13: Hardware Revision String: B1.4
01:48:13: Software Revision String: 0159
01:48:13: Firmware Revision String: 2.1.1_0159
01:48:13: Detected Mi device
01:48:13: (!) Version: 2.1.1_0159 is temporarily not supported (!)
01:48:13: Disconnected.
Is there any way to downgrade the firmware of the device or wait for Telink to support this version?
Fortunately, I had some other device lying around that I had not upgraded, and I had successfully converted it to Zigbee.
I had to add the external converter because of some troubles with zigbee2mqtt upgrade.
Thank you very much!
The dev is working on supporting the latest 2.1.1_0159 firmware, so you can wait.
To downgrade, follow this: https://github.com/pvvx/ATC_MiThermometer/issues/378#issuecomment-1791370165
Thank you
I went back to ATC4.4 via the ttl converter, the thermometer works again. As soon as I upload the ATC40000, it’s over and the thermometer refuses to connect. Would it be possible to elaborate a bit on how to upload the zigbee variant via TTL, thank you
Hello, follow this: https://github.com/devbis/z03mmc#flashing-firmware-with-usb-to-uart
good morning,
can you help me?
Detected custom Firmware
12:14:43: Hardware Version: LYWSD03MMC B1.5, Software Version: 4.4, Sensor: SHTC3 (SHTV3)
12:14:43: Custom config HEX string: 55211000002804a931318ab4
12:16:08: File: z03mmc.bin
12:16:08: File size: 129236 bytes
12:16:08: Count: 8078
12:16:11: Start DFU
12:16:16: Update error: NotSupportedError: GATT operation failed for unknown reason.
12:16:16: Disconnected.
fortunally i can connect again with the device, but how can i solve? i installed before the ATC_ota_40000.bin firmware
Remove the battery for 10-15 seconds.
Reinsert it.
Change browsers or use your phone.
Let me know again.
Cheers
One question – how replacing BLE firmware with Zigbee affects the range of the device?
It stays the same, although the Zigbee firmware can benefit from your mesh network.
Thank you.
Except this device, what are other devices that can be converted from BLE to Zigbee?
I ordered several of these below from Aliexpress and discovered that they are not supported in HA and no way to use them except cloud. Trying to udnerstand how to salvage them…
https://www.aliexpress.us/item/3256804656532300.html
None at the moment, although I believe every Telink device can theoretically be flashed to Zigbee.
Seems like the TH05 model you have uses encrypted BLE advertisements. It can be done, but understandably no one has interest in bothering with it.
Your best bet is local tuya w/hub. 🙂
Can confirm the transitional firmware step is important as bricked two out of 7 OTA, not an issue for me as done via wires now but still should have done it (found this guide after I had done it)! Worth noting that there is a report of an issue with bluetooth devices such as these connected to homeassistant using an SSD wearing out the SSD quite quickly as constant writes of a small file, this zigbee approach prevents that so seems like a good approach if true. Also makes my Z2M map look more fun
Hello. Is it possible to change the “MHO-C303” model to zigbee?? It is a product with a clock and a thermo-hygrometer, and the guide description shows as follows.
Hygro thermometer clock with alarm, rectangular body, e-ink display, broadcasts temperature, humidity and battery status. Not encrypted.
Similar to the LYWSD02, with additional clock features (alarm, pomodoro timer). Runs on two AAA batteries.
-redacted-
Yes, I am familiar with all of Xiaomi’s models, like the MiaoMiao MHO-C303.
It’s not possible at this time.
If you can’t connect, please disable extensions in the browser like ublock origin. Without disabled i can’t connect. After that it goes a lot more smooth. But also needed reconnect 1 time.
Just amazing devices are these small Xiaomi sensors. Lot of features and very precise. Hope there comes a lot more functionality in the firmware so you can configure it like the PVVX firmware. So enable and disable smile, battery status on display, update interval and so on.
Hi
I have flashed one of my LYWSD03MMC with the zigbee firmware and it worked also a few days with my sonoff Dongle-E and ZHA in home assistent.
But now my ZHA network no sees the LYWSD03MMC anymore.
An shorting grd and reset also not set it to pairing mode.
I cant add the LYWSD03MMC to my network.
So what can i do now?
Is maybe the battery low?
any news about dev for version 2.1.1_0159 compatible?
Not yet, I will update when it happens.
This looks as wonderful project, thank you for all the effort. However I am trying to flash the transition firmware, getting the message “Incorrect head in Telink OTA binary firmware”. Seemed simple but still I am doing something wrong. 🙂
10:29:21 AM: Searching for devices
10:29:23 AM: Connecting to: LYWSD03MMC
10:29:23 AM: Hardware Revision String: ���U
10:29:23 AM: Software Revision String: 0130
10:29:23 AM: Firmware Revision String: 1.0.0_0130
10:29:23 AM: Detected Mi device
10:29:23 AM: Connected
10:29:27 AM: Activating now, please wait…
10:29:31 AM: Registration successful
10:29:31 AM: Send Login, please wait…
10:29:31 AM: Repeat login!
10:29:36 AM: File: ATC_ota_40000.bin
10:29:57 AM: Incorrect head in Telink OTA binary firmware
ANy ideas? Thank you in advance!
I will reply to myself. I solved the problem by programming the device via serial line. However, the python script approach did not work – device did not reset to boot mode when using parameters suggested in tutorial. But the web serial flasher tool performed the soft reset and flashing was successful then.
Excelent tutorial! Straightforward steps. Just converted 3 new units and got them paired in HA/ZHA.
Hi
Do you know if it’s possible to do the same in jeedom
In jeedom, in the zigbee2mqtt folder, there is no configuration.yaml file… Thanks
No, I am not really familiar with Jeedom.
The external converter is fairly new, so I guess you would need to adapt it to Jeedom in order to use it.
Thanks a lot for your page. 🙂
For Jeedom, you don’t need an adapter, BUT you must update dependencies on JeeZigbee plugin parameters page, to have at least zigbee2mqtt >= 1.33.1.
You can find version of ZigbeeMqtt on “zigbee network” on JeeZigbee gestion page.
thanks a lot
Hi, will sensor pair with Aqara hub eg e1 after flashing to zigbee?
No, it won’t. You can use it with open source hardware only.
Hello, having issues to connect to a new device, it’s the first time I try this:
16:23:36: Connecting to: LYWSD03MMC
16:24:14: MiVer5, DevID: 0x055B-LYWSD03MMC, FnCnt: 1, CtrID: 0x5830 Not bound, Standard certification, MAC: A4C1386E458A, Capability: 0x28 – front binding, IO: 0x0001
16:24:21: Not found Telink UUID service!
anything I’m doing wrong?
kr
Ivan
Your device is the Tuya version, which doesn’t have the Telink chipset.
You can’t flash it.
Fantastic, just flashed 2 of them and zha picked them up right away!
I have been having Bluetooth issues and passing the Bluetooth device through to a vm of HA and this has now solved it.
Thanks very much
My devices is flashed with the BLE firmware from ATC (https://github.com/atc1441/ATC_MiThermometer) and comes back with the following
09:55:14: Searching for devices
09:55:26: Get Advertising MAC (Web Experimental Features!)
09:55:26: Connecting to: ATC_5456FA
09:55:26: MAC: A4C1385456FA, Bat: 79%, Vbat: 2921 mV, Temp: 18.3°C, Humi: 65%, Count: 26
09:55:36: Not found Telink UUID service!
09:55:36: Disconnected.
Is there something that can be done here?
Thanks in Advance
Try to connect with this web flasher: https://pvvx.github.io/ATC_MiThermometer/TelinkMiFlasher.html
And select Zigbee firmware directly, click flash.
this flasher https://pvvx.github.io/ATC_MiThermometer/TelinkMiFlasher.html results in :
13:54:23: Searching for devices
13:54:48: Get Advertising MAC (Web Experimental Features!)
13:54:48: Connecting to: ATC_6E0752
13:54:51: MAC: A4C1386E0752, Bat: 72%, Vbat: 2863 mV, Temp: 18.2°C, Humi: 64%, Count: 20
13:54:53: Not found Telink UUID service!
13:54:53: Disconnected.
So it connects to the device, retrieves bat/temp/humi/etc info but then disconnects.
Try to connect with this web flasher: https://atc1441.github.io/TelinkFlasher.html
and flash ATC_ota_40000.bin
Thx for the Zigbee2MQTT yml instructions! Couldn’t pair without this.
Pairing tip: put Zigbee2MQTT in pairing mode while at the end of your flashing. Then the device will be automatically paired, without you to remove the battery.
I flashed 3 devices, the first two I had no problems, but the third now is stuck. It looked OK, but after flashing the z03mmc.bin firmware, the screen is ON but it doesn’t refresh the temp/humidity anymore and it doesn’t connect to Zigbee2MQTT. If I take the battery, it refresh the temp/humidity just once, it blinks the screen once, and then nothing…
Hi all, I converted successfully 3 devices but the battery consumption is too high compared with other devices. I’ve a switchbot ble temperature devices that is at 100% battery after few months while the converted xiaomi zigbee device was dropped to 90% after one week.
Could you shared the steps to return to ble firmware?
Regards
You can flash the BLE firmware back only by using UART
See here: https://github.com/devbis/z03mmc#flashing-firmware-with-usb-to-uart
Hi,
thanks for the reply.
reading the page I found that is possible to return to BLE using OTA update
https://github.com/devbis/z03mmc#return-to-bluetooth-firmware
the problem is that is not very clear to me how to do that
I have the newest firmware on my xiaomi sensors, and after pairing the flasher recognises it and automaticly disconected with incompatibly problem.
I just flashed my Mi Thermometer, but it displays only Temp, no humidity/battery:
MQTT publish: topic ‘zigbee2mqtt/Mi Temp 5’, payload ‘{“battery”:null,”humidity”:null,”linkquality”:80,”temperature”:27.68,”update”:{“installed_version”:-1,”latest_version”:-1,”state”:”idle”},”update_available”:false}’
I used new sensor.
Is there any way to fix this?
Interesting is that after 2 days suddenly Mi Temp started broadcasting these, so (for) now it works
That’s awesome!
Just a question: will I be able to connect the Zigbee-converted device with the XIAOMI Mijia Smart Multi-Mode Gateway ZigBee/WIFI/Bluetooth?
Thank you,
Luca
No, you can only add it to open-source software and networks in Home Assistant.
Have a Xiaomi Scale (1) laying around and would love to make it talk Zigbee. Any Chance?
FYI: Fahrenheit support is now available with the custom firmware and Zigbee2MQTT v.1.34.0 upwards.
Thanks!
I have updated my sesnosr, but the temp is not refreshed in HA. I’m using ZHA
I had the same with zigbee2mqtt – i suspect it is the “min rep change” filter that is stopping it reporting because if I lower it to 1 I get lots of updates!
I have a poor reception scenario, and I was playing around (before flashing to zb) with transmit power in the pvxx flasher. But not with a better bt reception as result.
I thought that might change with zb, but doesn’t.
As I read: “Remember, you will not be able to reconnect to the device with the Telink flashed since there is no Bluetooth firmware installed anymore.”
– I might not be able to play around with transmit power, if this would be possibile anyway.
Q.: How can I have a better range with zb, without using a zb Bulb as relay?
Zigbee is a mesh protocol, it benefits greatly from routers being added to the network (switches, bulbs, mains connected devices)
Range is reduced significantly when you don’t have something to relay traffic to the coordinator.
which brings me to…
I can’t edit the zb device anyway, right? Get rid of those silly smiling faces.
Not ATM.
Hello,
Thanks a lot for this tuto. Great!
For information, zigbee firmware is now directly available on https://pvvx.github.io/ATC_MiThermometer/TelinkMiFlasher.html
So, no need 2 steps operation to convert from BT to Zigbee.
Also i upgraded my zigbee2mqtt version to the last one (1.34.0) and the LYWSD03MMC was directly recognized and paired 😀
Best Regards
LB
Hello, I also have a problem with uploading the firmware in the second step. I managed to update the transitional firmware. However, when trying to upload z03mmc.bin, I receive the following message:
20:30:00: Connecting to: ATC_C070A1
20:30:08: NetworkError: Connection Error: Connection attempt failed.
20:30:08: Reconnect 1 from 5
20:30:10: Hardware Revision String: B1.5
20:30:10: Software Revision String: V4.4
20:30:10: Firmware Revision String: github.com/pvvx
20:30:10: Detected custom Firmware
20:30:10: Hardware Version: LYWSD03MMC B1.5, Software Version: 4.4, Sensor: SHTC3 (SHTV3)
20:30:10: Custom config HEX string: 55051000002804a931318ab4
20:30:44: File: z03mmc.bin
20:30:44: File size: 130004 bytes
20:30:44: Count: 8126
20:31:11: Start DFU
20:31:17: Update error: NotSupportedError: GATT operation failed for unknown reason.
20:31:17: Disconnected.
Similarly, when trying to return to the original firmware:
21:09:21: Connecting to: ATC_C070A1
21:09:24: Hardware Revision String: B1.5
21:09:24: Software Revision String: V4.4
21:09:24: Firmware Revision String: github.com/pvvx
21:09:24: Detected custom Firmware
21:09:24: Hardware Version: LYWSD03MMC B1.5, Software Version: 4.4, Sensor: SHTC3 (SHTV3)
21:09:24: Custom config HEX string: 55051000002804a931318ab4
21:09:27: Load firmware file ‘Original_OTA_Xiaomi_LYWSD03MMC_v1.0.0_0130.bin’…
21:09:28: File: Original_OTA_Xiaomi_LYWSD03MMC_v1.0.0_0130.bin
21:09:28: File size: 92868 bytes
21:09:28: Count: 5805
21:09:35: Start DFU
21:09:42: Update error: NotSupportedError: GATT operation failed for unknown reason.
21:09:42: Disconnected.
I tried restarting the device, using the website https://devbis.github.io/telink-zigbee/ you can pair the sensor and read its data. Can something be done about it? Unfortunately, this seems to be a standard issue for HW B1.5.
Unfortunately so, please wait for a fix. Follow here: https://github.com/pvvx/ZigbeeTLc
Anyone has successfully converted back from Zigbee to BT via OTA?
I couldn’t via zigbee2MQTT OTA feature as it’s mentioned in this article
Did you set the local OTA index?
yes, I tried but it didn’t work.
I’ve been using the pvvx firmware because the reporting interval allows me to use humidity based automation in Home Assistant for bathroom fan automation.
What are the reporting intervals like with the Zigbee firmware? Are they based on time or changes in temperature and/or humidity?
They are set to 5minutes when there is no change and report immediately when there is a change of +-0.1°C or 1% humidity.
Would it be possible to expose reporting interval as a configurable parameter? I would prefer a less frequent report in favor of longer battery life. To me it looks like with the current setup it will hardly last for three months.
Could someone post a photo of the TTL-USB adapter that successfully updated the firmware? Here https://github.com/pvvx/TlsrComSwireWriter there is information that “Does not work on USB-COM adapters that have LEDs on at the RX input.” – I can’t find one…
Okay, via this website https://pvvx.github.io/ATC_MiThermometer/USBCOMFlashTx.html I changed firmware using a TTL-USB adapter with an FTDI chip and LEDs on at the RX input…
So I’ve bricked my device in the first step, using the transitional firmware ATC_ota_40000.bin. Any idea what went wrong? Log below:
21:53:27: Searching for devices
21:53:59: Get Advertising MAC (Web Experimental Features!)
21:53:59: Connecting to: LYWSD03MMC
21:54:11: MiVer5, DevID: 0x055B-LYWSD03MMC, FnCnt: 1, CtrID: 0x5830 Not bound, Standard certification, MAC: A4C13804DA34, Capability: 0x28 – front binding, IO: 0x0001
21:54:21: Hardware Revision String: B1.4
21:54:21: Software Revision String: 0130
21:54:21: Firmware Revision String: 1.0.0_0130
21:54:21: Detected Mi device
21:54:21: Connected
21:54:41: Activating now, please wait…
21:54:45: Registration successful
21:54:45: Send Login, please wait…
21:54:45: Received device infos are correct
21:54:45: Login successful
21:56:26: File: ATC_ota_40000.bin
21:56:26: File size: 82628 bytes
21:56:26: Count: 5165
21:56:55: Start DFU
21:58:17: Update done after 80.452 seconds
21:58:23: Disconnected.
Looks like the flash succeeded, are you unable to reconnect via Bluetooth?
Unfortunately not, and the device’s display is also blank. Removing and reinserting the battery didn’t help either.
Could it be the wrong device’s model? It is a NUN4126GL, not sure if that matters.
One more update: during the UART flashing I realize the PCB says HW:B2.0 – could it be it’s not supported by the firmware yet?
cheers
Mike
Sorry, overlooked your comment and started my own just below – I’m in the very same situation. Already tried with 3 out of 8 devices and all of them bricked the same way…
Let’s see if we can help the maintainer to find and resolve the root cause.
Mike
OK, so I managed to move forward flashing the z03mmc.bin fw using UART.
The device is unbricked, I can put it into pairing mode shorting Reset and GND for 3s, Z2M will detect a new device, but it’s unsupported and interview failed.
I’m running z2m 1.34.0 commit: aae7312 and tried even setting up the external converter but it didn’t have any impact, stil Unsupported.
Mike
I completed the process on 3 devices. First one connected to zigbee2mqtt BUT the other two refuses to pair (removed and reinstalled new batteries, 3 seconds short in reset-gnd several times…) My zigbe2mqtt is old, but I managed to make it works with the first device… What can be the problem with the other two devices?
It’s hard to tell without looking at the logs. Can you pair to the sensors via Bluetooth?
Is it possible the flashing did not complete?
I have the exact same problem. I have three sensors that I successfully flashed with the zigbee firmware. I managed to pair them with ZHA with no issues. They were working fine but I wanted to try them out with Zigbee2mqtt as well, so I removed them from ZHA, and did a reset (connect Reset and Gnd on the back for 3 seconds) on two of them. I am no longer able to pair them. Neither with zigbee2mqtt nor with ZHA. The third one that I did not reset is okay. It pairs well with ZHA again. I suspect that the reset caused the other two devices to not connect to my zigbee coordinator anymore. 🙁
I am facing the same problem
3 devices, one can be paired with Z2M – the other two don’t want to.
I have tried everything. new battery, fixed power supply with 3.3V, older firmware 1.1.6 instead of 1.1.8 … 7 seconds shorted RST and GND … (the three dashes appear correctly), all without success.
The thermometers are 30cm away from the coordinator – so it can’t be the distance either.
Where can you view logs to see if anything is happening? Nothing happens in the Z2M log (debug)…as if the thermometers would not even go into pairing mode
Hi, Thanks for the awesome writeup!
I can’t find the cluster for toggling the display from C to F in ZHA. Can this be done in the UI?
Follow this to change from C to F and visa versa: https://github.com/pvvx/ZigbeeTLc/issues/28
Do you know if its also possible to connect it to the tuya zigbee hub after flashing the new firmware?
No, you wont be able to connect it to anything else other than ZHA or Z2M.
If by any bad luck I flashed it with an wrong firmware, is there any chance to revert it back using usb ttl? I have to mention that the sensor is stuck on black screen, nothing is showing on display
You can ALWAYS flash back to whatever you want. Telink chips CANNOT be bricked, under any circumstances.
Folow my guide here:
https://smarthomescene.com/guides/convert-qingping-cgdk2-from-bluetooth-to-zigbee/#converting-qingping-cgdk2-to-zigbee-uart
I stumbled on this page just a few days ago and I have to say you and devbis have done an impressive job!
I recently purchased a SwitchBot indoor/outdoor thermo-hygrometer (W3400010) as I couldn’t find a relatively cheap but good quality outdoor sensor and I hope one day you will dig in converting this product to Zigbee (it uses a REALTEK RTL8762CMF that support Zigbee).
The SwitchBot Outdoor meter cannot be converter to Zigbee at this time, because of many reasons.
See this deep-dive review: https://smarthomescene.com/reviews/switchbot-outdoor-thermo-hygrometer-review/
Hello Buddies, I flashed succesfully 3 on 4 LYWSD03MMC without problem.
For the first I tried, i flashed a bad zigbee file 🙁 the one for mho-c122, my LYWSD03MMC works perfectly but I want the original zigbee file, how can I proceed to flash the correct one ?
Thank you for your ansewer
Is LYWSD02MMC that much different? It uses TLSR8250 but I can’t change firmware on it 🙁
No, the TLSR8250 can support custom firmware.
It’s just the dev hasn’t made a version for it.
See here which models are supported at this moment:
https://github.com/pvvx/ZigbeeTLc
Thanks. I’ll have to wait then…
can it be paired with Smart Things?
No, it can’t
Battery life is horrible though, flashed with transitional firmware into latest available Zigbee (…117.bin) everything works and every sensor is picked up by ZHA but all 8 sensors drained their batteries in 7-8 days. I installed new batteries just to confirm, reset and re-paired all sensors and now they´re all at around 40% after a few days.
Re-flashing or going back to BLE does not seem to be working on ZHA?
It shouldn’t be such a big difference in battery life.
Are you sure they are drained, or you are just going by the percentages reported?
Because those are wildly inaccurate.
I was wondering if I can change any settings, like on custom BLE firmware? Does it persist the settings separately, so that I could change settings on BLE and then flash to Zigbee and keep the settings?
I am trying to flash back to BLE via zigbee2mqtt OTA, but struggling to get sensor into zigbee receiving mode. I managed to create local OTA index with a proper file and zigbee2mqtt now shows that update is available for this sensor. However, when I click “update” I always get timeout. I tried shorting the pins for 3 seconds and reinstalling the battery, to no avail. How can I see that the sensor has actually entered the mode it is supposed to be for Zigbee OTA?
You don’t need to do anything other than provide a brand new battery, which is most likely the cause of the timeout.
This was it, thank you!
Hey thanks for the instructions.
I have successfully flashed 5 x LYWSD03MMC.
Now I still have a MJWSD05MMC here and am trying to flash it.
Connecting still works, but when I click on “Activate”, I get NotSupportedError: GATT operation failed for unknow reason.
Any Ideas?
It’s still not supported, don’t flash it you will brick it and you will have to restore it by soldering an UART adapter.
Okay, but it says at the top of your text that it is supported!? 🤔
That section lists supported devices for the original pvvx BLE firmware, I’ve edited the article to make it more clear.
Sorry for the confusion.