If you check out our DIY section, you will find several guides for creating your own presence sensor with an ESP32 board. For tinkerers and DIY enthusiasts, this is an easy way to build your own device with open-source firmware and cheap components.
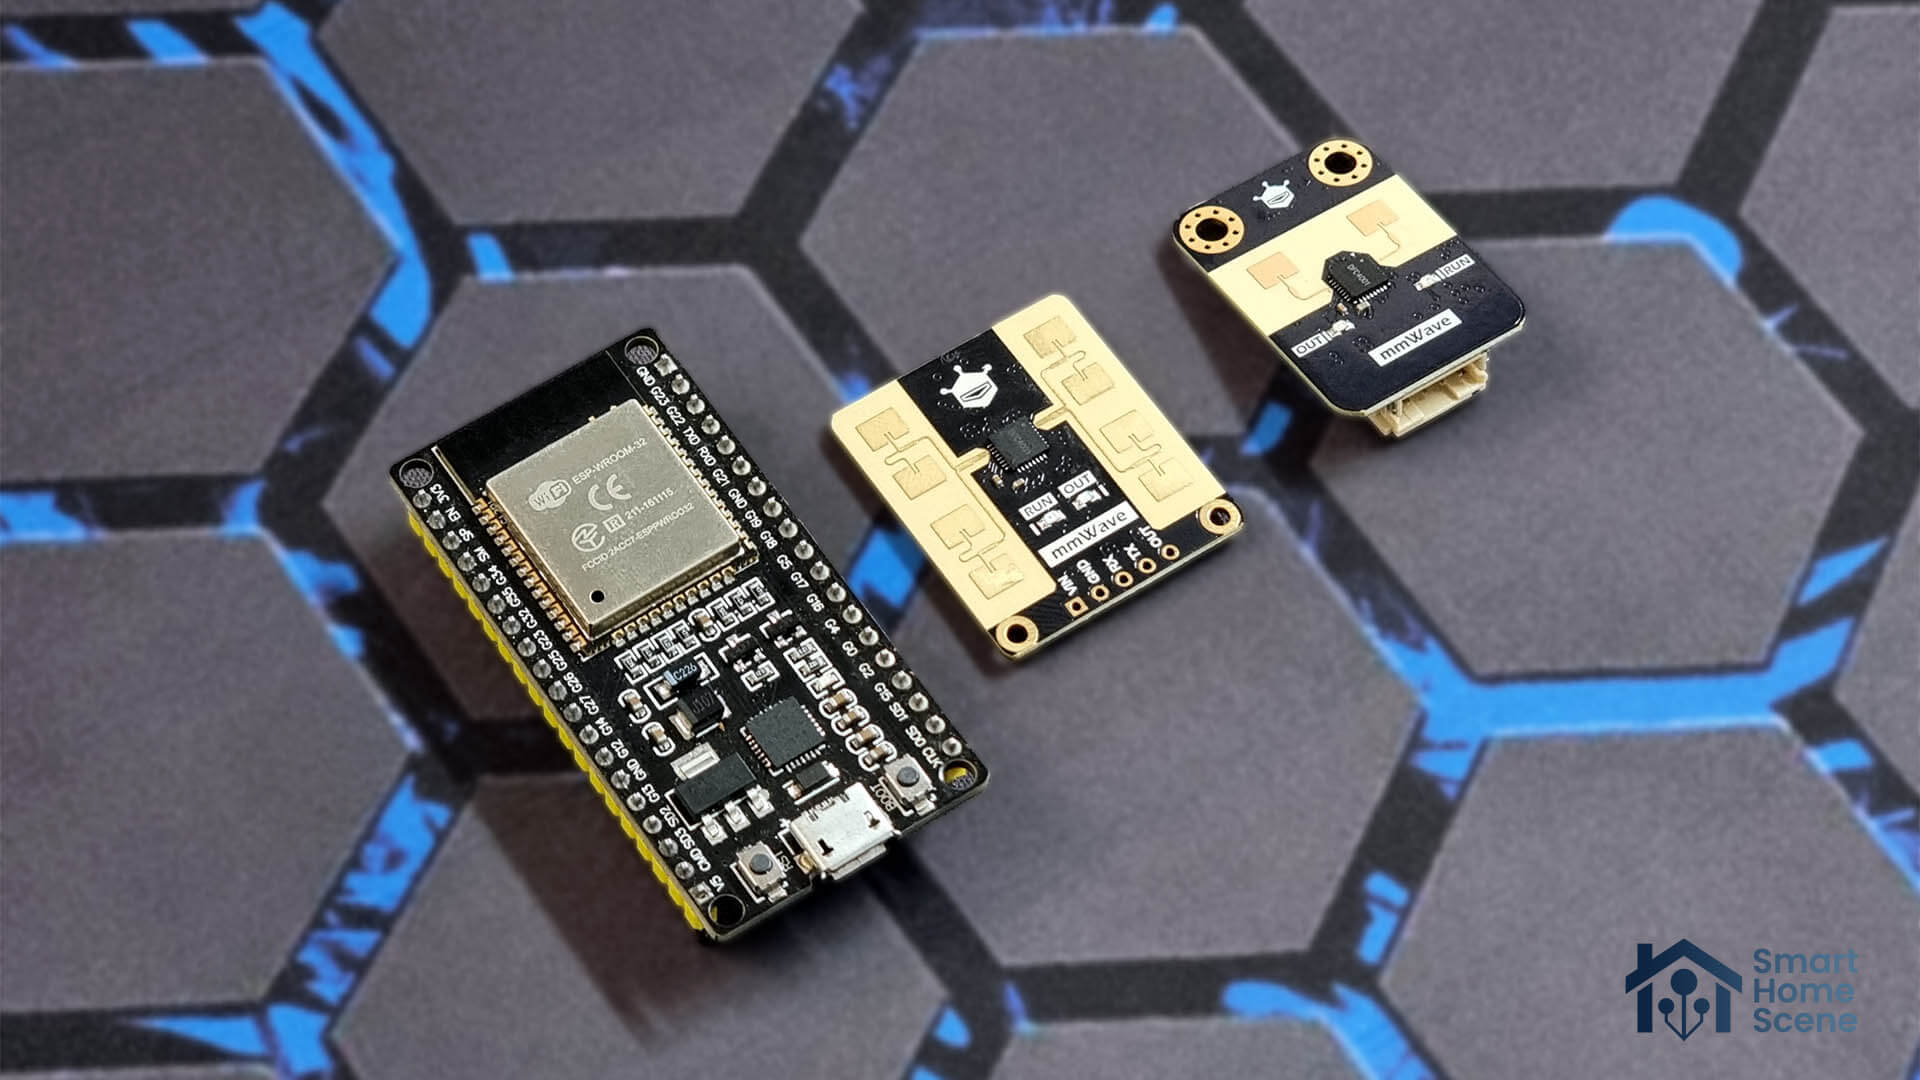
In this article, I’m sharing a guide for building a presence sensor with a 25 meters detection range! It’s based on the DFRobot C4001 (SEN0609) mmWave radar sensor and an ESP32 board, all coded through ESPHome and Home Assistant.
About the DFRobot C4001
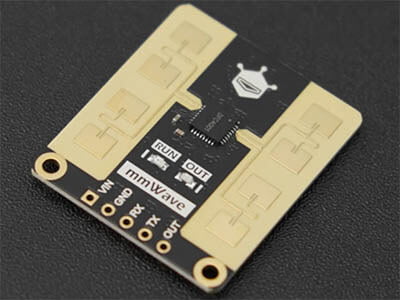
The DFRobot C4001 is a newly-released mmWave doppler radar sensor designed specifically for detecting human presence. It’s available as 12m and a whopping 25m meter variant, with minimal difference in cost (1$). In this guide, I’m using the 25m version (SEN0609), but the code can be easily adapted for the 12m (SEN0610) version as well.
Here are the differences between these two models:
 CM4001 (SEN0609, 25m) | 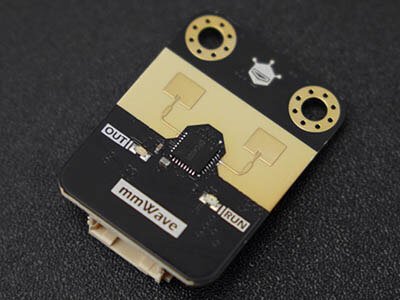 CM4001 (SEN0610, 12m) | |
|---|---|---|
| Static Detection Range | up to 16m | up to 8m |
| Motion Detection Range | up to 25m | up to 12m |
| Detection Beam Angle | 100×40° | 100×80° |
| Velocity Detection | 0.1 to 10 m/s | 0.1 to 10 m/s |
| Operating Voltage | 3.3/5V | 3.3/5V |
| Operating Frequency | 24GHz | 24GHz |
| Operating Temperature | -40~85℃ | -40~85℃ |
| Size | 26x30mm | 22x30mm |
| Applications | Human Detection Distance and Velocity Detection Environmental Monitoring Industrial Automation Real-time Monitoring and Tracking | Human Detection Distance and Velocity Detection Environmental Monitoring Industrial Automation Real-time Monitoring and Tracking |
| Price | $13.90 @ DFRobot | $12.90 @ DFRobot |
Requirements
In order to build this awesome 25m occupancy sensor, you are going to need a couple of things. I highly suggest going for the 25 meter variant as its easier to work with (2.54mm pin headers) and the minimal price difference doesn’t justify the range decrease. Here’s the shopping list:
🛒 25-meter version
Note: The DFRobot (25m) sensor comes with the header pins unsoldered, so you will need to solder them yourself. You cannot simply attach 2.54 jumper wires and connect the SEN0609 sensor and ESP32 board. The SEN0610 version uses a single 4-pin JST connector instead (included), so soldering may not be required if you get a pre-soldered ESP32 board.
Wiring the DFRobot and ESP32 Board
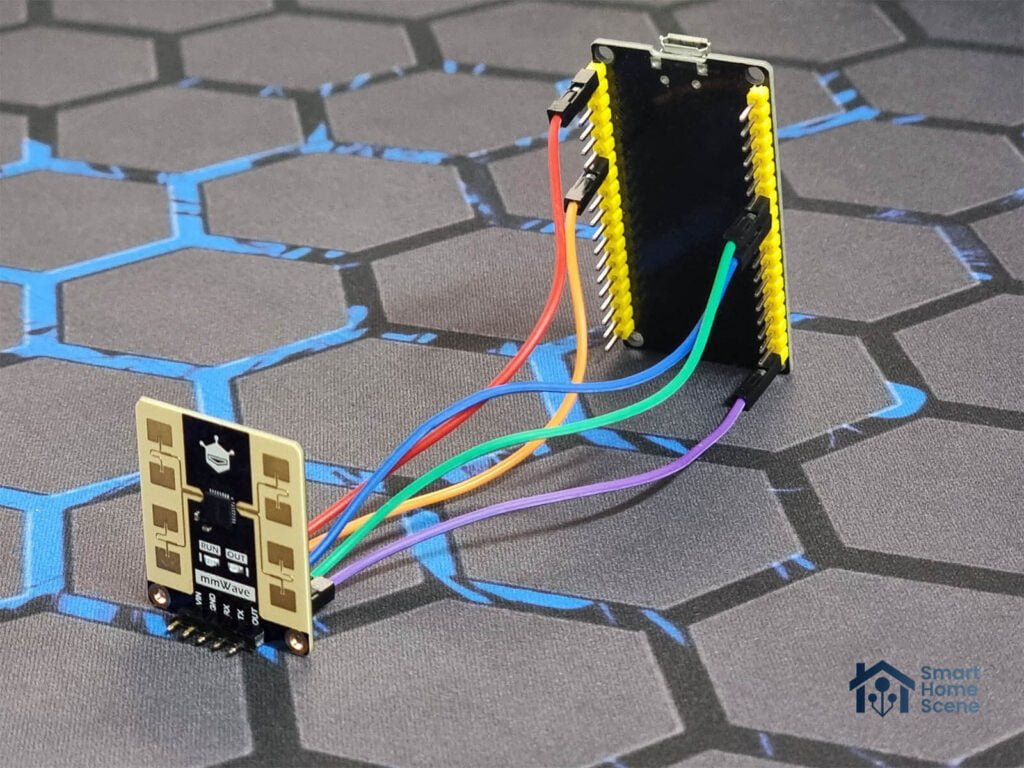
Once you have everything ready, you can continue to assemble this 25m mmWave occupancy sensor. I’ve recycled a generic ESP-WROOM-32 board from another project, but you can use any model you have at hand. Note the wiring diagram for the DFRobot and ESP32:
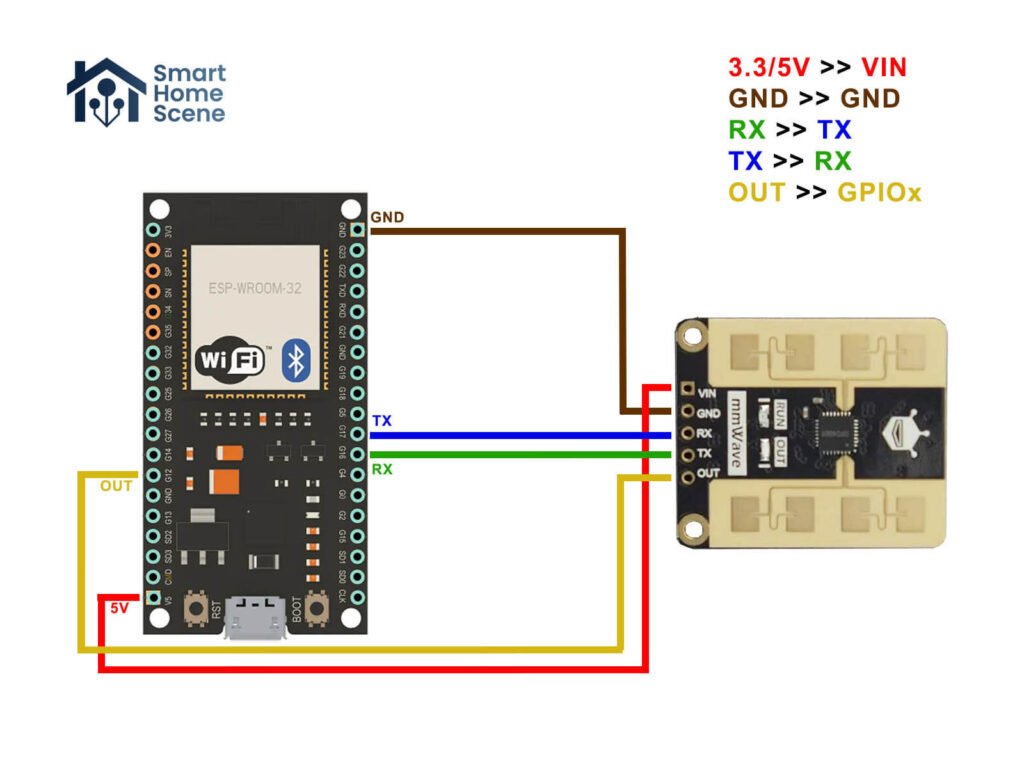
From the wiring diagram I created, you will notice the output terminal (OUT) is also connected to a GPIO pin (GPIO12) on the ESP board. This is because it is possible to use this sensor with only a single GPIO pin. However, if you wish to change settings and configure the sensor, a UART Bus component (and its GPIO pin connection) is required in the device’s configuration.
To make the code leaner, the binary occupancy status is updated through the output terminal instead of UART. You can enable the UART presence output entity if you wish to get UART data too. Here’s how my testing device looked once I wired it up:
Flashing and Adding the Sensor to Home Assistant
The ESPHome code for the DFRobot SEN0609 radar sensor was originally created for the EPLite by Lewis from EverythingSmartHome. The DFRobot SEN0609 is compatible with both the EPLite and the second revision of the EPOne. If you are using one of the ESH devices, you can upgrade by simply swapping the sensor and re-flashing the board. Props to Lewis for developing the code and sharing it with the community!
It’s worth noting that a batch of the DFRobot SEN0609 has a set of indicator LEDs mounted on the front, which cannot be turned off. It’s nothing a little black tape can’t fix, but for the time being, I’ve removed the code for the LEDs. I’ve adapted the rest, eliminated some unnecessary things and tweaked it a bit to offer a better integration with generic ESP32 boards.
Here’s the full code, adapt it to your config:
DRRobot C4001 (SEN0609) ESPHome code
esphome:
  name: dfrobot-25m
  friendly_name: DFRobot 25M

esp32:
  board: esp32dev
  framework:
    type: esp-idf

# Enable logging
logger:

# Enable Home Assistant API
api:
  encryption:
    key: "xxxxx"

ota:
  password: "xxxxx"

wifi:
  ssid: !secret wifi_ssid
  password: !secret wifi_password

  # Enable fallback hotspot (captive portal) in case wifi connection fails
  ap:
    ssid: "Dfrobot-25M Fallback Hotspot"
    password: "xxxxx"

i2c:
 sda: 21
 scl: 22
 scan: true

uart:
  id: uart_bus
  tx_pin: GPIO16 #Change to your TX pin
  rx_pin: GPIO17 #Change to your RX pin
  baud_rate: 9600

binary_sensor:
  - platform: gpio
    name: Occupancy
    id: mmwave
    device_class: occupancy
    pin:
      number: GPIO12 #Change to your GPIO pin
      mode: INPUT_PULLDOWN

switch:
  - platform: template
    name: mmWave sensor
    id: mmwave_sensor
    disabled_by_default: True
    entity_category: config
    optimistic: true
    restore_mode: RESTORE_DEFAULT_ON
    turn_on_action:
      - uart.write: "sensorStart"
      - delay: 1s
    turn_off_action:
      - uart.write: "sensorStop"
      - delay: 1s

  - platform: template
    name: UART presence output
    id: uart_presence_output
    entity_category: config
    disabled_by_default: true
    optimistic: true
    turn_on_action:
      - switch.turn_off: mmwave_sensor
      - delay: 1s
      - uart.write: "setUartOutput 1 1"
      - delay: 1s
      - uart.write: "saveConfig"
      - delay: 3s
      - switch.turn_on: mmwave_sensor
    turn_off_action:
      - switch.turn_off: mmwave_sensor
      - delay: 1s
      - uart.write: "setUartOutput 1 0"
      - delay: 1s
      - uart.write: "saveConfig"
      - delay: 3s
      - switch.turn_on: mmwave_sensor

  - platform: template
    name: UART target output
    id: uart_target_output
    entity_category: config
    disabled_by_default: true
    optimistic: true
    assumed_state: false
    turn_on_action:
      - switch.turn_off: mmwave_sensor
      - delay: 1s
      - uart.write: "setUartOutput 2 1 1 1"
      - delay: 1s
      - uart.write: "saveConfig"
      - delay: 3s
      - switch.turn_on: mmwave_sensor
    turn_off_action:
      - switch.turn_off: mmwave_sensor
      - delay: 1s
      - uart.write: "setUartOutput 2 0"
      - delay: 1s
      - uart.write: "saveConfig"
      - delay: 3s
      - switch.turn_on: mmwave_sensor

number:
  - platform: template
    id: range_minimum
    name: Range (Minimum)
    icon: mdi:arrow-collapse-left
    entity_category: config
    min_value: 0
    max_value: 25
    initial_value: 0
    optimistic: true
    step: 0.1
    restore_value: true
    unit_of_measurement: m
    mode: slider

  - platform: template
    id: range_maximum
    name: Range (Maximum)
    icon: mdi:arrow-collapse-right
    entity_category: config
    min_value: 0
    max_value: 25
    initial_value: 12
    optimistic: true
    step: 0.1
    restore_value: true
    unit_of_measurement: m
    mode: slider

  - platform: template
    id: range_reduced_mmwave
    name: Range Reduced (mmWave)
    icon: mdi:arrow-collapse-horizontal
    entity_category: config
    min_value: 0
    max_value: 25
    initial_value: 0.8
    optimistic: true
    step: 0.1
    restore_value: true
    unit_of_measurement: m
    mode: slider
    set_action:
      - switch.turn_off: mmwave_sensor
      - delay: 1s
      - uart.write: !lambda
          std::string ms = "setRangeReduced " + to_string(x);
          return std::vector<unsigned char>(ms.begin(), ms.end());
      - delay: 1s
      - uart.write: "saveConfig"
      - delay: 1s
      - switch.turn_on: mmwave_sensor

#Occupancy clear delay
  - platform: template
    name: Clearance Delay (Occupancy)
    icon: mdi:clock-end
    entity_category: config
    id: mmwave_off_latency
    min_value: 1
    max_value: 600
    initial_value: 15
    optimistic: true
    step: 5
    restore_value: true
    unit_of_measurement: seconds
    mode: slider
    set_action:
      - switch.turn_off: mmwave_sensor
      - delay: 1s
      - uart.write: !lambda |-
          std::string mss = "setLatency " + to_string(id(mmwave_on_latency).state) + " " + to_string(id(mmwave_off_latency).state);
          return std::vector<unsigned char>(mss.begin(), mss.end());
      - delay: 1s
      - uart.write: "saveConfig"
      - delay: 1s
      - switch.turn_on: mmwave_sensor

#Occupancy detection delay
  - platform: template
    name: Detection Delay (Movement)
    icon: mdi:clock-start
    id: mmwave_on_latency
    entity_category: config
    min_value: 0
    max_value: 2
    initial_value: 0
    optimistic: true
    step: 0.25
    restore_value: true
    unit_of_measurement: seconds
    mode: slider
    set_action:
      - switch.turn_off: mmwave_sensor
      - delay: 1s
      - uart.write: !lambda |-
          std::string mss = "setLatency " + to_string(id(mmwave_on_latency).state) + " " + to_string(id(mmwave_off_latency).state);
          return std::vector<unsigned char>(mss.begin(), mss.end());
      - delay: 1s
      - uart.write: "saveConfig"
      - delay: 1s
      - switch.turn_on: mmwave_sensor

#Static presence detection sensitivity
  - platform: template
    name: Sensitivity (Occupancy)
    icon: mdi:target-variant
    id: sensitivity_occupancy
    entity_category: config
    min_value: 0
    max_value: 9
    initial_value: 7
    optimistic: true
    step: 1
    restore_value: true

#Initial movement trigger sensitivity
  - platform: template
    name: Sensitivity (Movement)
    icon: mdi:target-variant
    id: sensitivity_movement
    entity_category: config
    min_value: 0
    max_value: 9
    initial_value: 5
    optimistic: true
    step: 1
    restore_value: true

button:
  - platform: template
    name: "Set Distance"
    id: set_distance
    entity_category: config
    on_press:
      - switch.turn_off: mmwave_sensor
      - delay: 1s
      - uart.write: !lambda
          std::string ms = "setRange " + to_string(id(range_minimum).state) + " " + to_string(id(range_maximum).state);
          return std::vector<unsigned char>(ms.begin(), ms.end());
      - delay: 1s
      - uart.write: "saveConfig"
      - delay: 1s
      - switch.turn_on: mmwave_sensor

  - platform: template
    name: "Set Sensitivity"
    id: set_sensitivity
    entity_category: config
    on_press:
      - switch.turn_off: mmwave_sensor
      - delay: 1s
      - uart.write:
          !lambda std::string mss = "setSensitivity " + to_string(id(sensitivity_occupancy).state) + " " + to_string(id(sensitivity_movement).state);
          return std::vector<unsigned char>(mss.begin(), mss.end());
      - delay: 1s
      - uart.write: "saveConfig"
      - delay: 1s
      - switch.turn_on: mmwave_sensor

  - platform: template
    name: Restart mmWave Sensor
    id: restart_mmwave
    entity_category: config
    internal: true
    on_press:
      - uart.write: "resetSystem"
  - platform: template
    name: Factory Reset mmWave
    icon: mdi:cog-counterclockwise
    id: factory_reset_mmwave
    disabled_by_default: true
    entity_category: config
    on_press:
      - switch.turn_off: mmwave_sensor
      - delay: 1s
      - uart.write: "resetCfg"
      - delay: 3s
      - switch.turn_on: mmwave_sensor
Once flashed and connected to your Wi-Fi network, your new DIY sensor should get auto discovered in Home Assistant. If not, add it manually by navigating to Settings > Devices & Services > + Add Integration > ESPHome and pasting the IP address of the ESP board. Here’s what the sensor adds to Home Assistant once added:
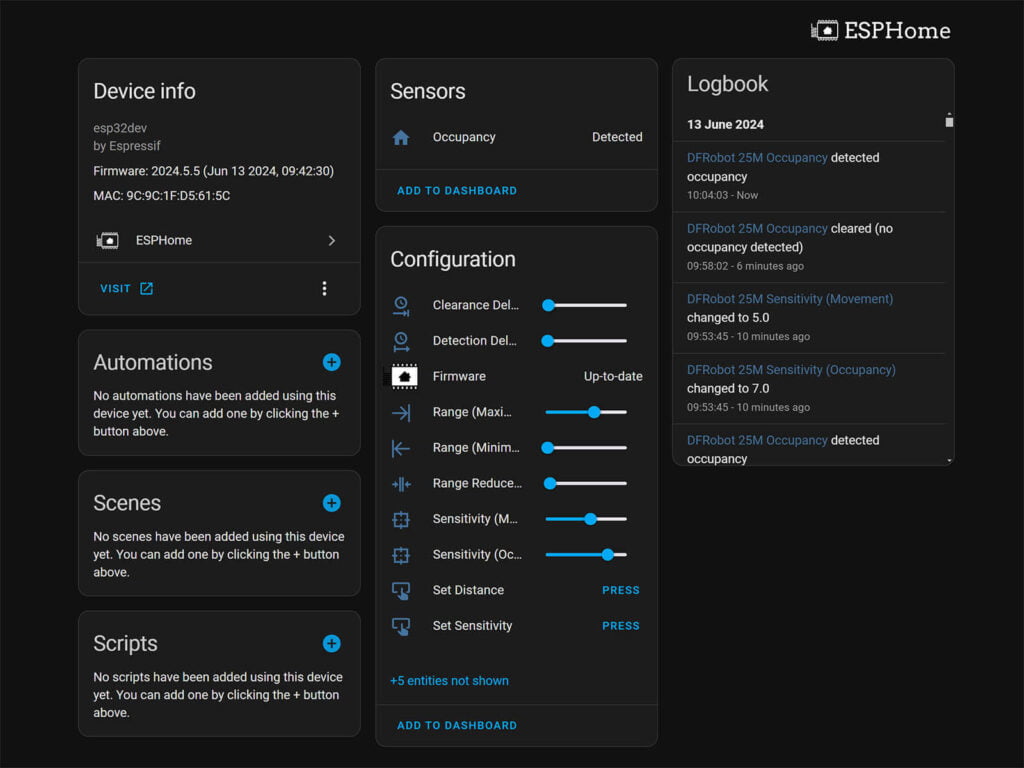
I’ve also renamed some of the entities added to Home Assistant, to make it more understandable and user-friendly. You can change their names in the ESPHome config above. I have some ideas for further improving the firmware for the DFRobot sensor (like separate motion and occupancy entities), so it will remain deployed in the office until then. If you have to offer a better version of the code, please share it in the comments bellow.
Configuring and Testing Performance
Okay, now for the fun part. The DFRobot SEN0609’s entities are very easy to understand and configure. You can set the minimum and maximum detection range, set the sensitivity separately for the initial trigger and static occupancy detection and add clearance/detection delays.
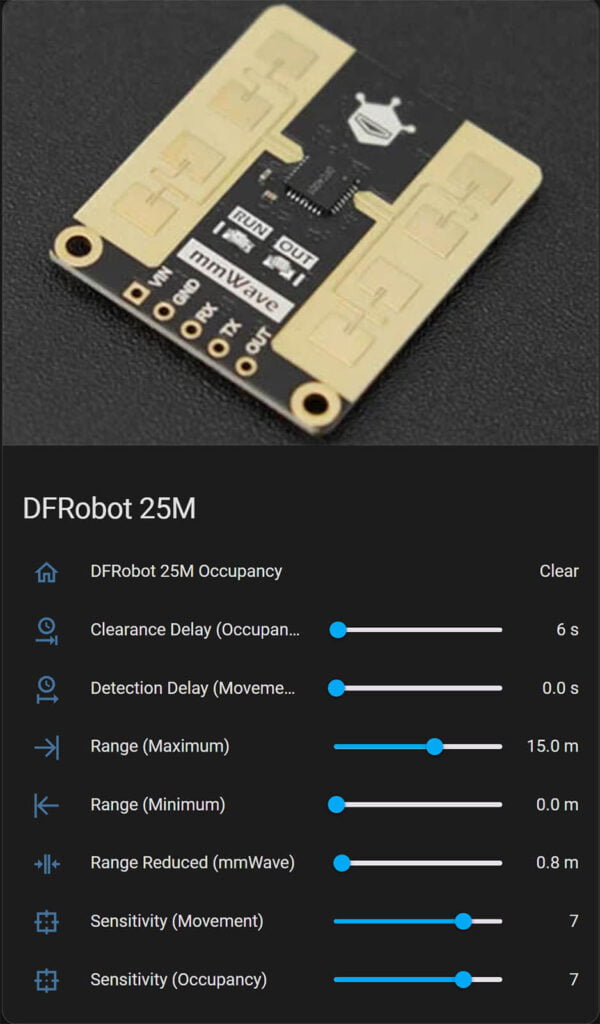
It’s important to understand that the huge 25 meter range of the DFRobot only applies to movement beyond 16 meters. In other words, the sensor is capable in detecting static presence from 0-16 meters and detect only movement from 16-25 meters.
Because of its huge detection range, it was a real challenge to find a space indoors that is so large. I managed to install it inside a furniture production plant (when no one was looking) and benchmark it’s performance.
TLDR, it is incredible.
Test 1: Mounted in office (6 meters)
I installed the sensor in a corner in my office and set the maximum range to 10 meters. I left the movement sensitivity at its default value of 5 and the occupancy at 7. Detection delay was set to 0 and presence keep time to 30 seconds.
After a full day of triggering the sensor and monitoring my static presence in front of the PC, I can comfortably state that this is one of the best mmWave radar sensor available. No false negative triggers at this distance, no unexpected delays, no performance issues of any kind. The fan-triggered false positives are still there though, so watch out for that PC fan spinning in the sensors’ field of view.
Test 2: Mounted in production plant (20 meters)
For this one, I set the detection range to the maximum of 25 meters. I bumped motion and occupancy sensitivity to 9 and left the detection/occupancy delays the same. I attached the device in a corner of this production plant and started moving around.
Comin in from the front at about 20 meters, and the occupancy sensor gets triggered! Standing still at this distance and the presence clears, which I expected per the sensor specs.
I wanted to see how sensitive it truly was to motion, so I lowered the occupancy clear time to 5 seconds and stood still without moving. As soon as I budged forward, the sensor changed state to occupied immediately! When I stopped in place, it cleared presence within a few seconds. I was so impressed!
Moving into it’s occupancy range of 15 meters and standing still, gave me a few false negative triggers initially. I realized this is because 5 seconds is very short period of time for the wave to travel back and forth reliably and update the sensor. Increasing the time out to 30 seconds eliminated most false negative triggers. Moving further towards the device, eliminated 99% of them. Ultimately, I would say that this sensor detects static presence reliably within 10-12 meters.
Final thoughts
After a few days of tinkering with the DFRobot 25-meter mmWave radar sensor, I’ve gotten a good sense of it’s capability and performance level. This occupancy sensor is absolutely excellent and I would even say it raises the bar for mmWave radar sensors used in the smart home.
The static presence detection set at 16 meters is a huge number and I don’t think most people have indoor living spaces that long or wide. If you manage to find a good use case for the 25 meter motion detection range, than you need to look no further than the DFRobot SEN0609 radar sensor.
With that being said, do you really need a detection range of 25 meters for indoor presence monitoring? Debatable. For example, the HLK-2410b/c is more than capable of reliably detecting human presence in normal-sized rooms. It’s maximum range is set at 9 meters and it can operate reliably up to 7 meters from my tests. Check out the relevant DIY guide and decide for yourself.
The next important thing to consider is price. The DFRobot SEN0609 (25m) goes for $13.90 currently, while the DFRobot SEN0610 (12m) costs $12.90. Hi-Link sensors are only $3-$5 each. It’s not a huge difference if taken at face value, but you could deploy 2 or 3 Hi-Link presence sensors for the price of one DFRobot.
With all things considered, the DFRobot C4001 sensors are an excellent choice if price is not an issue for you. Here are some links to their official store as well as Amazon.
SIDE NOTE: If you are looking for a ready-made, reliable and tested presence sensor, consider the new Apollo MSR-2 multi-sensor. Just like the first gen MSR-1, it uses the HLK-LD2410b and is very reliable, tweakable, and works with Home Assistant out of the box. You can read the full review here.


I received the DFRobot SEN0609 C4001 sensor today. Using your code, it displays occupancy detection, but I’m still unable to change the default settings. I think the UART interface is not working, and the sensor operates on its default settings, which are very sensitive. Is there any fix for this?
Make sure to swap RX/TX pins. RX on the sensor needs to go to TX on the board, vice versa for TX. I had RX and TX swapped in the config and everything started to work immediately.
I had the same issue but mine was caused by my confusion with the set range and set sensitivity button. I didn’t realize that you can’t just change the range or sensitivity and expect it to change. You have to click the respective “set” button to apply the new setting before it changes. I hope that saves someone the time I spent trying everything else haha.
So, if someone were to use the DRRobot C4001 (SEN0610), how would the yaml work since there is no GPIO to map to? An example for that would be great to see here. Otherwise great stuff.
See this comment
Hi, this is excellent stuff. However, since the SEN0610 does not have an additional connection to a GPIO, how would the binary sensor setup be done in the ESPHome code? Would one have to add another bus configuration and drop the I2C reference in the code? An example of that would be beneficial.
Thanks
Yes, the UART output needs to be used and converted to sensors for Home Assistant.
Here’s an example how that works for the LD112H.
https://smarthomescene.com/diy/diy-presence-sensor-with-hi-link-ld1125h-and-esp32-for-home-assistant/#adding-the-ld1125h-to-home-assistant
I did not have the time for write it out for the SEN0610, but it would be very similar like the code for the SEN0609.
SHS,
I could use a little guidance here. The example doesn’t highlight the conversion very well. I cannot get the sensitivity, occupancy, and motion sensors working correctly. I have only been able to get the Wifi information working.
Hey.
Take a look at the official code here:
https://wiki.dfrobot.com/SKU_SEN0610_Gravity_C4001_mmWave_Presence_Sensor_12m_I2C_UART
Use the values from the SEN0609 code to adapt it to the code of the SEN0610.
Set the
disabled_by_default: falsefor the UART sensors (UART presence output and UART target output).I am currently traveling, so I can’t help you further my guy.
Let me know how far you go, I’ll take a look when I am in front of my workbench.
Cheers!
Would really appreciate some help with the SEN0610 as i just picked it up and it seems to be quite different. They’ve included 2 dip switches on the back, one for switching from uart to i2c and address select. As its quite new, seems no one has written any code to make it work in esphome yet
Thanks to @Fran
https://gist.github.com/fracarvic/f9fad50e08c6362296159224c9a63488
Hi, great article, probably the most comprehensive to date for esphome users relating to the SEN0609, so much appreciated. As always a new chip is released and eveyone wants the YAML yesterday! 🙂
Just one question plz… for the SEN0609, is the I2C bus config required? I thought the 0609 was a UART device?
Thanks in advance
Jaz
I have a test ESPHome package for SEN0610
https://gist.github.com/fracarvic/f9fad50e08c6362296159224c9a63488
You can include it with :
packages:
dfrobot_sen0610: !include
file: common/dfrobot-sen0610.yaml
vars:
uart_tx_pin: GPIO2
uart_rx_pin: GPIO3
Using your code I end up with the ability to set parameters but the binary sensor is not working. It shows “Presence: Unknown”. What step did I miss?
I kept at it and now I have it working thanks to your package. Thanks!
For me, all it took was adding the following:
packages:
dfrobot_0610: !include { file: .dfrobot-sen0610.yaml }
with your package file saved in my esphome directory with a leading dot so it doesn’t show in the UI. When I flashed it was still showing “Unavailable” until I hit “factory reset device” and now it’s all good. Thanks again!
Hello, is your code working? With the Uart target values? If so, can you share it? Thanks in advance!
Thanks , this works actually pretty good, i got much better results with this sensor then the 25m sensor. Quick question, do you think it would be possible to run 2 sensors on the same board at the same time with your code ?
I’ll pick sen610 because of detection angle 100×80° . 12m (8M static) is more than enough for residential use. more detection angel in horizontal direction is critical. 40° is very problematic, especially with relatively low ceiling (and ceiling mount)
Am I missing something?
This is strange.
I just looked at the specs for both sensors and it looks like detection angle is backward.
This is ref to horizontal range graph for SEN0609:
https://www.dfrobot.com/product-2793.html?tracking=7fGfMwM7A8N85IAAa3zpGsLAhPm9huZ0Mg1xHe6pA8trimhxgl6ND5XaMNYo5GbD
This is ref to horizontal range graph for SEN0610:
https://www.dfrobot.com/product-2795.html?tracking=7fGfMwM7A8N85IAAa3zpGsLAhPm9huZ0Mg1xHe6pA8trimhxgl6ND5XaMNYo5GbD
Hey,
Thanks for this guide, helped me along the way. I’m wondering if anyone has figured out a way to disable LED’s on the SEN0610? Very bright and very annoying..
Been through the UART spec, but no luck: https://dfimg.dfrobot.com/5ea64bf6cf1d8c7738ad2881/wiki/3b88a4ecd7d7f18918a0fa8ba1f970c6.pdf
someone have a working config for SEN0609 + ESP8266 D1 mini? Thanks
It is apparently easy to hack someones wifi / network if they have an ESP8266 on their network.
That’s not true. At all.
https://github.com/kaminoer/SEN0609-D1-mini
Config and wiring for SEN0609 + ESP8266 D1 mini.
Great, thanks for sharing!
Hey SHS,
I did a deep dive in the functionality of this sensor after getting one, i wanted to use the ‘range reduced’ functionality but found out quickly it doesn’t work.
After going into the ESP32 rabbithole and debugging the sensor it appears that setRangeReduced is not a valid command, i looked up the datasheet for the SEN0609 and range reduced is not even mentioned. There is a similar command which is setTrigRange, this does work as intended however it does not work as reduced range it just sets the range from where the trigger will occur.
Lewis confirmed this and has since changed the SEN0609 code for the EP1 and EPL.
Hey,
Thanks for telling me this.
I will look into it as soon as possible and change the config!
Cheers
Hello, does anyone have more information about the UART target output? How do I use it with esphome? I would like to have more data on the detections. I would also like to know if it is possible to clear the occupancy return status from homeassistant? Thanks in advance!
I have no way near these results. i use the 25m version and well its way better in prescence detection then the hlk radars i wanted to use this one outside for the flood lights on my parking spot before my shop.
When pointing it outside it gave detected all the time , not sure if its meant to use outside but i hoped it would.
Then done some testing in my living room that is about 11m long , it seems that the prescence trigger range is about 6 meters and stops.
Same for in my garage/shop, 5.8 / 6.1 meter and stops.
You can have a look at the video’s ive made of my screen and a laser distance measure device.
So im not sure where you have those amazing numbers from but i wished they where in mine also 🙁
https://www.youtube.com/shorts/4eQHb0kIhIQ – see the video and the ranges i have, these are in my home also the same, didnt matter where i tested.
i read this in the pdf file that comes with the sensor, maybe this is why i see the 6 meter range constantly coming for detection at my sensor.
” The trigger distance of the C4001 millimeter wave presence sensor refers to the
distance at which it can trigger from no one to someone. For example, if the
maximum detection distance is configured as 10 meters, and the trigger distance is
set to 6 meters, the sensor will only display “someone” when someone is within 6
meters. If someone is between 6-10 meters, it will not be triggered as “someone”.
The trigger distance can be set within the range of 0-25m, with a default of 6m. “