With the current smart presence sensors available in the home automation market, comes the inevitable challenge of actually picking the right presence sensor for your smart home. There are so many models and variants to choose from, many of which are total trash, despite their attractive price tags. I will leave a full list at the bottom of this post of devices I’ve reviewed so far.
Recently, I tested the Apollo MSR-1 Prescence Multi-Sensor with CO2 monitoring and a bunch of other interesting features/sensors. The MSR-1 turned out to be highly capable, highly customizable and a dream for any true home automation enthusiast. I highly suggest you check out what the MSR-1 has to offer in my review.
The Apollo MSR-1 is based on the 24GHz Hi-Link HLK-LD2410b mmWave radar sensor, which is also used in many other devices of the same type (e.g. Moes ZSS-LP-HP02). If coded correctly, you can turn it into a reliable presence detection device without false positive or negative triggers.
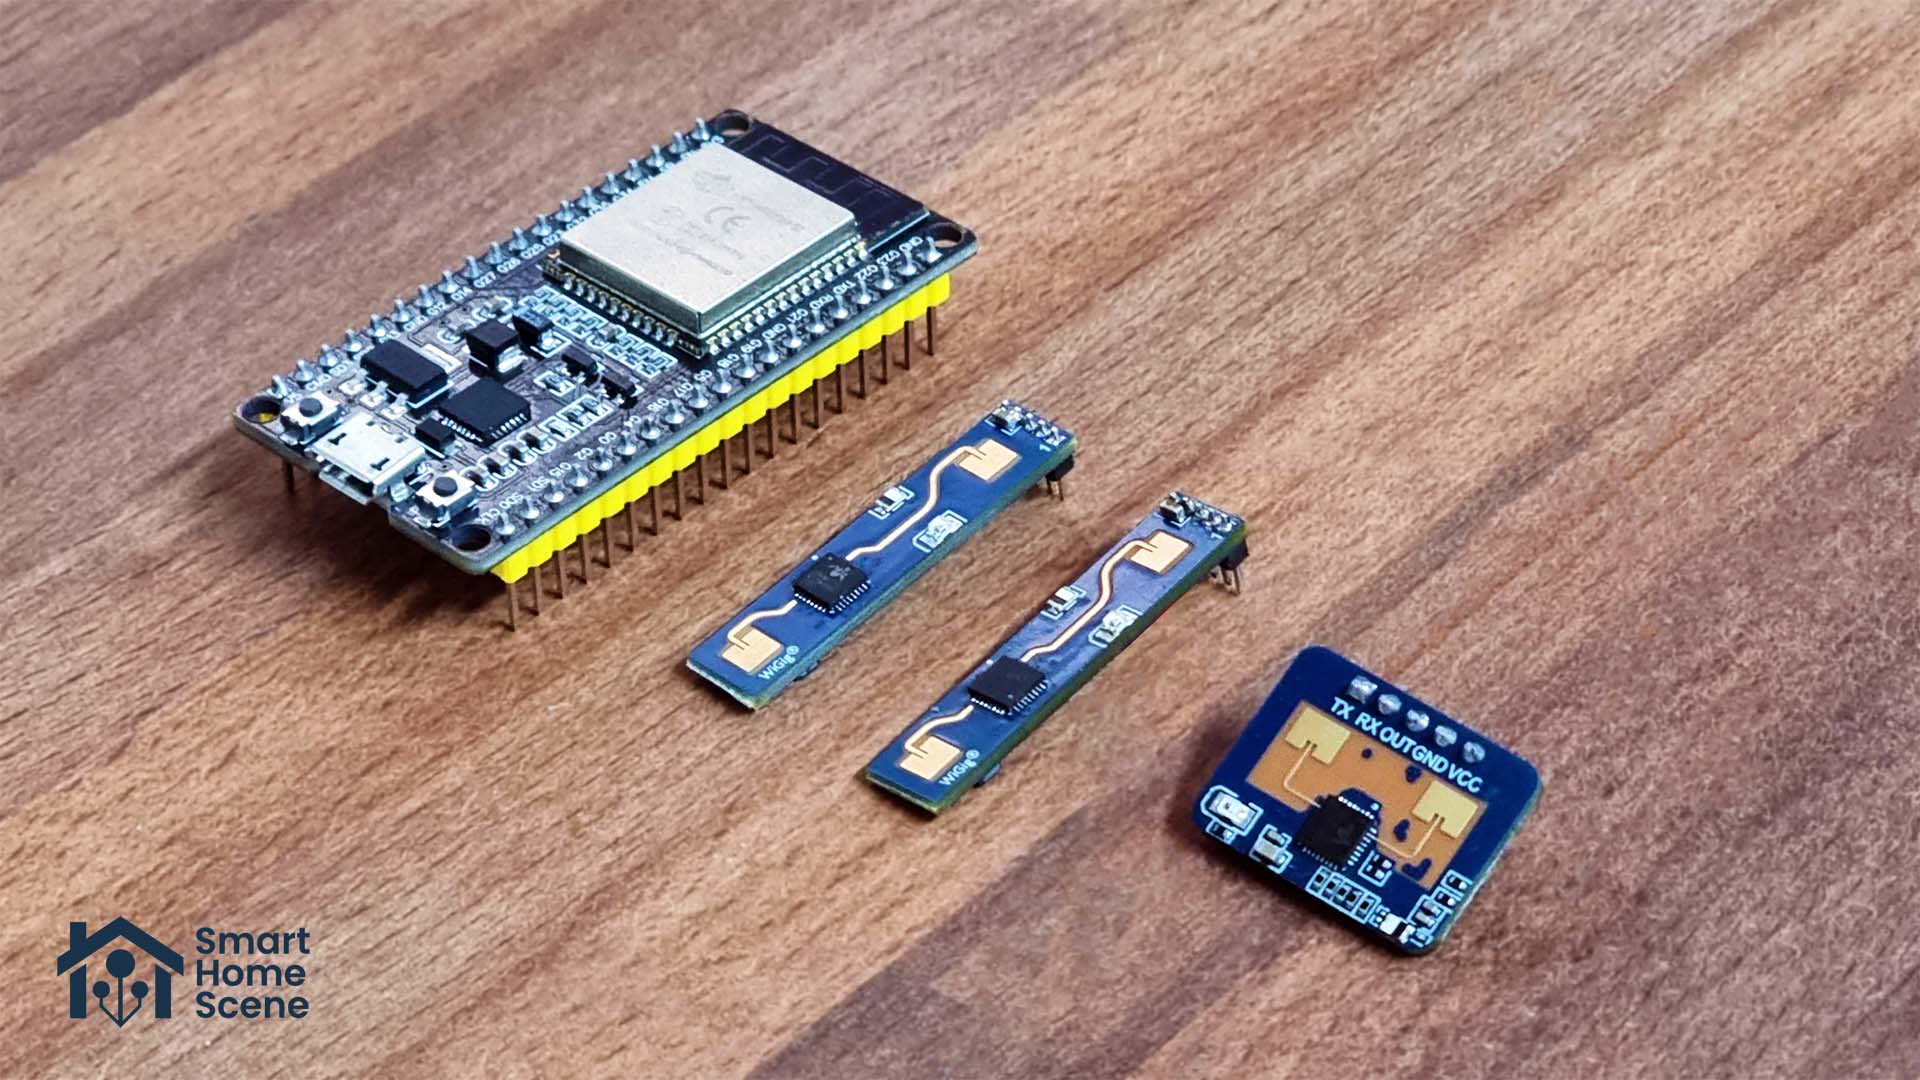
In this article, I am sharing a DIY guide for creating a simple presence sensor based on the HLK-LD2410 sensor and an ESP32 board, all coded through ESPHome and Home Assistant.
Different LD2410 Sensor Versions
The Hi-Link LD2410 Presence Sensor actually has three available versions released, although the core functionality is the same. This guide uses the LD2410 model, without B or C, but the examples and wiring diagram bellow can be used for any of the LD2410 models. Here’s the main differences between:
- LD2410
- No Bluetooth
- 1.27mm pins
- AliExpress | Amazon
- LD2410B
- Has Bluetooth
- 1.27mm pins
- AliExpress | Amazon
- LD2410C
- Has Bluetooth
- 2.54mm pins (standard)
- AliExpress | Amazon
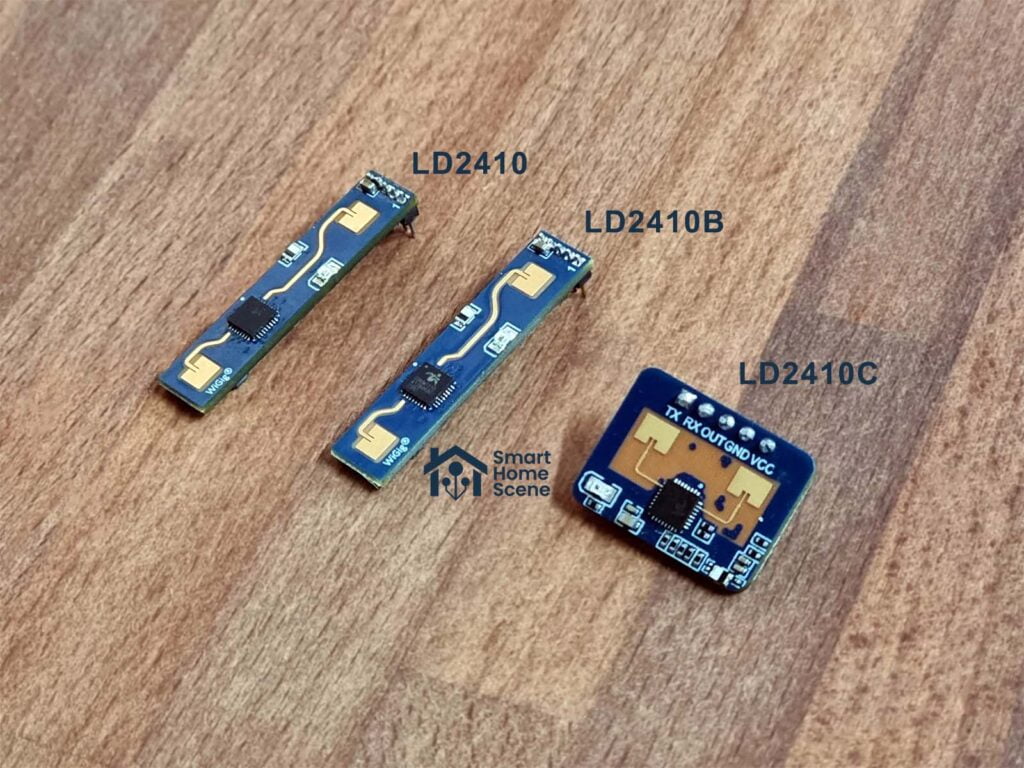
The LD2410B can be used as a Bluetooth presence sensor instead of Wi-Fi, if that’s what you prefer. The LD2410C has a different form factor and standard connection pins, so might be the better choice. Their capability in terms of radar detection is identical, whichever you choose it will perform the same.
Requirements
To create your own presence sensor based on the Hi-Link LD2410, you are going to need a couple of things. First, you need to decide on the LD2410 model and form factor, which will impact how you approach attaching the sensor to an ESP32 Board.
If you go for the LD2410/LD2410B, you are better off using a 1.25mm to 2.54mm connector instead of soldering the wires. I highly recommend not soldering, since the pins on the LD2410 are very small its almost impossible to properly solder a wire without short-circuiting the adjacent one. If you get the LD2410C, you can use standard 2.54mm Dupont connectors instead.
Here is a full requirements/shopping list of items used in this project:
🛒 Without Soldering
- ESP32 Pre-soldered
- Hi-Link LD2410 Radar Sensor OR
- Hi-Link LD2410B Radar Sensor OR
- Hi-Link LD2410C Radar Sensor
- 1.25mm to 2.54 Connector (LD2410)
- 2.54mm to 2.54 Connector (LD2410C)
- USB Cable
- Old 5V adapter
🛒 With Soldering
- ESP32 Not soldered
- Hi-Link LD2410 Radar Sensor OR
- Hi-Link LD2410B Radar Sensor OR
- Hi-Link LD2410C Radar Sensor
- Soldering Iron (Kaiweets KETS02)
- USB Cable
- Old 5V adapter
Wiring the LD2410 Presence Sensor
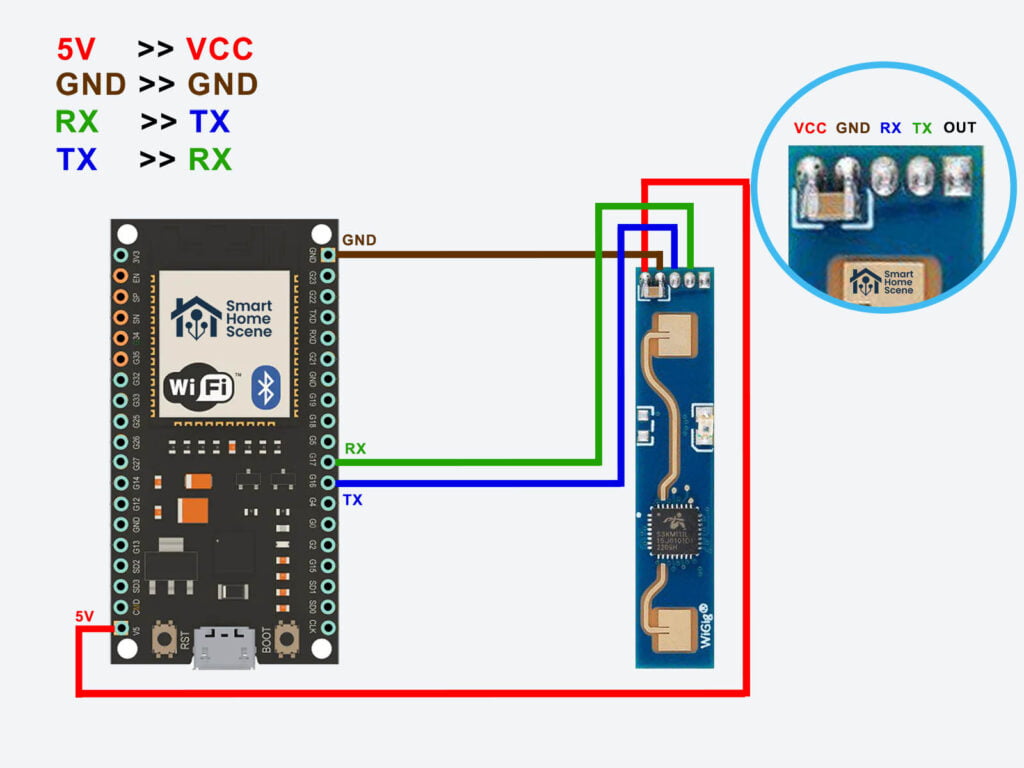
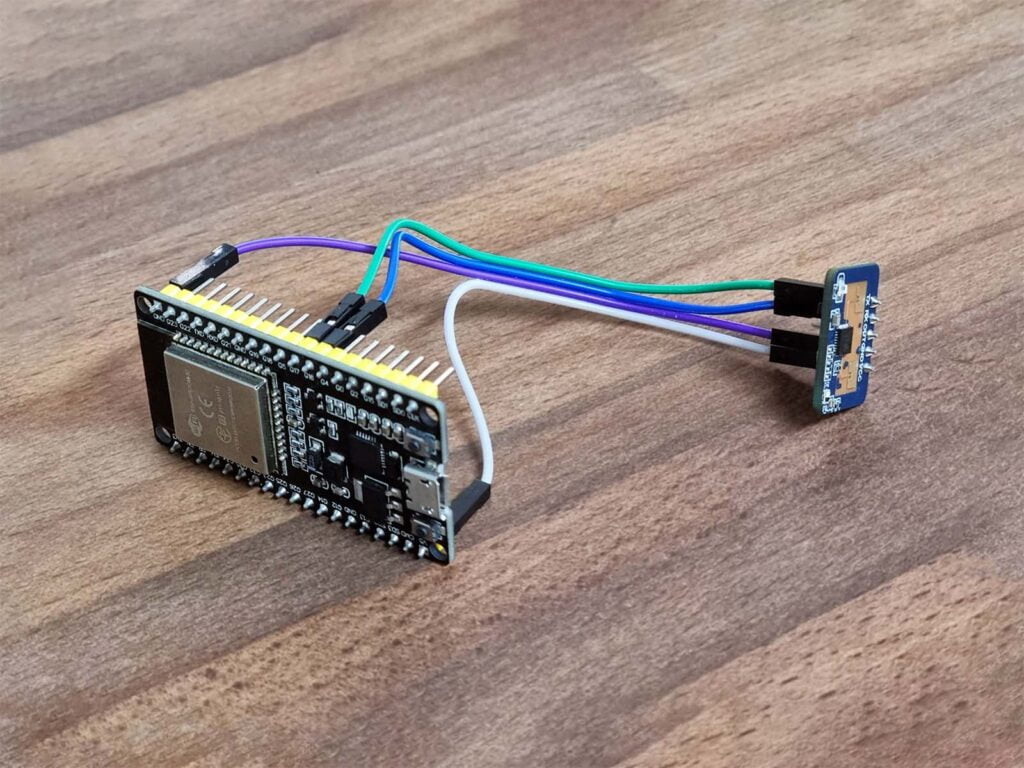
Once you have all the components and tools ready, you can start to assemble this DIY presence sensor. Basically, all we need to do is connect a few wires from the ESP32 board to the Hi-Link LD2410 presence sensor and code it in ESPHome.
In my example, I am using a generic ESP32-WROOM-32 board from AliExpress. Depending on your ESP32 board type, you might have a slightly different pinout number. You can google the correct layout for your particular model if you need too. In total, 4 wires need to be connected in the following order:
| ESP32 Board | HLK-LD2410 |
|---|---|
| 5V | VCC |
| GND | GND |
| RX (eg. GPIO17) | TX |
| TX (eg. GPIO16) | RX |
ESP32 Boards usually have two sets of RX & TX terminals, so you use can whichever is more convenient, just make sure you change the pinout in the .yaml file I’m sharing bellow. I drew a wiring diagram for my particular ESP32 board and LD2410 wiring diagram:
I did not have a 5-pin connector on hand to attach the LD2410, I managed to recycle only a 3-pin from an old laptop. I had to solder the last wire until the 5-pin arrives (the last terminal [OUT] is unused). This build is good enough for testing, but not usable as a presence detection sensor in a final mounting position. A better and more secure connection is definitely needed, using the 5-pin connector. Here’s how it looks after I was done:
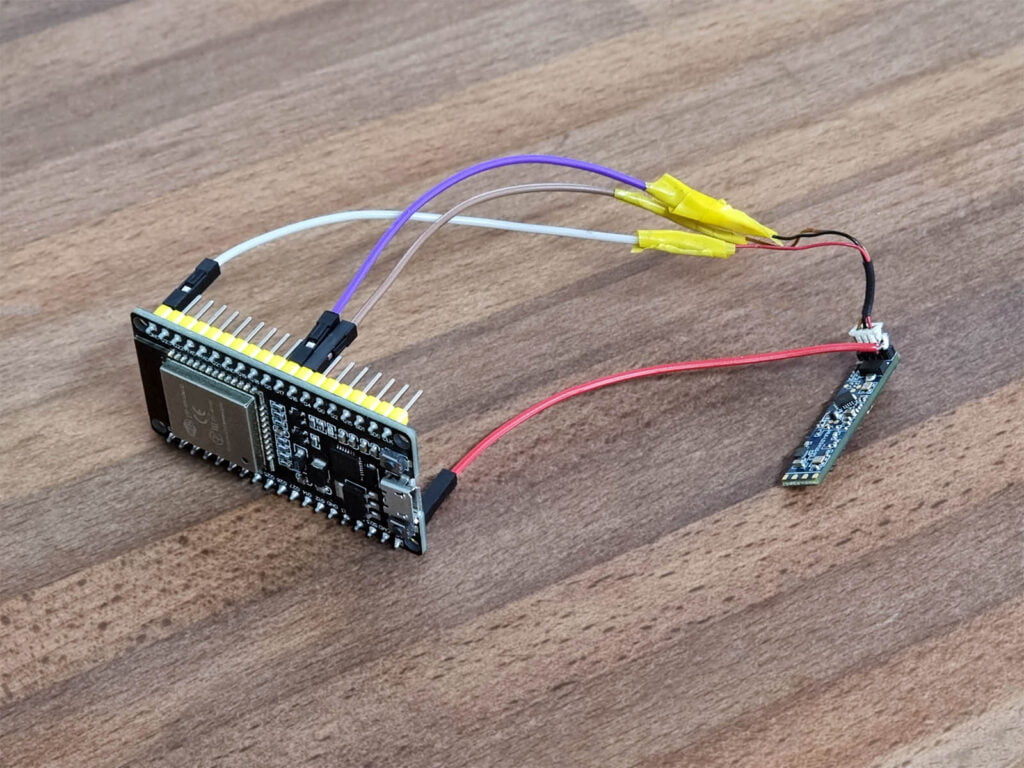
Like I mentioned above, you do not need a 5-pin connector for the LD2410C. You can simply attach the standard Dupont connectors from the ESP32 Board to the sensor and you are done. PRO Tip: These 2.54mm connectors are standard in any old PC, so they can be recycled.
Flashing the ESP32 Board
Once I connected the HLK-LD2410 to my ESP32 dev board, it was ready for ESPHome and Home Assistant. This particular model is natively supported in ESPHome, you can go over all available options on this page. I connected the board with an USB cable to my PC and used the ESPHome Web Flasher to initialize the device.
The web-flasher will ask you for your Wi-Fi info and automatically generate the OTA password and API encryption key. In the ESPHome Home Assistant Add-on, create a new device and add the following code to your existing configuration, without replacing the already generated info:
esphome:
  name: ld2410
  friendly_name: LD2410

esp32:
  board: esp32dev
  framework:
    type: arduino

# Enable logging
logger:

# Enable Home Assistant API
api:
  encryption:
    key: "gkROOOAh0xAjCVobOvDVZfPfezQvMEaK9FT1UJEshVU="

ota:
  password: "3e17e1c064adcb643234d5a49982329c"

captive_portal:

wifi:
  ssid: !secret wifi_ssid
  password: !secret wifi_password

  # Enable fallback hotspot (captive portal) in case wifi connection fails
  ap:
    ssid: "Ld2410 Fallback Hotspot"
    password: "YHPbLCbJsHZ9"

  power_save_mode: none

ld2410:
  id: ld2410_radar

uart:
  tx_pin: GPIO16
  rx_pin: GPIO17
  baud_rate: 256000
  parity: NONE
  stop_bits: 1

number:
  - platform: ld2410
    timeout:
      name: Radar Timeout
    max_move_distance_gate:
      name: Radar Max Move Distance
    max_still_distance_gate:
      name: Radar Max Still Distance
    g0:
      move_threshold:
        name: g0 move threshold
      still_threshold:
        name: g0 still threshold
    g1:
      move_threshold:
        name: g1 move threshold
      still_threshold:
        name: g1 still threshold
    g2:
      move_threshold:
        name: g2 move threshold
      still_threshold:
        name: g2 still threshold
    g3:
      move_threshold:
        name: g3 move threshold
      still_threshold:
        name: g3 still threshold
    g4:
      move_threshold:
        name: g4 move threshold
      still_threshold:
        name: g4 still threshold
    g5:
      move_threshold:
        name: g5 move threshold
      still_threshold:
        name: g5 still threshold
    g6:
      move_threshold:
        name: g6 move threshold
      still_threshold:
        name: g6 still threshold
    g7:
      move_threshold:
        name: g7 move threshold
      still_threshold:
        name: g7 still threshold
    g8:
      move_threshold:
        name: g8 move threshold
      still_threshold:
        name: g8 still threshold

binary_sensor:
  - platform: ld2410
    has_target:
      name: Radar Target
      id: radar_has_target
    has_moving_target:
      name: Radar Moving Target
    has_still_target:
      name: Radar Still Target


sensor:
  - platform: ld2410
    moving_distance:
      name: Radar Moving Distance
      id: moving_distance
    still_distance:
      name: Radar Still Distance
      id: still_distance
    moving_energy:
      name: Radar Move Energy
    still_energy:
      name: Radar Still Energy
    detection_distance:
      name: Radar Detection Distance
      id: radar_detection_distance
    g0:
      move_energy:
        name: g0 move energy
      still_energy:
        name: g0 still energy
    g1:
      move_energy:
        name: g1 move energy
      still_energy:
        name: g1 still energy
    g2:
      move_energy:
        name: g2 move energy
      still_energy:
        name: g2 still energy
    g3:
      move_energy:
        name: g3 move energy
      still_energy:
        name: g3 still energy
    g4:
      move_energy:
        name: g4 move energy
      still_energy:
        name: g4 still energy
    g5:
      move_energy:
        name: g5 move energy
      still_energy:
        name: g5 still energy
    g6:
      move_energy:
        name: g6 move energy
      still_energy:
        name: g6 still energy
    g7:
      move_energy:
        name: g7 move energy
      still_energy:
        name: g7 still energy
    g8:
      move_energy:
        name: g8 move energy
      still_energy:
        name: g8 still energy
Adding the LD2410 in Home Assistant
Save the .yaml file and re-flash the ESP32 Board. Once it boots backup, it will be discovered in Home Assistant automatically. If it isn’t, you can navigate to Settings > Devices & Services > Add Integration > Add ESPHome device and input the IP address of the ESP32 board along with the encryption key. Once added, it will generate a bunch of entities in Home Assistant.
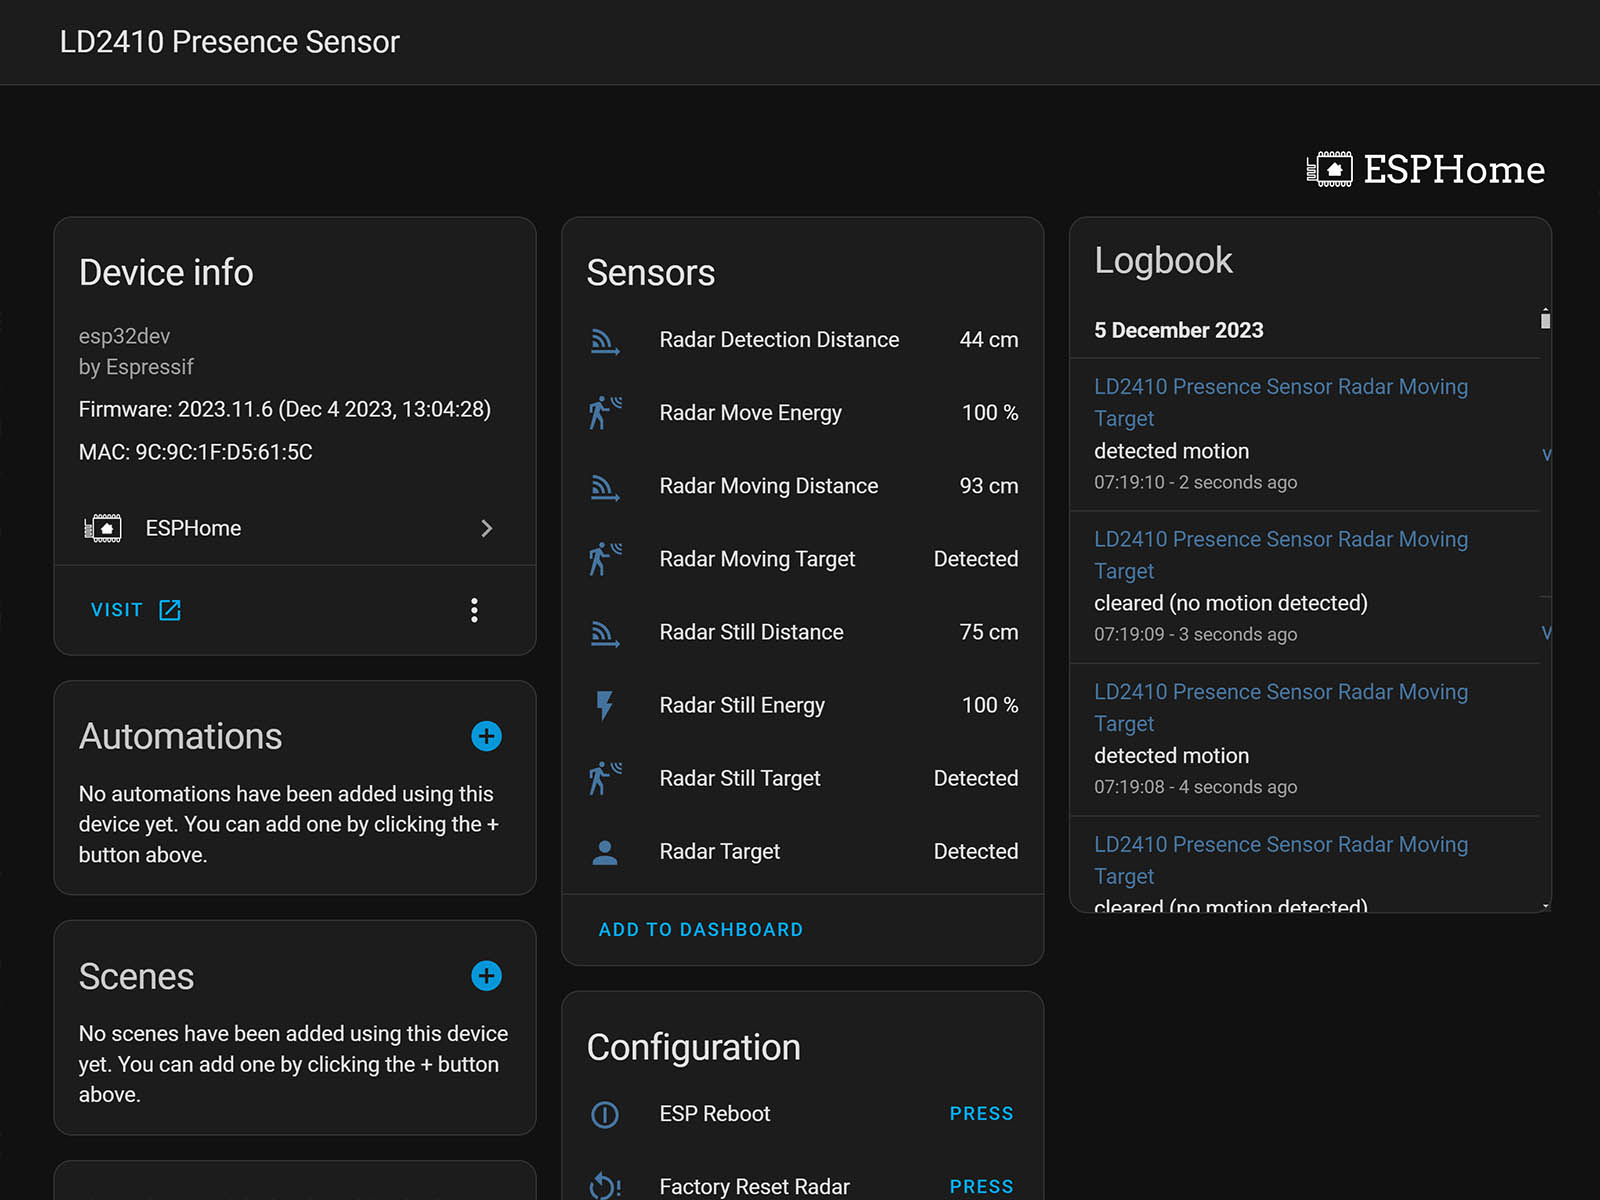
Most of these are pretty self explanatory, although some differentiation is needed between the radar entities. The radar distinguishes between still and moving targets, and their statuses are mutually exclusive. They change states whenever either a stationary or moving target is identified. The radar target entity consolidates both states, requiring both to be clear for the overall presence to be considered clear, and vice versa.
The entities “radar detection distance” and “radar moving distance” provide the target distance in centimeters. Meanwhile, “radar moving energy” and “radar still energy” gauge the energy and speed of the target at that distance. A higher percentage reading indicates increased speed; the faster the movement, the higher the percentage displayed.
Optimizing LD2410 Presence Detection
With native ESPHome support, the LD2410 can be fine-tuned to eliminate false triggers and optimize the sensor for your space. This is done through a featured called Gates which are just energy thresholds for different distances of detection from the sensor. You can tweak the move and still energy settings within this range to avoid false alarms. Make sure to enable Radar Engineering Mode in the configuration before adjusting the gate and toggle it off once you are done.
The LD2410 has the following gates thresholds by default:
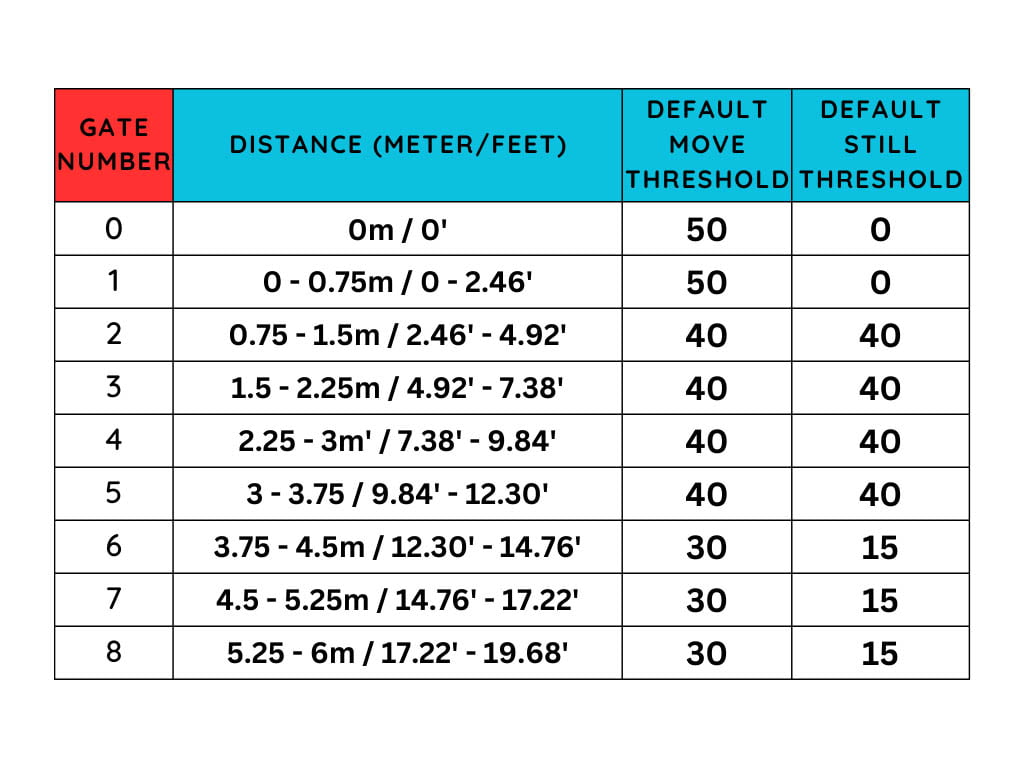
For instance, if I want to fine-tune the second gate, covering movement from 0.75 to 1.5 meters, I need to tweak the thresholds for motion and stillness in gate 2 (g2). One easy method is to start with the maximum values and then gradually reduce them until it accurately detects a person without setting off false alarms. To fully optimize, you’ll need to adjust the thresholds for each gate.
Adding LD2410 Detection Zones
Incremental detection zones can be added to the configuration of the LD2410 sensor, which can be used for pinpoint accuracy in detecting presence. These need to be defined in the ESPHome configuration yaml file before they are exposed, so edit the file and add the following under the number and binary_sensors domains, leaving the rest as is:
number:
# Setting ending of zone 1 occupancy
  - platform: template
    name: "Radar End Zone 1"
    id: radar_z1_end
    device_class: distance
    min_value: 0
    max_value: 600
    step: 1
    mode: box
    update_interval: never
    optimistic: true
    restore_value: true
    initial_value: 10
    icon: "mdi:arrow-collapse-right"
    entity_category: CONFIG

  # Setting ending of zone 2 occupancy
  - platform: template
    name: "Radar End Zone 2"
    id: radar_z2_end
    device_class: distance
    min_value: 0
    max_value: 600
    step: 1
    mode: box
    update_interval: never
    optimistic: true
    restore_value: true
    initial_value: 36
    icon: "mdi:arrow-collapse-right"
    entity_category: CONFIG

  # Setting ending of zone 3 occupancy
  - platform: template
    name: "Radar End Zone 3"
    id: radar_z3_end
    device_class: distance
    min_value: 0
    max_value: 600
    step: 1
    mode: box
    update_interval: never
    optimistic: true
    restore_value: true
    initial_value: 100
    icon: "mdi:arrow-collapse-right"
    entity_category: CONFIG

binary_sensor:
  ## Set Up Radar Zones Based On Distance
  - platform: template
    name: "Radar Zone 1 Occupancy"
    device_class: occupancy
    icon: mdi:motion-sensor
    lambda: |-
      if ((id(radar_has_target).state) && (id(radar_detection_distance).state < id(radar_z1_end).state)) {
        return true;
      } else {
        return false;
      }
  - platform: template
    name: "Radar Zone 2 Occupancy"
    device_class: occupancy
    icon: mdi:motion-sensor
    lambda: |-
      if ((id(radar_has_target).state) && ((id(radar_z1_end).state < id(radar_detection_distance).state) && (id(radar_detection_distance).state < id(radar_z2_end).state))) {
        return true;
      } else {
        return false;
      }
  - platform: template
    name: "Radar Zone 3 Occupancy"
    device_class: occupancy
    icon: mdi:motion-sensor
    lambda: |-
      if ((id(radar_has_target).state) && ((id(radar_z2_end).state < id(radar_detection_distance).state) && (id(radar_detection_distance).state < id(radar_z3_end).state))) {
        return true;
      } else {
        return false;
      }
You can create three zones by specifying the distance in centimeters, indicating the maximum range the sensor should detect for each zone. For instance, if Zone 1 is set to 50cm, it senses presence from 0 to 50cm. Zone 2 starts where Zone 1 ends, so if Zone 2 is set to 300cm, it detects presence from 50 to 300cm measured from the sensor. Each zone has its own sensor entity that changes states accordingly. Here’s a simple chart for better visualization:

Full Configuration Example
The following code is a full configuration example for the LD2410/LD2410B/LD2410C presence sensor attached to an ESP32 Board. It includes some added things like control buttons, ESP board information (CPU, Memory), uptime sensor, firmware sensor and factory reset buttons.
#Define Project
substitutions:
  name: diy-ld2410
  device_description: ${name} guide by SmartHomeScene.com

esphome:
  name: "${name}"
  friendly_name: LD2410 Presence Sensor
  comment: DIY LD2410 Presence Sensor with ESPHome by www.smarthomescene.com
  on_boot:
  - priority: 900.0
    then:
      - lambda: |-
          id(cpu_speed) = ESP.getCpuFreqMHz();

#Define Board Type
esp32:
  board: esp32dev
  framework:
    type: arduino


# Enable Home Assistant API
api:

logger:

ota:
  password: "3e17e1c064adcb643234d5a49982329c"

captive_portal:

wifi:
  ssid: !secret wifi_ssid
  password: !secret wifi_password

  #Enable fallback hotspot (captive portal) in case wifi connection fails
  ap:
    ssid: "DIY LD2410"

 #Open web port for browser access
web_server:
  port: 80

uart:
  tx_pin: GPIO16
  rx_pin: GPIO17
  baud_rate: 256000
  parity: NONE
  stop_bits: 1

globals:
  - id: cpu_speed
    type: int
    restore_value: no
    initial_value: "0"
ld2410:
  id: ld2410_radar

#Configuration entities
number:
  - platform: ld2410
    timeout:
      name: Radar Timeout
    max_move_distance_gate:
      name: Radar Max Move Distance
    max_still_distance_gate:
      name: Radar Max Still Distance
    g0:
      move_threshold:
        name: g0 move threshold
      still_threshold:
        name: g0 still threshold
    g1:
      move_threshold:
        name: g1 move threshold
      still_threshold:
        name: g1 still threshold
    g2:
      move_threshold:
        name: g2 move threshold
      still_threshold:
        name: g2 still threshold
    g3:
      move_threshold:
        name: g3 move threshold
      still_threshold:
        name: g3 still threshold
    g4:
      move_threshold:
        name: g4 move threshold
      still_threshold:
        name: g4 still threshold
    g5:
      move_threshold:
        name: g5 move threshold
      still_threshold:
        name: g5 still threshold
    g6:
      move_threshold:
        name: g6 move threshold
      still_threshold:
        name: g6 still threshold
    g7:
      move_threshold:
        name: g7 move threshold
      still_threshold:
        name: g7 still threshold
    g8:
      move_threshold:
        name: g8 move threshold
      still_threshold:
        name: g8 still threshold
  # Setting ending of zone 1 occupancy
  - platform: template
    name: "Radar End Zone 1"
    id: radar_z1_end
    device_class: distance
    min_value: 0
    max_value: 600
    step: 1
    mode: box
    update_interval: never
    optimistic: true
    restore_value: true
    initial_value: 10
    icon: "mdi:arrow-collapse-right"
    entity_category: CONFIG

  # Setting ending of zone 2 occupancy
  - platform: template
    name: "Radar End Zone 2"
    id: radar_z2_end
    device_class: distance
    min_value: 0
    max_value: 600
    step: 1
    mode: box
    update_interval: never
    optimistic: true
    restore_value: true
    initial_value: 36
    icon: "mdi:arrow-collapse-right"
    entity_category: CONFIG

  # Setting ending of zone 3 occupancy
  - platform: template
    name: "Radar End Zone 3"
    id: radar_z3_end
    device_class: distance
    min_value: 0
    max_value: 600
    step: 1
    mode: box
    update_interval: never
    optimistic: true
    restore_value: true
    initial_value: 100
    icon: "mdi:arrow-collapse-right"
    entity_category: CONFIG

#Occupancy sensor
binary_sensor:
  - platform: ld2410
    has_target:
      name: Radar Target
      id: radar_has_target
    has_moving_target:
      name: Radar Moving Target
    has_still_target:
      name: Radar Still Target
  ## Set Up Radar Zones Based On Distance
  - platform: template
    name: "Radar Zone 1 Occupancy"
    device_class: occupancy
    icon: mdi:motion-sensor
    lambda: |-
      if ((id(radar_has_target).state) && (id(radar_detection_distance).state < id(radar_z1_end).state)) {
        return true;
      } else {
        return false;
      }
  - platform: template
    name: "Radar Zone 2 Occupancy"
    device_class: occupancy
    icon: mdi:motion-sensor
    lambda: |-
      if ((id(radar_has_target).state) && ((id(radar_z1_end).state < id(radar_detection_distance).state) && (id(radar_detection_distance).state < id(radar_z2_end).state))) {
        return true;
      } else {
        return false;
      }
  - platform: template
    name: "Radar Zone 3 Occupancy"
    device_class: occupancy
    icon: mdi:motion-sensor
    lambda: |-
      if ((id(radar_has_target).state) && ((id(radar_z2_end).state < id(radar_detection_distance).state) && (id(radar_detection_distance).state < id(radar_z3_end).state))) {
        return true;
      } else {
        return false;
      }

#Exposes configuration and status sensors
sensor:
    #Device UPTIME
  - platform: uptime
    name: Uptime
    id: sys_uptime
    update_interval: 60s
    #Device CPU Speed
  - platform: template
    name: "ESP Cpu Speed"
    accuracy_decimals: 0
    unit_of_measurement: Mhz
    lambda: |-
      return (id(cpu_speed));
    entity_category: "diagnostic"
    #Device Memory
  - platform: template
    id: esp_memory
    icon: mdi:memory
    name: ESP Free Memory
    lambda: return heap_caps_get_free_size(MALLOC_CAP_INTERNAL) / 1024;
    unit_of_measurement: "kB"
    state_class: measurement
    entity_category: "diagnostic"
    #Device Temperature
  - platform: template
    id: sys_esp_temperature
    name: ESP Temperature
    lambda: return temperatureRead();
    unit_of_measurement: °C
    device_class: TEMPERATURE
    update_interval: 60s
    #Device RSSI
  - platform: wifi_signal
    name: RSSI
    id: wifi_signal_db
    update_interval: 60s
    entity_category: "diagnostic"
  - platform: ld2410
    moving_distance:
      name: Radar Moving Distance
      id: moving_distance
    still_distance:
      name: Radar Still Distance
      id: still_distance
    moving_energy:
      name: Radar Move Energy
    still_energy:
      name: Radar Still Energy
    detection_distance:
      name: Radar Detection Distance
      id: radar_detection_distance
    g0:
      move_energy:
        name: g0 move energy
      still_energy:
        name: g0 still energy
    g1:
      move_energy:
        name: g1 move energy
      still_energy:
        name: g1 still energy
    g2:
      move_energy:
        name: g2 move energy
      still_energy:
        name: g2 still energy
    g3:
      move_energy:
        name: g3 move energy
      still_energy:
        name: g3 still energy
    g4:
      move_energy:
        name: g4 move energy
      still_energy:
        name: g4 still energy
    g5:
      move_energy:
        name: g5 move energy
      still_energy:
        name: g5 still energy
    g6:
      move_energy:
        name: g6 move energy
      still_energy:
        name: g6 still energy
    g7:
      move_energy:
        name: g7 move energy
      still_energy:
        name: g7 still energy
    g8:
      move_energy:
        name: g8 move energy
      still_energy:
        name: g8 still energy

#Exposes control buttons
button:
  - platform: restart
    icon: mdi:power-cycle
    name: "ESP Reboot"

  - platform: factory_reset
    disabled_by_default: True
    name: "Factory Reset ESP"
    id: factory_reset_all

  - platform: ld2410
    factory_reset:
      name: "Factory Reset Radar"
    restart:
      name: "Restart Radar"
    query_params:
      name: query params

#Exposes control switches
switch:
  - platform: ld2410
    bluetooth:
      name: "Radar Control Bluetooth"
      id: radar_bluetooth
    engineering_mode:
      name: "Radar Engineering Mode"
time:
  - platform: sntp
    id: time_sntp

#Radar firmware version
text_sensor:
  - platform: ld2410
    version:
      name: "Radar Firmware Version"
#Set distance resolution - 0.75m or 0.2m
select:
  - platform: ld2410
    distance_resolution:
      name: "Radar Distance Resolution"
Summary
Reliable presence detection for less than $10? Well why not. The 24GHz Hi-Link LD2410 is a great way to detect presence around your home once properly tuned. With the full example from above, this DIY presence sensor becomes very flexible, customizable and adjustable to your space.
I must have spent around 2-3 hours tuning the Gates and Zones for the LD2410. Once I was done, there were absolutely no false triggers and it was able to reliable detect presence in my living room. Because of this, It’s fair to note that I consider this approach a highly DIY solution for true Home Automation enthusiasts, it’s definitely not for everyone.
If you want a ready-made product operating in the same way, the Apollo MSR-1 is your device. I honestly don’t think there’s a better multi-sensor out there, highly considering price, features and size as a factor. You can get the Apollo MSR-1 on their Official Webstore from $34.99.
Once again, here’s a list of things needed for this project:
- ESP32 Pre-soldered
- Hi-Link LD2410 Radar Sensor OR
- Hi-Link LD2410B Radar Sensor OR
- Hi-Link LD2410C Radar Sensor
- 1.25mm to 2.54 Connector (LD2410)
- 2.54mm to 2.54 Connector (LD2410C)
- USB Cable
- Old 5V adapter


Do you know if this will work through a glass door or if we place the sensor on a drawer?
Yes, it can detect you through glass although the radar transmit power is limited.
Make it short range and you are good.
There is also a nice “calibration card” available for Home Assistant: https://esphome.io/components/sensor/ld2410.html#home-assistant-card
you recommend not to solder, but what is so difficult to solder those few wires, in my case they are all soldered and I have had no problems with it. There are SMD components that are smaller.
But other than that it is a very clear article, I had not yet come across defining zones and I will certainly incorporate them into my config.
My personal choice is to always solder, but over time I realized most people are going to defer from a project if it involves soldering.
So this is why I always provide a non-soldering route, if possible.
Thanks for the feedback.
Hi thanks for the tutorial. Before I go down this route can you recommend a case to put this kit in?
Cheers
Well, if you have access to a 3D printer you can make your own.
Otherwise, AliExpress is your friend:
https://s.click.aliexpress.com/e/_DFXS9Kh
Thanks for this tutorial. I bought all the parts but have this when trying to flash esp32 with your code :
Failed config
number.ld2410: [source /config/esphome/esphome-web-d04e44.yaml:45]
Platform not found: ‘number.ld2410’.
Anyone have the same issue ?
The code is correct 100%. For reference, see the number platform for the LD2410 sensor:
https://esphome.io/components/sensor/ld2410.html#number
You most likely have an error in pasting. Can you share a screenshot of your config? Or your code on paste bin?
Hi, indeed code is 100% correct. Issue was on the ESP Home version which had to be updated. Now it’s working well 🙂
As entities like Radar Movie Target can be verbose when a target is moving, I think this can impact HA database. Do you have any recommabndation to optimize this ?
You could always exclude entities from the recorder:
https://smarthomescene.com/guides/optimize-your-home-assistant-database/#optimizing-your-entities
Hi,
thanks for sharing. Unfortunately I still get all sensors reporting “unknown” in HA. I have tried multiple ESP32’s and LD2410b’s and get the same result, which in fairness is the same result I get when trying other ESPhome/LD2410 write-up’s.
That said I’ve a couple of 2410’s running as standalone BLE devices and they have been very stable, so its not a huge problem, but I would be good to have the choice of WiFi or BLE.
More trawling the net I guess.
did you ever figure this out? Having the same issue. No matter the ESP32 or pin arrangment.
Swap the RX and TX pins
update: out of shear frustration I swapped the RX and TX connections around, so its now
RX (LD2410 pin 3 from the left, after VCC and Gnd) RX (ESP32 30pin dev board – pin 21 – GPIO16)
TX(LD2410 pin 4 from the left) TX (ESP32 30pin dev board – pin 22 – GPIO17)
and its working!
Great tutorial, works perfectly!
I just wonder how to set the three zones. Are the initial_values in your example measured in cm? Like so: zone1=[0..10]cm zone2=[10..36]cm and zone3=[36..100]cm
Yes, each zone is measured in centimeters.
For instance, if Zone 1 is set to 50cm, it senses presence from 0 to 50cm. Zone 2 starts where Zone 1 ends, so if Zone 2 is set to 300cm, it detects presence from 50 to 300cm measured from the sensor etc.
Thanks for comfirmation. Made some tests with different values and found it out as well.
Does it has to be ESP32? I did a device with ESP8285, uploaded software, connected wit API to HASS, I can see all defined entities but no one of them is accessible except entities linked with ESP like CPU speed, Uptimre and RSSI
No, it doesn’t have to be an ESP32.
But you most likely need to swap the RX and TX pins
It`s not this problem, I have made a pcb and soldered everything, so can`t swap the pins, anyway device works with another software uploaded inside. I tried to flash it with your yaml and does not work with this particular yaml. However thanks for your opinion. When I use ESP32 yaml works like a charm.
Change the pins in the YAML according to your ESP8285 pinout dude:
uart:tx_pin: GPIO16
rx_pin: GPIO17
Just wanted to thank you for this straight forward tutorial…. GOLD!!!
Excellent tutorial. I really appreciate all the effort on creating very useful content.
Thanks, appreciate the feedback.
Great tutorial; thank you SHS! When the LD2410 I ordered w/the 1.25mm->2.54 DuPont cable came I thought at first they forgot the LD2410. I was shocked how TINY it is! It was very difficult to connect the 1.25mm end of the cable to the LD2410 pin header, but I did.
I used this with an ESP32 and works great in my office for presence detection. I tried to use in a larger room (dining room & kitchen combination) and no matter how I adjusted the gate settings, it would still fail to detect a person in some parts of the kitchen (furthest from the sensor).
Nevertheless I am a tinkerer and I really enjoyed this project. I am not sure if I will build another one, but it is fun to experiment and I am pleased I was able to get a successful outcome. I don’t have a case for it yet as I’m going to let it “burn in” for a few days to verify it stays functional/WiFi stays connected. At that point I’ll probably order a project box for it. Thanks!
Hey man,
Glad you had fun with this sensor.
For the next one, you might go for the LD2410C, which has the standard 2.54 connectors but is a bit larger.
OR even the LD2411S, which has better antennas, accuracy and precision.
Cheers
Thanks SHS! I think if I do another one I will surely use the LD2410C. I was concerned when connecting to the pins on the LD2410 that I may snap them off, as the connector did not want to easily slide onto the pins. It was a struggle!
By the way do you have any recommendations for how I should package up this project? I was looking at project boxes like this on Amazon: https://amzn.to/3OPynsR I’m wondering I need to do anything special to protect the ESP32/exposed pins, or if I could just carefully place the ESP32 (I used one like you have listed in the article) and the LD2410 in the project box and voila, it’s done! Thanks for any tips and your website has been a fantastic resource – thanks for all the great info. 🙂
You can use any box you like, the ESP32s are very resilient – they don’t need any protection whatsoever.
I have a bunch connected and scattered around my work area/testing bench, no issues whatsoever.
Just make sure you don’t short-circuit anything and you’re good 🙂
Thank you SHS! Appreciate the advice. Have a nice day and enjoy smart home automation!!!
I always asking in case I see those recommendation – do you really understand requirements for sensor, and ESP32 UART connection is must have?
ESP32 is a dual core multi threading freeRTOS based system with 240MHz each core.
And ld2410 has Bluetooth onboard with same protocol used as in UART.
So first question is why don’t use ESP32 as a global hub to connect Bluetooth to several sensors and collect data? Do ESP32 as a hub?
Or in case the Bluetooth interface is so complicated – may ESP8266 using WiFi also can be a good point as simple UART to WiFi controller?
I understand perfectly well, that’s the difference actually (Bluetooth) between the LD2410 & LD2410B.
Why use it though? Over deploying Bluetooth or BLE devices can oversaturate the 2.4GHz band and cause all kinds of issues, especially if you are running a Zigbee network too.
Now, do you really understand? Bluetooth is good, Zigbee is great, wired is KING.
Oh, and yes, you can use ESP8266 too. They cost about the same but ESP32s can be repurposed for so much more.