A while back I shared a simple guide for creating your own presence sensor with an ESP board and the popular Hi-Link LD2410 mmWave radar sensor. It included the complete ESPHome code as well the wiring diagrams for the LD2410B and LD2410C sensor models.
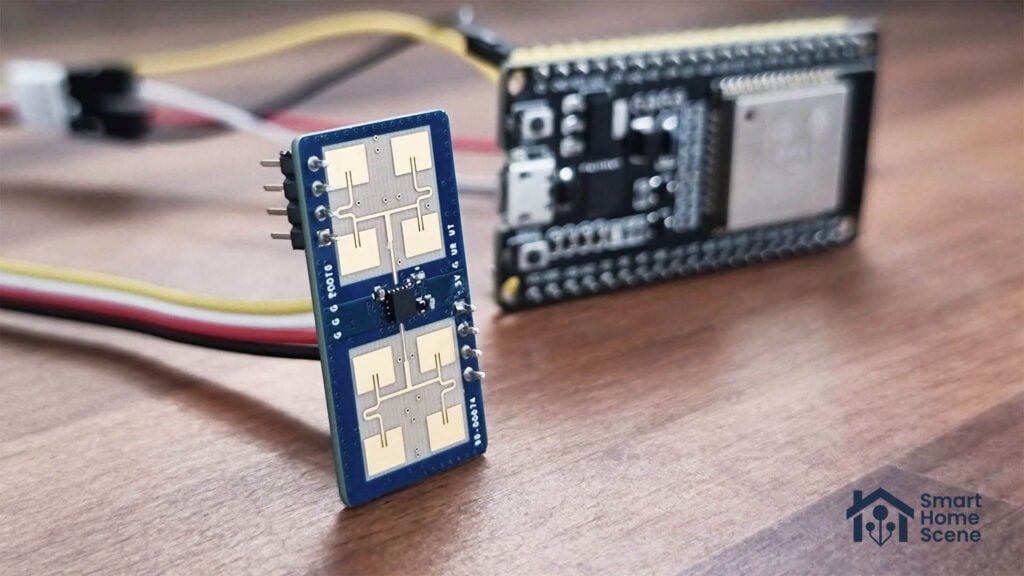
In this article, I’m writing about a similar DIY presence sensor based on the HLK-LD1125H, a 24GHz millimeter wave sensor capable of detecting motion of up to 9 meters.
Requirements
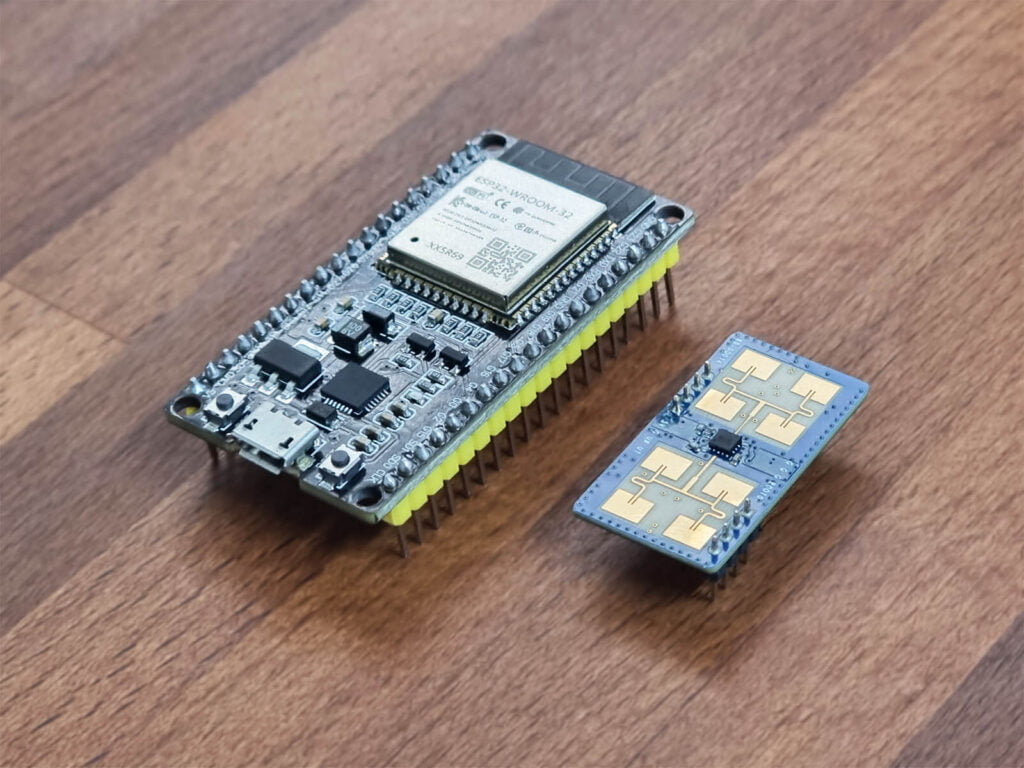
You are going to need a few things to create this DIY presence sensor, including an ESP32 or ESP8266 board. I highly suggest you go for an ESP32, as it’s more powerful, has Bluetooth and you can easily repurpose the Bluetooth radio if you need to. Both are very similar in price, so there is no need to get the weaker ESP8266.
Here’s a list of all the things you are going to be needing, with or without soldering:
🛒 Without Soldering
- ESP32 Pre-soldered
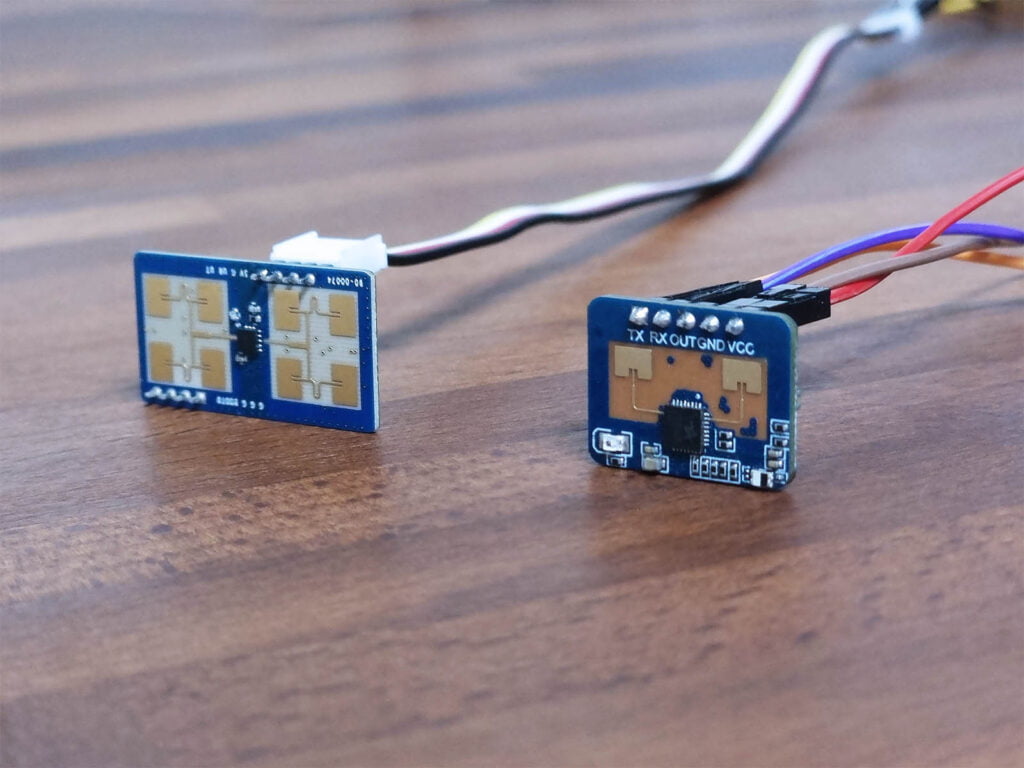
- Hi-Link LD1125H Radar Sensor
- 2mm to 2.54mm Connector
- USB Cable
- Old 5V adapter
🛒 With Soldering
- ESP32 Not soldered
- Hi-Link LD1125H Radar Sensor
- Soldering Iron (Kaiweets KETS02)
- USB Cable
- Old 5V adapter
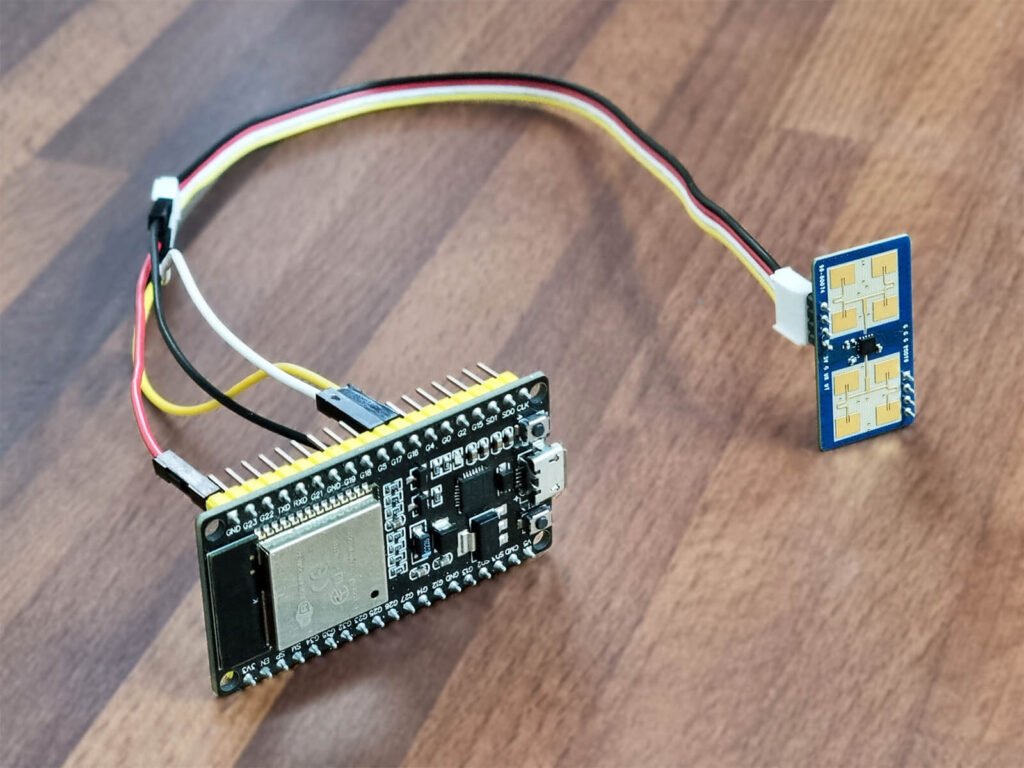
Its important to note that the HLK-LD1125H uses 2mm connectors, so you will need 2 to 2.54mm jumpers to be able to connect the sensor to the ESP board. If you choose to solder everything, there is no need for a connector.
Wiring the HLK-LD1125H and ESP32 Board
Once you have everything ready, you can assemble this DIY presence sensor. I am using a generic ESP32-WROOM-32 board from AliExpress, although you can use any model you want to. The wiring diagram is as follows:

Depending on the model, ESP32 boards can have more than one pair of RX/TX pins, so you can wire the sensor to whichever is more convenient. In my example, I’m using GPIO16 for RX and GPIO17 for TX on the ESP32-WROOM board. Since I did not have a 2mm to 2.54mm jumper at hand, I recycled an old 2mm JST Connector and managed to attach it to the sensor.
Works perfectly fine for testing the device, although the wires need to be soldered before it can be installed in its final position. Here’s how it looks:
Flashing the ESP32 Board
The ESPHome firmware for the Hi-Link LD1125H was developed by patrick3399 and you can find the original files on his repository. I’ve adjusted a few things, removed some unnecessary lines from the code and comments and set the board type to esp32dev.
Here’s the full code:
Click to expand
esp32:
  board: esp32dev
  framework:
    type: esp-idf
    version: recommended

# Enable Home Assistant API
api:
  encryption:
    key: "XXXXX"

ota:
  password: "XXXXX"

wifi:
  ssid: !secret wifi_ssid
  password: !secret wifi_password
  power_save_mode: LIGHT

  # Enable fallback hotspot (captive portal) in case wifi connection fail
  ap:
    ssid: "Presence-Sensor-LD1125H"
    password: "XXXXX"

captive_portal:

substitutions:
  devicename: "presence_sensor_ld1125h" #Rename
  upper_devicename: Presence Sensor LD1125H #Rename

esphome:
  name: $devicename
  on_boot: #LD1125H Initial Setting
    priority: -200
    then:
      - uart.write:
          id: LD1125H_UART_BUS
          data: !lambda |-
            std::string th1st = "mth1=" + str_sprintf("%.0f",id(LD1125H_mth1).state) +"\r\n";
            return std::vector<uint8_t>(th1st.begin(), th1st.end());
      - uart.write:
          id: LD1125H_UART_BUS
          data: !lambda |-
            std::string th2st = "mth2=" + str_sprintf("%.0f",id(LD1125H_mth2).state) +"\r\n";
            return std::vector<uint8_t>(th2st.begin(), th2st.end());
      - uart.write:
          id: LD1125H_UART_BUS
          data: !lambda |-
            std::string th3st = "mth3=" + str_sprintf("%.0f",id(LD1125H_mth3).state) +"\r\n";
            return std::vector<uint8_t>(th3st.begin(), th3st.end());
      - uart.write:
          id: LD1125H_UART_BUS
          data: !lambda |-
            std::string rmaxst = "rmax=" + str_sprintf("%.1f",id(LD1125H_rmax).state) +"\r\n";
            return std::vector<uint8_t>(rmaxst.begin(), rmaxst.end());

external_components:
  - source:
      type: git
      url: https://github.com/ssieb/custom_components #Thanks for @ssieb components.
    components: [ serial ]

logger:
  level: INFO
  baud_rate: 0

uart:
  id: LD1125H_UART_BUS
  rx_pin: GPIO16
  tx_pin: GPIO17
  baud_rate: 115200
  data_bits: 8
  stop_bits: 1
  parity: NONE

globals:
  - id: LD1125H_Last_Time
    type: time_t
    restore_value: no
    initial_value: time(NULL)
  - id: LD1125H_Last_Mov_Time
    type: time_t
    restore_value: no
    initial_value: time(NULL)
  - id: LD1125H_Clearence_Status
    type: bool
    restore_value: no
    initial_value: "false"


interval:
  - interval: 1s #Clearance Scan Time
    setup_priority: -200
    then:
      lambda: |-
        if ((time(NULL)-id(LD1125H_Last_Time))>id(LD1125H_Clear_Time).state) {
          if ((id(LD1125H_Clearence_Status) == false) || (id(LD1125H_Occupancy).state != "Clearance")) {
            id(LD1125H_Occupancy).publish_state("Clearance");
            id(LD1125H_Clearence_Status) = true;
          }
          if (id(LD1125H_MovOcc_Binary).state == true) {
            id(LD1125H_MovOcc_Binary).publish_state(false);
          }
          if (id(LD1125H_Mov_Binary).state == true) {
            id(LD1125H_Mov_Binary).publish_state(false);
          }
        }

number:
  - platform: template
    name: ${upper_devicename} LD1125H mth1 #mth1 is 0~2.8m Sensitivity.
    id: LD1125H_mth1
    icon: "mdi:cogs"
    optimistic: true
    restore_value: true #If you don't want to store the setting at ESP, set it to false.
    initial_value: "60.0" #Default mth1 Setting
    min_value: 10.0
    max_value: 600.0
    step: 5.0
    set_action:
      then:
        - uart.write:
            id: LD1125H_UART_BUS
            data: !lambda |-
              std::string th1st = "mth1=" + str_sprintf("%.0f",x) +"\r\n";
              return std::vector<uint8_t>(th1st.begin(), th1st.end());

  - platform: template
    name: ${upper_devicename} LD1125H mth2 #mth2 is 2.8~8m Sensitivity.
    id: LD1125H_mth2
    icon: "mdi:cogs"
    optimistic: true
    restore_value: true #If you don't want to store the setting at ESP, set it to false.
    initial_value: "30" #Default mth2 Setting
    min_value: 5
    max_value: 300
    step: 5
    set_action:
      then:
        - uart.write:
            id: LD1125H_UART_BUS
            data: !lambda |-
              std::string th2st = "mth2=" + str_sprintf("%.0f",x) +"\r\n";
              return std::vector<uint8_t>(th2st.begin(), th2st.end());

  - platform: template
    name: ${upper_devicename} LD1125H mth3 #mth3 is above 8m Sensitivity.
    id: LD1125H_mth3
    icon: "mdi:cogs"
    optimistic: true
    restore_value: true #If you don't want to store the setting at ESP, set it to false.
    initial_value: "20" #Default mth3 Setting
    min_value: 5
    max_value: 200
    step: 5
    set_action:
      then:
        - uart.write:
            id: LD1125H_UART_BUS
            data: !lambda |-
              std::string th3st = "mth3=" + str_sprintf("%.0f",x) +"\r\n";
              return std::vector<uint8_t>(th3st.begin(), th3st.end());

  - platform: template
    name: ${upper_devicename} LD1125H rmax #rmax is max detection distance.
    id: LD1125H_rmax
    icon: "mdi:cogs"
    optimistic: true
    restore_value: true #If you don't want to store the setting at ESP, set it to false.
    initial_value: "8" #Default rmax Setting
    min_value: 0.4
    max_value: 12
    step: 0.2
    set_action:
      then:
        - uart.write:
            id: LD1125H_UART_BUS
            data: !lambda |-
              std::string rmaxst = "rmax=" + str_sprintf("%.1f",x) +"\r\n";
              return std::vector<uint8_t>(rmaxst.begin(), rmaxst.end());

  - platform: template
    name: ${upper_devicename} LD1125H Clearence Time
    id: LD1125H_Clear_Time
    icon: "mdi:cogs"
    optimistic: true
    restore_value: true #If you don't want to store the setting at ESP, set it to false.
    initial_value: "5" #LD1125H Mov/Occ > Clearence Time Here
    min_value: 0.5
    max_value: 20
    step: 0.5

  - platform: template
    name: ${upper_devicename} LD1125H Movement Time
    id: LD1125H_Mov_Time
    icon: "mdi:cogs"
    optimistic: true
    restore_value: true #If you don't want to store the setting at ESP, set it to false.
    initial_value: "1" #LD1125H Mov > Occ Time Here
    min_value: 0.5
    max_value: 10
    step: 0.5

sensor:
  - platform: wifi_signal
    name: ${upper_devicename} WiFi Signal
    update_interval: 60s
  - platform: uptime
    name: ${upper_devicename} Uptime
  - platform: template
    name: ${upper_devicename} LD1125H Distance
    id: LD1125H_Distance
    icon: "mdi:signal-distance-variant"
    unit_of_measurement: "m"
    accuracy_decimals: 2
    filters:    # Use Fliter To Debounce
    - sliding_window_moving_average:
        window_size: 8
        send_every: 2
    - heartbeat: 0.2s

text_sensor:
  - platform: wifi_info
    ip_address:
      name: ${upper_devicename} IP Address
    ssid:
      name: ${upper_devicename} SSID
    bssid:
      name: ${upper_devicename} BSSID
    mac_address:
      name: ${upper_devicename} Mac Address

  - platform: serial
    uart_id: LD1125H_UART_BUS
    name: ${upper_devicename} LD1125H UART Text
    id: LD1125H_UART_Text
    icon: "mdi:format-text"
    internal: False #If Don't Want to See UART Receive Data, Set To True
    on_value:
      lambda: |-
        if (id(LD1125H_UART_Text).state.substr(0,3) == "occ") {
          id(LD1125H_Distance).publish_state(atof(id(LD1125H_UART_Text).state.substr(9).c_str()));
          if ((time(NULL)-id(LD1125H_Last_Mov_Time))>id(LD1125H_Mov_Time).state) {
            id(LD1125H_Occupancy).publish_state("Occupancy");
            if (id(LD1125H_MovOcc_Binary).state == false) {
              id(LD1125H_MovOcc_Binary).publish_state(true);
            }
            if (id(LD1125H_Mov_Binary).state == true) {
              id(LD1125H_Mov_Binary).publish_state(false);
            }
          }
          if (id(LD1125H_MovOcc_Binary).state == false) {
            id(LD1125H_MovOcc_Binary).publish_state(true);
          }
          id(LD1125H_Last_Time) = time(NULL);
          if (id(LD1125H_Clearence_Status) == true) {
            id(LD1125H_Clearence_Status) = false;
          }
        }
        else if (id(LD1125H_UART_Text).state.substr(0,3) == "mov") {
          id(LD1125H_Distance).publish_state(atof(id(LD1125H_UART_Text).state.substr(9).c_str()));
          id(LD1125H_Occupancy).publish_state("Movement");
          if (id(LD1125H_MovOcc_Binary).state == false) {
            id(LD1125H_MovOcc_Binary).publish_state(true);
          }
          if (id(LD1125H_Mov_Binary).state == false) {
            id(LD1125H_Mov_Binary).publish_state(true);
          }
          id(LD1125H_Last_Mov_Time) = time(NULL);
          id(LD1125H_Last_Time) = time(NULL);
          if (id(LD1125H_Clearence_Status) == true) {
            id(LD1125H_Clearence_Status) = false;
          }
        }
  - platform: template
    name: ${upper_devicename} LD1125H Occupancy Status
    id: LD1125H_Occupancy
    icon: "mdi:motion-sensor"

binary_sensor:
  - platform: status
    name: ${upper_devicename} Status
  - platform: template
    name: ${upper_devicename} LD1125H Occupancy or Movement
    id: LD1125H_MovOcc_Binary
    device_class: occupancy
  - platform: template
    name: ${upper_devicename} LD1125H Movement
    id: LD1125H_Mov_Binary
    device_class: motion
In the ESPHome Home Assistant Add-on, simply create a new device and add this code without erasing the autogenerated info (Wi-Fi credentials, OTA password, API encryption key). Adjust any parameters you need to and flash the ESPBoard connected to the server PC or by using the web flasher. If you’ve used another set of RX/TX pins, make sure to change them in the code under the uart variable.
Adding the LD1125H to Home Assistant
Once the device reboots, it will be automatically discovered in Home Assistant through the ESPHome integration. If it is not, you can add it manually by navigating to Settings > Devices & Services > Add Integration > Add ESPHome device and enter the IP address of the ESP32 board along with the encryption key.
It will add a bunch of entities in Home Assistant for control and presence status:
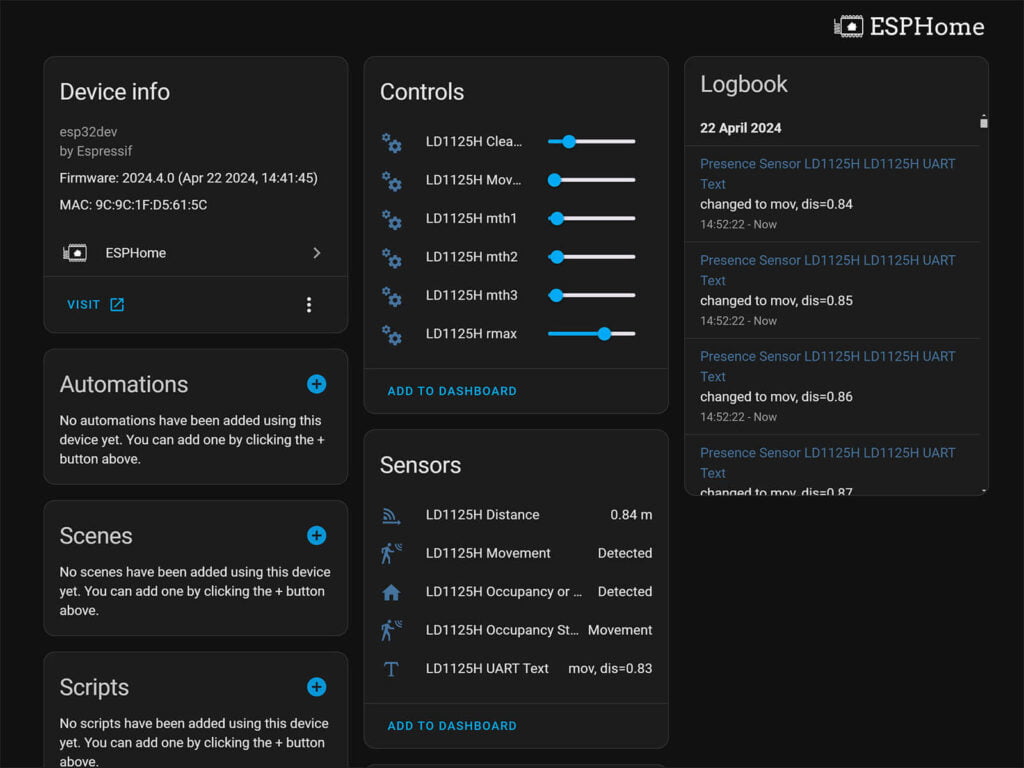
While most of the detection entities are pretty self-explanatory, some need to be differentiated so there’s no confusion. These are used to fine tune the operation of the sensor and have the following meaning:
- Clearance time:
- Keep occupied state after presence has been cleared
- Default: 5s, Minimum: 0.5s, Maximum: 20s
- Max detection distance (rmax):
- Maximum presence detection distance of the sensor
- Default: 8m, Minimum: 0.4m, Maximum: 12m
- Movement time:
- Change state to occupied after movement has been detected for X seconds
- Default: 1s, Minimum: 0.5s, Maximum: 10s
The sensor sensitivity settings for the LD1125H are divided in three zones which can be set individually. For example, you can set the sensor to be most sensitive in its immediate vicinity, while least sensitive at its maximum detection range. Here’s how they correspond to the detection distance:
- Sensitivity 0-2.8 meters (mth1):
- Default: 60, Minimum: 10, Maximum: 600
- Sensitivity 2.8-8 meters (mth2):
- Default: 30, Minimum: 5, Maximum: 300
- Sensitivity above 8 meters (mth3):
- Default: 20, Minimum: 5, Maximum: 200
The sensor entities in Home Assistant can seem a bit confusing at first, but they are actually quite simple to understand. This particular configuration exposes a total of 5 different state entities, very useful for different types of automations:
- Distance:
- Displays the distance of the target in meters
- Occupancy (sensor):
- Occupancy sensor with states:
movement,occupancy,clear movementis used when the target is present and movingoccupancyis used when the target is present but stays stillclearis used when there is no movement or occupancy
- Occupancy sensor with states:
- Movement (binary sensor):
- Movement binary sensor with states:
movementorclear detectedis used when the target is movingclearis used when the target is present but not movingclearis used when there is no movement- Suitable for fast automation triggers
- Movement binary sensor with states:
- Occupancy or movement (binary sensor):
- Combines movement and occupancy into one binary sensor with states:
detectedandclear detectedis used if either movement (binary) and occupancy (sensor) are detecting presence/movementclearis used only when both have a state ofclear- Suitable for automation triggers when the room is empty
- Combines movement and occupancy into one binary sensor with states:
- UART Text:
- Sensor with the same movement and occupancy data used for diagnostical purposes
- You can remove it from Home Assistant by setting
internal: Trueunder theplatform: serial line
And lastly, there are a few ESP diagnostic entities which give you information about signal quality, device uptime, network ID, MAC address etc. You can remove any you deem unnecessary from the code.
Comparing the LD1125H vs LD2410
The HLK-LD2410 sensor is probably the most common and widely used model by Hi-Link. It was also the first mmWave radar sensor from the company to receive official ESPHome support. It’s used in many devices and DIY projects, like in my personal favorite Apollo MSR-1.
The LD2410 is released in three versions with the same core functionality and capability: LD2410, LD2410B (Bluetooth) and LD2410C (different form factor and pins). Here’s how its base features compare on paper to the LD1125H I’m testing in this article:
| Model | Pins | Frequency | Motion Range | Occupancy Range |
|---|---|---|---|---|
| HLK-2410B/C | 2.54mm | 24GHz | 8m | 5m |
| HLK-1125H | 2mm | 24GHz | 9m | 4m |
The official stats alone tell me nothing in terms of reliability and performance of these two HLK sensors. To benchmark the real life performance of the LD1125H, I installed both of them in my office next to each other, overlooking my working chair as well as office entrance and observed their behavior for a couple of days. I set their sensitivity and detection range to roughly same values. Here’s what I learned in a few bullet points:
- Detection Speed:
- Both sensors detect movement almost instantly
- Both
movemententities are suitable for automation triggers
- Detection Range:
- Both sensors detect
movementat about 8 meters - LD2410 changes
occupancyto true at about 6 meters - LD1125H changes
occupancyto true at about 5 meters
- Both sensors detect
- Static Detection:
- Both sensors are most reliable within 4 meters and can be used as a daily driver
- Under 3 meters, I experienced no false positive or negative triggers for both sensors.
- Around 5 meters, LD1125H gave me some false negatives for static
occupancycompared to none of the LD2410. However, themovemententity is very reactive even at 5 meters to the slightest movement (breathing) because it still depends on the radar. This prevents the hybrid occupancy entity to change state and cause too much false negatives. - Around 7 meters, false negatives occur for both devices in detecting static presence. The movement entity is still jumping between states, but becomes unreliable at detecting small movements. It can still detect you entering the room quite reliably though.
- Target Distance:
- Although near the true value, neither target distance entities were 100% correct
- LD2410 measured with an offset of -5%
- LD1125H measured with an offset of about +10%
Summary
Ultimately, both of these sensors a great pick for a DIY solution to static human presence detection. They provide comparable performance with minor differences which can attributed to fine-tuning and positioning. It’s very difficult to claim one is better than the other, as they are very very similar.
If I had to pick one, I would get the LD2410C for its standard 2.54mm pins, native ESPHome support and slightly lower price tag. If you prefer an already made solution, then you cannot go wrong with the Apollo MSR-1. Here’s the shopping list for both sensors:
🛒 DIY LD1125H Presence Sensor
- ESP32 Board
- Hi-Link LD1125H Radar Sensor
- 2mm to 2.54mm Connector OR
- Soldering Iron (Kaiweets KETS02)
- USB Cable
- Old 5V adapter
🛒 DIY LD2410C Presence Sensor
- ESP32 Board
- Hi-Link LD2410C Radar Sensor
- 2.54 to 2.54mm Connector OR
- Soldering Iron (Kaiweets KETS02)
- USB Cable
- Old 5V adapter
SIDE NOTE: Recently, DFRobot released a new 24GHz radar sensor with a detection distance of a whopping 25 meters! It’s labelled as C4001 and is available in 12 meter and 24 meter variants. You can get it on Amazon, AliExpress or their Official Webstore. It’s currently on its way to me for testing.
One of SmartHomeScene’s readers sent me a link to a 3D case he has printed specifically for this device.
Check it out and print it for yourself. Thanks Danny!


I’ve designed a compact 3d-printable housing for a presence/luminance sensor using either the HLK-LD1125 or the HLK-LD2410C and incorporating the BH1750 for luminance. Link is here: https://www.thingiverse.com/thing:6671735.
I’ve made 2 of each of these so far and they are working brilliantly. Thanks so much for the guide and good work!
with ESPHOME 2025.3, lambda’s are disallowed. This will break many upgrades on lots of devices. They now want to have everything via external components. Will you update your YAML ?
forget about it, misread. It’s custom components, not lambdas … duh …
Yeah, the name’s changing basically, to external components
Thanks, this works great! I have so many things I want to do with these sensors!
Just notice to anyone trying to flash this, now the OTA has to be paltform declared, so the syntax should be:
ota:
password: “xxxx”
platform: esphome