If you consider yourself a smart home enthusiast, than you probably have come across multiple HVAC integrations and implementations in Home Assistant. Generally, people buy off-the-shelf solutions such as the Nest Learning Thermostat, Amazon Smart Thermostat, Ecobee SmartThermostat and integrate it with their smart home environment. This is one way to do it, but if you have a big house with many rooms that need temperature control, it will get costly very fast.
In this article, I will show you how to make your own cheap, yet reliable heating thermostat, using a Sonoff Basic and Xiaomi Temperature & Humidity Sensor.
All within Home Assistant. Let’s get started!
Prerequisites
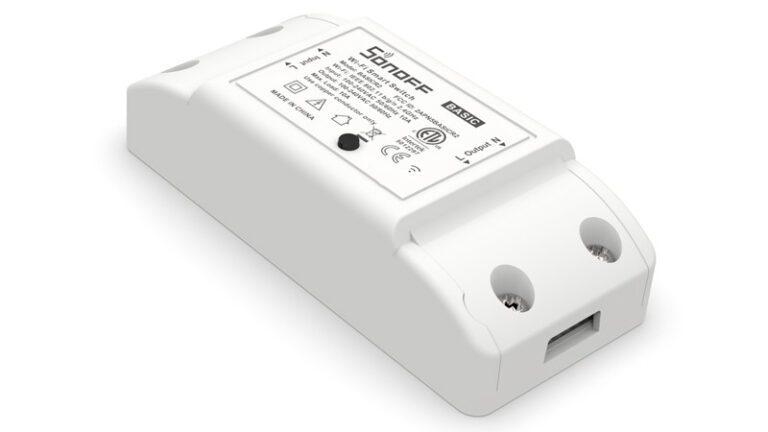
In my guide, I am using a Sonoff Basic R2 Switch and a Xiaomi Mijia Temperature & Humidity sensor model LYWSD02. This can be achieved using any switch or sensor.
For our DIY project, we will need a couple of devices and optionally a couple of skills:
- Running Home Assistant
- Sonoff Basic Switch
- Xiaomi Temperature & Humidity Sensor
- (Optional) Basic Soldering skills
- (Optional) Custom Firmware Flashing skills
Preparing the Sonoff Basic
(Optional) Flashing custom firmware
The Sonoff is a cloud-connected Chinese device, which means it is operating its own firmware with its own mobile app. To get rid of this dependency, we need to flash the Sonoff with a custom open-source firmware, such as Tasmota or ESPHome.
For the purpose of this guide, I will not go into details about how you can flash the Sonoff, but you can follow these excellent guides as a starting point:
- https://esphome.io/devices/sonoff_basic.html
- https://tasmota.github.io/docs/devices/Sonoff-Basic/#serial-flashing
If you choose to flash the Sonoff switch, you then need to integrate it to Home Assistant using their official integrations. For my DIY project, I used a pre-flashed Sonoff basic with Tasmota.
(Optional) Continue without flashing
If you choose not to flash the switch, you can use AlexxIT’s SonoffLAN custom integration, to be able to control the Sonoff via Home Assistant. Follow the guide HERE.
(Optional) Turning the Sonoff into a dry relay switch
To connect the Sonoff Basic to your heating device, we (most likely) need to turn it into a dry relay switch. This is because we use 110V/220V to power the switch from the wall and the Sonoff will relay the same current to its output terminals. Most HVAC devices only support a dry circuit breaker installed to its input thermostat terminals and loading it with 110V/220V will fry its electronics. This is because outside current here is not needed:
- Circuit open: HVAC off
- Circuit closed: HVAC on
In our DIY project, the Sonoff Basic will act as a circuit breaker, thus turning the heating device on/off.
Note: It is possible that you do not need to turn the Sonoff into a dry relay switch. Maybe your heating entity does not care if current is supplied to its thermostat connector. Always do your due diligence and check the user manual!
As an alternative, you can purchase a low voltage Sonoff switch, operating on 5v, and use that in your DIY thermostat. For example:
Sonoff Basic 5V
AliExpress
Sonoff Basic R2
AliExpress
I had a spare Sonoff Basic R2 laying around, so I decided to use that. To turn it into a dry contact relay, we need to break it open, cut out its output circuit on the PCB and do some soldering:
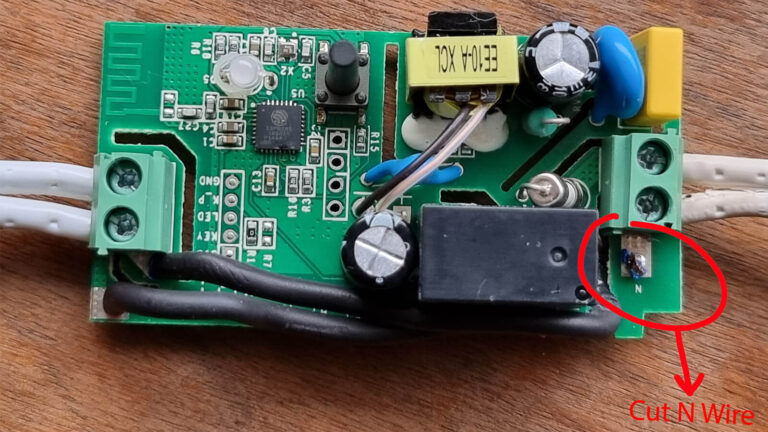
Step 1: Dissasemble the Sonoff Basic
Step 2: On the top side of the PCB, we cut the N wire with small pliers
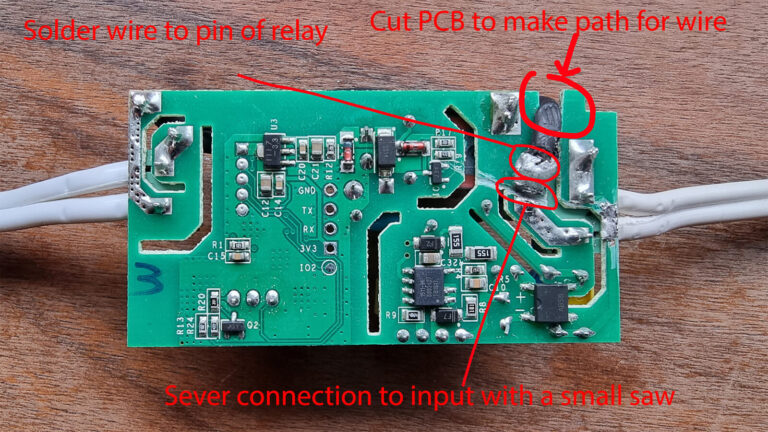
Step 3: On the bottom side we cut the PCB with a small hand saw, to make path for the wire to be connected to the pin of the relay
Step 4: Next, we sever the connection of the relay pin to the input terminal
Step 5: Next, we solder the wire to the pin of the relay
Step 6: Reassemble the Sonoff Basic
Note: Always disconnect the switch from ANY connection first. If you are not comfortable doing this yourself, I suggest you find a qualified electrician who can do it for you.
Switch Integration with Home Assistant
For my particular use case, I used a flashed Sonoff Basic with Tasmota. I had them flashed in batch when I first go them to eliminate cloud dependency. Once our Sonoff is turned into a dry contact relay and Tasmota is flashed, we can integrate it in Home Assistant using the official Tasmota integration and an MQTT Broker.
For the purpose of the length of this tutorial, we are not going to go into detail of installing Tasmota or Mosquitto MQTT. We will assume you have already integrated your switch into Home Assistant. Here are guides if you haven’t:
Preparing the Temperature Sensor
Picking a temperature sensor
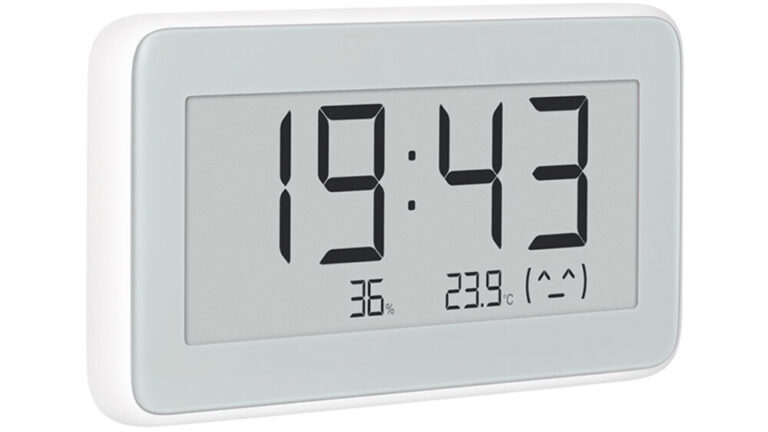
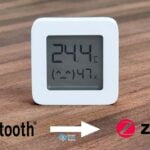
For my particular scenario, I am going to be using a cheap Xiaomi Mijia Temperature & Humidity sensor, model LYWSD02. These are cheap, run on small button batteries which can last years and advertise their current state quite frequently via BLE (Bluetooth Low Energy). As a plus, they have a beautiful E-Ink display, that shows time, temperature & humidity and a little smiley face which indicates comfort level.
If you don’t already own a temperature sensor, I would recommend the following models:
Xiaomi Mijia Temperature & Humidity Sensor LYWSD02
AliExpress
Xiaomi GlearGrass Temperature & Humidity Sensor CGG1
AliExpress
Note: You can use ANY sensor that feeds temperature data into Home Assistant to create your custom thermostat.
Sensor Integration with Home Assistant
Now that we picked our temperature monitor, we need to capture its BLE packets and feed them to Home Assistant. This data will control our Sonoff Basic switch and in turn, control our heating appliance. We will examine two options to do this:
- Using the Raspberry Pi4 Bluetooth chip as a BLE Tracker (Integration via Passive BLE Monitor)
- Using an ESP32 as a BLE Tracker (Integration via ESPHome)
If you have a spare ESP32 board, you can use it to bring the temperature sensor into HA.
If you are running HA on a Raspberry Pi, you can use its Bluetooth chip to capture the BLE packets from the temperature and humidity sensor.
Whatever you device, range and placement will be crucial to maintain stability, as Bluetooth has a very low range in a crowded environment (Wi-Fi, ZigBee etc.). If you have a very large house, you can use multiple ESP32s and place them accordingly. Your other option would be to use a Wi-Fi or a ZigBee temperature sensor.
Note: If you have a ZigBee coordinator connected to your RPI, it is best to add a USB extension cable to the dongle. The USB ports on the Raspberry are known for being to “noisy” and creating interference with Bluetooth or Wi-Fi.
Passive BLE Monitor: Capture data with built-in Bluetooth module
This Home Assistant custom component is an alternative for the standard built in mitemp_bt integration and the Bluetooth LE Tracker integration that are available in Home Assistant. BLE monitor supports much more sensors than the build in integration from a variety of manufacturers.
Unlike the original mitemp_bt integration, which is getting its data by polling the device with a default five-minute interval, this custom component is parsing the Bluetooth Low Energy packets payload that is constantly emitted by the sensor. This does not affect the battery of the devices as much as the built-in integration.
It also solves connection issues some people have with the standard integration (due to passivity and the ability to collect data from multiple bt-interfaces simultaneously). BLE monitor also has the possibility to track BLE devices based on its (static) MAC address or its UUID. It will listen to incoming BLE advertisements for the devices that you have chosen to track.
The easiest way to setup passive BLE monitor is through the Home Assistant Community Store.
- Open HACS and click + Explore and download Repositories
- Search for Passive BLE Monitor and click Download this repository with HACS
- Restart Home Assistant
- Open configuration in the sidebar, click Devices & Services
- Click + Add Integration in the bottom right corner
- Search for Passive BLE Monitor and select it
- In the configuration pop-up, select your Bluetooth interface/adapter (usually hci0)
- Check box “Discover devices and sensors automatically”
- Click submit
For setting advanced parameters, or using yaml mode click HERE
Note: Many Xiaomi ecosystem sensors do not broadcast BLE advertisements containing useful data until they have gone through the “pairing” process in the MiHome app. The encryption key is also (re)set when adding the sensor to the MiHome app, so do this first. Some sensors also support alternative ATC firmware, which doesn’t need to be paired to MiHome.
After this component is setup, the BLE monitor should auto-discover our LYWSD02 Temperature & Humidity sensor and feed data in Home Assistant. You can rename its entities in the Developer Tools menu in HA.
ESPHome Setup: Turn your ESP32 into a BLE Tracker
To use an ESP32 as a Bluetooth Low Energy Tracker, we need to upload the esp32_ble_tracker component to it. To initially setup your ESP32 with the ESPHome addon in Home Assistant, follow this guide. Assuming your ESP32 is already installed and configured in ESPHome, containing your Wi-Fi credentials etc. click edit and add the following code:
esp32_ble_tracker:
  scan_parameters:
    active: False
sensor:
  #Living Room
  - platform: xiaomi_lywsd02
    mac_address: "E7:2E:01:40:XX:XX"
    temperature:
      name: "Living Room Temperature"
    humidity:
      name: "Living Room Humidity"
    battery_level:
      name: "Living Room Battery Level"
Replace the mac_address with your own from the sensor, rename them accordingly, click Save, click Install. ESPHome will compile your new firmware and flash it to your ESP32. After the flashing is done, you can click Logs and see the BLE packets data pouring in!
Note: The scan_parameters configuration variable can be set to scan for packets in a precise window of time. This largely depends of how your BLE sensor advertises data. I would suggest leaving active: False, as this ensures constant scanning so you do not miss any BLE packets! See more HERE
Creating our custom thermostat
To create our custom climate entity, we will use the Generic Thermostat platform of Home Assistant. To do this, we need to add the following code in our configuration.yaml file:
climate:
  - platform: generic_thermostat
    name: Living Room
    heater: switch.thermoflux
    target_sensor: sensor.living_room_temperature
    min_temp: 15
    max_temp: 35
    ac_mode: false
    cold_tolerance: 1
    hot_tolerance: 0
    min_cycle_duration:
      seconds: 5
    initial_hvac_mode: "off"
    away_temp: 16
    precision: 0.1
The generic_thermostat platform offers a plethora of configuration variables, but for our DIY project these are the ones we we will use. We define the Sonoff basic switch as heater, the Temperature sensor as target_sensor. The other variables we are using:
- name string REQUIRED, default: Generic Thermostat
Name of thermostat. - heater string REQUIRED
entity_id for heater switch, must be a toggle device. Becomes air conditioning switch when ac_mode is set to true. - target_sensor string REQUIRED
entity_id for a temperature sensor, target_sensor.state must be temperature. - min_temp float (optional, default: 7)
Set minimum set point available. - max_temp float (optional, default: 35)
Set maximum set point available. - ac_mode boolean (optional, default: false)
Set the switch specified in the heateroption to be treated as a cooling device instead of a heating device. - min_cycle_duration time | integer (optional)
Set a minimum amount of time that the switch specified in the heateroption must be in its current state prior to being switched either off or on. - cold_tolerance float (optional, default: 0.3)
Set a minimum amount of difference between the temperature read by the sensor specified in the target_sensoroption and the target temperature that must change prior to being switched on. For example, if the target temperature is 25 and the tolerance is 0.5 the heater will start when the sensor equals or goes below 24.5. - hot_tolerance float (optional, default: 0.3)
Set a minimum amount of difference between the temperature read by the sensor specified in the target_sensoroption and the target temperature that must change prior to being switched off. For example, if the target temperature is 25 and the tolerance is 0.5 the heater will stop when the sensor equals or goes above 25.5. - initial_hvac_mode string (optional)
Set the initial HVAC mode. Valid values are off, heat or cool. Value has to be double quoted. If this parameter is not set, it is preferable to set a keep_alive This is helpful to align any discrepancies between generic_thermostatand heater state. - away_temp float (optional)
Set the temperature used by preset_mode: away. - precision float (optional)
The desired precision for this device. Can be used to match your actual thermostat’s precision. Supported values are 0.1, 0.5 and 1.0. This value is also used as the step size for setting the target temperature. Default: 0.1 for Celsius and 1.0 for Fahrenheit.
Connecting the thermostat
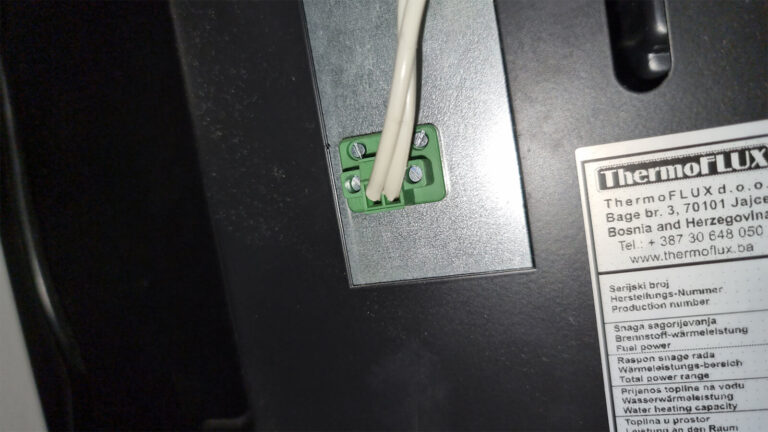
In my case, I am going to use the thermostat we just created to control a Thermoflux Interio 18kw Pellet Stove. The brains of this particular pellet burner is a microcomputer by Italian company Micronova SRL. In reality this does not matter, we just needed to know how to connect the sonoff basic to the stove. On the back panel, there is a convenient thermostat terminal which is where we wire the switch. I have already confirmed that we need a dry contact relay, hence why we butchered the Sonoff Switch.
Controlling the Thermostat with Home Assistant
The generic_thermostat platform we used, created a combined entity from the switch and sensor called climate.living_room. Now we can use this entity to turn the stove on/off, change temperature, set home/away modes and much more! We can create a basic thermostat card with Lovelace:
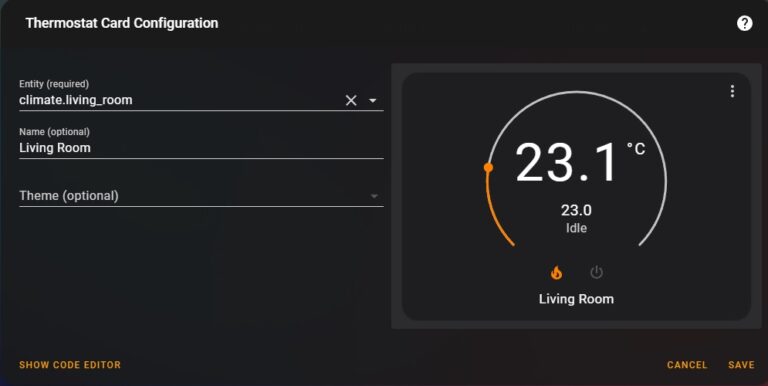
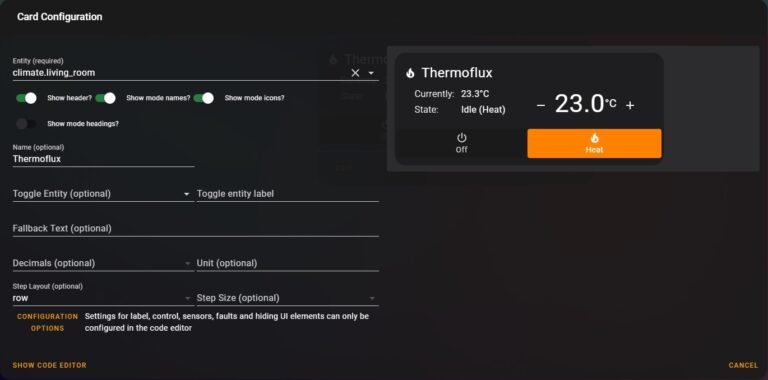
As the basic Thermostat Card of Home Assistant is very limited, I have decided to use a custom card: Simple Thermostat Card by nervetattoo for a more minimalistic view.
You can find it in HACS > Frontend.
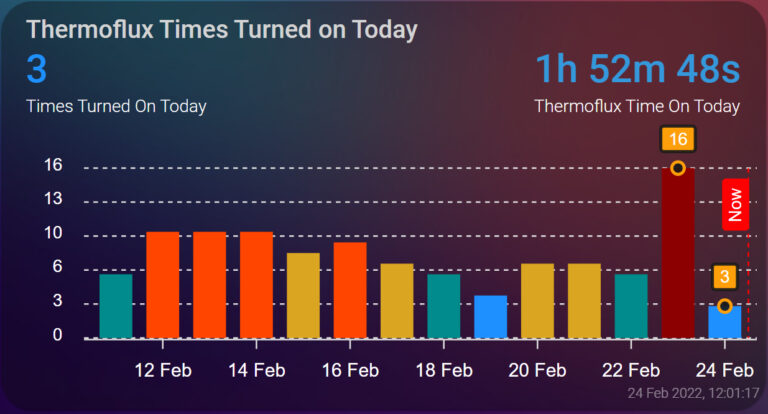
Track usage with History Stats
We can use the History Stats integration to track the entity and gather data and statistics about our thermostat, and in my case, my pellet stove. This component tracks the state of an entity and presents cumulative data in HA. For example, it can track the “on” state of our sonoff switch entity in a defined period of time:
Total time ON today & Times turned ON today
#Add this to your configuration.yaml
sensor:
#Total Time On Today
  - platform: history_stats
    name: Thermoflux Time On Today
    entity_id: switch.thermoflux
    state: "on"
    type: time
    start: "{{ now().replace(hour=0, minute=0, second=0) }}"
    end: "{{ now() }}"
    scan_interval: 300
#Times Turned On Today
  - platform: history_stats
    name: Thermoflux Times Turned On Today
    entity_id: switch.thermoflux
    state: "on"
    type: count
    start: "{{ now().replace(hour=0, minute=0, second=0) }}"
    end: "{{ now() }}"
    scan_interval: 300
Visualizing history data
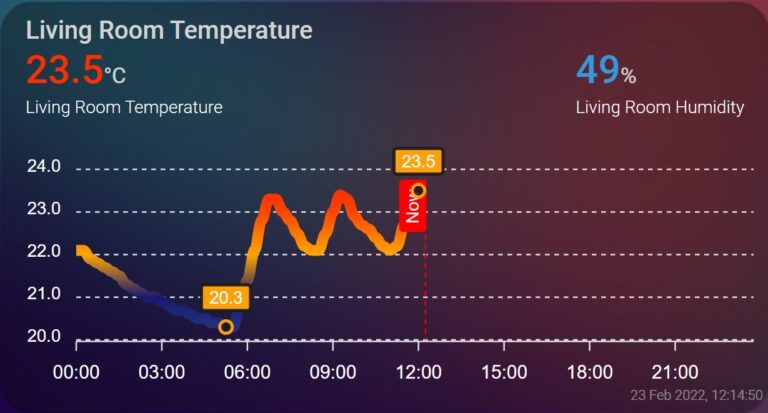
Using the new template sensors we created, we can visualize the data in Lovelace. The temperature sensor feeds data about temperature, humidity and battery very frequently in HA. Of course, we are once again going to use a custom card, as the basic cards are very limited in terms of customization. This is the ApexCharts Card by dev RomRider.
History Stats ApexCharts Card Example:
type: custom:apexcharts-card
apex_config:
  chart:
    height: 170px
experimental:
  color_threshold: true
graph_span: 14d
span:
  end: day
show:
  last_updated: true
header:
  show: true
  show_states: true
  colorize_states: true
  title: Thermoflux Times Turned on Today
now:
  show: true
  color: red
  label: Now
yaxis:
  - min: 0
    max: ~12
    decimals: 0
    apex_config:
      tickAmount: 5
series:
  - entity: sensor.thermoflux_times_turned_on_today
    type: column
    show:
      header_color_threshold: true
      extremas: true
    name: Times Turned On Today
    group_by:
      func: max
      duration: 1d
    color_threshold:
      - value: 1
        color: dodgerblue
      - value: 4
        color: darkcyan
      - value: 6
        color: goldenrod
      - value: 8
        color: orangered
      - value: 10
        color: darkred
  - entity: sensor.thermoflux_time_on_today
    show:
      as_duration: hour
      in_chart: false
Temperature & Humidity ApexCharts Card example:
type: custom:apexcharts-card
apex_config:
  chart:
    height: 170px
experimental:
  color_threshold: true
graph_span: 24h
show:
  last_updated: true
  loading: false
header:
  standard_format: false
  show: true
  show_states: true
  colorize_states: true
  title: Living Room Temperature
now:
  show: true
  color: red
  label: Now
span:
  start: day
series:
  - entity: sensor.living_room_temperature
    type: line
    extend_to_end: false
    group_by:
      func: last
      duration: 15m
    stroke_width: 7
    show:
      extremas: true
      header_color_threshold: true
    color_threshold:
      - value: 18
        color: steelblue
      - value: 21
        color: midnightblue
      - value: 22
        color: orange
      - value: 23
        color: orangered
      - value: 24.5
        color: red
  - entity: sensor.living_room_humidity
    show:
      in_chart: false
Summary
This guide for a DIY Thermostat using a Sonoff Basic and a Xiaomi Mijia Temperature & Humidity Sensor is a fun do-it-yourself project in Home Assistant. It appears overwhelming but in reality is very simple. If implemented properly, it replaces expensive off-the-shelf thermostat solutions such as the Ecobee or Google’s Nest at no loss of features.
Scalability is not an issue, because the components used are very cheap and additional rooms can be controlled for as little as $25 ($7 Sonoff, $18 Temperature & Humidity Sensor!). Considering it is easily integrated in Home Assistant, the options for control and automation are limitless. Schedules, additional modes (away, vacation, etc.), history tracking, google home integration are some of the things you can achieve with this simple DIY.


It seems to me that the Heather does not react aitomatcally when température is ay target.
It seems to me that my Heather does not react automatically when température is at target.
Where could be the pb ?
Hi, your heater should turn off/modulate once the target temperature is reached. Does you climate entity says Idle (Heat) once it reaches the set temperature?
If you can provide more information via email, we will be happy to help!
admin@smarthomescene.com
It is ok now
I was in off state so the target temp was not available for Heater control
Glad you got it working. Cheers!
Really nice guide thank you!
Is it possible with this setup to monitor wheter the hot water tap is running? So not the heating, the hot water Boiler. Just a simple on/off would suffice so I can link it to my fan and shower lights…