If you are running Home Assistant on Proxmox, than you are already familiar with the benefits and drawbacks of such a setup. You are effectively creating your very own mini server, capable or running all kinds of services.
If you looking to start and have the hardware, I suggest you begin with my guide for easily deploying HAOS on Proxmox. You can expand by separating add-ons like Zigbee2MQTT and run them in their own containers and develop custom backup strategies.
However, running your own virtual environment server can be an involved process which often requires maintenance, solving issues, updating things and making sure everything runs smoothly. It’s definitely not a set-and-forget kind of situation.

One of the things I often encounter people struggling with is properly passing through their USB devices to Home Assistant, like Zigbee and Z-Wave dongles, Bluetooth adapters etc.
In this article, I will cover how to properly setup USB passthrough to Home Assistant on Proxmox.
Methods of USB Passthrough
In Proxmox, you can add USB devices to a guest either through the Proxmox GUI or Proxmox Shell. There are two methods to consider here:
- Pass the USB Device ID to the VM (recommended for Zigbee/Z-Wave/Bluetooth Dongles)
- Pass the USB Port to the VM
Even though both methods allow for hot plugging, which means adding USB device while the VM is running, I found it works without errors if you stop the VM first. Select your HAOS VM on left, click the dropdown menu in the top right corner and click Stop before continuing.
USB Vendor/Device ID Method
Using the device ID ensures the USB device stays assigned to the VM in case you reconnect it to another port. It will be automatically passed through even when using a another USB port. This is applicable for Zigbee/Z-Wave/Bluetooth dongles for Home Assistant OS.
GUI: USB Device ID Passthrough
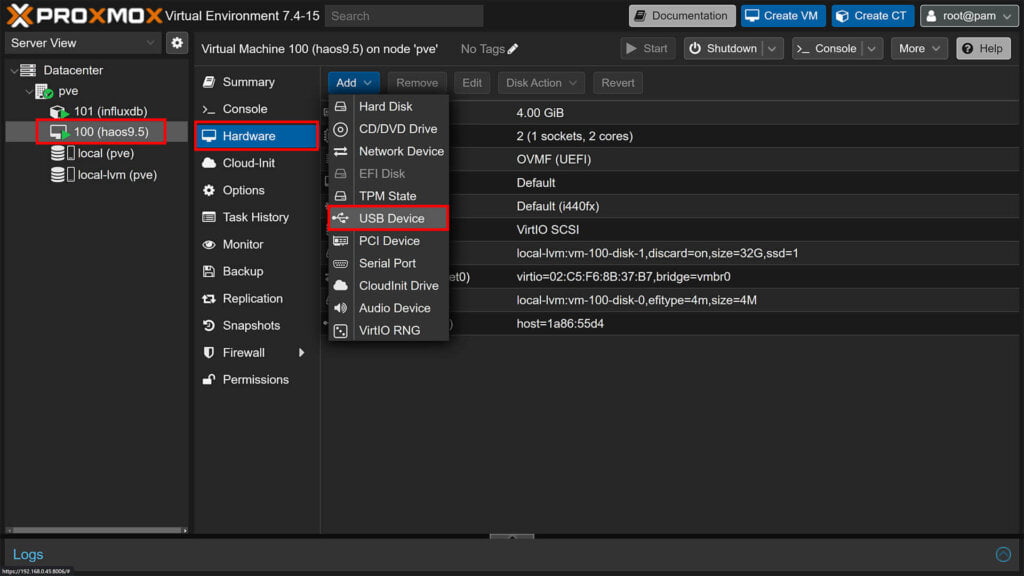
- Select the Home Assistant VM from the left list under your node.
- Click Hardware in the middle pane
- Click Add at the top and click USB Device
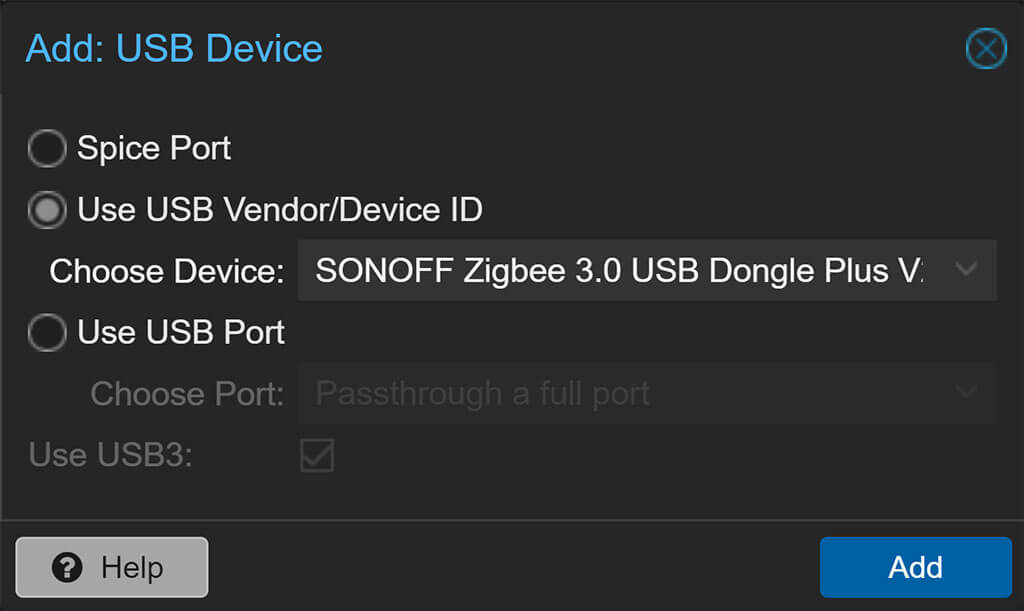
- In the popup window, select Use Vendor/Device ID
- Select your device from the list
- Click Add

- You will see the device added with its ID at the end of the hardware list
- Done
Shell: USB Device ID Passthrough
- Select you node from the left menu
- Click Shell in the middle pane
- Execute the following command:
lsusb- The command will list all attached USB devices to your Proxmox Host
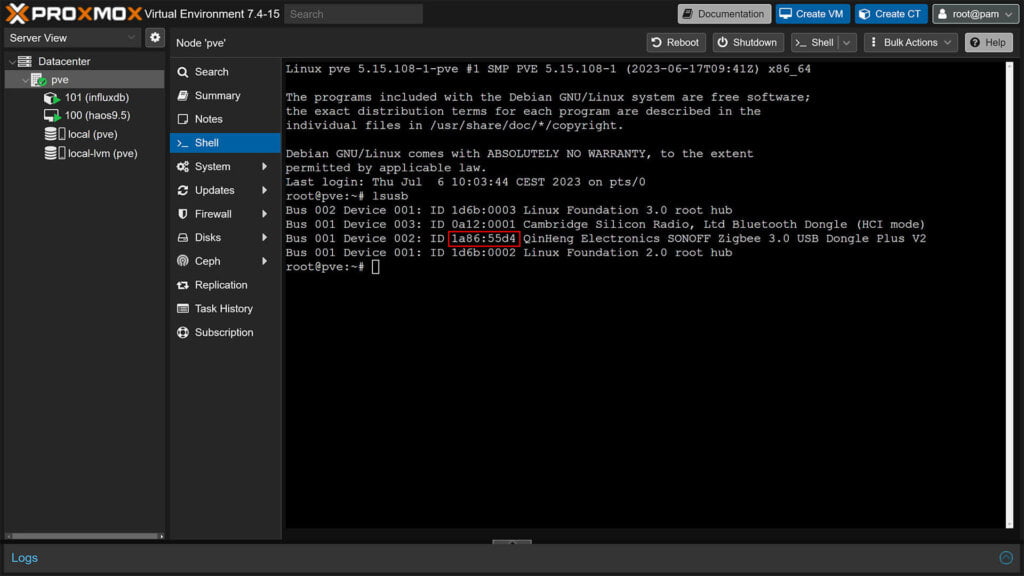
Depending on what is attached to your host, you can identify your USB device from it’s description. If you are unsure which one is your device, unplug it and run the command. Note the list, plug it back in, run the command again and compare the two lists. In my case, the Sonoff ZBDongle-E has an ID 1a86:55d4.
To assign the device to the VM, execute the following command:
qm set 100 -usb0 host=1a86:55d4- Replace 100 with the ID of your HA VM
- Increment -usb0 if you are adding more than one device:
- First device is -usb0
- Second device is -usb1
- Replace 1a86:55d4 with your Device ID
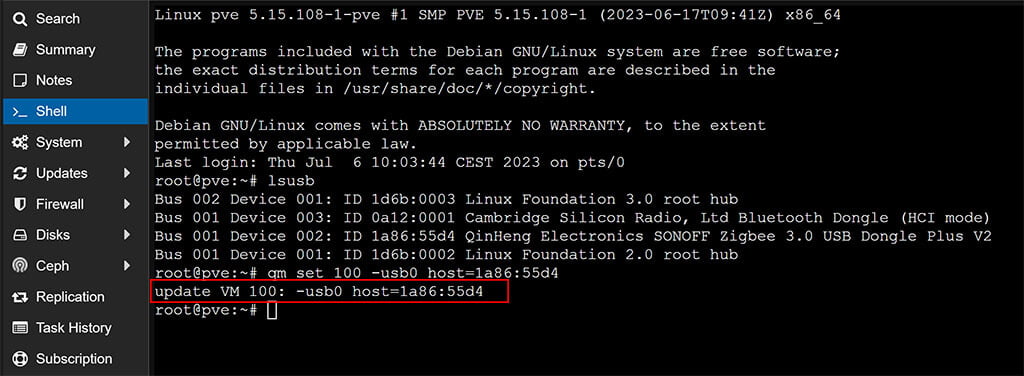
You will get a confirmation in the shell: Update VM 100: -usb0 host=1a86:55d4. Start your VM.
USB Port Method
Instead of adding USB Devices by ID, we can use the same setup flow to assign USB Ports instead. This will allow the port to always be accessible from the VM, no matter what’s plugged to it. For example, this is suitable for USB hard drives and flash drives.
GUI: USB Port Passthrough
- Select the Home Assistant VM from the left list under your node.
- Click Hardware in the middle pane
- Click Add at the top and click USB Device

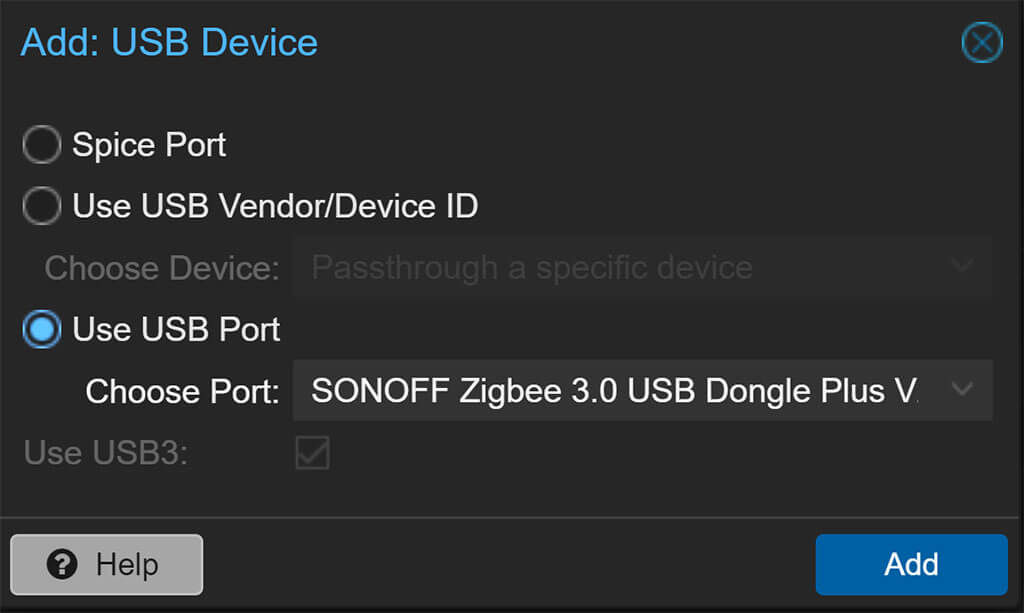
- In the popup window, select Use USB Port
- Select your device from the list attached to the port
- Click Add
- You will see the device added by Port number at the end of the hardware list
- Done.
Shell: USB Port Passthrough
- Select you node from the left menu
- Click Shell in the middle pane
- Enter QM monitor with the following command:
qm monitor 100 #Replace with VM ID- Once in QM monitor, execute the next command to get bus, address and port number
info usbhost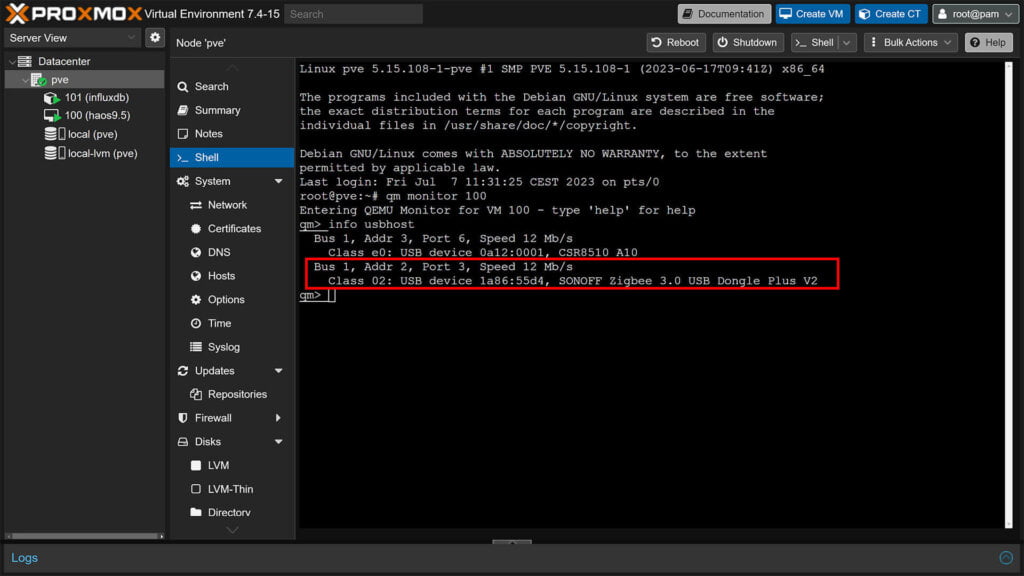
- You will get a list of attached devices and their USB port information
- Note the Bus, Address and Port, my Sonoff ZBDongle-E has Bus 1, Addr 2, Port 3 => 1-2.3.
- Exit QM Monitor by typing quit
- Execute the following command:
qm set 100 -usb0 host=1-2.3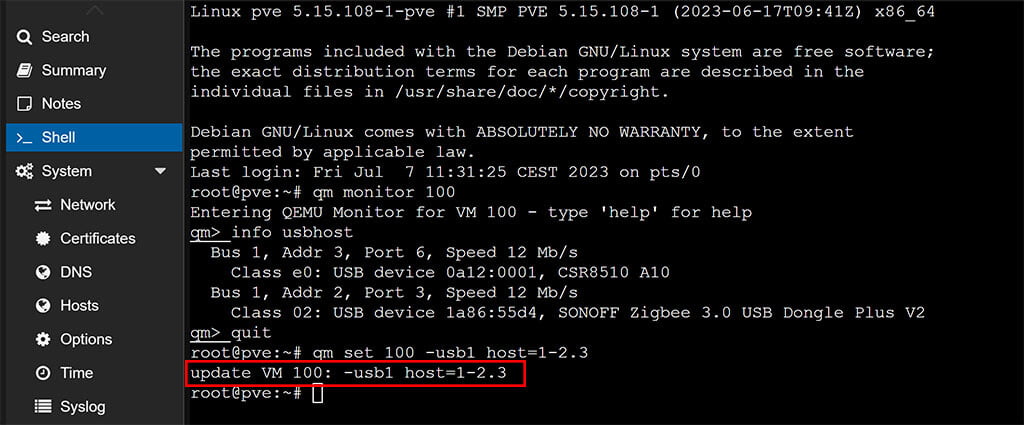
- Note the format of the host parameter:
- Bus (1) is separated with a dash (-) while Addr (2) is separated with a dot from Port (3).
- You will get a confirmation message in the shell: Update VM 100: -usb0 host=1-2.3.
- Start your VM
If the device you attached is USB 3.0, you can add the following to the command:
qm set 100 -usb1 host=1-2.3,usb3=yesSummary
If you haven’t encountered any errors, your USB device should be auto-discovered in Home Assistant once you restart the VM. If you navigate to the hardware panel in Proxmox, you can see a list of your USB devices forwarded to the VM:

For a Zigbee or Z-Wave dongle, always use the Device ID method when assigning the device to the VM. This will ensure it’s always accessible, no matter which port it’s plugged into or if Proxmox configuration is changed. If you get any errors, share them in the comments bellow.


Thanks! Your article saved my day! I have been trying to set the dongle for a week!
Hello,
Thanks for your guide. I’m trying to connect a “”
I did it using USB Device ID Passthrough GUI method and also tried with Shell method.
Everything is working in Proxmox ( I see it in the list of forwarded USB devices as usb0 )
But i’m unable to find the dongle in HA. When i check with dmesg | grep -i usb in HA Terminal, I don’t see it :
[core-ssh ~]$ dmesg | grep -i usb
[ 0.596935] ACPI: bus type USB registered
[ 0.598359] usbcore: registered new interface driver usbfs
[ 0.600017] usbcore: registered new interface driver hub
[ 0.601603] usbcore: registered new device driver usb
[ 0.985354] ehci-pci 0000:00:01.0: new USB bus registered, assigned bus number 1
[ 1.006035] ehci-pci 0000:00:01.0: USB 2.0 started, EHCI 1.00
[ 1.008452] hub 1-0:1.0: USB hub found
[ 1.012231] usbcore: registered new interface driver usb-storage
[ 1.014198] usbcore: registered new interface driver usbserial_generic
[ 1.016307] usbserial: USB Serial support registered for generic
[ 1.051935] usbcore: registered new interface driver usbhid
[ 1.053594] usbhid: USB HID core driver
[ 1.266184] usb 1-1: new high-speed USB device number 2 using ehci-pci
[ 1.439422] input: QEMU QEMU USB Tablet as /devices/pci0000:00/0000:00:01.0/usb1/1-1/1-1:1.0/0003:0627:0001.0001/input/input1
[ 1.450060] hid-generic 0003:0627:0001.0001: input,hidraw0: USB HID v0.01 Mouse [QEMU QEMU USB Tablet] on usb-0000:00:01.0-1/input0
[ 1.582060] usb 1-2: new high-speed USB device number 3 using ehci-pci
[ 1.748627] input: QEMU QEMU USB Keyboard as /devices/pci0000:00/0000:00:01.0/usb1/1-2/1-2:1.0/0003:0627:0001.0002/input/input2
[ 1.814392] hid-generic 0003:0627:0001.0002: input,hidraw1: USB HID v1.11 Keyboard [QEMU QEMU USB Keyboard] on usb-0000:00:01.0-2/input0
Do you have an idea ?
Best,
Forgot to give the name of the dongle :
Sonoff Zigbee 3.0 USB Dongle Plus “ZBDongle-P” VID:DID 10c4:ea60
Did you ever resolve your USB issue?
I have the same problem and it is driving me mad!