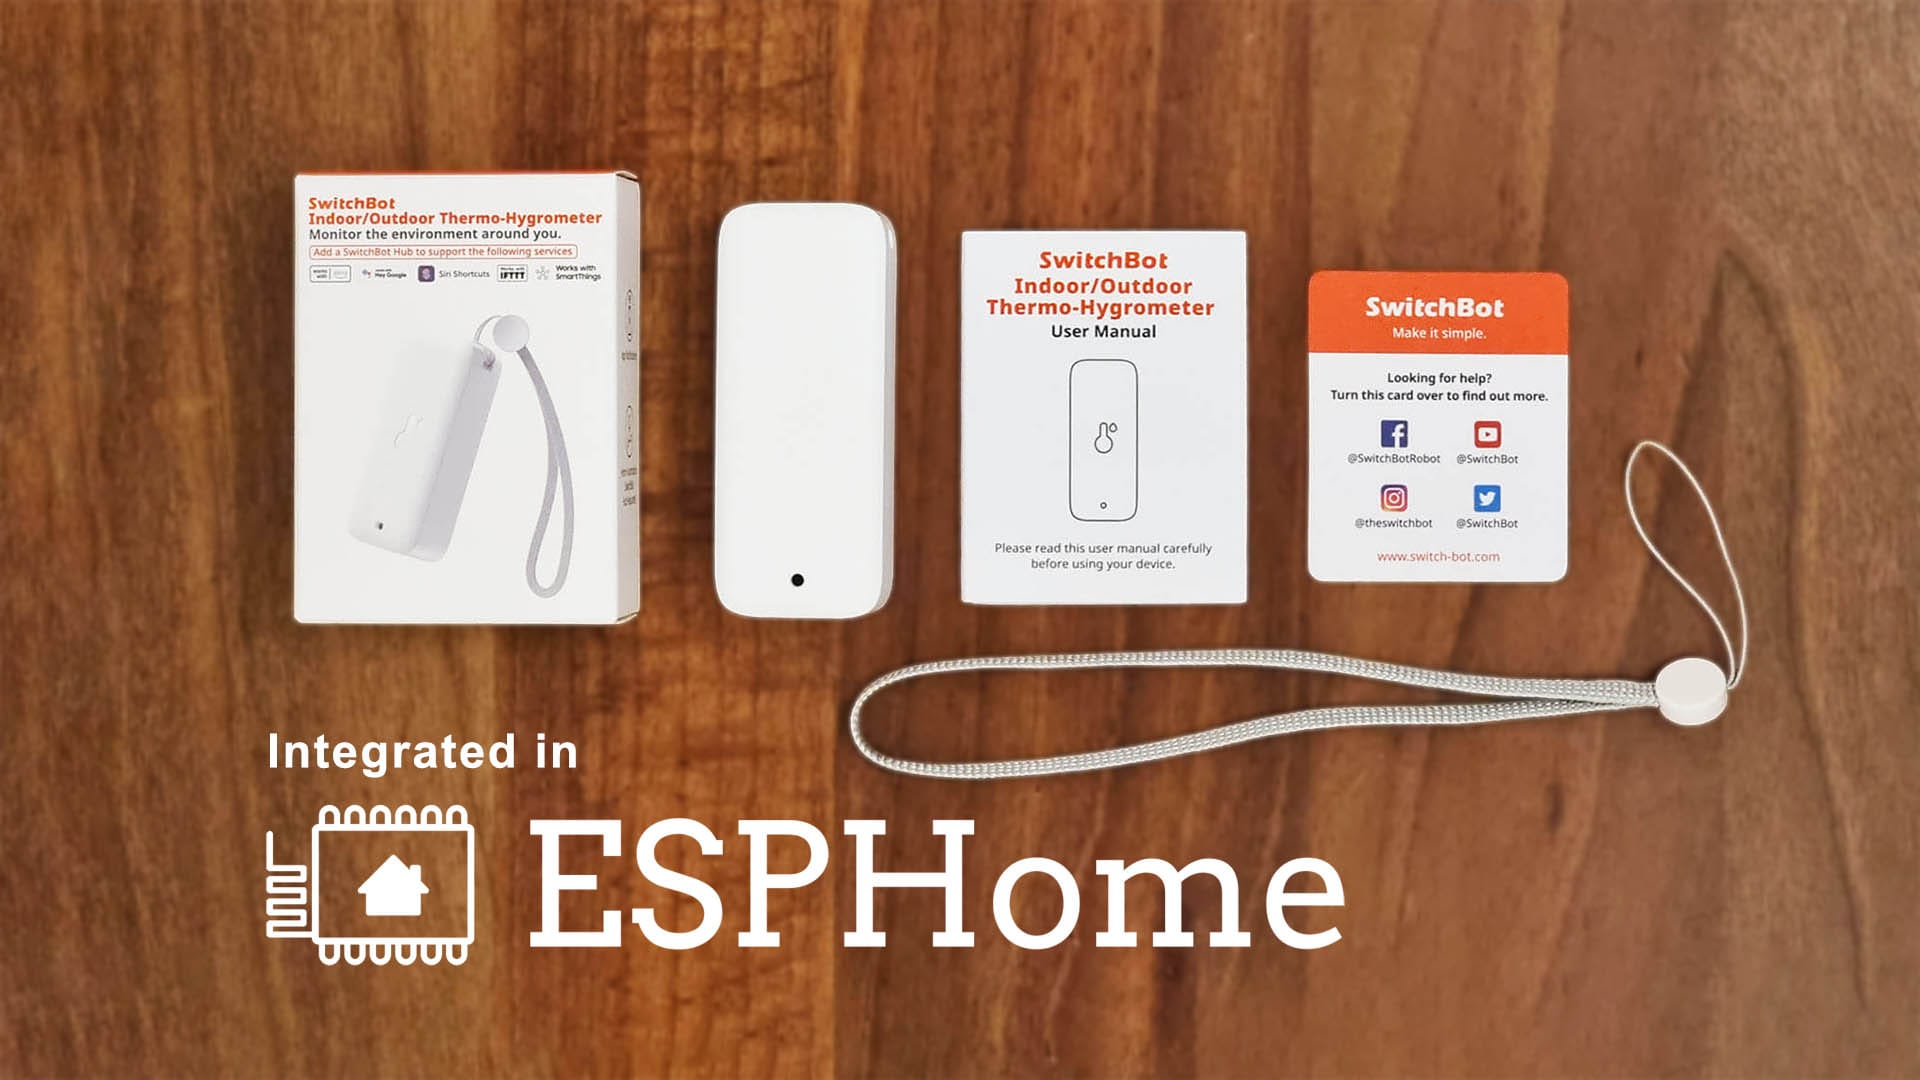
The SwitchBot Indoor/Outdoor Thermo-Hygrometer is an excellent outdoor temperature and humidity meter that uses BLE (Bluetooth Low Energy) as a communication protocol. The device is powered by a set of AAA batteries and because of its BLE connectivity, it has a long battery life of 2 years. You can get it on Amazon or SwitchBot’s Webstore for $14.99.
This Outdoor Meter is natively supported in Home Assistant through the SwitchBot Bluetooth integration, as well as Passive BLE monitor and the Theengs Decoder. You can add and use it in Home Assistant through these integrations without issues, obtaining data at regular interval.
However, digging through the internet, I was unable to get a working ESPHome code and directly capture BLE packets from this device. It appears to be the only SwitchBot device that uses a different advertising and data publishing approach compared to their previous Meter and Meter Plus models.
Of course, you could simply flash an ESP32 board and use bluetooth_proxy to forward BLE advertisements to Home Assistant, leveraging the official integration for data parsing. But where’s the fun in taking the easy route? Where’s the challenge in a 2 or 3 click integration? Why not lose hours and dive deeper into understanding SwitchBot’s new BLE advertising method? Ain’t no other way to scratch that itch.
In this article, I’m sharing the process in capturing, decoding and integrating BLE advertisements of the SwitchBot Outdoor Thermo-hygrometer in ESPHome and Home Assistant. Since there is no official SwitchBot ESPHome component, my integration method uses the esp32_ble_tracker platform and lambda inline functions, for correctly parsing byte data.
If you just want the ESPHome code for flashing an ESP32 board and capturing packets, jump to this section. If you want to learn about capturing SwitchBots’s BLE advertisements (and maybe others), read along.
Obtaining the MAC address
Before you do anything with any Bluetooth device, you obviously need the correct MAC address. There are many ways to get the address of the SwitchBot Outdoor Meter, the simplest one being just checking the SwitchBot app. The MAC address can be found under Settings > Device Info > BLE MAC.
I used my ESP32 to scan for devices near me and deduct which one was SwitchBots. I compared this to the app, and noted my device has a F8:C2:2B:20:30:E5 as MAC address. The simple code for scanning for nearby devices is as follows:
esp32_ble_tracker:

logger:
  level: DEBUG
Whenever BLE devices are discovered, the output will be printed in the logs. ESPHome will also print the name of the device along with the MAC, so you will know it’s the correct one. Save it, you will need for your ESPHome code.
Understanding BLE Advertisements
In a standard Bluetooth implementation, services and characteristics are pre-defined by the Bluetooth Special Interest Group (SIG), providing a common structure for advertising BLE data. This standardized approach makes it easier to understand and parse the data. However, many companies choose to use non-standard services and characteristics or even create entirely custom implementations.
To save battery, devices often send their entire BLE payload in a single frame, which requires decoding by the receiver. This adds complexity, as understanding the transmitted data requires knowledge of the specific calculation and byte storing logic used by the device. The data must be extracted from the bytes sent in the BLE advertisement and interpreted by the software receiving the payload—in this case, ESPHome.
In the case of SwitchBot, only basic data such as the company name, device name, model, and MAC address is sent through standard services and characteristics. There isn’t even a custom characteristic used to send temperature, humidity, and battery readings. Instead, these readings must be extracted and decoded from the data bytes embedded within a single BLE advertisement frame.
This means that SwitchBot transmits data through advertising packets rather than using GATT characteristics. The device broadcasts its data in the form of manufacturer-specific data or service data embedded directly within the advertising packets. This approach allows the device to conserve battery power by sending data intermittently without the need for maintaining a continuous BLE connection. It’s great for SwitchBot, but hard for techies like me who need to understand the calculation logic behind one-byte characteristics.
SIDE NOTE: A good way to check for the Bluetooth characteristics is to use nRF Mobile App.
Decoding One-byte Characteristics
Since all data needs to be retrieved from single bytes, I needed to understand the calculation logic behind extracting temperature, humidity, and battery levels. Fortunately (or unfortunately), SwitchBot provides a BLE API for their devices, including the Outdoor Meter, in order to help other ecosystems integrate their devices.
The first important step was to determine the actual data size of the manufacturer data and service data clusters. This is important to condition the lambda later, and avoid parsing mistakes or getting incorrect readings. I flashed this lambda to my ESP32 board:
esp32_ble_tracker:
on_ble_advertise:
- mac_address: "F8:C2:2B:20:30:E5"
then:
- lambda: |-
for (auto data : x.get_manufacturer_datas()) {
ESP_LOGD("ble_adv", "Manufacturer data size: %d", data.data.size());
}
for (auto data : x.get_service_datas()) {
ESP_LOGD("ble_adv", "Service data size: %d", data.data.size());
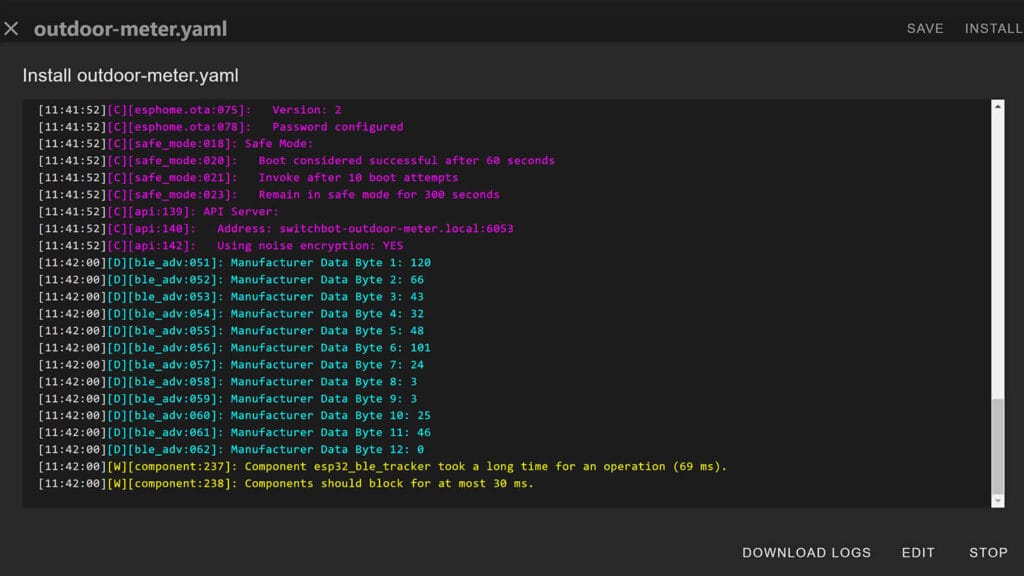
}Once it captured the first BLE packet for my SwitchBot Outdoor Meter, it printed the following in the logs:
[10:52:09][D][ble_adv:037]: Manufacturer data size: 12
[10:52:09][D][ble_adv:040]: Service data size: 3
[10:52:17][D][ble_adv:037]: Manufacturer data size: 12
[10:52:17][D][ble_adv:040]: Service data size: 3
Monitoring the device for 10 minutes, I noted the manufacturer data size is always equal to 12 and the service data always equal to 3. If no condition is used in the lambda, it is possible the data will be skewed and incorrect. Therefore, it is best to condition the byte processing with the data size.
I decided to start with the simple integer values: battery percentage and humidity. As temperature can also have a negative value and a decimal point, I correctly assumed the values goes through a more complex calculation formula and I left it for last.
Another important aspect of this process is using bitmasking to extract the correct values from each byte. Applying a bitmask allows me to isolate specific bits within a byte by performing a bitwise AND operation with a predefined pattern. This technique helps in filtering out unwanted bits and focusing only on the bits that contain the data I need, such as the actual value of the battery level or other sensor readings.
SwitchBot’s API tells me it applies a 0x7F bitmask for battery and humidity, and three others for temperature. Which was correct.
SwitchBot’s API tells me I need to capture data byte 5 for battery, byte 12 for humidity and bytes 10 and 11 for temperature. Which was incorrect.
Battery Data
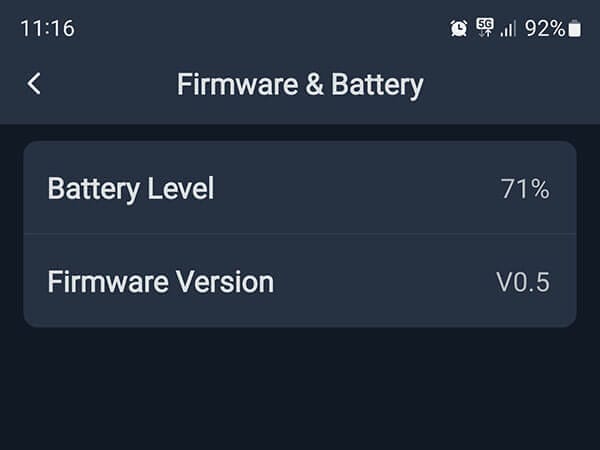
My first approach was to decode the battery percentage data. As I knew the value is stored in a single byte, all I had to do was capture the correct byte and apply the 0x7F bitmask. By applying a bitmask like 0x7F, I can ignore the most significant bit (MSB) and focus only on the lower 7 bits, which contain the actual battery percentage. This method allows me to decode the data accurately, even when it’s packed into a single byte. All that remained was to find the correct byte which contained the battery data.
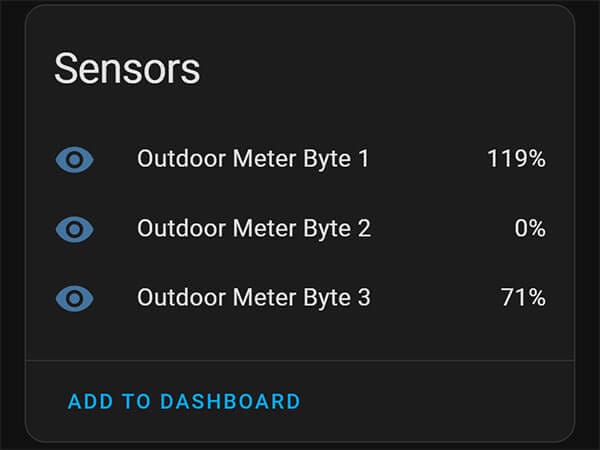
SwitchBot’s API tells me the battery percentage is advertised at byte 5, which was incorrect. Capturing the 5th byte from service data was not even possible, as the cluster had a size of 3. So, I just decided to capture each byte, apply the bitmask to each and compare the readings to the SwitchBot app. I used this function to parse all three individually:
esp32_ble_tracker:
  on_ble_advertise:
    - mac_address: "F8:C2:2B:20:30:E5"
      then:
        - lambda: |-
            for (auto data : x.get_service_datas()) {
                if (data.data.size() == 3) {
                    int8_t byte1_value = data.data[0] & 0x7F;
                    int8_t byte2_value = data.data[1] & 0x7F;
                    int8_t byte3_value = data.data[2] & 0x7F;

                    id(outdoor_byte_1).publish_state(byte1_value);
                    id(outdoor_byte_2).publish_state(byte2_value);
                    id(outdoor_byte_3).publish_state(byte3_value);
                }
            }

# Template sensors for each byte, repeat for each byte
sensor:
  - platform: template
    name: "Outdoor Meter Byte 1"
    id: outdoor_byte_1
    unit_of_measurement: "%"
    accuracy_decimals: 0
.............
Looking at the readings in Home Assistant and comparing them to the SwitchBot app, the correct byte turned out to be number 2. Just to make sure, I swapped the batteries in the device and the value popped to 100% only at byte 2. Success!
IMPORTANT: In programming, arrays (or lists of items) typically start at index 0. This is true in many languages, including C++ and Python, which ESPHome’s C++ lambdas follow. Which means, data byte 3 logged in the console is actually byte 2.
I eliminated the lambda for the incorrect bytes and tidied up the template. This is the correct code with the lambda function to parse battery percentage and save it in a template sensor with ESPHome:
esp32_ble_tracker:
  on_ble_advertise:
    - mac_address: "F8:C2:2B:20:30:E5"
      then:
        - lambda: |-
            for (auto data : x.get_service_datas()) {
                if (data.data.size() == 3) {
                    int8_t battery_pct = data.data[2] & 0x7F;
                    id(outdoor_battery).publish_state(battery_pct);
                }
            }
sensor:
  - platform: template
    name: "Outdoor Meter Battery"
    id: outdoor_battery
    unit_of_measurement: "%"
    accuracy_decimals: 0
    icon: "mdi:battery"
Humidity Data
To decode humidity, I decided to use the same approach. Flash individual sensors for each byte and compare the reading to the app. Since humidity is published under manufacturer data and not service data, it meant having 12 separate sensors. This time, I decided to log the output in the ESPHome console instead of creating template sensors in Home Assistant. Easier, neater and much less code.
As humidity used the same bitmask, which was 0x7F, this is the lambda to parse data from each individual byte in ESPHome:
esp32_ble_tracker:
  on_ble_advertise:
    - mac_address: "F8:C2:2B:20:30:E5"
      then:
        - lambda: |-
            for (auto data : x.get_manufacturer_datas()) {
                if (data.data.size() == 12) {
                    int8_t byte1_value = data.data[0] & 0x7F;
                    int8_t byte2_value = data.data[1] & 0x7F;
                    int8_t byte3_value = data.data[2] & 0x7F;
                    int8_t byte4_value = data.data[3] & 0x7F;
                    int8_t byte5_value = data.data[4] & 0x7F;
                    int8_t byte6_value = data.data[5] & 0x7F;
                    int8_t byte7_value = data.data[6] & 0x7F;
                    int8_t byte8_value = data.data[7] & 0x7F;
                    int8_t byte9_value = data.data[8] & 0x7F;
                    int8_t byte10_value = data.data[9] & 0x7F;
                    int8_t byte11_value = data.data[10] & 0x7F;
                    int8_t byte12_value = data.data[11] & 0x7F;

                    ESP_LOGD("ble_adv", "Manufacturer Data Byte 1: %d", byte1_value);
                    ESP_LOGD("ble_adv", "Manufacturer Data Byte 2: %d", byte2_value);
                    ESP_LOGD("ble_adv", "Manufacturer Data Byte 3: %d", byte3_value);
                    ESP_LOGD("ble_adv", "Manufacturer Data Byte 4: %d", byte4_value);
                    ESP_LOGD("ble_adv", "Manufacturer Data Byte 5: %d", byte5_value);
                    ESP_LOGD("ble_adv", "Manufacturer Data Byte 6: %d", byte6_value);
                    ESP_LOGD("ble_adv", "Manufacturer Data Byte 7: %d", byte7_value);
                    ESP_LOGD("ble_adv", "Manufacturer Data Byte 8: %d", byte8_value);
                    ESP_LOGD("ble_adv", "Manufacturer Data Byte 9: %d", byte9_value);
                    ESP_LOGD("ble_adv", "Manufacturer Data Byte 10: %d", byte10_value);
                    ESP_LOGD("ble_adv", "Manufacturer Data Byte 11: %d", byte11_value);
                    ESP_LOGD("ble_adv", "Manufacturer Data Byte 12: %d", byte12_value);
                }
            }
All outputs were neatly logged in the ESPHome console. The SwitchBot app gave me a reading of 46%, which corresponded to byte 10 with the applied bitmask. Most of the other values don’t make sense, reporting at close to 0 or a above 100%, but exhaling into the sensor moved the value of bit 10 correctly which proved that indeed byte 10 was the correct one.
IMPORTANT: In programming, arrays (or lists of items) typically start at index 0. This is true in many languages, including C++ and Python, which ESPHome’s C++ lambdas follow. Which means, data byte 11 logged in the console is actually byte 10.
Temperature Data
All that remained was to capture the temperature data. This is where things got tricky. Not only is the temperature data stored in two bytes instead of one, it can also have a negative sign before the value. Which means, the two need to be combined after applying the correct bitmasks in order to get the temperature value. From the SwitchBot API, I deducted that the bitmasks are indeed correct while the bytes are not.
Let’s break it down.
- The temperature data is stored across two bytes:
data.data[x]anddata.data[y]. - Fractional Part: The last 4 bits of
data.data[x](extracted usingdata.data[x] & bitmask 0x0F) are multiplied by0.1to get the decimal portion of the temperature. The bitmask and multiplier are retrieved from SwitchBot’s API. - Whole Number Part: The lower 7 bits of
data.data[y](extracted usingdata.data[y] & 0x7F) represent the main part of the temperature. The bitmask is retrieved from SwitchBot’s API. - The fractional part and the whole number part are added together to form the complete temperature value.
- The most significant bit (MSB) of
data.data[y](checked usingdata.data[y] & 0x80) indicates if the temperature is positive or negative. If the MSB is0, the temperature is negative, so the value is multiplied by-1.
I decided to just create a sensor and test it out. While SwitchBot’s bytes of 11 and 10 turned out to be incorrect, working backwards, I landed on the correct value at bytes 8 and 9 in zero-indexed order. This was the correct lambda:
esp32_ble_tracker:
  on_ble_advertise:
    - mac_address: "F8:C2:2B:20:30:E5"
      then:
        - lambda: |-
            for (auto data : x.get_manufacturer_datas()) {
                if (data.data.size() == 12) {
                    float temperature = (float(data.data[8] & 0x0F) * 0.1) + float(data.data[9] & 0x7F);
                    if (!(data.data[9] & 0x80)) {
                        temperature = -temperature;
                    }
                    id(outdoor_temperature).publish_state(temperature);
                }
            }
sensor:
  - platform: template
    name: "Outdoor Meter Temperature"
    id: outdoor_temperature
    unit_of_measurement: "°C"
    accuracy_decimals: 1
    icon: "mdi:thermometer"
Creating Template Sensors
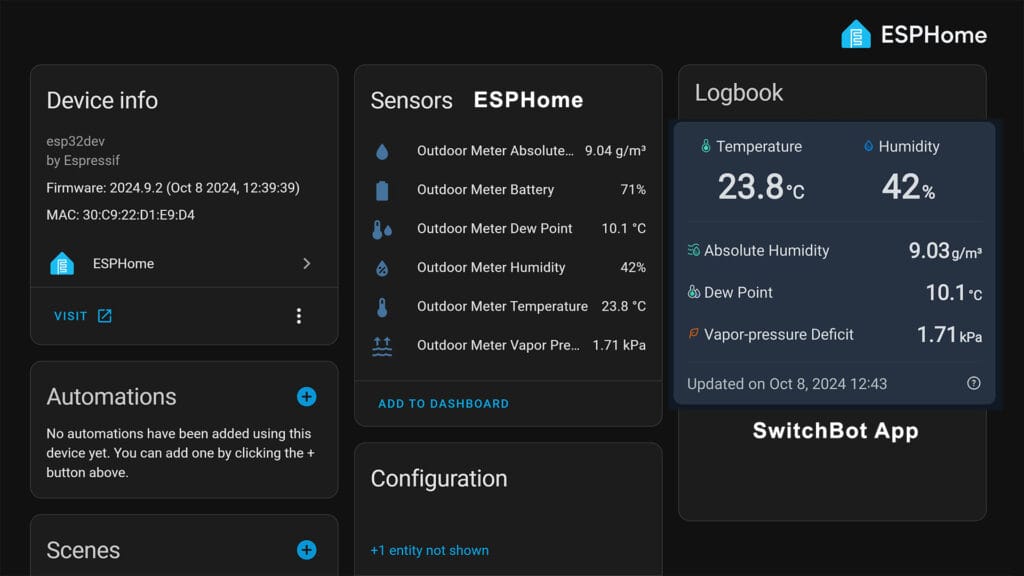
Besides temperature and humidity, the SwitchBot Outdoor Meter calculates absolute humidity, dew point and vapor-pressure deficit in the app. I won’t go into too much detail about what each one does and is useful for, but these can be simply calculated from the temperature and humidity values.
Here’s a template sensor for each that you can add to the ESPHome config:
sensor:
## ABSOLUTE HUMIDITY
  - platform: template
    name: "Outdoor Meter Absolute Humidity"
    id: outdoor_absolute_humidity
    unit_of_measurement: "g/m³"
    accuracy_decimals: 2
    icon: "mdi:water"
    lambda: |-
      if (id(outdoor_temperature).state != NAN && id(outdoor_humidity).state != NAN) {
        float temp = id(outdoor_temperature).state;
        float rh = id(outdoor_humidity).state;
        return (6.112 * exp((17.67 * temp) / (temp + 243.5)) * rh * 2.1674) / (273.15 + temp);
      } else {
        return NAN;
      }
## DEW POINT
  - platform: template
    name: "Outdoor Meter Dew Point"
    id: outdoor_dew_point
    unit_of_measurement: "°C"
    accuracy_decimals: 1
    icon: "mdi:thermometer-water"
    lambda: |-
      if (id(outdoor_temperature).state != NAN && id(outdoor_humidity).state != NAN) {
        float temp = id(outdoor_temperature).state;
        float rh = id(outdoor_humidity).state;
        float a = 17.67;
        float b = 243.5;
        float alpha = ((a * temp) / (b + temp)) + log(rh / 100.0);
        return (b * alpha) / (a - alpha);
      } else {
        return NAN;
      }
## VAPOR-PRESSURE DEFICIT
  - platform: template
    name: "Outdoor Meter Vapor Pressure Deficit"
    id: outdoor_vapor_pressure_deficit
    unit_of_measurement: "kPa"
    accuracy_decimals: 2
    icon: "mdi:waves-arrow-up"
    lambda: |-
      if (id(outdoor_temperature).state != NAN && id(outdoor_humidity).state != NAN) {
        float temp = id(outdoor_temperature).state;
        float rh = id(outdoor_humidity).state;
        float es = 6.112 * exp((17.67 * temp) / (temp + 243.5));
        float vpd = (1.0 - (rh / 100.0)) * es;
        return vpd / 10.0; // Convert from hPa to kPa
      } else {
        return NAN;
      }
Full Config Example
Here is the full example for capturing BLE advertisement data of the SwitchBot Outdoor Thermo-Hygrometer, parse it in ESPHome and publish it as sensors in Home Assistant.
SwitchBot Outdoor Meter ESPHome (click to expand)
esphome:
  name: switchbot-outdoor-meter
  friendly_name: Outdoor Meter

esp32:
  board: esp32dev
  framework:
    type: arduino

logger:


api:
  encryption:
    key: "xxxx" #Replace

ota:
  - platform: esphome
    password: "xxx" #Replace

wifi:
  ssid: !secret wifi_ssid
  password: !secret wifi_password

  ap:
    ssid: "Outdoor-Meter Fallback Hotspot"
    password: "xxx" #Replace

captive_portal:

esp32_ble_tracker:
  on_ble_advertise:
    - mac_address: "F8:C2:2B:20:30:E5" #Replace MAC address
      then:
        - lambda: |-
            for (auto data : x.get_manufacturer_datas()) {
                if (data.data.size() == 12) {
                    float temperature = (float(data.data[8] & 0x0F) * 0.1) + float(data.data[9] & 0x7F);
                    if (!(data.data[9] & 0x80)) {
                        temperature = -temperature;
                    }
                    id(outdoor_temperature).publish_state(temperature);
                    id(outdoor_humidity).publish_state(data.data[10] & 0x7F);
                }
            }
            for (auto data : x.get_service_datas()) {
                if (data.data.size() == 3) {
                    int8_t battery_pct = data.data[2] & 0x7F;
                    id(outdoor_battery).publish_state(battery_pct);
                }
            }
sensor:
  - platform: template
    name: "Outdoor Meter Temperature"
    id: outdoor_temperature
    unit_of_measurement: "°C"
    accuracy_decimals: 1
    icon: "mdi:thermometer"

  - platform: template
    name: "Outdoor Meter Humidity"
    id: outdoor_humidity
    unit_of_measurement: "%"
    accuracy_decimals: 0
    icon: "mdi:water-percent"

  - platform: template
    name: "Outdoor Meter Battery"
    id: outdoor_battery
    unit_of_measurement: "%"
    accuracy_decimals: 0
    icon: "mdi:battery"

  - platform: template
    name: "Outdoor Meter Absolute Humidity"
    id: outdoor_absolute_humidity
    unit_of_measurement: "g/m³"
    accuracy_decimals: 2
    icon: "mdi:water"
    lambda: |-
      if (id(outdoor_temperature).state != NAN && id(outdoor_humidity).state != NAN) {
        float temp = id(outdoor_temperature).state;
        float rh = id(outdoor_humidity).state;
        return (6.112 * exp((17.67 * temp) / (temp + 243.5)) * rh * 2.1674) / (273.15 + temp);
      } else {
        return NAN;
      }

  - platform: template
    name: "Outdoor Meter Dew Point"
    id: outdoor_dew_point
    unit_of_measurement: "°C"
    accuracy_decimals: 1
    icon: "mdi:thermometer-water"
    lambda: |-
      if (id(outdoor_temperature).state != NAN && id(outdoor_humidity).state != NAN) {
        float temp = id(outdoor_temperature).state;
        float rh = id(outdoor_humidity).state;
        float ln_rh = log(rh / 100.0);
        return (243.5 * (ln_rh + (17.67 * temp) / (temp + 243.5))) / (17.67 - ln_rh - (243.5 / temp));
      } else {
        return NAN;
      }

  - platform: template
    name: "Outdoor Meter Vapor Pressure Deficit"
    id: outdoor_vapor_pressure_deficit
    unit_of_measurement: "kPa"
    accuracy_decimals: 2
    icon: "mdi:waves-arrow-up"
    lambda: |-
      if (id(outdoor_temperature).state != NAN && id(outdoor_humidity).state != NAN) {
        float temp = id(outdoor_temperature).state;
        float rh = id(outdoor_humidity).state;
        float es = 6.112 * exp((17.67 * temp) / (temp + 243.5));
        float vpd = (1.0 - (rh / 100.0)) * es;
        return vpd / 10.0; // Convert from hPa to kPa
      } else {
        return NAN;
      }
DISCLAIMER: I am still not entirely sure whether the correct bytes that worked for me will work for you as well. I can only assume there are variants of this device, with SwitchBot using different locations for storing and advertising the values. If my code does not work for you, and assuming one-byte decoding is true for service and manufacturer data in your device as well, try changing the bytes only to the following:
Battery [5], Humidity [12], Temperature [10, 11]
SwitchBot’s Thermo-Hygrometer is available on all Amazon stores as well as their Official webstore. You can get it for about $14.99, but keep an eye on promo codes which are frequently available on the listing itself.

SwitchBot Webstore
Outdoor Meter | Outdoor Meter Combo![]()
United States | United Kingdom | Germany
Canada | Netherlands | France
*If links fail to open, try disabling your AdBlocker.


While it’s not on my Bucket List a.t.m., I highly appreciate your Guides and Walkthroughs like this, and wanted to leave a Big Thanks! ☺️
You’re welcome Dan!
Cheers!
I just tried this, work for me, but getting the values only if I have the esphome log open, once I close the log display (from ha esp adding logs) the values stop updating.
I wanted to use your approach, instead of ble proxy, because I wanted to see update even when values don’t change and I can use force_update true on esp, while proxy dose not give me last update only when values change.
Just tried this, working flawlessly, but it does unfortunately highlight how bad the sensors themselves are, so I dont think I will continue using them. Mine is reading more than 6c high.
Your work is magnificent. I had understood from the Switchbot_to_mqtt project that it was necessary to decode the BLE string in some way but I didn’t know where to start.
Thank you!!!!
Are you happy with the accuracy? I am not…
Really? I think it’s pretty darn accurate.
I use it only outdoors btw
Thanks for the write up. I will give this discovery process a shot for another Bluetooth thing I want to capture data from.
Is there any reason to use this method instead of the native Switchbot integration via Bluetooth proxy?
There is no “major” reason to do it this way. Home Assistant’s Integration also operates locally!
However, using ESPHome with direct byte parsing functions provides complete local control without relying on the official SwitchBot Bluetooth integration, offering greater flexibility, customization, and independence from built-in Bluetooth radios or dongles.
My preferred way is to use ESP32s for everything, as I have them all over my home.
mine were regularly off by very large margins. I did return them for replacement, replacement was just as bad. I frankly cannot recommend them. their response time to temperature changes was very very slow and they were regularly upto 6 Celsius off from actual temperature according to calibrated sources, which I think personally is far enough off to be entirely unusable.
I am instead just applying this article as a tutorial on decoding temperature measurements from ble on ESPHome and have made a few of my own sensors that are reporting by ble.
My application for doing this in ESPHome is for pairing with some esphome trv’s I’ve made and having a remote sensor for room temperature without having to rely on HA working
That is definitely not my experience with the SwitchBot Outdoor Thermometer.
But hey, it’s possible.
Glad you are finding value in the article anyway, cheers.
Hi SHS, very impressive work.
Have you seen there are 2 GPIOS available on the PCB: P00 and P03.
Do you mind there’s a way to get their state ?
I did notice those, but I never occurred to me they might be useful.
What are you trying to achieve?
I just would like to use them as 2 extra GPIOs and get, maybe, switches connected to them.
I do have this but I use the easy method using official integration.
But I need to use switchbot motion sensor with a esphome relay without using HA. switchbot motion sensor should trigger the esphome relay is that possible?
Therothically it possible.
Shelly does use that system with their gen three devices, ultra local control. Relay and motion sensor connected via Bluetooth.
Nice piece of reverse engineering. Kudos.
I’m finding using ESP32s as Bluetooth/BLE nodes over the WireGuard VPN between my place & my partner’s a little problematic when using the SwitchBox BLE integration. Having the ESP32 pull the data (currently an M5Stack AtomU) works much more reliably, thanks.
Hi, from the Netherlands.
Is it possible always set to the more then 10 degree’s speed, because the closer it gets to the actual temperature the slower it gets like most wireless temperature meters “for accuracy”. And is this difficult to do?
I’m not sure I understand what you mean
Those wanting to implement something similar for Govee environment devices – such as the H5075 which is about the same price as the equivalent SwitchBot entry-level LCD thermometer/hygrometer but with a bigger, clearer and more informative display – should be able to glean the required information from the following HA integration source code.
https://github.com/Home-Is-Where-You-Hang-Your-Hack/sensor.goveetemp_bt_hci/blob/master/custom_components/govee_ble_hci/govee_advertisement.py
The Govee Bluetooth HA integration for these also works well with ESPHome BLE proxy/repeater devices by the way. I have two at my partner’s that my HA server reads via an M5Stack AtomU over the WireGuard VPN between our houses.
Hello, thank you for your work, I have integrated it into my ESPHome and it works! The only thing is that the update speed is very slow. I have three other xiaomi_lywsd03mmc thermometers and they are much faster. Is there a way to speed up communication? If you want, I can send you my configuration and a log.