Recently I wrote a tutorial covering the Easiest way to install Home Assistant on Proxmox by using automated helper scripts, which streamlines the deployment process significantly. Since I shared that article, many of you contacted me asking for a guide of how to separate Zigbee2MQTT from HA in Proxmox.
This article is a continuation of the first one, and I’m going to show you how to do exactly that: Separate Zigbee2MQTT from Home Assistant entirely, so It can run as separate container independent from Home Assistant.
Why separate Zigbee2MQTT from Home Assistant?
For the uninitiated, you might wonder why would you want to separate Zigbee2MQTT from Home Assistant? Running it like an add-on gives you full control and access to it’s features right from Home Assistant.
Well, a separate Zigbee2MQTT instance on your local network has a few advantages, with the most important being your Zigbee network will no longer be affected by Home Assistant restarts, updates, braking changes and other downtime you server might experience.
Zigbee2MQTT will run completely independently and still push it’s data through MQTT in Home Assistant.
Prerequisites
Before starting with this tutorial, a few conditions need to be met to be able to follow along. This article is specifically dedicated to a Proxmox VE, since that’s the most popular virtualization platform among Home Assistant users. If you have different hardware or VM, the guide can be easily adapter if needed.
- Running Proxmox Virtual Environment
- Running Home Assistant VM in Proxmox
- All devices on the same local network
My Proxmox is running on a cheap Mini PC, but you can deploy yours on any hardware you want. It should be powerful enough to make the experience better, faster and more stable than a Raspberry Pi.
Methods of Separating Zigbee2MQTT from Home Assistant
There are two actual ways to separate Zigbee2MQTT from Home Assistant in Proxmox:
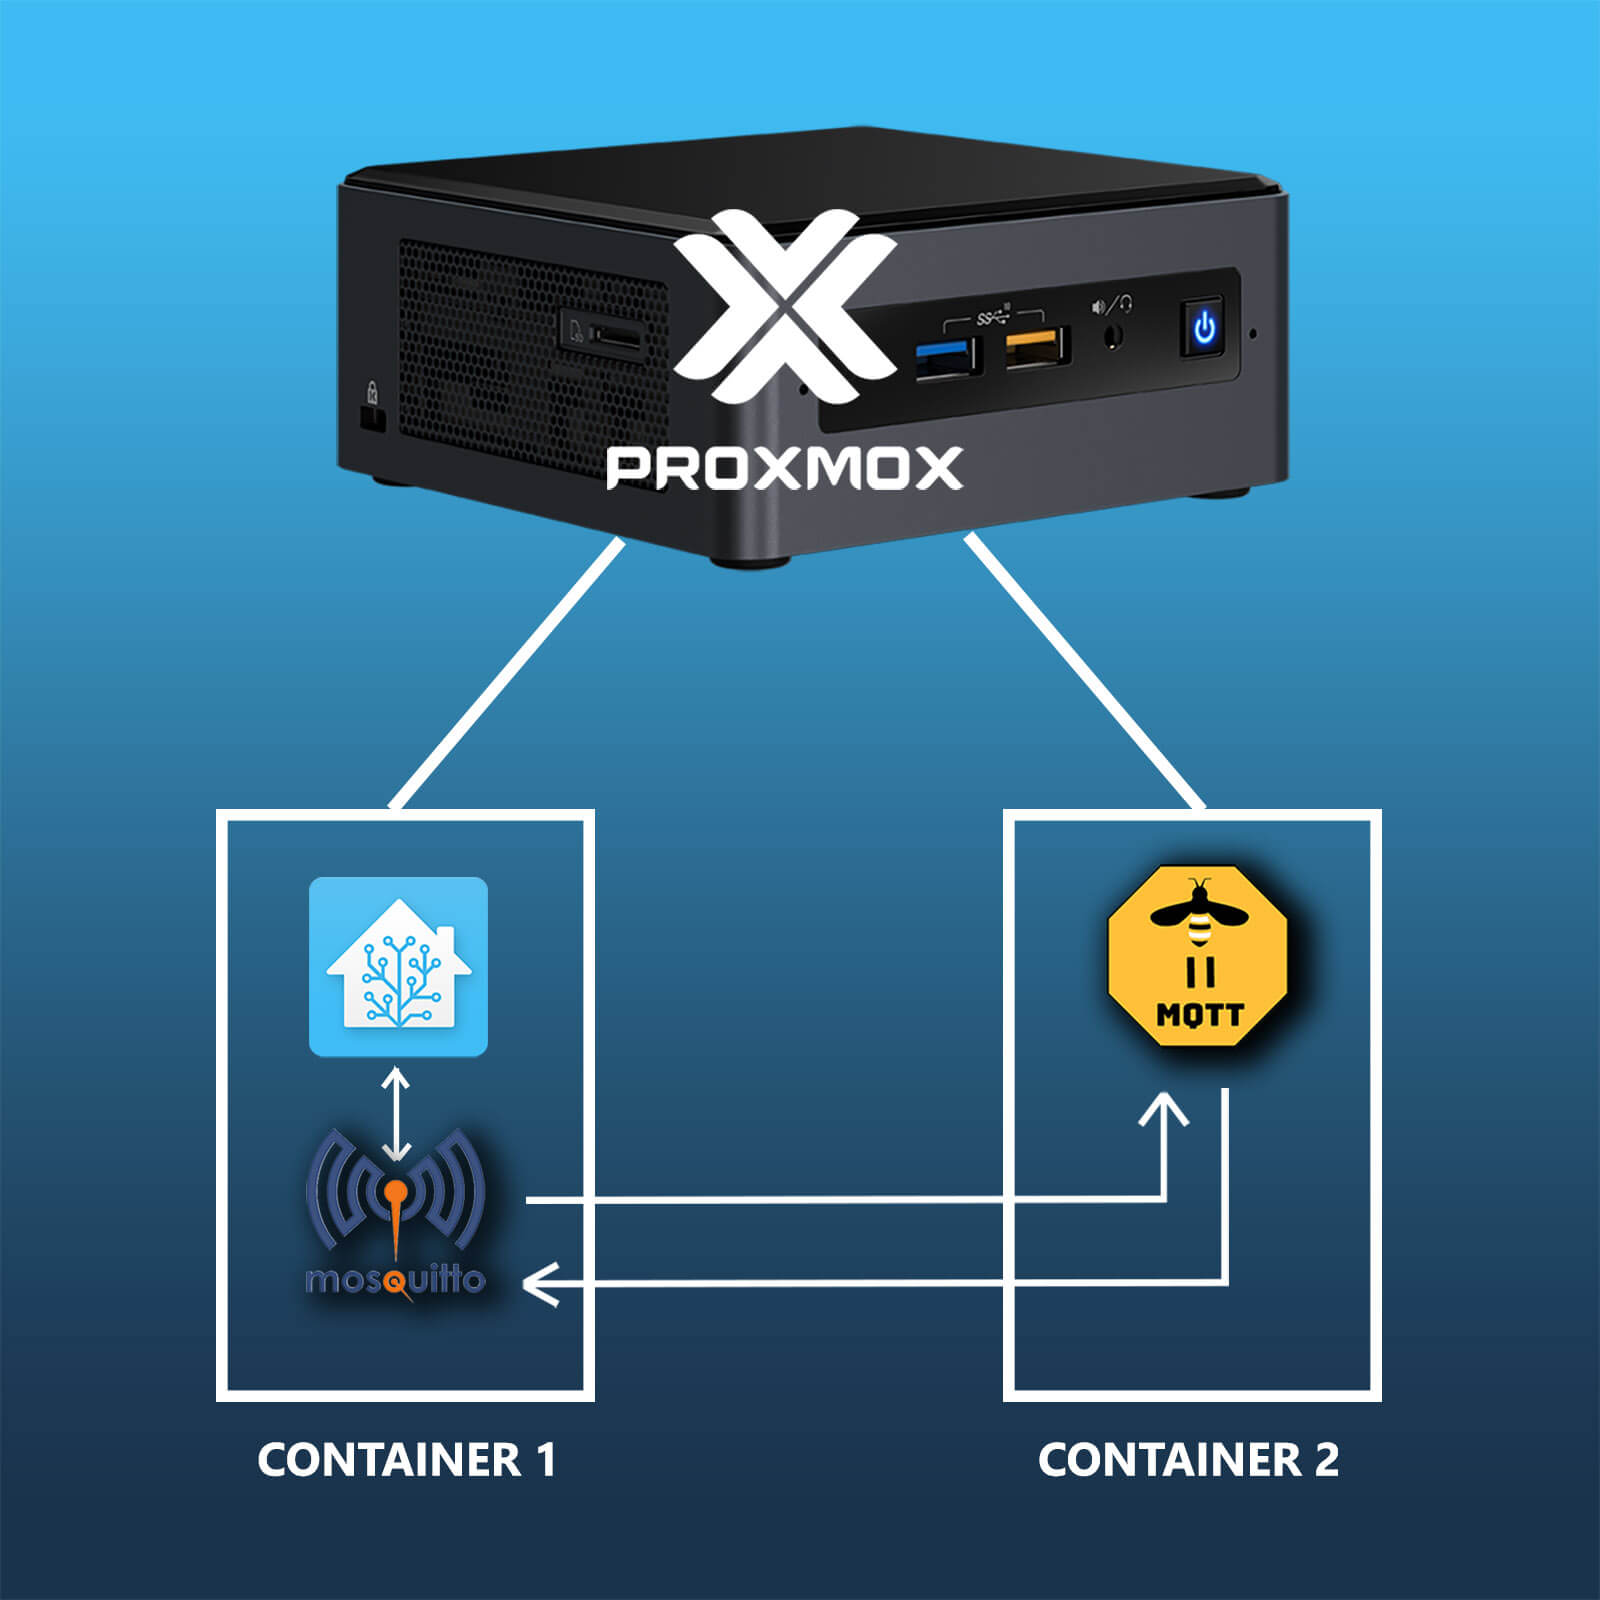
- Method A: Partial Separation
- Separate Zigbee2MQTT Container
- MQTT Broker (Mosquitto) installed in Home Assistant as an add-on
- Method B: Complete Separation
- Separate Zigbee2MQTT Container
- Separate MQTT Broker (Mosquitto) Container deployed in Proxmox
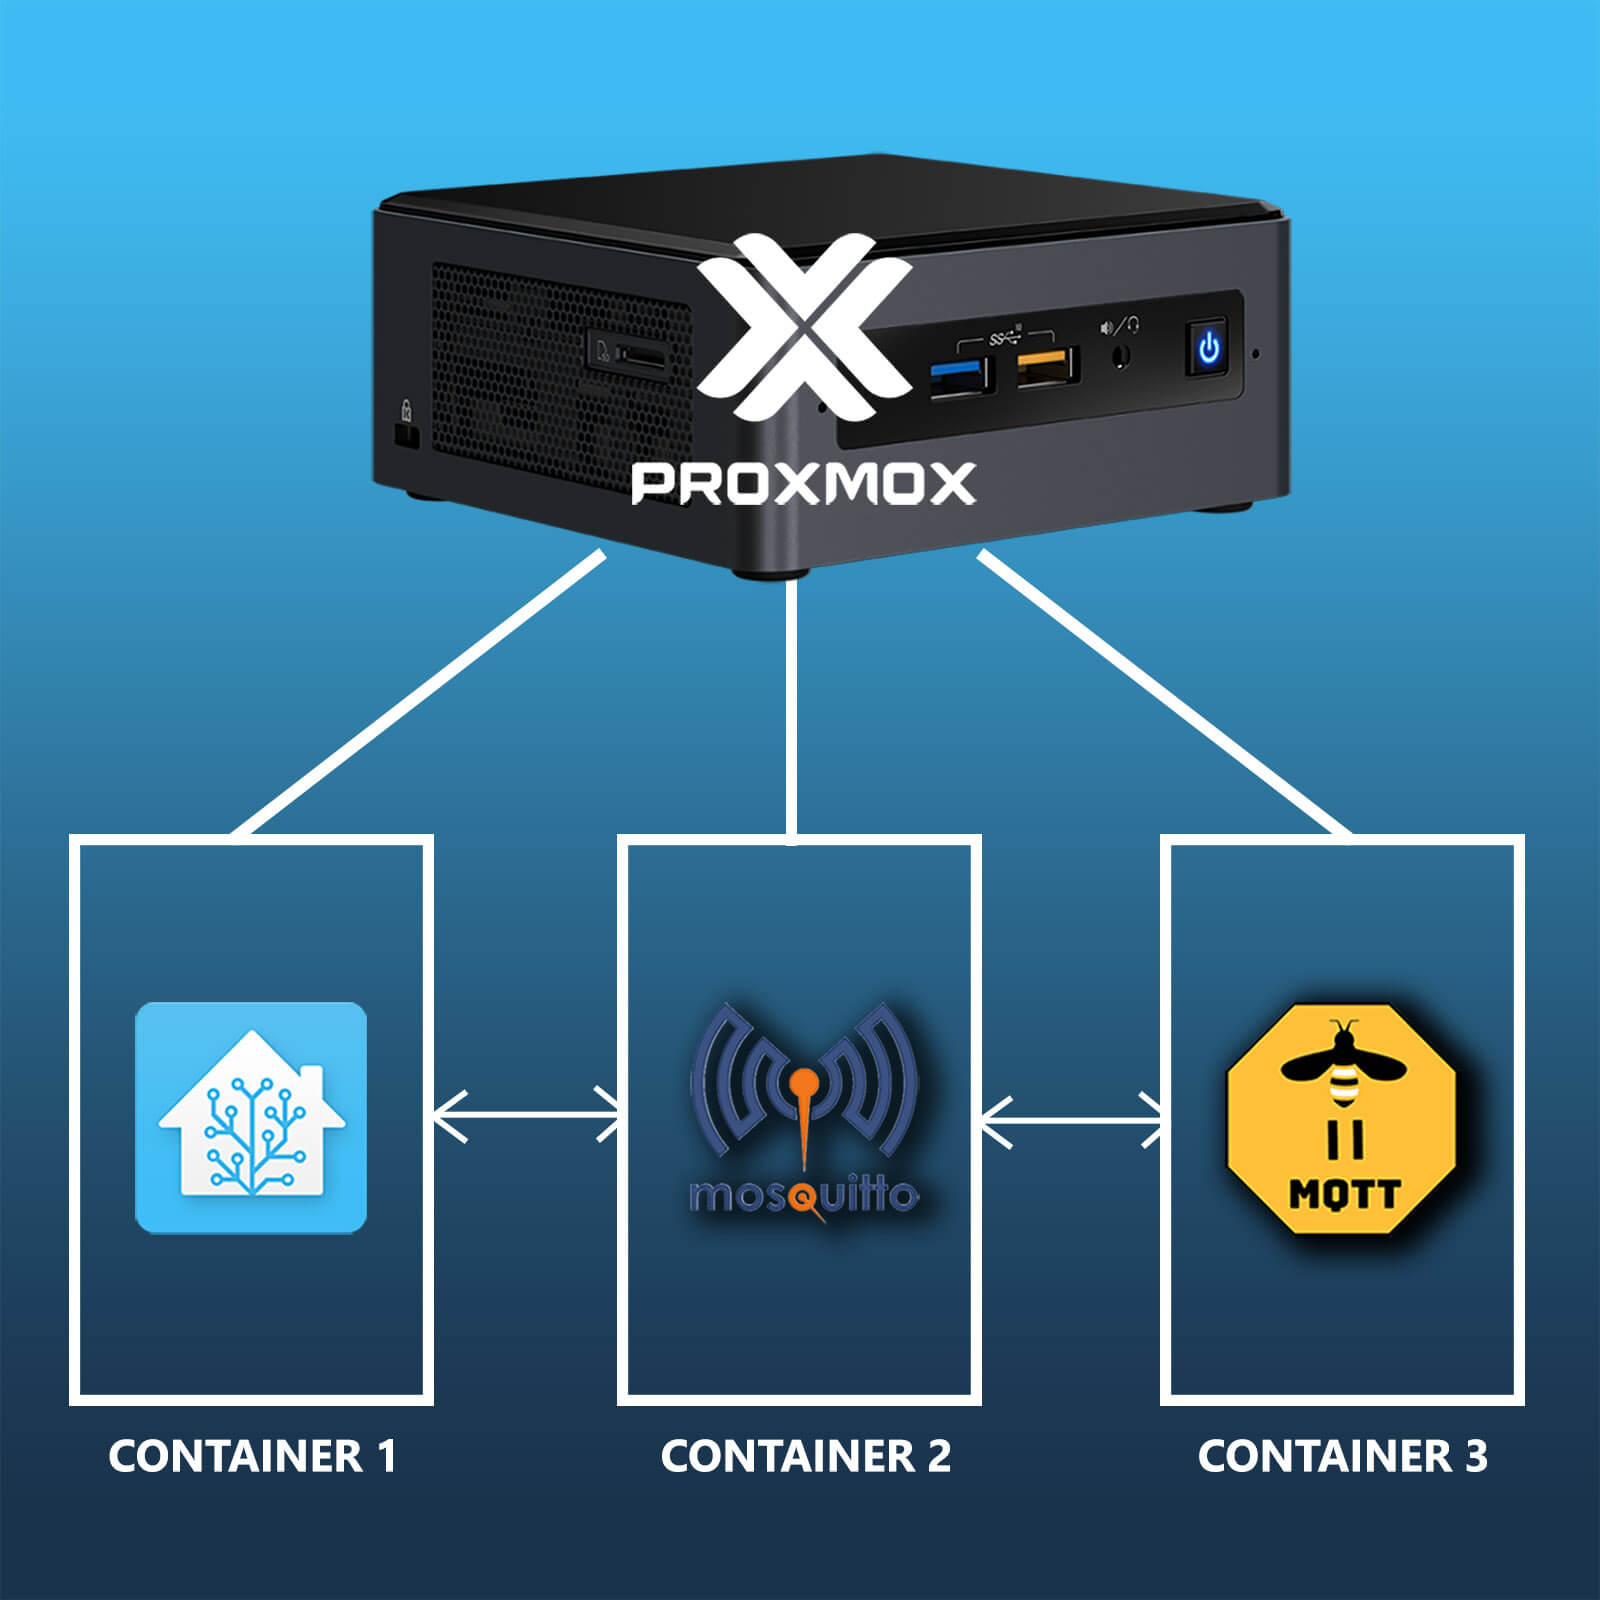
In this guide, I will cover both so you can decide which one is for you. Method A is a partial separation, as the MQTT Broker is still installed in Home Assistant as an add-on. Method B is a complete separation, as both are deployed as separate containers along side HA and connected with the MQTT Integration.
Installing MQTT Broker (Mosquitto)
Before we can fully setup and deploy a Zigbee2MQTT Container in Proxmox, we are going to setup the MQTT broker. Like I mentioned above, we can do this in two ways:
Method A: Install MQTT Broker as an Add-on in Home Assistant
1. Open up your Home Assistant instance
2. Navigate to Settings > Add-ons > Add-on Store and search for MQTT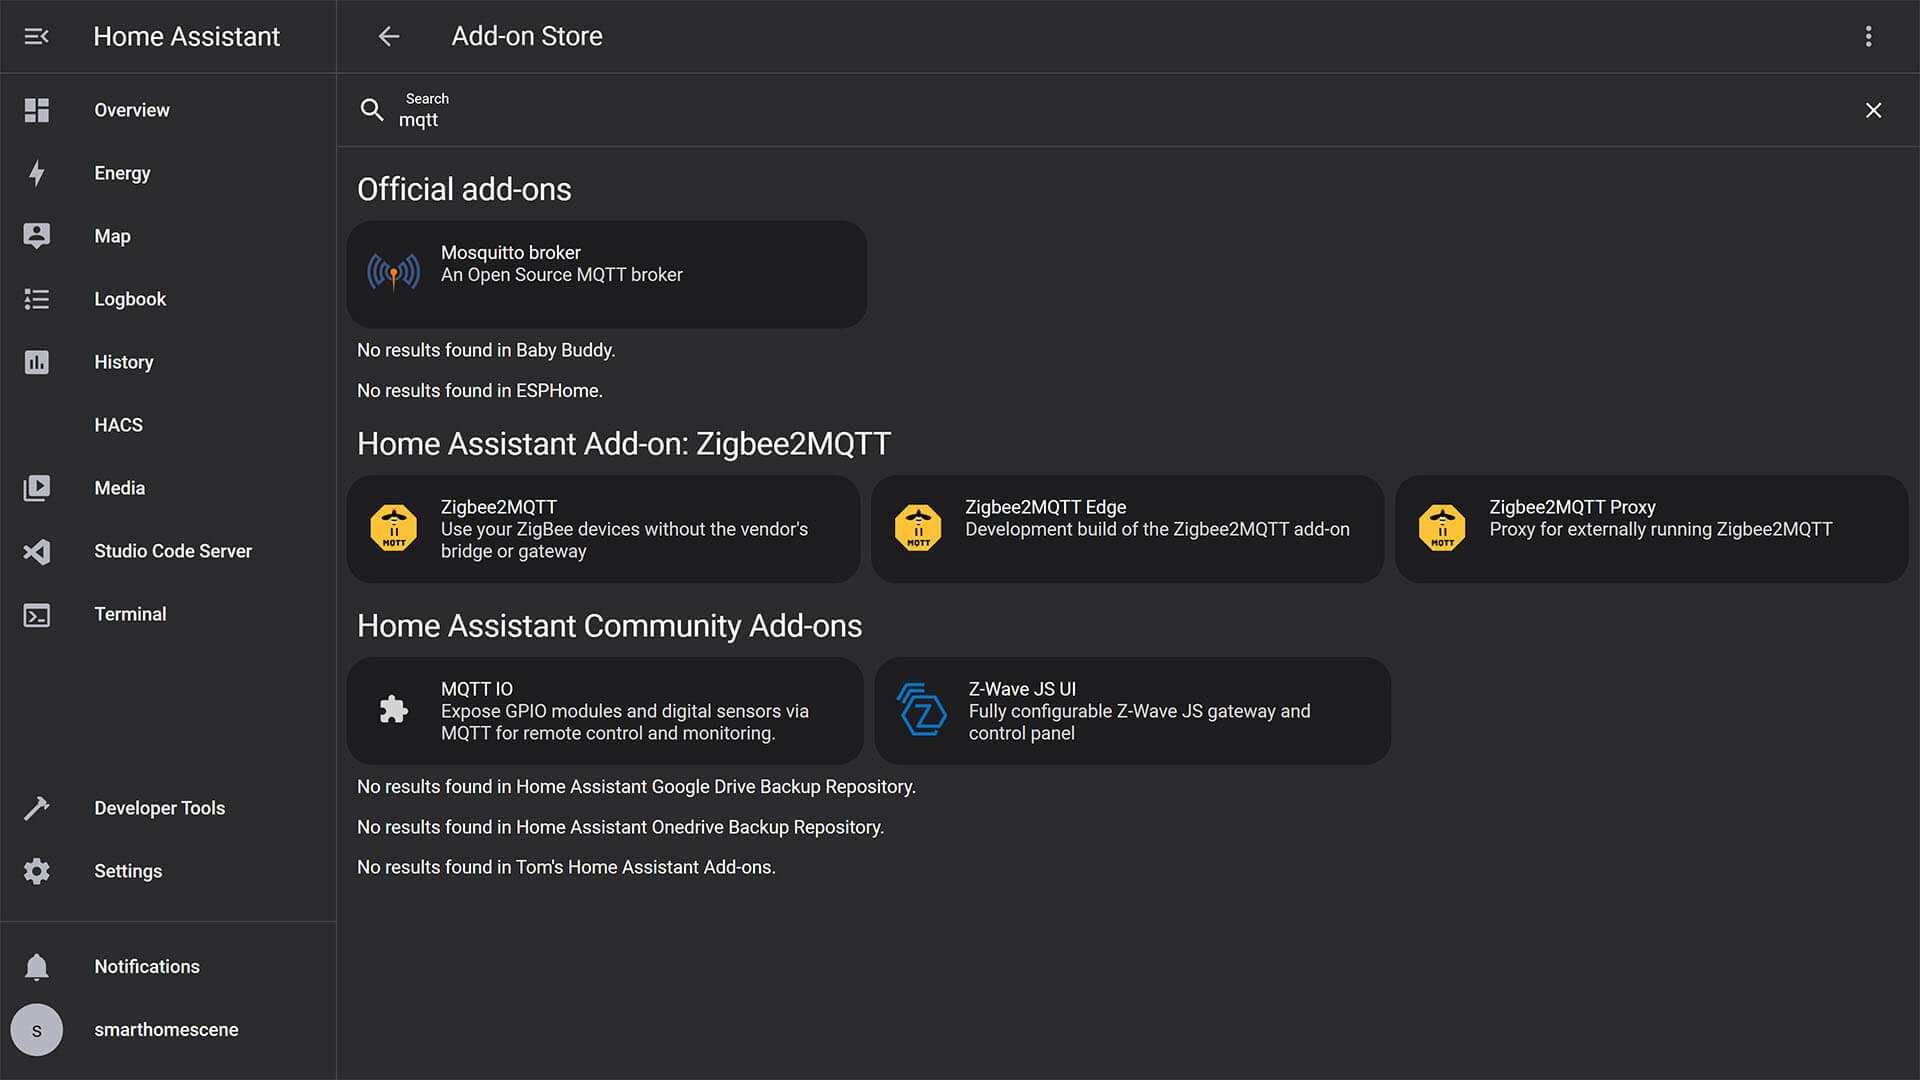
3. Select Mosquitto broker and click Install
4. Turn on the Start on boot and Watchdog toggles
5. Navigate to the Configuration tab and create a new user with any credentials you want to
6. Optionally, at the bottom of the screen you can change the access port
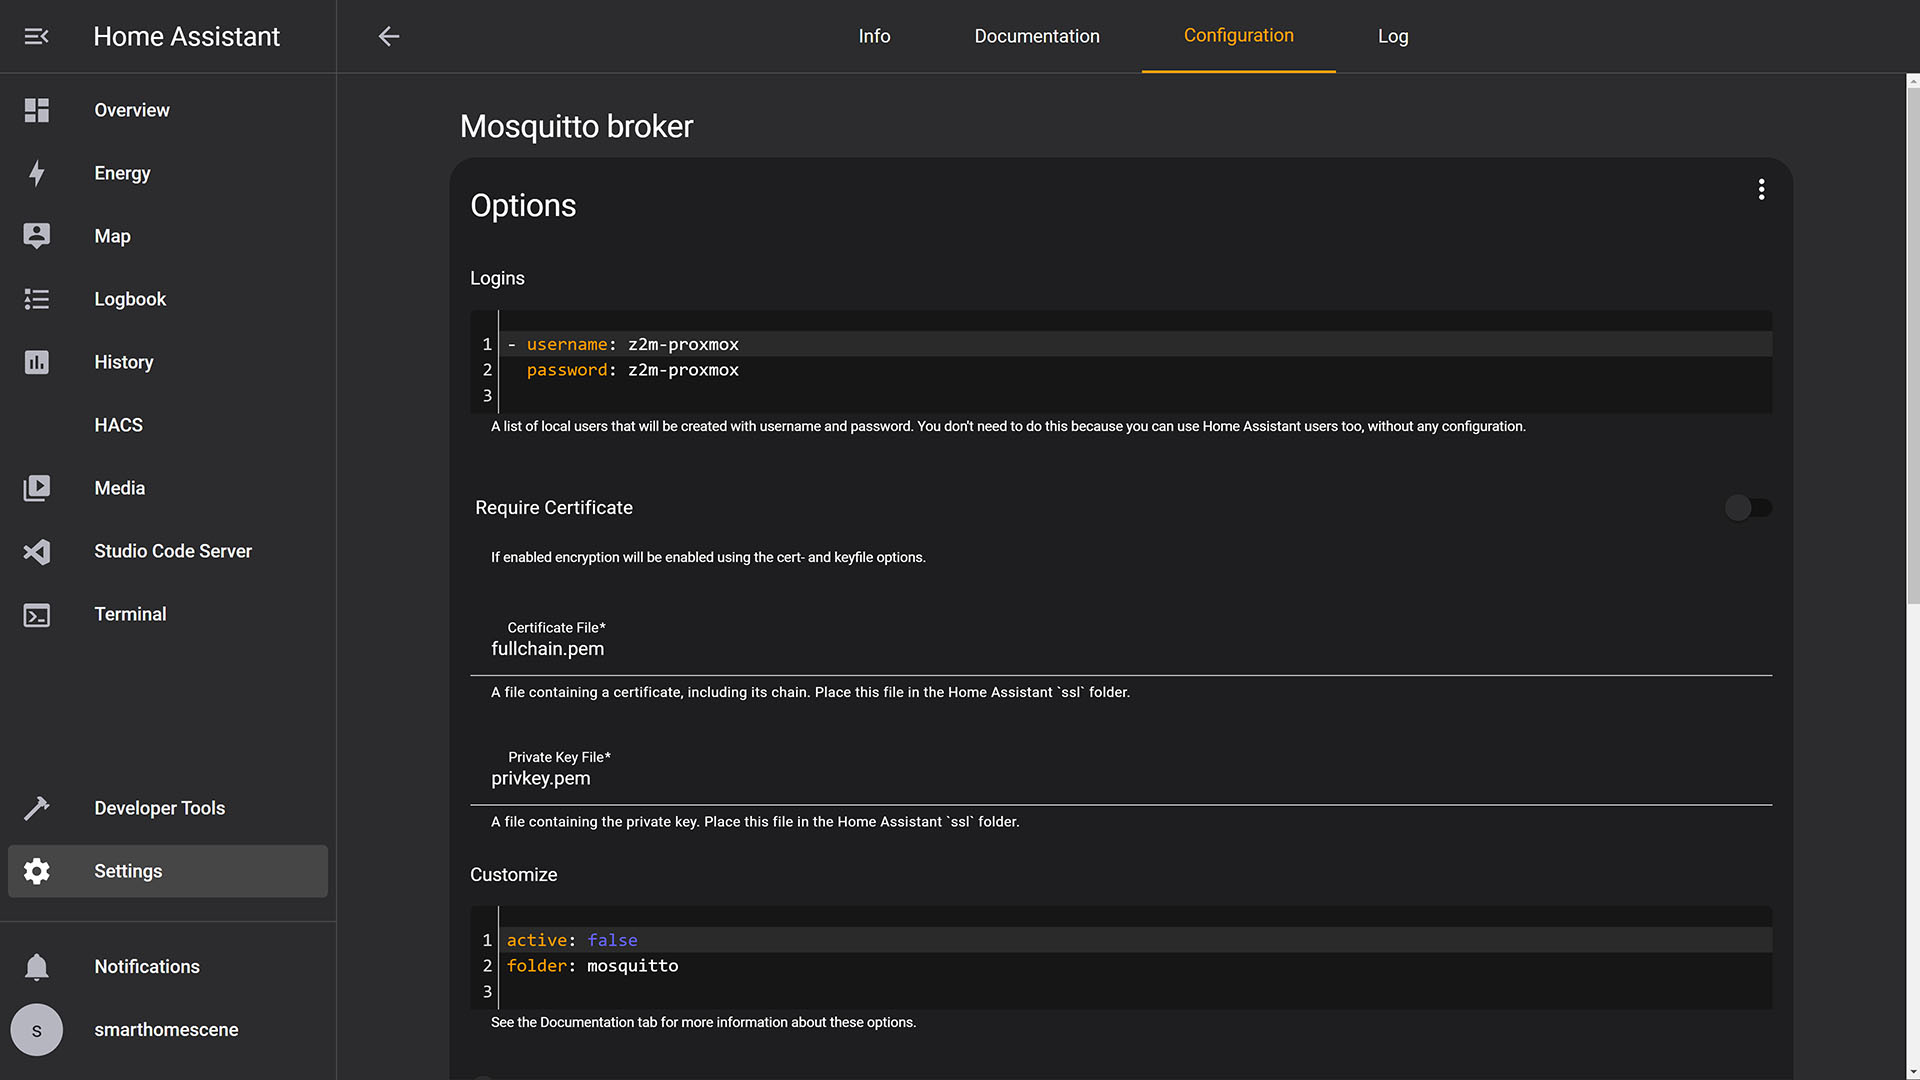
7. Your MQTT Broker access IP address is: homeassistant_ip:port (e.g. 192.168.0.XXX:1883)
8. Your MQTT Broker login credentials are set in the add-on (e.g. username: z2m-proxmox, password: z2m-proxmox)
8. Done
Method B: Install MQTT Broker as a Proxmox Container
1. Open up your Proxmox VE and click Shell
2. Run the following script to install MQTT Mosquitto
bash -c "$(wget -qLO - https://github.com/community-scripts/ProxmoxVE/raw/main/ct/mqtt.sh)"3. The script will install MQTT with default settings: 512MiB RAM – 2GB Storage – 1vCPU
4. You can customize these by selecting Advanced settings during installation
5. Once Mosquitto is installed, you will get a Completed Successfully message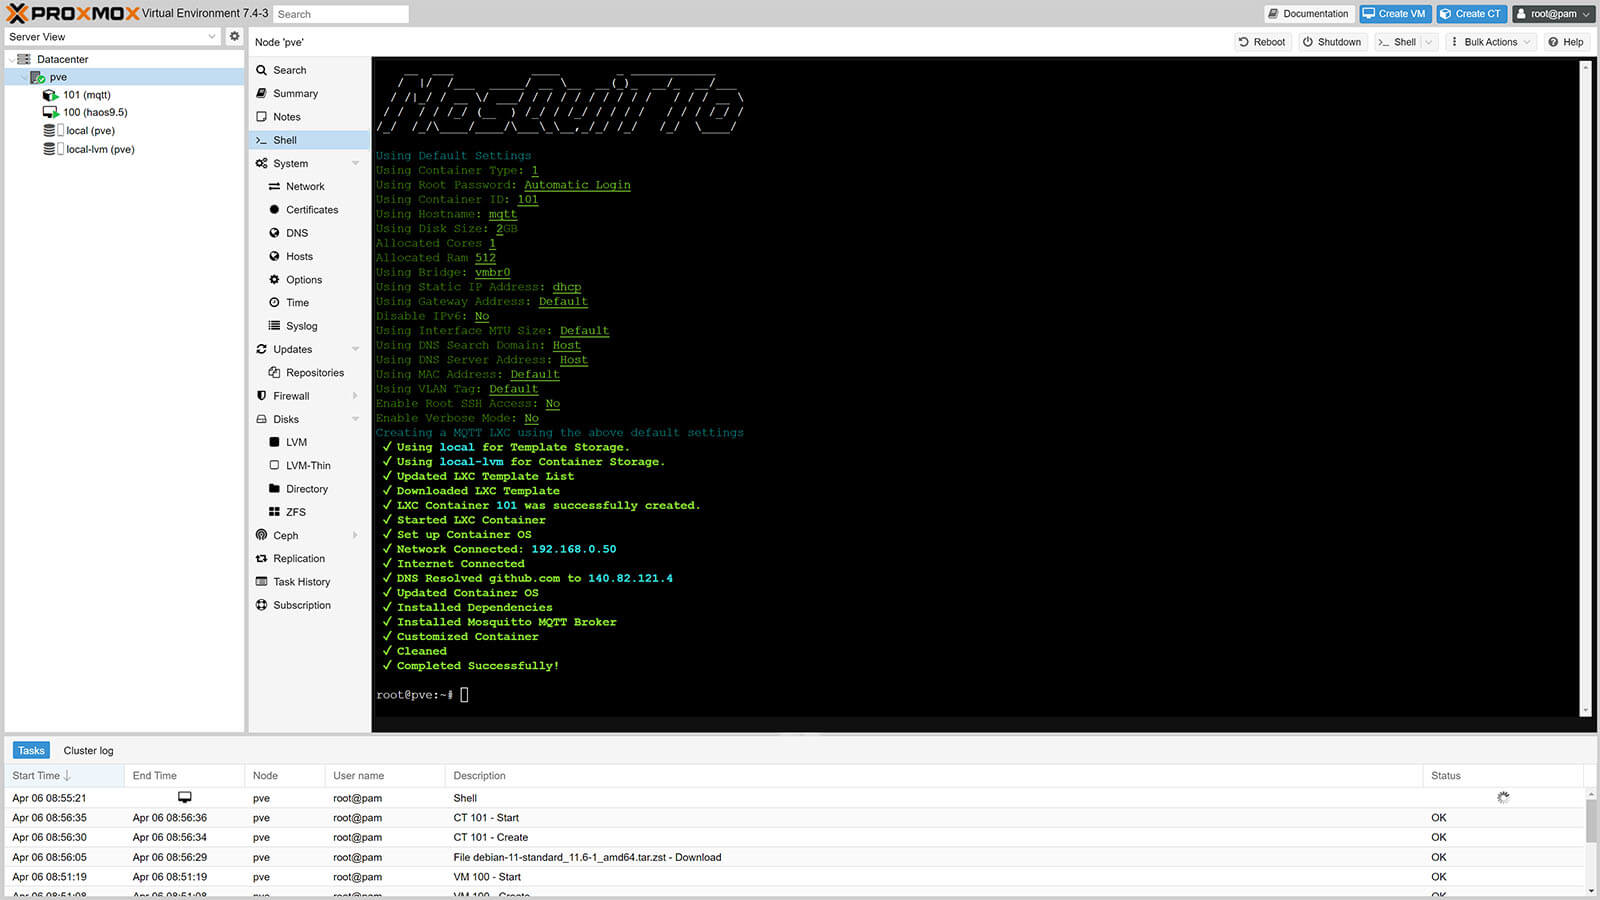
6. Mosquitto comes with a built in password creating tool
7. Click the MQTT container on the left and click Console
8. Run the following command
#Replace <user> with your desired MQTT username
sudo mosquitto_passwd -c /etc/mosquitto/passwd <user>
9. Input a password twice to make sure it matches
10. Ensure that the file is managed by the appropriate user and group
chown mosquitto:mosquitto /etc/mosquitto/passwd11. Next, we need to create configuration file for Mosquitto pointing to the password file we have just created.
12. Run the following command in the console
sudo nano /etc/mosquitto/conf.d/default.conf13. This will create an empty file, paste the following configuration in it:
allow_anonymous false
persistence true
password_file /etc/mosquitto/passwd
listener 1883
13. Save the file with CTRL + O and hit Enter. You will get a wrote XX lines confirmation message.
14. Exit with CTRL + X
15. Restart Mosquitto by running the following command
sudo systemctl restart mosquitto15. Done, your MQTT server is up and running on Proxmox
16. Your MQTT credentials are the username and password you created during installation
17. You MQTT access is Mosquitto’s IP Address:1883
Installing Zigbee2MQTT Container in Proxmox
Assuming you have everything ready, Home Assistant Operating System deployed as a container in Proxmox and your MQTT Broker running on your local network, we can deploy Zigbee2MQTT easily by running tteck‘s helper scripts, now developed by the community. This step is the same for both methods:
1. Open your Proxmox VE
2. Login with your username and password
3. Click your node on the left and open Shell
4. Run the following command:
bash -c "$(wget -qLO - https://github.com/community-scripts/ProxmoxVE/raw/main/ct/zigbee2mqtt.sh)"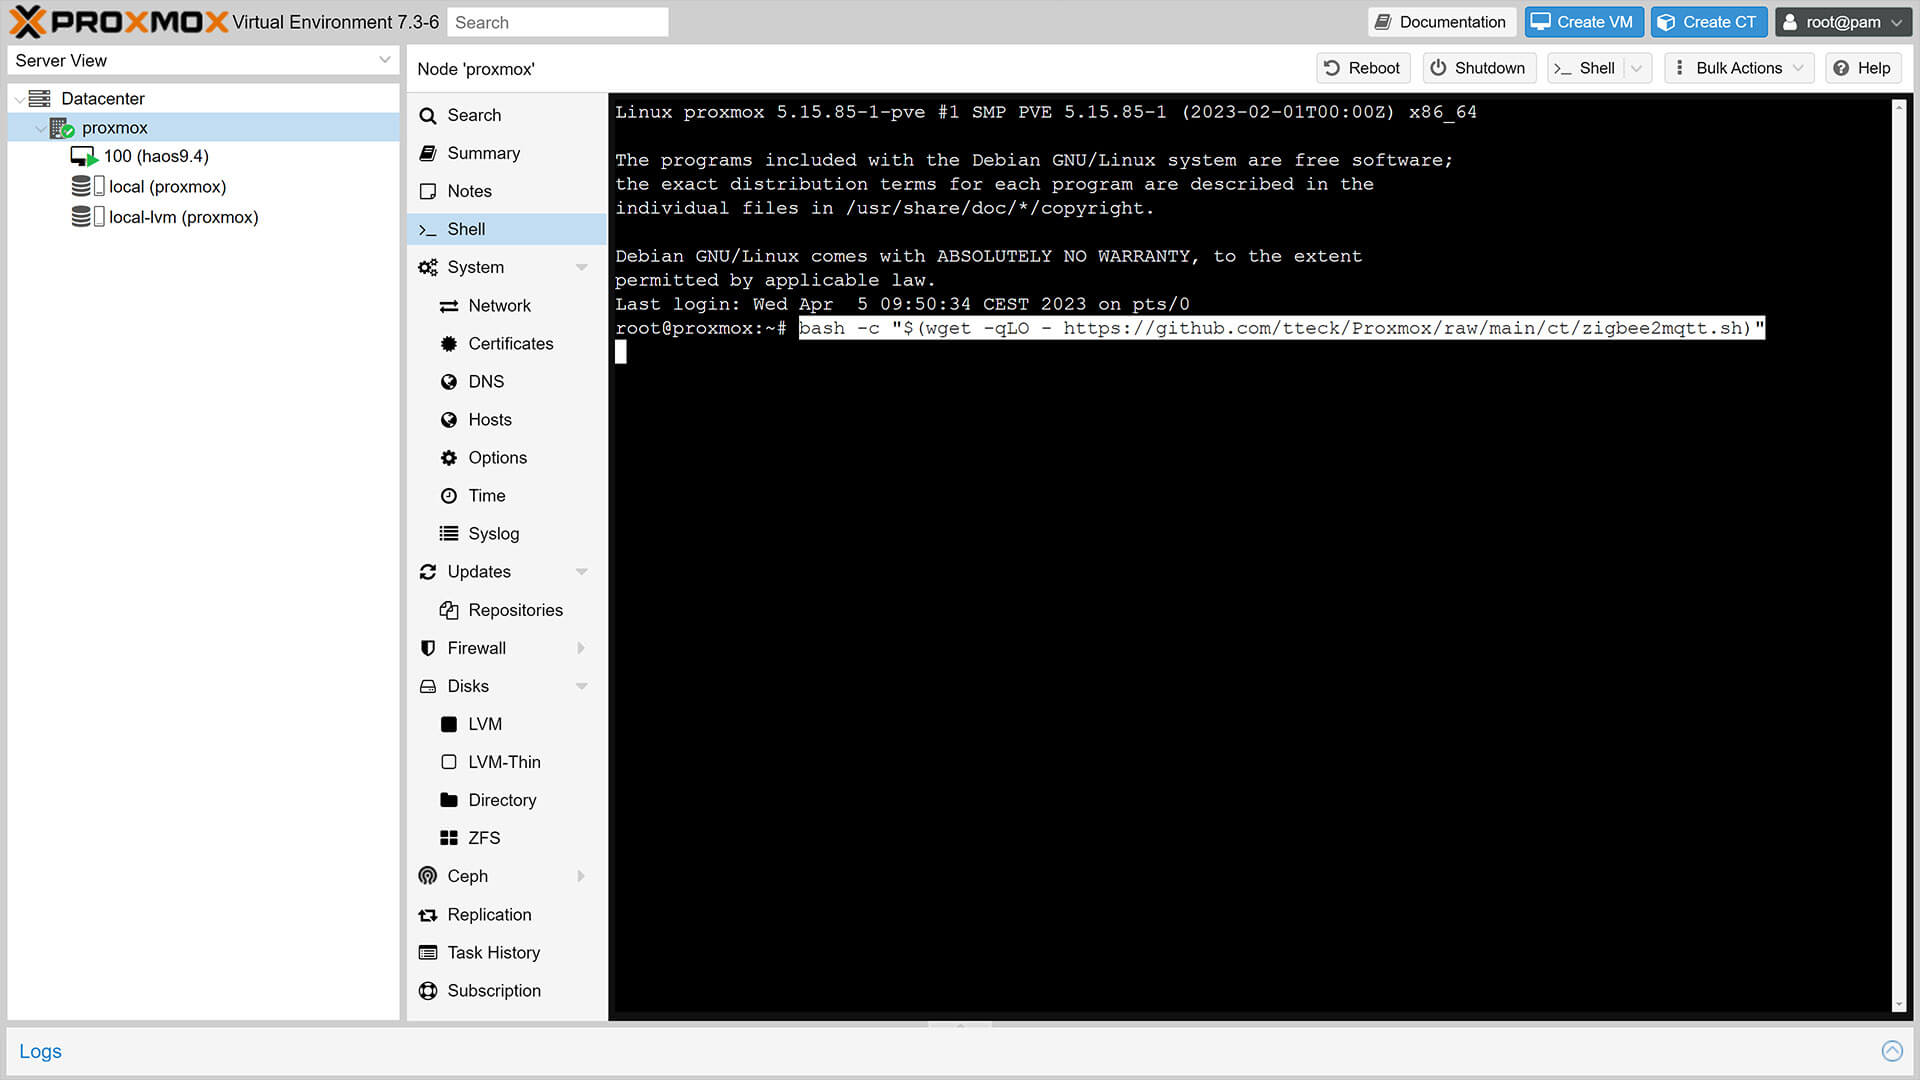
5. The script will start to install Zigbee2MQTT
6. Choose advanced settings to setup dedicated RAM, Storage, CPU cores and set Privileged mode. This will automatically perform USB Passthrough and necessary permission for the container automatically. Otherwise choose Default Settings: 1GB RAM – 4GB Storage – 2vCPU and set the USB passthrough yourself later
7. You will get a prompt mid-install to switch to Edge (Dev) branch, choose Y or N

8. Once the process is finished, you will see the Zigbee2MQTT Container under your node on the left
9. A confirmation message Completed Successfully will appear in the shell
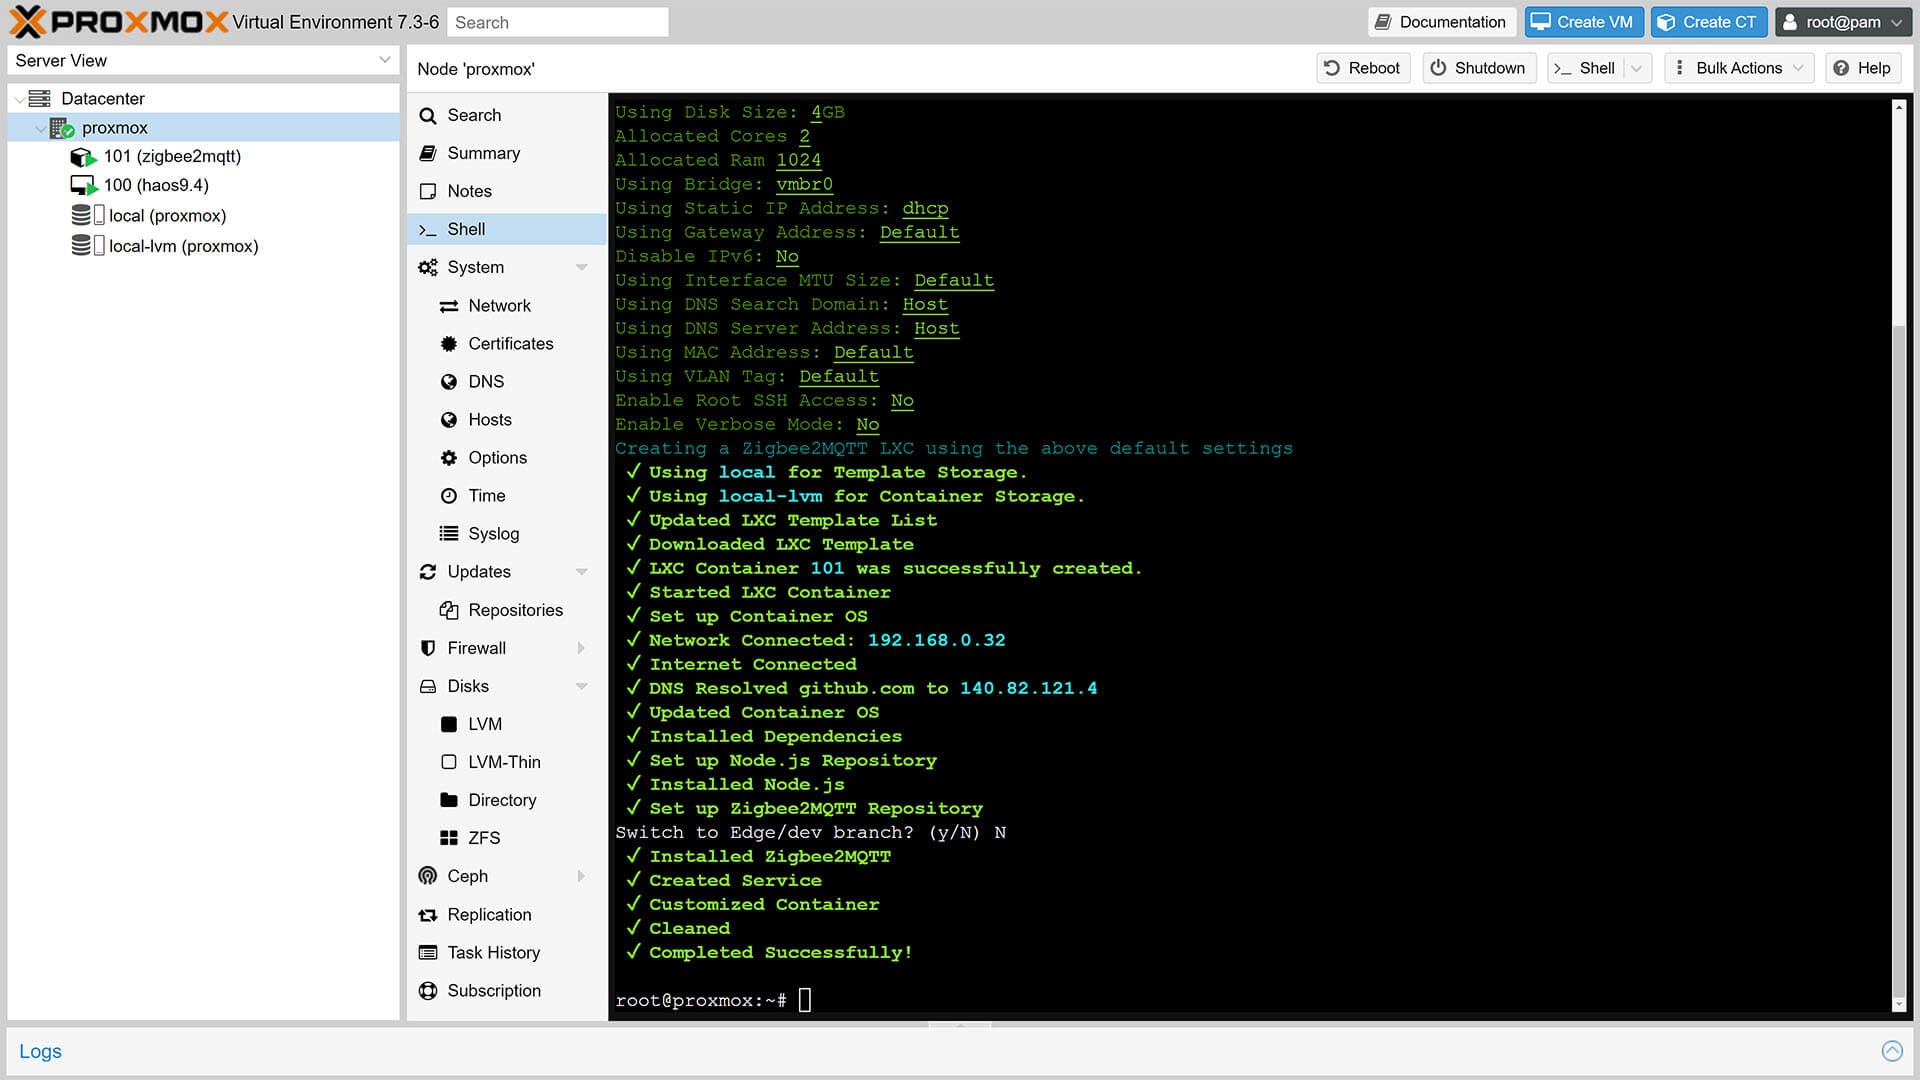
10. Done
Before we can start Zigbee2MQTT, we need to edit it’s configuration.yaml file and input the MQTT credentials and passthrough your Zigbee dongle to the container.
Zigbee Dongle USB Passthrough
If your Zigbee dongle was plugged in while you installed Zigbee2MQTT and the LXC was created privileged, the script will automatically setup USB Passthrough to the container. To verify and find out the serial-id of your dongle, open the Proxmox shell and input the following command:
ls -l /dev/serial/by-id1. You will get an output similar to this, depending on your adapter type:
2. Copy the serial-id just before the -> symbol
(eg. usb-ITEAD_SONOFF_Zigbee_3.0_USB_Dongle_Plus_V2_20220813094657-if00)
3. Save it in a file, we are going to need it for the configuration.yaml file
For some people, the adapter is not identified when listing by serial id. As an alternative, you can pass the USB port directly, but you need to keep in mind that with this method the dongle will always have to stay in the same USB port. Instead of copying the adapter-id, copy the port at the end, in this case tty/ACM0:
/dev/ttyACM0Add the port in Zigbee2MQTT’s configuration.yaml file, see the example bellow.
Editing Zigbee2MQTT Configuration
Before Zigbee2MQTT can be started, we need to edit the main configuration.yaml file. Open the Zigbee2MQTT Container, click Console and input the following command:
nano /opt/zigbee2mqtt/data/configuration.yaml1. In the opened file, paste the following configuration and edit it to match your MQTT Credentials and Adapter:
frontend:
  port: 8080 #Change Frontend UI Access Port Default: 8080
homeassistant: true
permit_join: false
mqtt:
  base_topic: zigbee2mqtt
  server: 'mqtt://192.168.0.50:1883'
  user: z2m-proxmox #MQTT Username
  password: z2m-proxmox #MQTT Password
  keepalive: 60
  reject_unauthorized: true
  version: 4
serial:
  port: /dev/serial/by-id/usb-ITEAD_SONOFF_Zigbee_3.0_USB_Dongle_Plus_V2_20220813094657-if00
  #port: /dev/ttyACM0 #Uncomment for USB Port Method
  #adapter: deconz (Uncomment For Conbee II)
  #adapter: ezsp (Uncomment For Sonoff ZBDongle-E)
advanced:
  pan_id: GENERATE
  network_key: GENERATE
  channel: 20 #Choose Zigbee channel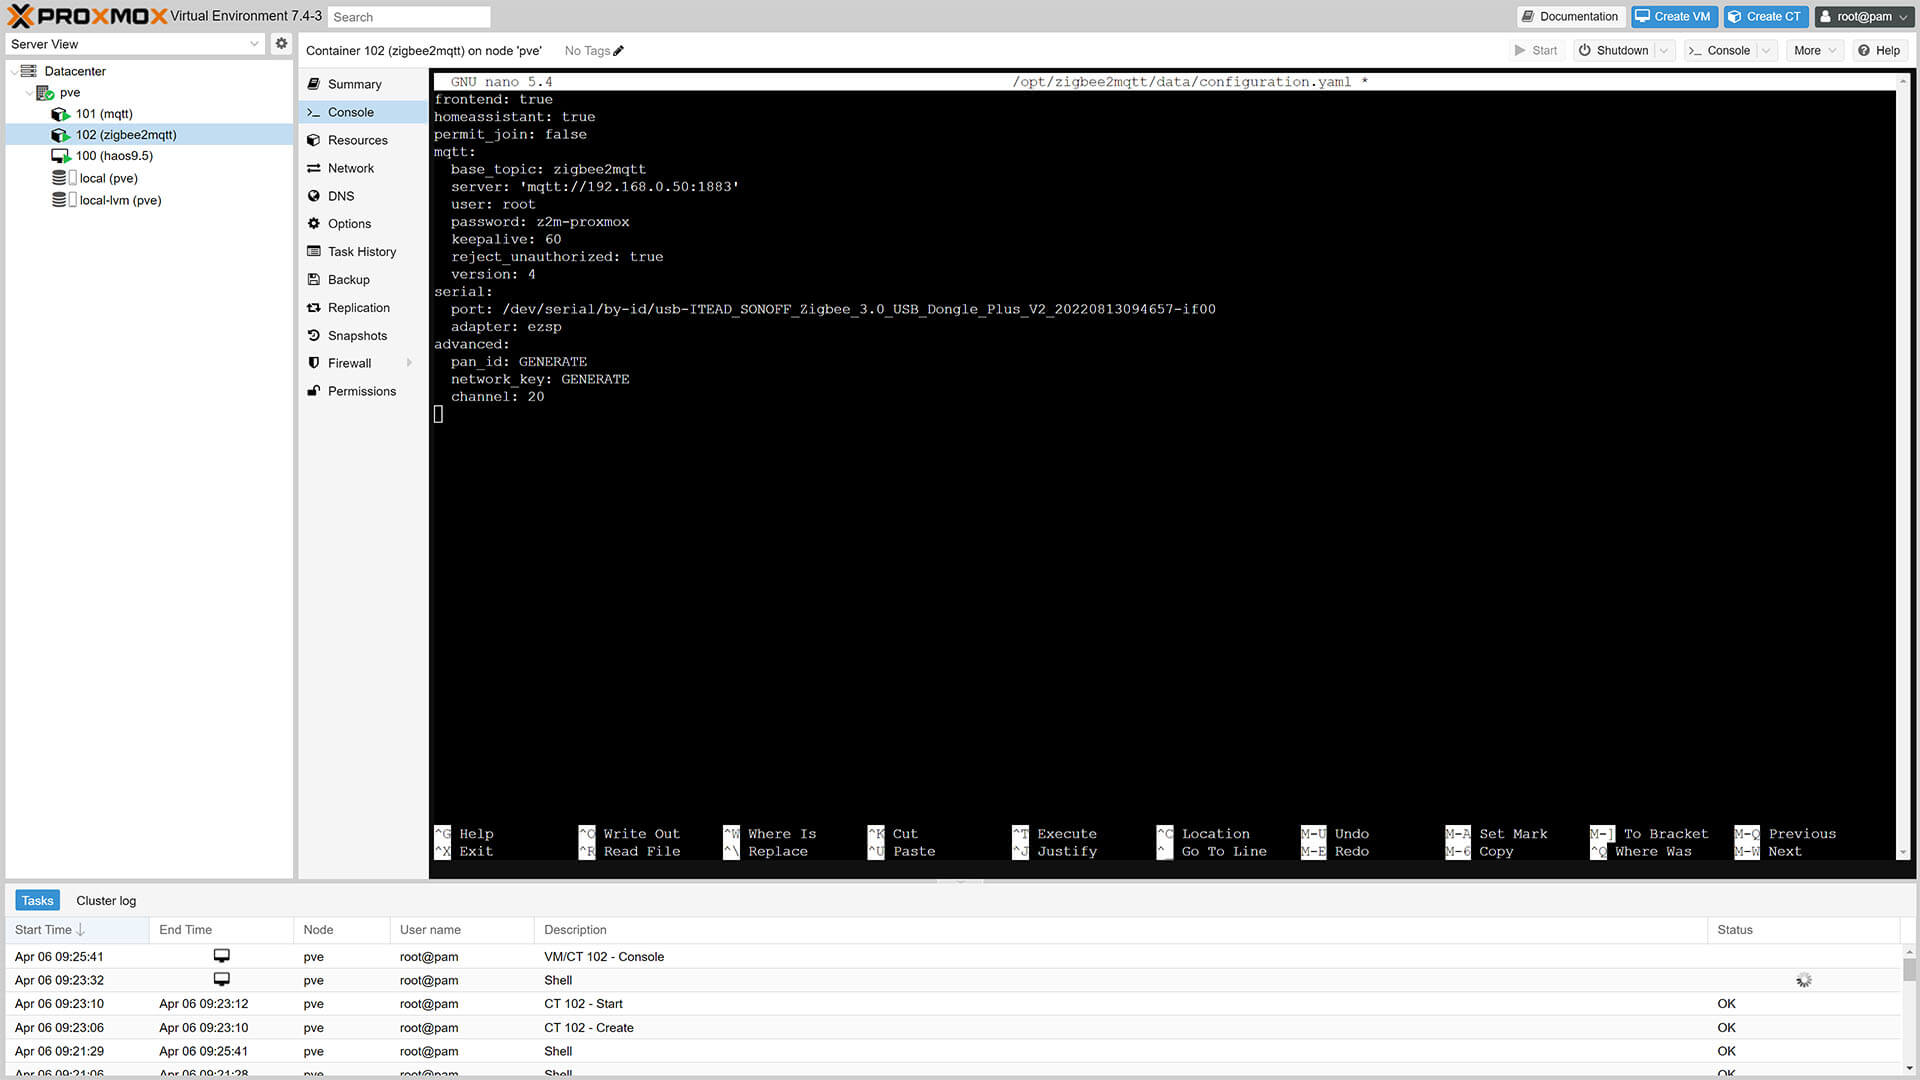
2. Click CTRL + O, Enter you should get a wrote XX lines confirmation prompt. Exit the editor with CTRL + X.
3. Start Zigbee2MQTT with:
cd /opt/zigbee2mqtt && npm start4. Zigbee2MQTT should start automatically and you will get the confirmation in the log:
5. Done
Connecting Zigbee2MQTT to Home Assistant
Once everything is up and running, all that remains is to connect Zigbee2MQTT to Home Assistant via the Mosquitto MQTT Broker:
- If you’ve used Method A: Partial separation, Zigbee2MQTT should already be connected to your MQTT Broker in Home Assistant (Auto-discovered)
- If you’ve used Method B: Complete separation, we will use the MQTT Integration to connect Z2M to Home Assistant
1. In Home Assistant, navigate to Settings > Devices & Services > Add Integration
2. Search for MQTT
3. Add the first MQTT Integration and input your broker credentials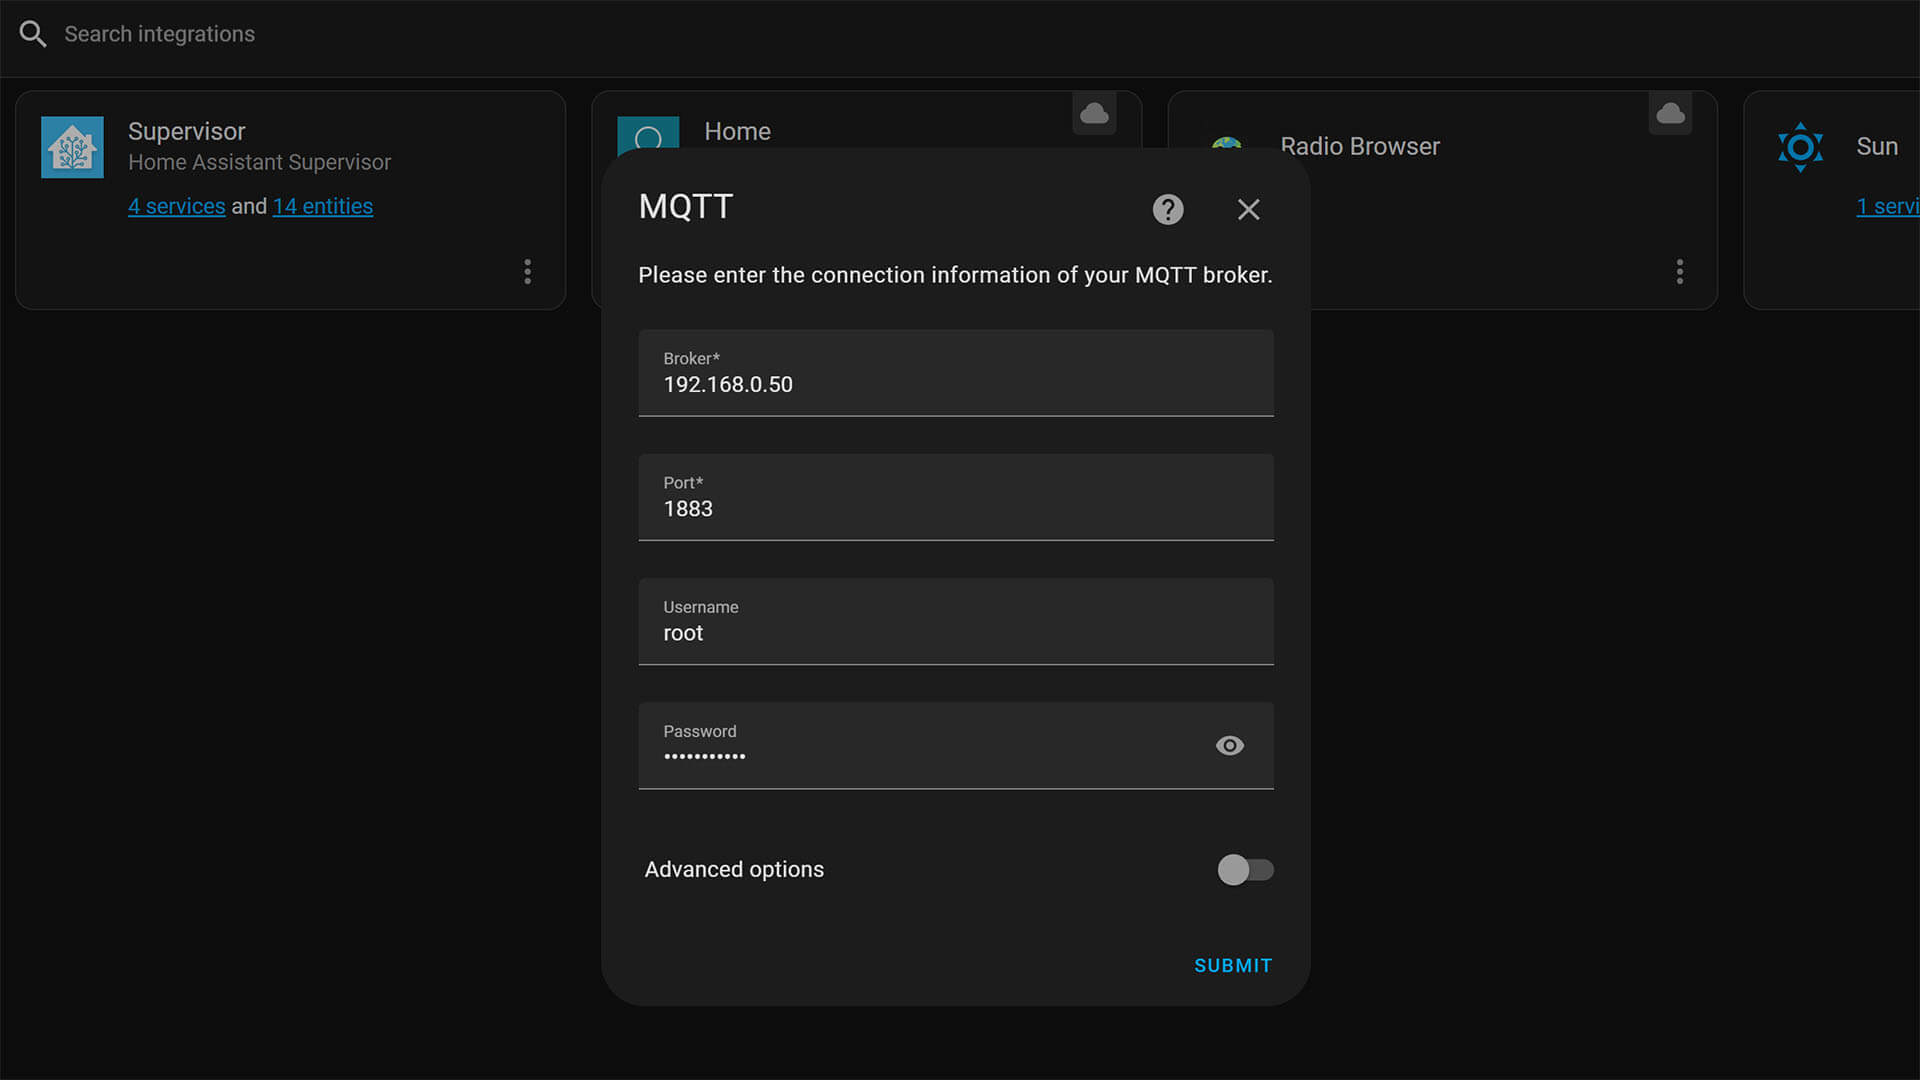
4. If everything is correct, you will get a confirmation message
5. Done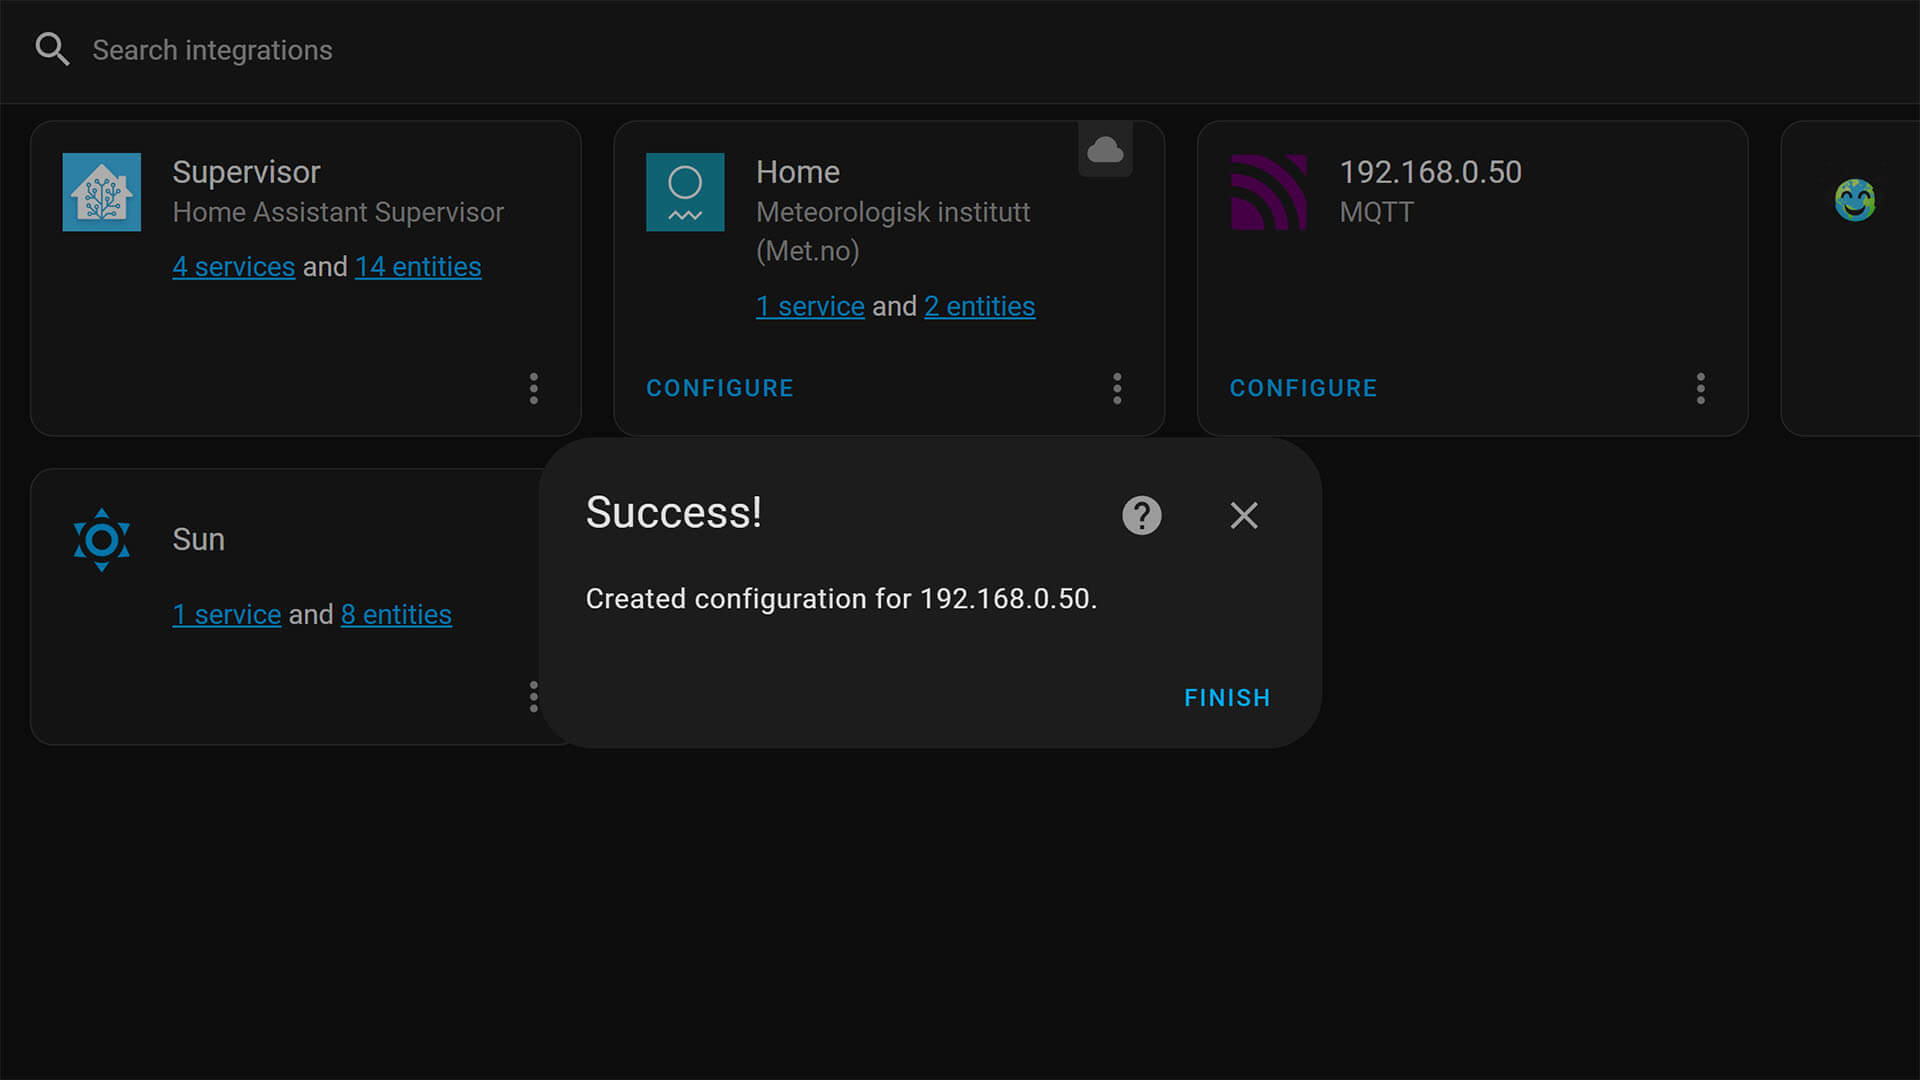
Accessing Zigbee2MQTT in your Web Browser
Since you don’t have the Zigbee2MQTT Add-on installed in Home Assistant directly, you can access it’s UI by navigating to the IP_address:Port directly in your web browser.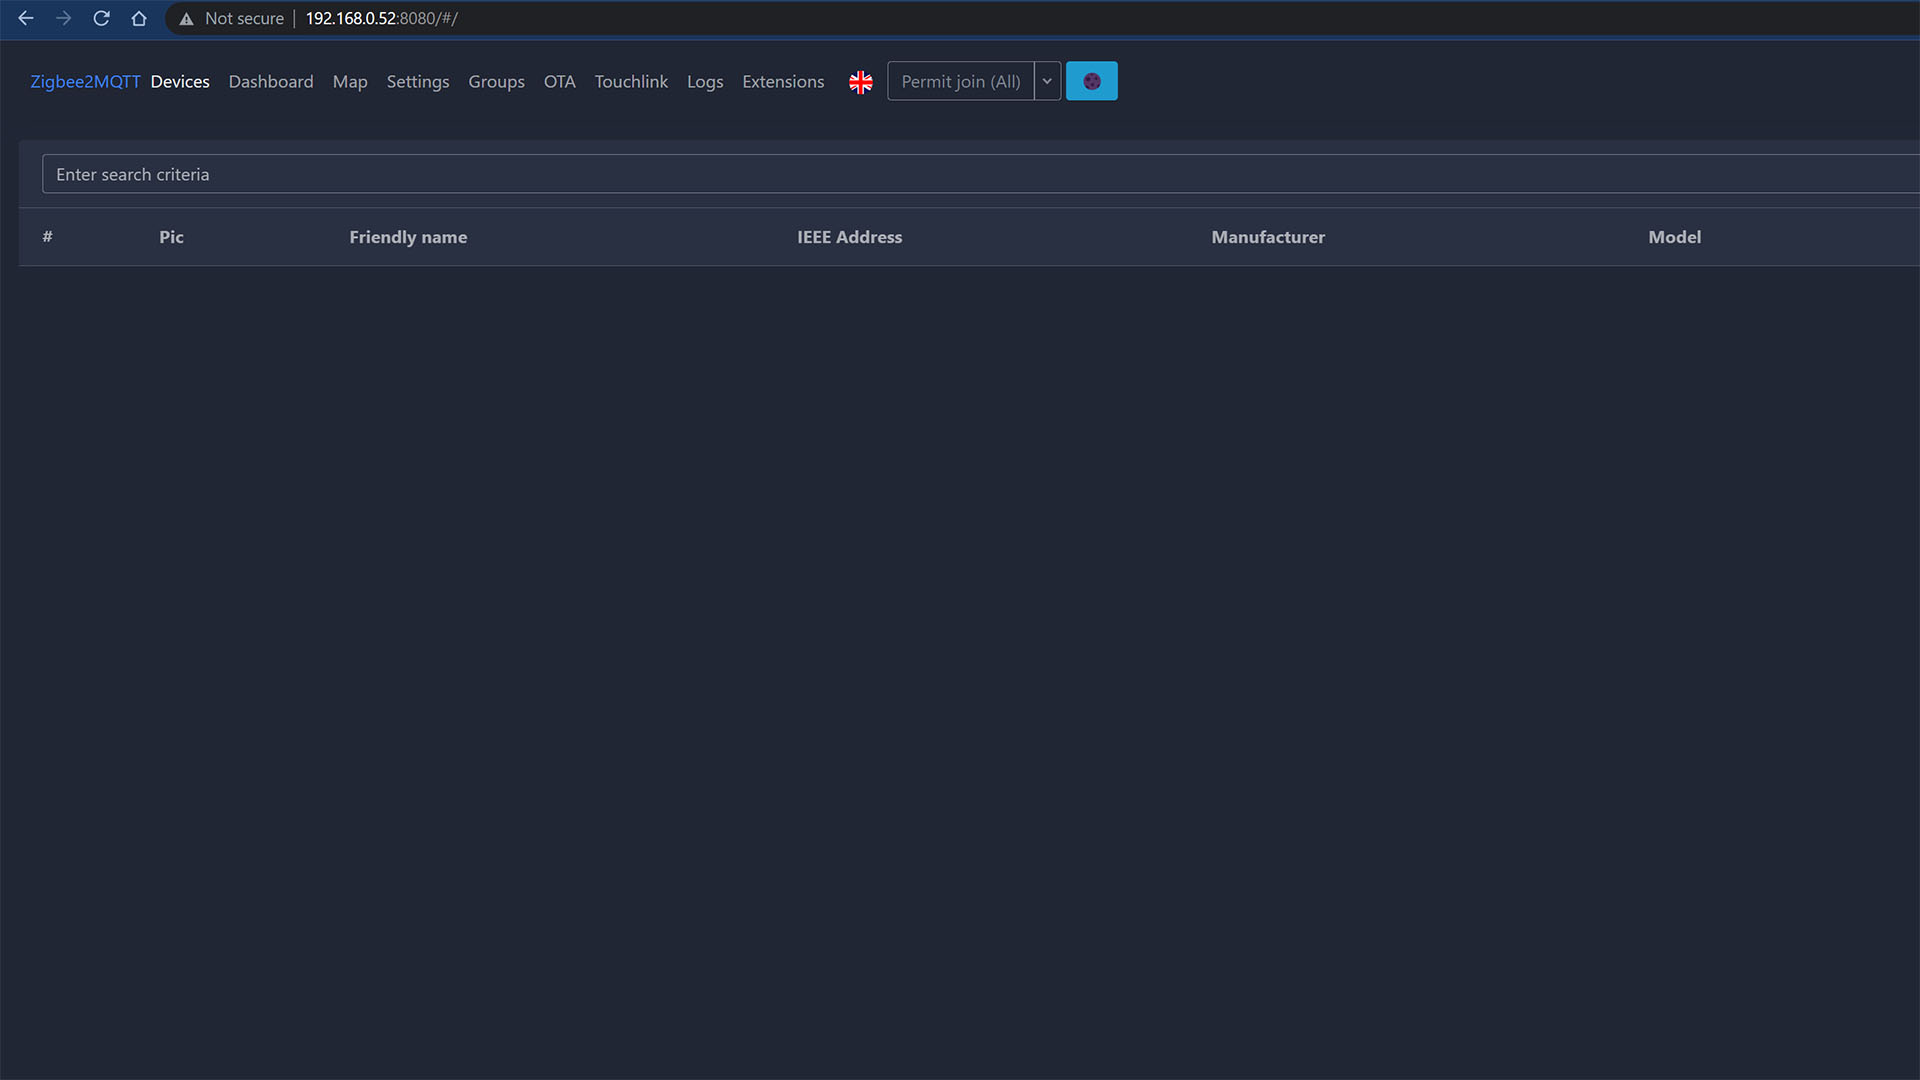
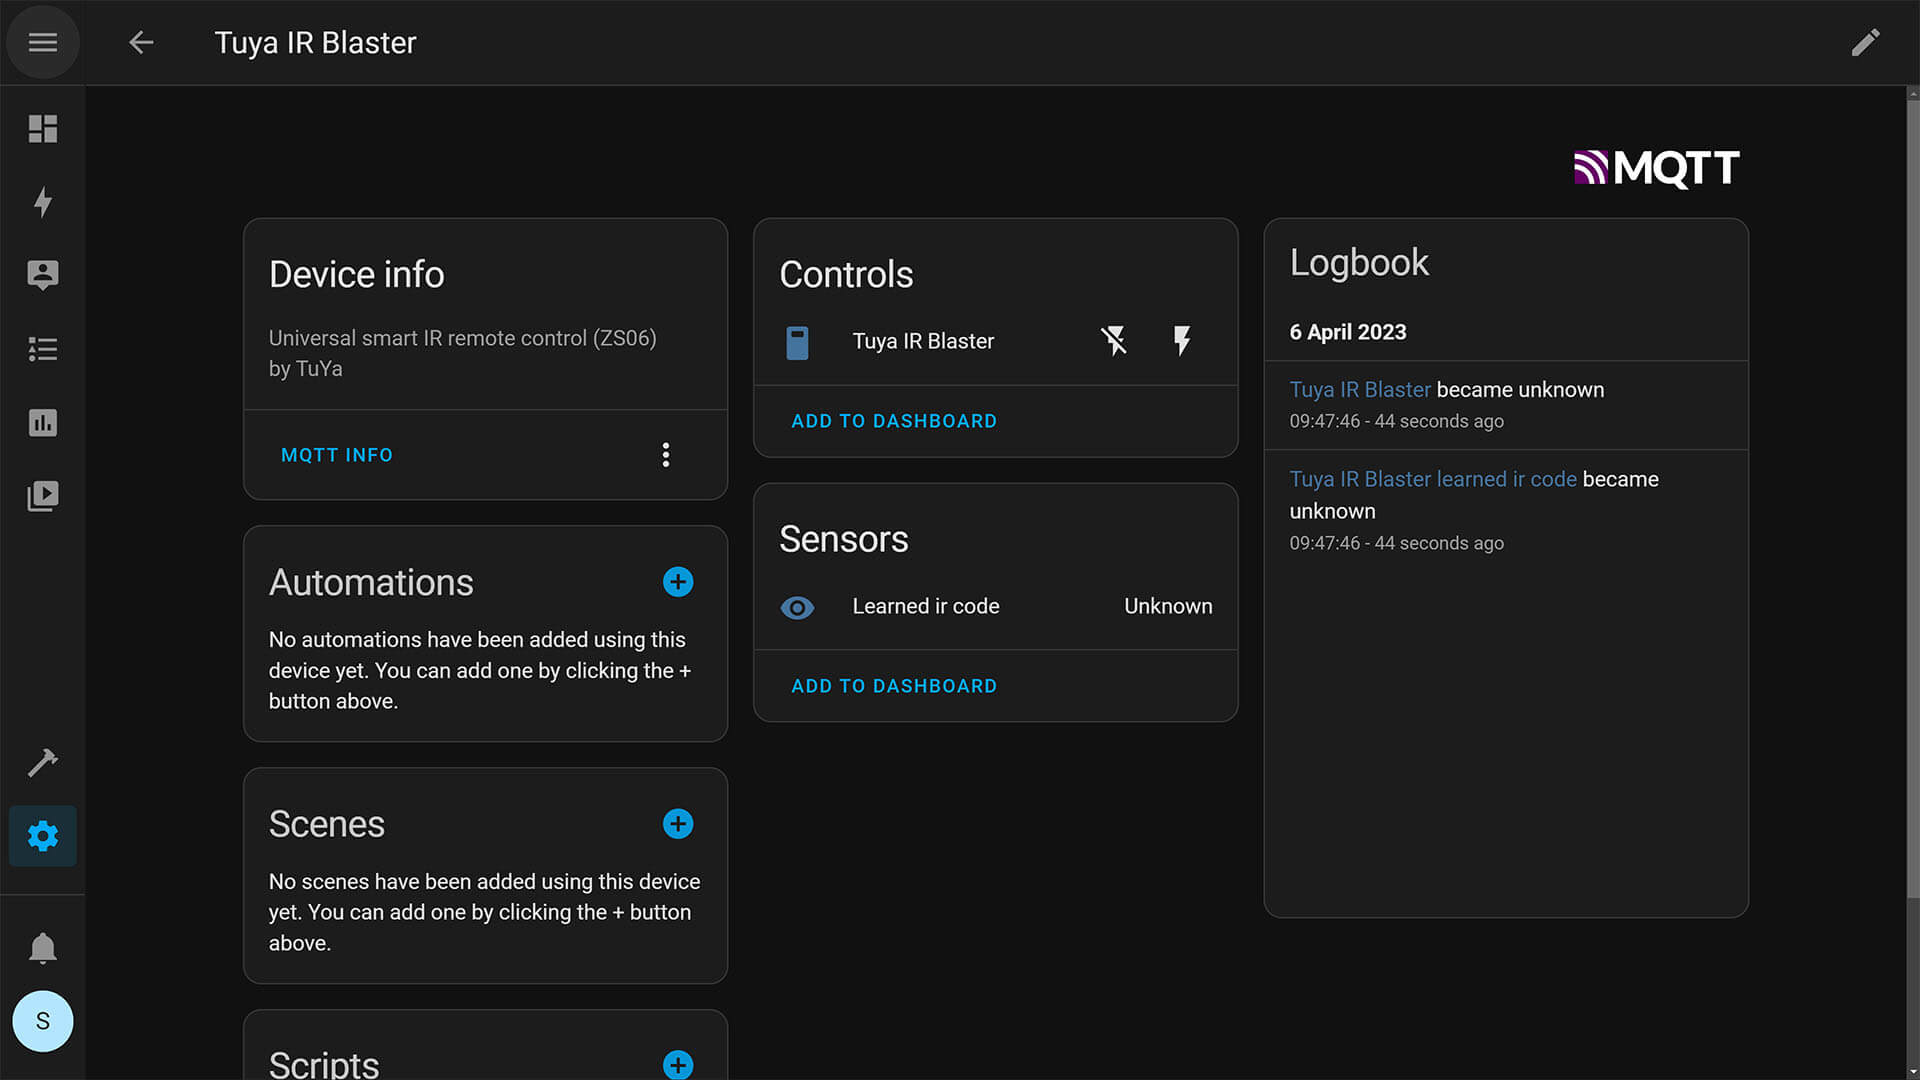
You can now add devices like you normally would, and Zigbee2MQTT will push them to your MQTT Broker (Mosquitto) which will in turn add them to Home Assistant!
For example, if I pair the Tuya IR Blaster it will automatically show up in Home Assistant: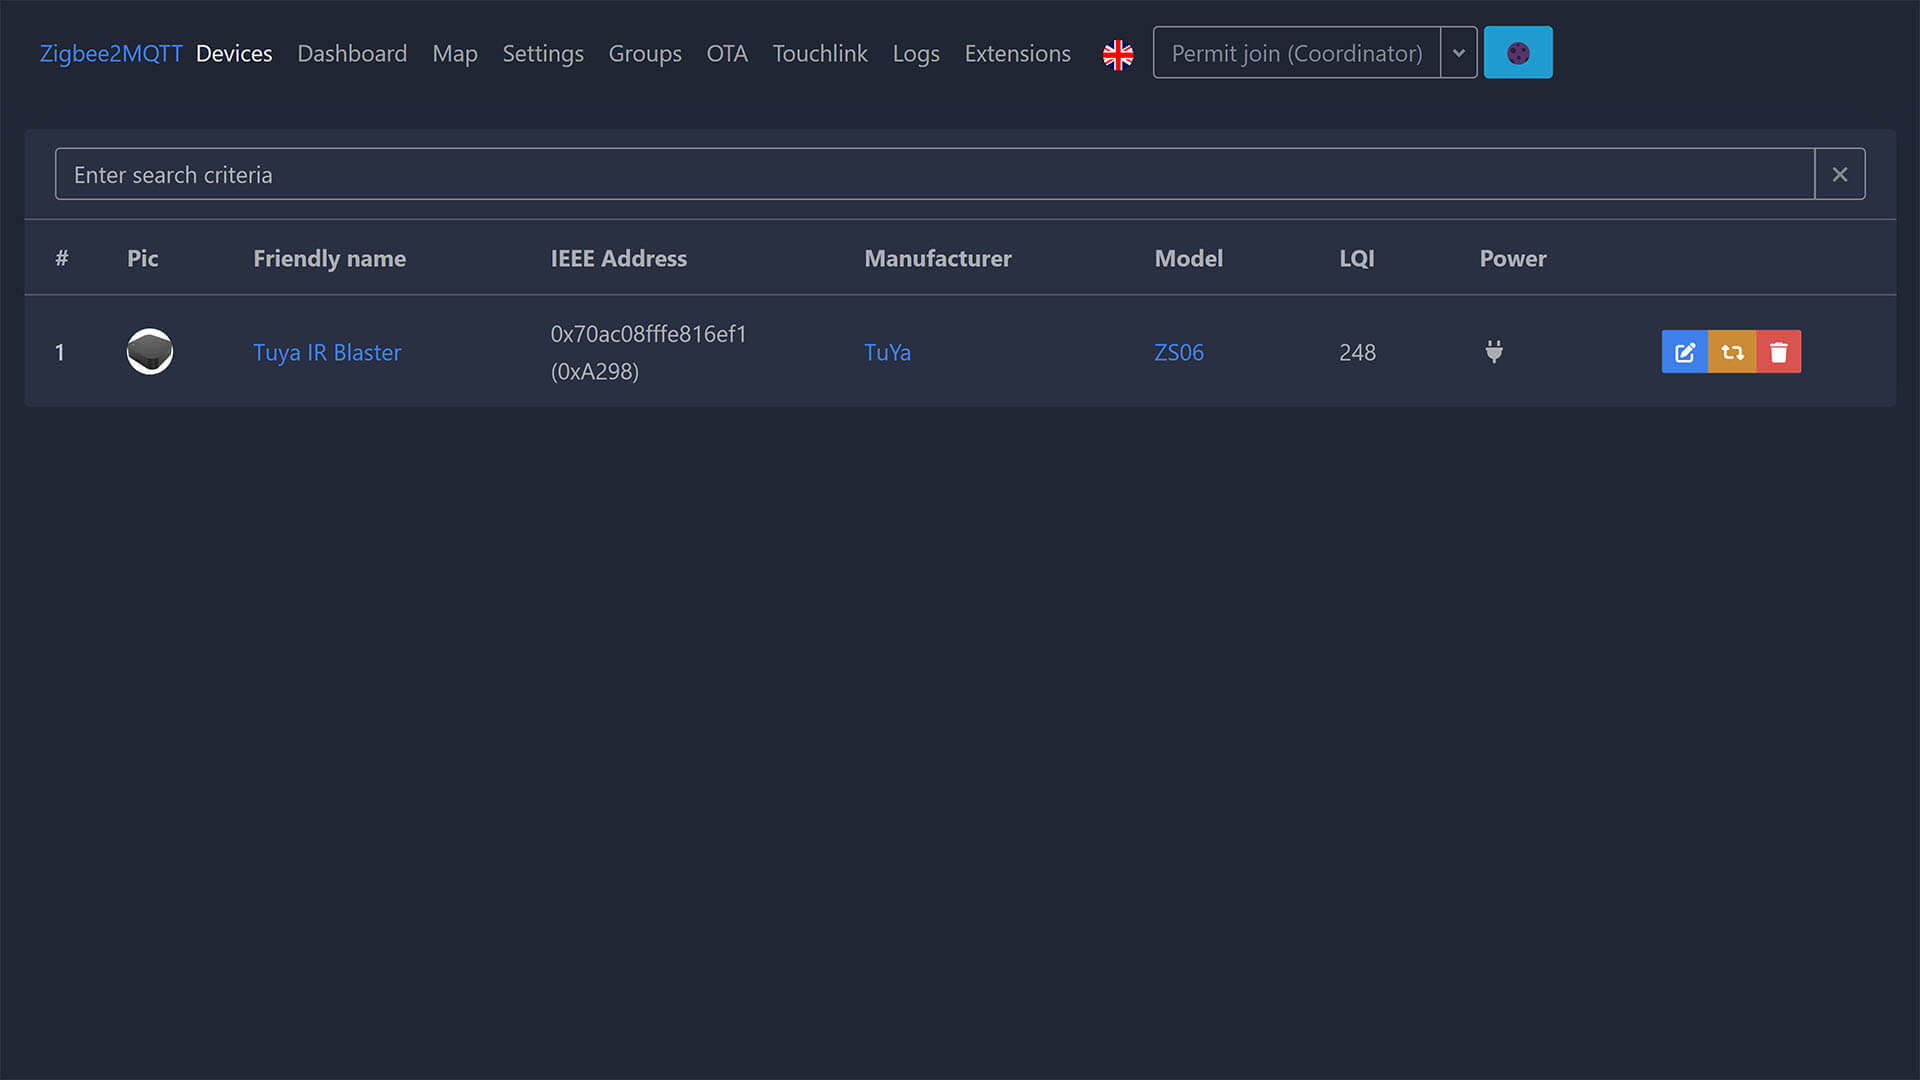
Troubleshooting and Best Practices
Before you get to troubleshooting installation errors, open up your router and set static IP addresses to everything (Proxmox, Home Assistant, Mosquitto MQTT, Zigbee2MQTT). A static IP will make sure the deployed containers are always accessible at the same local IP and will not be shifted around by DHCP, resulting in connectivity errors.
Errors are possible while going through the deployment process of Zigbee2MQTT and Mosquitto Broker on Proxmox. Different hardware may present different obstacles. Here are a few common errors and how to solve them:
- If you get no such file or directory errors, you will need to create the Zigbee2MQTT directory manually and set the correct user permissions. Run the following commands in the Proxmox shell:
# Create a directory for zigbee2mqtt and set your user as owner of it
sudo mkdir /opt/zigbee2mqtt

#Change USER with Your Proxmox User
sudo chown -R ${USER}: /opt/zigbee2mqtt- Verify you are using the correct port for the Zigbee adapter
- Always use serial-id instead of ttyACM0
- Run the following command in the Proxmox shell to get the correct serial-id
ls -l /dev/serial/by-id- See the complete list for Zigbee2MQTT failing to start here
Summary
Hopefully, this guide helped you separate your Zigbee network from Home Assistant in Proxmox. If you were successful, you are now running Zigbee2MQTT as a separate LXC container, which means independent uptime and backups from Home Assistant.
For those you are not using Proxmox, or have different hardware available the general process is the same and can be adapted to your setup. For example, let’s say you have two Raspberry Pi’s and want to use one for your Zigbee2MQTT network, Method A: Partial Separation is applicable to you:
- 1st Raspberry Pi:
- Install and setup Home Assistant
- Install and setup Mosquitto MQTT as an Add-on within Home Assistant
- 2nd Raspberry Pi:
- Install and setup Zigbee2MQTT directly on the Pi
- Connect it to your MQTT Server running on the first Pi
There are several other ways this guide can be adapted to fit your hardware, let me know in the comments if you need some help or advice for your particular setup.


Curious how you deal with updates when all are separated.
Well, Home Assistant is updated normally within itself.
For Zigbee2MQTT, you run the following commands:
# Stop Zigbee2MQTT and go to directory

sudo systemctl stop zigbee2mqtt

cd /opt/zigbee2mqtt
# Backup configuration
cp -R data data-backup
# Update
git pull
npm ci
# Restore configuration
cp -R data-backup/* data
rm -rf data-backup
# Start Zigbee2MQTT
sudo systemctl start zigbee2mqtt
First – thanks for working on this and posting. Very kewl.
1. I need to change my ip addres to a static, but it keeps defaulting to dhcp, since that is the auto script.
2. systemctl restart mosquitto is returning an error.
Job for mosquitto.service failed because the control process excited with error code.
Also – for installing manual, would be so awesome to see what the ‘auto’ defaults would be.
Thanks again
same with me, mqtt is failing on auto settings
I’m struggling to see the point here.
I switched from a RPi running Rasbian with HA and Z2M running as two separate instances (not using supervisor), to Proxmox with HAOS, and Z2M installed as a addon.
So much easier to control it all from HA.
Really don’t see the point in having my zigbee network running if HA is down.
Binding between remotes and bulbs still work, and I have nothing else connecting to Z2M than HA. (what should that be?).
Well, one of the points is written right there in the article – HA restarts wont take down the ZigBee network down with it.
Other than that, some people (like me) just like to have services separated also for simpler backups/recovery/updates.
Hi,
I did step by step as You wrote but have such error:
Zigbee2MQTT:info 2023-04-07 13:25:45: Logging to console and directory: ‘/opt/zigbee2mqtt/data/log/2023-04-07.13-25-45’ filename: log.txt
Zigbee2MQTT:info 2023-04-07 13:25:46: Starting Zigbee2MQTT version 1.30.3-dev (commit #09a56503)
Zigbee2MQTT:info 2023-04-07 13:25:46: Starting zigbee-herdsman (0.14.105)
Zigbee2MQTT:error 2023-04-07 13:25:47: Error while starting zigbee-herdsman
Zigbee2MQTT:error 2023-04-07 13:25:47: Failed to start zigbee
Zigbee2MQTT:error 2023-04-07 13:25:47: Check https://www.zigbee2mqtt.io/guide/installation/20_zigbee2mqtt-fails-to-start.html for possible solutions
Zigbee2MQTT:error 2023-04-07 13:25:47: Exiting…
Zigbee2MQTT:error 2023-04-07 13:25:47: Error: Error while opening serialport ‘Error: Error: Inappropriate ioctl for device setting custom baud rate of 115200’
at SerialPort. (/opt/zigbee2mqtt/node_modules/zigbee-herdsman/src/adapter/z-stack/znp/znp.ts:146:28)
at SerialPort._error (/opt/zigbee2mqtt/node_modules/@serialport/stream/dist/index.js:76:22)
at /opt/zigbee2mqtt/node_modules/@serialport/stream/dist/index.js:112:18
Proxmox “see” Sonof dongle – same as You have –
usb-ITEAD_SONOFF_Zigbee_3.0_USB_Dongle_Plus_V2_20220816162431-if00 -> ../../ttyACM0
Any idea what went wrong?
I am trying to find solution but no success.
Hi,
Could be several things, Please check here for a solution
https://www.zigbee2mqtt.io/guide/installation/20_zigbee2mqtt-fails-to-start.html
Also, add these lines to the configuration.yaml of zigbee2mqtt:
advanced:

baudrate: 115200

rtscts: false
Hi. I got same error as TADEK. Added advanced: …. lines you mentioned above but got same output still.
How would I get rid of this error?
My serial id of the dongle: usb-Silicon_Labs_Sonoff_Zigbee_3.0_USB_Dongle_Plus_0001-if00-port0
Hi! I ran into the same issue. Check whether you need to edit configuration.yaml in a different folder.
Where asked to edit “nano /opt/zigbee2mqtt/configuration.yaml”, try “/opt/zigbee2mqtt/data/configuration.yaml”
Hi! This works for me. But I also had to stop HA virtual machine. It did not allow me to use Dongle.
You sir…I thank you!
Missed your comment here earlier and went through the whole page again and saw your comment. It worked!
Thank you Sam!! You made my day!
Hi, if you are using Zigbee2MQTT in container or standalone your could use Zigbee2MQTT Proxy addon.
Nice tutorial, but I a’m afraid I can’t use it on my Raspberry pi 4 with primox and HA.
Are there any chans to do the same on arm64 ??
What errors are you encountering?
✗ This script will not work with PiMox!
Has anyone managed to migrate from the HA add-on _without_ re-pairing ? I tried various ways to copying the pan_id and network_key from HA and whilst the Z2M starts in the container, I can’t see any devices on the network.
No matter what I do, I can’t get the sonoff to show up on the zigbee2mqtt container. So frustrating. Can’t seem to find any help online either. hmm I got mqtt working, even did a test. Pretty cool. Unless there is something I am missing, it just won’t see the device like my vms can.
i had same issues like. the issue was serial.
serial:
port: /dev/serial/by-id/usb-1a86_USB_Serial-if00 this was not working
port: /dev/ttyACM1 this was working for me
ls -l /dev/serial/by-id
show me :
lrwxrwxrwx 1 root root 13 Apr 18 07:03 usb-Texas_Instruments_TI_CC2531_USB_CDC___0X00124B000E0EAAE3-if00 -> ../../ttyACM1
hope it will help
Important u have to have privileges LXC container
Hello Again! I’ve been struggling with this one all day today, but am at another impasse. I have mosquito installed and set up correctly, I have my second container with zigbee2mqtt installed, but cannot no matter what get the serial ID of the Sonoff USB.
I have followed the directions, I plugged it into my windows PC to at least make sure it seemed legit. When I use lsusb it shows it as a devide that’s plugged in called Silicon Labs CP210x UART Bridge, but when I try to run the ls -l /dev/serial/by-id command it will return total: 0 with nothing else.
When I tried to use mkdir, it said the directory was already there, and when i changed the owner, it didn’t give me an error so I assume that went swimmingly.
I feel like there’s something simple I’m missing and any pointers in the right direction would be appreciated!
could this be done by using Docker rather than LXC container and what would be the pros of this?
also, what is the practical advantage of using method B over method A ?
yes it could be done with Docker, since docker is based on LXC but for dummies, Except the HomeAssistant part that its being using a VM not LXC.
You can use proxmox to have A: HAOS VM, B: Linux VM with Portainer or your orchestrator of choice, spawn containers on the orch. VM, the integrations are made via http/etc.
The pros of doing with Docker is that is very easy to do and manage updates, but you will have more time setting up another VM.
How to connect LAN zigbee adapter to LXC container
Interesting idea!
The memory footprint for the default separated installation is much larger than the integrated installation and therefore may not be ideal for some users compared to the value of separating the three functions.
Yes, however I would not separate Mosquitto MQTT from Home Assistant unless you have some special use case. It has a minimal footprint on the hardware and there is no need to run a separate container for it.
I wrote the guide of separating Mosquitto for educational purposes.
Cheers
and because the sh** never runs as described i installed it in the homeassistant installation haha
I’d be happy to contribute quite a bit more than a “cup of coffee”, but the guide contains quite a large gap. Namely “How to migrate an existing zigbee network from a current HA add-on without a need to generate a new network and re-pair devices”.
Due to HA vs. Proxmox memory reporting diffs, my HA VM gets sluggish after a few days. HA will say 2gb ram used, but PM will say +5gb. I think it has to do with SWAP file size reporting.
Anyhow i have PM stop and restart HA every two days to create a backup. During the time the VM is recycled my Z2M is offline. I’d love to run it separately, but not enough to regenerate a new network pan-id and re-pair +65 devices.
Fill the gap and i’d be happy to donate to the guide.
Hello JT,
Thank you for the feedback.
It’s actually quite easy to backup and restore a Zigbee2MQTT backup (using built-in backup feature)
BUT, you cannot be certain that the backup will actually work.
You WILL get a list of all your devices in Z2M, some of them will work, most of them will not.
Most Zigbee coordinators, including the popular ZBDongle-E, rely on a Network Co-Processor (NCP) firmware type.
The Zigbee application as well as the network protocol stack is saved on the dongle itself, which manages most of the Zigbee network.
Actual Zigbee implementation is saved on the devices themselves when you pair them.
The Zigbee integration you are using, simply communicates to the dongle to send/receive commands from devices added to the network.
So when you restore a backup, the information saved on the devices themselves doesn’t match your new network and they refuse to communicate.
There is no easy way to know which devices will survive a backup, which devices will fail. This is related to different manufacturers’ implementation.
I’ve tested this extensively, and I’ve had about 50% success rate.
I hope I’m making things clear.
Cheers
I am intending to move from HA with MQTT broker and z2mqtt as addons to the separate LXC install for the MQTT broker and z2mqtt (method B). HA is already running in a VM on Proxmox. I will be using the same Sonoff dongle E (disconnect it from the HA VM and then pass through to the new z2mqtt container). Will backup and restore work in that case? The zigbee application and network protocol stack will remain on the stick, and it will simply be re-used for the new z2m installation.
Yes, you can safely backup and restore your config since all your hardware remains the same.
Thanks, worked perfectly! All devices survived the change-over. Simply needed to copy over the files from /opt/zigbee2mqtt/data/ to the new z2M LXC, modify the MQTT IP-address in the configuration.yaml and all is up and running.
Hi there,
First thing…thanks for the excellent guide and your work here. Followed your guide to install proxmox and HA, now having an issue.
While trying to find the serial-id on the proxmox shell, it shows cannot access: no such file or directory. But inside HA under hardware, I can see my Sonoff Zigbee dongle with the serial-id. and it shows “/dev/serial/by-id/usb-ITead_Sonoff_Zigbee_3.0_USB_Dongle_Plus_88385799ec5fec1193b0325f25bfaa52-if00-port0”
why can’t my proxmox shell access the directory?
Thanks
Hi SHS,
My previous comment can be removed. i managed to get the Z2M container to work, I was using Method A. I got the Z2M server up and got some of my devices integrated.
Thanks agian for the guides
when I am setting this up I get an error about the baud rate. Is there a way to set the baud rate in the config file so I don’t get this error
Yes, see here:
https://www.zigbee2mqtt.io/guide/configuration/adapter-settings.html
i followed both of your guides, installed proxmox, ha, mqtt and everything works fine. When I install zigbee2mqtt everything works but at the first restart CT doesn’t start anymore with this error:
run_buffer: 322 Script exited with status 25
lxc_init: 844 Failed to run lxc.hook.pre-start for container “103”
__lxc_start: 2027 Failed to initialize container “103”
TASK ERROR: startup for container ‘103’ failed
Please check the free space of your local-lvm partition.
It can cause this error, when there is not enough room for the container to start.
Thanks! Helped me get it up and running on Proxmox 8, hosted on a Dell Optiplex.
Thanks, this helped me quite alot. However I ran into a couple of small issues, the first was that the owner and group for the mosquitto password file (/etc/mosquitto/passwd) were set to root, they should be ‘mosquitto’. Secondly it would be extremely nice if the zigbee2mqtt service was setup as a daemon, but i found a description of that in the zigbee2mqtt documentation, here: https://www.zigbee2mqtt.io/guide/installation/01_linux.html.
Anyway thanks for a totally awesome guide.
Quick note– I installed Mosquitto as a separate container following these directions exactly, but got this error:
“`
ExecStart=/usr/sbin/mosquitto -c /etc/mosquitto/mosquitto.conf (code=exited, status=13)
“`
It appears that some files have incorrect ownership, so running this command fixed it for me:
“`
chown -hR mosquitto /etc/mosquitto“`
This swaps ownership of the necessary files to the ‘mosquitto’ user, which will actually be running the mosquitto.service.
Hope this helps someone!
This helped me alot! Thanks
Hello, first of all thank you for this guide. It is rare on the internet to approach somewhat special configurations.
My configuration:
Z2M is installed on a rasp pi under debian
Mqtt broker is on another rasp (in reality VM synology) for historical reasons with domoticz
Home assistant is installed on another rasp (another Synology VM)
So I followed method B which is closest to my configuration. Everything works correctly, the sensors appear in hometicz but not in Home Assistant.
While browsing the web I saw that I needed a second instance of Z2M. Is it correct ? or how to do it?
No, you do not need another instance.
If you want your MQTT broker appearing in Home Assistant, just add it with the IP address:
https://smarthomescene.com/guides/how-to-separate-zigbee2mqtt-from-home-assistant-in-proxmox/#connecting-zigbee2mqtt-to-home-assistant
Which will automatically add all your devices in Home Assistant communicating over MQTT.
You could also use the Zigbee2MQTT Proxy add-on in Home Assistant for accessing Z2M via Ingress:
https://github.com/zigbee2mqtt/hassio-zigbee2mqtt
If you are having issues, it’s going to come down to your network setup and whether things are accessible over your LAN.
Cheers
Thanks. Everything works fine now, the problem was that a “homeassistant: false” line was in the configuration.yaml file in /opt/zigbee2mqtt/data. Replace by true and it’s OK
Left `chown mosquitto:mosquitto /etc/mosquitto/passwd` out of the guide.
Thanks, added
Thanks for the detailed article. I have it all in HA and wanted to consider the port as outlined in option B above.
I have an Ethernet coordinator today running and configured. How do I go about pointing ZigBee2MQTT to the ethernet rather than the serial from the Proxmox container?
I also have the ID set to Generate, does that mean I will have to repair all of the nodes again? I believe the answer is es, but wanted to check.
One last question, I have a lot of nodes over a large area, some are too far and drop out. So was thinking about running multiple instances of ZigBee2MQTT to localize the nodes and reduce the congestion on each coordinator. I have an ethernet switch at each of the locations (house, pool cabana, garage, etc.) so can add an ethernet router and connect to the zigbee2MQTT container.
Can option B support multiple zigbee2MQTT instances in multiple containers and still connect to HA and the broker as you outlined?
I thought if I’d be making the architecture change, might as well go all the way to the distributed zigbee network to solve all my other network reliability issues.
Thanks again for a lot of great articles. Ton of learning.
Hi,
You can run as many as Zigbee2MQTT containers as you want. All you need to change is the base topic so they can connect to the same broker in Home Assistant (Option A) or Proxmox (Option B).
E.g. zigbee2mqtt, zigbee2mqtt2, zigbee2mqtt3 and so on…
With that said, I would leave that solution as a last resort.
First, I would try to consolidate and solidify everything under a single network, provided you have a good coordinator.
I would approach this by shifting some routers around, making sure a clear path is available for the most distant devices, and most importantly, pair them through the closest routers through the Permit (router name) option in Zigbee2MQTT.
This will force the network to self-heal and create better paths to the coordinator.
Of course, this can be really hardware dependent as well as room/house layout and distance.
ok will do that first and monitor the network for dropouts.
Is the setting in configuration.yaml in the container for the LAN coordinator the same as I have it now in the HA environment? I will give it a try later this week
You need to set the coordinator’s IP address in Z2M, e.g.:
serial:port: tcp://192.168.0.35:6638 #Change IP and Port
baudrate: 115200
Thanks for the guide!
I’m a bit confused. In Prerequisites you are saying “Running Home Assistant Container in Proxmox”. On a diagramm, you also show HA as a Container. But the whole guide is based on having HA as VM, not an LXC container.
Oh god, that’s a mistake.
If it’s a container, you cannot run Add-on in Home Assistant anyhow since the Supervisor is missing.
If it’s a VM, this guide applies to you.
Sorry for not making it clear, I will correct it.
Awesome tutorial!
I installed z2m LXC but when I tried to add the USB dongle I get this response:
root@pve:~# ls -l /dev/serial/by-id
ls: cannot access ‘/dev/serial/by-id’: No such file or directory.
Can you tell what is wrong? I installed it privileged.
The “by-id” folder is not created when you are plugging in the dongle.
Can you unplug the dongle, run
lsusb, plug the dongle and runlsusbagain to see it it’s recognized?