A while back a wrote a short tutorial on WallPanel, a custom integration capable of displaying images as a screensaver on your wall-mounted tablets and dashboards. Besides photos, it was also capable of displaying custom cards as an informational screensaver while hiding the Home Assistant top and sidebar.
A developer called Daanoz (Daan Sieben) recently developed a custom Google Photos Integration, which allows you to add albums from your Google Photos account as a camera entity to your Home Assistant setup. The entity will be showing media from your Google Photo album so you can add some personalization to your dashboards.
In this guide, I will share a step-by-step guide of how you can set it up and use it, because it is a little involved and includes creating a Google Developer Account. Let’s get started.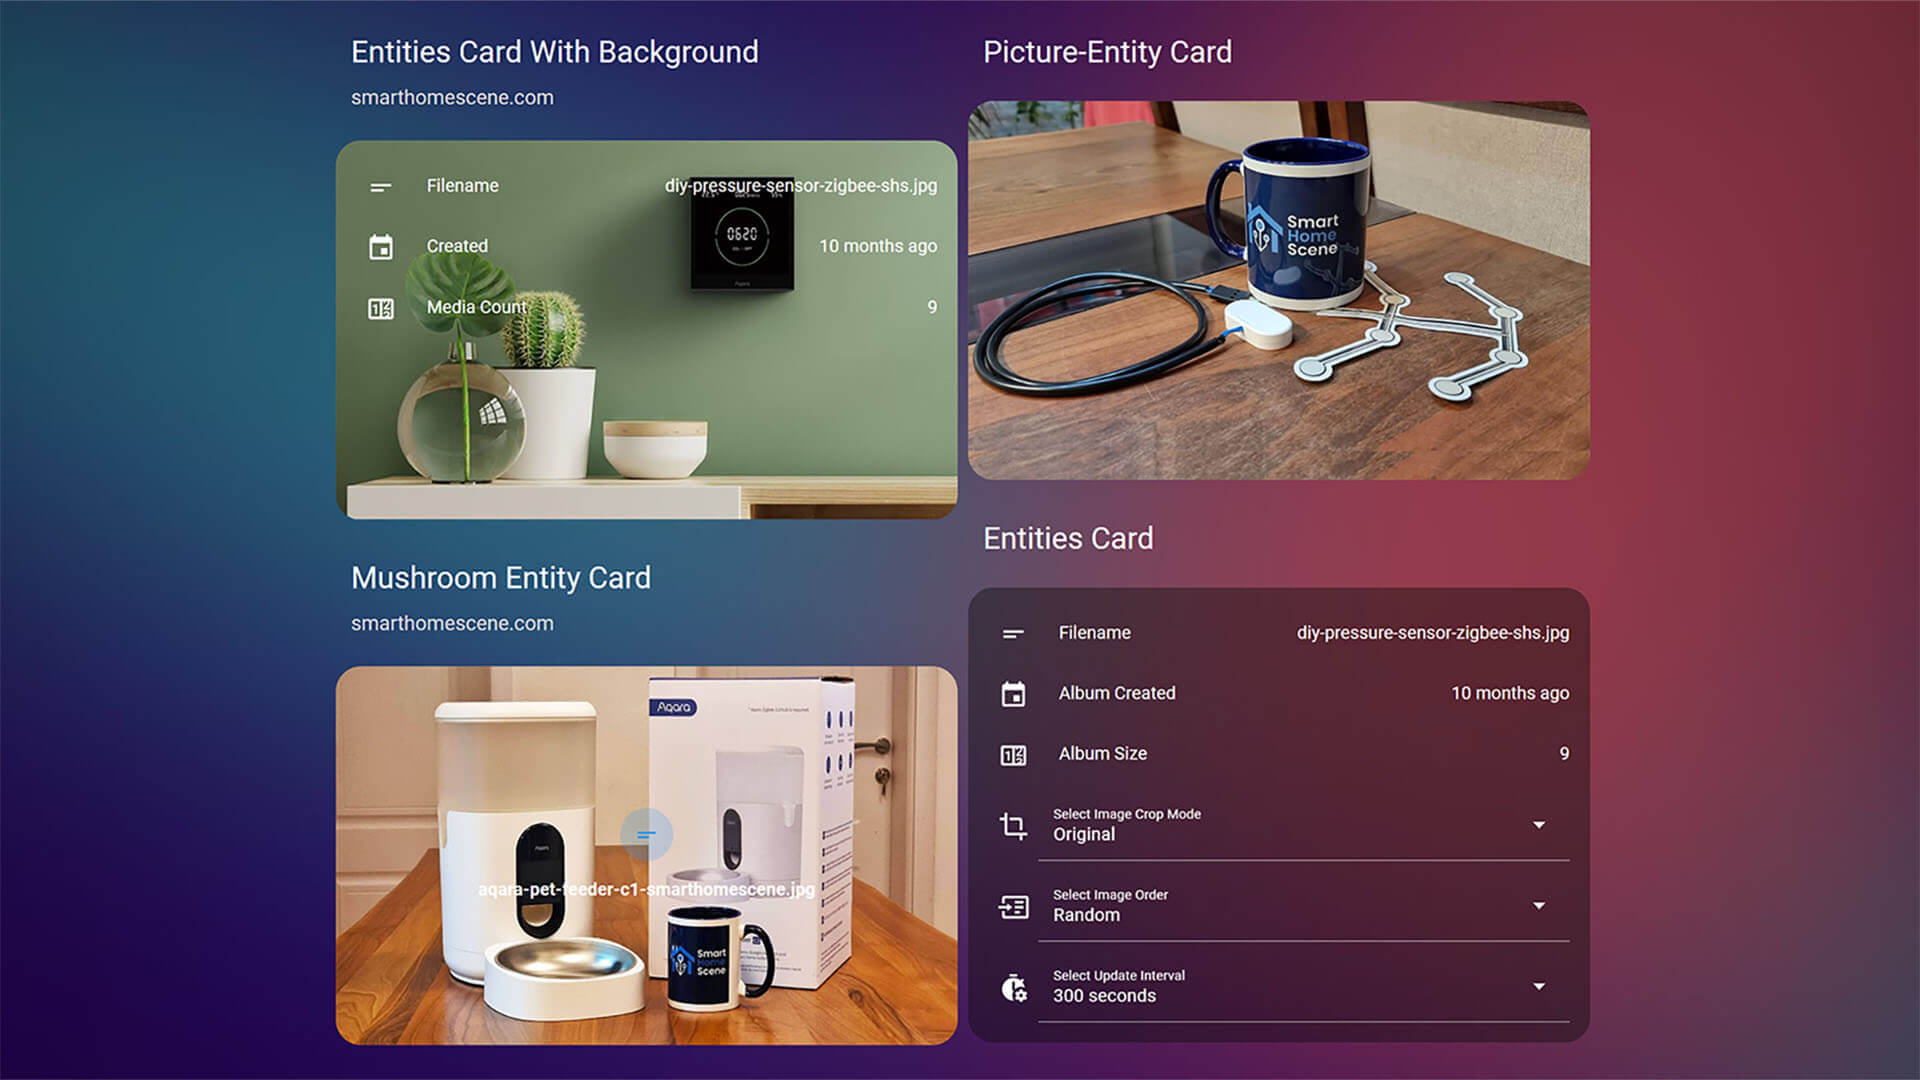
Installation
HACS
 << Click OR:
- Navigate to HACS > Integrations
- Click + Explore & Download Repositories
- Search for Google Photos
- Click Download
- Add a resource reference (YAML Mode only)
- Quick Reload configuration OR
- Restart Home Assistant

Manual
- Navigate to
configfolder- If you do not have a
custom_componentsfolder, create it.
- If you do not have a
- In the
custom_componentsfolder, create a new folder calledgoogle_photos- Download all the files from the
custom_components/google_photos/directory - Place the files you downloaded in the new folder you created.
- Download all the files from the
- Quick Reload configuration OR
- Restart Home Assistant
Configuration
Google Developer Account
If you don’t already have one, you need to create a Google Developer Account.
- Navigate to the Google Cloud Console and enable the Photos Library API
- A project called “My First Project” will be automatically created
- At the top of the screen, click Create Credentials
- On the left side of the screen, select OAuth Consent Screen
- In the first window, select External and click Create
- In the next OAuth Consent Screen window, input the following information:
- App name: homeassistant, hagooglephotos etc.
- User support email: select your email address
- Developer contact information: input email address again
- Don’t fill out anything else, as additional review process may take place
- Click Save and Continue at the bottom
- In the next Scopes window click Save and Continue without changing anything
- In the next Test Users window click Save and Continue without changing anything
- In the next Summary window click Back to Dashboard
- On the left side of the screen, select OAuth Consent Screen again
- Under Testing, click Publish App
- Click Confirm so it goes in Production
- If you skip this step, your credentials will expire in 7 days
- On the left side of the screen, select Credentials
- Click +Create Credentials at the top of the screen
- Click OAuth Client ID
- Under Application Type, select Web Application
- Give it a Name: Home Assistant Credentials, Google Photos Credentials etc.
- Under Authorized Redirect URI add: https://my.home-assistant.io/redirect/oauth
- Click Create
- You will be presented with a popup containing the Client ID and Client Secret
- Copy these is a text file and save it
Note: The Google Cloud Console is constantly subject to change and modification by Google. Its layout is frequently updated, jumbled around and changed. This guide will be updated whenever there is a change made.
Google Photos Integration
After you’ve installed the Google Photos integration in HACS, you need to add it to Home Assistant:
- Navigate to Settings > Devices & Services > + Add Integration
- Search for Google Photos and select it
- In the popup dialog window, input your Client ID and Client Secret that you saved earlier

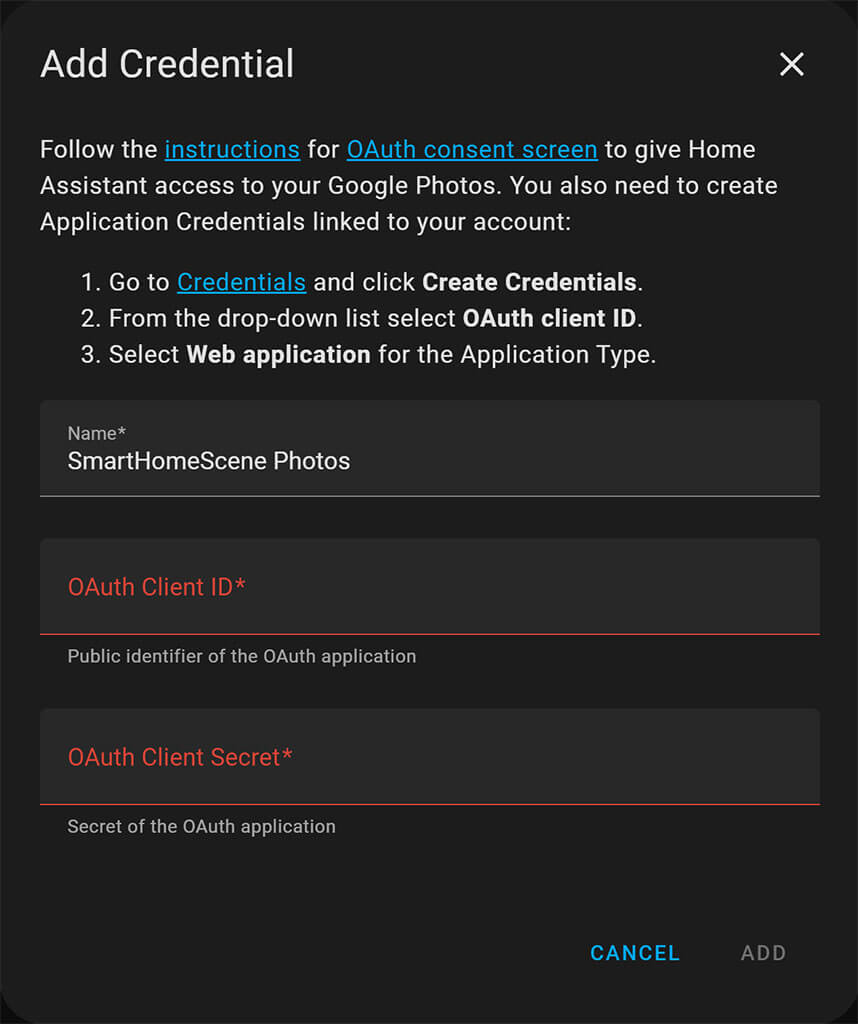
- Click Add
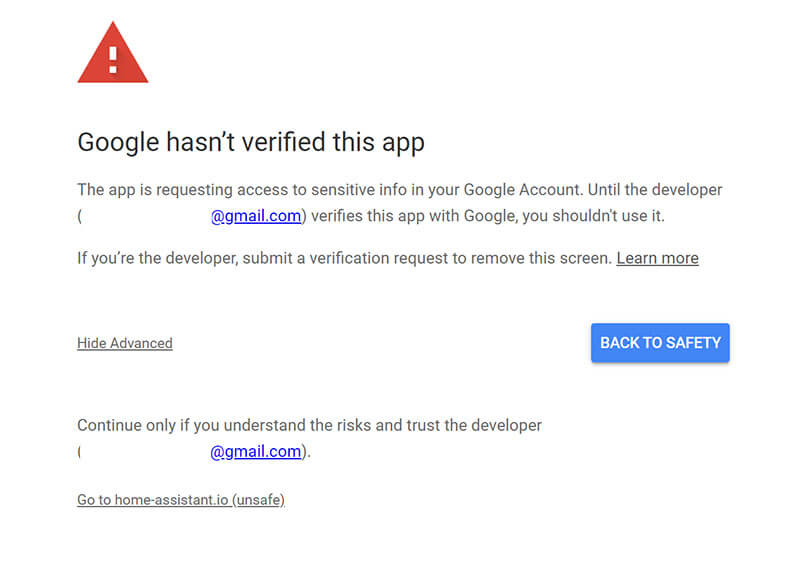
- You will be taken to a new window to select your Google Account
- You will get a Google has not verified this app warning
- Click Advanced and than Go to home-assistant.io

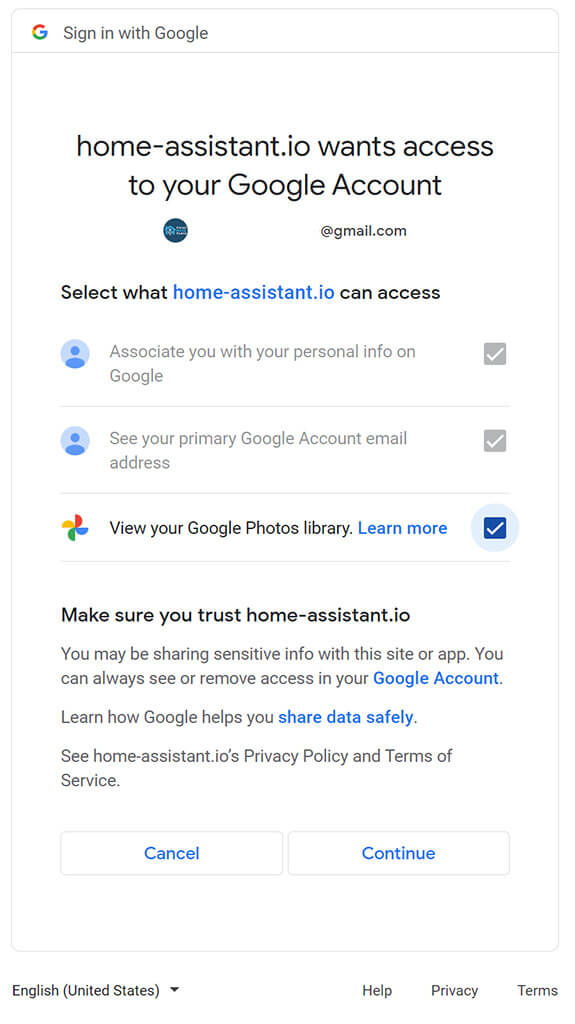
- Check the View your Google Photos Library

- Click Continue
- You will get a my.homeassistant.io redirection
- If the URL is not correct, edit it and click Update

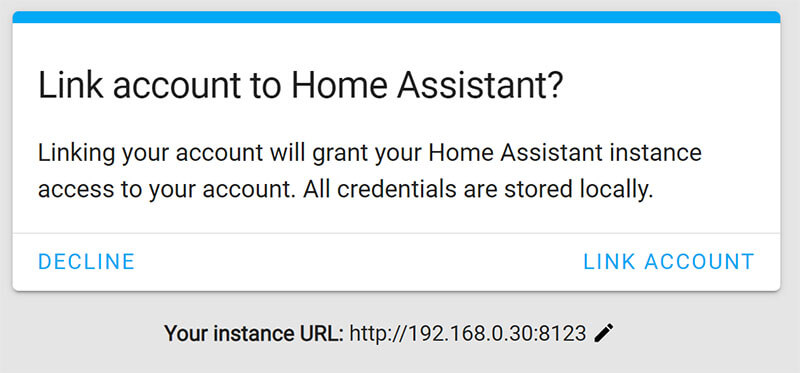
- Click Link Account which till take you back to Home Assistant
- You will be greeted with a success message, click Finish

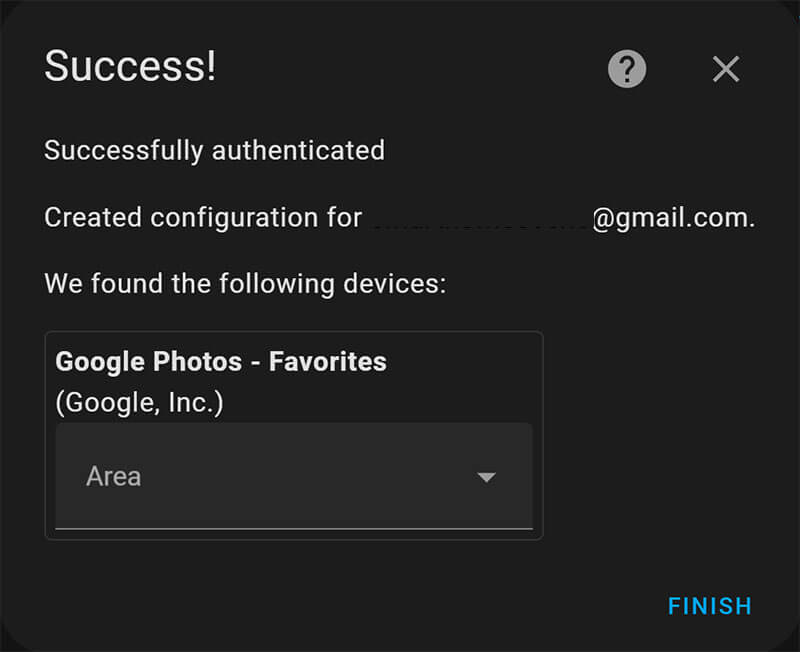
The first album which will be automatically added is your Favorites folder. If you want to add subsequent albums, click the Configure button under the Google Photos Integration > Select Album > Submit. Repeat for as many different albums you want to add, but don’t overdo it because you will reach Google’s API limit which is 10.000 request per project per day.
Usage
For each selected album that you add using the Google Photos Integration, the following entities will be created in Home Assistant: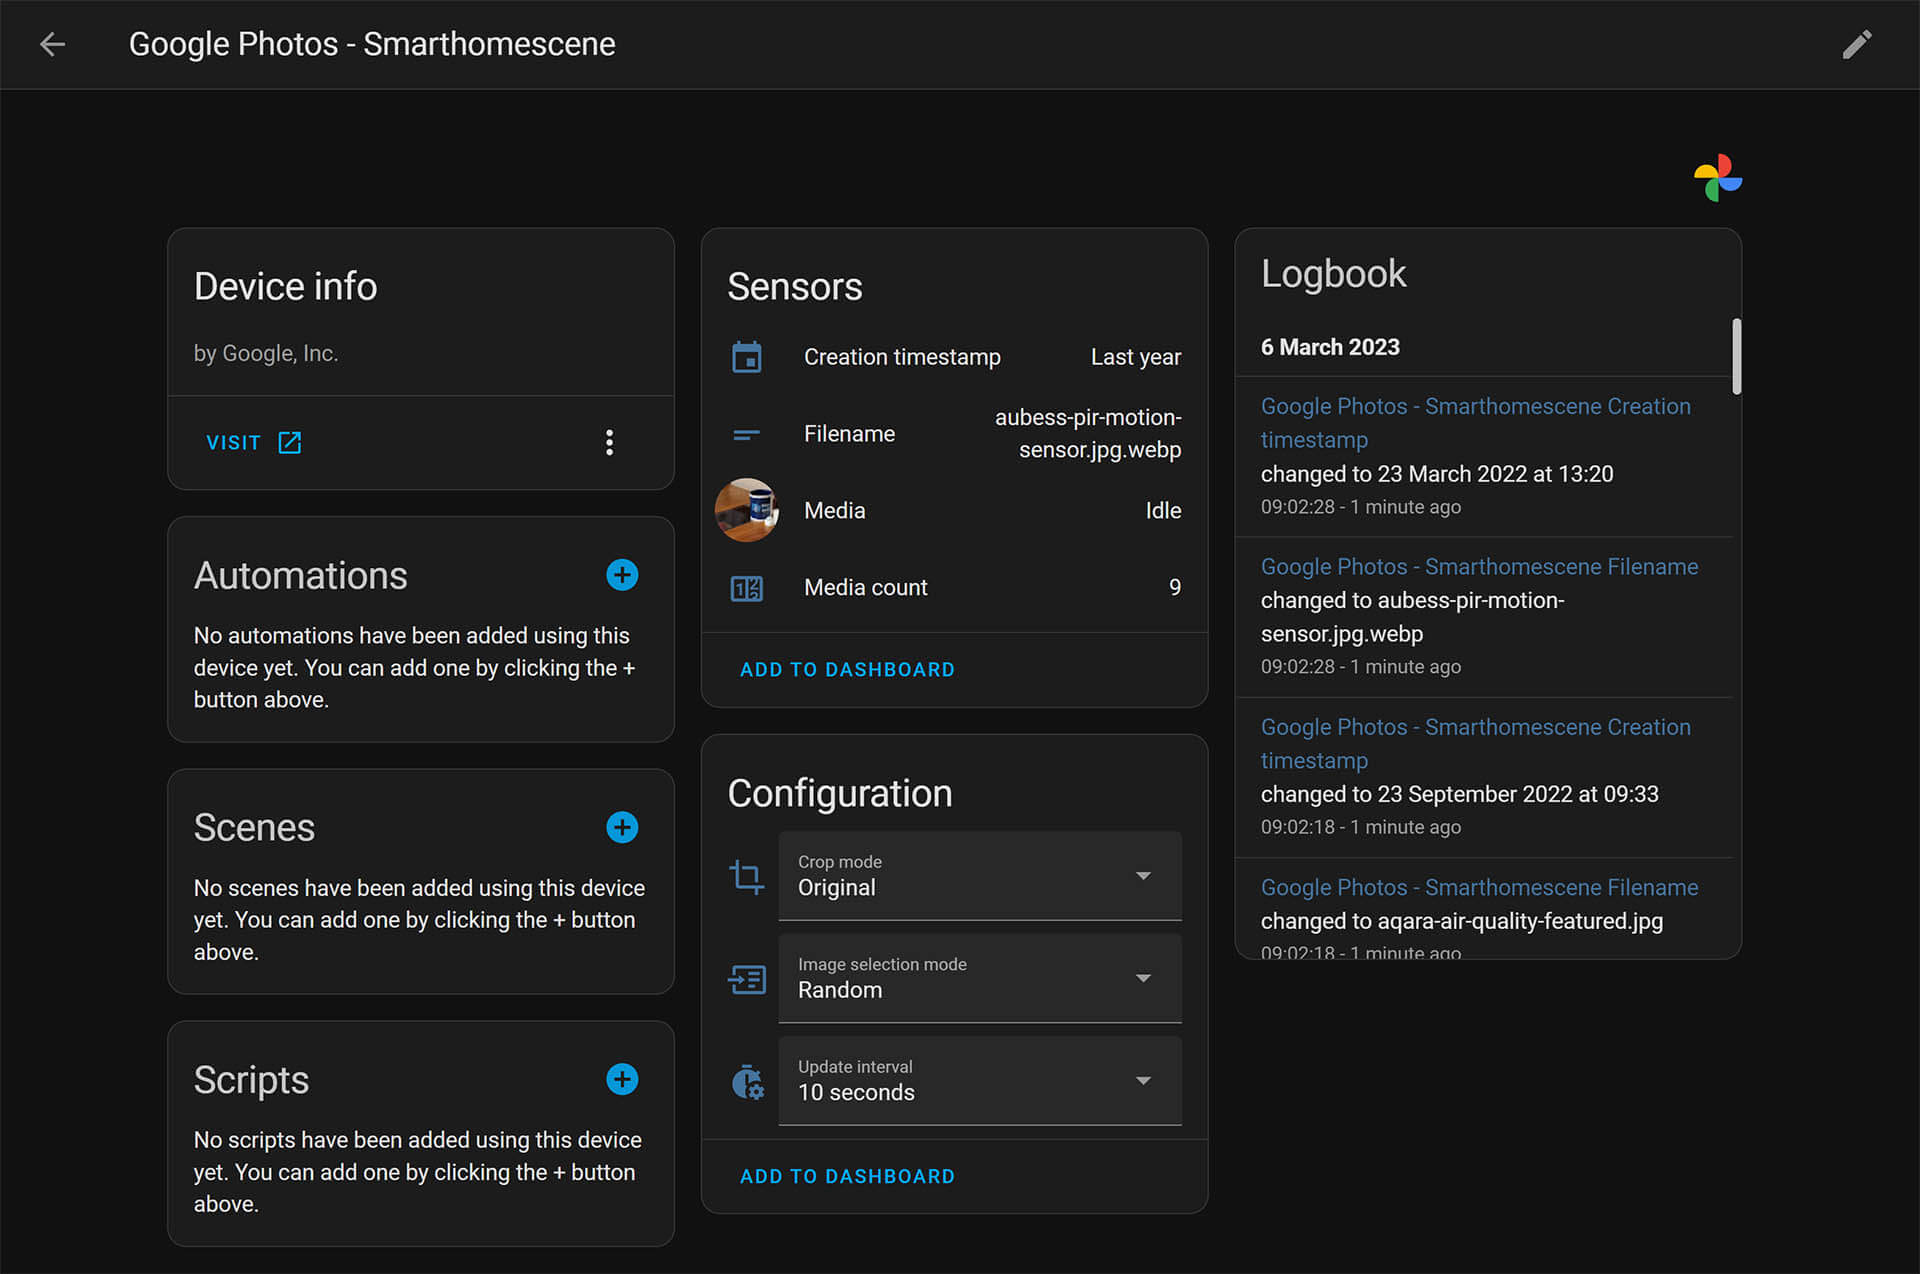
- camera.media: An image from the Google Photos Album.
- sensor.filename: Filename of the currently selected media item.
- sensor.creation_timestamp: Timestamp of the currently selected media item.
- sensor.media_count: Counter showing the number of media items in the album (photo + video).
- select.image_selection_mode: Image picking mode, Random or Album order
- select.crop_mode:
- Original: Provides scaled down images that would fit in the requested view in the original aspect ratio.
- Crop: Crops images to fit into the requested view.
- Combine: The integration will combine two images of the same orientation if it calculates that showing two images side by side would lead to a lower loss in square pixels than cropping a single image. For example; two portrait images on a landscape view.
- select.update_interval: How often to update the image, if you have a lot of albums running on your instance it is advisable to not set this too low.
You can use these entities to configure the behavior of the album images being displayed on your dashboard. Set the desired update_interval (don’t go too low, as you may reach the API limit) and select your crop_mode. As an example, here’s the camera entity added to a dashboard: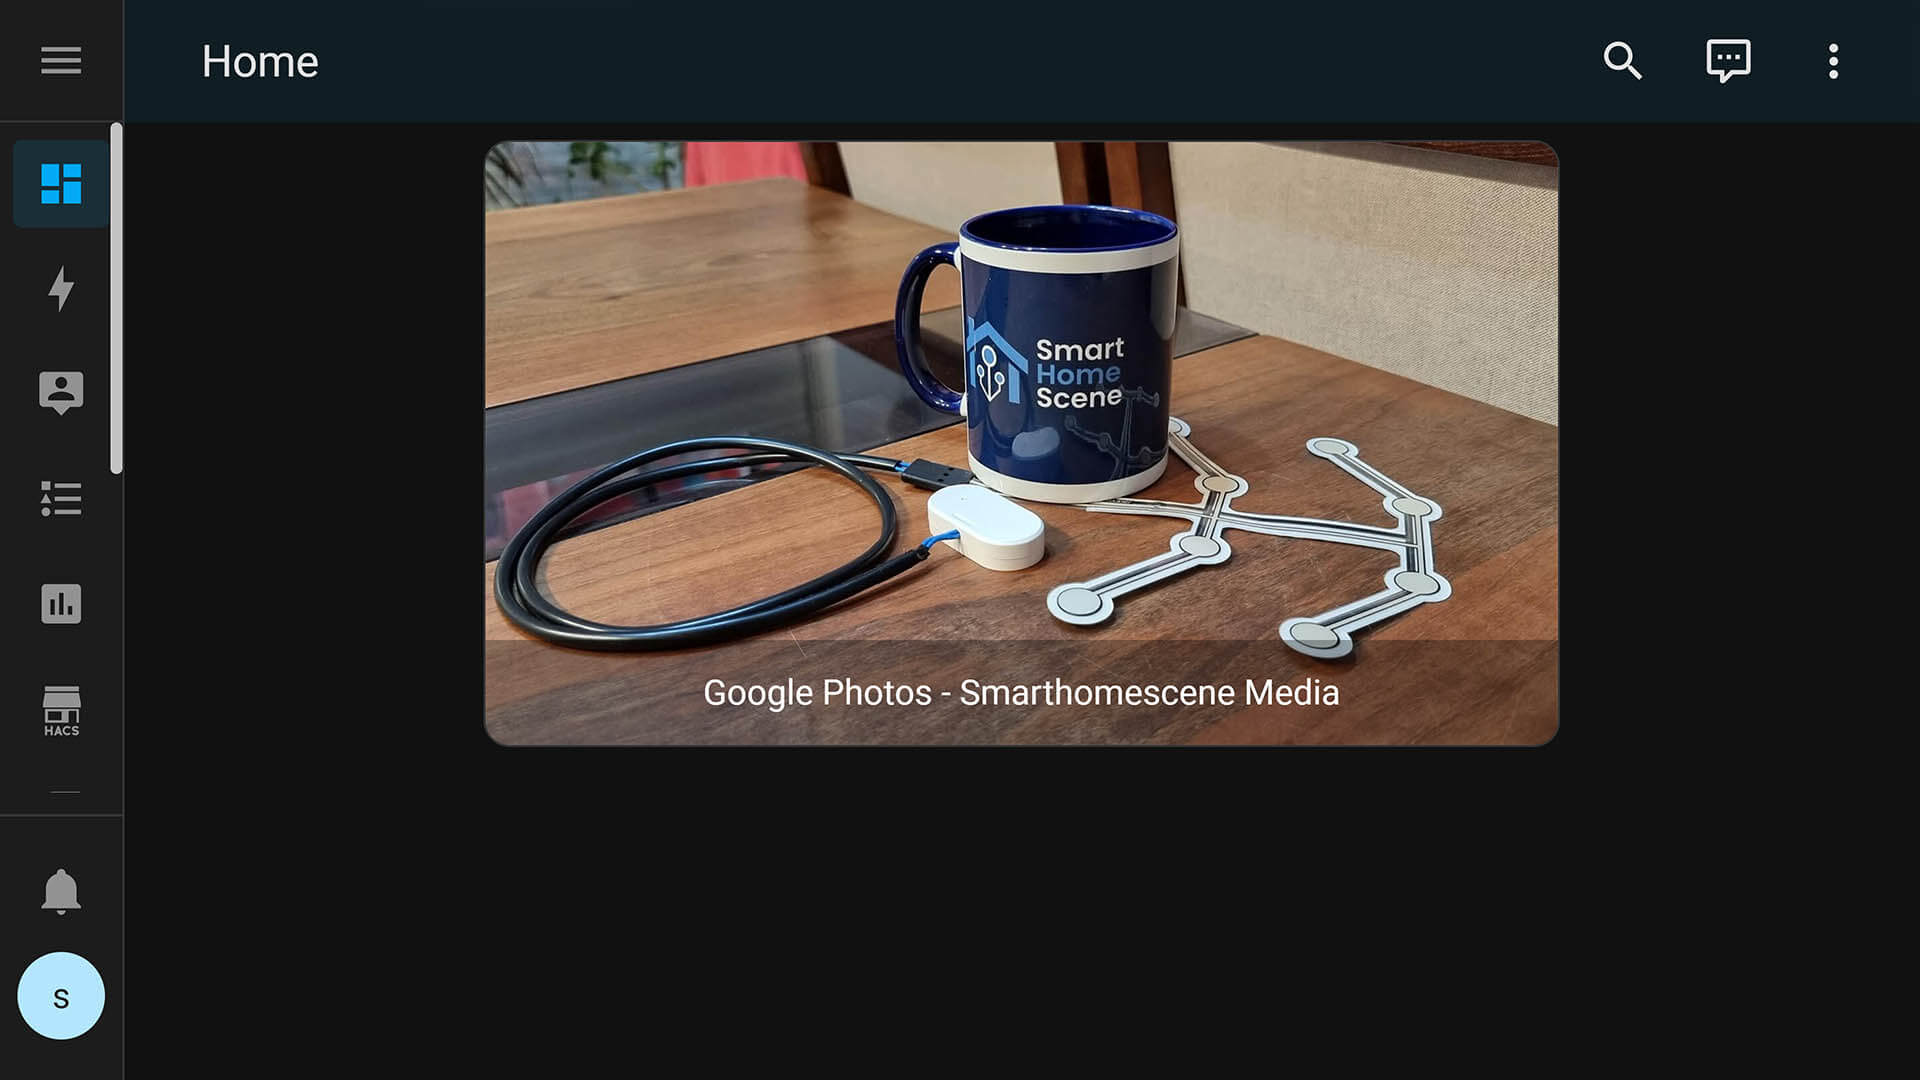
I can also add a tap_action to the card itself, to switch the photo when I single tap it. The code looks like this:
type: picture-entity #Google Photos Picture Entity Card
show_state: false
show_name: true
camera_view: auto
entity: camera.google_photos_smarthomescene_media
tap_action:
  action: call-service
  service: google_photos.next_media
  data:
    mode: Random
  target:
    entity_id: camera.google_photos_smarthomescene_media
With a bit of CSS magic using card-mod, we can change the background of any card to display a picture from the Google Photos camera entity. For example: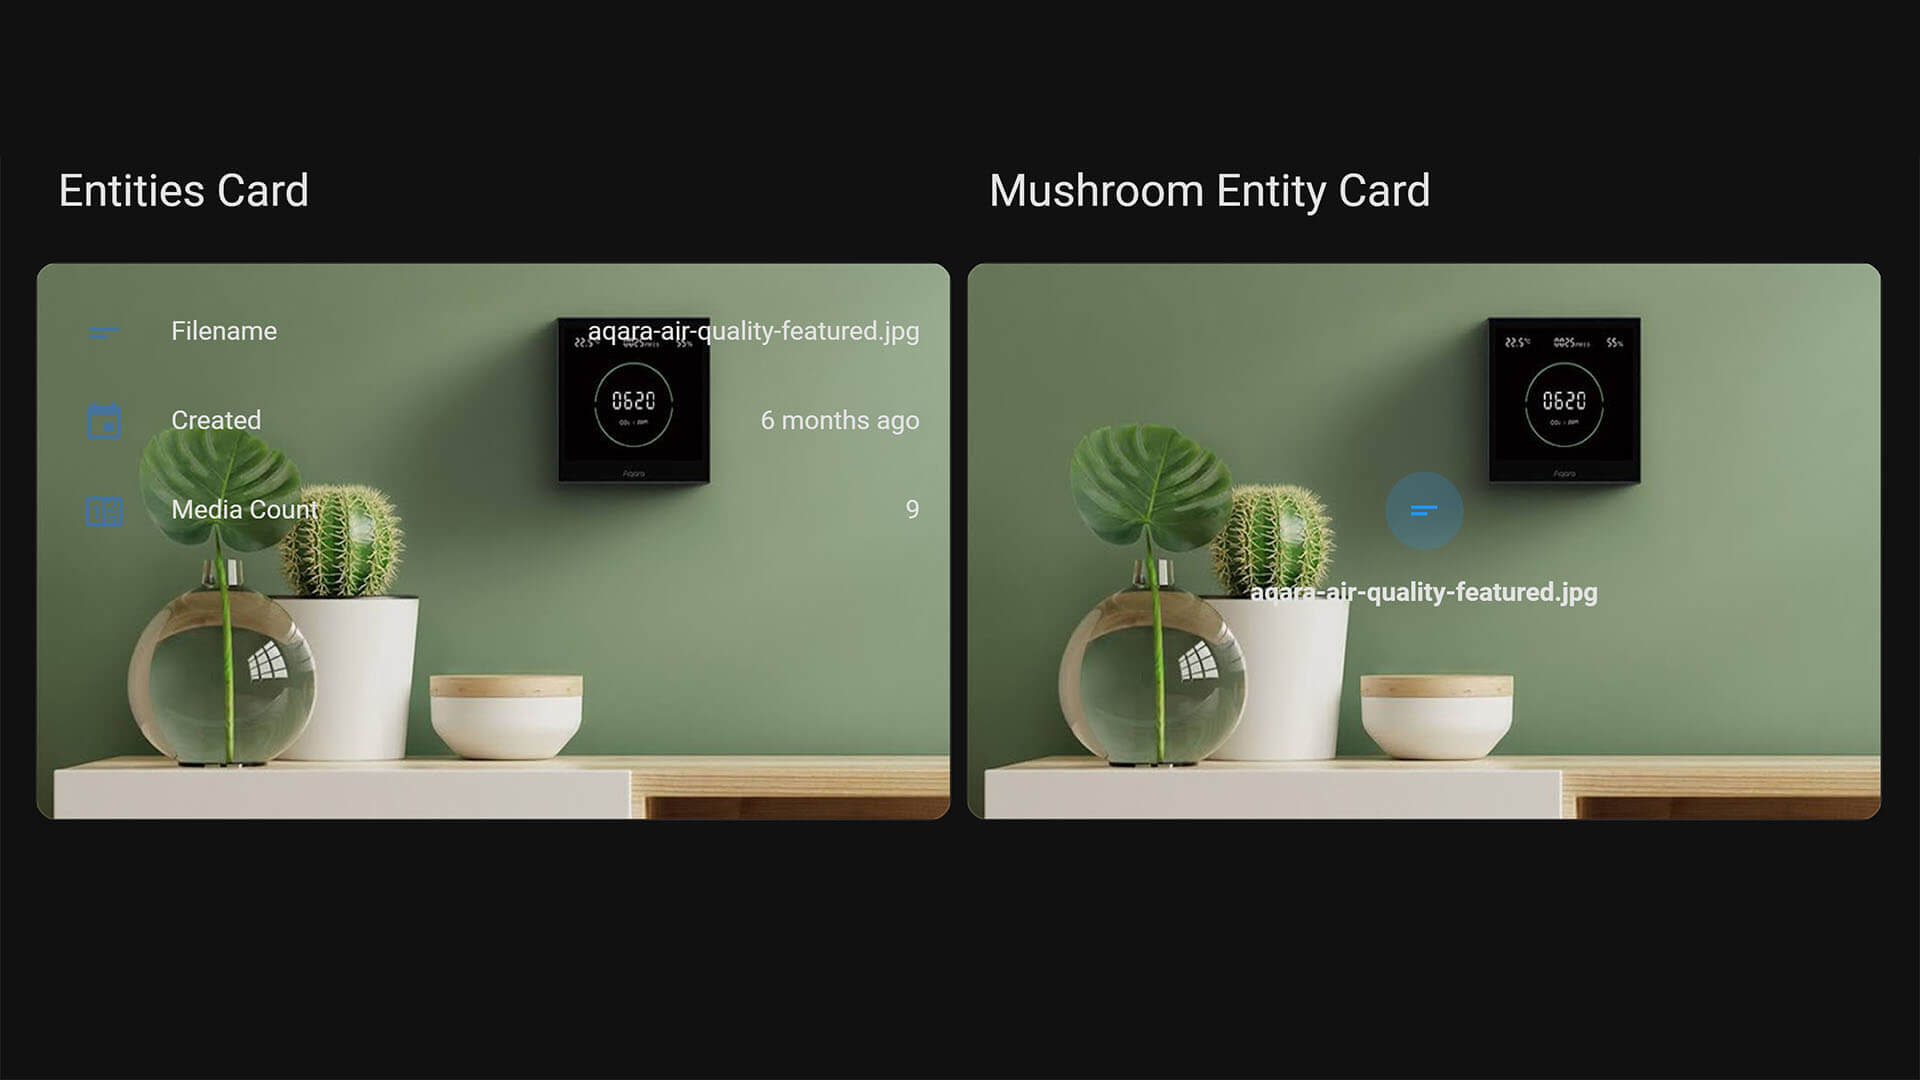
type: entities #Card-Mod Styling Example
entities:
  - entity: sensor.google_photos_smarthomescene_filename
    name: Filename
  - entity: sensor.google_photos_smarthomescene_creation_timestamp
    name: Created
  - entity: sensor.google_photos_smarthomescene_media_count
    name: Media Count
card_mod:
  style: |
    ha-card {
      background: url({{state_attr("camera.google_photos_smarthomescene_media","entity_picture")}});
      background-repeat: no-repeat;
      background-size: 100% 100%;
      height: 300px !important;
    }
Summary
Developer Daanoz did a good job with this simple Google Photos Integration. He has some interesting things marked as Future Plans on integration repo, such as Video playback, Content categories (eg. Animals, Kids, Landmarks), and a custom media frontend component. There are many use cases for it and if you get creative you can customize your dashboard however you want. For example:
- You can create a slideshow of your favorite family photos on your wall-mounted dashboard
- You can create a camera snapshot slideshow, if you set it to upload snaps directly to Google Photos
- You can create a custom gallery that will fit nicely with your dashboard design
Home Assistant is all about being local and privacy protected. This integration brushes against that principle, by cloud downloading your personal photos from your account via the Google Photos API. If this is not something you are bothered by, it can be great way to showcase you dog images to family or guests.


Unfortunately I entered the wrong data, which are invalid. Where can I enter client ID and key again? Unfortunately, the dialogs described do not appear again.
Hi,
Please follow these steps:
If you need to find these credentials again at any point, then navigate to APIs & Services > Credentials, and you will see Home Assistant Credentials (or whatever you named them in the previous step) under OAuth 2.0 Client IDs. To view both the Client ID and Client secret, click on the pencil icon; this will take you to the settings page for these credentials, and the information will be on the right-hand side of the page.
Cheers
No I think you got the question wrong. Stefan tried to ask how to get to the window which asks credentials. Once you type them wrong the integration dialog doesnt open anymore. Im in the same situation and HA side will never ask credentials again.
Can you try to remove the integration and start over?
Found the solution.
When you are in the list of the integrations, click on the 3 dots on the top right side of the screen.
There you have an entry that will list the authentication and you will be able to remove the incorrect one.