While converting Xiaomi Temperature and Humidity Sensors from Bluetooth to Zigbee, I came across an issue I realized many users had trouble solving. Reverting back to Bluetooth firmware Over-the-Air (OTA).
If you flashed the latest Zigbee firmware and want to revert back to original or custom Bluetooth firmware, you can no longer do that by using the Telink Flasher, since the device doesn’t communicate over Bluetooth anymore. You need to use ZHA or Zigbee2MQTT to flash a Bluetooth firmware Over-the-Air.
This article is a step-by-step guide for setting up local OTA index for Zigbee2MQTT and updating devices with your own firmware files. In principle, the process is similar for ZHA but I will cover it in a separate guide.
What’s a Local OTA Index?
The OTA Index file is like a menu of available firmware updates on a server. When Zigbee2MQTT wants to see if there’s a new update, it looks at the current hardware and firmware version of a device and checks it against the index file to find the right upgrade file for that device.
There are times when you need to use a firmware image that’s not listed in Zigbee2MQTT’s main index. This can be useful for DIY projects or testing alternative firmware on a widely-used device. In such cases, you can provide Zigbee2MQTT with an alternate index file, either saved locally or hosted on a web server which guides Zigbee2MQTT to the firmware image files you want to use.
Records in the override OTA index file take precedence over matching entries in the main index, allowing you to change the image for a specific device type.
Create Local OTA Index file
To create a local OTA index file, we need to access files inside Zigbee2MQTT’s main folder in Home Assistant. This is most easily done with a tool like File Editor or Studio Code Server, both of which you can install as Add-ons in Home Assistant.
- Stop Zigbee2MQTT
- Navigate to
/config/zigbee2mqtt/ - Create an empty file and name it
my_index.json - Open
configuration.yaml(found in/config/zigbee2mqtt/configuration.yaml) - Add the following lines at the end:
ota:
zigbee_ota_override_index_location: my_index.json- Note that
my_index.jsonandconfiguration.yamlneed to be in the same folder - Start Zigbee2MQTT
This file will be used as an index pointer to whatever firmware file you list here and used in Zigbee2MQTT’s OTA updates feature. Instead of a local path, you can also define an URL of a HTTP(s) accessible server containing the index file. In this case, zigbee_ota_override_index_location must be a valid URL.
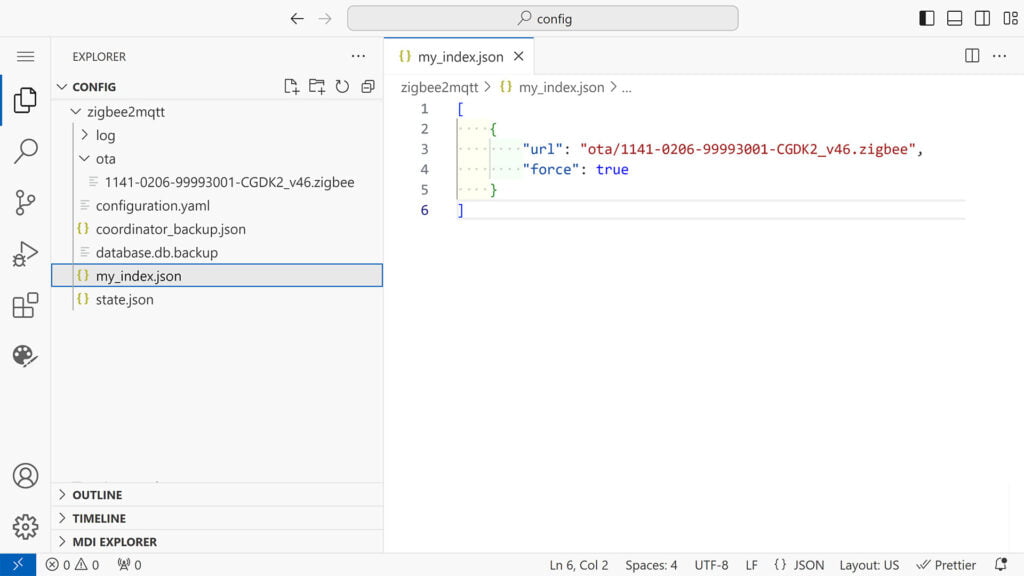
Each and every custom firmware you add to your my_index.json file will replace the original index of Zigbee2MQTT for that particular device’s make and model. It’s important to remember that this file needs to have the same structure as the main index file, check index.json for reference. For easy visualization, here’s how the folder and file structure should look like:
Flashing a Local Firmware
Now, let’s say I want to revert the Qinping CGDK2 to Bluetooth again and I want to flash the custom pvvx BLE firmware. I need to download the firmware file and make it accessible to Zigbee2MQTT, by adding its path to the my_index.json file.
- Stop Zigbee2MQTT
- Download your firmware file to your PC
- In this case,
1141-0206-99993001-CGDK2_v46.zigbee
- In this case,
- Upload it to
/config/zigbee2mqtt/ota- Create the
otafolder and name it anything you like, make sure you change the path if you do
- Create the
- Open the
my_index.jsonfile and add the following:
[
    {
        "url": "ota/1141-0206-99993001-CGDK2_v46.zigbee",
        "force": true
    }
]- Save the file and start Zigbee2MQTT
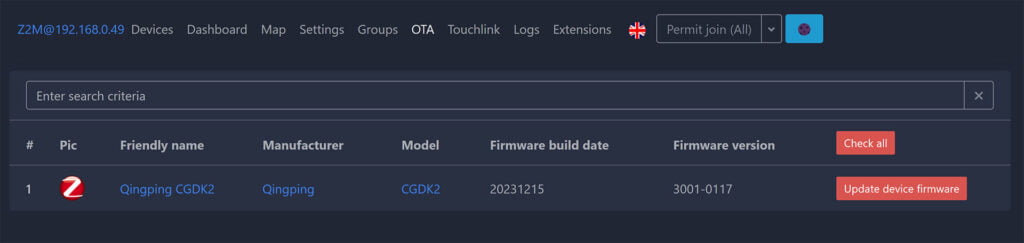
- Open Zigbee2MQTT and click OTA at the top
- Click Check All and the new firmware will become available for flashing
- Click Update device firmware and wait for the process to finish
- Done!
Typically, Zigbee2MQTT checks the current firmware of a device against available firmware images and permits flashing only when the file version is higher than the current one. We can define "force": true to bypass this restriction, like in the example above.
While the Zigbee specification technically allows firmware version downgrade, certain devices may refuse older firmware, and Zigbee2MQTT cannot compel this change.
Final Thoughts
Pushing a local firmware update file is very useful for tinkering with alternative firmware or testing DIY devices. If you are flashing battery powered devices, make sure you use a new battery with above 70% juice, since the OTA process is very battery-hungry.
If you encounter errors like Device didn’t respond to OTA request or Update failed with reason: ‘aborted by device’, try disconnecting the power supply or battery for a few seconds before trying again. Battery-powered devices are usually sleeping and may need to be activated by pressing a button, just before clicking Update device firmware.


Great tutorial. Thank you for support. Indeed there is a Telink Flasher were we can flash device with zigbee, however come back is not so easy. I am awaiting another tutorial about flashing back to BLE from Zigbee using ZHA.
Could you please cover the process using ZHA. Thank you in advance!