In this short guide we are going to show you how you can track your Home Assistant server available updates. This includes OS, core and supervisor updates as well as the Home Assistant Community Store (HACS). We’re going to create actionable notifications and some handy dashboard cards for tracking available updates.
This tutorial can be completely modified to suit you needs and wishes, but if you follow along you will be left with something like this dashboard in the end: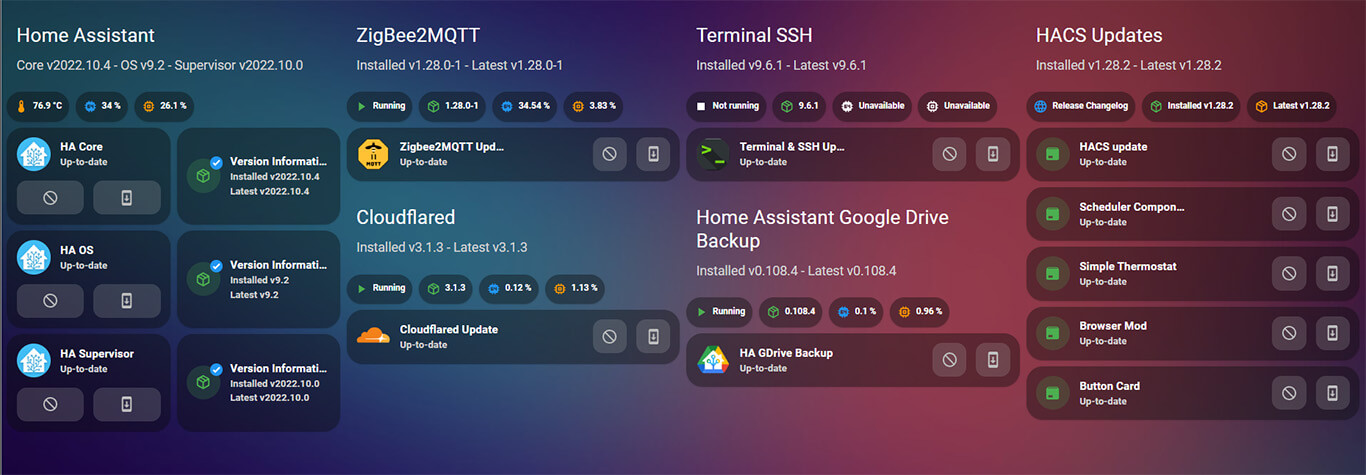
Why track updates?
Home Assistant always notifies you in the settings tab whenever there are available updates. This includes the OS, Core and Supervisor addons. However, HACS is not tracked by default and updates are excluded from the settings screen. To view HACS updates, you need to open the HACS integration page.
The method we are going to show you, brings all updates in one place so you could track all of them and receive a notification on your mobile device whenever there is one available. We will also make them updatable with one click right from your dashboard.
We are going to base our design on Mushroom Cards, because we think they are easiest to work with, especially for beginners. We will provide examples for each card so you can simply copy-paste the YAML and just edit your entities. As an additional overview of our server, we will track the CPU, RAM and a couple of other things thorough the system monitor integration. First we need to enable a couple of things.
Enable System Monitor
The System Monitor platform, will provide us with a few useful sensors which we can use to provide an overview of our server at a glance from the dashboard. To enable this integration, add the following to your configuration.yaml file:
#System Monitor Integration
sensor:
  - platform: systemmonitor
    resources:
      - type: disk_use_percent
        arg: /config
      - type: disk_use
      - type: disk_free
      - type: memory_use_percent
      - type: memory_use
      - type: memory_free
      - type: swap_use_percent
      - type: swap_use
      - type: swap_free
      - type: load_1m
      - type: load_5m
      - type: load_15m
      - type: network_in
        arg: eth0
      - type: network_out
        arg: eth0
      - type: throughput_network_in
        arg: eth0
      - type: throughput_network_out
        arg: eth0
      - type: packets_in
        arg: eth0
      - type: packets_out
        arg: eth0
      - type: ipv4_address
        arg: eth0
      - type: ipv6_address
        arg: eth0
      - type: processor_use
      - type: processor_temperature
      - type: last_boot
These are all the available sensors in the System Monitor integration. You do not need to enable everything, just delete or comment any sensor you do not wish added. It’s also good practice to use includes, to keep your configuration file under control.
Please note, this integration is not required for our purposed tutorial here, we are just going to use some of its provided sensors as a nice information overview placed as chips in some of the mushroom cards (CPU/RAM/Disk usage).
Enable Addon Update Entities
By default, an update entity is enabled for each Supervisor addon. There are a few additional sensors we can enable to be able to use in notifications and in dashboard design. For example, CPU usage, Memory usage, version and a binary_sensor which states if the Addon is running or not.
To enable sensor for a specific addon, Open Settings > Devices & Services > Supervisor > [Addon]. In this window, you will notice only an update entity is enabled, and everything else is disabled: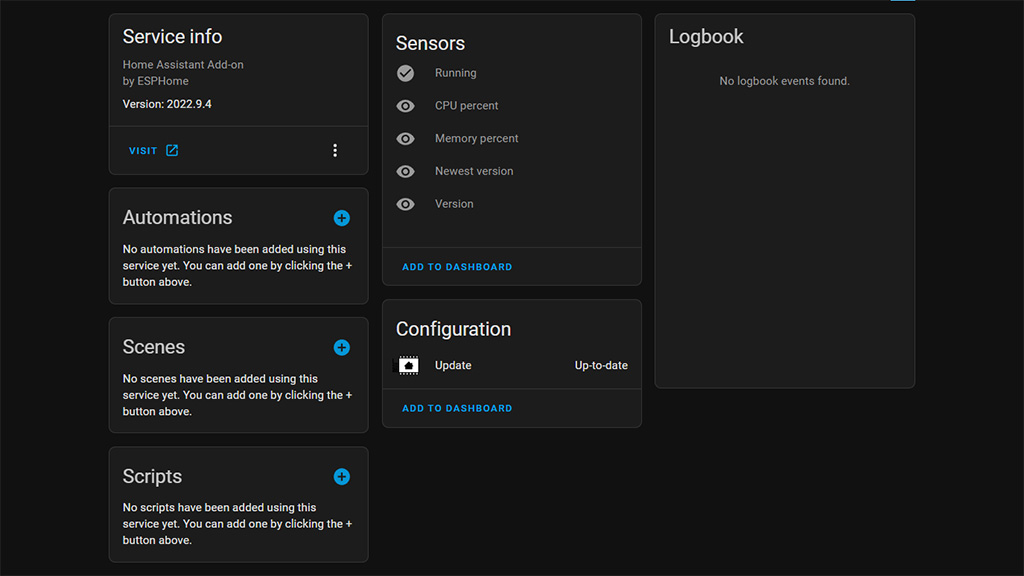
You click on the sensor you with to enable, such as Newest Version, and enable it in the advanced tab:
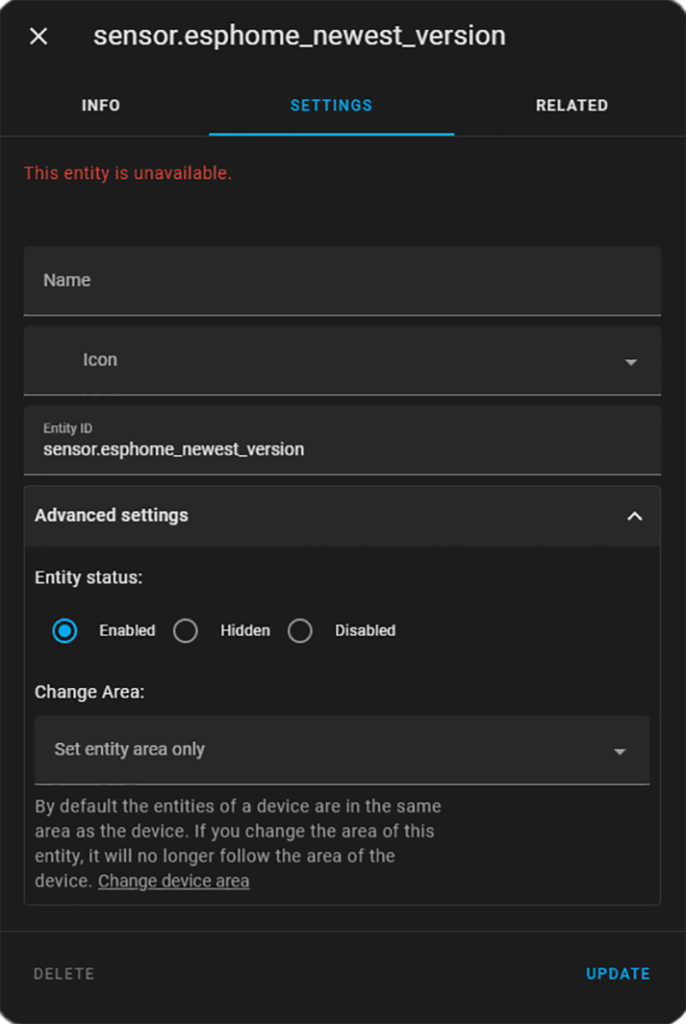
You could give it a name and an icon, but it’s not really necessary. All customization will be done later in our dashboard design. You click UPDATE and Home Assistant notifies you that the sensor will be added in 30sec.
Enable HACS Update Entities
HACS updates are not available as a separate entity for each integration. Instead, they are aggregated in one main sensor called sensor.hacs which aggregates available updates simply as a number, i.e. 1 pending update(s).
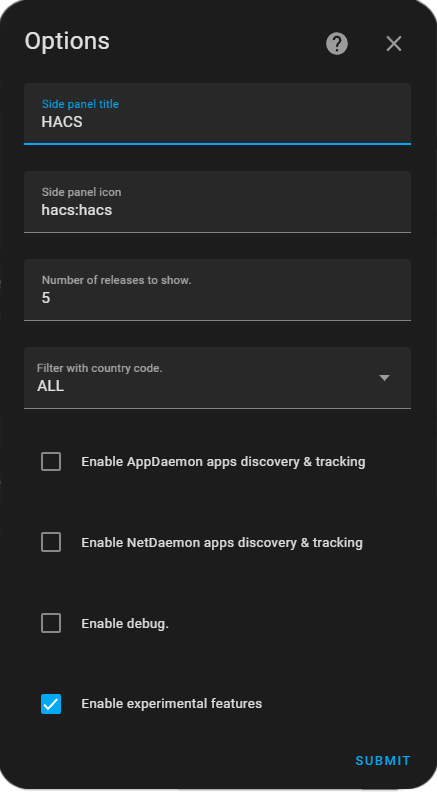
To enable update entities for each integration, we need to enable HACS Experimental Features.
Open Settings > Devices & Services > click Configure on HACS. This will present a dialog window, in which you check the Experimental Features box and click submit.
A confirmation window will appear, after which you need to restart Home Assistant. When Home Assistant has booted back up, if you head to Developer Tools > States window, you can see all the new update entities:
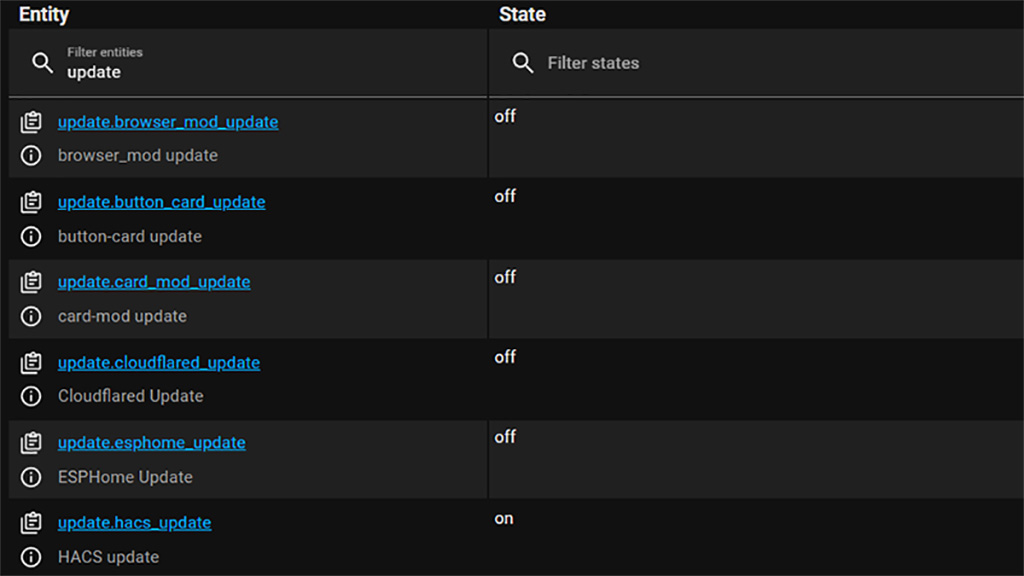
We can use these entities to create our notifications and dashboard overview cards.
IMPORTANT: Enabling Experimental Features in HACS changes a few other things as well. For example, it changes the UI of HACS to a simple list instead of the Integrations/Frontend design we are already used too. This is purely a cosmetic change, so no need to panic.
Creating Actionable Notifications
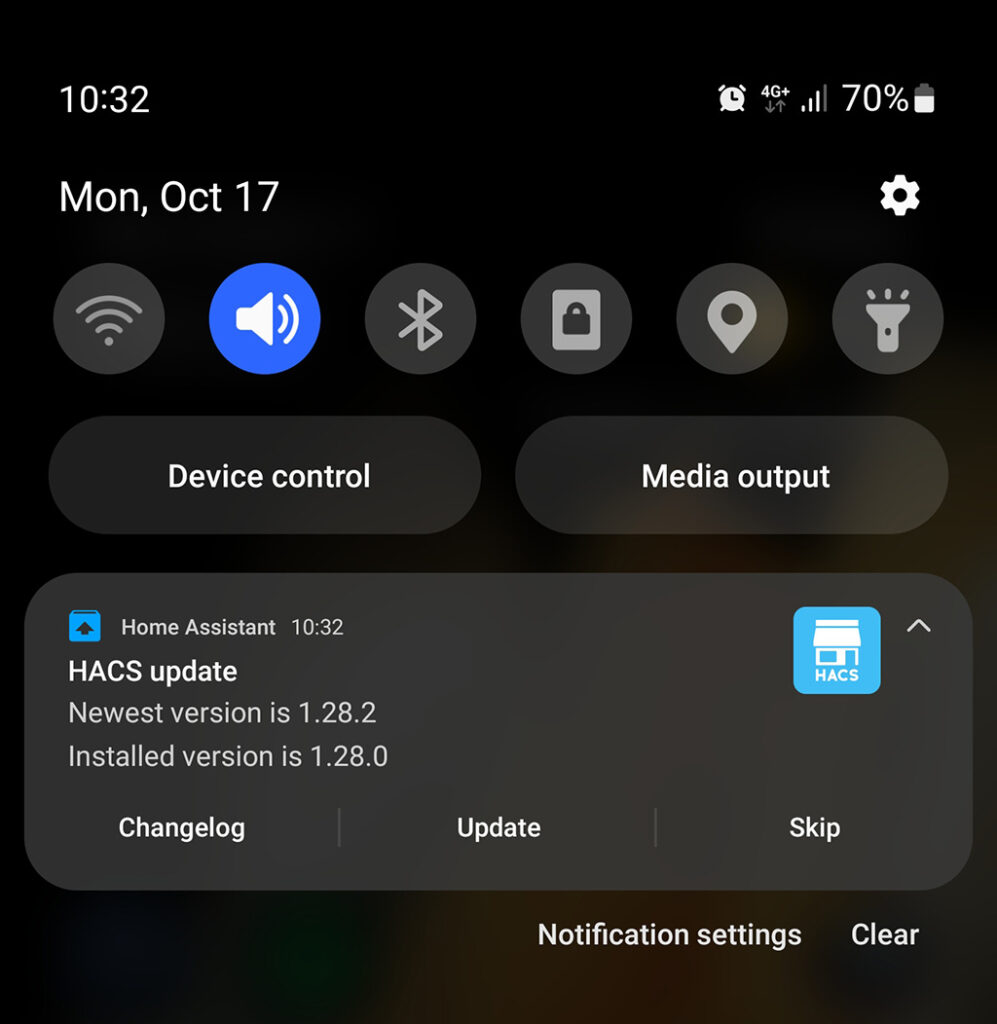
Home Assistant can notify you on your mobile device whenever an update is available. Whether this is necessary, it’s up to you to decide. User CentralCommand has shared a pretty awesome blueprint for quick setting of your actionable notifications for available updates. To use is, press the import button bellow:

Once added, you create a new automation based on this blueprint. Head over to Settings > Automations & Scenes > + Create Automation > Use a Blueprint > Update notifications: 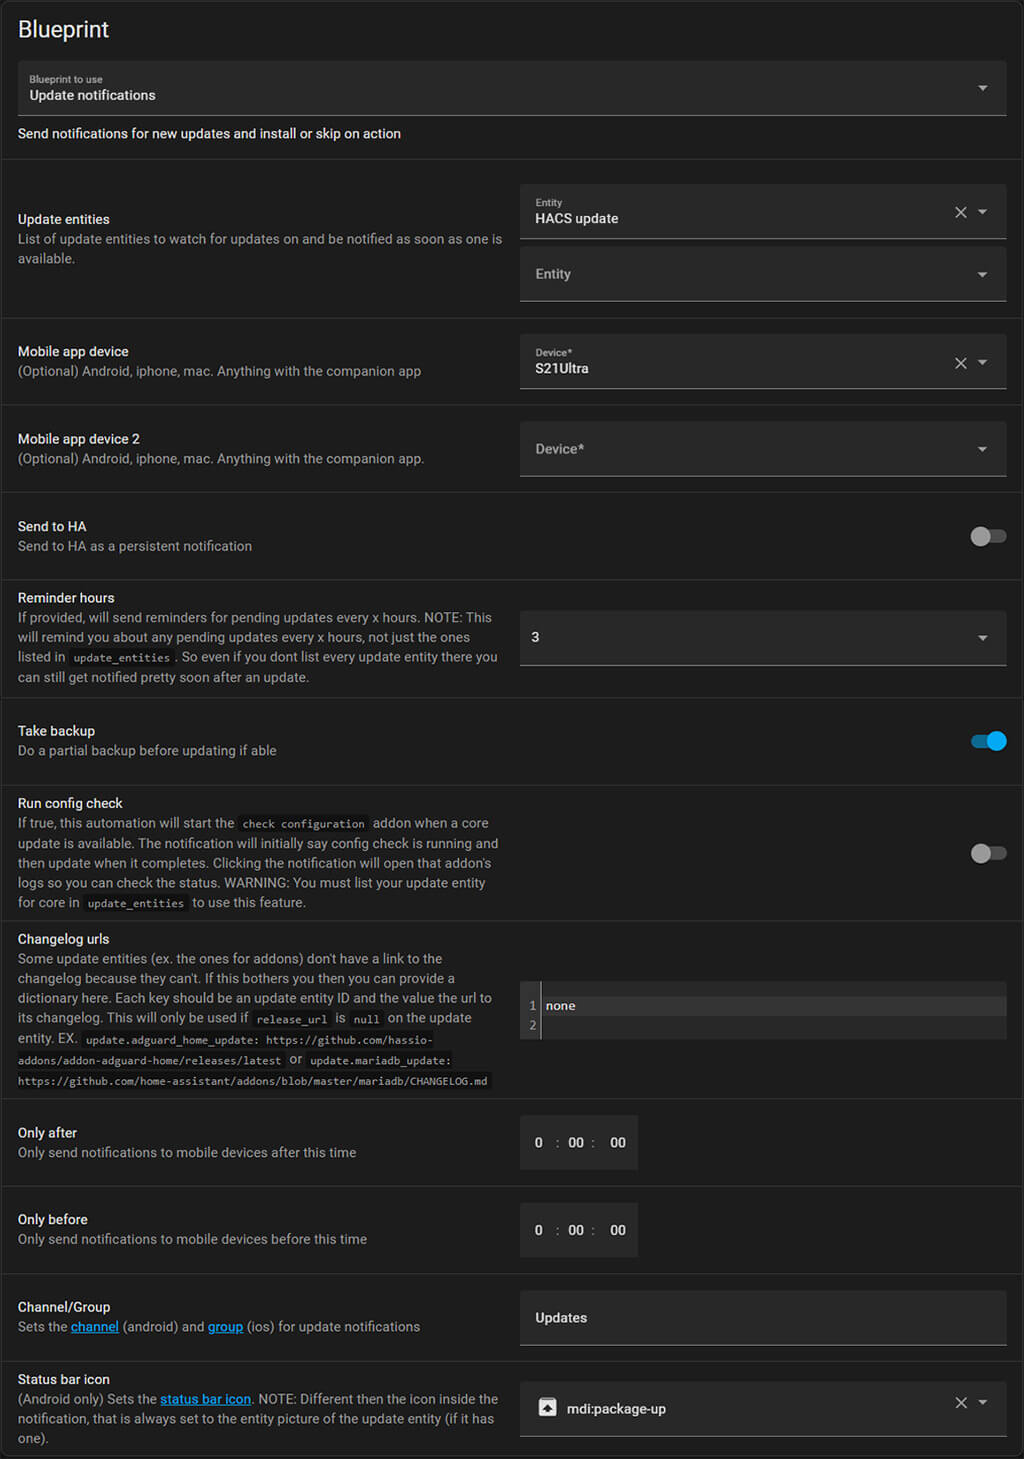
The variables are pretty self explanatory, you select your update entities, your notification device (mobile phone), set time and icon. Whenever there is an update available for the monitored entities, Home Assistant will notify you on your phone:
Creating an Overview Dashboard
We are basing our design on Mushroom Cards (Guide: Part1, Part2), so if you wish to copy-paste the YAML code directly, you can install them via HACS.
Creating a Home Assistant Server Update Card
This card will allow you to overview the Operating System, Core and Supervisor versions of Home Assistant and update them with the click of a button. As a chips header, we’ve placed a few entities such a CPU usage and temp, RAM usage, Disk space and network inbound traffic. You can modify these as you please:

Templating is used throughout the card to achieve a little more customization. The icons are dynamic, so whenever an update is available, the badge and color will change to orange/red to notify you about pending updates.
You can click the download button directly, HA will make a backup and update the corresponding entity.
Note: Theme is reeder_dark by dev hekm77.
#Home Assistant Server Update Card
type: vertical-stack
cards:
  - type: custom:mushroom-title-card
    title: Home Assistant Server
    subtitle: >
      Core v{{ state_attr('update.home_assistant_core_update',
      'installed_version') }} - OS v{{
      states('sensor.home_assistant_operating_system_version') }} - Supervisor
      v{{ state_attr('update.home_assistant_supervisor_update',
      'installed_version') }}
  - type: custom:mushroom-chips-card
    chips:
      - type: entity
        entity: sensor.processor_temperature
        icon_color: orange
      - type: entity
        entity: sensor.processor_use
        icon_color: blue
      - type: entity
        entity: sensor.memory_use_percent
        icon_color: orange
      - type: entity
        entity: sensor.disk_use_percent_config
        icon_color: deep-purple
      - type: entity
        entity: sensor.network_in_eth0
        icon_color: green
  - type: horizontal-stack
    cards:
      - type: custom:mushroom-update-card
        entity: update.home_assistant_core_update
        name: HA Core
        show_buttons_control: true
        icon_type: entity-picture
      - type: custom:mushroom-template-card
        primary: Version Information
        secondary: >-
          Installed v{{ state_attr('update.home_assistant_core_update',
          'installed_version')}}

          Latest v{{ state_attr('update.home_assistant_core_update',
          'latest_version')}}
        icon: mdi:package-variant-closed
        multiline_secondary: true
        fill_container: true
        entity: update.home_assistant_core_update
        tap_action:
          action: more-info
        icon_color: |-
          {% if is_state('update.home_assistant_core_update', 'on') %}
            orange
          {% else %}
            green
          {% endif %}
        badge_color: |-
          {% if is_state('update.home_assistant_core_update', 'on') %}
            red
          {% else %}
            blue
          {% endif %}
        badge_icon: |-
          {% if is_state('update.home_assistant_core_update', 'on') %}
            mdi:help
          {% else %}
            mdi:check-bold
          {% endif %}
  - type: horizontal-stack
    cards:
      - type: custom:mushroom-update-card
        entity: update.home_assistant_operating_system_update
        name: HA OS
        show_buttons_control: true
        icon_type: entity-picture
      - type: custom:mushroom-template-card
        primary: Version Information
        secondary: >-
          Installed v{{
          states('sensor.home_assistant_operating_system_version')}}

          Latest v{{
          states('sensor.home_assistant_operating_system_newest_version')}}
        icon: mdi:package-variant-closed
        multiline_secondary: true
        fill_container: true
        entity: update.home_assistant_operating_system_update
        tap_action:
          action: more-info
        icon_color: >-
          {% if is_state('update.home_assistant_operating_system_update', 'on')
          %}
            orange
          {% else %}
            green
          {% endif %}
        badge_color: >-
          {% if is_state('update.home_assistant_operating_system_update', 'on')
          %}
            red
          {% else %}
            blue
          {% endif %}
        badge_icon: >-
          {% if is_state('update.home_assistant_operating_system_update', 'on')
          %}
            mdi:help
          {% else %}
            mdi:check-bold
          {% endif %}
  - type: horizontal-stack
    cards:
      - type: custom:mushroom-update-card
        entity: update.home_assistant_supervisor_update
        name: HA Supervisor
        show_buttons_control: true
        icon_type: entity-picture
      - type: custom:mushroom-template-card
        primary: Version Information
        secondary: >-
          Installed v{{ state_attr('update.home_assistant_supervisor_update',
          'installed_version')}}

          Latest v{{ state_attr('update.home_assistant_supervisor_update',
          'latest_version')}}
        icon: mdi:package-variant-closed
        multiline_secondary: true
        fill_container: true
        entity: update.home_assistant_core_update
        tap_action:
          action: more-info
        icon_color: |-
          {% if is_state('update.home_assistant_supervisor_update', 'on') %}
            orange
          {% else %}
            green
          {% endif %}
        badge_color: |-
          {% if is_state('update.home_assistant_supervisor_update', 'on') %}
            red
          {% else %}
            blue
          {% endif %}
        badge_icon: |-
          {% if is_state('update.home_assistant_supervisor_update', 'on') %}
            mdi:help
          {% else %}
            mdi:check-bold
          {% endif %}
Creating an Addon update card
To create something similar for addons, we need to alter the card design a little bit. Again, you can include any information you wish here. This is just an example containing most entities for those who would like to recreate it.
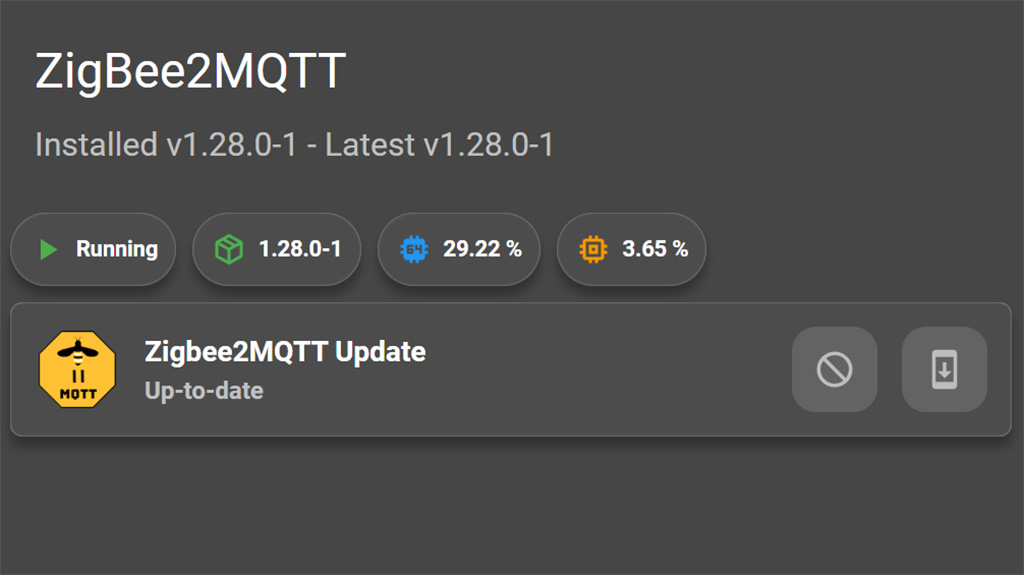
In this card, we add the Running binary_sensor in the chips header. CPU and RAM usage are listed, as well as current version information. The update entity is placed at the body of the card, so you can update with a click:
#Addon Update Card - ZigBee2MQTT
type: vertical-stack
cards:
  - type: custom:mushroom-title-card
    title: ZigBee2MQTT
    subtitle: >-
      Installed v{{ states('sensor.zigbee2mqtt_version') }} - Latest v{{
      states('sensor.zigbee2mqtt_newest_version') }}
  - type: custom:mushroom-chips-card
    chips:
      - type: entity
        entity: binary_sensor.zigbee2mqtt_running
        icon_color: green
      - type: entity
        entity: sensor.zigbee2mqtt_version
        icon_color: green
        icon: mdi:package-variant-closed
      - type: entity
        entity: sensor.zigbee2mqtt_cpu_percent
        icon_color: blue
      - type: entity
        entity: sensor.zigbee2mqtt_memory_percent
        icon_color: orange
  - type: custom:mushroom-update-card
    entity: update.zigbee2mqtt_update
    show_buttons_control: true
    icon_type: entity-picture
    layout: horizontal
Creating a HACS update card
HACS update entities are a little different, as they are not enabled by default. After enabling them using Experimental Features, we can use them in the card the same way. Considering users tend to have a lot of HACS integrations, we suggest adding them in a list:
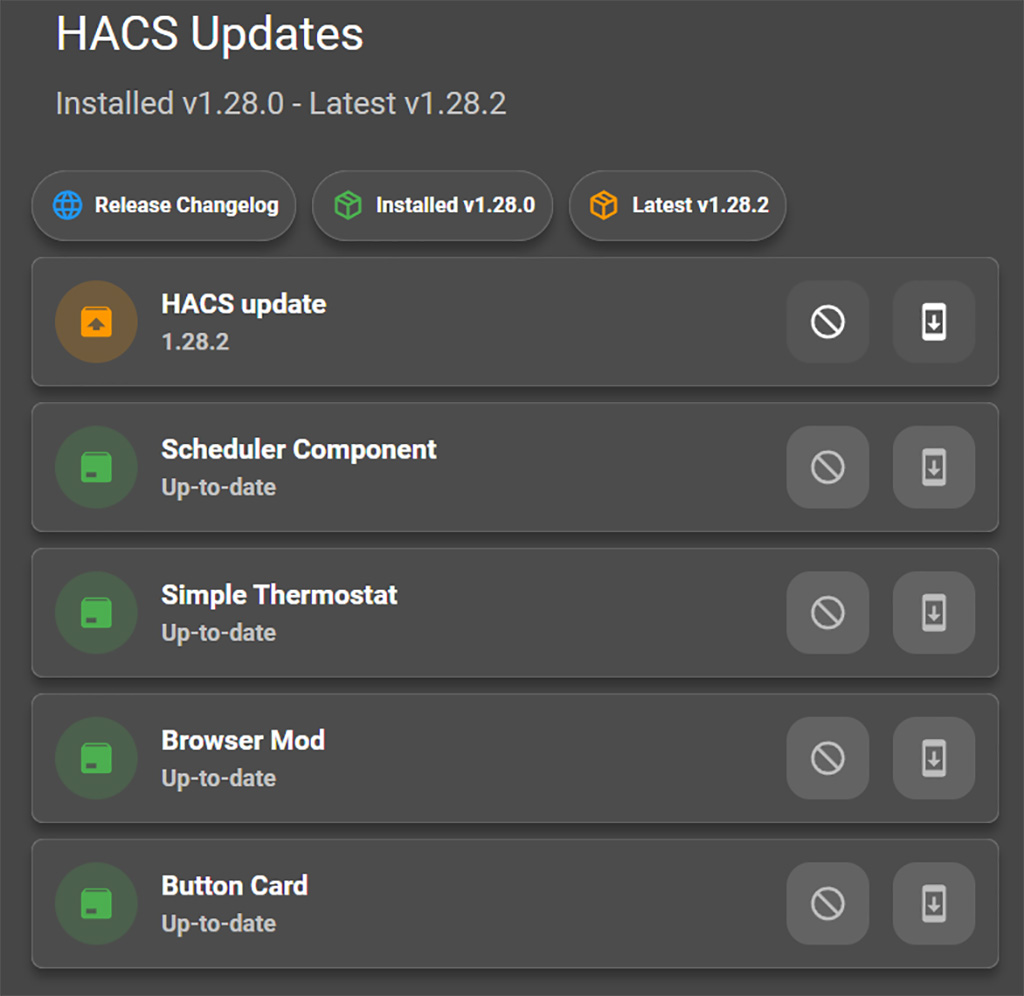
When an update is available, the card will turn orange to give you a visual notification. The download button will be clickable and you can update the integration right from the card. The release changelog template chip, will take you to the HACS releases page. Here, you can read the changes if you want, to make sure there are no breaking changes which affect you.
#HACS Updates Card
type: vertical-stack
cards:
  - type: custom:mushroom-title-card
    title: HACS Updates
    subtitle: >-
      Installed v{{ state_attr('update.hacs_update', 'installed_version') }} -
      Latest v{{ state_attr('update.hacs_update', 'latest_version') }}
  - type: custom:mushroom-chips-card
    chips:
      - type: template
        icon: mdi:web
        icon_color: blue
        content: Release Changelog
        tap_action:
          action: url
          url_path: https://github.com/hacs/integration/releases
      - type: template
        entity: update.hacs_update
        content: Installed v{{ state_attr('update.hacs_update', 'installed_version') }}
        icon_color: green
        icon: mdi:package-variant-closed
        tap_action:
          action: none
      - type: template
        entity: update.hacs_update
        content: Latest v{{ state_attr('update.hacs_update', 'latest_version') }}
        icon_color: orange
        icon: mdi:package-variant-closed
        tap_action:
          action: none
  - type: custom:mushroom-update-card
    entity: update.hacs_update
    layout: horizontal
    show_buttons_control: true
  - type: custom:mushroom-update-card
    entity: update.scheduler_component_update
    show_buttons_control: true
    icon_type: icon
    layout: horizontal
    name: Scheduler Component
  - type: custom:mushroom-update-card
    entity: update.simple_thermostat_update
    show_buttons_control: true
    name: Simple Thermostat
    layout: horizontal
  - type: custom:mushroom-update-card
    entity: update.browser_mod_update
    name: Browser Mod
    layout: horizontal
    show_buttons_control: true
  - type: custom:mushroom-update-card
    entity: update.button_card_update
    name: Button Card
    layout: horizontal
    show_buttons_control: true
Summary
These are just some examples of tackling pending updates in Home Assistant. Power users know they are very frequent and often contain breaking changes, so its good practice always to glance the dialog window to make sure they don’t affect you. If you would like to see more simple guides like these, consider buying us a coffee.


Excellent article. I didn’t know about that experimental feature in HACS. I found a much simpler way of showing available updates using the auto-entries card. You can remove the state: ‘on’ line if you want to show all update entities. It does combine all of the types of updates into one list, so may not work if you want to seperate them, though there may be some other filtering options that can do it.
type: custom:auto-entitiescard:
type: vertical-stack
card_param: cards
filter:
include:
- entity_id: update.*
state: 'on'
options:
type: custom:mushroom-update-card
show_buttons_control: true
layout: horizontal
entities:
- this.entity_id
Thank you Justin, this is a great suggestion!
For readers stumbling upon this comment: Auto-entities filters certain entities based on an exclusive or inclusive variable. In this case, Justin used an entity glob (*) to include all entities in the update domain with a state “on”, meaning pending update.
This auto-populates a list with updates in your dashboard.
Thanks again,
Cheers.
This is a bit rough, but I have found that addon updates always thend to have a entity_picture attribute set, and HACS updates always have a name: null attribute. Using this I was able to filter each type of update into ist’s own list. Sorry for the lack of indentation.
For addon updatestype: custom:auto-entities
card:
type: vertical-stack
card_param: cards
filter:
include:
- entity_id: update.*
state: 'on'
attributes:
entity_picture: '*'
options:
type: custom:mushroom-update-card
show_buttons_control: true
layout: horizontal
entities:
- this.entity_id
and HACS updates.
type: custom:auto-entities
card:
type: vertical-stack
card_param: cards
filter:
include:
- entity_id: update.*
state: 'on'
attributes:
title: null
options:
type: custom:mushroom-update-card
show_buttons_control: true
layout: horizontal
entities:
- this.entity_id
This is a clever way of handling the Auto-entities card. For most users, there may not even be a reason to separate them into categories. Most of them would want the list to populate only when the state is “on” i.e. when an update is available.
Thanks
Happy to share.
After enabling the experimental features, when accessing HACS from the sidebar I only see the my downloaded integrations. I can’t seem to get back to the HACS entry page that lists Integrations, Frontend, Automation, Add-ons, and About. Any idea how I resolve this?
Hello Ken,
This is a feature of the HACS experimental features. I mention it in the blog post.
You are still able to install custom cards and integrations, just with a slightly different UI.
Cheers
Thanks for the clarification.
Where do you get `update.home_assistant_core_update` from?
Hey David,
Navigate to Setting > Devices & Services > Devices (Tab)
Search for Home Assistant Core and enable the update entity (it’s disabled by default).
Cheers
Hi,
I seem to have come across an issue trying to enable Home Assistant Supervisor in the “entities” tab.
The only entity I have is “update.home_assistant_supervisor_update”, these show the installed version and latest version, but these don’t appear to exist as entities on their own.
Did HA change something?
Thanks,
James
Hello James,
Navigate to Settings > Devices & Services > Devices Tab.
Find the Home Assistant Core, Home Assistant Supervisor and Home Assistant Operating System.
When click the Supervisor for example, there is a hidden and disabled entity under Configuration.
Enable it and it will appear after a while in your list of entities, reporting the latest version and “update available”
Cheers
I got to be tired or something here…
I can not for the world find a) Supervisor or b) the hidden and disabled entity…
Well I can find the “Home Assistant Supervisor” under “Settings > Devices & Services > Devices”. And well there are no options there…
And I have no sight of the “Settings > Devices & Services > Supervisor > [Addon].” – it is simply not there (and no I do not run Core – I run ” Home Assistant 2023.7.2 Supervisor 2023.07.1 Operating System 10.3 Frontend-version: 20230705.1 – latest ” – so that can’t be it either…
Got to be tired or something is simply not there anymore…
When you navigate to Settings > Devices & Services > Home Assistant Supervisor > Services
You will get a list of all addons under the supervisor. Select the add-on you with to enable additional entities for and click “X entities now shown”.
Enable what you need and save.
Cheers
Hi,
I modified the Zigbee2MQTT one with the Edge entity, but somehow in the header I can’t get it to show the installed and latest version it only shows ”Installed vedge – Latest vedge”
maybe you can see what’s wrong? I have activated all the sensors
this is the yaml I used :
type: vertical-stackcards:
- type: custom:mushroom-title-card
title: ZigBee2MQTT
subtitle: >-
Installed v{{ states('sensor.zigbee2mqtt_edge_version') }} - Latest v{{
states('sensor.zigbee2mqtt_edge_newest_version') }}
- type: custom:mushroom-chips-card
chips:
- type: entity
entity: binary_sensor.zigbee2mqtt_edge_running
icon_color: green
- type: entity
entity: sensor.zigbee2mqtt_edge_newest_version
icon_color: green
icon: mdi:package-variant-closed
- type: entity
entity: sensor.zigbee2mqtt_edge_cpu_percent
icon_color: blue
- type: entity
entity: sensor.zigbee2mqtt_edge_memory_percent
icon_color: orange
- type: custom:mushroom-update-card
entity: update.zigbee2mqtt_edge_update
show_buttons_control: true
icon_type: entity-picture
layout: horizontal
Hey, what you are seeing is correct. The dev branch is labelled version: edge in the addon store which abbreviates to vedge in your code. I suggest removing the V for a neater look.
Cheers
Cheers
Some minor updates to HA OS – so it shows the right values…
type: vertical-stackcards:
- type: custom:mushroom-title-card
title: Home Assistant Server
subtitle: >
Core v{{ state_attr('update.home_assistant_core_update',
'installed_version') }} - OS v{{
state_attr('update.home_assistant_operating_system_update',
'installed_version') }} - Supervisor v{{
state_attr('update.home_assistant_supervisor_update', 'installed_version')
}}
- type: custom:mushroom-chips-card
chips:
- type: entity
entity: sensor.processor_temperature
icon_color: orange
- type: entity
entity: sensor.processor_use
icon_color: blue
- type: entity
entity: sensor.memory_free
icon_color: orange
- type: entity
entity: sensor.disk_use_percent
icon_color: deep-purple
- type: entity
entity: sensor.network_in_eth0
icon_color: green
- type: horizontal-stack
cards:
- type: custom:mushroom-update-card
entity: update.home_assistant_core_update
name: HA Core
show_buttons_control: true
icon_type: entity-picture
- type: custom:mushroom-template-card
primary: Version Information
secondary: >-
Installed v{{ state_attr('update.home_assistant_core_update',
'installed_version')}}
Latest v{{ state_attr('update.home_assistant_core_update',
'latest_version')}}
icon: mdi:package-variant-closed
multiline_secondary: true
fill_container: true
entity: update.home_assistant_core_update
tap_action:
action: more-info
icon_color: |-
{% if is_state('update.home_assistant_core_update', 'on') %}
orange
{% else %}
green
{% endif %}
badge_color: |-
{% if is_state('update.home_assistant_core_update', 'on') %}
red
{% else %}
blue
{% endif %}
badge_icon: |-
{% if is_state('update.home_assistant_core_update', 'on') %}
mdi:help
{% else %}
mdi:check-bold
{% endif %}
- type: horizontal-stack
cards:
- type: custom:mushroom-update-card
entity: update.home_assistant_operating_system_update
name: HA OS
show_buttons_control: true
icon_type: entity-picture
- type: custom:mushroom-template-card
primary: Version Information
secondary: >-
Installed v{{
state_attr('update.home_assistant_operating_system_update',
'installed_version')}}
Latest v{{ state_attr('update.home_assistant_operating_system_update',
'latest_version')}}
icon: mdi:package-variant-closed
multiline_secondary: true
fill_container: true
entity: update.home_assistant_operating_system_update
tap_action:
action: more-info
icon_color: >-
{% if is_state('update.home_assistant_operating_system_update', 'on')
%}
orange
{% else %}
green
{% endif %}
badge_color: >-
{% if is_state('update.home_assistant_operating_system_update', 'on')
%}
red
{% else %}
blue
{% endif %}
badge_icon: >-
{% if is_state('update.home_assistant_operating_system_update', 'on')
%}
mdi:help
{% else %}
mdi:check-bold
{% endif %}
- type: horizontal-stack
cards:
- type: custom:mushroom-update-card
entity: update.home_assistant_supervisor_update
name: HA Supervisor
show_buttons_control: true
icon_type: entity-picture
- type: custom:mushroom-template-card
primary: Version Information
secondary: >-
Installed v{{ state_attr('update.home_assistant_supervisor_update',
'installed_version')}}
Latest v{{ state_attr('update.home_assistant_supervisor_update',
'latest_version')}}
icon: mdi:package-variant-closed
multiline_secondary: true
fill_container: true
entity: update.home_assistant_core_update
tap_action:
action: more-info
icon_color: |-
{% if is_state('update.home_assistant_supervisor_update', 'on') %}
orange
{% else %}
green
{% endif %}
badge_color: |-
{% if is_state('update.home_assistant_supervisor_update', 'on') %}
red
{% else %}
blue
{% endif %}
badge_icon: |-
{% if is_state('update.home_assistant_supervisor_update', 'on') %}
mdi:help
{% else %}
mdi:check-bold
{% endif %}
Thanks, Lars! The current versions are now being displayed correctly with HA 2023.10
If you are any good with HA and scripting you don’t need HACS. In fact, when I tested it it brought bugs to my very stable system. Furthermore, when you have your HA node connected to the Internet, HACS may introduces a lot of security issues.
Ergo: Not recommended in my book.
Fair enough, it’s possible but not probable.
To develop all the things already available in HACS you would need another life in front of the keyboard.
This community is great, I’ve been doing Home Assistant since forever and never heard of a security hole in HACS.
It’s a personal choice.
Great guide. Thanks very much.
You are welcome friend. Cheers.