Today we introduce a simple frontend module for wall-mounted dashboards: WallPanel. WallPanel is a simple screensaver addon capable of displaying beautiful images when you are not using your wall tablet, developed by j-a-n. It has the capability of hiding the toolbar and sidebar, scrape images from any URL (web or local) and so much more! Let’s install it and see what it can do.
Installation
HACS
- Search for
WallPanelin the Frontend repository list - Click on the repository card
- Click on
Install this repository in HACS - Select the latest version
- Click on
Download
Manual
- Download wallpanel.js and place it into the folder config/www.
- Open Configuration => Lovelace Dashboards => Resources and add /local/wallpanel.js (Resource type: JavaScript module).
Configuration Variables
WallPanel offers quite a few configuration options for such a simple addon. These are used to fine-tune the screensaver, when it appears, how long it stays on, fade-in and fade-out duration, image sources, additional cards to show and much more.
| Config | Description | Default |
| enabled | Enable WallPanel? You will need to set this to true to activate the wall panel for the dashboard. | false |
| debug | Show debug output? | false |
| hide_toolbar | Hide the upper panel toolbar? | false |
| hide_sidebar | Hide the navigation sidebar? | false |
| fullscreen | Set browser window to fullscreen? Due to browser restrictions you will need to interact with the screen once to activate fullscreen mode after loading the dashboard page. | false |
| idle_time | Time in seconds after which the screensaver will start (0 = screensaver disabled). | 15 |
| fade_in_time | Screensaver fade-in time in seconds. | 3.0 |
| crossfade_time | Crossfade duration in seconds for screensaver images. | 3.0 |
| display_time | Duration in seconds after which the next screensaver image will be shown. | 15.0 |
| keep_screen_on_time | Time in seconds for how long to prevent screen to dimm or lock (0 = disabled). | 0 |
| black_screen_after_time | Time in seconds after which the screensaver will show just a black screen (0 = disabled). | 0 |
| control_reactivation_time | Time in seconds for which interaction with the dashboard is disabled after the screensaver is stopped. | 1.0 |
| screensaver_stop_navigation_path | Path to navigate to (e.g., /lovelace/default_view) when screensaver ist stopped. | |
| screensaver_entity | An entity of type ‘input_boolean’ to reflect and change the screensaver state (on = started, off = stopped). | |
| image_url | Fetch screensaver images from this URL. See below for details. | See below |
| image_excludes | List of regular expressions for excluding files and directories from local media sources. See below for details. | [] |
| image_fit | Value to be used for the CSS-property ‘object-fit’ of the images (possible values are: cover / contain / fill / …). | cover |
| image_list_update_interval | When using a local media source, the image list is updated at this interval. | 3600 |
| image_order | The order in which the images are displayed (possible values are: sorted / random). | sorted |
| show_exif_info | Show exif info on top of image? Only available for local jpeg images. | false |
| fetch_address_data | Fetch address data for EXIF GPS coordinates from nominatim.openstreetmap.org? | false |
| exif_info_template | Format of EXIF image info display (HTML). ${EXIF-tag-name} will be replaced with the corresponding EXIF tag value. | ${DateTimeOriginal} |
| info_animation_duration_x | Animation duration in seconds for the movement of the info box in x-direction (0 = no animation). | 0 |
| info_animation_duration_y | Animation duration in seconds for the movement of the info box in y-direction (0 = no animation). | 0 |
| info_animation_timing_function_x | The CSS timing-function to use for the animation of the info box movement in x-direction. | ease |
| info_animation_timing_function_y | The CSS timing-function to use for the animation of the info box movement in y-direction. | ease |
| info_random_move_interval | Interval of random movement of the info box in seconds (0 = no random movement). | 0 |
| info_random_move_fade_duration | Duration of the fade-in and fade-out animation of the info box in case of random movement. (0 = no animation). | 2.0 |
| style | Additional CSS styles for wallpanel elements. | {} |
| badges | Badges to display in info box. See below for details. | [] |
| cards | Cards to display in info box. See below for details. | See below |
| profiles | Configuration profiles. See below for details. | {} |
| profile | Configuration profile to activate. | |
| profile_entity | An entity of type ‘input_text’ used for dynamic activation of profiles. |
Usage
We are going to showcase the usage for the WallPanel addon through examples and provide the YAML code for each, so you can copy-paste to your dashboard directly.
In order to activate the WallPanel screensaver for a particular dashboard, we need to add the configuration above anything else in the raw configuration editor. If you use YAML mode, you need to add the code the same way using your file editor (Studio Code Server, File Editor etc.).
For example:
#Basic configuration and code placement
wallpanel:
  enabled: true
  fullscreen: true
title: Home
views:
  - title: Living Room
.....
Example 1: Basic Configuration
Let’s say we want a screensaver for our wall-mounted dashboard. We want it to start after 15seconds idle time, hide the toolbar and sidebar and go full screen:
#Basic Configuration
wallpanel:
  enabled: true
  hide_sidebar: true
  hide_toolbar: true
  fullscreen: true
  idle_time: 15
When the 15 seconds expire, you will be greeted with a fullscreen background and a weather entity card which is set by default.
Example 2: Tweaking Timings
To fine-tune the screensaver slideshow, we can configure several variables which will allow us to change fade-in time, image display time etc.
For example:
#Tweaking Timings
wallpanel:
  enabled: true
  hide_toolbar: true
  hide_sidebar: true
  fullscreen: true
  idle_time: 15
  fade_in_time: 5
  crossfade_time: 2
  display_time: 20
  black_screen_after_time: 180
  control_reactivation_time: 0.5
keep_screen_on_time: 0- idle_time: Defines the time in seconds after which the screensaver will start. Default: 15.0
- fade_in_time: Time in seconds to transition from dashboard to scrensaver. Default: 3.0
- crossfade_time: Crossfade time between images. Default: 3.0
- display_time: Duration in seconds of each image shown. Default: 15.0
- black_screen_after_time: A black screen will be shown after set time, to conserve energy. Default: 0 (disabled)
- control_reactivation_time: Delay in seconds after which the dashboard will be usable again after screensaver deactivation. Default: 1.0
- keep_screen_on_time: Time in seconds for how long to prevent screen to dimm or lock. Default 0 (disabled)
Example 3: Setting image sources
We can set the WallPanel addon to fetch images from various sources. You can upload your own images to the media folder or set a specific URL. We suggest creating a subfolder in the media directory, to better organize your photos. For example:
#Local media folder images
wallpanel:
  enabled: true
  hide_toolbar: true
  hide_sidebar: true
  fullscreen: true
  image_url: /media #or /media/pets, /media/birthday_party etc.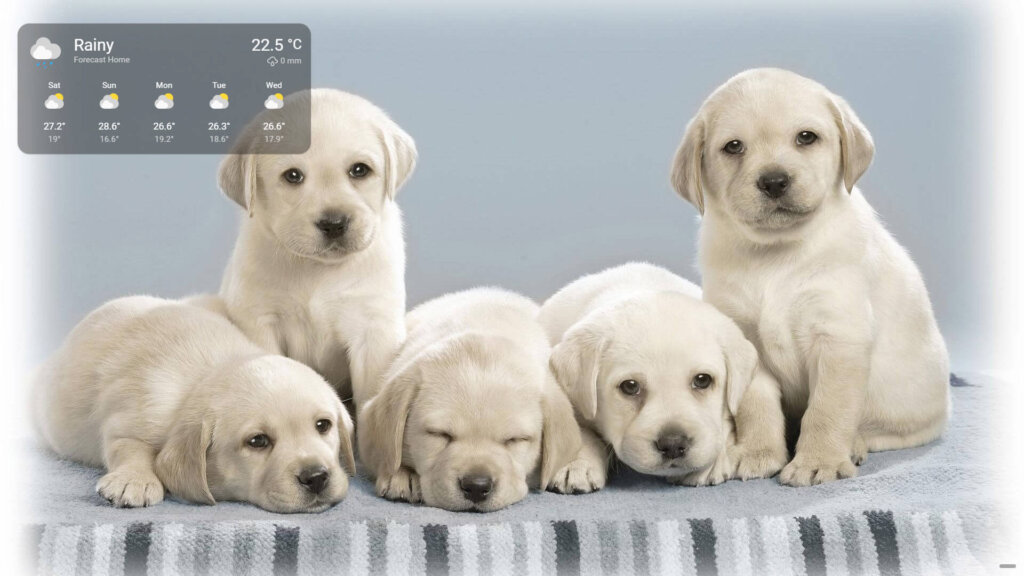
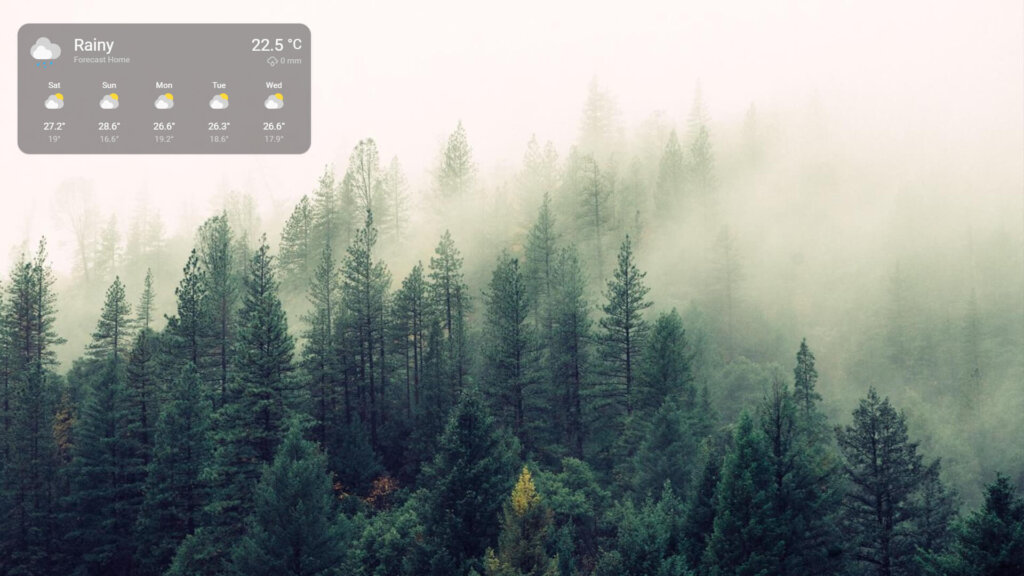
To fetch images from a web URL, we can use a page such as unsplash.com. We can configure the height, width and timestamp for our wanted URL. We can add a search query in the URL as well, which will deliver images based on our keyword. As an example:
#Web URL images
wallpanel:
  enabled: true
  hide_toolbar: true
  hide_sidebar: true
  fullscreen: true
  image_url: https://source.unsplash.com/random/${1920}x${1080}?dogs
You can add multiple search queries after the ? which will return randomized images based on your search query.
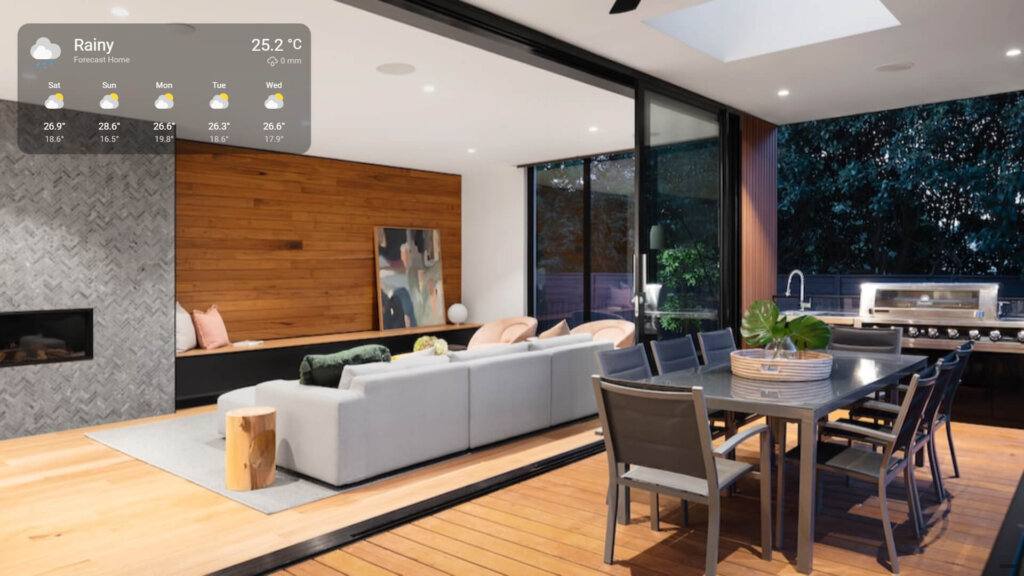
https://source.unsplash.com/random/${1920}x${1080}?dogs,cats,natureExample 4: Adding additional elements
Once the screensaver starts, a default weather entity card is displayed. We can add any card to be displayed and a user badge. Let’s add a custom:weather-card and a custom:sun-card nested within a vertical stack
#Adding additional elements: custom cards
wallpanel:
  enabled: true
  hide_toolbar: true
  hide_sidebar: true
  fullscreen: true
  idle_time: 15
  image_url: https://source.unsplash.com/random/${1920}x${1080}?weather
  cards:
    - type: vertical-stack
      cards:
        - type: custom:weather-card
          details: true
          forecast: true
          hourly_forecast: false
          name: Weather
          entity: weather.home
          current: true
          number_of_forecasts: '6'
        - type: custom:sun-card
          darkMode: true
          showAzimuth: true
          showElevation: true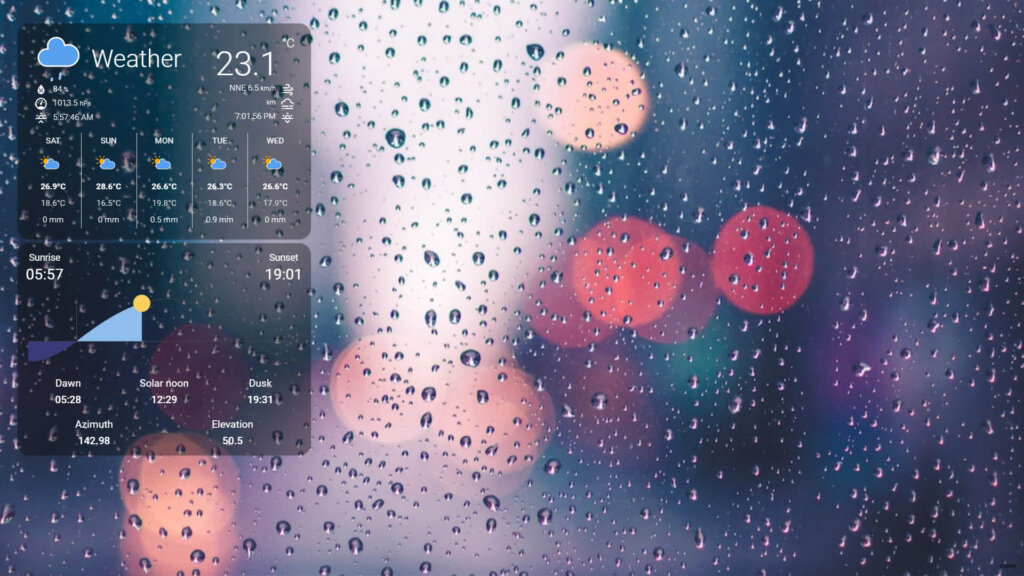
You can add any card you wish here. You can arrange them using vertical and horizontal stacks or scatter them around. We can also insert a user badge as a header:
#Adding additional elements: badges
wallpanel:
  enabled: true
  hide_toolbar: true
  hide_sidebar: true
  fullscreen: true
  idle_time: 15
  image_url: https://source.unsplash.com/random/${1920}x${1080}?weather
  badges:
    - entity: sun.sun
    - entity: person.smarthomescenecom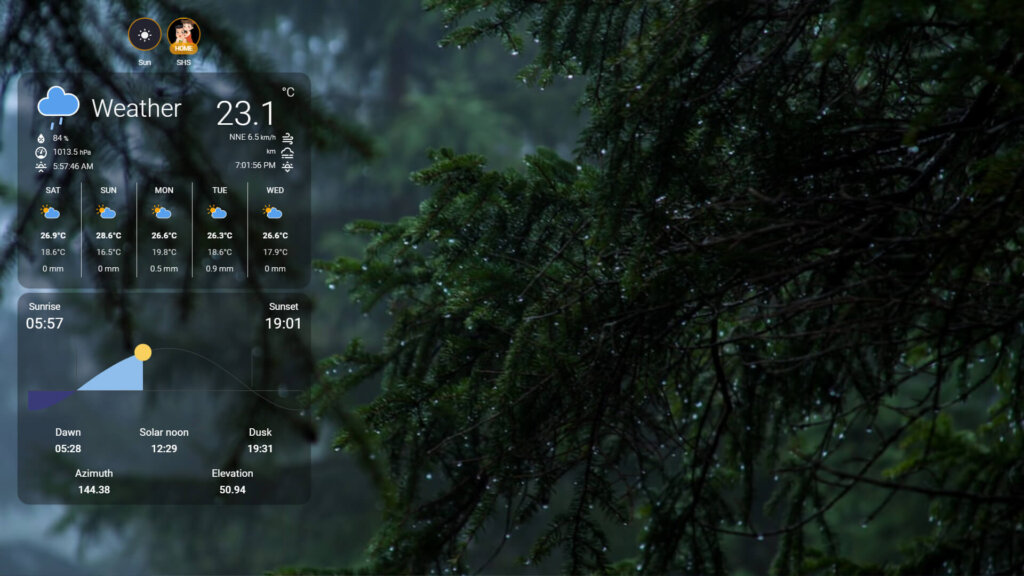
Example 5: Styling and animation
To make a more dynamic screensaver, we can add some animation to the elements and make them move through the screen. The additional elements are called an ‘info box’. We can configure the following:
- info_animation_duration_x: Animation duration in seconds for the movement of the info box in x-direction (0 = no animation).
- info_animation_duration_y: Animation duration in seconds for the movement of the info box in y-direction (0 = no animation).
- info_animation_timing_function_x: The CSS timing-function to use for the animation of the info box movement in x-direction. Default: ease
- info_animation_timing_function_y: The CSS timing-function to use for the animation of the info box movement in y-direction. Default: ease
- info_random_move_interval: Interval of random movement of the info box in seconds (0 = no random movement).
- info_random_move_fade_duration: Duration of the fade-in and fade-out animation of the info box in case of random movement. (0 = no animation).
For example, we can make the info box move smoothly from one end to the other horizontally:
#Styling and animation: horizontal animation
wallpanel:
  enabled: true
  hide_toolbar: true
  hide_sidebar: true
  fullscreen: true
  idle_time: 15
  image_url: https://source.unsplash.com/random/${1920}x${1080}?weather
  info_animation_duration_x: 30
  badges:
    - entity: sun.sun
    - entity: person.smarthomescenecom
To also move vertically, we need to set the y animation variable:
#Styling and animation: vertical animation
wallpanel:
  enabled: true
  hide_toolbar: true
  hide_sidebar: true
  fullscreen: true
  idle_time: 15
  image_url: https://source.unsplash.com/random/${1920}x${1080}?weather
  info_animation_duration_x: 30
  info_animation_duration_y: 30
  badges:
    - entity: sun.sun
    - entity: person.smarthomescenecom
We could also set the info_random_move_interval of the info box. This will make sure the cards move at a set inverval. The CSS timing function parameter (info_animation_timing_function_x) will give you different info box movements. The default is ease, while the other possible parameters are:
- linear The animation has the same speed from start to end
- ease Default value. The animation has a slow start, then fast, before it ends slowly
- ease-in The animation has a slow start
- ease-out The animation has a slow end
- ease-in-out The animation has both a slow start and a slow end
The end result:
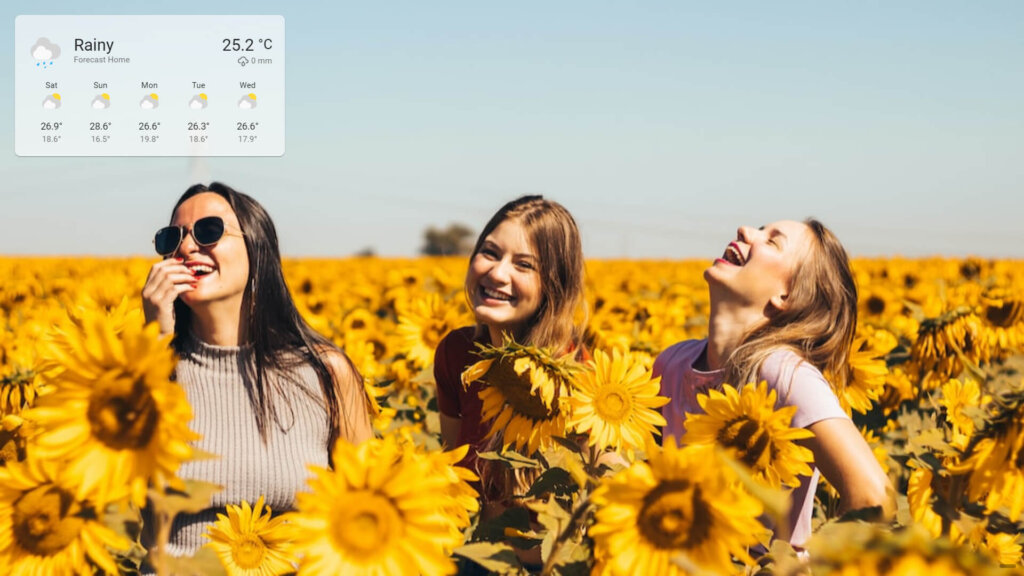
We could also some styling to the additional elements of the screensaver, such as cards and badges. For example, we can make the cards transparent:
#Transparent Cards
wallpanel:
  enabled: true
  hide_toolbar: true
  hide_sidebar: true
  fullscreen: true
  idle_time: 15
  image_url: https://source.unsplash.com/random/${1920}x${1080}?gaming
  style:
    wallpanel-screensaver-info-box:
      '--wp-card-width': 450px
    wallpanel-screensaver-info-box-content:
      '--ha-card-background': none
      '--ha-card-box-shadow': none
      text-shadow: -0.5px -0.5px 0 rgb(17, 17, 17), 0.5px -0.5px 0 rgb(17, 17, 17), -0.5px 0.5px 0 rgb(17, 17, 17), 0.5px 0.5px 0 rgb(17, 17, 17)
      '--primary-text-color': '#ffffff'
      '--secondary-text-color': '#dddddd'
Or we can apply a Light or Dark Mode:
#Light Mode
style:
  wallpanel-screensaver-container:
    background-color: '#333333dd'
  wallpanel-screensaver-info-box:
    '--wp-card-width': 450px
    background-color: '#ffffff99'
    box-shadow: 0px 2px 1px -1px rgba(0, 0, 0, 0.2), 0px 1px 1px 0px rgba(0, 0, 0, 0.14), 0px 1px 3px 0px rgba(0, 0, 0, 0.12)
  wallpanel-screensaver-info-box-content:
    '--ha-card-background': none
    '--ha-card-box-shadow': none
    '--primary-background-color': '#fafafa'
    '--secondary-background-color': '#e5e5e5'
    '--primary-text-color': '#212121'
    '--secondary-text-color': '#727272'
#Dark Mode
style:
  wallpanel-screensaver-info-box:
    '--wp-card-width': 450px
    background-color: '#00000099'
    box-shadow: 0px 2px 1px -1px rgba(0, 0, 0, 0.2), 0px 1px 1px 0px rgba(0, 0, 0, 0.14), 0px 1px 3px 0px rgba(0, 0, 0, 0.12)
  wallpanel-screensaver-info-box-content:
    '--ha-card-background': none
    '--ha-card-box-shadow': none
    '--primary-background-color': '#111111'
    '--secondary-background-color': '#202020'
    '--primary-text-color': '#e1e1e1'
    '--secondary-text-color': '#9b9b9b'
Example 6: Profiles
WallPanel also offers the possibility to create profiles. Profiles are much like templates, you can predefine any variable or setting and change them dynamically. In order to utilize WallPanel profiles, we must create an input_select helper in Home Assistant.
Navigate to Settings, Devices & Services and click Helpers in the top tab group.
Create new Dropdown Helper (input_select) and add your desired options (night, day, black etc)
#input_select YAML code
wallpanel:
  name: wallpanel_screensaver
  icon: mdi:monitor-shimmer
  options:
    - day
    - night
  initial: day
This will create a new entity, which will contain your Profiles names as a simple list. The state of the entity is the profile name, which you must match exactly when configuring the WallPanel variables:
#Defining Profiles
wallpanel:
  enabled: true
  hide_toolbar: true
  hide_sidebar: true
  fullscreen: true
  idle_time: 15
  image_url: https://source.unsplash.com/random/${1920}x${1080}?weather
  profile_entity: input_select.wallpanel
  profiles:
    day:
      image_url: https://source.unsplash.com/random/${1920}x${1080}?day,sun
    night:
      image_url: https://source.unsplash.com/random/${1920}x${1080}?moon,dark
Under the profiles variable, we can define different animations, styles and image_urls. Anything above profiles, will be overwritten once a specific profile has been activated. For example, we can add different styles for light & dark mode:
#Adding styles to profiles
wallpanel:
  enabled: true
  hide_toolbar: true
  hide_sidebar: true
  fullscreen: true
  idle_time: 15
  profile_entity: input_select.wallpanel
  profiles:
    day:
      image_url: https://source.unsplash.com/random/${1920}x${1080}?day,sun
      style: #Light mode
        wallpanel-screensaver-container:
          background-color: '#333333dd'
        wallpanel-screensaver-info-box:
          '--wp-card-width': 450px
          background-color: '#ffffff99'
          box-shadow: >-
            0px 2px 1px -1px rgba(0, 0, 0, 0.2), 0px 1px 1px 0px rgba(0, 0, 0,
            0.14), 0px 1px 3px 0px rgba(0, 0, 0, 0.12)
        wallpanel-screensaver-info-box-content:
          '--ha-card-background': none
          '--ha-card-box-shadow': none
          '--primary-background-color': '#fafafa'
          '--secondary-background-color': '#e5e5e5'
          '--primary-text-color': '#212121'
          '--secondary-text-color': '#727272'
    night:
      image_url: https://source.unsplash.com/random/${1920}x${1080}?moon,dark
      style: #Dark mode
        wallpanel-screensaver-info-box:
          '--wp-card-width': 450px
          background-color: '#00000099'
          box-shadow: >-
            0px 2px 1px -1px rgba(0, 0, 0, 0.2), 0px 1px 1px 0px rgba(0, 0, 0,
            0.14), 0px 1px 3px 0px rgba(0, 0, 0, 0.12)
        wallpanel-screensaver-info-box-content:
          '--ha-card-background': none
          '--ha-card-box-shadow': none
          '--primary-background-color': '#111111'
          '--secondary-background-color': '#202020'
          '--primary-text-color': '#e1e1e1'
          '--secondary-text-color': '#9b9b9b'
We can use our newly created input_select helper entity to change our style whenever we want. Or we can simply create a sun-based automation: when the sun sets, select night profile, when the sun rises select day profile:
#Automatic profile selection
alias: Wallpanel Sunrise Profile
description: "Select Day Profile On Sunrise"
mode: single
trigger:
  - platform: sun
    event: sunrise
    offset: 0
action:
  - service: input_select.select_option
    data:
      option: day
    target:
      entity_id: input_select.wallpanel
This module is a nice and easy way to add a custom screensaver to your home control panels. It does not really have a use case for a mobile phone for example, but for a wall-mounted dashboard it’s very much in character. All credit goes to dev j-a-n for creating this awesome module.


Hi, i really like your documentation.
But everything i want to test or add in my config, it doesn’t work.
All of your example do i have to put into the RAW Config Editor, right?
But why did you mention Studio code server?
I’m really struggling on it.
can you help me?
Hello Cedric,
The Raw Configuration editor is for people who you Lovelace in storage mode, meaning, they edit their dashboard through the UI.
Studio Code Server is just a text editor, recommended for people who use Lovelace in YAML mode, meaning, no editing Lovelace through the UI.
Hope I’m being clear.
Cheers
I put the basic code in at the very top on my raw config…. screen saver never turns on
Hello Eric,
The code is correct, I’ve just checked.
Have you tried clearing your cache (Ctrl + F5)?
Maybe check the log for wall-panel related errors and paste them here.
Cheers.
is there a way to disable the cards (not display the weather on top of the screensaver)
Hello Leon,
You can add a blank card from the custom button-card.
Cheers
the picture does not change on the backround… 🤔😩
Once enabled, what is the best course to disable on a dashboard, since the editing menu is hidden?
Hi there,
Is it possible to target a lan shared folder ?
Yes it is, you have to add it as a media source in HA though. And than setup the URL in WallPanel.
See here:
https://www.home-assistant.io/more-info/local-media/setup-media
Cheers!
Integration error: wallpanel – Integration ‘wallpanel’ not found.
Any ideas? integration installed.
Where are you adding the wallpanel code?
You need to add it under each Dashboard YAML code or in the Raw configuration editor.
hi what is the correct code to pick a random picture of the specified folder from a synology nas and change it every 5 minutes or so? Thanks in advance..
Hello,
You can set any custom URL on your local network
#Local media folder imageswallpanel:
enabled: true
hide_toolbar: true
hide_sidebar: true
fullscreen: true
image_url: /media #or /media/pets, /media/birthday_party etc.
Depending on your network settings though, you might need to add the URL of the folder as a media_dir.
Cheers
What is the image_fit parameter value to show two pictures sometimes?
Depending on the ratio, you might try fit or contain.
Pre-stitching the images together might be needed though.
Sorry again for your inconvenience.. but im all the way stuck: i cant access to my synology… dont know why: its all listed in the media – sidebar and im able to go trough the browser and into the folders in Home Assistant itself an can there get access and view of the Pictures( the image format of the pictures in the folder is: -redacted-
Thanks again for your help
Can you use more than one “image_url”?
Thanks for the guide!
Yes, you can create profiles for day and night with different image URLs. Cheers!
I always get the message “entity not available: weather.home”.
The entity is available and all my weather cards are working just fine. It’s just wallpanel not showing the weather anymore.
I reinstalled the weather service and wallpanel but it didn’t fix it.
Any ideas?
If you put your own weather card using one of your existing weather entities, that will overwrite wallpanel’s default. The wallpanel card utilizes “weather.home”, which I didn’t have as well. But after using one of the many weather cards and feeding that with one of my available weather entities, everything went well.
How would one center the cards or badges?
I noticed the screensaver plays on all my dashboards – is there a way to make it play for only one dashboard at a time?
Yes, you simply add it through the raw configuration editor on the dashboard you want to activate it.
Unless I’m missing something?
Hi There, very cool screensaver.
I run into an issue though. when selecting hide_toolbar: true The Toolbar is indeed removed but I cannot get it back. Which means that I can not acces the yaml editor anymore to make changes.
Hello, if you append
?edit=1and the end of your URL, you can enter edit mode directly.Cheers
Hi,
really great screensaver with tons of options, but I run in a problem as soon as I want to switch from one profile to another
In the raw config I entered:
profiles:
night:
show_images: false
day:
show_images: true
profile_entity: input_text.wallpanel_profile
and via automation I switch from one profile to another based on time constraints,
but here comes the poblem
situation 1:
– profile day is active
– wallpanel starts with profile day via automation (=some pictures)
– I end the wallpanel
– switch to profile night
– wallpanel starts with profile night via automation (=no pictures, just black background)
– I end the wallpanel
– switch back to profile day
– wallpanel starts with profile day via automation (=some pictures)
–> everything great
situation 2:
– profile day is active
– wallpanel starts with profile day via automation (=some pictures)
– switch to profile night (and wallpanel is still active)
– wallpanel starts with profile night via automation (=no pictures, just black background)
– switch back to profile day (and wallpanel is still active)
–> still no background pictures, just black background 🙁
means move from profile night to profile day works great as long as the wallpanel is deactivated in between but not if the wallpanel is always active
any ideas?
best thanks
best regards
Gerald
Please submit an Issue on official Github repo:
https://github.com/j-a-n/lovelace-wallpanel/issues
“I have the same problem as ‘SLEEPYMAXX.’ I cannot select an album from the NAS as an error is always displayed… indicating that it cannot create a file list or an unknown error has occurred.”
Everything working well but just if i add
?wp_enabled=true command to browser link otherwise nothing happen
I tried enabled: true command
Not on browser not on tab not on ios app
Do you know how to make the “image info box” moveable/animated (or at least to disappear and reappear at certain time intervals)? I use it to display “picture location” and “date taken” info, but the box sits always in same place. I am concerned about screen burn on the right side of the box since this is always in same place.