UPDATE 24.04.2023: Aqara has released a new firmware update 1.1.6_0005.0025 which enables local control. The FP2 can now be used without an internet connection, hub, or app dependence in Home Assistant after it’s initial setup.
Even though the Aqara FP1 never hit western markets officially, home automation enthusiasts sourced it from Asian stores because it turned out to be a capable Zigbee-based mmWave Human Presence Sensor. You can still buy it for ~$49.99 on AliExpress and maybe a little less if you apply an active discount code.
I’ve talked about the FP1 many times on smarthomescene, sharing some tips, tricks, automation examples and explaining how to add detection regions in Zigbee2MQTT. I’ve also compared it’s performance with some other mmWave Presence Sensors floating the market, see more in this article.
About 6 months later, and it’s time to teardown and review it’s successor, the Aqara FP2 Human Presence Sensor. Unlike the Zigbee FP1, this one is ESP32-based which means Wi-Fi + Bluetooth. Let’s see what it’s got and how it compares to it’s predecessor.
I bought this about 20 days ago on AliExpress for $75 from a seller that I’ve dealt with in the past. I simply messaged them, asking for the FP2 and they sent me a “special payment link” and 15 days later I had it. You can buy it for $82.99 on Amazon US and some Amazon EU stores.
Technical Specification
- Model: RTCZCGQ12LM
- Connectivity: Wi-Fi IEEE 802.11 b/g/n 2.4GHz + Bluetooth 4.2
- Adapter Input: 100- 240VAC, 50/60Hz, 0.2A
- Adapter Output: 5V1A
- Adapter Cable Length: 2m
- Adapter Cable Type: USB A to USB-C
- Detection Angle: 120°
- Detection Distance: 6-8m
- Working Temperature: -10~40 degrees C
- Working Humidity: 0~95% RH, no condensation
- Montage: Magnet or Sticker with Swivel
Disassembly
The Aqara FP2 comes in a small package containing the sensor itself, a manual, power adapter, 2m USB-A to USB-C cable, a magnetic plate with a sticker and some screws for installation. It’s important to note, that the version I got is meant for Asian markets, so slight packaging differences are likely in the western version.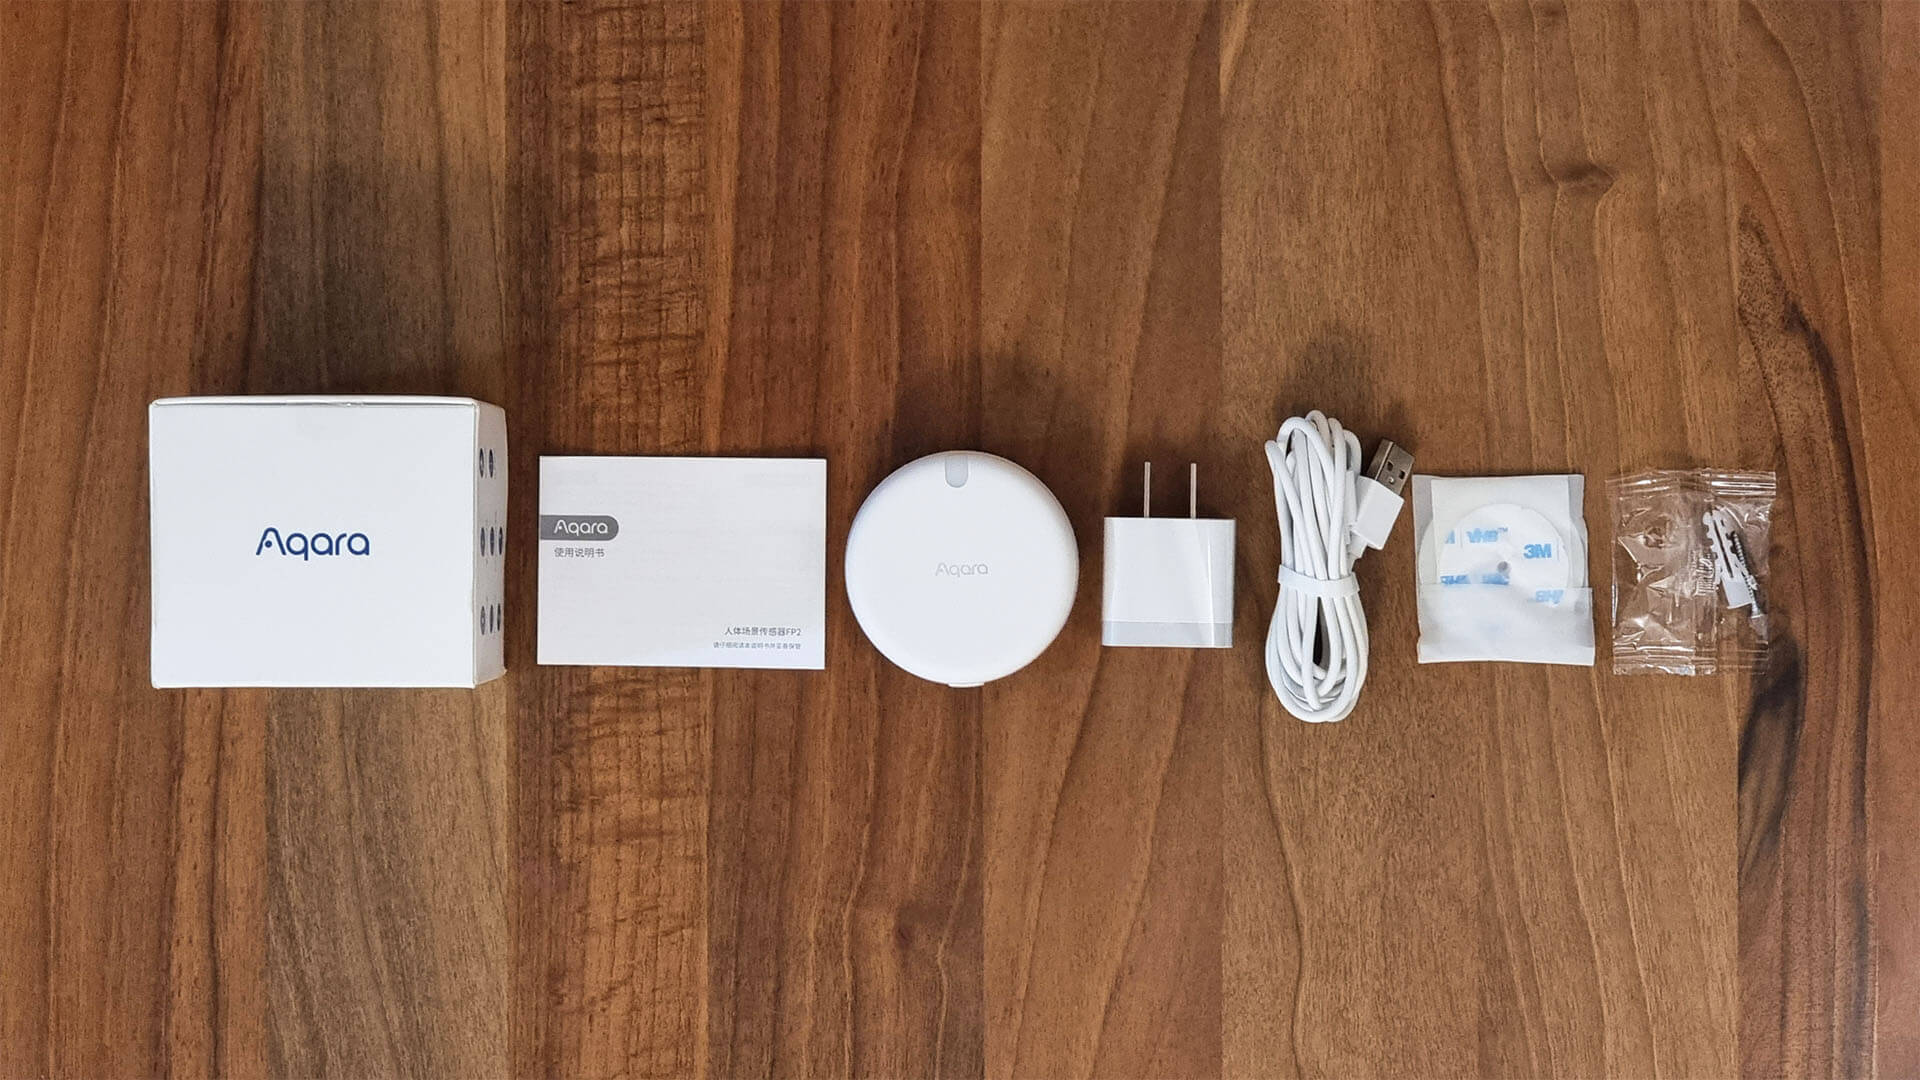
My first impression of the Aqara FP2 is that it resembles it’s predecessor, with a similar round shaped body, a pairing button and an illuminance sensor at the top. It’s flatter than the FP1, which makes it better looking when installed on a flat surface.
On the backside, the magnetic mounting base is also very similar to the FP1. It fully extends for a more versatile installation, however it does not swivel 360° like the FP1. This might be a downgrade, but I feel like it offers just enough flexibility as is.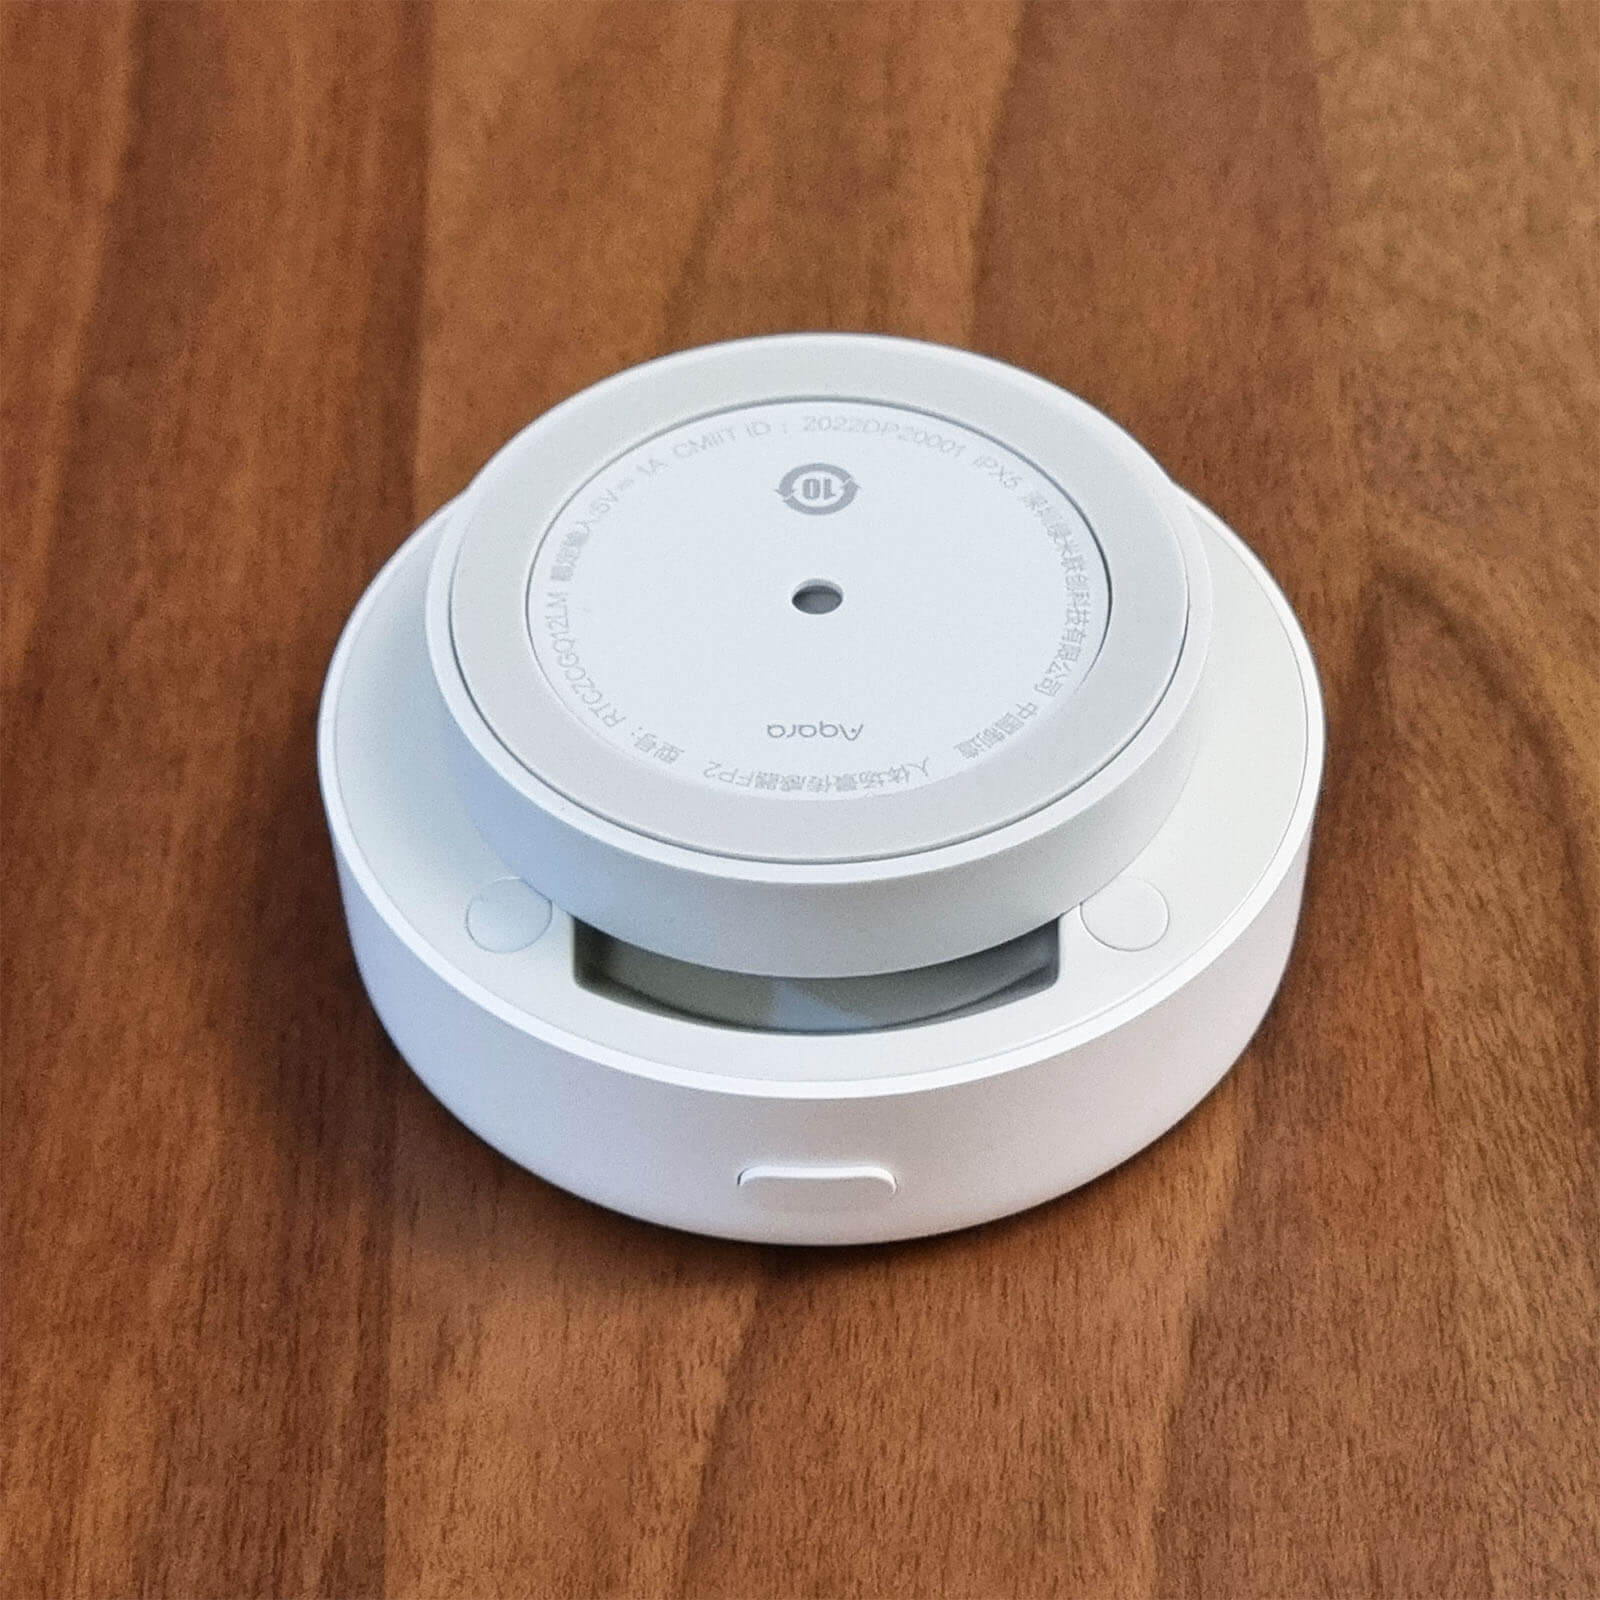
Turning it to it’s side, it does feel larger than the FP1. It’s head is bigger, rounder but looks better overall in my opinion. 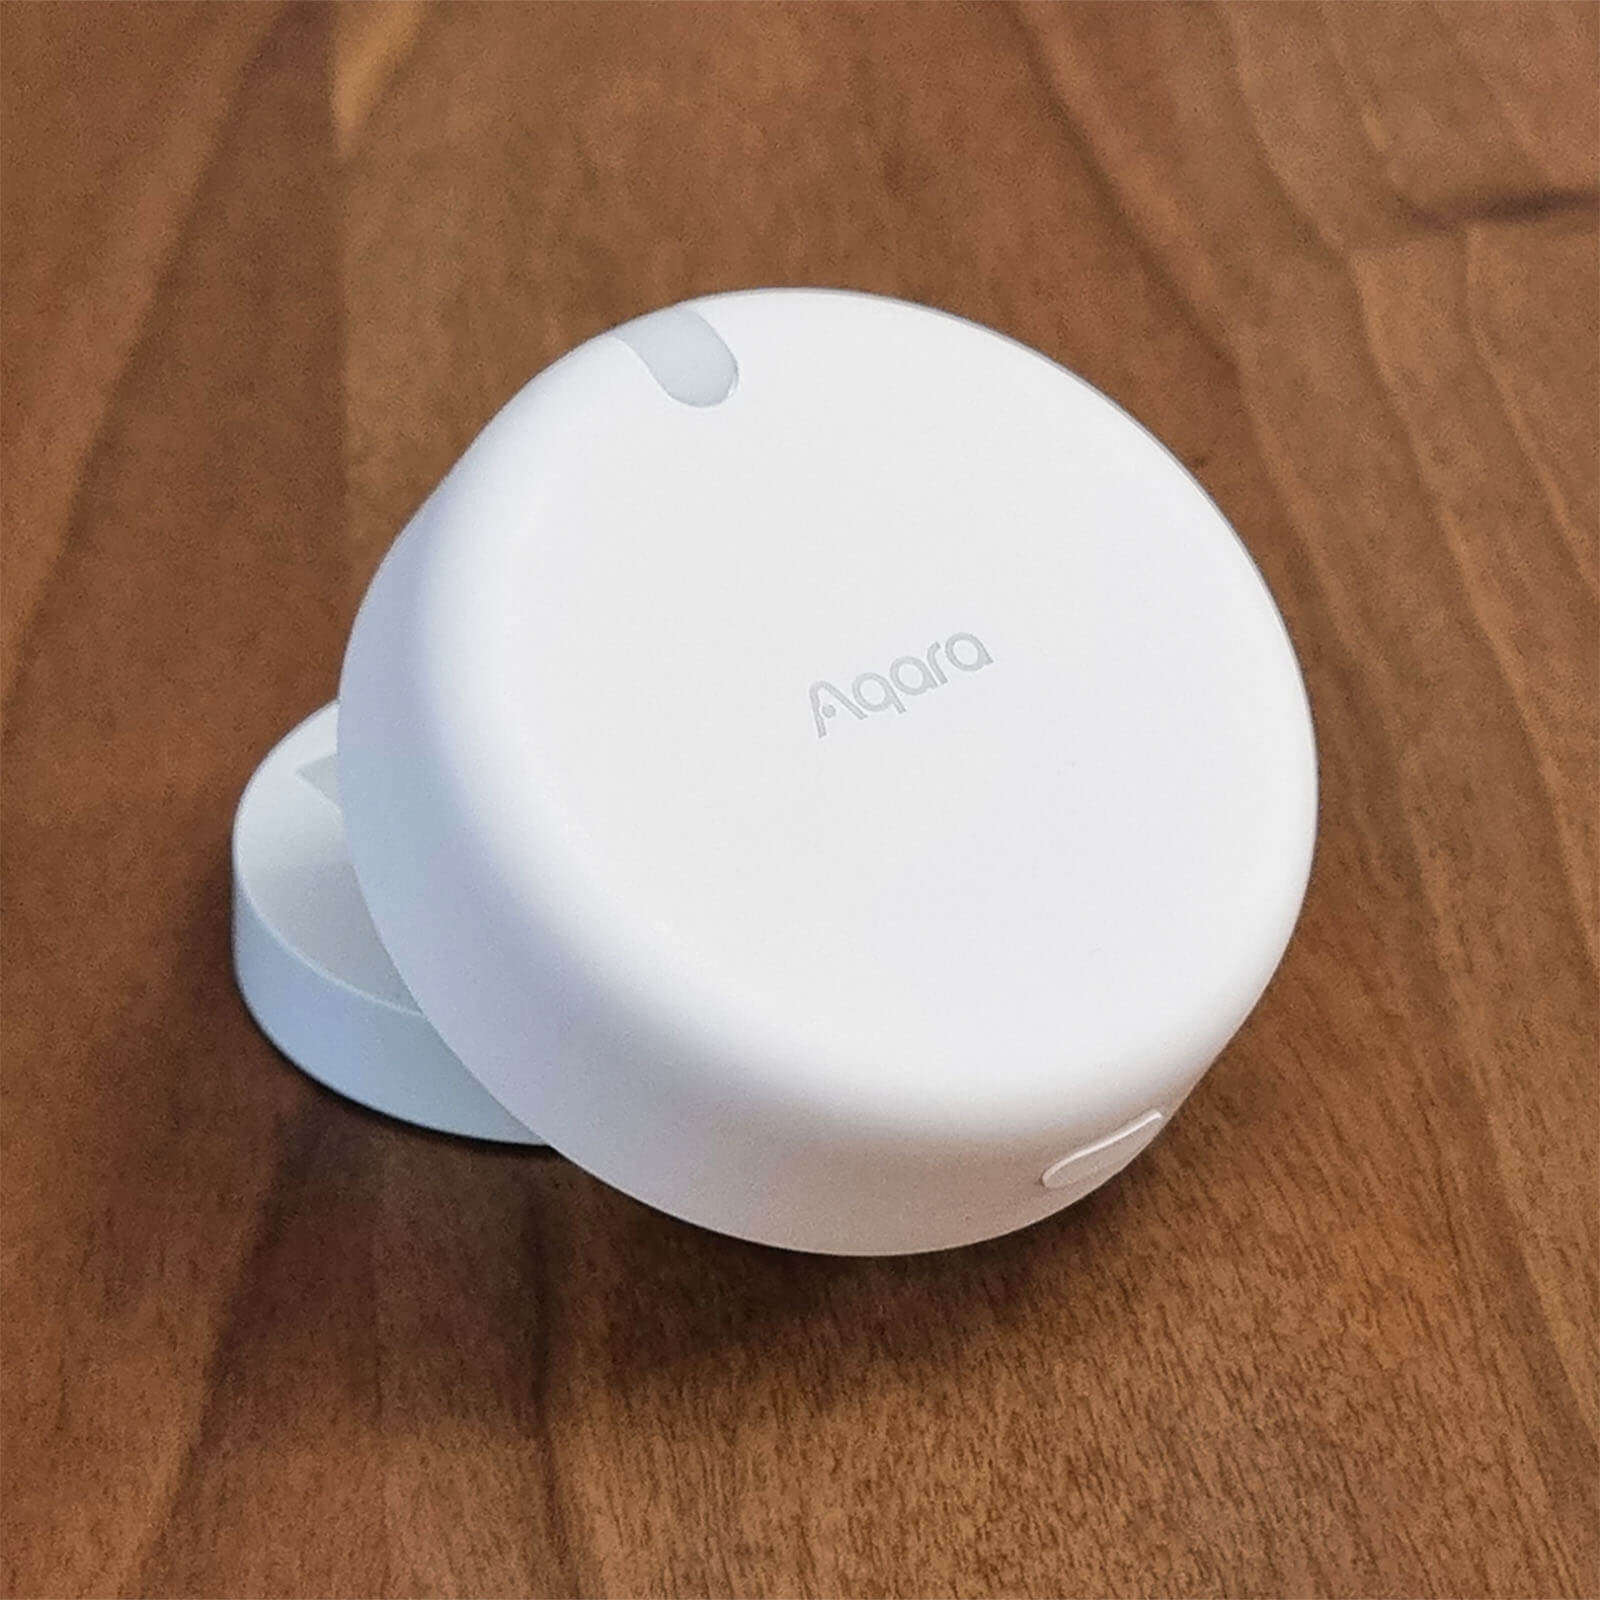
Extending the swivel out, you can see the USB-C powering port underneath as well as a HomeKit sticker with a unique code for pairing.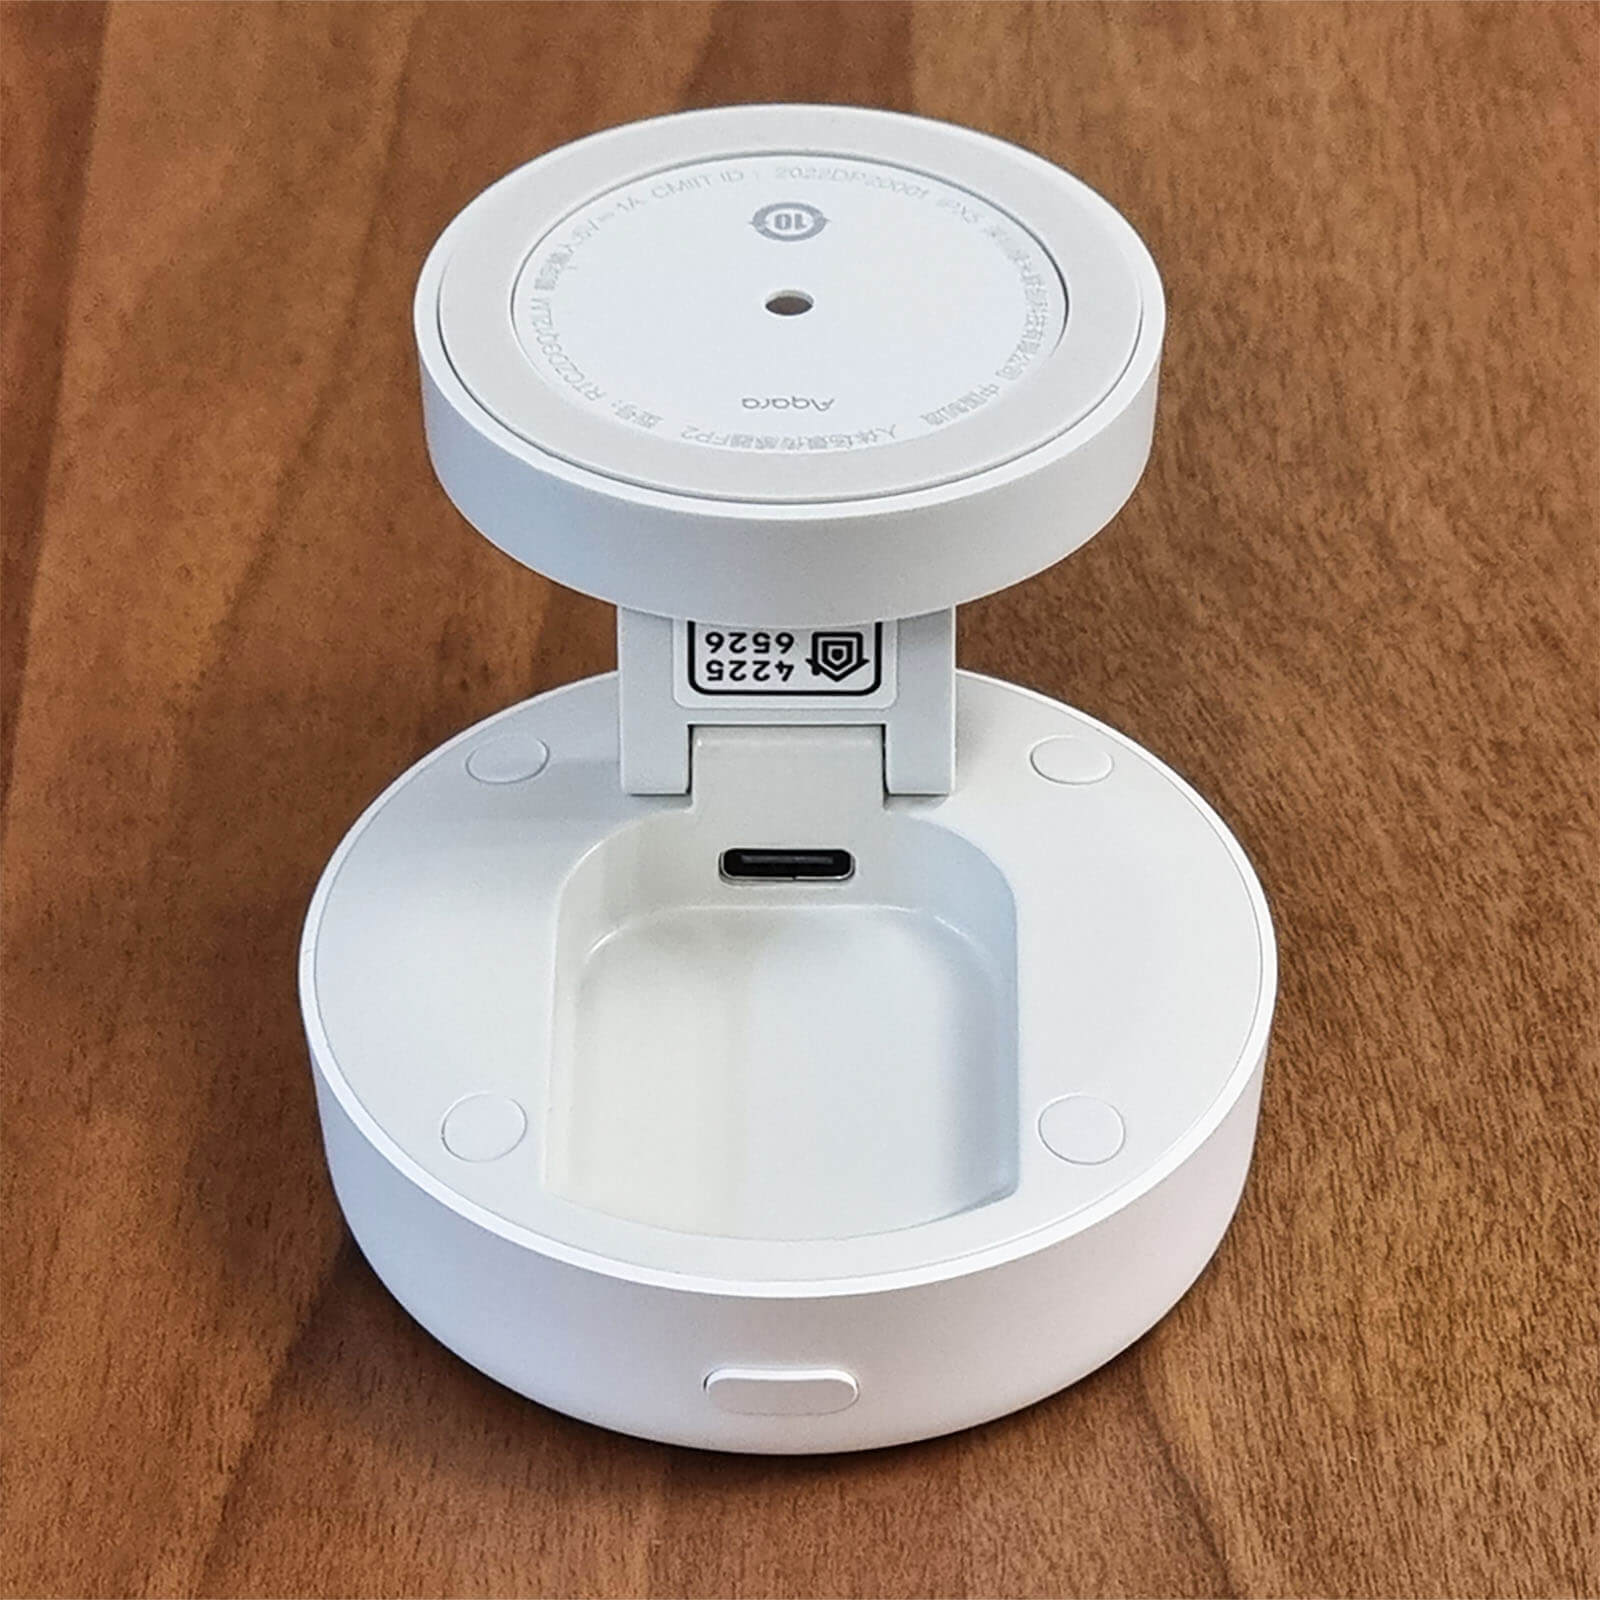
Opening the Aqara FP2 by removing 4 screws holding the body together and you are greeted by a familiar trademark, a black PCB. This is common in almost all Aqara products. The powering PCB remains on the back cap, and is connected by slotting the 8pin connector in the main PCB.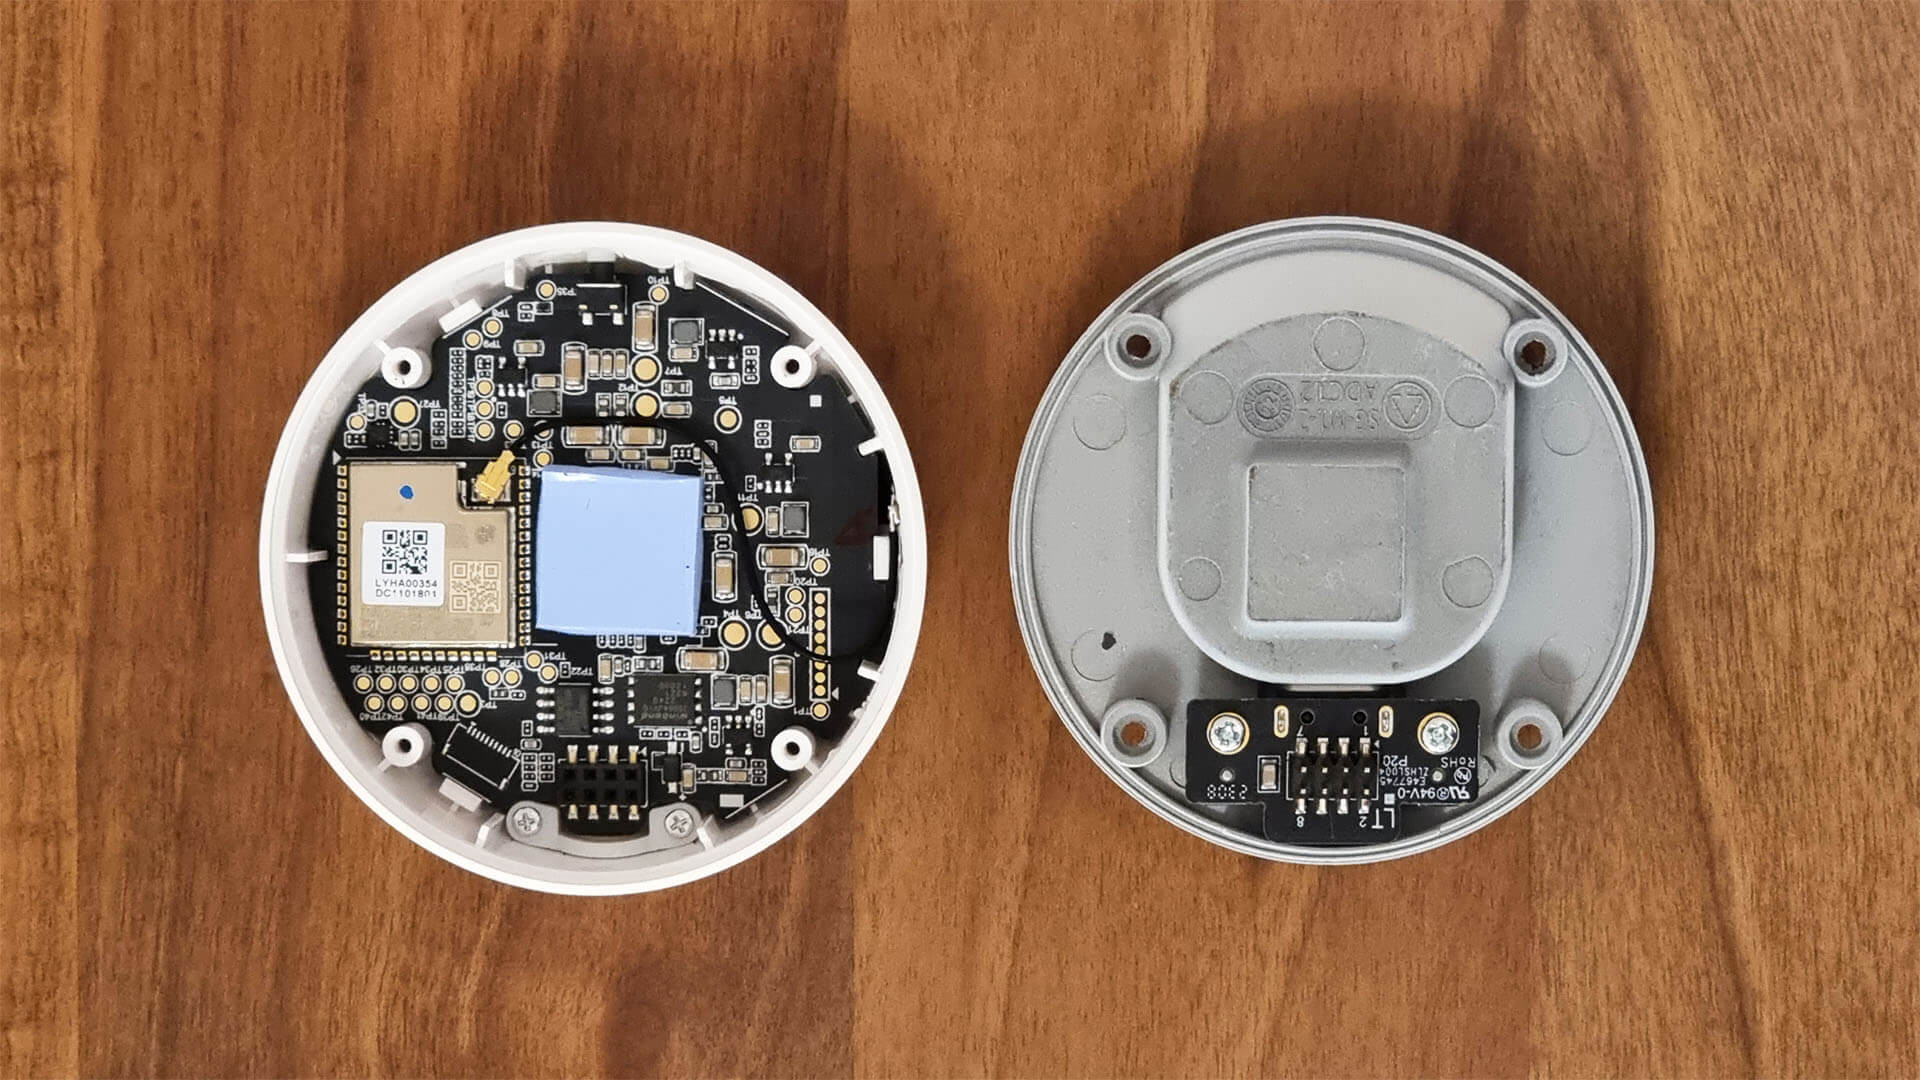
Zooming into the main PCB, you can see the main ESP32 chip powering the Aqara FP2. It’s an ESP32-WROOM-32U [Datasheet] model with both Wi-Fi and Bluetooth capabilities. The main difference between 32U and the more common 32D model is the external antenna connector, which boost connectivity and reception strength.
In the middle you can see the back of the mmWave radar sensor, which is protected by a heat dissipation pad (2nd image).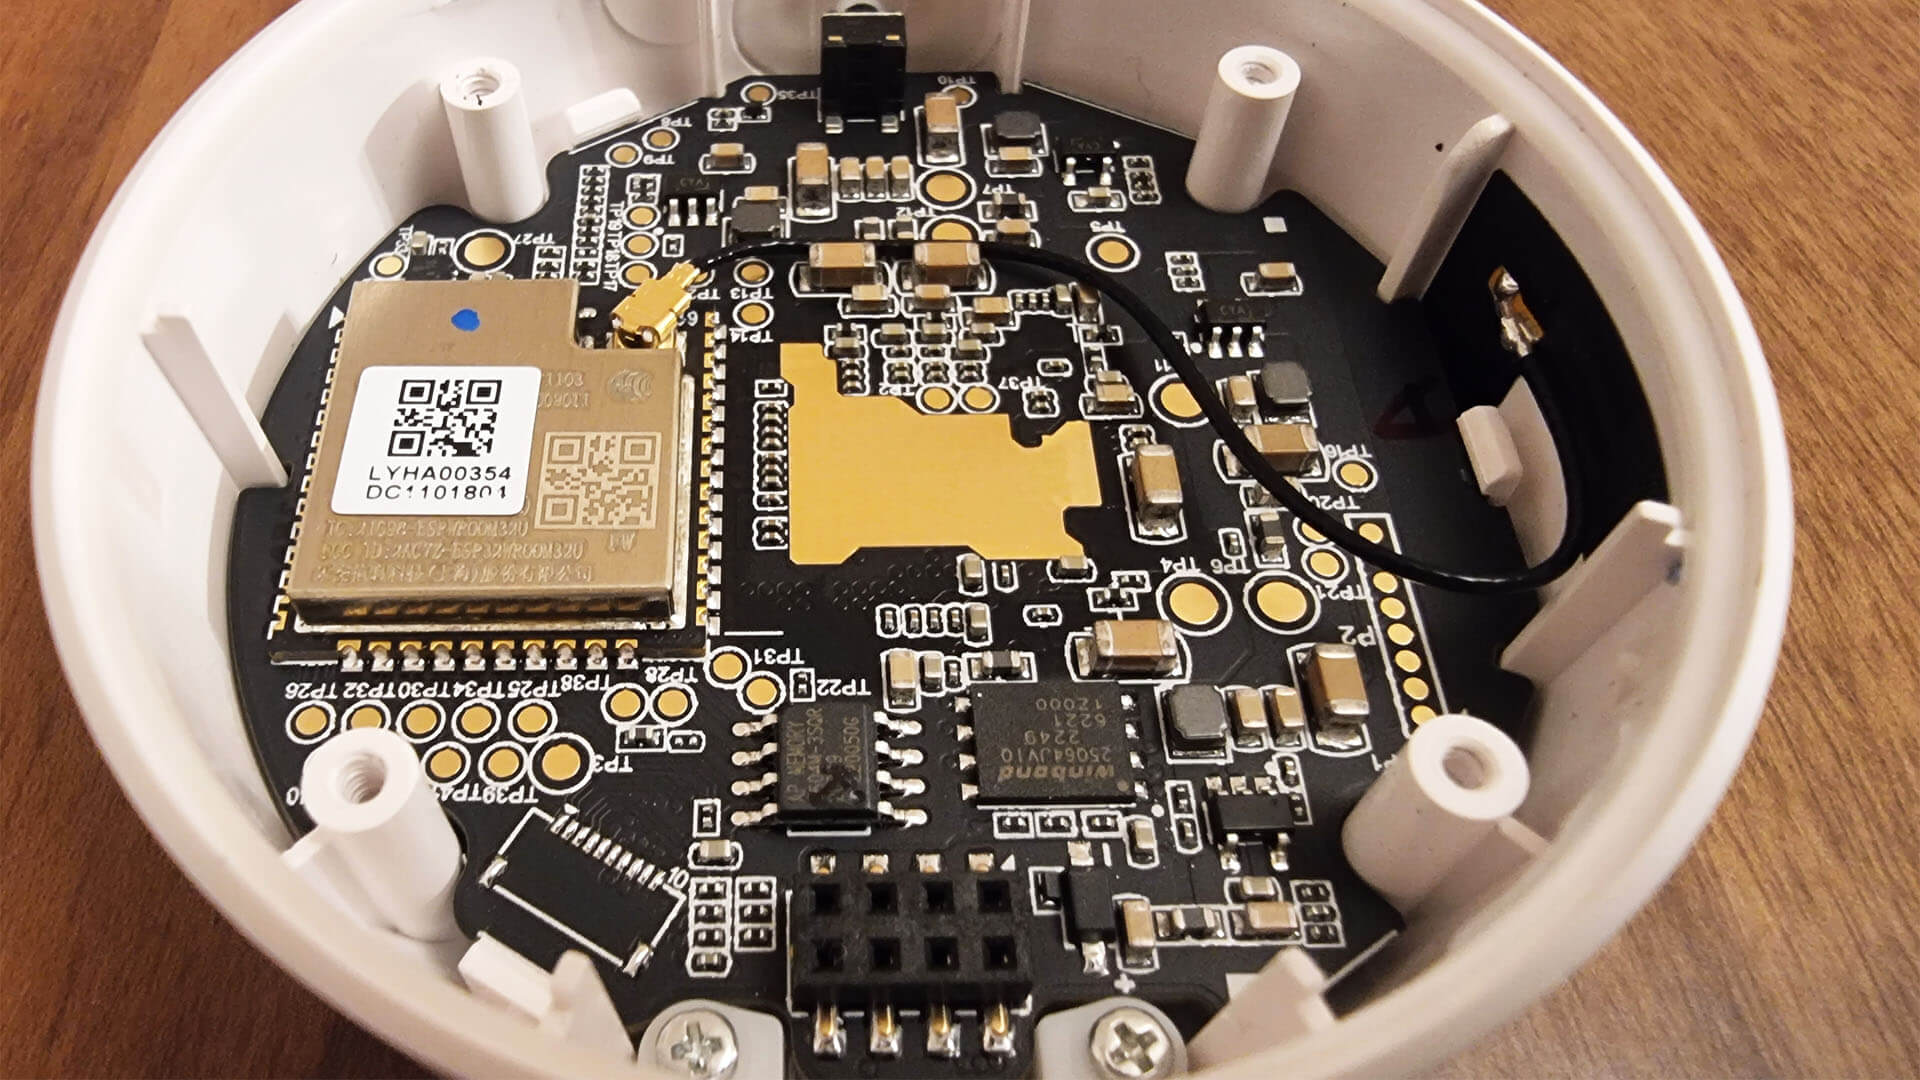
A closeup of the ESP32 board and sensor heat pad.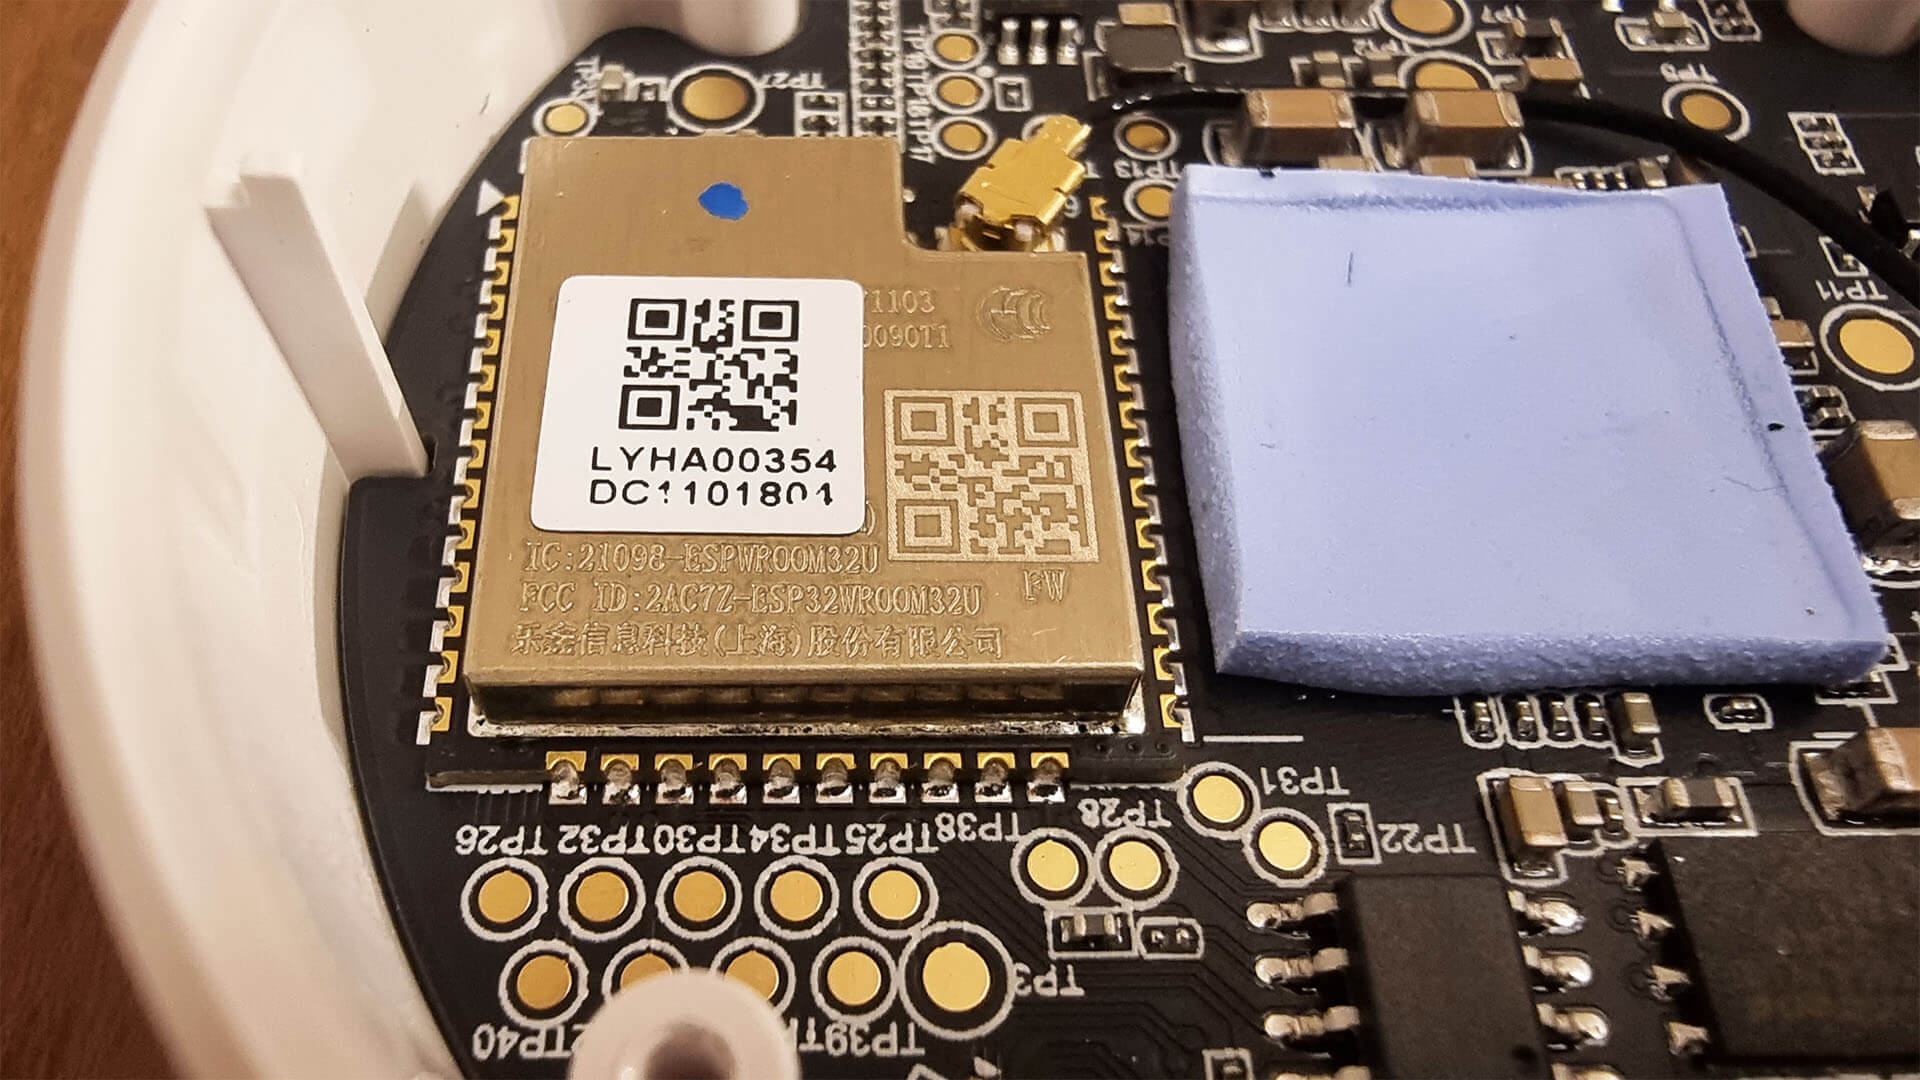
A closeup of the USB-C power PCB.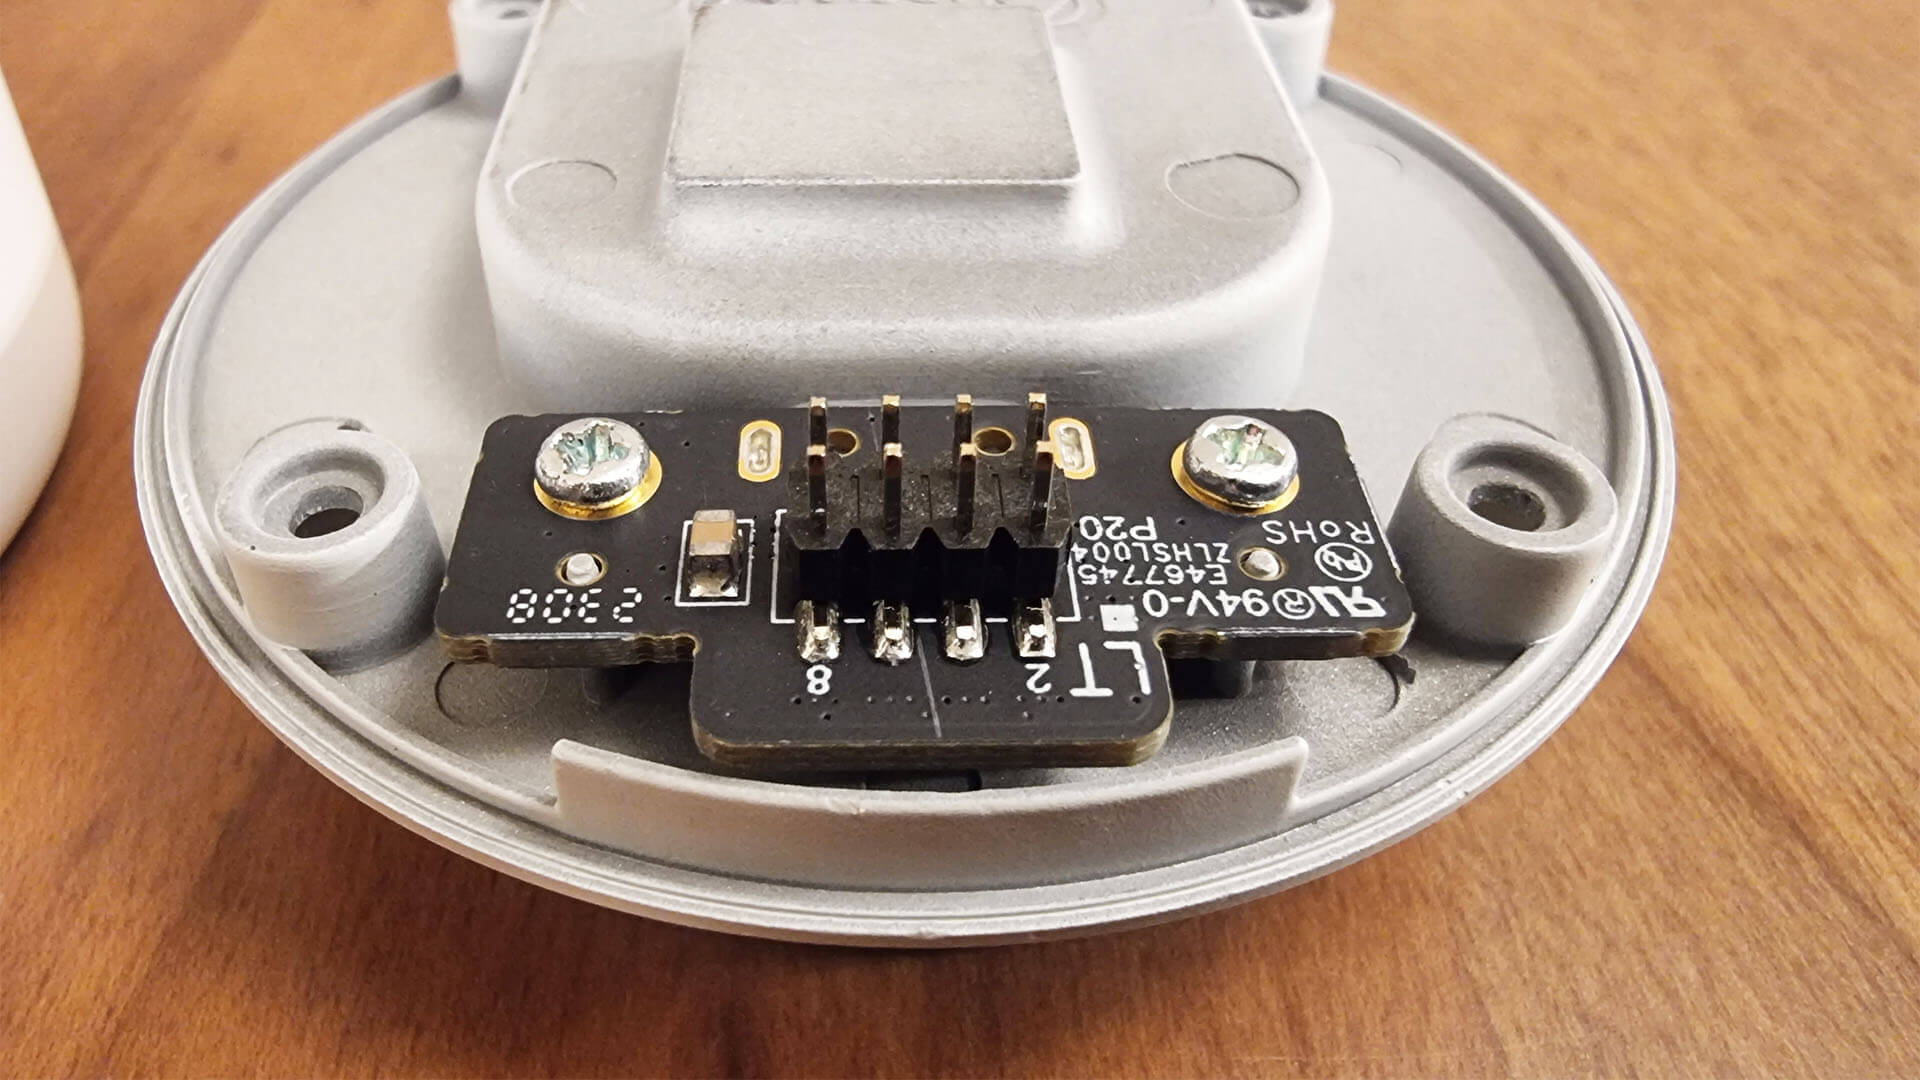
Flipping over the main PCB and we can see the main component of this device: mmWave Radar Sensor for Human Prescence Detection. The model is IWR6843 [Datasheet] developed by Texas Instruments, a well known company that designs, manufactures and sells semiconductors and various integrated circuits globally.
The IWR6843 is also a 60-64GHz rated radar sensor, similar to the one in the Aqara FP1. However, this is boasted as an extremely capable sensor, up to 10 person detection in a single room so even though it’s similar on paper, it should perform better than the German-made sensor in the FP1.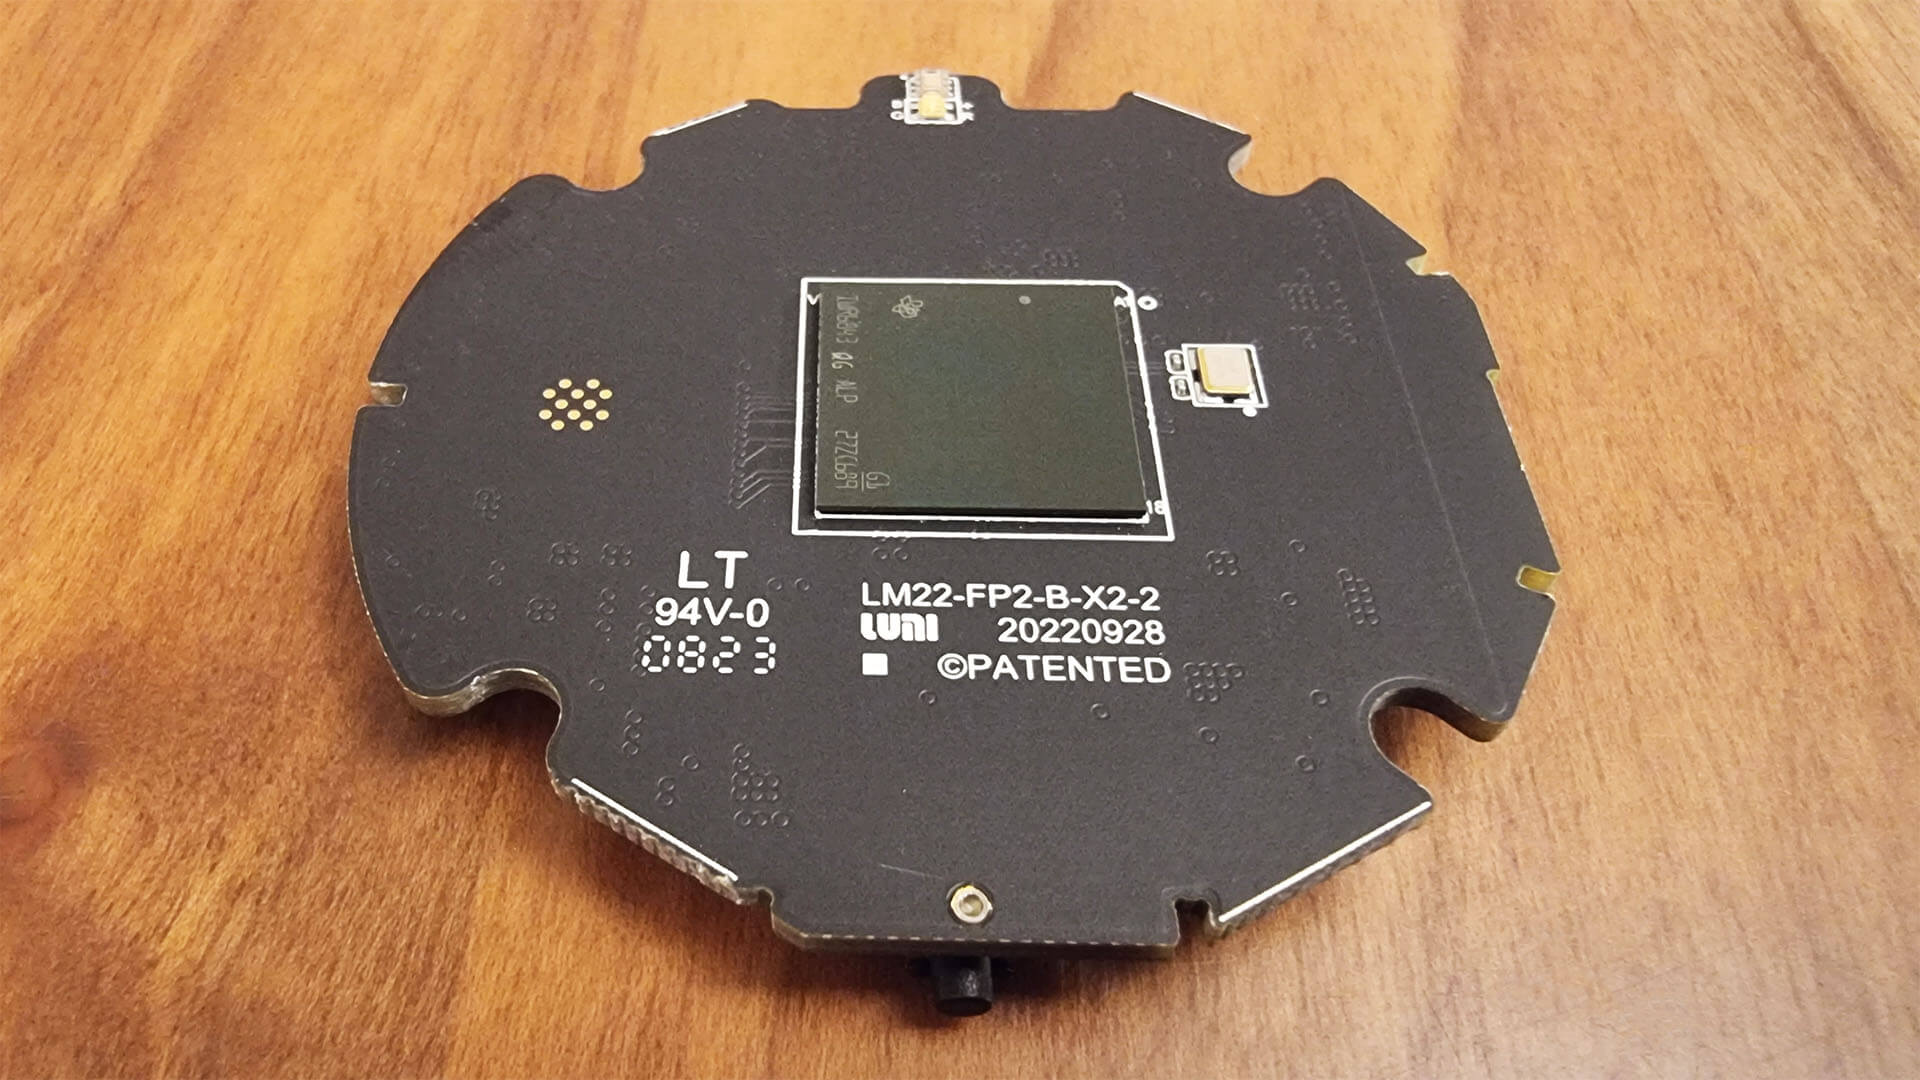
You can see the small illuminance sensor at the top and pairing button at the bottom of the PCB.
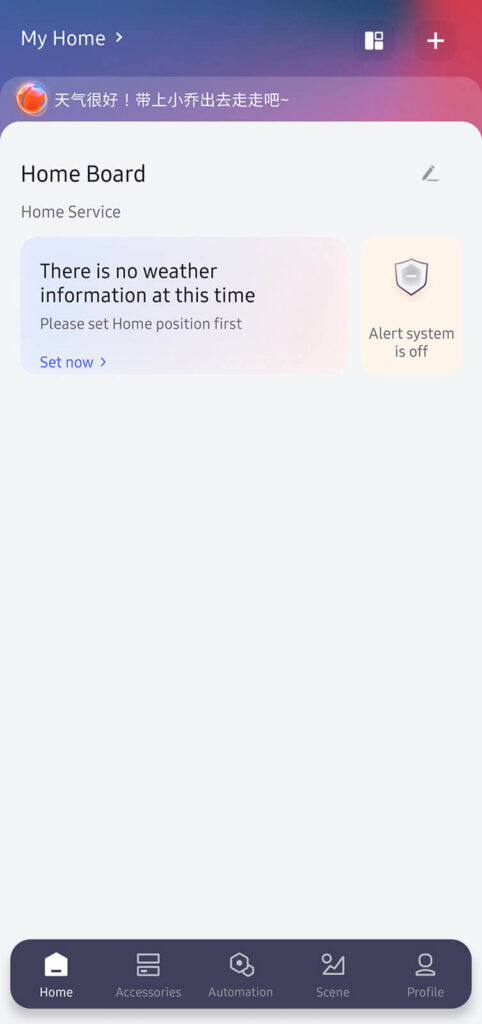
Aqara Home App
Initialization
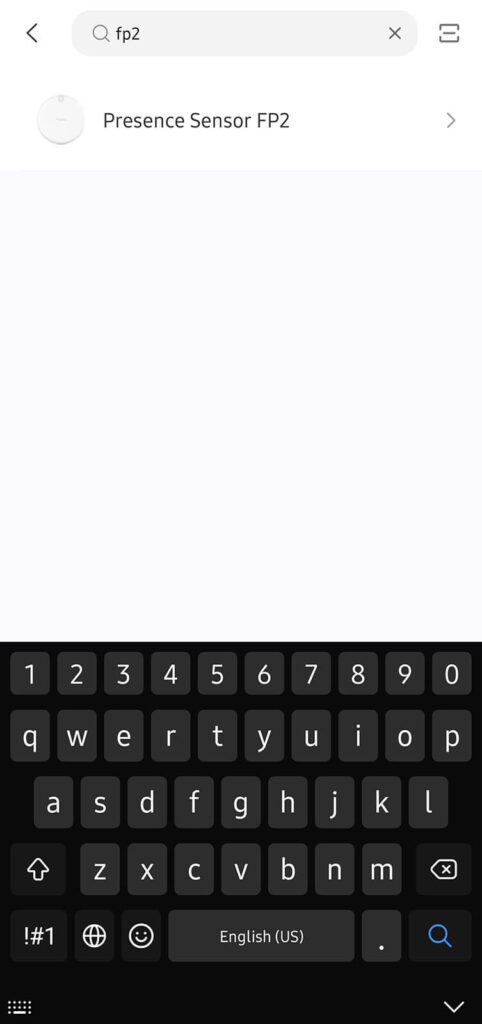
To initialize the Aqara FP2 Human Presence Sensor, you are going to need the Aqara Home App. Download it from the Play/App Store and create a username if you don’t already have one. If you encounter any issues, change the server of the app to Chinese Mainland.
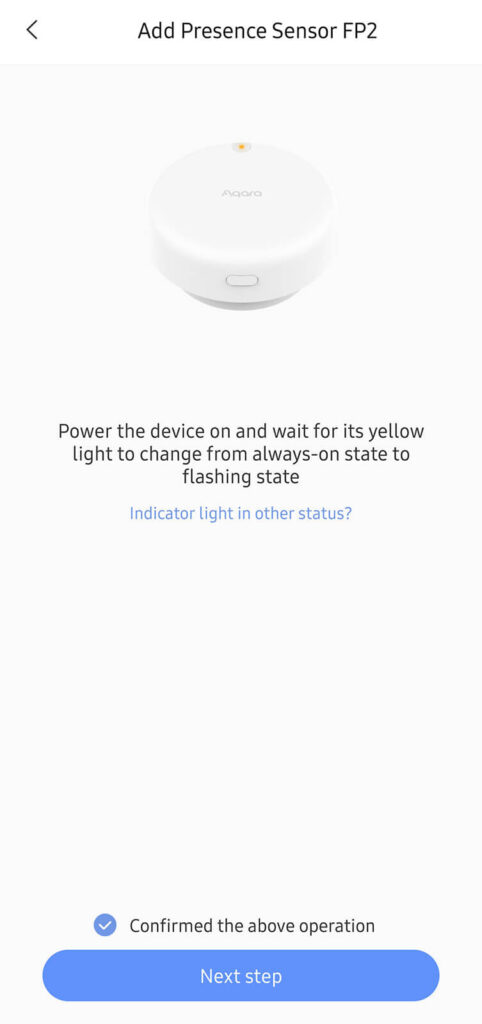
Power on the Aqara FP2 and it should automatically enter pairing mode and start blinking. If it doesn’t, hold the button to enter pairing mode. Press the + button in the Aqara Home App:
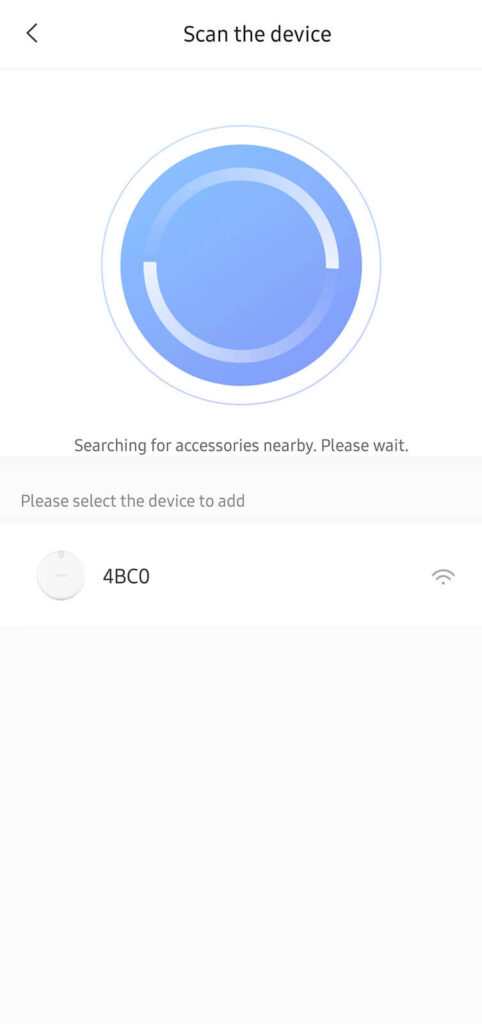
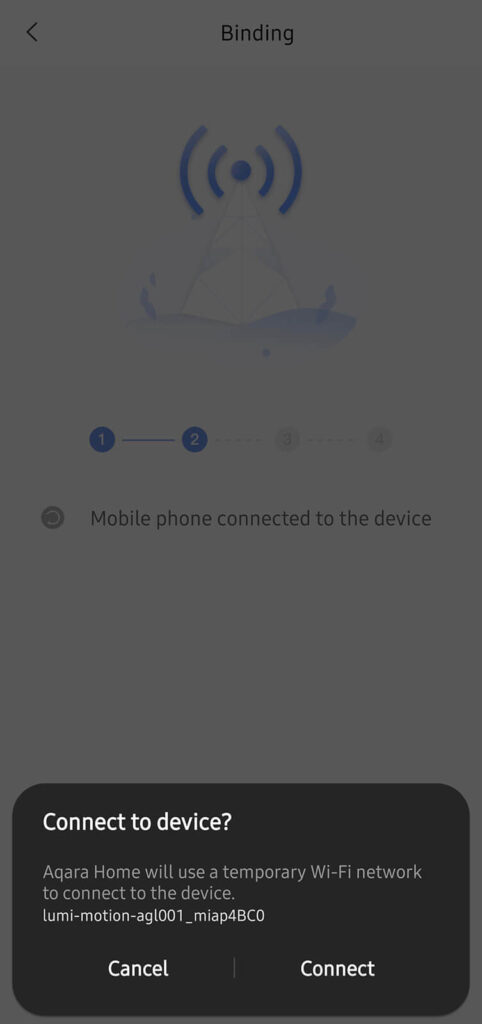
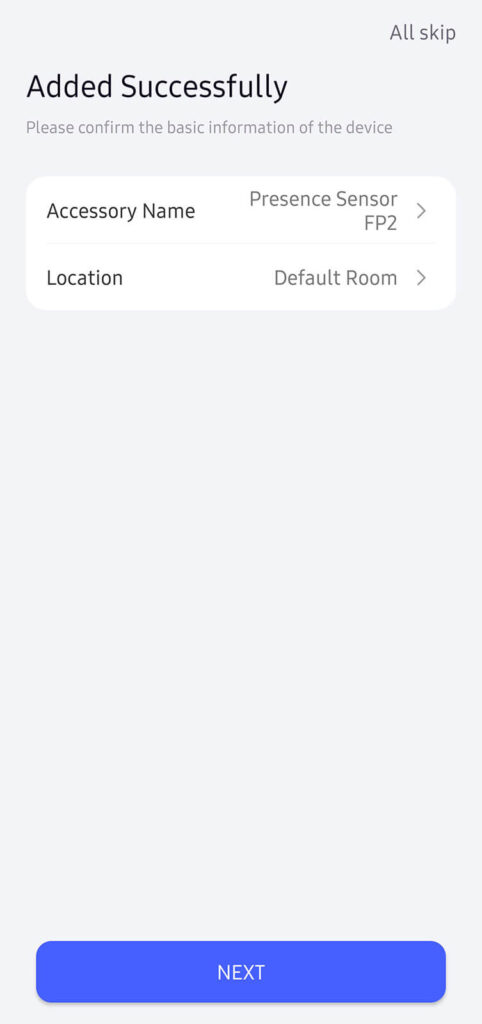
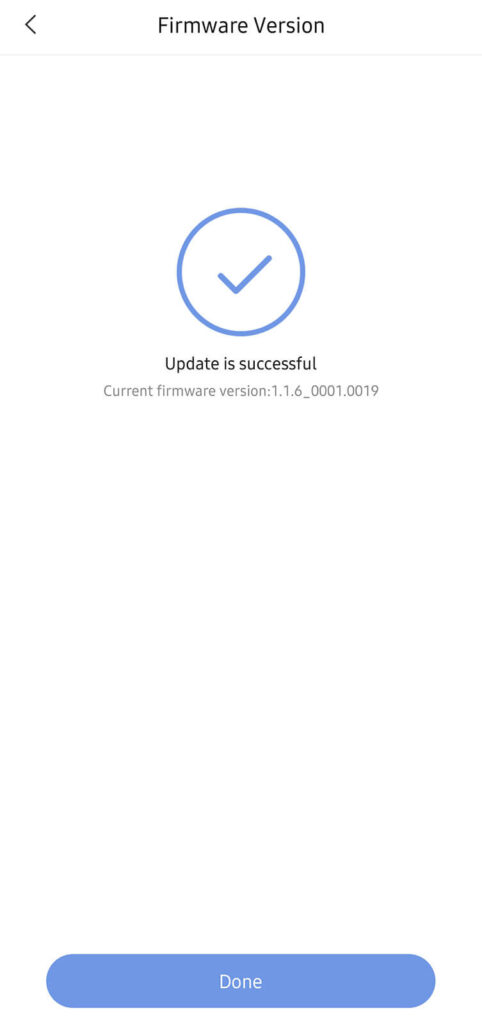
Once you’ve successfully added the FP2 to the Aqara Home App, I suggest you click All Skip before you configure the detection mode and zones. First, it’s important to check for a firmware update of the sensor. Click the FP2 under the Accessories menu in the app and scroll down to the Version menu:


You can now continue to setup the detection mode and detection zones in the Aqara Home App.
Detection Mode
The Aqara FP2 can be configured in three separate modes, which you can subsequently fine-tune for optimum results:
- Only enable body existence monitoring
- Fixed mode, used to only detect presence without zones
- Personnel positioning
- Provides real-time location data and proximity sensing functions
- Suggested installation location is on a vertical surface (wall)
- Falling detection
- Used for detecting people falling
- Suggested installation location is top down on a ceiling
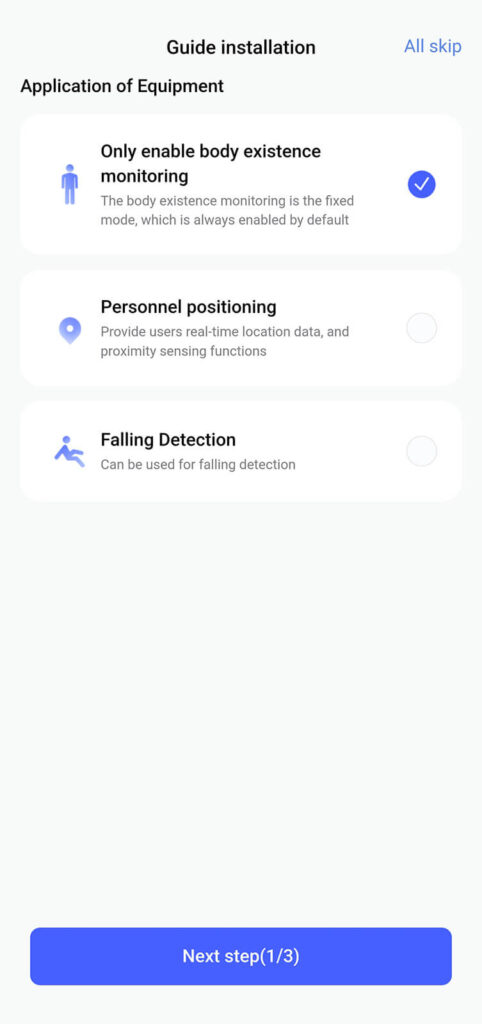
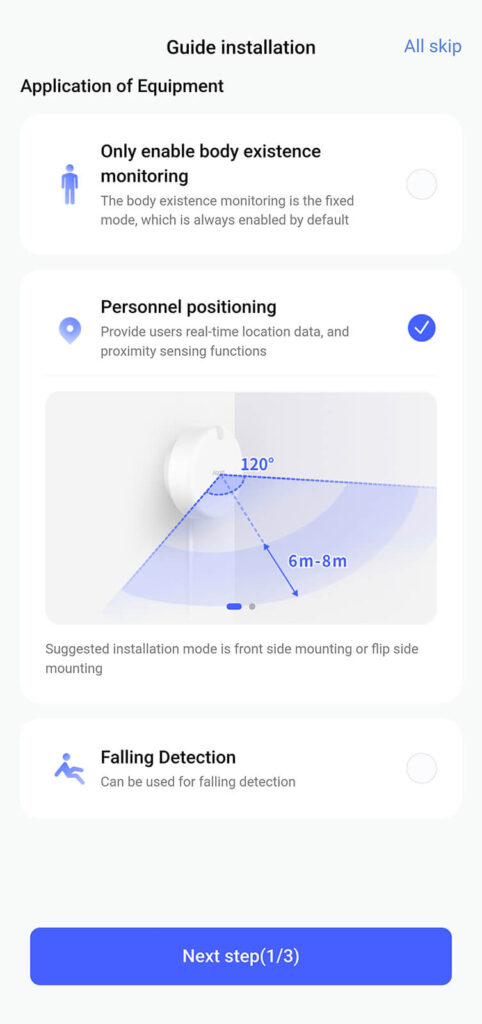

No matter which mode you choose, the app neatly explains how it’s used, how to configure it and the way to install the Aqara FP2. As an example, I will set the sensor in Personnel Monitoring mode which is used to detect multiple people and their correct position in the room.
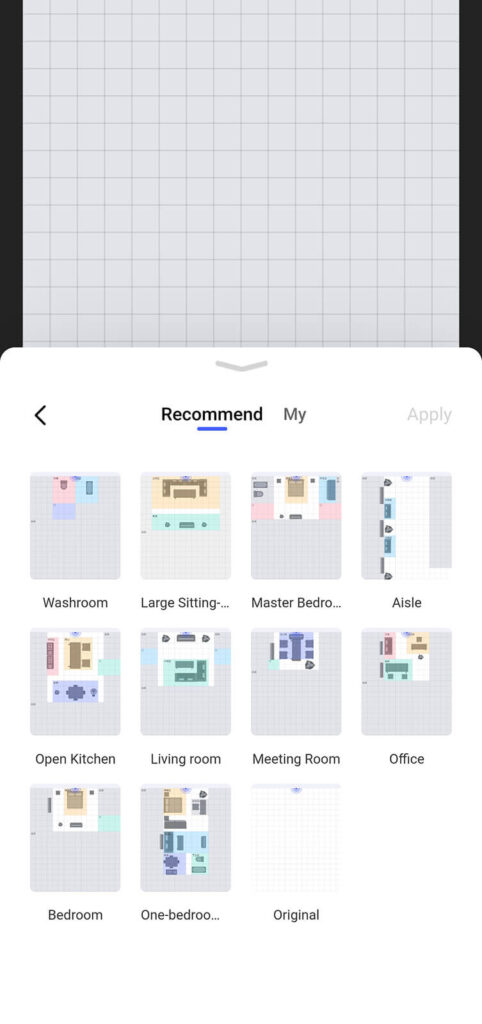
Detection Zones
The app allows you to set various detection zones and save them as templates. You add furniture positions to these zones, so you can mirror your existing room in the Aqara App. Here’s a few screenshots showcasing how these are used:
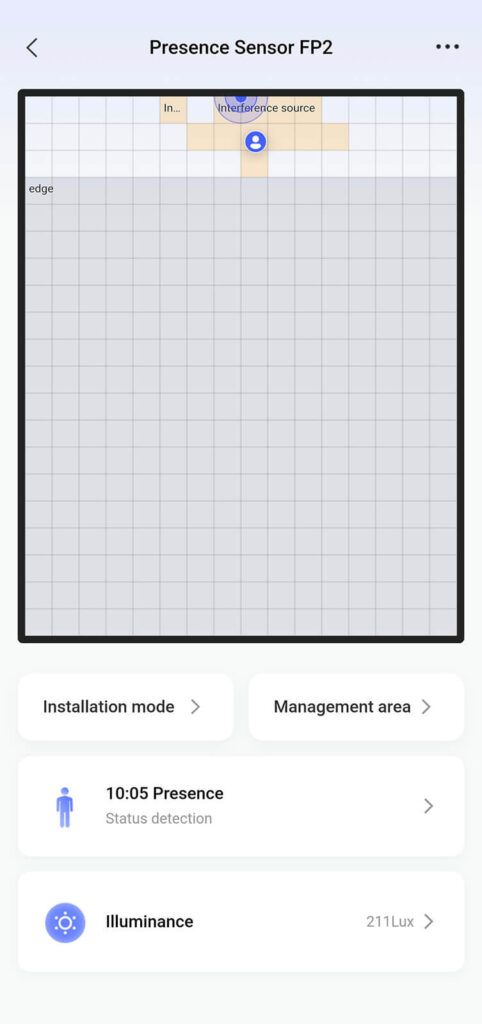
You can create a template or edit the existing area
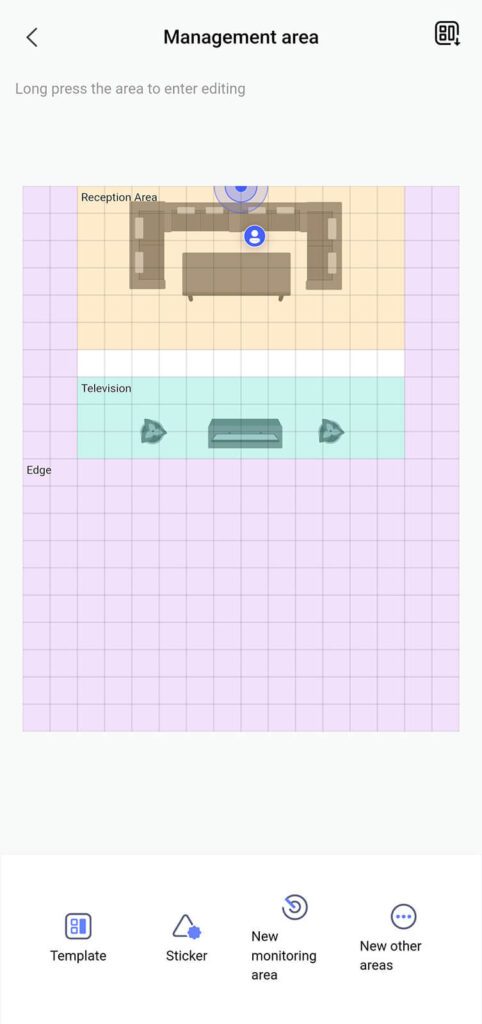

In the last screenshot, I quickly put together a simple layout of my office. I positioned the FP2 on a wall on my left side and sat at in my chair. My desk is huge, so I enlarged it and added a few other elements in the room.
I was surprised the sensor pinpointed my exact location while I was in the chair. The person symbol kept hovering while I was moving around and If I tried sitting completely still it stopped moving. This is a very capable sensor! Moving around the room, it gave me the following results:

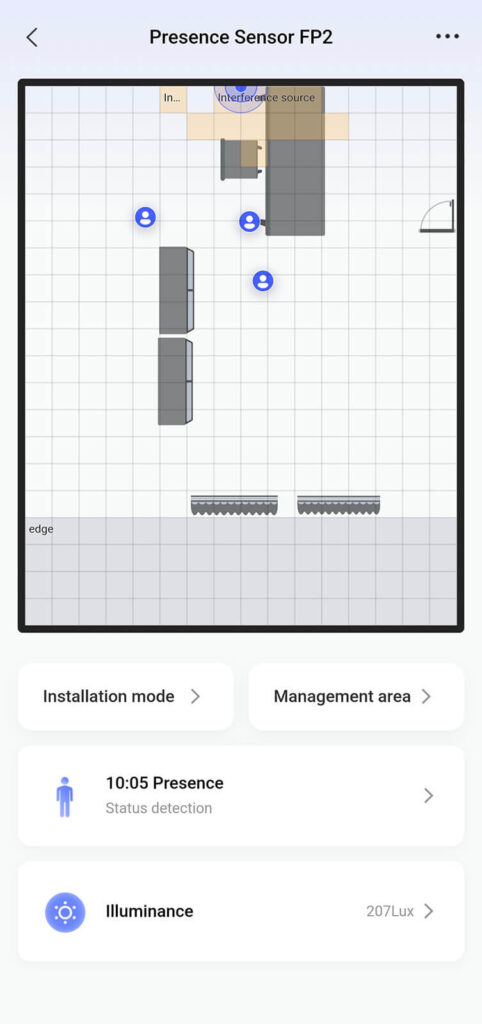
The Aqara FP2 was incredibly accurate in detecting my position. In the last picture, I asked some colleagues to come into my office to see if it can detect them which it did. Multi person presence detection is by a sensor is a now a reality. I do have some notes I will add in the summary at the end of this article.
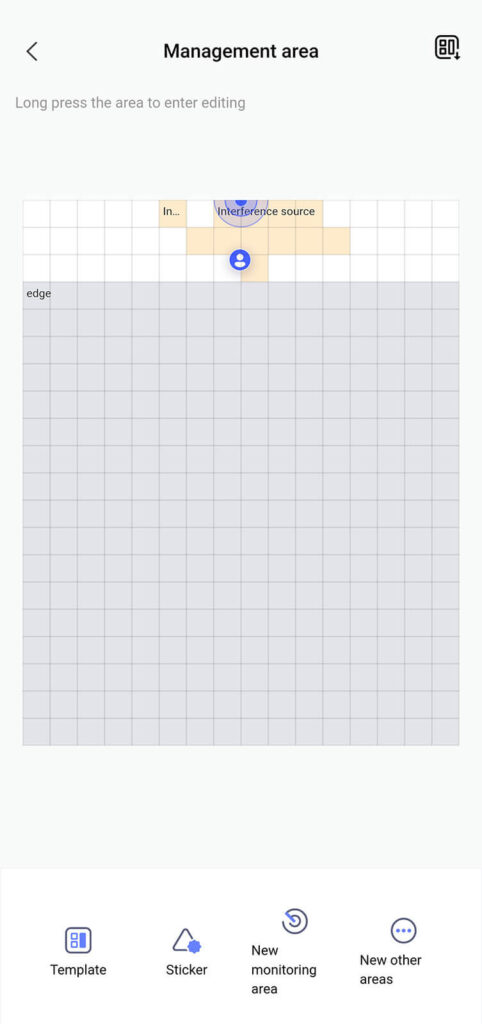
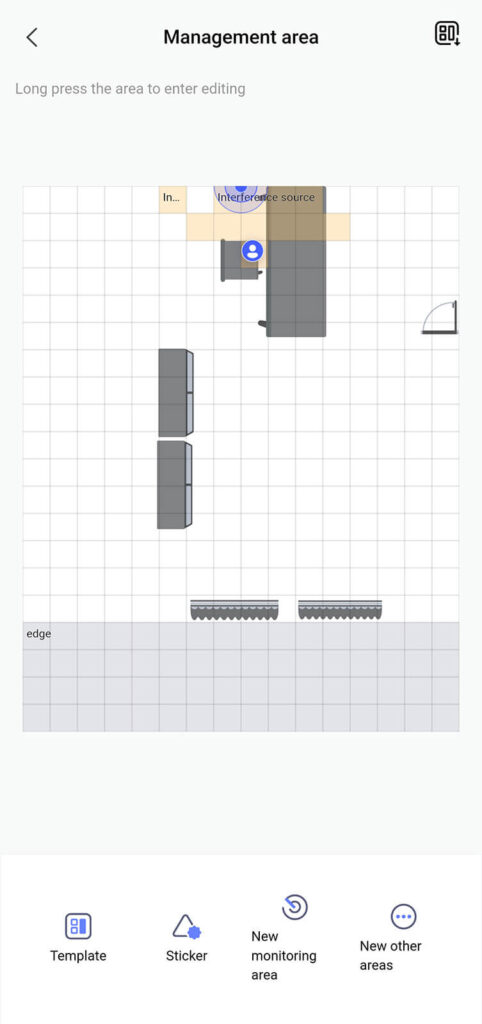
Interference Sources
One feature that home automation enthusiasts will be happy to know Aqara added, is the defining of so-called interference sources. What this means is, you can make the device ignore you moving fan in the room so it doesn’t trigger the sensor.
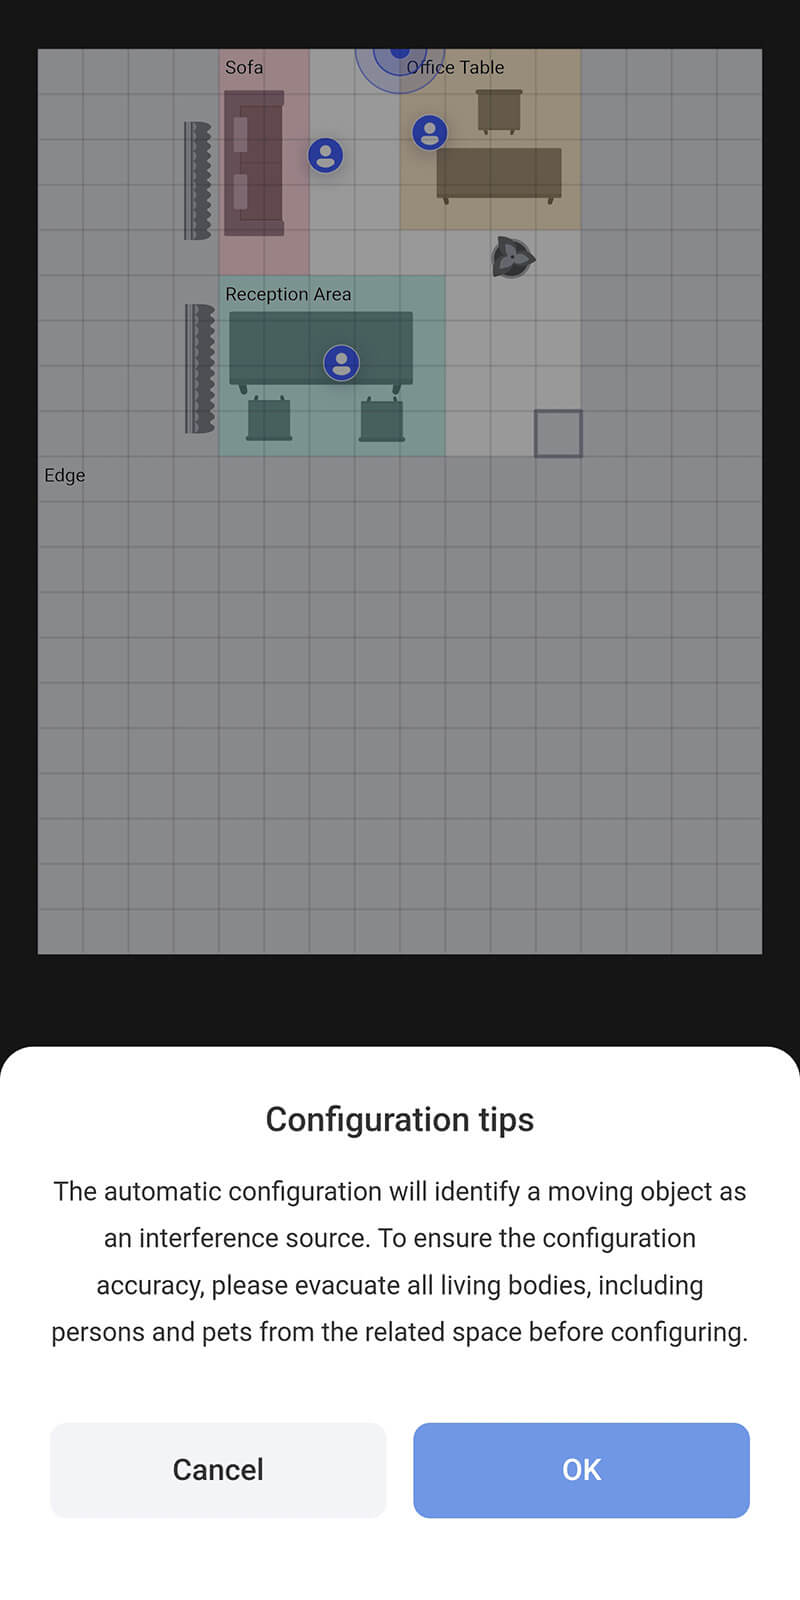
In the app, navigate go Management Area and click New Other Areas. Here you can manually define Interference sources that would potentially trigger the sensor or use the automatic mode.
To setup this mode, you need to leave the room and toggle the moving fan. Trigger the Automatic Configuration within the app and it will identify the fan as an interference source, ignoring it in the future. This eliminates false positive triggers, which were a plague in the Aqara FP1.
In this menu, you can also define exits and entrances of the room as well as it’s edges. This is important for optimizing it’s performance, so it has better presence detection in an object crowded room.
Home Assistant Integration
At this point, it’s still early to conclude what is the best way to integrate the Aqara FP2 in Home Assistant. Considering the device has an ESP32 board, perhaps ESPHome development is possible somewhere in the future. I feel like if someone manages to port the sensor in ESPHome, it’s going to take a considerable effort to implement everything correctly, especially the detection zones.
However, I managed to successfully integrate the Aqara FP2 in Home Assistant via the HomeKit Controller Integration. Put the device in pairing mode by holding the button until the LED starts blinking:
The device should get auto discovered if the default Home Assistant config is enabled. If not, navigate to Settings > Devices & Services > + Add Integration > Apple > HomeKit Controller. Select the sensor at the prompt: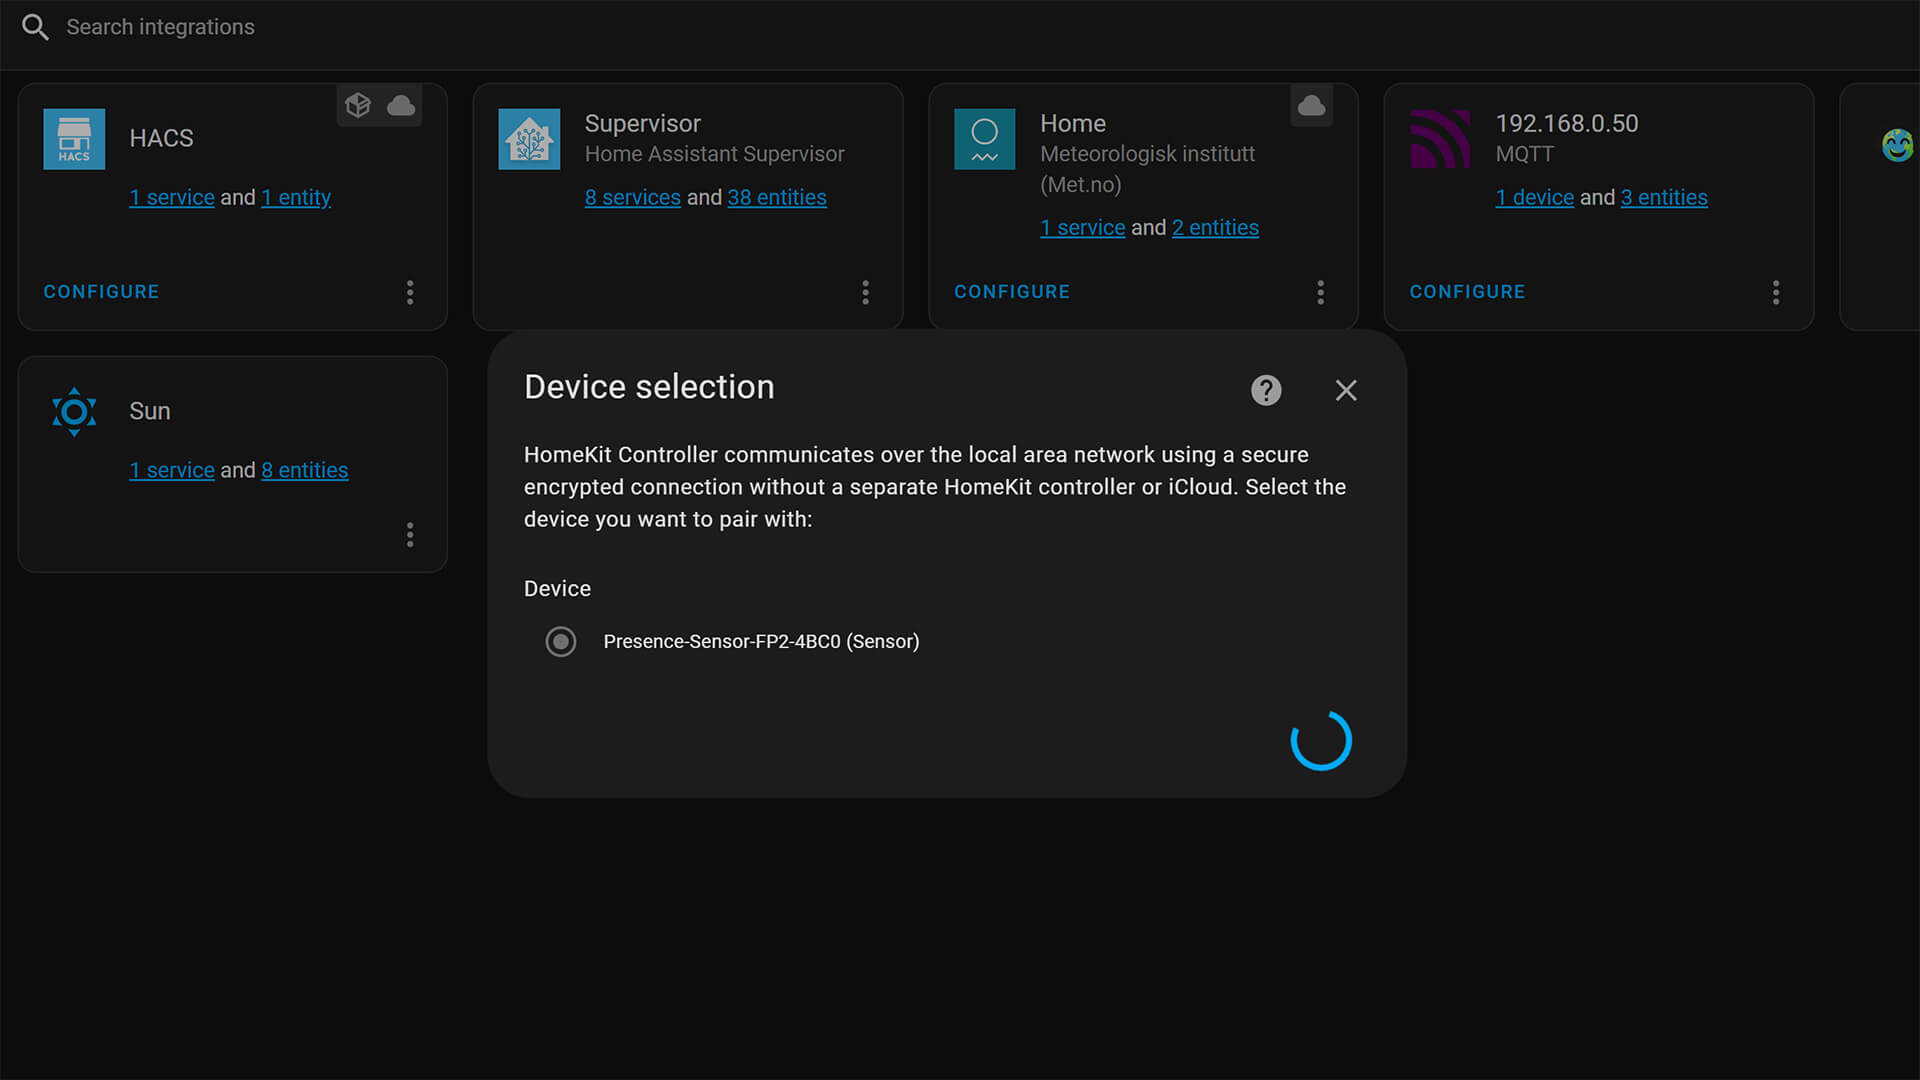
It will ask you for the HomeKit Pairing Code which you can find on the back sticker on the device itself. Input the code without dashes and press submit.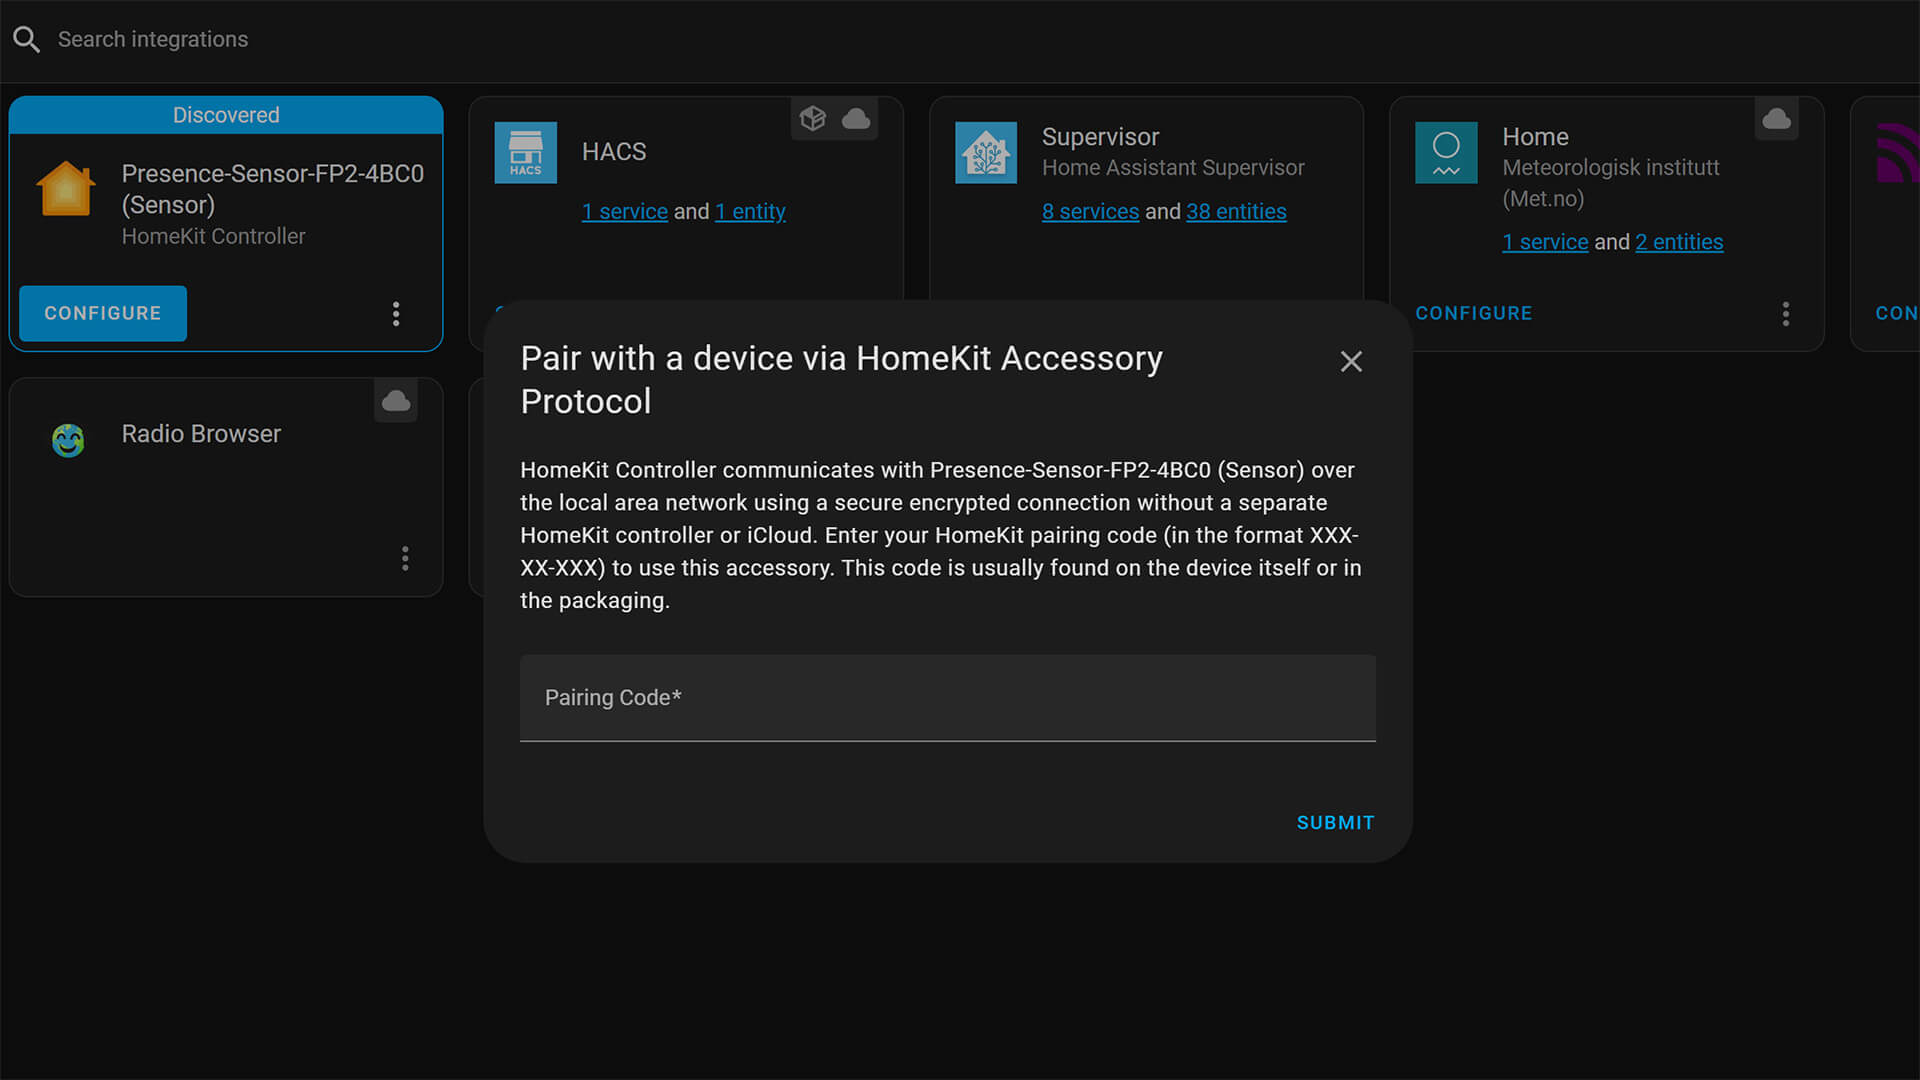
A Success! message will appear, asking you to select an area for the device. Click Finish.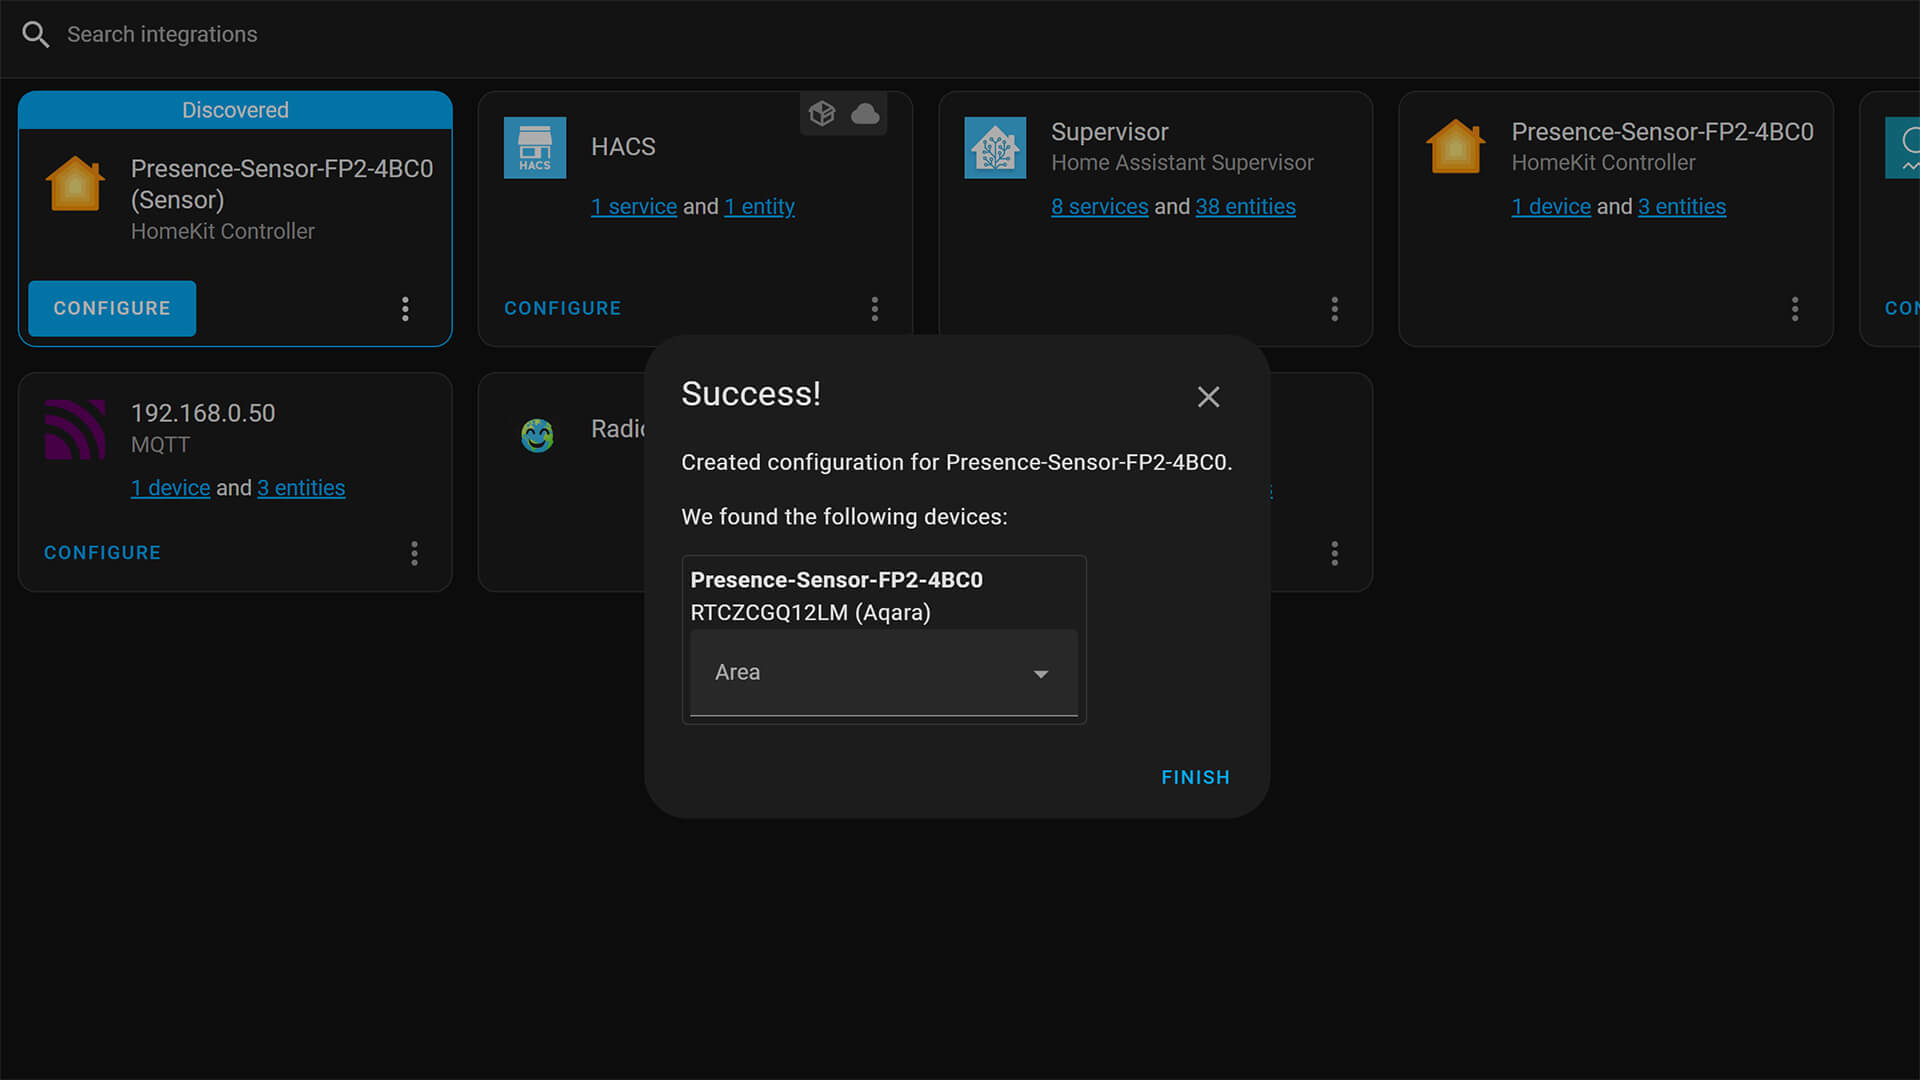
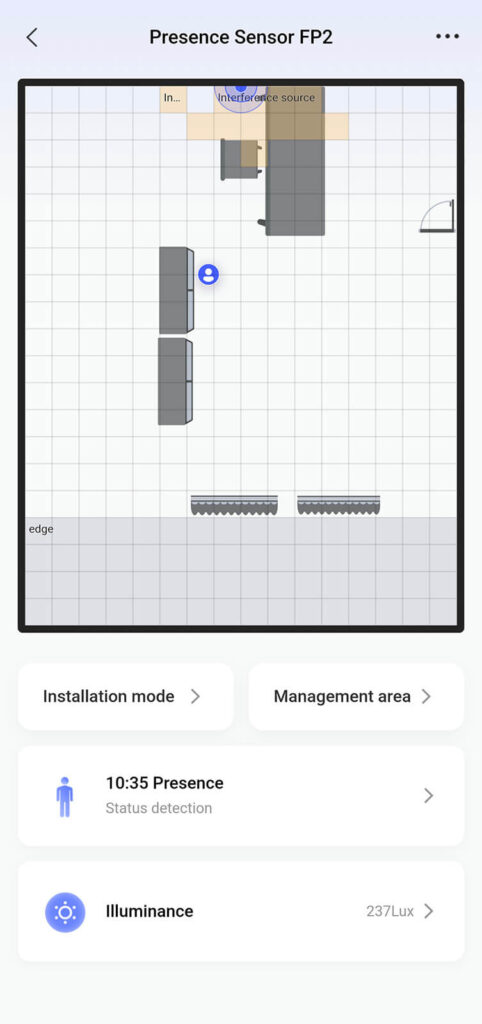
If done correctly, it exposes the following entities in Home Assistant via the HomeKit Controller Integration: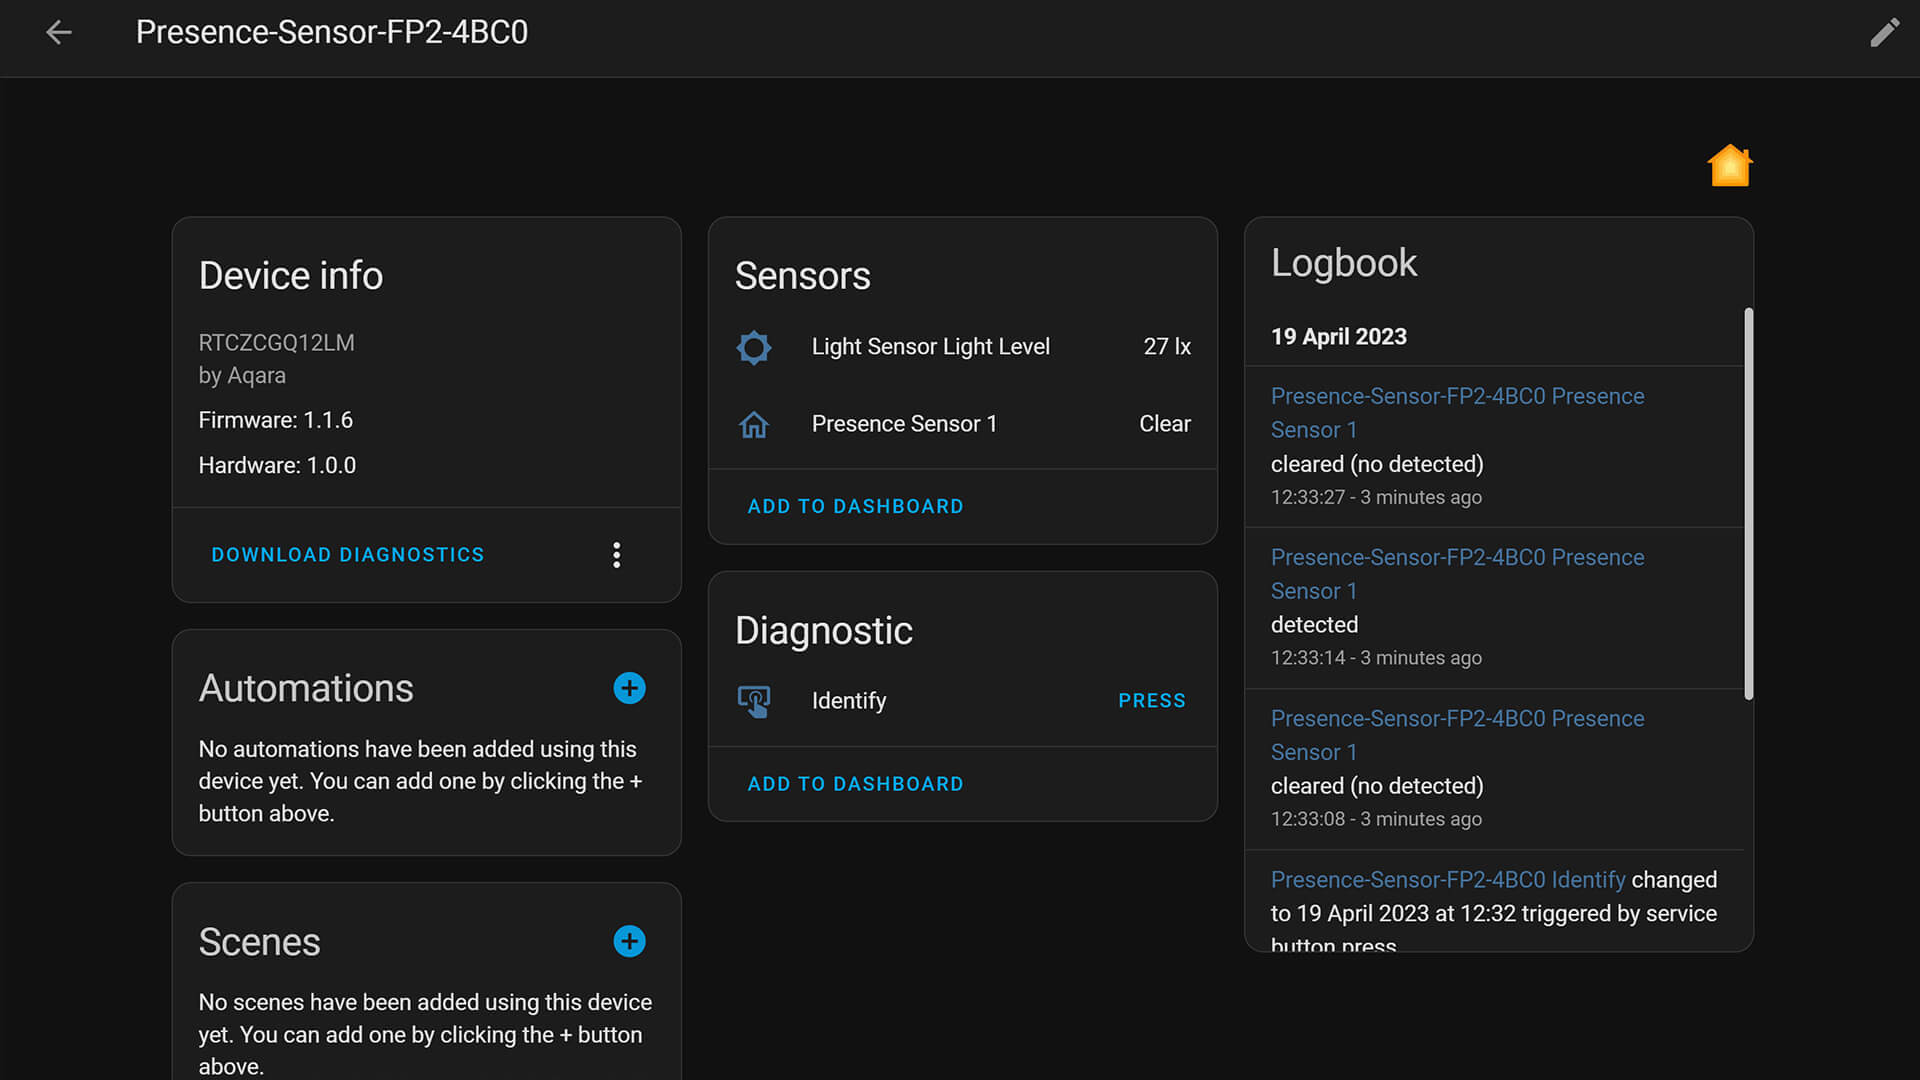
The Presence Sensor entity is there and fully usable as well as the illuminance reading. The identify button simply blinks the LED on the Aqara FP2. What even neater, is that you can add more zones and presence templates which will be automatically exposed in Home Assistant. In the Aqara Home App, create a few more other detection zones and they will be added as separate entities in Home Assistant:
NOTE: If you remove the Aqara Home App after setting your detection zones, the Aqara FP2 will still work without the app with Home Assistant via the HomeKit Controller Integration. Everything you’ve preconfigured will be functional and working, so you do not actually need the app after the initial deployment of the sensor.
You will need it again if you want to edit zones and tweak settings. With firmware update 1.1.6_0005.0025, the device works locally and without an internet connection in Home Assistant.
Aqara FP1 vs FP2
Design
Before diving into the capabilities of the Aqara FP2, here is a side-by-side comparison with it’s predecessor noting some design differences and choices.
Starting with the obvious, the cable of the FP1 is permanently attached to it’s body whereas the FP2 uses USB-C which can be easily replaced. The successor also has an illuminance sensor, notably seen on the top of its case while the FP1 does not have one.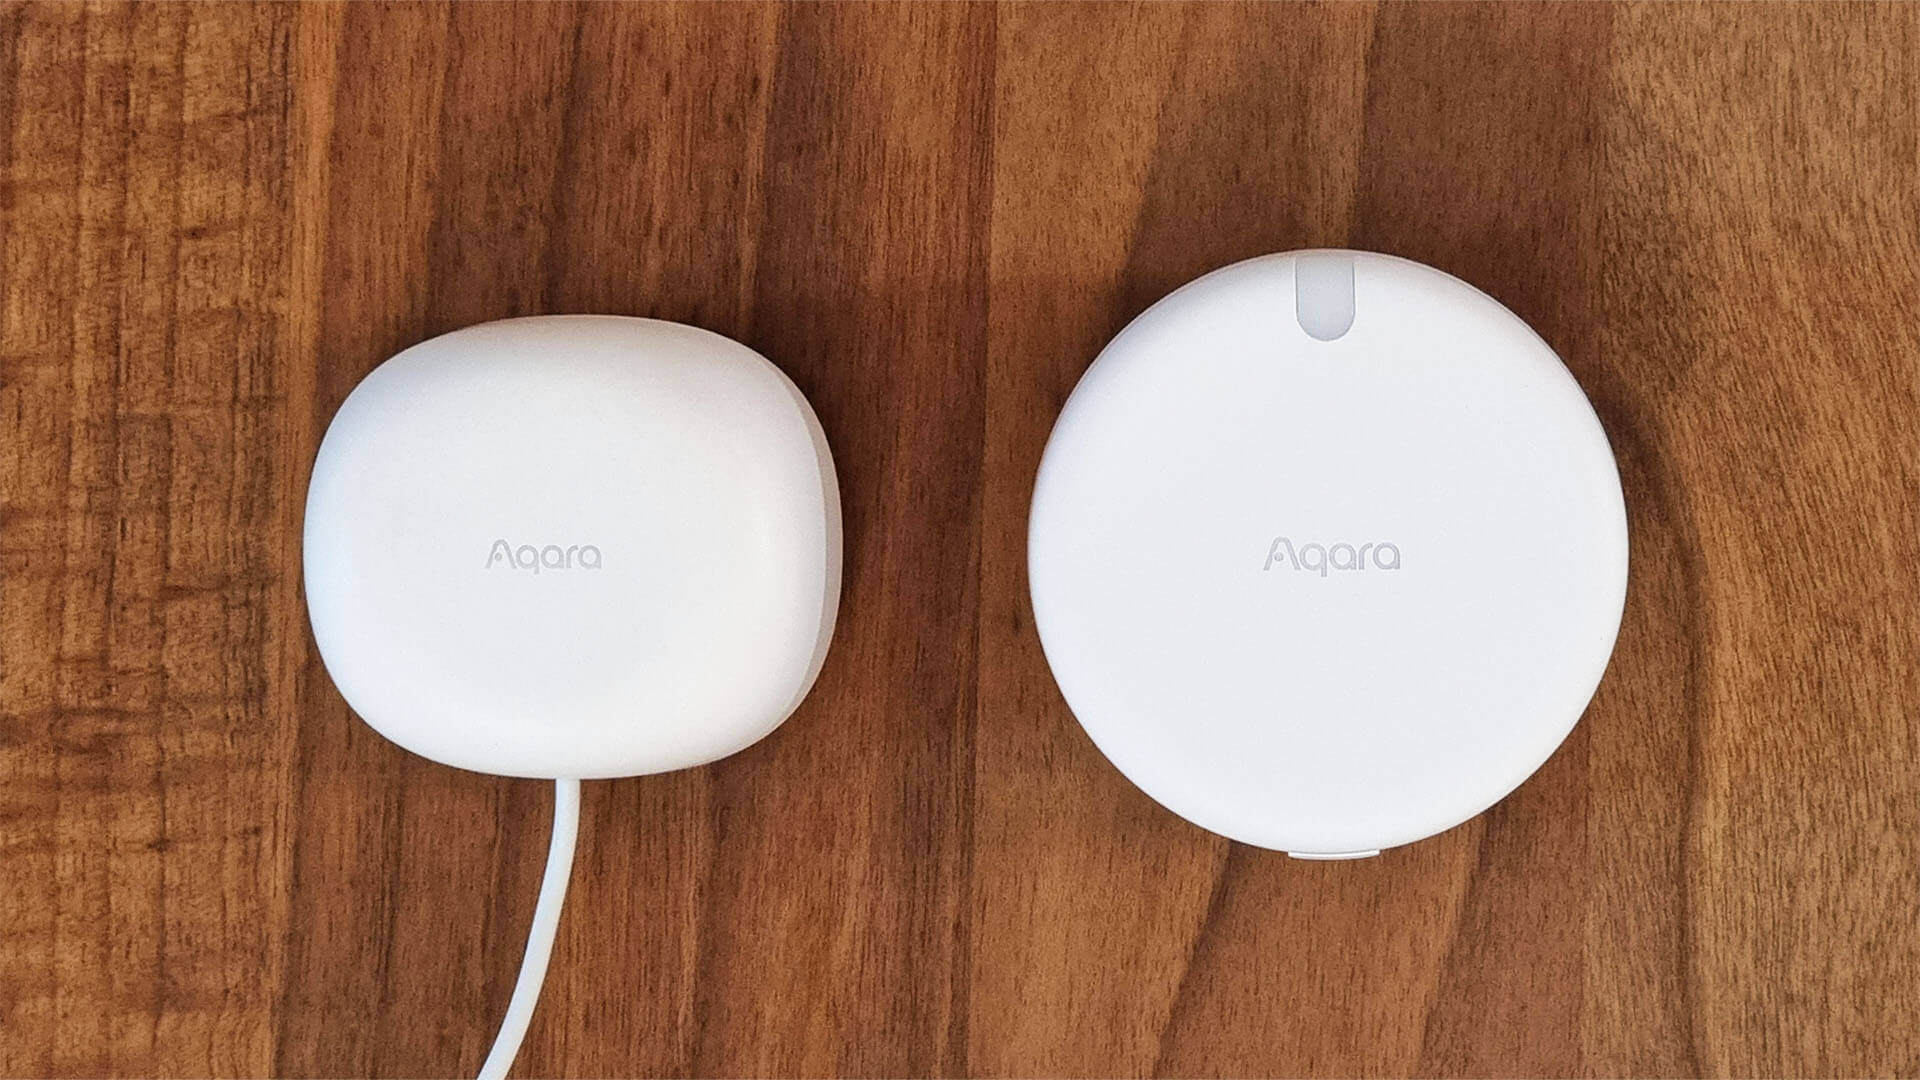
Size wise, the FP1 is bulkier and thicker, while the FP2 is flatter and more round. They weigh about the same, with the FP2 being slightly heavier when held. The feel of the plastic case is the same for both devices.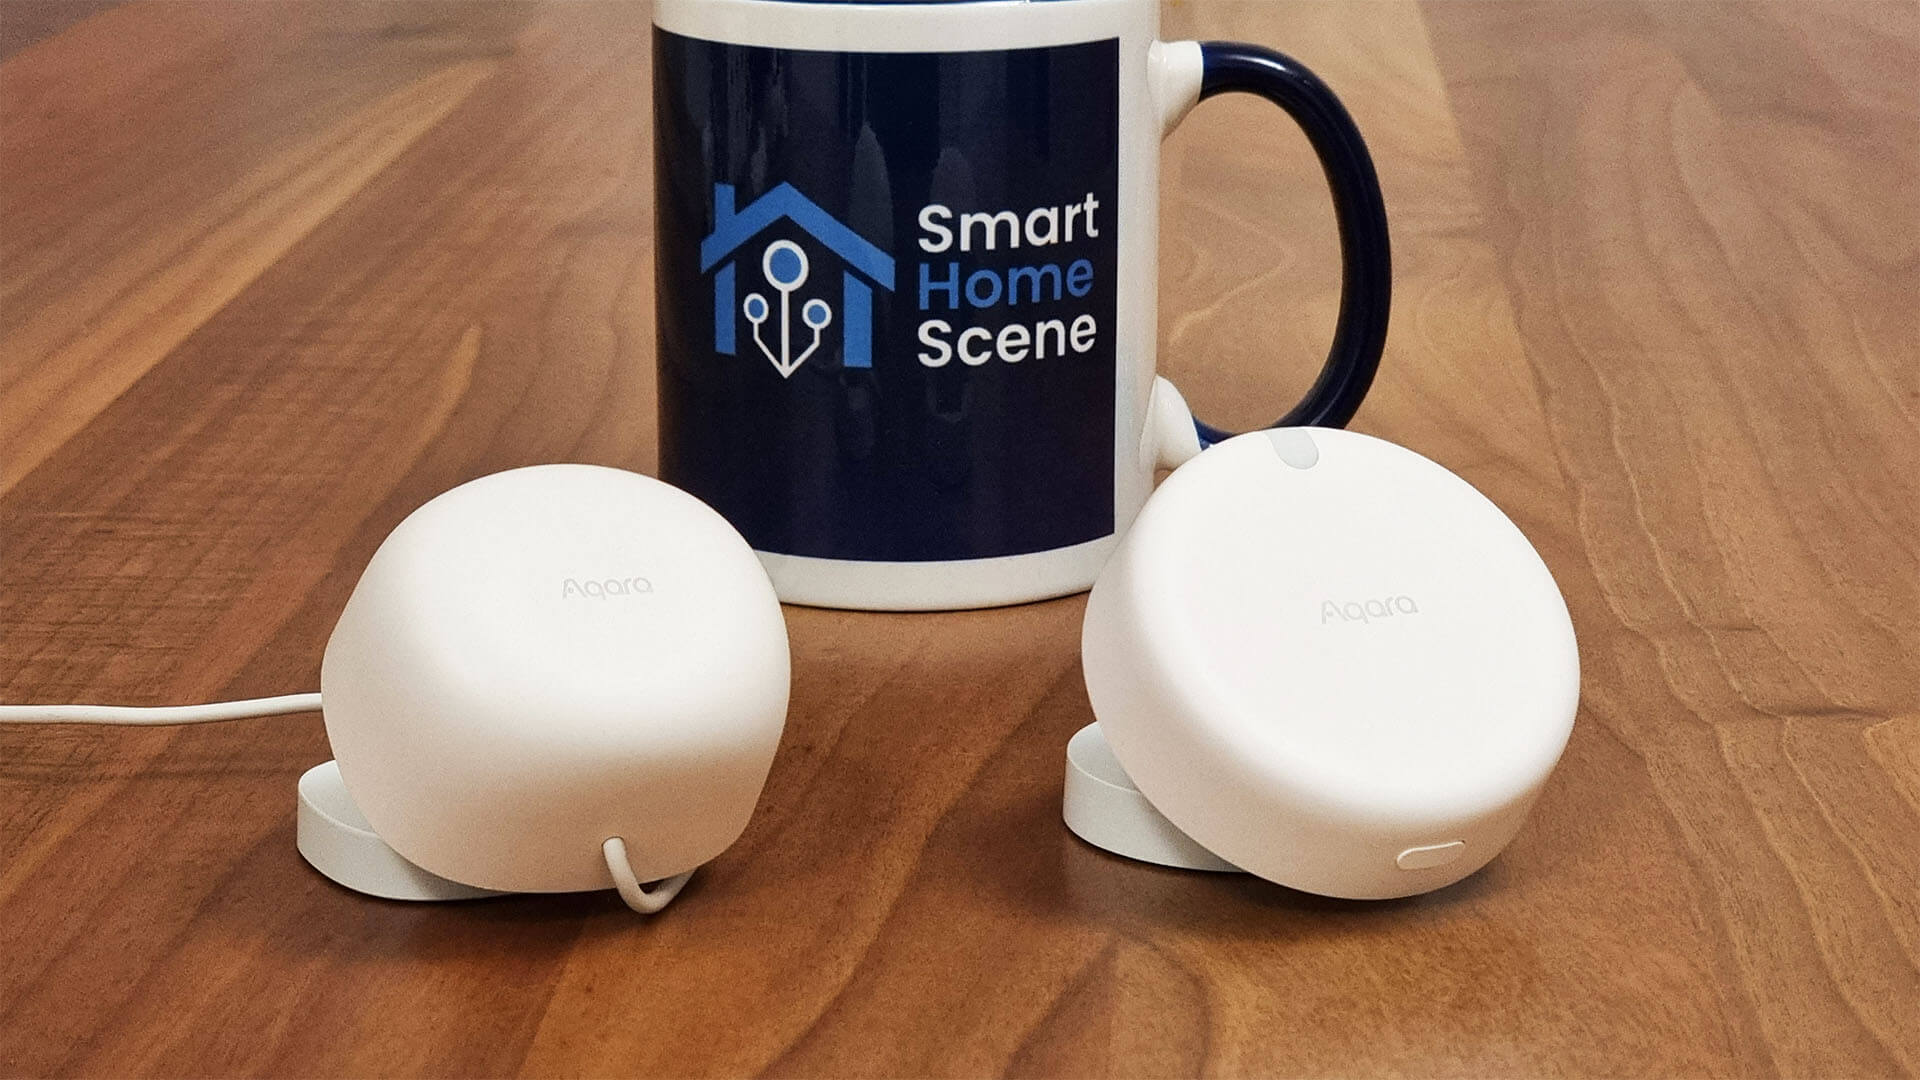
The thickness is best seen when you place them flat on their back. At first, it seems like the FP1 is much thicker, but the FP2 has a bigger mounting base which somewhat nullifies the thickness difference.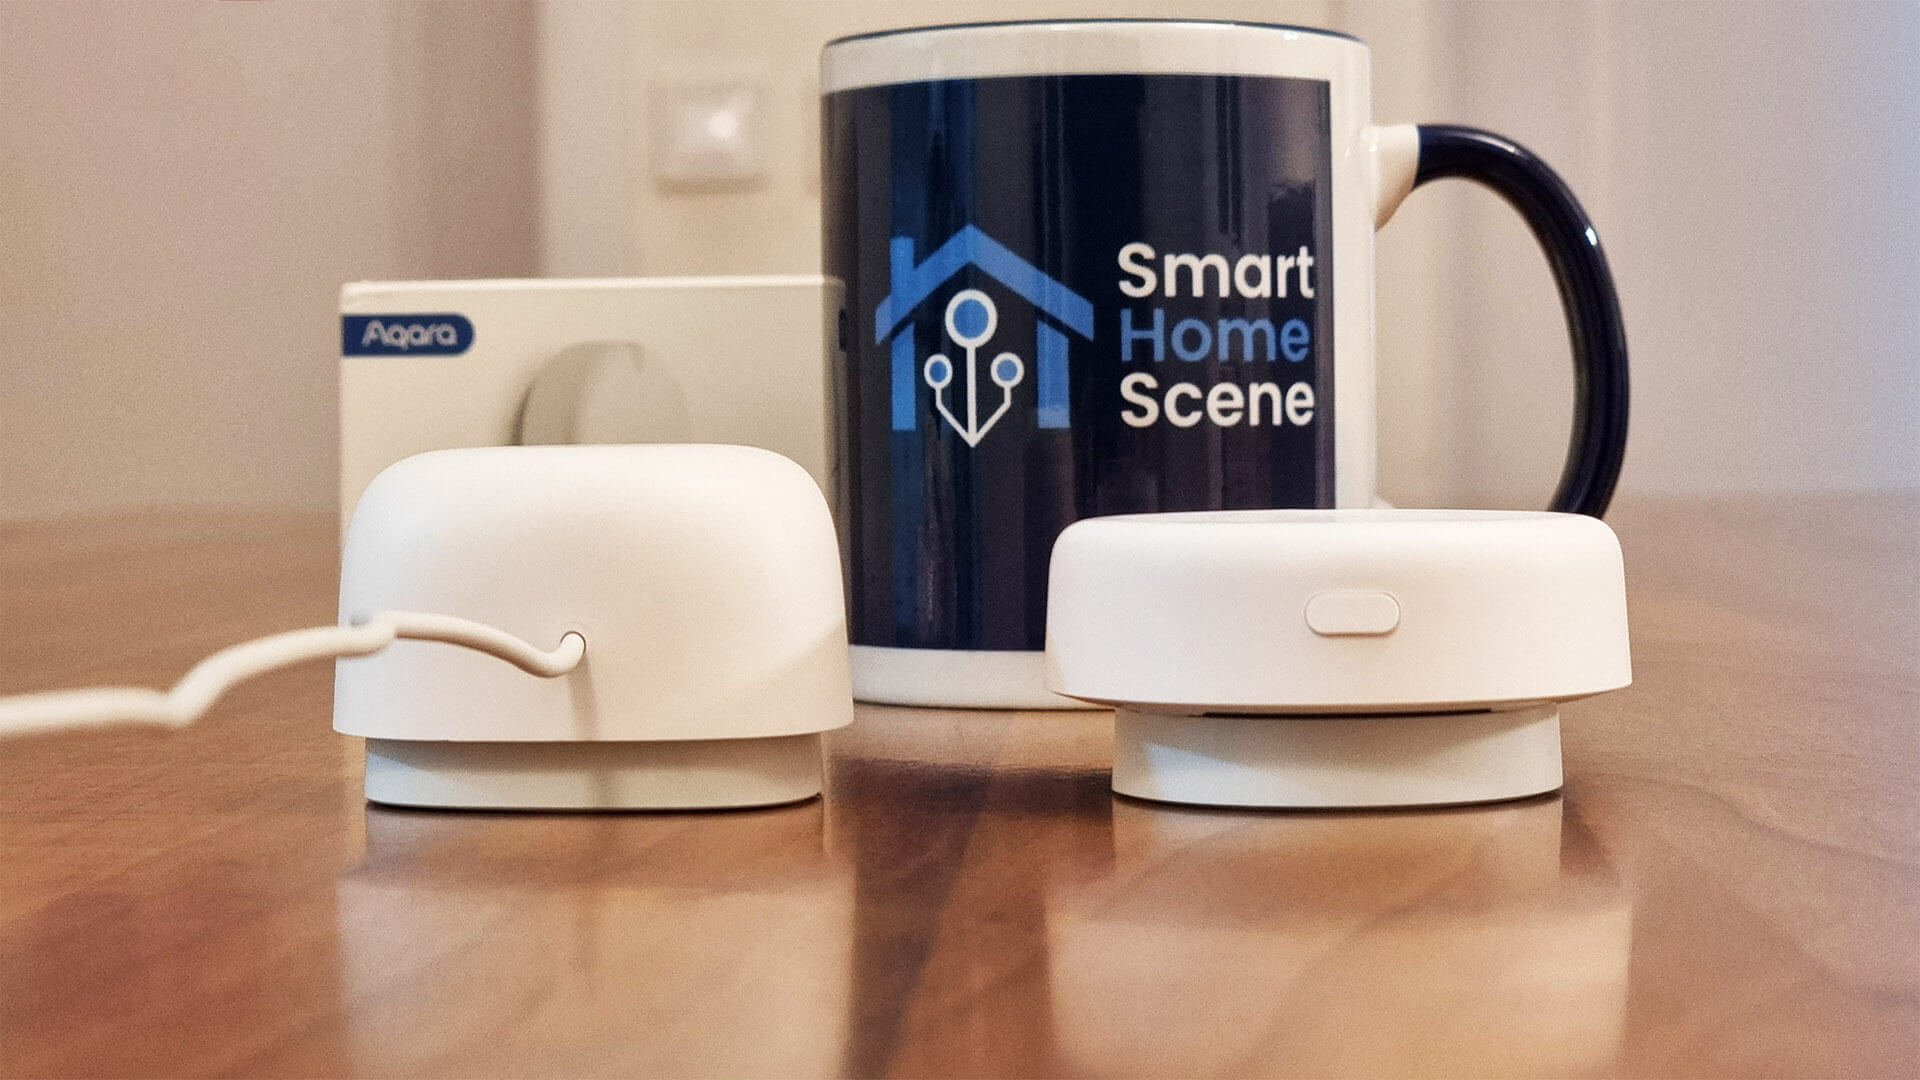
One advantage the FP1 has over it’s successor is that it’s swivel rotates for a full circle or 360°. While the FP2 still has a versatile mounting swivel with a powerful magnet, it does not rotate at all. Here is an image showing the logo upside down because it can’t be rotated.
It’s important to note, the Aqara Home App has a setting which you can tweak and tell the sensor it’s currently upside down! This avoids confusion and errors while it’s detecting presence. 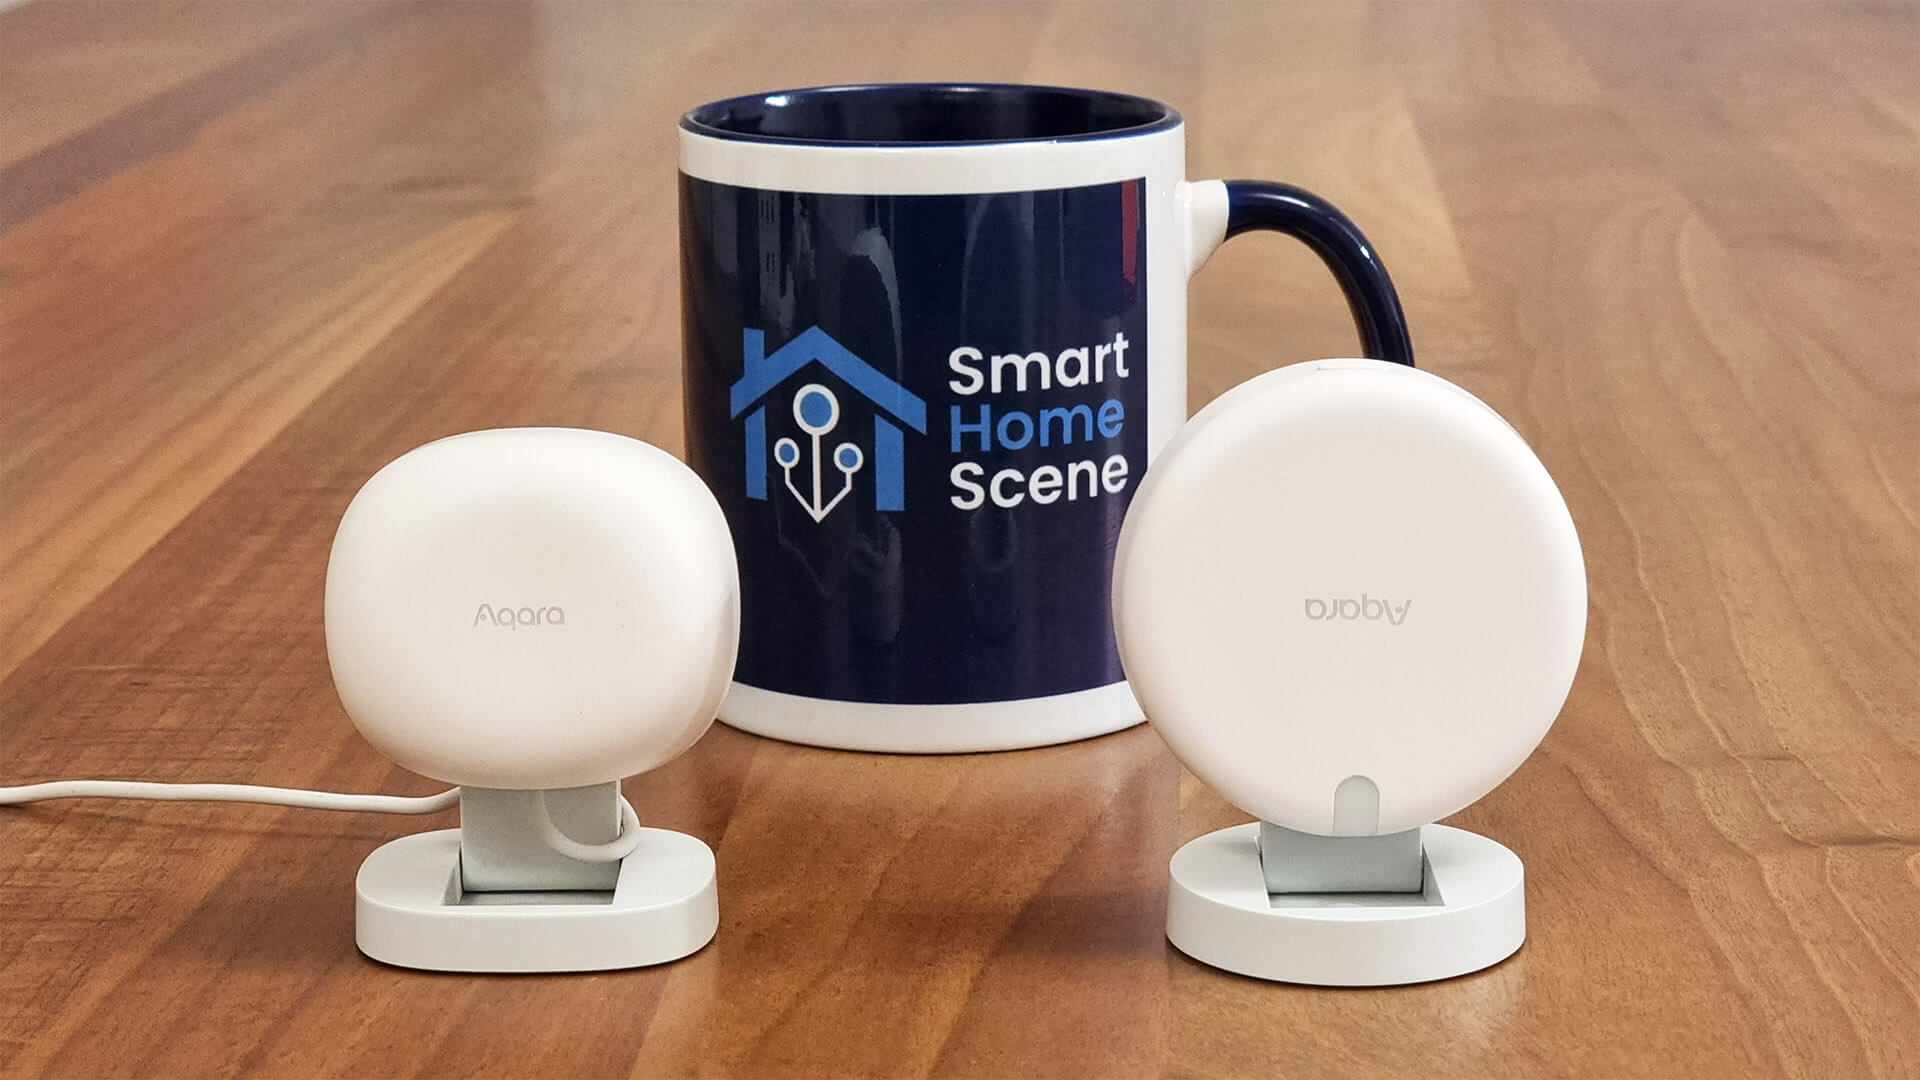
Flipping them for a back view, you can see the pairing button on the FP1 is behind it’s magnet base. The FP2 has a pairing button on the bottom front of it’s case. Both cases are held together by 4 screws, with the FP2 also having protective caps over the screws.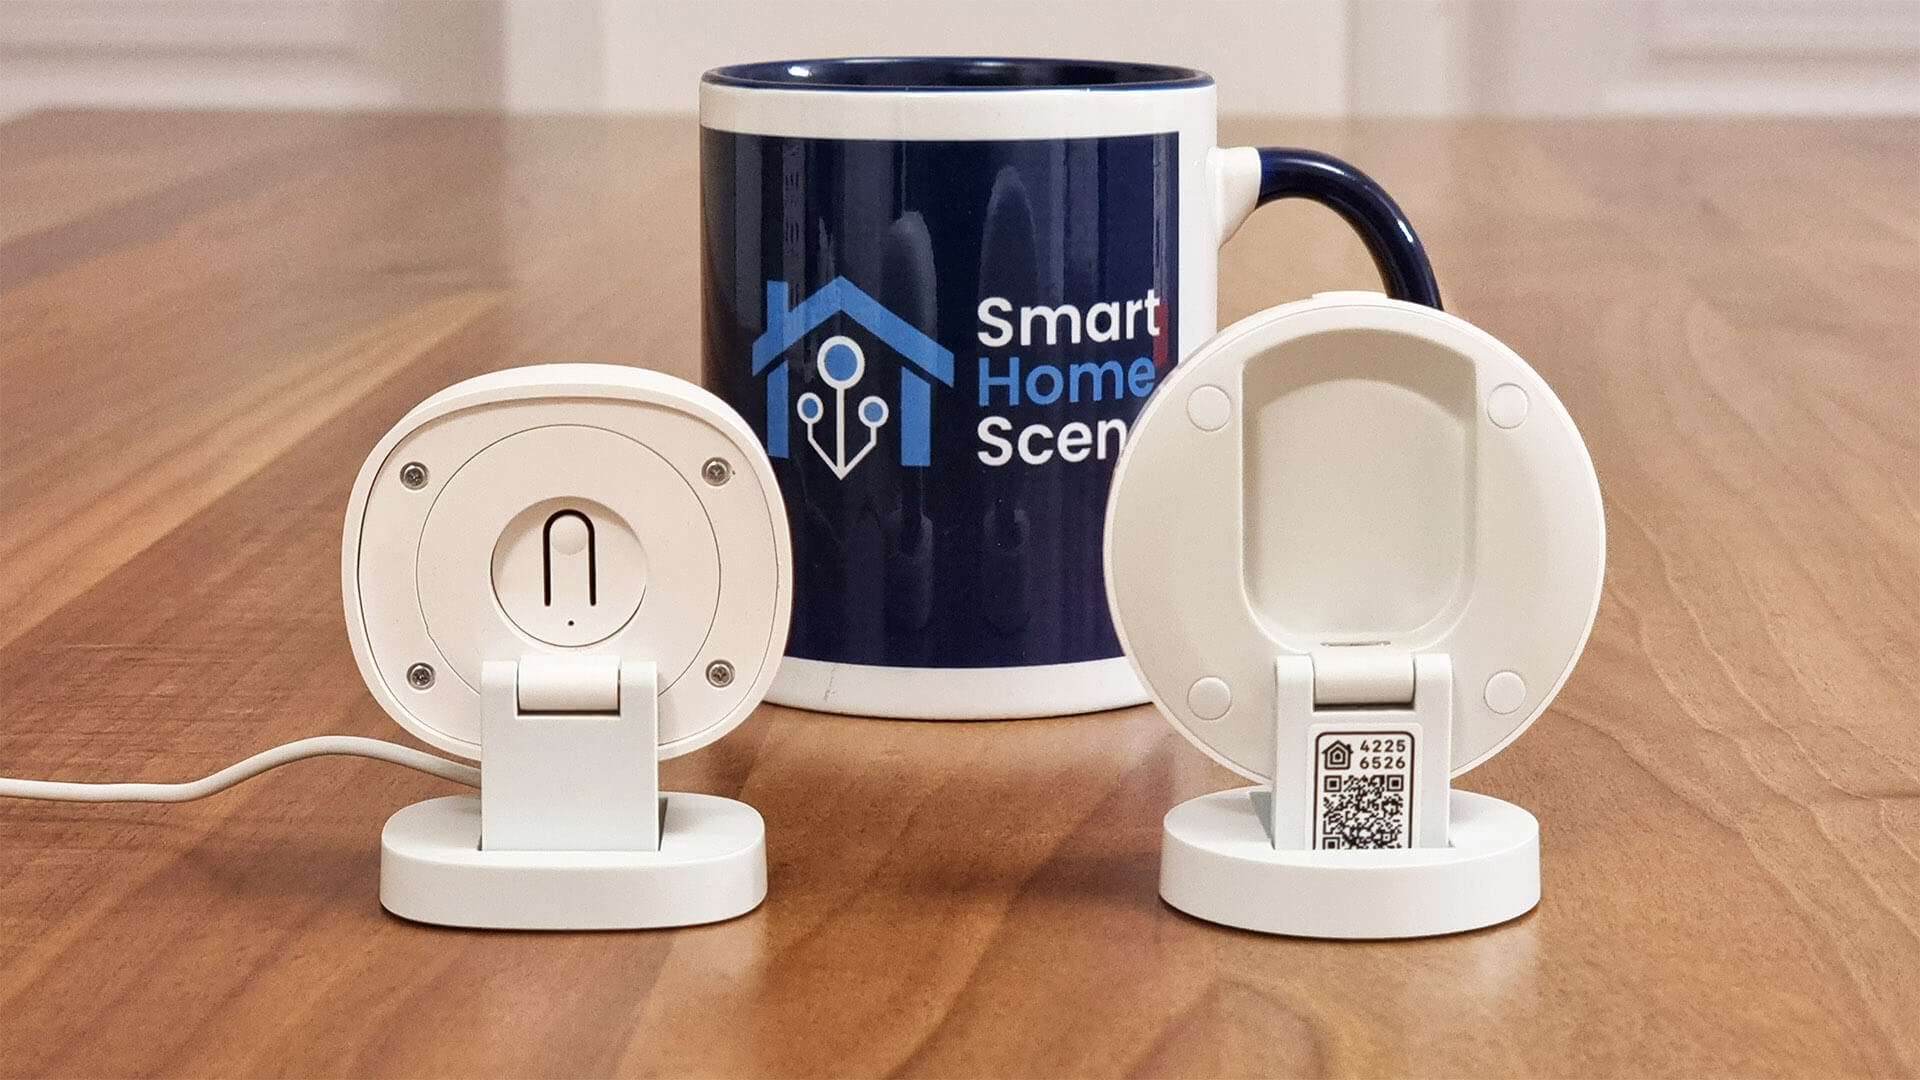
From the side, you can see how the magnetic swivels extend allowing you to achieve a more flexible mounting position. Even though the FP1 can be rotated, I don’t feel like the FP2 is limited in any way by not having a rotating swivel.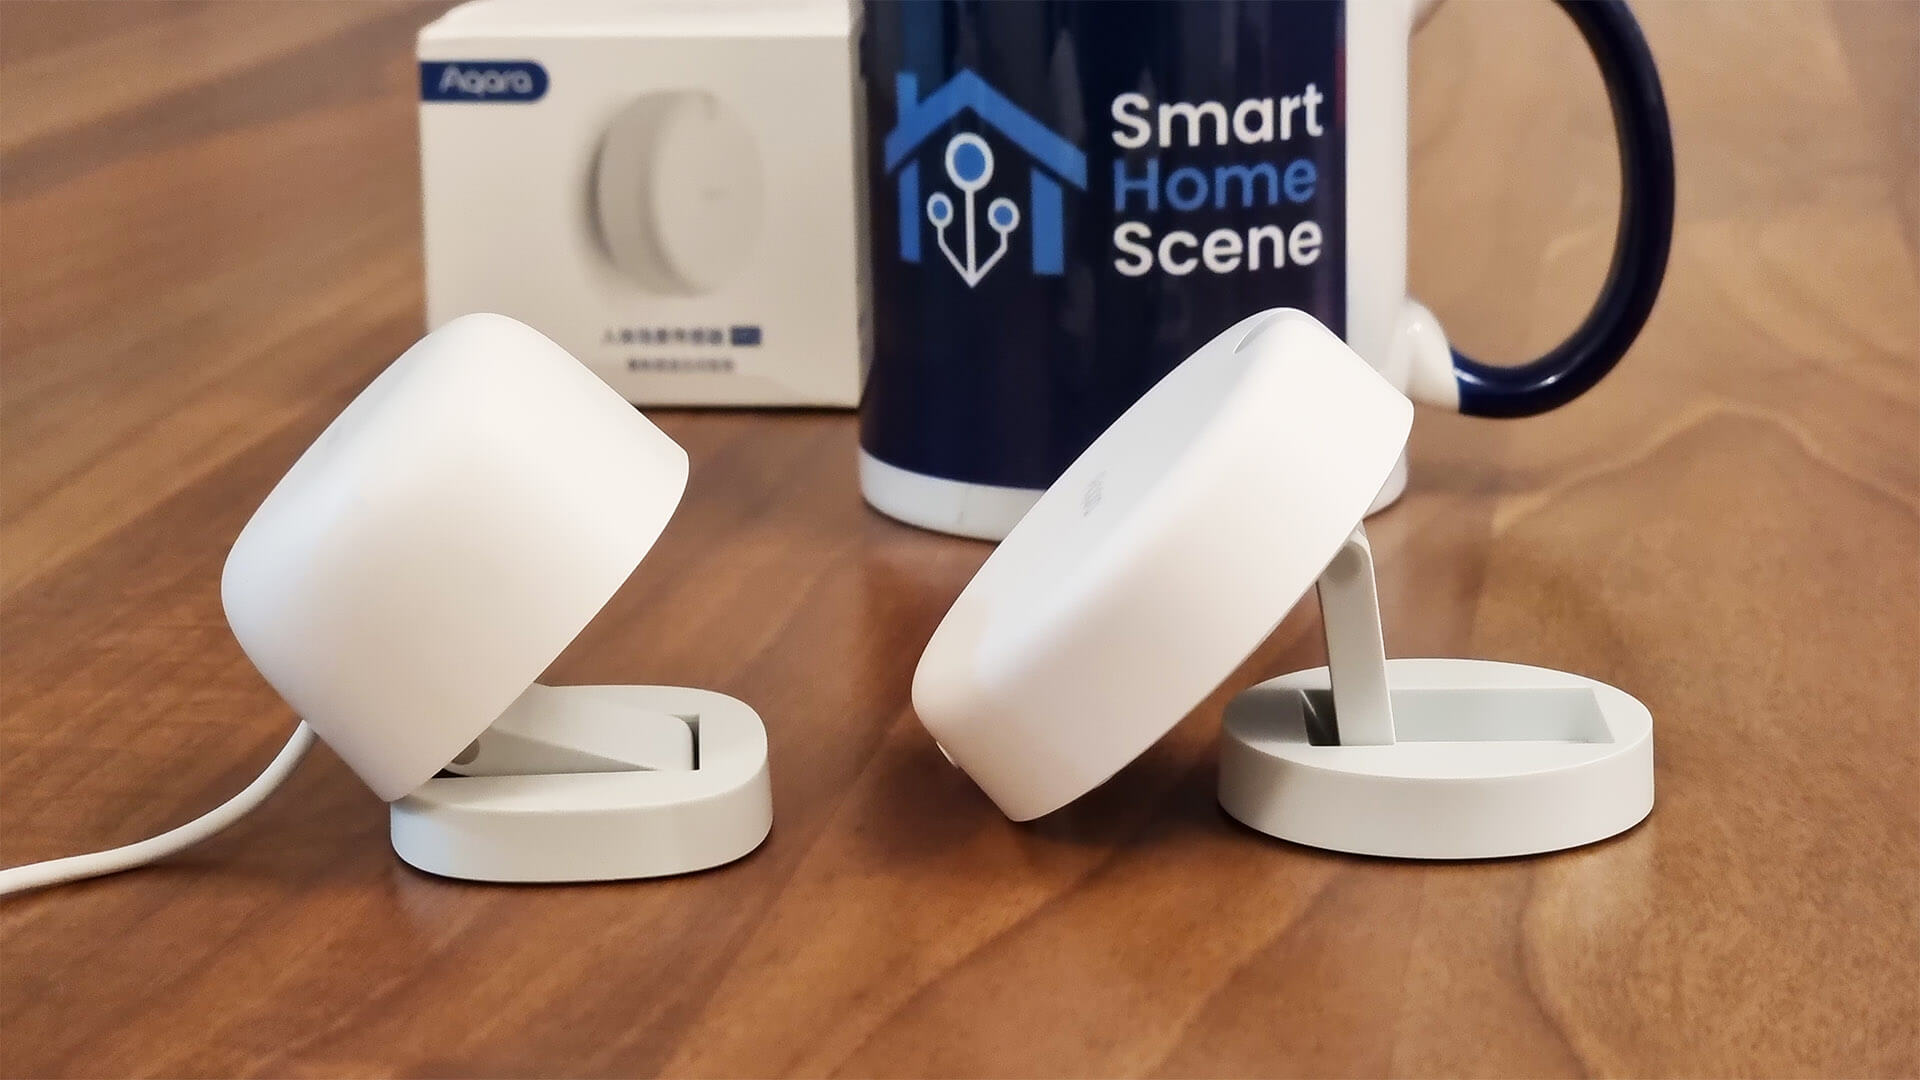
Technical Specs and Features
When it comes to their technical specification and features, the most obvious difference is the connectivity. The FP1 is a Zigbee-based presence sensor, while the FP2 relies on Wi-Fi like I mentioned earlier. Here is a summary in a simple table:
Aqara FP1 RTCZCGQ11LM
- Connectivity: Zigbee 3.0
- Adapter Input: 100- 240VAC, 50/60Hz, 0.2A
- Adapter Output: 5V1A
- Cable Type: Non-detachable USB-A
- Cable Length: 2m
- Working Temperature: -10~40 degrees C
- Working Humidity: 0~95% RH, no condensation
- Mounting Base: 360° rotating magnetic swivel with included sticker and screws
- Sensor Type: 60GHz mmWave Radar
- Sensor Model: XENSIV™ BGT60TR13C
- Sensor Manufacturer: Infineon, Germany
- Detection Angle: 120°
- Detection Distance: 5m
- Detection Modes: Undirected, Left-Right side monitoring
- Detection Zones: 7×4 grid
- Matter Compatibility: No
- Ecosystem Compatibility: Amazon Alexa, Google Home, Home Assistant
Aqara FP2 RTCZCGQ12LM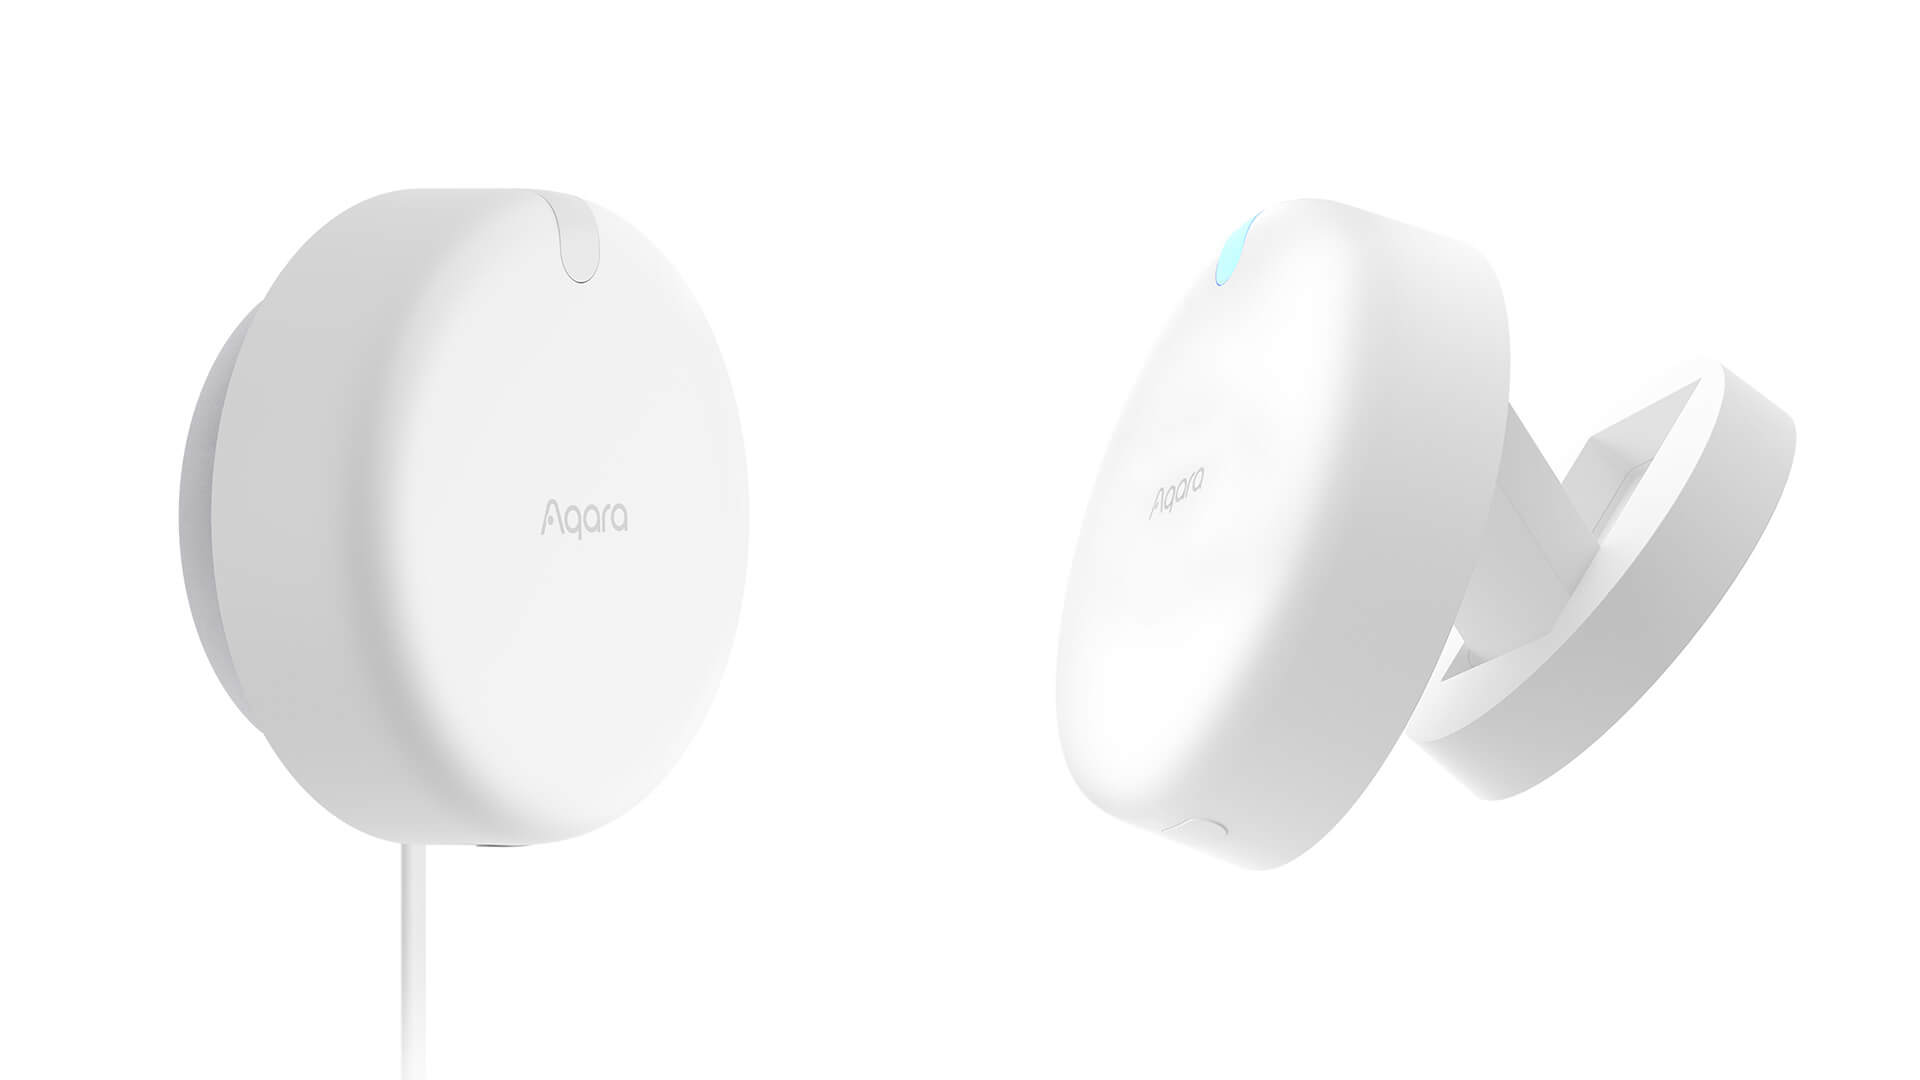
- Connectivity: Wi-Fi + Bluetooth
- Adapter Input: 100- 240VAC, 50/60Hz, 0.2A
- Adapter Output: 5V1A
- Cable Type: USB-A to USB-C
- Cable Length: 2m
- Working Temperature: -10~40 degrees C
- Working Humidity: 0~95% RH, no condensation
- Mounting Base: Non-rotating magnetic swivel with included sticker and screws
- Sensor Type: 60-64GHz mmWave Radar
- Sensor Model: IWR6843
- Sensor Manufacturer: Texas Instruments, USA
- Detection Angle: 120°
- Detection Distance: 6-8m
- Detection Modes: Static presence detection, multiple people tracking, falling detection
- Detection Zones: 20×16 grid
- Matter Compatibility: Yes, with an update
- Ecosystem Compatibility: Apple HomeKit, Amazon Alexa, Google Home, Home Assistant
Performance
Benchmarking performance between the Aqara FP2 and it’s predecessor was not really fruitful because the FP2 is superior in every sense of the word when it comes to it’s sensor capabilities. I tested a few triggers though, just for anyone interested in detection and clearance times, and here is a summary:
Aqara FP1
- Presence Detected: 5 Seconds
- Presence Detected with presence_event hack is around 0.5 seconds
- Presence Cleared: ~5 seconds
Aqara FP2
- Presence Detected: Instant
- PIR sensor combinations are not needed with the Aqara FP2
- Presence Cleared: ~1 seconds
What’s great about the Aqara FP2 is that combining the device with a PIR motion sensor for instant triggers is not necessary anymore. The detection is instant as soon as you appear within it’s sight.
Price
When it comes to price, naturally the Aqara FP1 is cheaper than it’s successor. The real question is, is the FP2 worth it’s price tag of $82.99? Obviously, that’s up to you to decide.
- Is multi-person detection something you need or want?
- Is native HomeKit and Matter support important for your setup?
- Is cloud dependency okay with you, perhaps until the FP2 is completely jailbroken?
I feel like the Aqara FP1 is still a capable mmWave presence sensor, if implemented correctly. Better yet, the Tuya ZY-M100 is an incredible alternative at a really low price. I may be biased, because I love local communication (Zigbee) and don’t really like to depend on Wi-Fi for these types of devices. The choice is yours.
If you decide to buy the Aqara FP2, it’s official release date is 20.04.2023 and can be bought on Amazon. Here are a couple of affiliate links for both sensors, from which you support smarthomescene.com directly at no additional cost to you.
Aqara FP1 Human Presence Sensor – $49.99
![]()
AliExpress | AliExpress | AliExpress | AliExpress![]()
United States | Canada | United Kingdom
Germany | Netherlands | Sweden | Spain
France | Italy | Poland | Australia
*If links fail to open, try disabling your AdBlocker.
Aqara FP2 Human Presence Sensor – $82.99
![]()
AliExpress | AliExpress | AliExpress![]()
United States | Canada | United Kingdom
Germany | Netherlands | Sweden | Spain
France | Italy | Poland | Australia
*If links fail to open, try disabling your AdBlocker.
Summary
I am pleased with the performance and capabilities of the Aqara FP2 Human Presence Sensor. I did not expect a company to listen to it’s consumers, but apparently Aqara did, at least to an extent.
To get optimum performance from the FP2 along with all it’s features, you are bound to their app, at least for now. Like the FP1, additional tweaking, positioning and extensive testing is going to be needed for avoid any issues the FP1 had, like false positive and negative triggers.
An early adopter reported in the community forums that the FP2 sometimes gets stuck in presence detected, just like the FP1 did. Digging through the app, there is a setting to reset it’s presence status if it does get stuck. I did not encounter such issues though, for the the sensor performed very accurately.
Additional settings available in the Aqara Home App, such as changing orientation setting (when the sensor is installed with the logo upside down) make it so the device operates without obstacles. During testing, if I flipped the sensor on it’s face on my desk, the app prompted me that “The current installation mode does not correspond with the monitoring mode”, telling me to install it vertically.
I fully intend to deeply test the Aqara FP2 in the future with Matter support, benchmarking everything it has to offer.


Hi,
thanks for the review. What I would like know:
What happens when you use the app to create more scenes/entities to use with the HA homekit integration and then put the device in a local wifi without internet access? Does it work using local HA without the cloud?
Also, with cable powered smarthome devices I would love to see power consumption measurements in reviews. There are people saying “1-2 Watts here and there is no problem” but with 30+ devices running 24/7/365 this is adding up quickly and electricity is quite expensive in some countries of the world.
Hello,
I’ve added a paragraph explaining this behavior:
NOTE: If you remove the Aqara Home App after setting your detection zones, the Aqara FP2 will still work without the app with Home Assistant via the HomeKit Controller Integration. Everything you’ve preconfigured will be functional and working, so you do not actually need the app after the initial deployment of the sensor. You will need it again if you want to edit zones and tweak settings.
UPDATE 24.04.2023: Aqara has released a new firmware update 1.1.6_0005.0025 which enables local control. The FP2 can now be used without an internet connection, hub, or app dependence in Home Assistant after it’s initial setup.
Cheers
Thanks a lot! 🙂
Excellent review! Awesome to hear about the update allowing local control.
Multiperson positioning is certainly very interesting, have you imagined any use cases?
Thanks for the early review.
I think one of the most important things is that now it’s possible to hide the cable behind the device which isn’t possible with the FP1 and a reason why I didn’t want to really use it. I want a professionally installation with hidden cables – now I can effectively ceiling mount this device and hide the cable in the loft – fitting one in each room.
Local use is important to me for speed and reliability. You said if connected with Homekit you don’t need the app – but I assume it still needs internet connectivity and it isn’t working on the device with the zones setup and then communicating directly to HA or Homekit is it? Or is it? Will this change when Matter comes along too? I don’t mind setting it up in the app (like you do with Philips Hue) at all if it’ll then working over LAN rather than WAN.
Hello Dan,
UPDATE 24.04.2023: Aqara has released a new firmware update 1.1.6_0005.0025 which enables local control. The FP2 can now be used without an internet connection, hub, or app dependence in Home Assistant after it’s initial setup.
Cheers
thanks for the walk through but im not able to add mine to HA after initial setup. When i choose HomeKit Controller i only see HASS Bridge and not the sensor. any advice?
Hello,
You need to put the device in pairing mode before it can be added to the HomeKit Controller Integration.
Hold the button until the LED starts blinking.
Cheers
Hi, tank you for the interesting review.
One question, how does it work in case of radiant floor heather?
I assume that a heather can be manager (excluding the area), buy what about an entire heating floor, with a 32°C temperature, so very close to the 36°C human body temperature?
I am not sure I understand you question correctly. But if you are asking me would a floor heater cause false positives triggers, the answer is no, it would not.
Great review, thanks! Couple of questions: 1) can the sensor ‘look’ through a (dry)wall or a wooden door (with glass)? 2) what objects/materials interfere with the detection, like washing machine/dryer/fan/pets/arcon/etc etc? 3) did you notice any false positives? 4) what is the maximum length for solid detection, like sitting/laying still on a couch? 5) when used in HA (after fully setting it up), does it then work locally or is there still a Chinese cloud connection?
Hello Roger,
1. The sensor can look through drywall or glass and detect motion
2. Interference sources can be anything that moves, good thing is you can exclude the area from detection in the app
3. No false positives for me, as I’ve excluded a fan in my room
4. The maximum length seems to be about 5 meters in my tests
5. After the latest firmware update, the device can be used completely locally.
Cheers
Absolutely Spot on Review! I purchased through your link immediately after your post went up. I’ve gotten it installed with some basic automations with 3 zones, and it all just WORKS. I even have it ignoring a ceiling fan right above it with an interference zone.
Keep up the great work! Awesome device.
Thank you for the support friend <3
Can you re link the AliExpress seller. The link provided goes nowhere. Impossible to buy the FP2 in Australia. Thanks.
Try this link, they keep changing
Edit: This one is $79. Short window for ordering though, as they remove them continiously and reappear after a while
Do you have a new link to the AliExpress seller?
Try this link, they keep changing
Edit: This one is $79. Short window for ordering though, as they remove them continiously and reappear after a while
137 dollars incl VAT. Jeez.
This one is $79. Short window for ordering though, as they remove them continiously and reappear after a while
For now, thank you for your guidance.
Unfortunately, there is one point where I can’t get any further…
When integrating using the “Homekit controller”, the FP2 sensor is not displayed. But I just can not find the error.
I have reset the FP2 and it flashes diligently. Do I have to set up anything else in HA?
Yes, the actual Homekit Controller Integation it it’s not auto-discovering the device.
Does it not show up?
Is there also the ability to get the body position in Home Assistant? For example sitting, laying, standing?
My use case would be detecting if there are 2 persons in bed and trigger an auto ation if they lay down. might be that location is sufficient.
No, it will not be able to report two separate people in a single zone in Home Assistant. Presence will be triggered with one or two, so it’s the same result.
You can however (if applicable), create separate zones and push them to Home Assistant as separate entities.
Hi great review, just discovered your site. Now that the firmware allows for local control is it possible to set up zones in HA without using the app or is the app still required for zoning?
At this point no, it’s still not possible.
And I’m not sure it will ever be. This requires some serious development, and another custom and more capable integration.
Still via the app, although this has improved. I would also never set up the zones via the HA, as in the best case you are on the move with your mobile phone, and the mobile phone is also better for making fine adjustments later on. The only thing that needs to be improved is the map view if you have placed the thing in the 90 degree corner and the tiles could be more filigree in the setting. I have installed 6 of them and am 99.8% 🙂 satisfied 🙂