Those who follow smarthomescene.com, already know the dominant communication protocol mentioned here is Zigbee. Almost every device I review tends to be Zigbee or open-source Wi-Fi (ESP Boards).
My networks are based on the Sonoff ZBDongles, especially the EZSP version working with Zigbee2MQTT and ZHA. Even though it’s marked as experimental in Z2M, they have performed well in my testing and development setup.
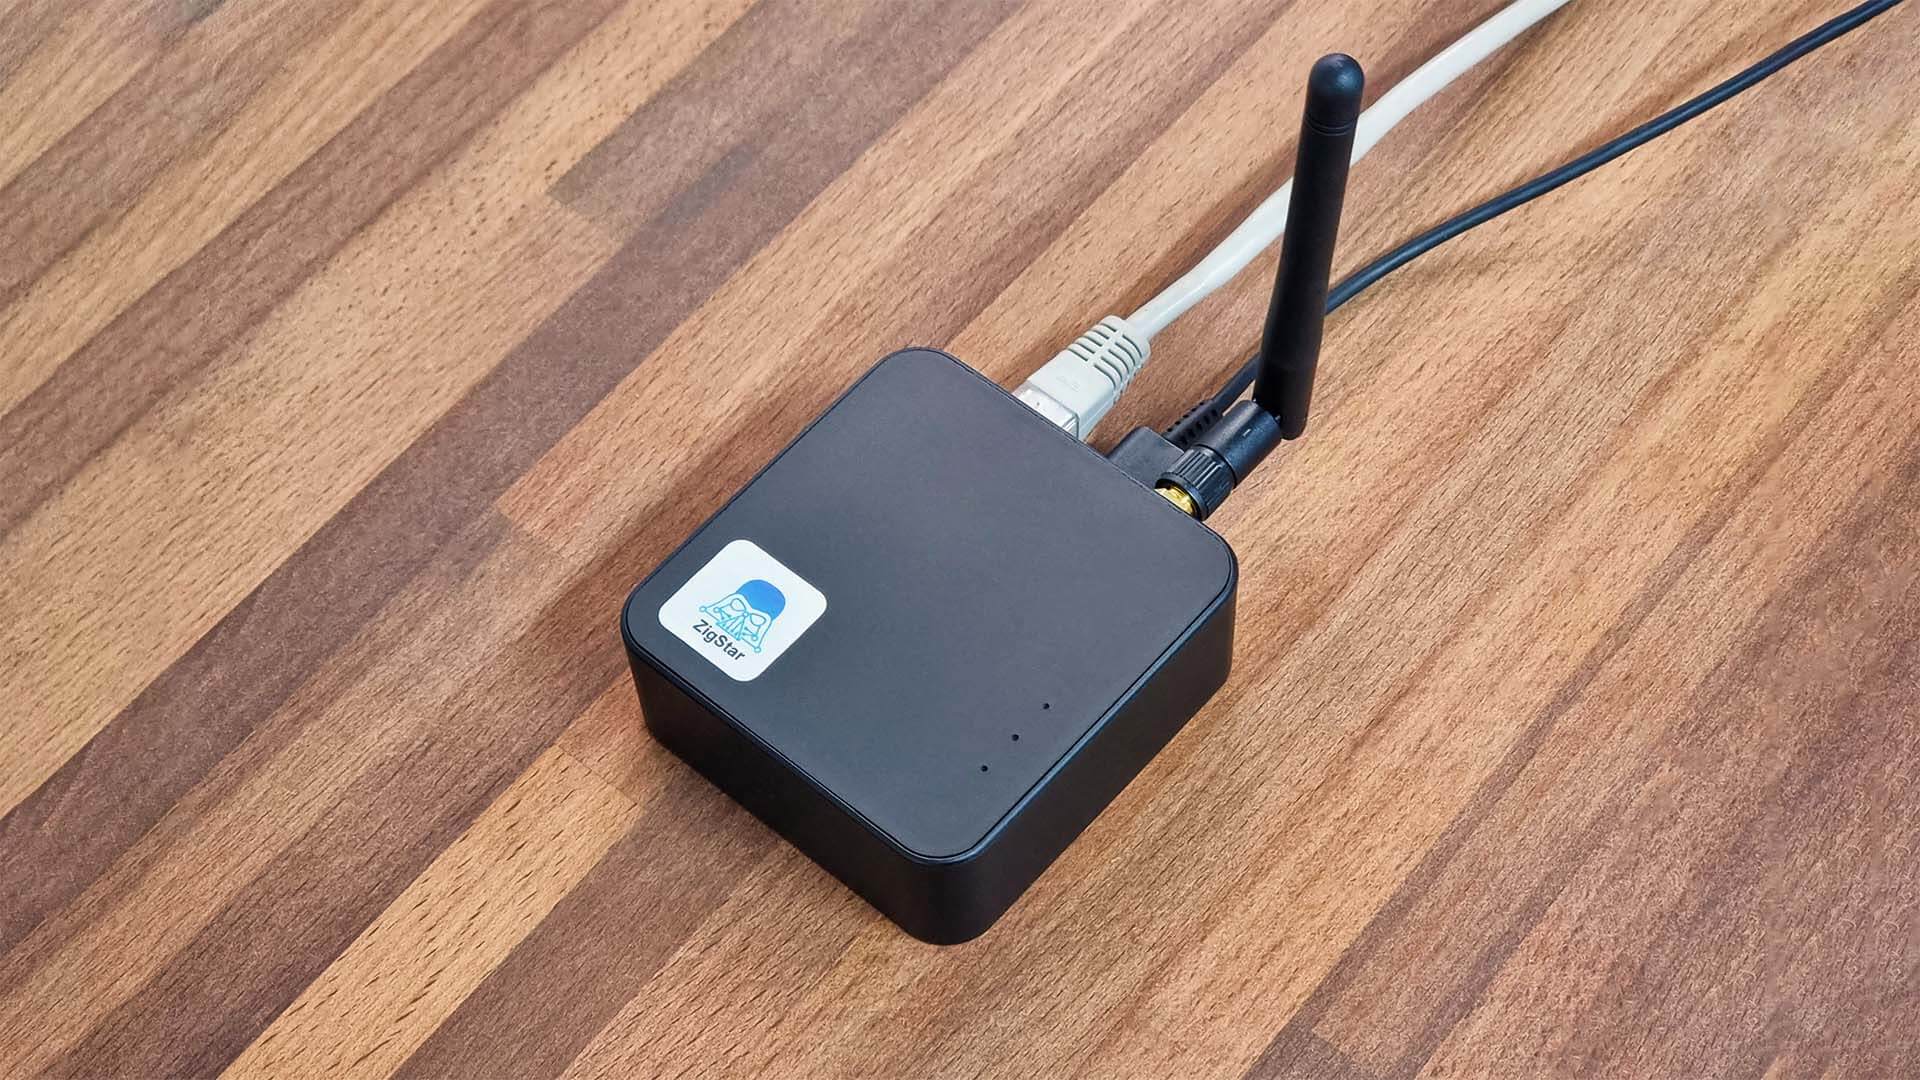
The ZigStar UZG-01 I am testing in this article is a hybrid Zigbee coordinator, which can work over USB, Wi-Fi or LAN. You can also choose to power it over USB-C or Power-over-Ethernet (PoE). This was sent to me by Radu from the ZigStar open source and DIY project. You can get it on Tindie or Elecrow.
Technical Specification
- Power: USB-C or PoE 802.3af
- Zigbee: USB, Wi-Fi, LAN
- Zigbee Role: Coordinator or Router
- Chips: ESP32, LAN8720, CH340C
- TI CC2652P2 with +20db amplifier
- TI CC2652P7 with hardware revision v0.2+
- DIY Pinouts: Yes
- Indicator LEDs: Blue (Power), Red (Working mode), Yellow (Connection)
- Size: 73x72x27mm
- Update: Yes, over LAN/Internet/USB
Disassembly
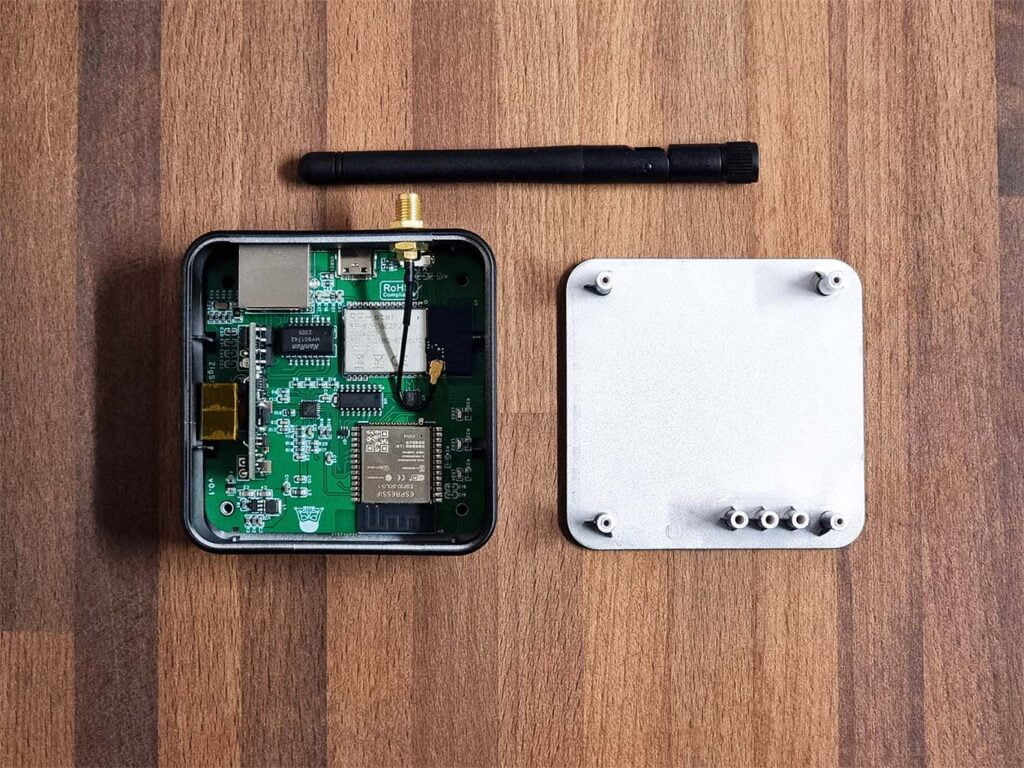
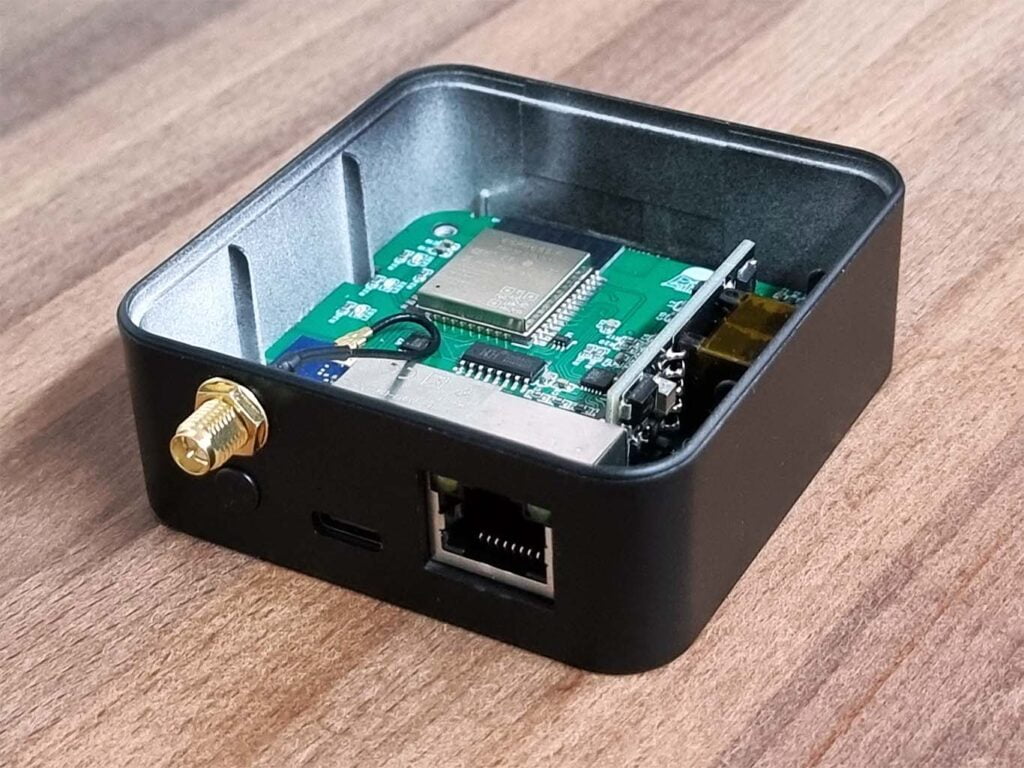
The ZigStar UZG-01 is held together by 4 screws on bottom of the case which is produced by a factory in China. The other 3 holes are used by the onboard LED indicators. The 20dBm antenna uses a standard SMA connector, which you need to screw in place before using.
Since the UZG-01 is a hybrid coordinator, it has a LAN/PoE port as well as a USB-C port. You can basically choose between using the LAN or USB-C port for connectivity and power, or power it via USB-C and use it via LAN/Wi-Fi.
The button can be used to power cycle or reset the device, as well as quickly change operation modes.
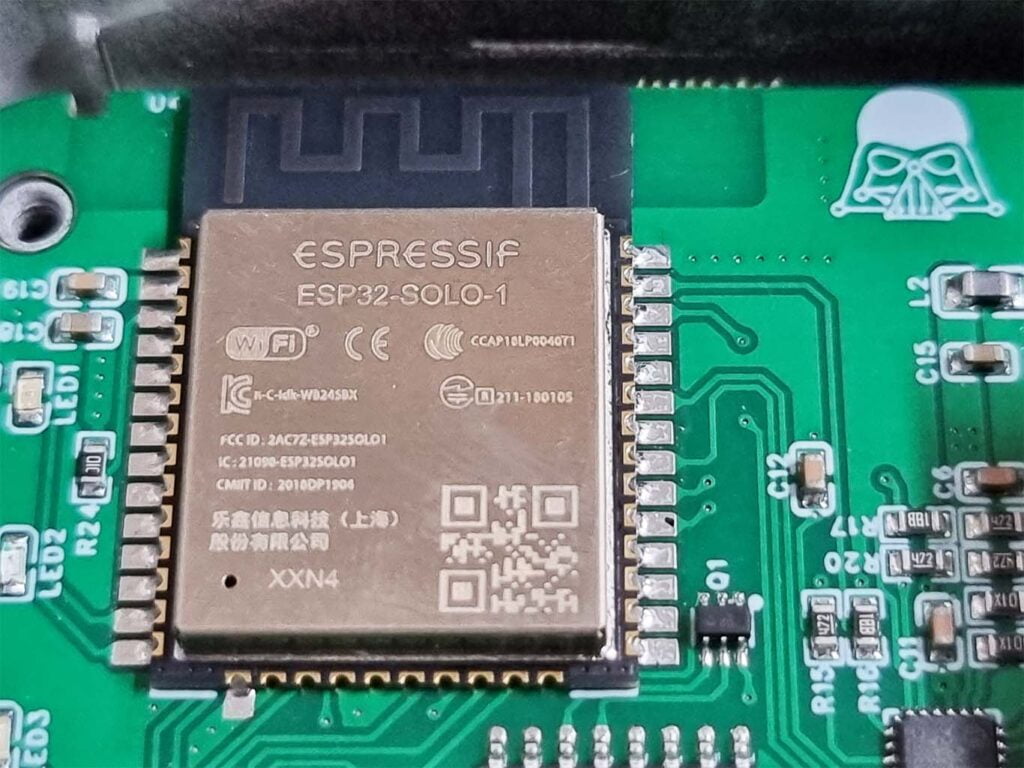
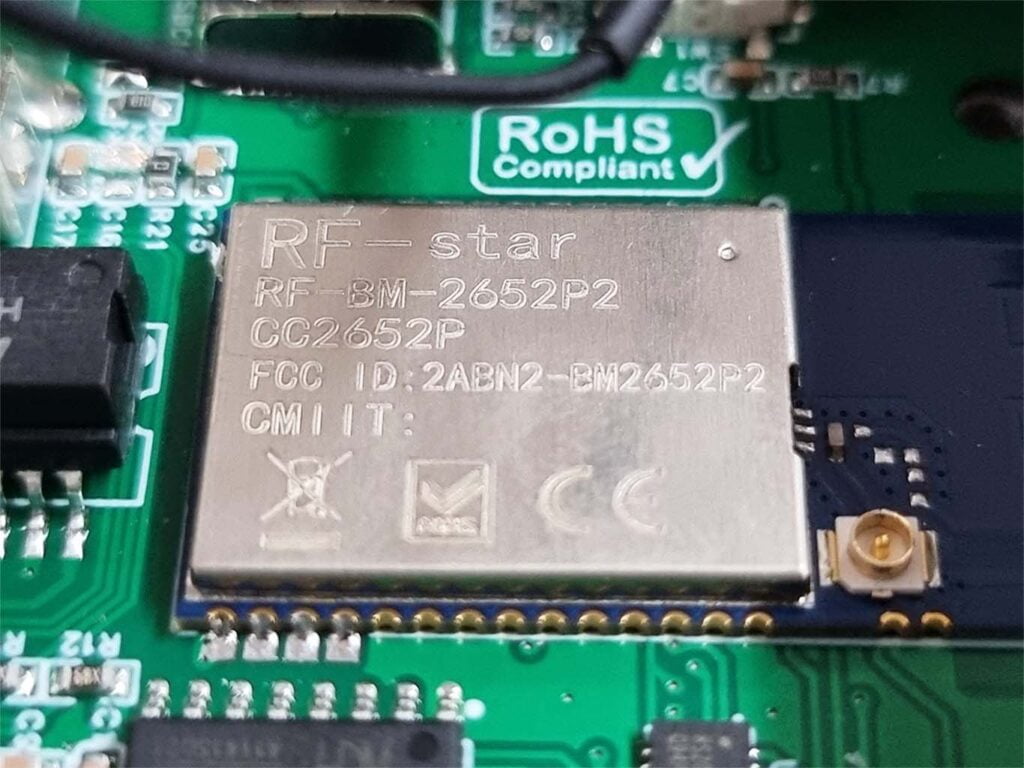
Zooming into the main communications modules on the PCB, my sample of the ZigStar UZG-01 uses an ESP32-SOLO-1 [Datasheet] board to handle Wi-Fi connectivity, operation logic and add processing power to the device. From v0.2 and above, the board ships with the better ESP32-WROOM-32E [Datasheet]
Zigbee communication is handled by the Texas Instruments CC2652P2 [Datasheet] chip with a 20dBm antenna, however if you were to order the UZG-01 now it will ship with a better chip – the CC2652P7 [Datasheet] which can handle up to 300 devices in a direct connection.
Updating the firmware
The ZigStar UZG-01 dongle uses the official Z-Stack firmware by Koenkk, the developer behind Zigbee2MQTT. So it’s a good idea to update the device before deployment, it’s probably outdated since it was pre-flashed when assembled. There are two main modules than can be flashed and updated:
- ESP32:
- Controls Power, Ethernet, Wi-Fi, LEDs and additional systems
- Uses the Official UZG Firmware
- CC2652P:
- Controls the Zigbee network
- Uses the Official Z-Stack Firmware
Both of these can be flashed remotely, over a LAN connection by accessing the web dashboard or with an USB-C cable. I’ve chosen the simplest and least error prone update methods for the ZigStar UZG-01, although there are more ways you can flash the ESP32 and CC2652P chips.
Updating the ESP32 Chip
To flash the latest UZG firmware, connect the coordinator to your network with a LAN cable and power it up. You can use PoE or an USB-C cable for power, just make sure the blue LED turns on. Access the IP Address of the device in your web browser (e.g. 192.168.0.26), you can find it in your router’s DHCP list:
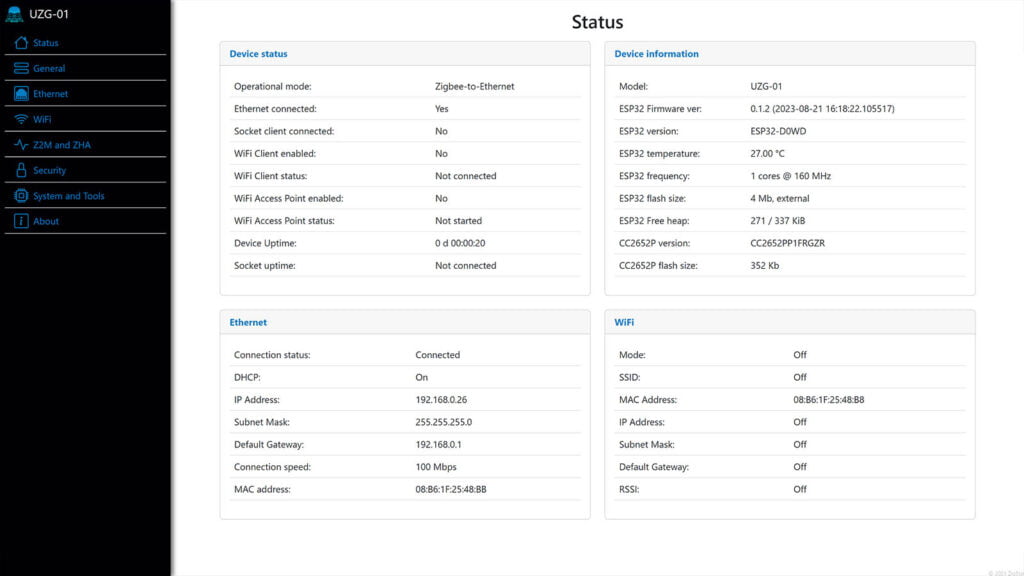
Note the ESP32 Firmware version under Device information, you are going to want to verify that the device has actually updated once the process finished. Continue to:
- Download the latest firmware from the UZG-01 repository
- File UZG-01.bin
- Access the web dashboard in your browser e.g. 192.168.0.26
- Click System and Tools
- Click System Tools tab at the top

- Click Choose file… and select the UZG-01.bin file you downloaded
- Click ESP32 OTA Update
- Wait for the process to finish and the device to reboot
- Confirm the ESP32 firmware version
- Done!
Updating the CC2652P Chip
The CC2652P chip can be updated via the official Home Assistant Add-on effortlessly and natively within HA. Because I haven’t actually deployed the ZigStar UZG-01 Coordinator, I will flash the firmware using the official ZigStar Multi tool via LAN Cable:
IMPORTANT: Before you continue, you need to identify the correct version of the CC2652P chip. First generation uses the CC2652P2 chip, while the new and latest hardware revision V0.2+ is based on the CC2652P7. In the web dashboard, look under Status > Device Information:
- Model: UZG-01
- Use firmware with a tag “..launchpad_coordinator_”;
- Model: UZG-01 v0.2+
- Use firmware with a tag “CC1352P7”;
Or you can unscrew the case of the coordinator and look at the chip model.
- Download the latest release of ZigStar Multi Tool
- File ZigStarGW-MT-x64.exe.zip
- Download the latest Z-Stack Firmware
- CC2652P2 – CC1352P2_CC2652P_launchpad_coordinator_20230507.zip
- CC2652P7 – CC1352P7_coordinator_20230507.zip
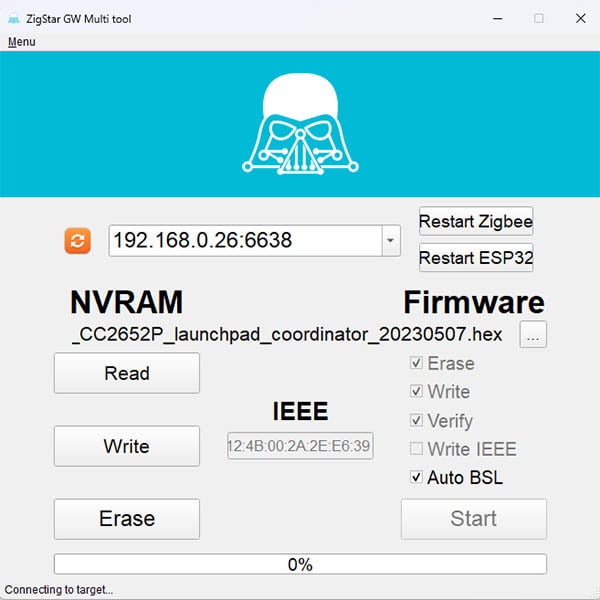
- Start the ZigStart Multi Tool
- The tool will autodetect the IP and Port of the UZG-01
- If it does not, input it manually: e.g.
192.168.0.26:6638(default port) - You can find the IP and Port in the web dashboard
- If it does not, input it manually: e.g.
- Extract the firmware
.zipyou downloaded - Click
...and select the firmware file in.hexformat - Check the
Erase, Write, VerifyandAuto BSLboxes - Click Start
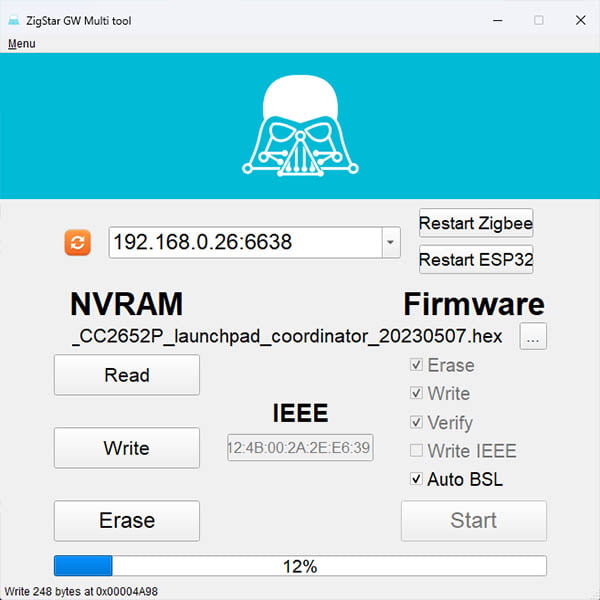
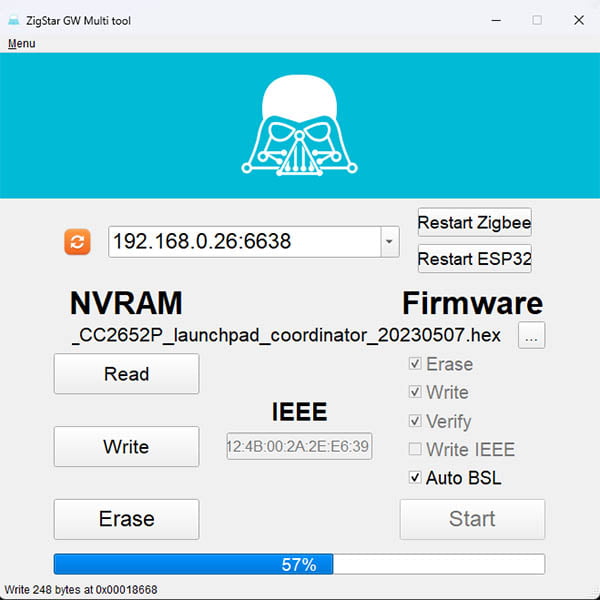
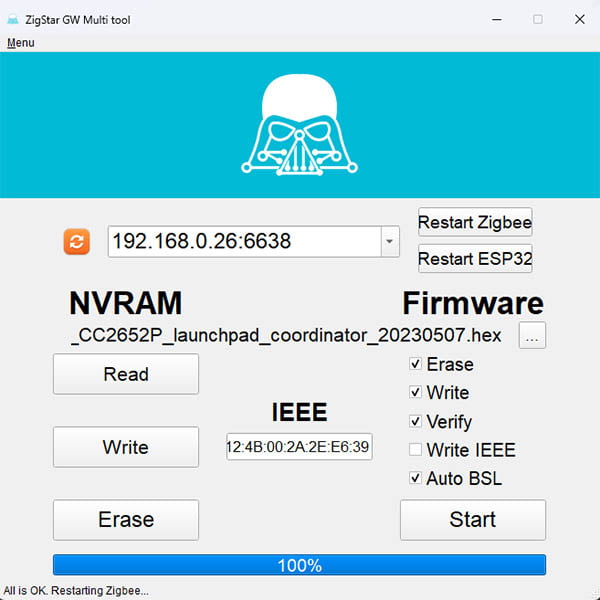
The whole process takes around 6-8 minutes, when you see the All is OK. Restarting Zigbee… at the bottom status bar of the multi tool, you can close the program and continue to deploy the UZG-01 as your coordinator.
Home Assistant Integration
The ZigStar UZG-01 PoE coordinator works with both ZHA and Zigbee2MQTT in Home Assistant. For the purpose of this guide, I am going to configure it in both integrations as a LAN coordinator and not USB.
Zigbee2MQTT
To configure Zigbee2MQTT, I needed to edit it’s configuration.yaml file. Since Z2M is running as an Add-on in Home Assistant, this can be done in the add-on settings too. Assuming your MQTT broker is setup, Navigate to Settings > Add-on > Zigbee2MQTT > Configuration. Add the following at the end (edit to match your IP and Port):
mqtt:
  base_topic: zigbee2mqtt
  server: mqtt://core-mosquitto:1883
  user: SmartHomeScene #MQTT Username
  password: somepassword #MQTT Password
serial:
  port: tcp://192.168.0.35:6638 #Change IP and Port
  baudrate: 115200
advanced:
  transmit_power: 20
If you did everything correctly, you can now pair devices to the UZG-01 coordinator. When you navigate to Settings > About in Zigbee2MQTT, you will notice it’s running the latest Z-Stack firmware:

If you are having issues and the add-on won’t start, you might need to make Zigbee2MQTT regenerate the network pan_id, network_key as well as ext_pan_id. Stop Zigbee2MQTT if it’s running and add this to it’s configuration.yaml file:
advanced:
  pan_id: GENERATE
  ext_pan_id: [0x01, 0x02, 0x03, 0x04, 0x05, 0x06, 0x07, 0x08]
  network_key: GENERATE
ZHA
With the ZigStar connected to my LAN network, I managed to add it as a coordinator to a ZHA network. Since this is a development and testing instance, I erased all settings left by previous dongles.
In Home Assistant, navigate to Settings > Devices & Services > Add Integration > Zigbee Home Automation:
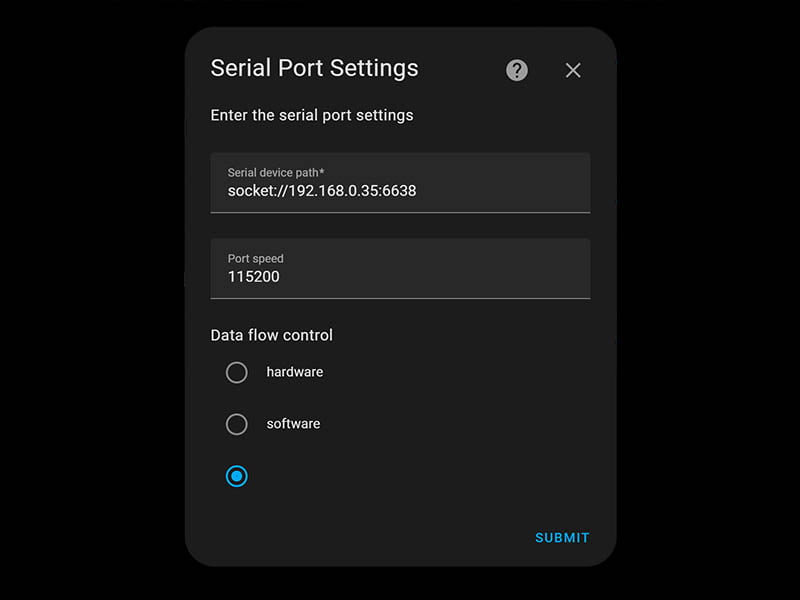
socket://IP:PORTLeave port speed at
115200Leave data flow control undefined
The IP Address and Port can be changed in the web dashboard of the ZigStar UZG-01 if needed. Whatever IP address you choose, remember to always reserve it in your router’s DCHP settings.
Migrating network without repairing devices
If you are using Zigbee2MQTT, it might be possible to migrate your existing network to the UZG-01 if certain conditions are met. This is more complex to achieve successfully than it actually sounds, but If you are willing you can try.
The process is described really well on Zigbee2MQTT’s website, but in summary switching between adapters requires repairing, except when:
- When adapters are the same repairing is not required (e.g. CC2531 -> CC2531)
- Switching from a CC2530 or CC2531 based adapter to a CC2538/CC2652/CC1352 based adapter does not require repairing (e.g. CC2531 -> CC2652)
- Switching between CC2538, CC2652 and CC1352 based adapters does not require repairing (e.g. CC2538 -> CC2652)
Since I do not own any Texas Instruments based coordinator (I use EFR32MG21 Sonoff ZBDongle-E), I could not migrate anything over to the UZG-01.
Using the UZG-01 as a Zigbee Router
The UZG-01 can also be used as a Zigbee router instead of a coordinator, by flashing the correct firmware. Once flashed, it will boot up in pairing mode automatically so you can add it your network.
Instead of downloading the coordinator firmware, get the router firmware and follow the procedure like in the guide earlier to flash it with the ZigStar Multi Tool. Again be mindful of CC2652P chip, select the _launchpad_router_ tag file.
If you want to re-pair the device, go to the web-interface, section System and Tools and click Router reconnect under the System control tab.
Using the UZG-01 as a Bluetooth Proxy
Another cool feature the developer managed to add to the UZG-01’s ESP32 board is the ability to flash a custom firmware which will also enable EPSHome Bluetooth proxies in Home Assistant. This doubles the utility of the ZigStart UZG-01, however there are few things to note.
Bluetooth is widely regarded as an interference source for Zigbee networks, so using an ESP board as a Bluetooth proxy so close to the Zigbee chip is not recommended. If you are interested you can try it out by flashing the firmware from the official ZigStar website.
ZigStar Home Assistant Add-on
Recently ZigStar released an official Home Assistant Add-on for flashing and updating devices directly in Home Assistant. You can install it by adding the repository in Settings > Add-ons > Add-on Store > Three dots > Repositories:
https://github.com/mercenaruss/zigstar_addonsTwo additional add-ons will appear in the store once you’ve added the repo: ZigStar TI CC2652 FW Flasher and ZigStar Silicon Labs FW Flasher. For the UZG-01, we need to install the former and change the configuration for a network-attached UZG-01 before we can flash it:
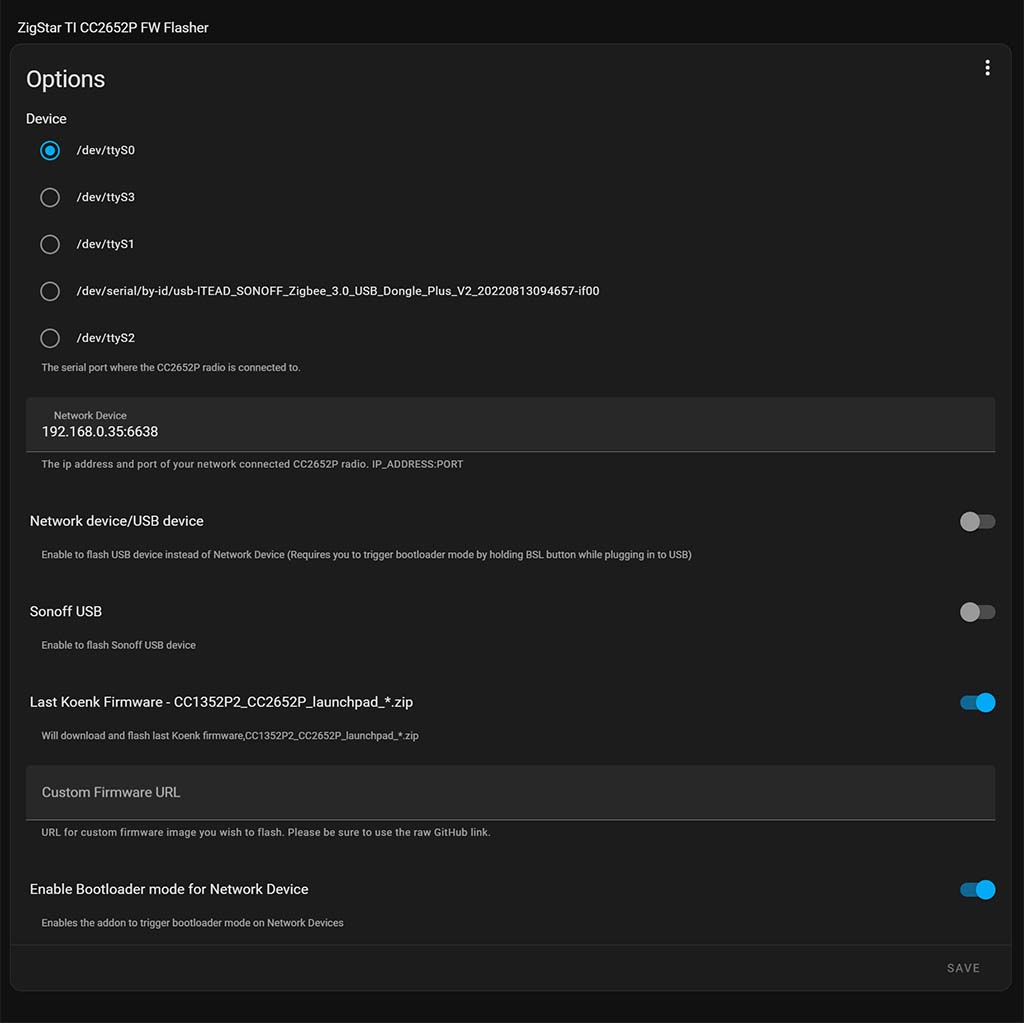
Input the IP address of the UZG-01 along with the port, make sure the bootloader for network device is enabled and click Save. When you start the add-on, observe the logs as it will start flashing the UZG-01 immediately.
IMPORTANT: Make sure the coordinator is not in use by ZHA or Zigbee2MQTT. If you have the second hardware revision (v0.2+), paste in the the URL for the CC2652P7 mentioned earlier instead of the _launchpad_ firmware toggled.
Experience and Summary
After deploying the ZigStar UZG-01 as a coordinator in a development Zigbee2MQTT network, I started to pair devices that I had on hand. My previous network centered around the ZBDongle-E was very robust and performed without hiccups.
The UZG-01 performed as I expected too and pairing devices was very responsive. This is largely dependent on the device itself though, usually end devices are more difficult to pair. Aqara devices are also known as difficult to pair, although by now I learned how to handle them properly.
If you are looking to replace your coordinator, consider the ZigStar UZG-01 as a top tier device. The flexibility it offers in terms of installation options is enough to chose it over other coordinators. Further, the CC2652P7 module it ships with is very powerful and officially supported in both Zigbee2MQTT and ZHA.
The device is available for purchase on Elecrow and Tindie for $46.20.
Alternative: Best Zigbee Coordinators for Home Assistant


So in Router mode it can extend the existing ZigBee network via Ethernet link to HA?? That would be awesome for long distance connections on large properties.
Yes exactly, the device is very versatile 🙂
Hi,actually no and yes.
Yes – you can have multiple zigbee networks on different channels.
No – routing is not working over LAN,is a mesh,so Zigbee to Zigbee.
Check: https://uzg.zig-star.com/multiple-gateways-setup/
Thank you for this review, very useful 🙂
I have the usb version of zigstar that work well.
Hi,
i was wondering if the UZG-01 can be directly connected to a Alexa hub (like an echo gen 4) and if that would enable me to attach/control a great range of Zigbee devices via Alexa without using multiple gateways and without using instable Alexa-skills.
I’m a newbie in the smart home scene and are currently thinking about the infrastructer to setup @ my home. Mainly i would like to control differnet zigbee devices (like RGBW stripes and bulbs, dimmed, using tunable white, grouped, szenes) via Alexa .
My newbie understanding:
One option is to setup a HA server with Zigbee2MQTT, to attach the UZG-01 and to do a Alexa integration without the Nabu Casa Cloud. i bought already a mini PC and the UZG-01.
… but, do i really need the HA server, because i don’t mind to use directly Alexa (since i don’t have any security devices like ddor opener …).
THANK YOU
No, you cannot use the UZG-01 directly with Alexa.
Alexa is a voice assistant, not a smart home server.
Either go for Home Assistant OS directly on the mini PC
Or use Proxmox and deploy HA OS and Zigbee2MQTT (not really for beginners, but a great learning experience!)
Start here: https://smarthomescene.com/tag/proxmox/
Thank you for your quick response and the recommendation. Wasn’t aware the Proxmox option to be honest. THX.
Just a short comment regarding Alexas being a voice assistant only.
Well, the amazon echo 4Gen finds my ZigBee bulbs from Osram (directly without any Alexa skills) and i can control brigthness and can tune the white color via Alexa without any problems. But i doubt somehow that the echo 4Gen can find/control also ZigBee bulbs from other common brands (like MiLight, Tradfri, Ledvance, aquara …) without the need to use a brand specific hub, instable Alexa skills like (Mi-Light Cloud skill, Aquara skill, Hue skill who all have very bad valuations) and the need to configure bulbs upfront in cloud apps like tuyda or smart life. I ordered some LED strips/bulbs and will find out.
My thought: The echo 4G maybe would find a gateway like the UZG-01 (or a ZB-GW03 Zigbee smart hub) and the bulbs/stripes attached to that gateway.
Probably i have to setup HA (which is ok).
kind regards
Thank you for a great guide (and website!). Just wanted to share that if you use the CC2652P7 and want to migrate from another chip (in my case a Electrolama zzh! CC2652R) you don’t need to reflash with the old IEEE. It’s as simple as replacing the adapter and you are up and running.
At time of writing the only flashing tool that supports the CC2652P7 is the HA addon (https://uzg.zig-star.com/flashing-and-updating/#ha-addon-ethernet)
Hey, thanks for the great guide. May I have a quick one? My TI chip is CC2652PP1FRGZR. I really can’t decide what update file I need to use? Do you have any idea, please? 😀
Thanks.
Hey, you need to use the _launchpad_coordinator firmware file for the CC2652P:
https://github.com/Koenkk/Z-Stack-firmware/tree/master/coordinator/Z-Stack_3.x.0/bin
File name: CC1352P2_CC2652P_launchpad_coordinator_20230507.zip