Using a Sonoff 4CH Pro to Automate an Aquarium
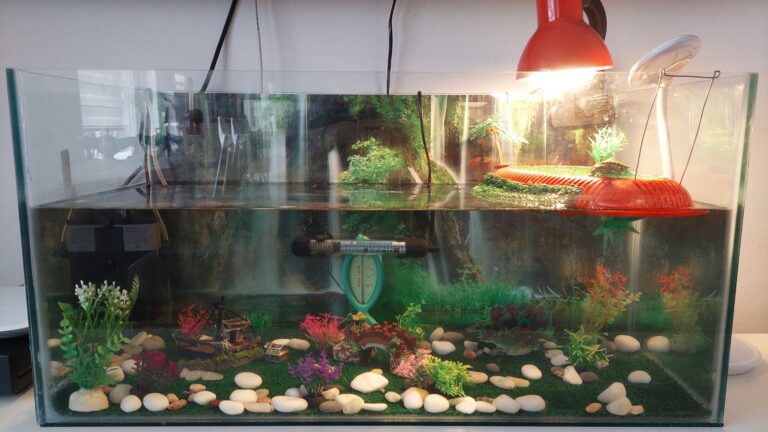
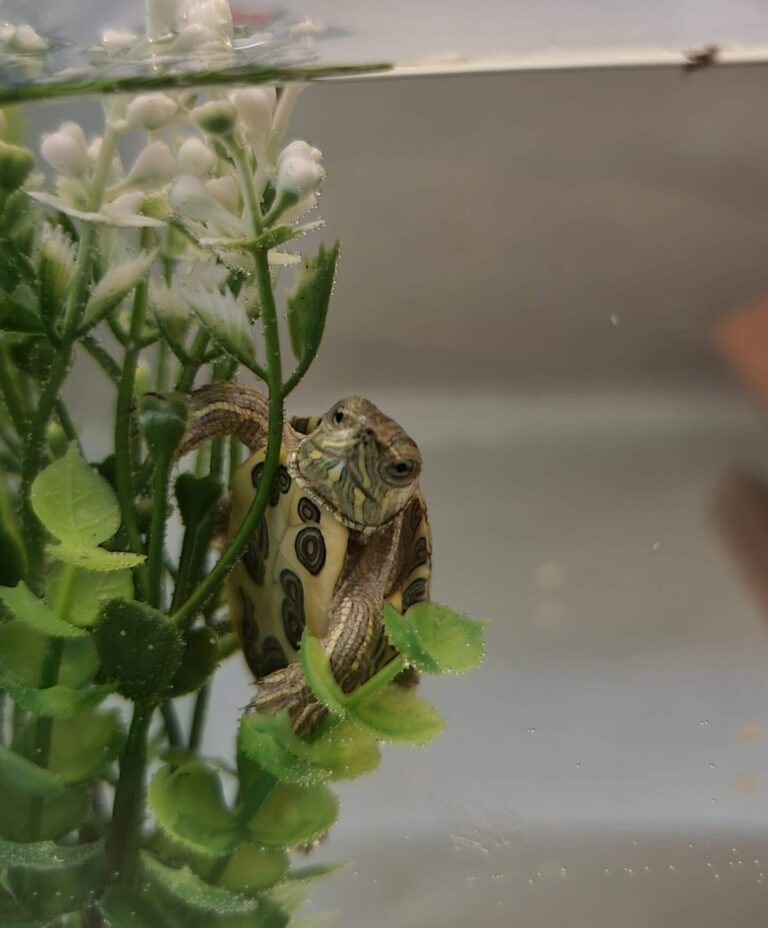
My daughter is 2 years old and she has a pet turtle, a red eared slider named Lulu that she adores. As she is too young to care for it by herself, I decides I would automate its aquarium and living area to make it easier for her to enjoy the turtle. I used a spare Sonoff 4CH Pro I had lying around to wire everything up together and setup automations, reminders and trackers inside Home Assistant.

Wiring the components to the Sonoff 4CH Pro
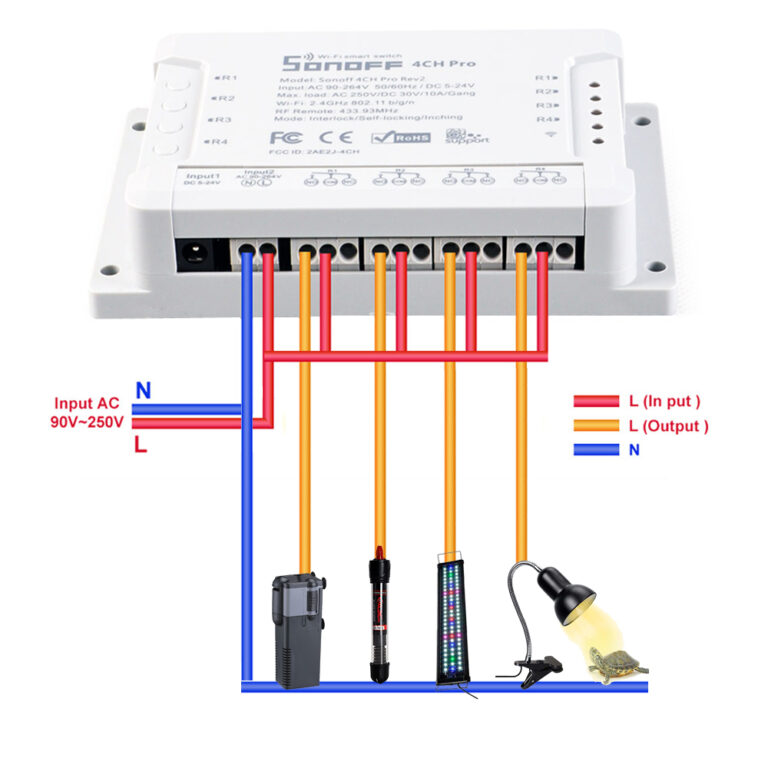
Wiring everything together proved to be somewhat of a challenge, considering the terminals on the Sonoff are too close together. I needed to connect 4 wires of the components neutral to the neutral coming out of the mains.
After a failed attempt to connect the wires directly, I decides its best to use screw terminals and connector terminal clamps. I also needed to bridge the Live wire (L) between the Sonoff’s COM ports. I installed small terminal clamps and connected them without issues. All that remained, was the Live out wire, or the NO terminal on the switch wired to each of the devices L wire. The final wiring looked like this:

Integrating with Home Assistant
As I had not gotten around to flashing this particular Sonoff with Tasmota, I had to integrate it with Home Assistant via a custom integration. I used AlexxIT’s excellent SonoffLAN integration. This particular integration is capable of adding devices directly to Home Assistant, to be used in a couple of modes: Local and Cloud, Cloud only, Local mode with load config from cloud and Local only mode with manually getting the device key.
Whichever mode you choose, you need to first create a Sonoff account, using the eWelink app in the Play Store/App Store. Follow the instructions to pair your particular device to your account. After you confirm it is working, I suggest checking for a firmware update within the app.
The integration is available in HACS, or you can install it manually by copying the sonoff folder from the latest release page.
For my use case, I used the Local and Cloud mode:
#Add this to your configuration.yaml
sonoff:
  username: myemail@gmail.com #Your ewelink account
  password: mypassword #Your ewelink password
Important: Cloud mode cannot work simultaneously with two copies of the component: For example an eWelink account and a Home Assistant integration. You need to create a second account and share the device within the app with your second account, than use that in configuration.yaml
After you have configured everything, restart Home Assistant. Entities will be automatically discovered from the Sonoff 4CH Pro in our use case and added into Home Assistant.
The integration sets device_class: switch by default, but I wanted to change the Light and UVB light to device_class: light for better Home Assistant representation and control. The way we do this is we add the device ID under the sonoff: code in configuration.yaml. For example:
#Add this to your configuration.yaml
sonoff:
  username: myemail@gmail.com #Your ewelink account
  password: mypassword #Your ewelink password
  devices:
    10002bca76:
      name: Aquarium
      device_class:
        - switch
        - switch
        - light
        - light
Note: The easies way to find your Device ID is to open the eWelink app, click on the device, click on the three dots in the right corner and scroll to the bottom. You will see your Device ID here, after Model.
Because my Sonoff 4CH Pro has 4 terminals, we add them into a list. The first and second terminal will remain switches, because the aquarium pump and heater are connected to those. The third and forth will be converted to lights, as the Ambient light and UVB light are connected to them.
See all device_class options here. Again, restart Home Assistant to load the new configuration.
Automating the boring stuff
Turtles are very active little creatures, they like to swim a lot, dive, play and explore. The single most important thing about their well-being is the UVB light. If you are keeping an Aquarium inside such as myself, you MUST have an UVB light. They like to bask under the light for heat and to absorb the much needed UVB rays. It is important to turn of the light at sunset, to not mess with their circadian rhythms. So we setup two simple automations to turn the UVB light on at sunrise and turn it off at sunset. Example:
Turn ON UVB Light At Sunrise
#Turn ON UVB At Sunrise
alias: 'Aquarium: Turn On UVB'
description: Turn on UVB light each morning at sunrise
trigger:
  - platform: sun
    event: sunrise
    offset: '0'
condition: []
action:
  - service: light.turn_on
    data: {}
    target:
      entity_id: light.sonoff_aquarium_uvb
mode: single
Turn OFF UVB Light At Sunset
#Turn OFF UVB at sunset
alias: 'Aquarium: Turn OFF UVB '
description: Turn off UVB light each evening at sunset
trigger:
  - platform: sun
    event: sunset
    offset: '0'
condition: []
action:
  - service: light.turn_off
    data: {}
    target:
      entity_id: light.sonoff_aquarium_uvb
mode: single
This will turn on the UVB light without any conditions, because the turtle needs UVB whether you are home or not. We will use the same way to control the ambient light, which is a simple led light for humans to see into the tank and create a beautiful view. We setup two automations to turn the light on at sunset, and turn it off at midnight (because it is not needed after). Example:
Turn ON Ambient Light At Sunset
#Turn on Ambient Light After Sunset
alias: 'Aquarium: Turn On Ambient Light'
description: Turn on Ambient Light after sunset
trigger:
  - platform: sun
    event: sunset
    offset: '0'
condition: []
action:
  - service: light.turn_on
    data: {}
    target:
      entity_id: light.sonoff_aquarium_light
mode: single
Turn OFF Ambient Light at Midnight
#Turn off Ambient Light At Midnight
alias: 'Aquarium: Turn OFF Ambient Light at midnight'
description: Turn off Ambient Light At Midnight
trigger:
  - platform: time
    at: '00:00'
condition: []
action:
  - service: light.turn_off
    data: {}
    target:
      entity_id: light.sonoff_aquarium_light
mode: single
Cleaning Reminders with input_datetime helpers
Next we will setup simple reminders and notifications to track the cleaning of the tank.
For this, we need to setup two input_datetime helpers, one for weekly clean (partial) and one for monthly clean (full). You can use the UI of Home Assistant under Configuration > Automations & Scenes > Helpers tab for creating the input_datetime and name them accordingly. For this particular use case, we do not heed a timestamp, as its only important to track which days the aquarium has been cleaned. Example:
#Add this to your configuration.yaml
input_datetime:
  aquarium_weekly_clean:
    name: Aquarium Weekly Clean Date
    has_date: true
    has_time: false
    icon: mdi:fishbowl-outline
  aquarium_monthly_clean:
    name: Aquarium Monthly Clean Date
    has_date: true
    has_time: false
    icon: mdi:fishbowl
Setting clean date with NFC Tags
You can add the input_datetime entity to your dashboard, and manually input todays date when you clean the tank. But where is the fun in that? We need to automate and streamline, as this is Home Assistant. I chose to use NFC tags glued to the side of the tank, to set todays date to the corresponding helper via a service call. Two tags were needed for my use case, one for the weekly clean and another for the full, monthly clean.
To add NFC tags to Home Assistant, you need to open the HA companion app, navigate to Configuration > Tags > + Add tag. Give it a name and a Tag ID, click Create and Write and scan the NFC tag. Than we can setup the automations to set todays date on the input_datetime helpers:
Tag Automation: Performed a weekly clean
alias: 'Aquarium: Performed a weekly clean'
description: 'Aquarium: Performed a weekly clean'
trigger:
  - platform: tag
    tag_id: Aquarium Weekly Clean
condition: []
action:
  - service: input_datetime.set_datetime
    data:
      date: "{{ now().strftime('%Y-%m-%d') }}"
    target:
      entity_id: input_datetime.aquarium_weekly_clean
mode: single
Tag Automation: Performed a monthly clean
alias: 'Aquarium: Performed a monthly clean'
description: 'Aquarium: Performed a monthly clean'
trigger:
  - platform: tag
    tag_id: Aquarium monthly Clean
condition: []
action:
  - service: input_datetime.set_datetime
    data:
      date: "{{ now().strftime('%Y-%m-%d') }}"
    target:
      entity_id: input_datetime.aquarium_monthly_clean
mode: single
Daily reminder for cleaning the tank
Next, we setup a simple automation to fire daily at 16:00 (this is the time convenient for me, as I get off work around 16:00), to remind us of the days remaining until the tank needs to be cleaned: both partially and fully.
alias: 'Aquarium: Clean Notify'
description: 'Aquarium: Clean notify'
trigger:
  - platform: time
    at: '16:00'
condition: []
action:
  - service: notify.mobile_app_s21ultra
    data:
      title: Aquarium Cleaning Reminder
      message: >-
        Partial Clean in:
          {{ (((as_timestamp(now())-states.input_datetime.aquarium_weekly_clean.attributes.timestamp)) | int(0) /60/1440-7) | round(0) | abs}} day(s) <br>
        Full Clean in:
          {{ (((as_timestamp(now())-states.input_datetime.aquarium_monthly_clean.attributes.timestamp)) | int(0) /60/1440-30) | round(0) | abs}} day(s)
mode: single

Creating a custom dashboard
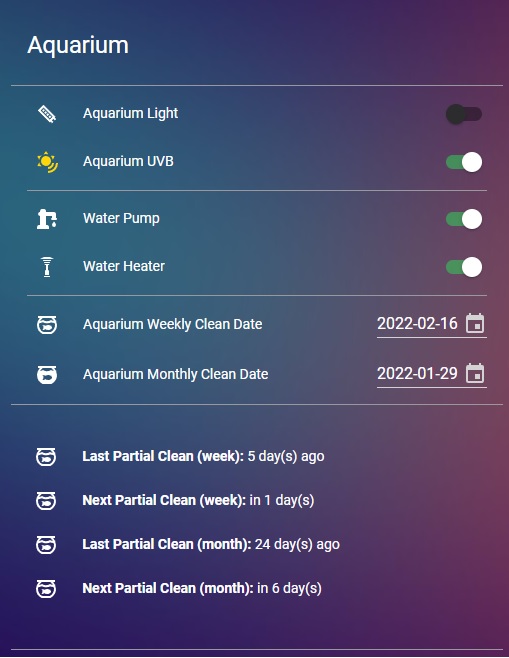
If you are a frequent UI user, you might want to represent the data in your dashboard and for quick toggles to turn off the pump and heater when cleaning the tank. I used some basic home assistant cards: Vertical Stack card, Entity card, Markdown card and the great and powerful custom card card-mod to remove card borders and background.

Configuration example
type: vertical-stack
cards:
- type: entities
title: Aquarium
show_header_toggle: false
style: |
ha-card {
background-color: var(--primary-primary-color);
box-shadow: none;
}
entities:
- type: section
- entity: light.sonoff_aquarium_light
- entity: light.sonoff_aquarium_uvb
- type: divider
- entity: switch.sonoff_aquarium_pump
name: Water Pump
- entity: switch.sonoff_aquarium_heater
name: Water Heater
- type: divider
- entity: input_datetime.aquarium_weekly_clean
- entity: input_datetime.aquarium_monthly_clean
- type: section
- type: markdown
style: |
ha-card {
background-color: var(--primary-primary-color);
box-shadow: none;
}
content: >-
<ha-icon icon="mdi:fishbowl-outline"/></ha-icon>
**Last Partial Clean (week):** {{ (((as_timestamp(now())-states.input_datetime.aquarium_weekly_clean.attributes.timestamp)) | int(0) /60/1440-1) | round(0) }} day(s) ago <br>
<ha-icon icon="mdi:fishbowl-outline"/></ha-icon>
**Next Partial Clean (week):** in {{ (((as_timestamp(now())-states.input_datetime.aquarium_weekly_clean.attributes.timestamp)) | int(0) /60/1440-7) | round(0) | abs}} day(s) <br>
<ha-icon icon="mdi:fishbowl-outline"/></ha-icon>
**Last Partial Clean (month):** {{ ((as_timestamp(now())-states.input_datetime.aquarium_monthly_clean.attributes.timestamp)) | int(0) /60/1440) | round(0) }} day(s) ago <br>
<ha-icon icon="mdi:fishbowl-outline"/></ha-icon>
**Next Partial Clean (month):** in {{ (((as_timestamp(now())-states.input_datetime.aquarium_monthly_clean.attributes.timestamp)) | int(0) /60/1440-30) | round() | abs}} day(s)
- type: entities
style: |
ha-card {
background-color: var(--primary-primary-color);
box-shadow: none;
}
entities:
- type: sectionSummary
Because turtles are messy little creatures, its best to leave the aquarium filter pump running 24/7. That is why no automations are needed for this entity. I use the toggle to turn it off when cleaning the tank. The same applies to the water heater, as it has its own thermostat and a knob from which you can set the desired temperature. It turns itself on/off automatically to keep the water conditions optimal. Now Lulu is a happy little red eared slider!

Sources:

hello,
I don’t get this to work
“{{ (((as_timestamp(now())-states.input_datetime.aquarium_weekly_clean.attributes.timestamp)) | int(0) /60/1440-1) | round(0) }}”