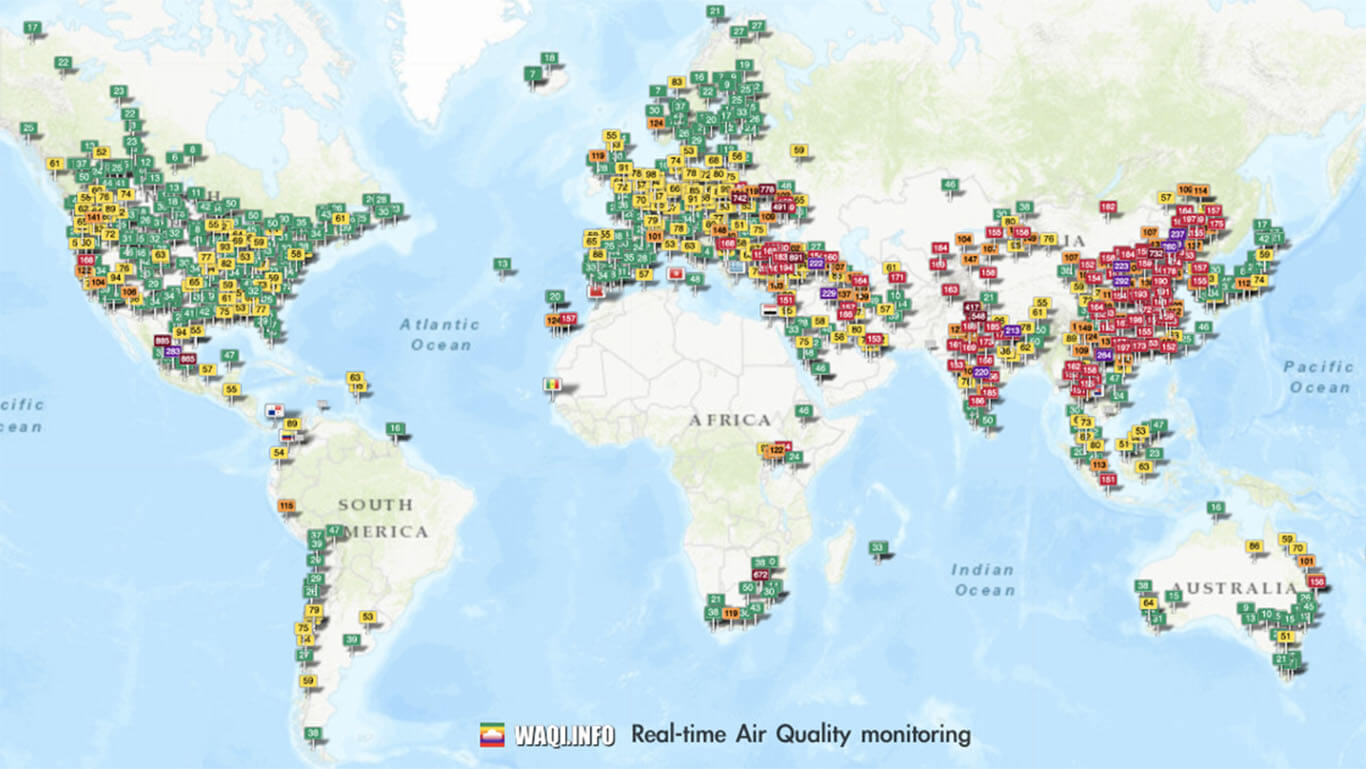
The World Air Quality Index is a non-profit project started in 2007 with a mission of promoting air pollution awareness for citizens and provide a unified and world-wide air quality information. In this short tutorial, we are going to guide you in integrating WAQI, the Worlds Air Quality Index database in your Home Assistant Instance so you can monitor air pollution for any location in the world.
How does WAQI work?
WAQI sources its air quality official data from each country respective Environmental Protection Agency (EPA), which is measured from each EPAs station using professional monitoring equipment. The data gathered and published on World Air Quality Index is real-time and therefore initially unvalidated at the time of publication. In order to strengthen the quality, a set of real-time AI algorithms are used to detect abnormal data conditions (sparks, low reporting, etc.) and automatically ‘disable’ data reported from defective stations.
WAQI offers a free API to this data, within their “acceptable usage” policy:
- All the APIs are provided for free.
- A valid key must be used for accessing the API.
- All the API are subjected to quota.
- The data can not be sold or included in sold packages.
- The data can not be used in paid applications or services.
- The data can not be redistributed as cached or archived data.
- Attribution to the World Air Quality Index Project as well as originating EPA is mandatory.
- Public usage by for-profit corporations requires explicit agreement wit the World Air Quality Index team.
- Public usage by non-profit organization requires prior notification (by email) to the World Air Quality Index team.
WAQI in Home Assistant
Even though there is an official WAQI integration for Home Assistant, it is a bit limited and configurable only thorough YAML. Developer pawkakol1 created a custom integration (worlds-air-quality-index) which is easier to configure and can be used to monitor any Air Quality station worldwide. This custom component supports the following sensors, IF they are provided by the monitored station in WAQI:
- Air Quality Index
- Carbon monoxide (CO)
- Nitrogen dioxide (NO2)
- Ozone (O3)
- Particulate matter (PM10)
- Particulate matter (PM2,5)
- Sulphur dioxide (SO2)
- Atmospheric pressure
- Humidity
- Temperature
- Rain
- Wind speed
- Wind direction
To integrate WAQI in your Home Assistant instance, you would need a few things:
- WAQI custom_component installed
- WAQI.info account token (create HERE)
- Integration Method
- Geographical Coordinates (works with WAQI internal stations ONLY)
- Station ID (works with ANY station WAQI monitors)
Installation
HACS
The worlds-air-quality-index integration is available in the Home Assistant Community Store (HACS).
- Open HACS
- Click Integrations
- Click + Explore and download repositories
- Search for “worlds-air-quality-index”
- Click + Download this repository with HACS
- Restart Home Assistant
Manual
- Download the world-air-quality-index folder and copy it into your /config/custom_components folder
- Restart Home Assistant
Account Token
First, open the API account page and create an account to request a token:
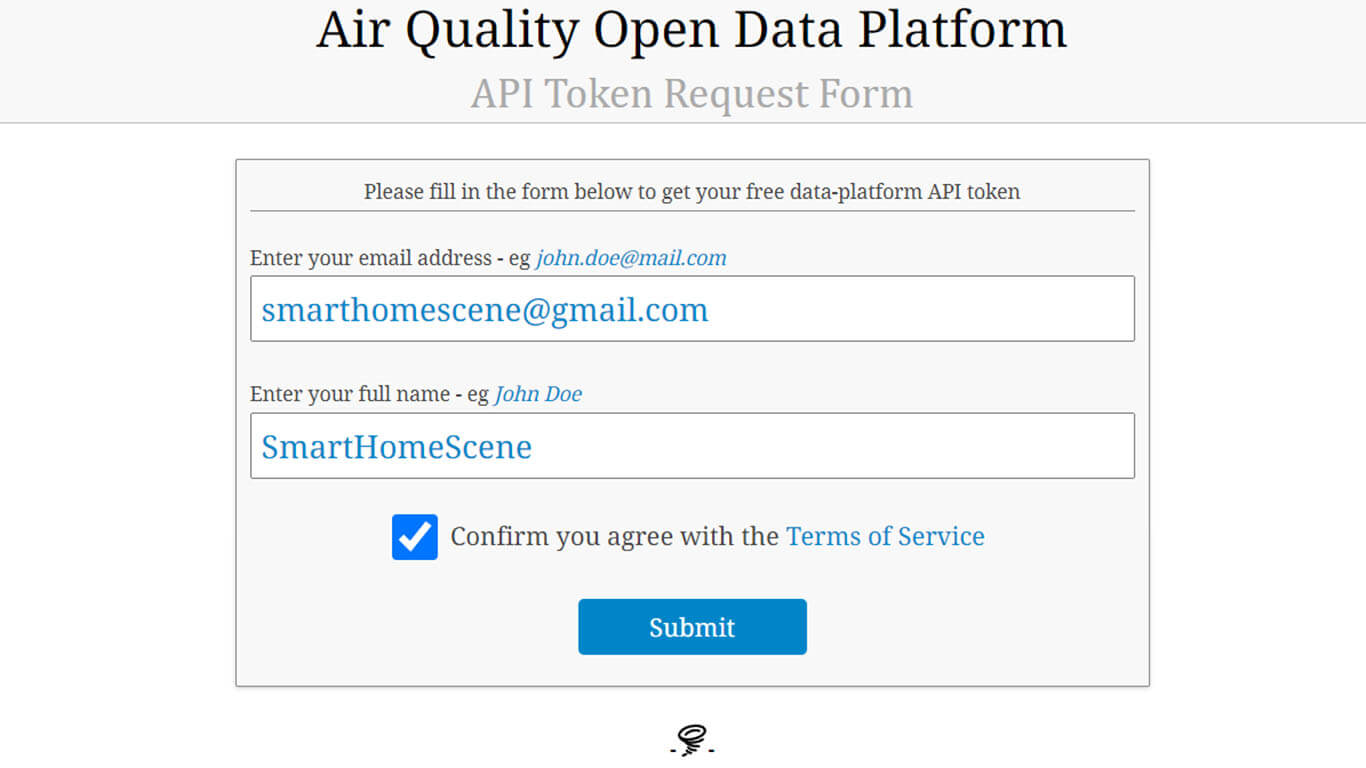
A confirmation e-mail will be sent to you, and after you click the link validate you will be taken to the following page:
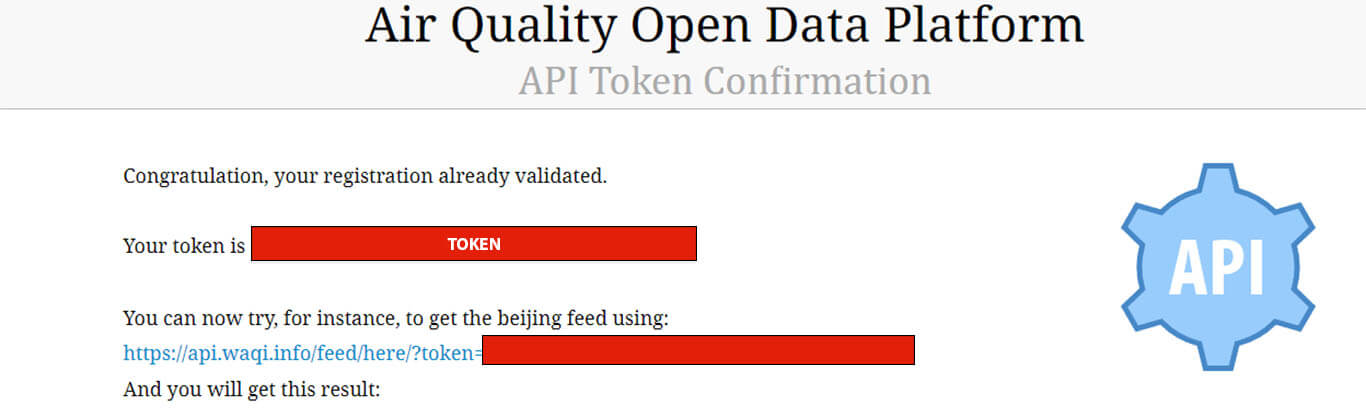
Save your token in a file somewhere for quick access, as we will need it to access the API and setup the integration. You can also click the clink it provides to test if the API responds to your token and it is valid. Once all is good, proceed to the next step.
Integration
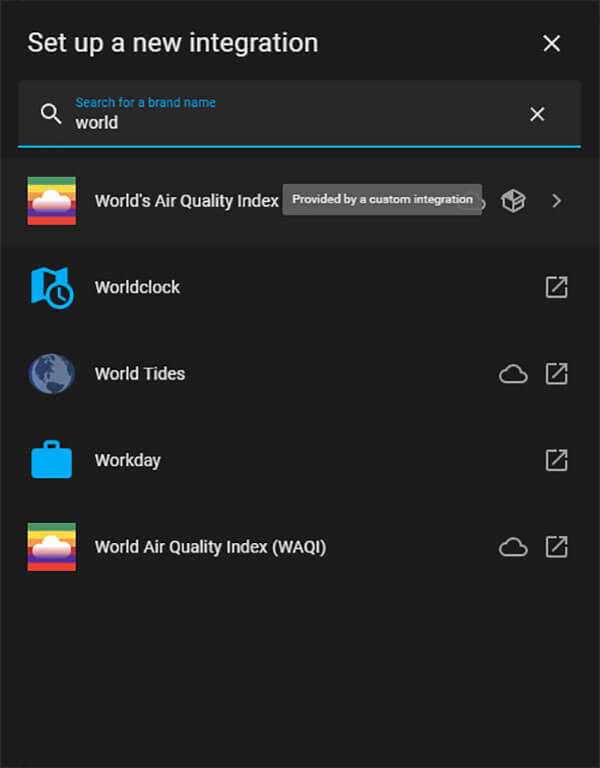
The WAQI custom component offers two methods of integration and for both you will need a token to access the API. Which method is suitable for you, depends on the station or location you want to integrate in Home Assistant. In our example, we are going to use the Air Quality Station in London, UK. To proceed, navigate to Settings > Devices & Services > and click + Add Integration
IMPORTANT: In the pop-up dialog window, make sure you select the integration provided by the custom component. Even though Home Assistant has its own WAQI integration, it is a bit more limited, so we are going to use the custom integration from HACS.
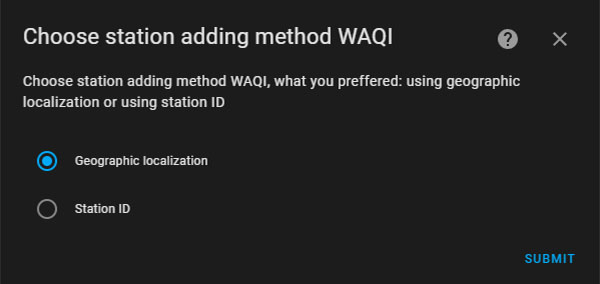
Choose you station adding method (Geographical Localization or Station ID) and click submit.
Geographical Coordinates
This method of integration works with WAQI internal stations ONLY. It will not provide data from third party sources obtained through their API. By default, your home coordinates (set in Home Assistant) are inserted in the latitude and longitude fields in the geographic localization method. This integration will find the closest station to your location, that is supported by waqi.info API. If you don’t put your own custom name, it will automatically input name of the nearest station found.
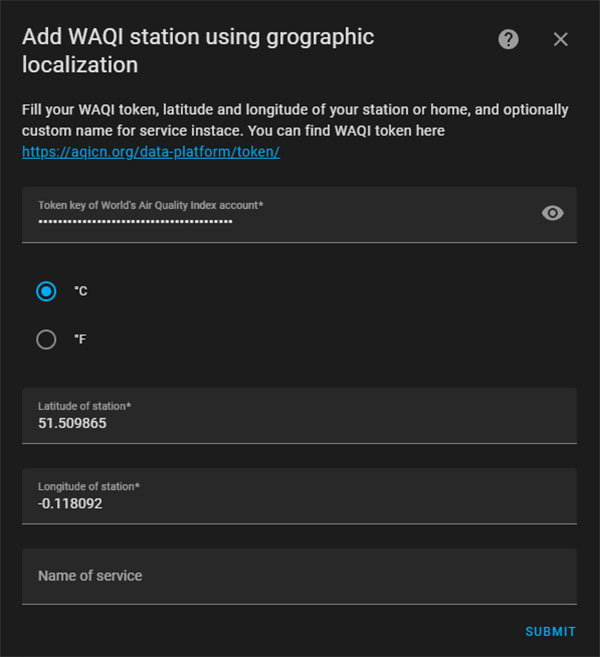
You will be greeted with a Success! popup message if everything is correct and the supported sensors for your station will be added to your Home Assistant instance.
Station ID
This method of integration can poll information from any station WAQI receives data (Internal or Third-party). We just need to provide the correct station ID and poll with the appropriate API call. To successfully add a Station, WAQI API needs to differentiate between internal and third-party stations.
Internal Stations:
https://api.waqi.info/feed/@5724/?token={{token}}Third-Party Stations:
https://api.waqi.info/feed/A5724/?token={{token}}WAQI internal stations do not need the “A” or “@” prefix to poll their API from the custom component. For third party stations, an “A” prefix needs to precede the station ID. To find the correct station ID, open the waqi.info website and navigate on the map to the station you want to integrate. Click on it and it will open in a new window, than and scroll down to:
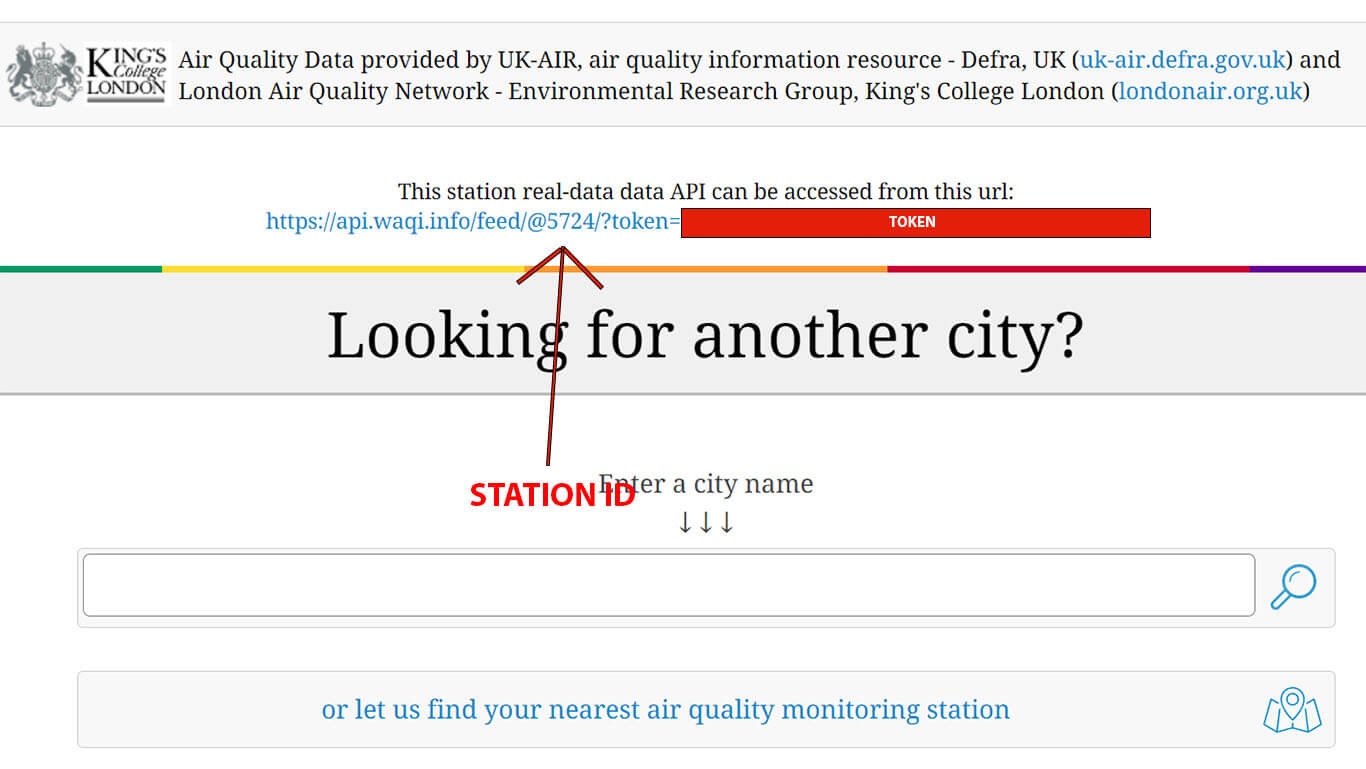
The API will automatically add the correct prefix for the selected station and if you are logged in, your token at the end. You can test this URL in a web browser, if it returns some data than the URL and Token are correct and working. Copy the Station ID and Token and save them in a text file. Navigate to Settings > Devices & Services > + Add Integration. Select “Station ID” as you method of integration:
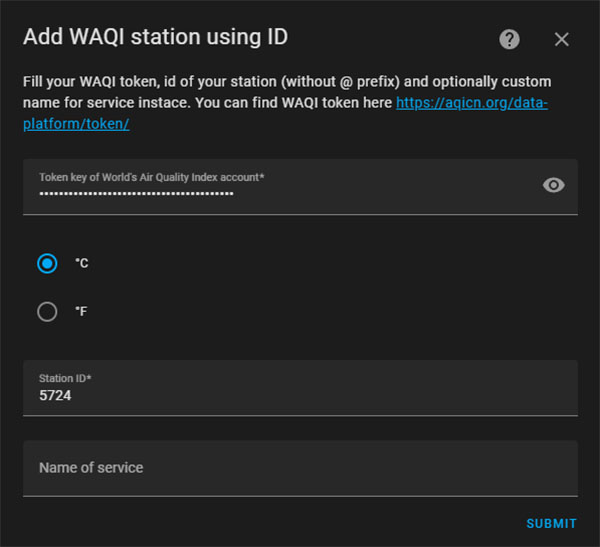
If you are adding an internal station, remove any prefixes (@). If you are adding a third-party station, prefix the station ID with “A”. For example, Internal Station ID: 5724, Third Party Station ID: A5724. You will be greeted with a Success! message and the supported sensors for the station will be added to Home Assistant.
You can repeat this process for any additional station you want to monitor.
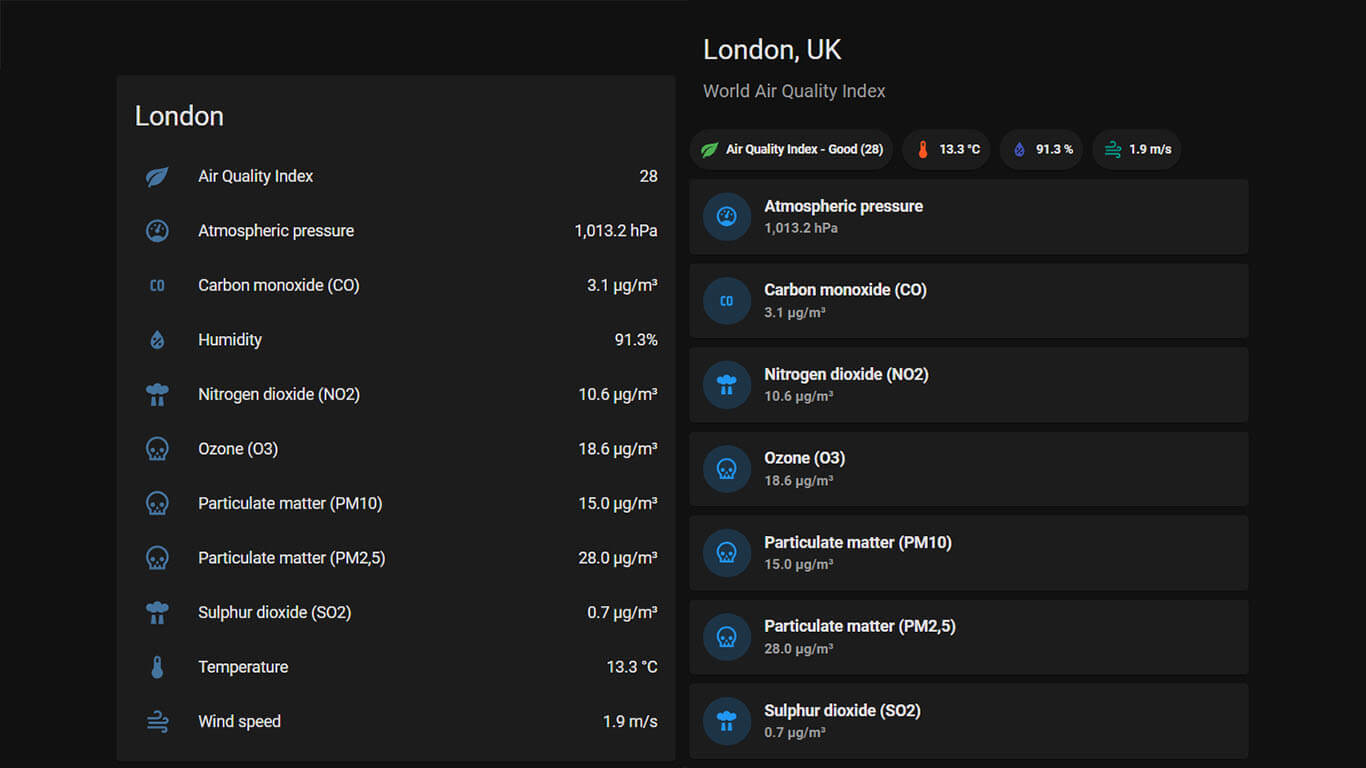
Using the Data
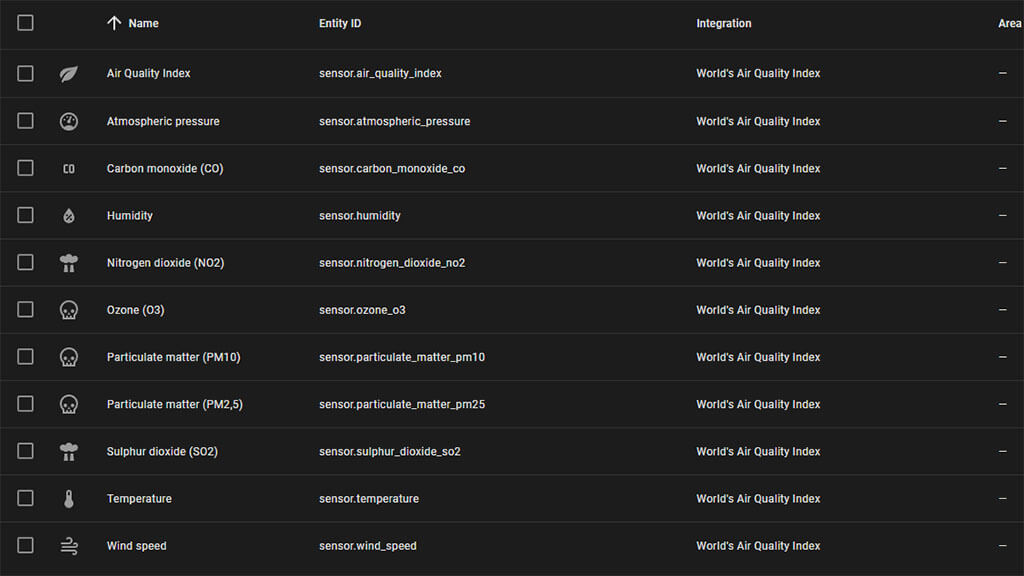
We can use the available entities to create a useful dashboard to represent the available data. In our example, WAQI exposed 11 air quality entities:

If we click “Add to Dashboard”, Home Assistant will automatically populate an entities card and will ask us where we want to add it. This is good for a quick overview, but its also very bland.
As another example, we can create a Mushroom Cards stack, with a dynamic template chip as a header.
The “Air Quality Index – Good (xx)” chip will dynamically change its color and text, based on the Air Quality Index the entity provides. Further, you can also setup an automation to notify you when air quality falls bellow a certain threshold. The code for the card is as follows:
type: vertical-stack
cards:
  - type: custom:mushroom-title-card
    title: London, UK
    subtitle: World Air Quality Index
  - type: custom:mushroom-chips-card
    chips:
      - type: template
        entity: sensor.air_quality_index
        icon: mdi:leaf
        content: >-
          {% set aqi = states('sensor.air_quality_index') | float %}

          {% if aqi <= 50 %} Air Quality Index - Good
          ({{states('sensor.air_quality_index')}})

          {% elif 51 >= aqi <= 100 %} Air Quality Index - Moderate
          {{states('sensor.air_quality_index')}} - Moderate

          {% elif 101 >= aqi <= 150 %} Air Quality Index - Unhealthy for
          Sensitive Groups {{states('sensor.air_quality_index')}} - Unhealthy
          for Sensitive Groups

          {% elif 151 >= aqi <= 200 %} Air Quality Index - Unhealthy
          {{states('sensor.air_quality_index')}} - Unhealthy

          {% elif 201 >= aqi <= 300 %} Air Quality Index - Very Unhealthy
          {{states('sensor.air_quality_index')}} - Very Unhealthy

          {% elif aqi > 300 %} Air Quality Index - Hazardous

          {% endif %}
        icon_color: |-
          {% set aqi = states('sensor.air_quality_index') | float %}
          {% if aqi <= 50 %} green
          {% elif 51 >= aqi <= 100 %} yellow
          {% elif 101 >= aqi <= 150 %} orange
          {% elif 151 >= aqi <= 200 %} pink
          {% elif 201 >= aqi <= 300 %} purple
          {% elif aqi > 300 %} red
          {% endif %}
      - type: entity
        entity: sensor.temperature
        icon_color: deep-orange
      - type: entity
        entity: sensor.humidity
        icon_color: indigo
      - type: entity
        entity: sensor.wind_speed
        icon_color: teal
  - type: vertical-stack
    cards:
      - type: custom:mushroom-entity-card
        entity: sensor.atmospheric_pressure
      - type: custom:mushroom-entity-card
        entity: sensor.carbon_monoxide_co
      - type: custom:mushroom-entity-card
        entity: sensor.nitrogen_dioxide_no2
      - type: custom:mushroom-entity-card
        entity: sensor.ozone_o3
      - type: custom:mushroom-entity-card
        entity: sensor.particulate_matter_pm10
      - type: custom:mushroom-entity-card
        entity: sensor.particulate_matter_pm25
      - type: custom:mushroom-entity-card
        entity: sensor.sulphur_dioxide_so2
You can use this templating example to apply to any other sensor you wish to track more closely, for example PM, CO2 or O3.
BONUS: Install your own Air Quality Station
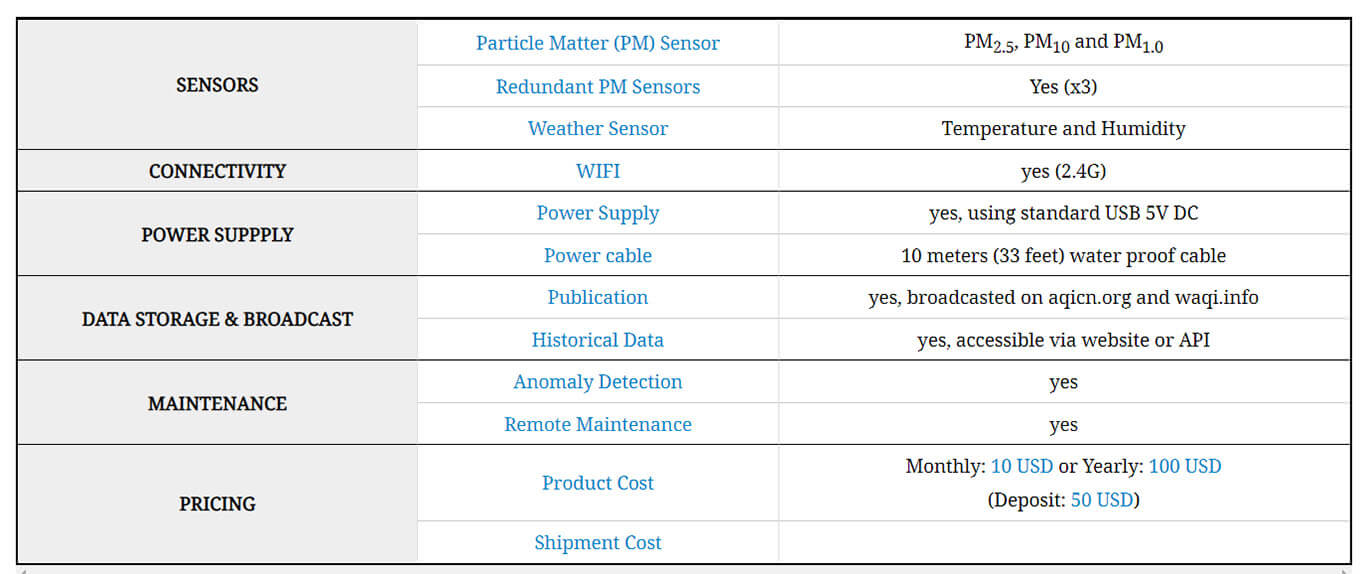
The WAQI non-profit organization offers an official way of acquiring your very own air quality station! They currently have one model on sale, as well as some more models coming in the near future. The available model is labeled GAIA A12, priced at $10 per month or $100 if paid yearly. It is also possible to purchase the station for a one-time payment of $200. Every 2 years, WAQI will send you a new station to replace the old one, free of charge! Prices will seem a little high, especially since a DIY stations can be made for much less, but this directly supports the WAQI project and helps spread air quality awareness.
If you are in a position to afford such a station, please consider implementing the GAIA A12 model, as this will further the mission of the WAQI project.
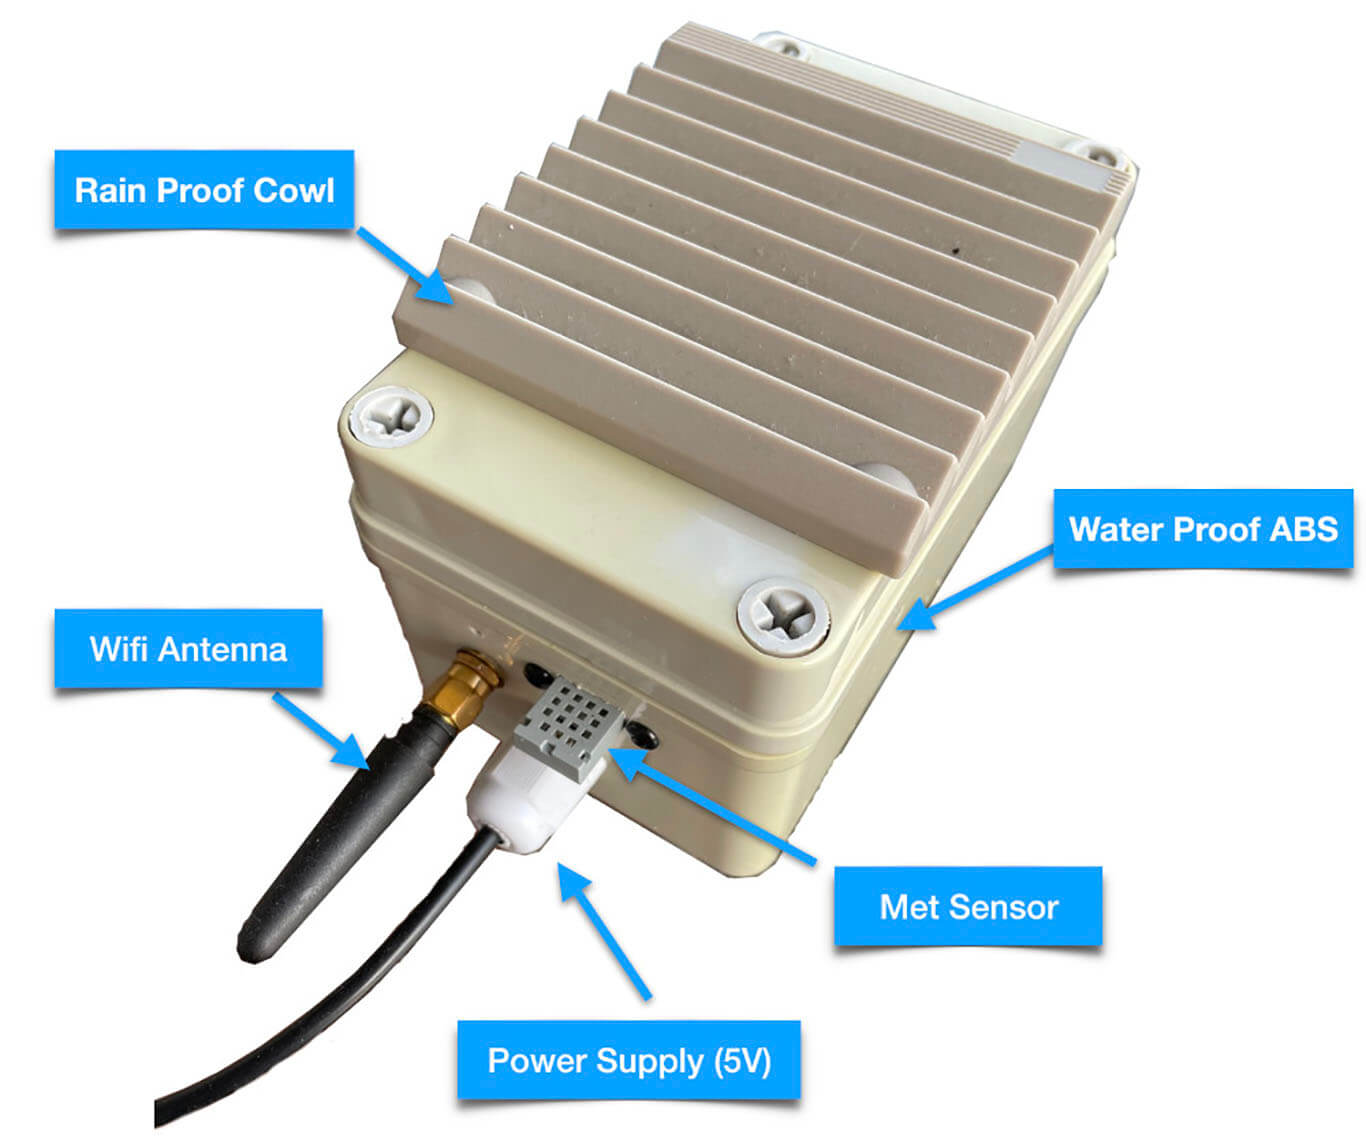

After you’ve acquired you GAIA A12 station, you can add it to the WAQI map and implement its sensors in Home Assistant in the same way as in this tutorial.
Currently, more models are being developed with a bunch of other sensors such as Gaia A13: With More Gas Sensors, GAIA A15: With LoRaWAN connectivity and GAIA A18: Solar Powered (Off-Grid). You can read more HERE.


Just want to say thanks for sharing so much on your website. I really enjoy it and it’s useful for me.
You are welcome, thanks for the feedback friend!
Thanks a lot. I used the code and it works well, especially with the mushroom cards. However I hab one issue with the elif part.
{% elif 51 >= aqi =“ to “51<=“ for the statement to be true, also for the other elif statements.
Cheers, Stef
I tried both ways with Geographical Coordinates and Station ID and in both instances I only got 7 enteties: Why is this:
1. – https://prnt.sc/oo4kqZ-lnxVE
2. – https://prnt.sc/PkO9LllOOrwh
I followed your guide step by step.
Thank you for all your helps, support and hard work friend!
The entities exposed are dependent on the data the station provides.
Try another station for comparison.
Cheers
Dear SHS,
thanks a lot for your post! Great initiative from your side. I implemented my own AQI dashboard and am now trying to start my own sensors. I got the idea from you to get a GAIA A12 sensor and was browsing about the sensor.community, as well as the Nettigo Air Monitor Kits.
What I found to be a major advantage of the NWA kits is the Home assistant integration with local polling. I find this feature neat, in order to be independent of data up-/downlink.
So my question is: do you have any knowledge about an integration of the GAIA sensors with local polling?
Thanks a lot for your reply!
Regards, Stefan
Hello Stefan,
It is my understanding that GAIA stations can be integrated in HA through their API only.
The purpose of deploying a GAIA station is to provide air quality information to everyone, so it’s against it’s core principle or running it locally.
However, each component it uses can be freely bought from AliExpress and assembled yourself.
You can easily code an ESP32 board and run it completely local.
Alternatively, you could use the LoRa version and use a LoRa dongle to capture it’s payload with HA.
And don’t connect the station to the internet at all.
Cheers
Dear SHS,
thanks for your thoughts. I actually asked the WAQI guys and got the following message: “the GAIA station has an embedded server returning the real-time concentration in JSON format.
This way, you can configure your home assistant to fetch the data directly from the station rather than the internet server.
The GAIA station also has an MDNS server, so you can get its IP address by connecting to “GAIA-A12-XXXXX”, where XXXXX Is your station ID.”
I decided to buy the NAM sensor and will fetch the data locally, as well as send it to sensor.community. As I understand, the stations will be published on the WAQI map.
Nevertheless, I’ll be watching the development of the GAIA sensors, as I think they are more reliable due to the redundant PM sensors, as well as have PM1 readings.
Thanks again for the great post!
Cheers, Stefan