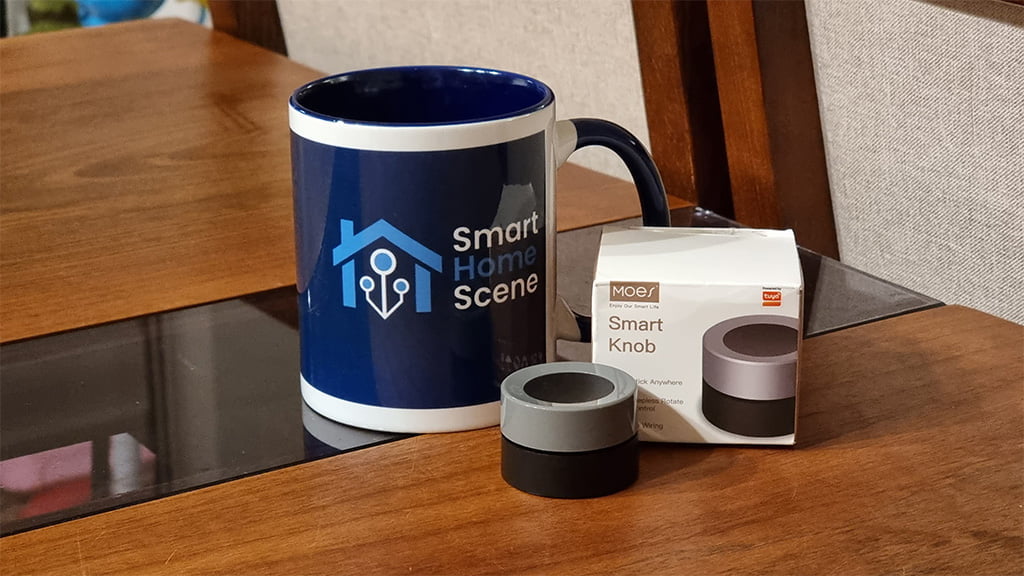
On our AliExpress Reviews channel we’ve tested all kinds of ZigBee devices: switches, dimmers, plugs, motion sensors, door sensor, smoke sensor etc. Today we are writing about a different kind of gadget, the MoesHouse ZigBee Smart Knob/Button, model ERS-10TZBVK-AA. It retails from $12~$14 depending on your location and shipping options.
This device is manufactured by Eardatek, the same company who makes one of the best smart dimmer with a touch panel. It is branded and sold in the Tuya ecosystem by MoesHouse. In this review, we are going to pry open the device, pair it to Home Assistant and see what it can do.
This Tuya based Zigbee smart dimmer knob can be bought from AliExpress or Amazon for ~$15.
Technical Specification
- Model: ERS-10TZBVK-AA
- Connectivity: ZigBee 3.0
- Power: Button Battery CR2032 3V DC
- Working Temperature: -10°C – 45°C
- Working Humidity: <90% RH
- Dimensions: 40x40x29mm
What’s Inside?
This little smart scene switch device arrives with a metal plate, a sticker and a small pin for resetting the gadget. The metal plate can be mounted anywhere using 2 screws and the knob snaps in place firmly onto into using a magnet placed on its backside.
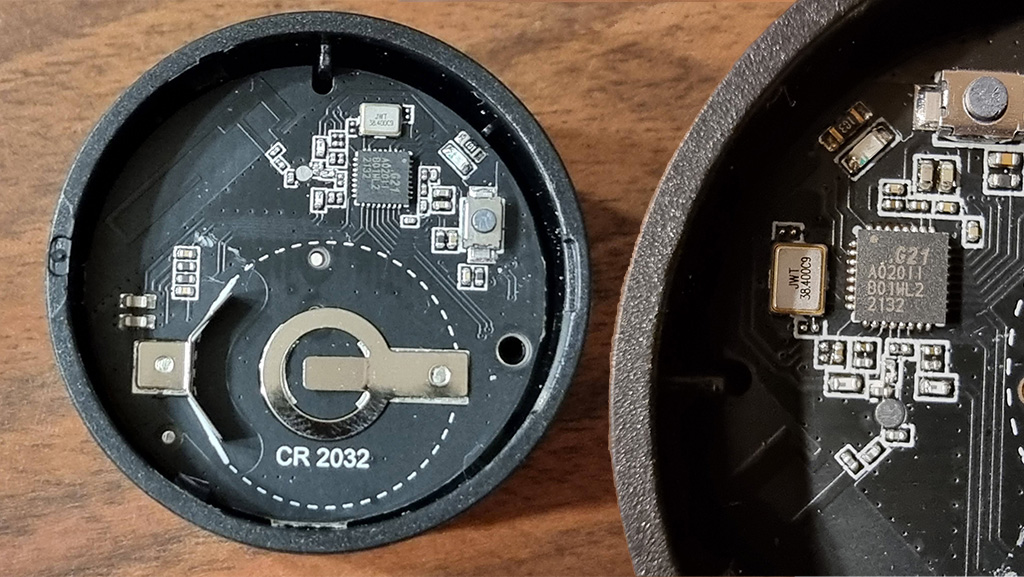
Note: It operates using a CR2032 button battery, which is NOT INCLUDED! This battery is used in many ZigBee devices, such as the Tuya Door Sensor TS0203 and is fairly easy to find.
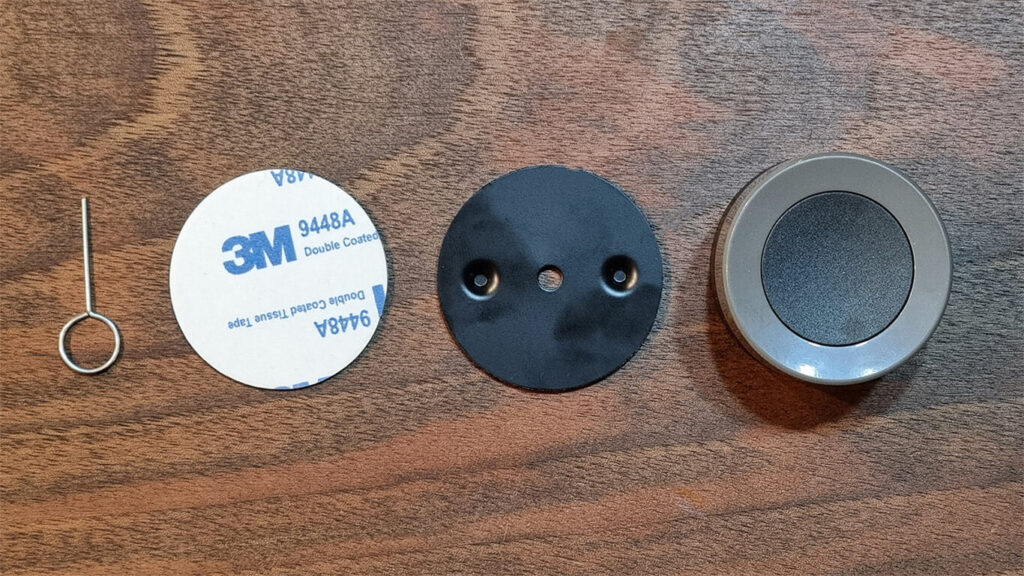
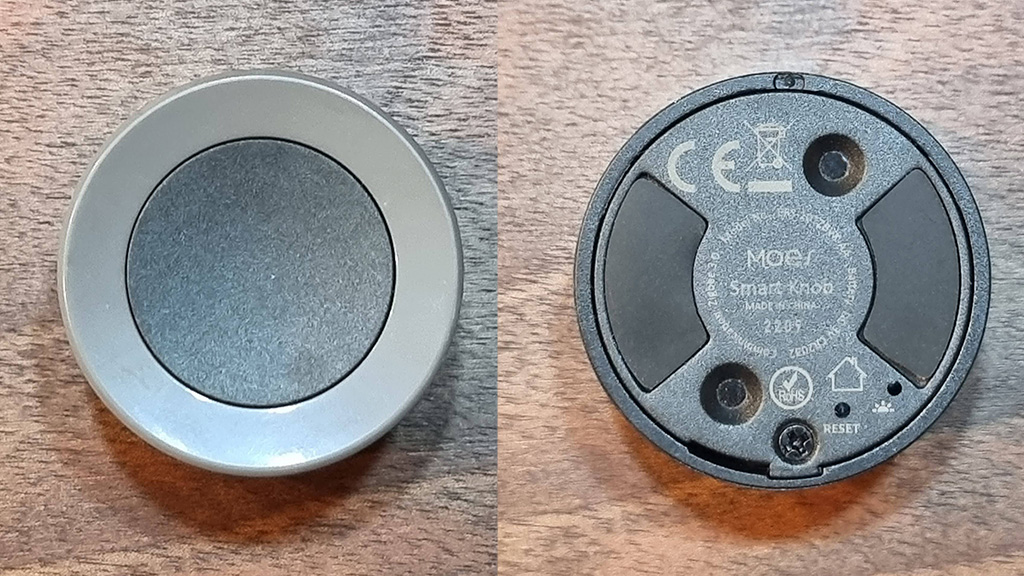
The body of the smart knob is made from high quality PU plastic, it feel slick and premium. On the backside, there are two holes in which the metal plate snaps in place for mounting, a small hole for resetting the device and a screw which reveals the battery slot. Two rubber pads are also placed on the sides to avoid the knob from slipping when rotating it on a table for example.
Once the back plate is unscrewed, the battery slot can be seen. It holds a CR2032 battery which, again, is NOT included in the package. You would have to supply it from somewhere else. On the plate itself, there is a small but very powerful neodymium magnet which clings firmly to any metal surface.
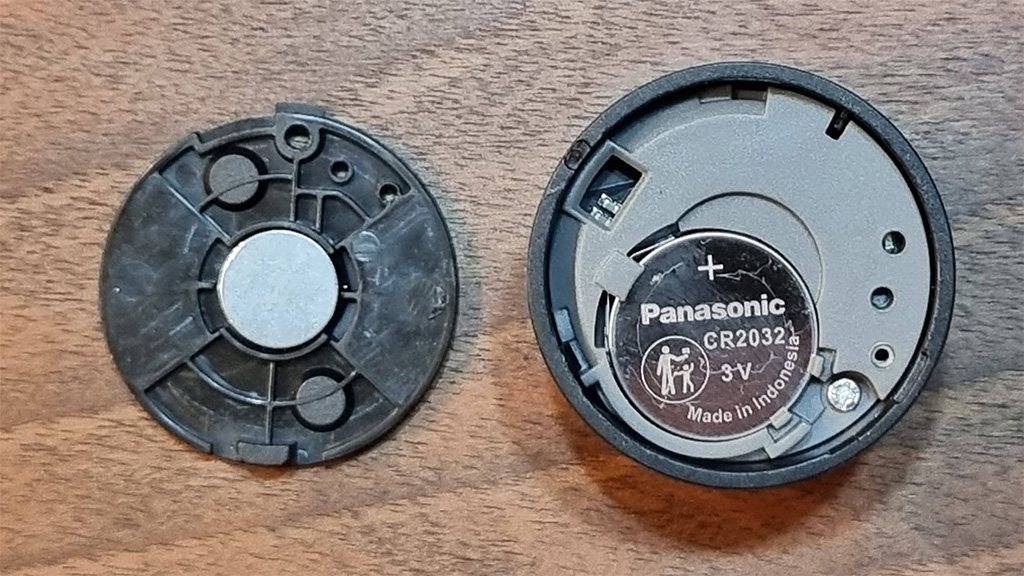
Behind the battery slot, lies the reset button accessible with the hairpin. ZigBee communication is handled by a G21 A02011 chip, which is a ZigBee 3.0 capable module developed by Silicon Labs.
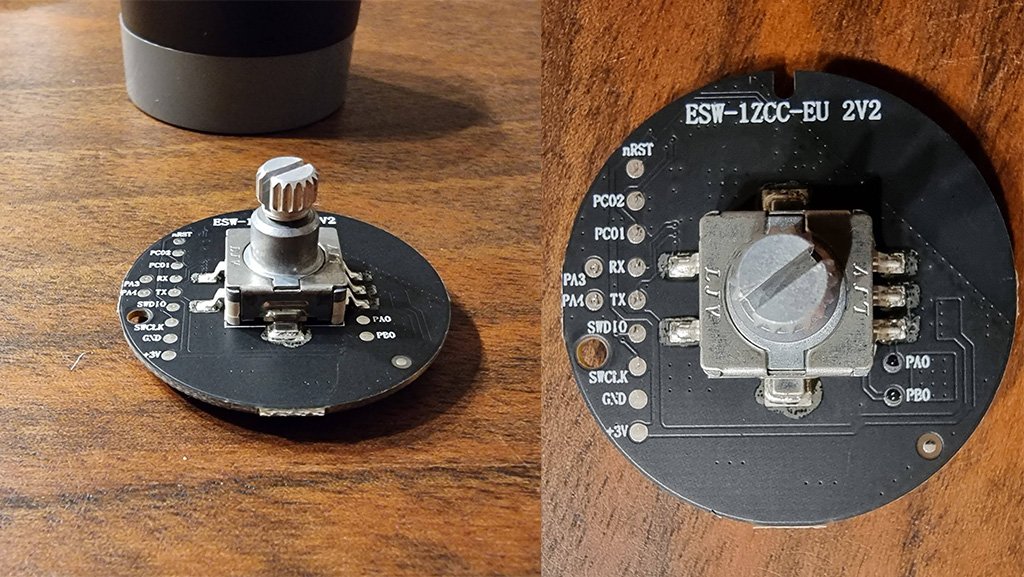
The device is fully disassembled when removing the main PCB. A metal rotary encoder is mounted in the middle, which is operated by a plastic molded shell. The encoder doubles as a button as well, which gives a nice clicky feedback when pressed.
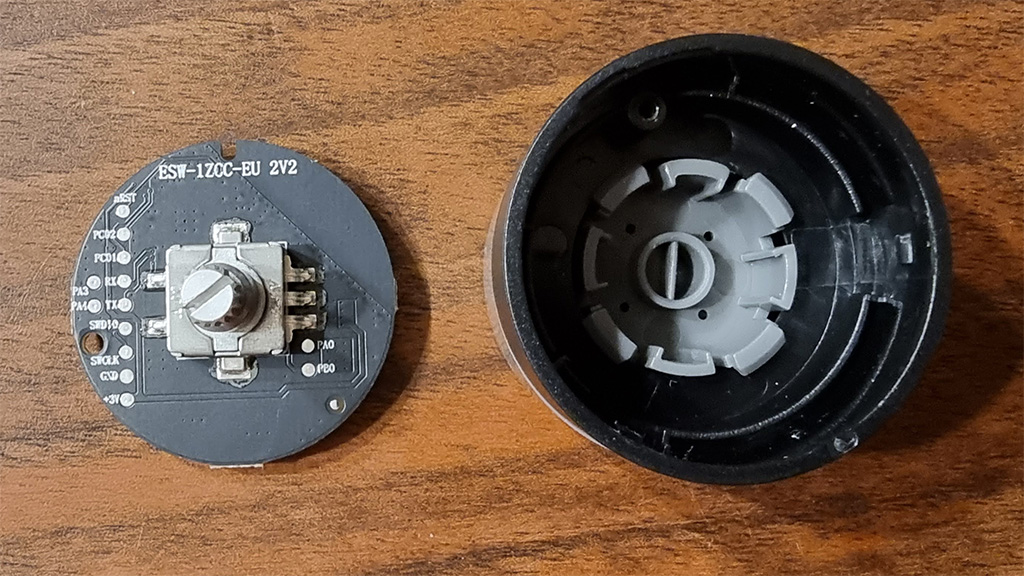
The knob itself is a generic LJV rotary encodercommonly used is cars audio systems to control volume. It can be found developed and sold by many different Chinese suppliers. Good thing is its completely metal and the grooves can be clearly felt when rotating the knob.
Integration Compatibility
As of this moment, this Moes ZigBee Smart Knob is compatible with ZHA and ZigBee2MQTT only. To pair the MoesHouse ZigBee Smart Knob, you plug the hairpin in the small hole on the back and hold for a couple of seconds until the LED starts flashing. The LED will keep flashing until paired. If the LED flashes a few times and then stops, it means the battery is weak (<3 volts) and needs to be replaced.
ZigBee2MQTT
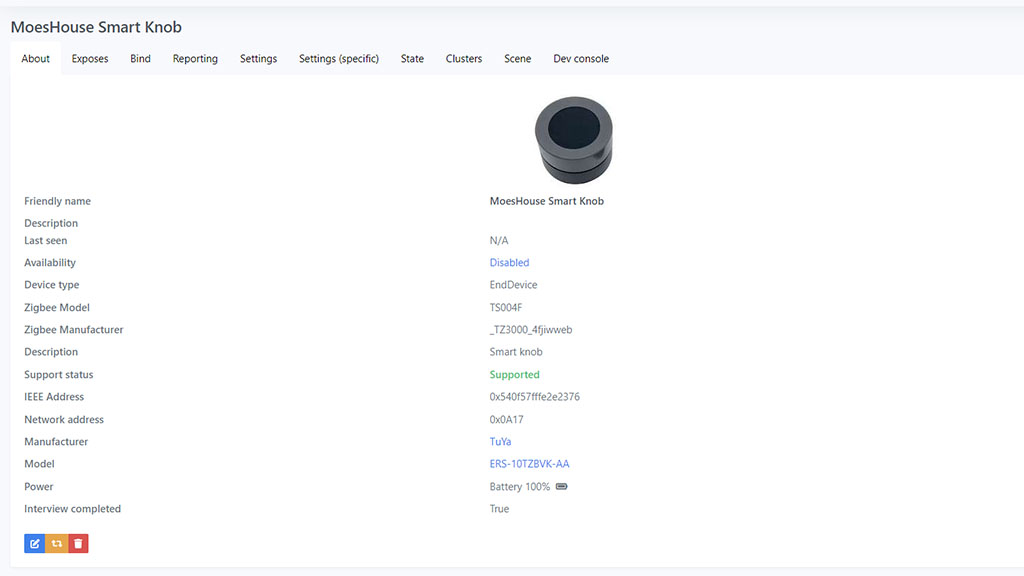
Once added to ZigBee2MQTT, it exposes the following entities to Home Assistant:
- operation_mode: command/event. Command is used for group control, event for button clicks
- action: Acquires triggered action as a state (e.g click, rotate_left)
- action_step_size: 0-255 values, used for brightness, volume control
- action_transition_time: Action transition time in seconds
- action_rate: 0-255 values, rate of action event to be published
- battery: Remaining battery in %
- linkquality: Signal quality in LQI
Important: The action event toggle can turn off an unsuspecting ZigBee device on your network. This is a known issue, because Tuya groups various devices in group 0 by default. To bypass this issue, simply create a new group with different ID (1 for example) within Z2M and add the smart knob in this group. This will isolate it from other Tuya devices on your network and potentially avoid problems.
ZHA
Paired in ZHA, it exposed the same entities as in ZigBee2MQTT. A custom quirk for this smart knob was added on March 5th, see more HERE. It supports most of the actions available:
Command mode:
SHORT_PRESS, BUTTON
LONG_PRESS, BUTTON
LONG_RELEASE, BUTTON
ROTATED_SLOW, RIGHT (one step)
ROTATED_SLOW, LEFT (one step)
(HA automation is triggering it false positive but the quirk is making it OK).
ROTATED_FAST, RIGHT (3 steps)
ROTATED_FAST, LEFT (3 steps)
Event mode:
SHORT_PRESS, BUTTON_1
DOUBLE_PRESS, BUTTON_1
LONG_PRESS, BUTTON_1
ROTATED, RIGHT
ROTATED, LEFT
You can quickly switch between operating modes (command and event) by triple clicking the button.
Testing
To initially test this MoesHouse smart knob, we can create a simple automation which will trigger on a button click event:
#Toggle Action Event
alias: MoesHouse SmartKnob Toggle Switch
description: "MoesHouse SmartKnob Toggle Switch"
mode: single
trigger:
  - platform: state
    entity_id:
      - sensor.moeshouse_smart_knob_action
    to: toggle
condition: []
action:
  - service: switch.toggle
    data: {}
    target:
      entity_id: switch.wall_light_1
To reduce light brightness for example, we can create a simple automation which will trigger on events rotate_left or rotate_right:
#Rotate Action Event
alias: MoesHouse SmartKnob Brightness Increase
description: MoesHouse SmartKnob Brightness Increase
mode: single
trigger:
  - platform: state
    entity_id:
      - sensor.moeshouse_smart_knob_action
    to: rotate_right
condition: []
action:
  - service: light.turn_on
    data:
      brightness_step: 10
    target:
      entity_id: light.bar_lights
If you follow this pattern, and create simple automations based on button events you can create loads of automations. This is the simple and easy way to utilize this smart knob as a button or a simple dial for various devices. However, this is underutilizing the knob itself, as it’s capable of so much more.
You could develop complex automations by testing each and every action or operation mode yourself, which is tedious work. Luckily, the community has developed a blueprint for this smart knob, both for ZigBee2MQTT and ZHA.
Blueprints
ZigBee2MQTT
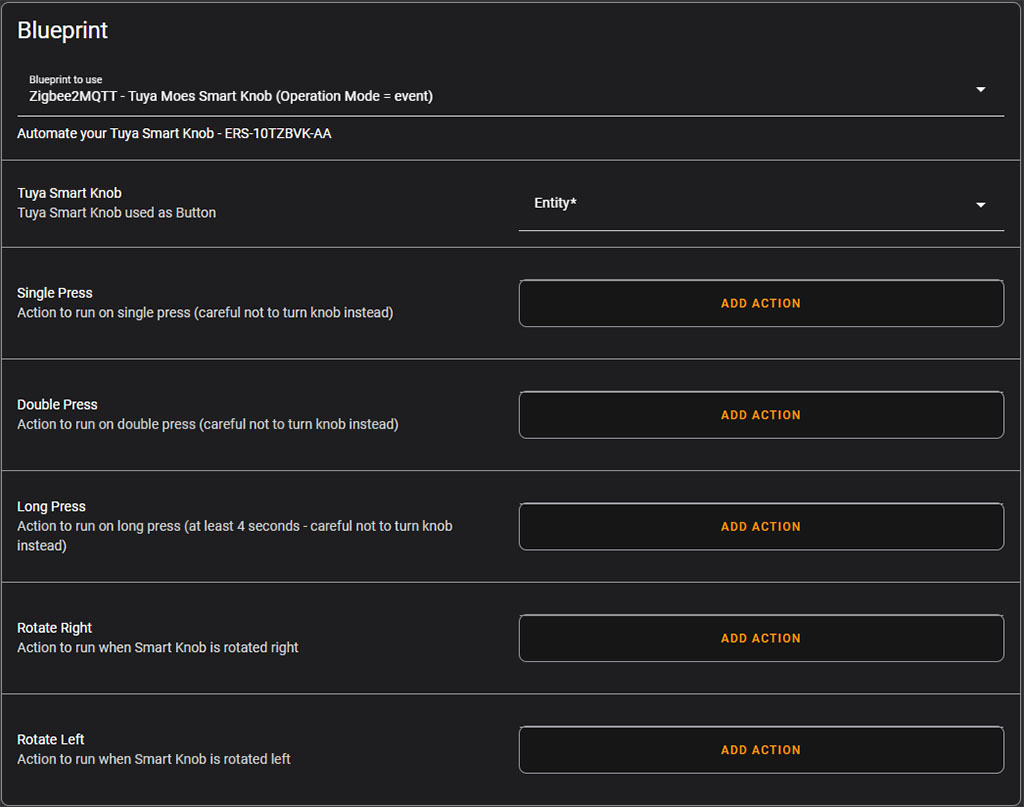
We could streamline this process by using this blueprint by user rdeangel.

#Operation Mode: Event Blueprint
blueprint:
  name: Zigbee2MQTT - Tuya Moes Smart Knob (Operation Mode = event)
  description: Automate your Tuya Smart Knob - ERS-10TZBVK-AA
  domain: automation
  input:
    switch:
      name: Tuya Smart Knob
      description: Tuya Smart Knob used as Button
      selector:
        entity:
          integration: mqtt
          domain: sensor
          multiple: false
    button_short_press:
      name: Single Press
      description: Action to run on single press (careful not to turn knob instead)
      default: []
      selector:
        action: {}
    button_double_press:
      name: Double Press
      description: Action to run on double press (careful not to turn knob instead)
      default: []
      selector:
        action: {}
    button_long_press:
      name: Long Press
      description: Action to run on long press (at least 4 seconds - careful not to turn knob instead)
      default: []
      selector:
        action: {}
    button_rotate_right:
      name: Rotate Right
      description: Action to run when Smart Knob is rotated right
      default: []
      selector:
        action: {}
    button_rotate_left:
      name: Rotate Left
      description: Action to run when Smart Knob is rotated left
      default: []
      selector:
        action: {}
  source_url: https://community.home-assistant.io/t/zigbee2mqtt-tuya-moes-smart-knob-ers-10tzbvk-aa/419989
mode: restart
max_exceeded: silent
trigger:
- platform: state
  entity_id: !input 'switch'
  attribute: action
action:
- variables:
    command: '{{ trigger.to_state.state }}'
- choose:
  - conditions:
    - '{{ command == ''single'' }}'
    sequence: !input 'button_short_press'
  - conditions:
    - '{{ command == ''double'' }}'
    sequence: !input 'button_double_press'
  - conditions:
    - '{{ command == ''hold'' }}'
    sequence: !input 'button_long_press'
  - conditions:
    - '{{ command == ''rotate_right'' }}'
    sequence: !input 'button_rotate_right'
  - conditions:
    - '{{ command == ''rotate_left'' }}'
    sequence: !input 'button_rotate_left'
Than you can create an automation by defined desired actions per event.
ZHA
A similar blueprint could be imported when using ZHA, shared by user jory. This one is a little more complex, and uses both operations modes: command and event. It streamlines the process of turning this smart knob into a light dimmer. You could use the Import Blueprint button or copy it’s contents directly
#Full ZHA Blueprint
blueprint:

  name: ZHA - Tuya - TS004F Rotating Knob - Custom Actions

  description: >-
    This automation adds triggers for all actions of the Tuya TS004F rotating knob remote.
    It can be used in both Command/Dimmer and Event/Scene mode. Both modes have their own actions.

    In Command/Dimmer mode the config is mostly internal except for pressing the button.
    In Event/Scene mode you can select your own actions.
    To switch modes you can press the button 3 times fast.

    Sold on AliExpress by brands like Moes, Girier etc.

  domain: automation

  input:
    mode:
      name: Automation Mode
      description: "https://www.home-assistant.io/docs/automation/modes/"
      default: restart
      selector:
        select:
          mode: dropdown
          options:
            - single
            - restart
            - queued
            - parallel
    max:
      name: Automation Max Queue
      description: The maximum number of runs that can be executing and/or queued up at a time.
      default: 10
      selector:
        number:
          mode: box
          min: 1
          max: 100
    remote:
      name: Tuya - TS004F Rotating Knob
      description: Select the remote control you wish to use.
      selector:
        device:
          integration: zha
          manufacturer: _TZ3000_4fjiwweb
          model: TS004F
    light:
      name: Light (Command/Dimmer mode)
      selector:
        target:
          entity:
            domain: light
    toggle:
      name: Toggle (Command/Dimmer mode)
      selector:
        action:
      default: []
    press_short:
      name: Short Press (Event/Scene mode)
      selector:
        action:
      default: []
    press_double:
      name: Double Press (Event/Scene mode)
      selector:
        action:
      default: []
    press_long:
      name: Long Press (Event/Scene mode)
      selector:
        action:
      default: []
    rotate_left:
      name: Rotate Left (Event/Scene mode)
      selector:
        action:
      default: []
    rotate_right:
      name: Rotate Right (Event/Scene mode)
      selector:
        action:
      default: []

mode: !input mode
max: !input max
max_exceeded: silent

trigger:
  - platform: event
    event_type: zha_event
    event_data:
      device_id: !input remote

action:
  - variables:
      light: !input light
      command: "{{ trigger.event.data.command }}"
      cluster_id: "{{ trigger.event.data.cluster_id }}"
      endpoint_id: "{{ trigger.event.data.endpoint_id }}"
      args: "{{ trigger.event.data.args }}"
      direction: "{% if trigger.event.data.args[0] == 0 %} 0 {% elif trigger.event.data.args[0] == 1 %} 1 {% elif trigger.event.data.args[0] == 3 %} 3 {% endif %}"
      value: "{% if trigger.event.data.args[1] %} {{ trigger.event.data.args[1] / 2 }} {% endif %}"
      speed: "{% if trigger.event.data.args[2] == 1 %} 0.5 {% else %} 0 {% endif %}"

  - choose:

    # Command Mode
    - conditions:
        - "{{ command == 'toggle' }}"
        - "{{ cluster_id == 6 }}"
        - "{{ endpoint_id == 1 }}"
      sequence: !input toggle

    # Command Mode: Dimming
    - conditions:
        - "{{ command == 'step' }}"
        - "{{ cluster_id == 8 }}"
        - "{{ endpoint_id == 1 }}"
        - "{{ direction == 0 }}"
      sequence:
        - repeat:
            while:
              - condition: template
                value_template: "{{ repeat.index < 2 }}"
            sequence:
              - service_template: light.turn_on
                target: !input light
                data_template:
                  brightness_step_pct: "{{ value }}"
                  transition: "{{ speed }}"
    - conditions:
        - "{{ command == 'step' }}"
        - "{{ cluster_id == 8 }}"
        - "{{ endpoint_id == 1 }}"
        - "{{ direction == 1 }}"
      sequence:
        - repeat:
            while:
              - condition: template
                value_template: "{{ repeat.index < 2 }}"
            sequence:
              - service_template: light.turn_on
                target: !input light
                data_template:
                  brightness_step_pct: "{{ - value }}"
                  transition: "{{ speed }}"

    # Command Mode: Color Temperature
    - conditions:
        - "{{ command == 'step_color_temp' }}"
        - "{{ cluster_id == 768 }}"
        - "{{ endpoint_id == 1 }}"
        - "{{ direction == 1 }}"
      sequence:
        - repeat:
            while:
              - condition: template
                value_template: "{{ repeat.index < 2 }}"
            sequence:
              - service_template: light.turn_on
                target: !input light
                data_template:
                  color_temp: "{{ ( state_attr( light.entity_id, 'color_temp' ) or 300 ) + value }}"
                  transition: "{{ speed }}"
    - conditions:
        - "{{ command == 'step_color_temp' }}"
        - "{{ cluster_id == 768 }}"
        - "{{ endpoint_id == 1 }}"
        - "{{ direction == 3 }}"
      sequence:
        - repeat:
            while:
              - condition: template
                value_template: "{{ repeat.index < 2 }}"
            sequence:
              - service_template: light.turn_on
                target: !input light
                data_template:
                  color_temp: "{{ ( state_attr( light.entity_id, 'color_temp' ) or 300 ) - value }}"
                  transition: "{{ speed }}"

    # Command Mode: Color Hue
    - conditions:
        - "{{ command == 'move_hue' }}"
        - "{{ cluster_id == 768 }}"
        - "{{ endpoint_id == 1 }}"
      sequence:
        - repeat:
            while:
              - condition: template
                value_template: "{{ repeat.index < 24 }}"
            sequence:
              - service_template: light.turn_on
                target: !input light
                data_template:
                  hs_color:
                    - "{{ ( value + (state_attr( light.entity_id , 'hs_color' )[0] or 0)) % 360 }}"
                    - 100
                  transition: 0.5
              - delay:
                  hours: 0
                  minutes: 0
                  seconds: 1
                  milliseconds: 0
    - conditions:
        - "{{ command == 'stop_move_step' }}"
        - "{{ cluster_id == 768 }}"
        - "{{ endpoint_id == 1 }}"
      sequence:

    # Event mode: Short Press
    - conditions:
        - "{{ command == 'remote_button_short_press' }}"
      sequence: !input press_short

    # Event mode: Double Press
    - conditions:
        - "{{ command == 'remote_button_double_press' }}"
      sequence: !input press_double

    # Event mode: Long Press
    - conditions:
        - "{{ command == 'remote_button_long_press' }}"
      sequence: !input press_long

    # Event mode: Rotate Left
    - conditions:
        - "{{ command == 'left' }}"
      sequence: !input rotate_left

    # Event mode: Rotate Right
    - conditions:
        - "{{ command == 'right' }}"
      sequence: !input rotate_right
Once imported, you can create a very detailed automation in command/event mode. In command mode, you can setup the knob to control a light’s brightness, color or hue.
Verdict
The MoesHouse Tuya Smart Knob is a great little battery operated gadget which can be used to control any device within your Home Assistant server. It pairs easily and has so much potential for triggering automations and scenes.
It’s worth noting that battery life will not be great when used frequently, but this should present no issue as the CR2032 battery is dirt cheap and can be replaced easily.
The best way to dim using this knob is to go up/down in small increments. The step can be fine-tuned for a better experience. With its two operation modes, you can control a large number of devices by binding them in Z2M or creating automations.
If you would like to test this MoesHouse Tuya Smart Knob yourself, consider using one of our affiliate links bellow to help the maintenance of this blog.
Moes Smart Knob Remote ERS-10TZBVK-AA ~ $14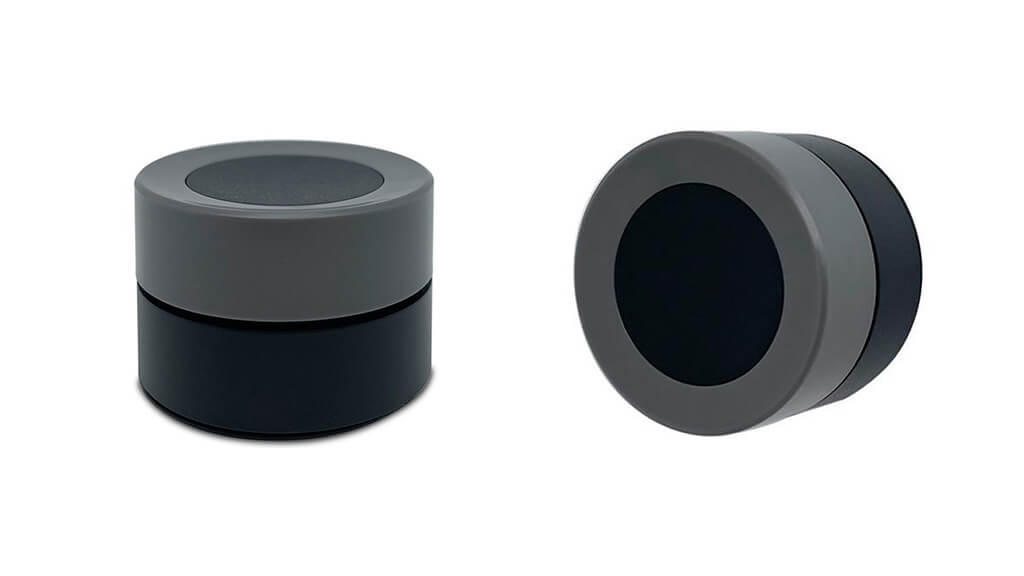
![]()
AliExpress | AliExpress | AliExpress | AliExpress![]()
United States | Canada | United Kingdom
Germany | Netherlands | Sweden | Spain
France | Italy | Poland | Australia
*If links fail to open, try disabling your AdBlocker.


Does this device support Zigbee binding via ZHA? If you’re using it to dim a Zigbee device, that might let you get much more responsive dimming functionality
I cant bind it via Z2M