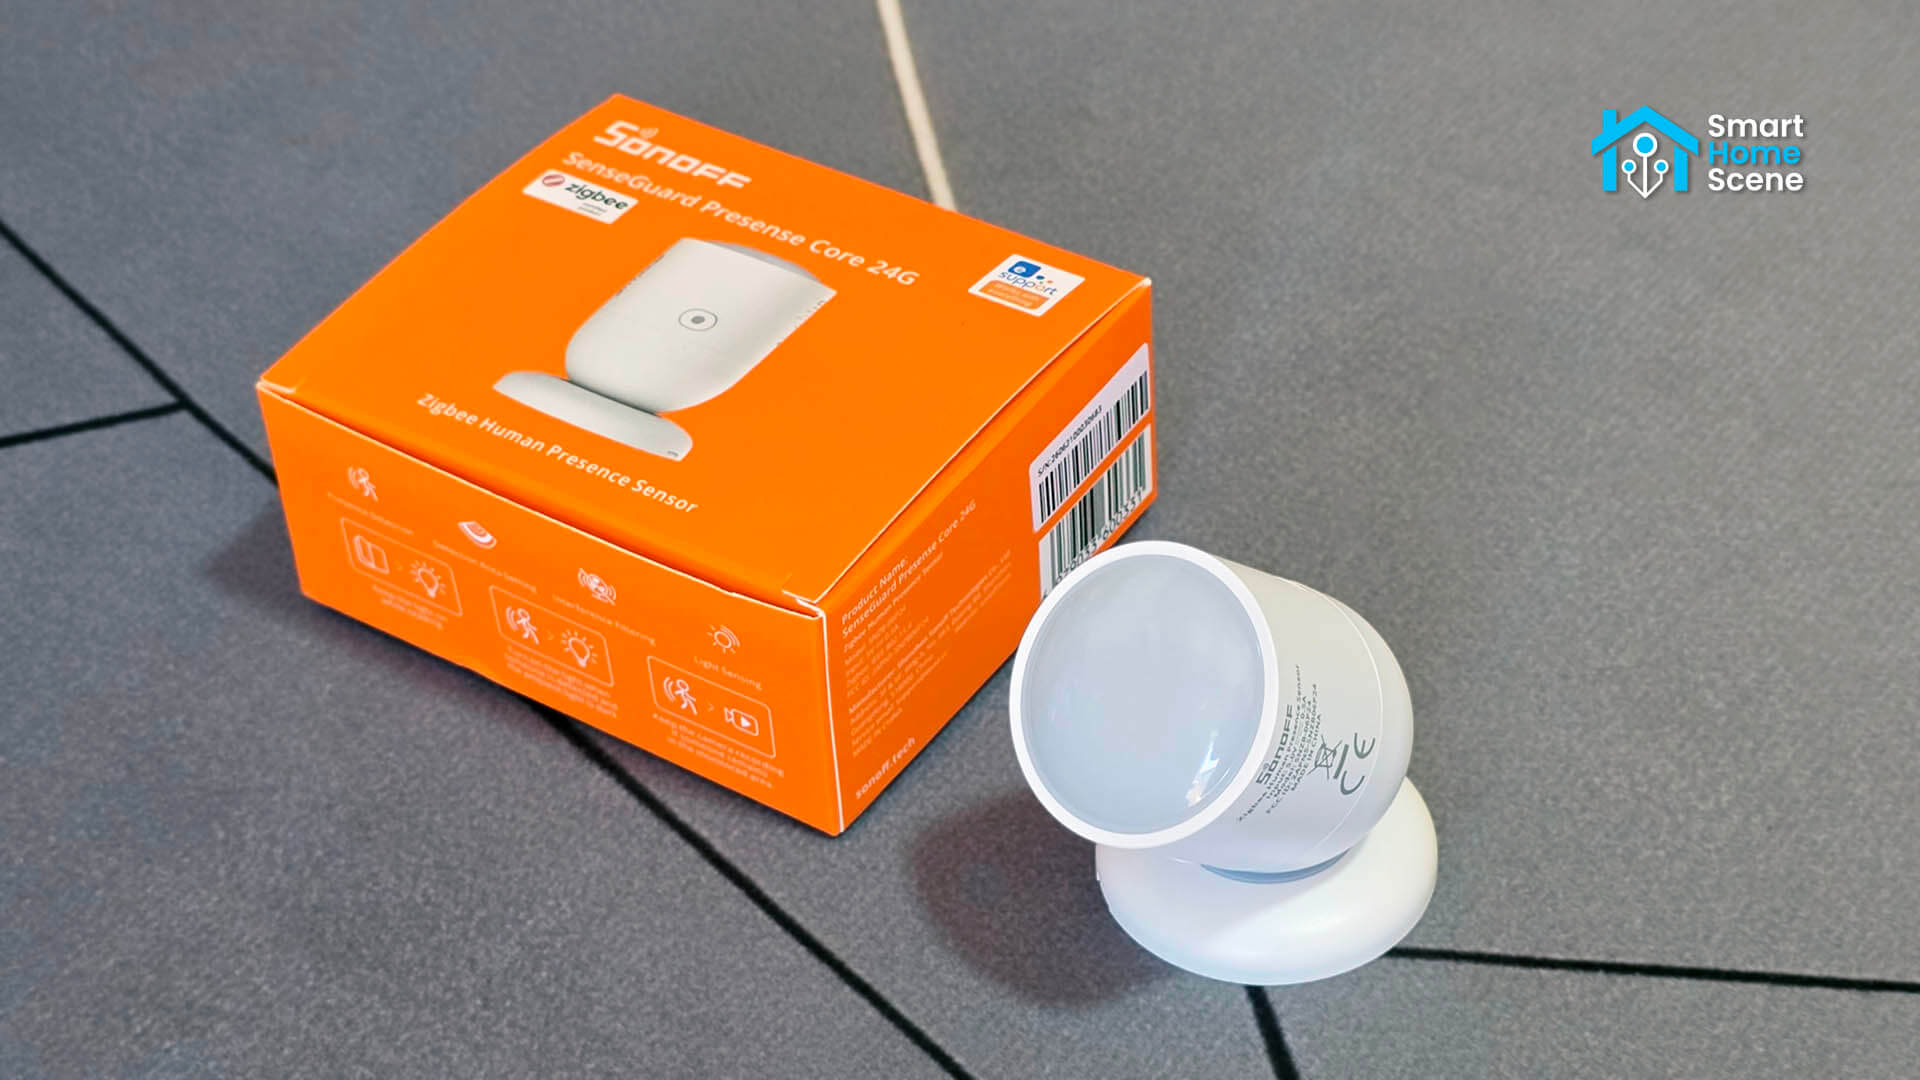
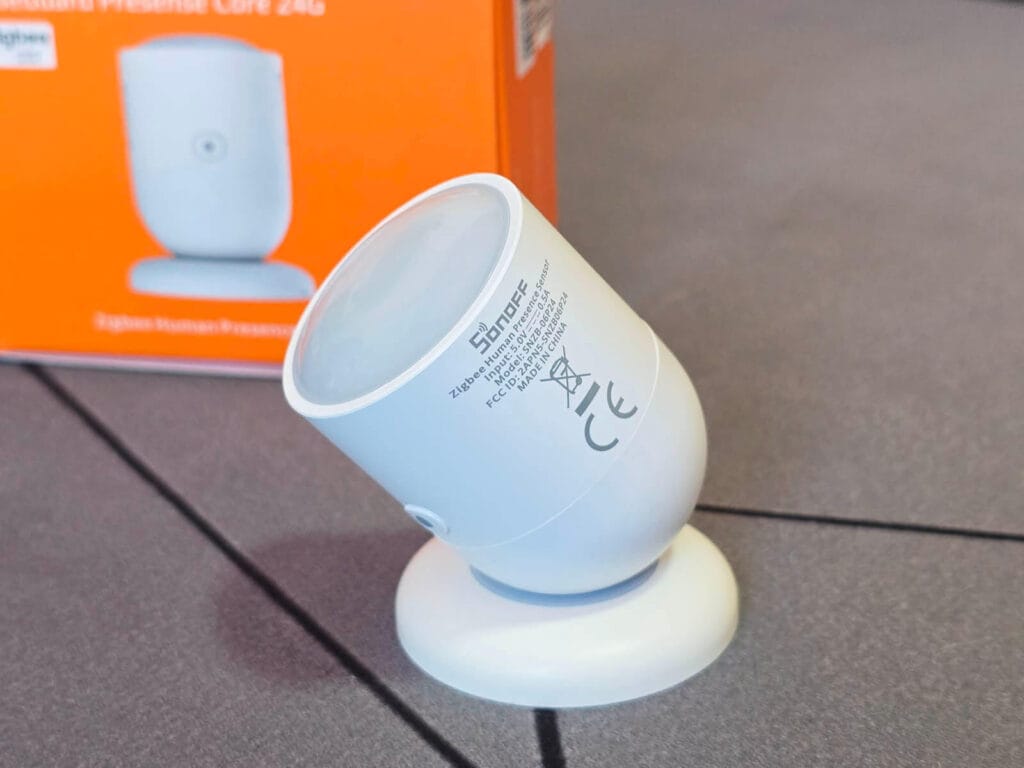
The SONOFF SenseGuard Presence Core 24G (SNZB-06P24) is the official successor to the SNZB-06P, one of the most popular budget presence sensors for Zigbee users. The form factor is the same, the Zigbee connectivity is the same, but the hardware underneath is a different story.
SONOFF made some meaningful changes with this device. The 5.8GHz radar got replaced by a 24GHz version, and the feature set changed accordingly. Seven configurable detection zones, a spatial learning calibration system, and a proper lux sensor. The price also reflects that: $24.90 versus around $18 for the original.
I tested the SNZB-06P24 in Home Assistant through both Zigbee2MQTT and ZHA. I bought it on AliExpress, but you can also get it on Amazon US, Amazon DE, Amazon NL, Amazon UK, Domadoo or Sonoff’s Official Webstore.
SNZB-06P vs SNZB-06P24: What’s different?
The SNZB-06P24 is a completely new device in terms of hardware, not just a minor refresh. The original SNZB-06P used a 5.8GHz radar module and a Silicon Labs EFR32MG22 Zigbee SoC. The SNZB-06P24 replaces both: the 5.8GHz radar with 24GHz and the Silabs MCU with a Telink one. Here’s how they compare side by side:
 |  | |
|---|---|---|
| Model | SNZB-06P | SNZB-06P24 |
| Radar frequency | 5.8GHz | 24GHz |
| Detection angle | 100° | 120° |
| Detection range | 4m | 4m |
| Stationary detection | Up to 4m | Up to 4m |
| Detection zones | None | 7 linear zones (0.5m increments) |
| Sensitivity control | Low / Medium / High | Numeric scale, -6 to +6 |
| Interference calibration | None | Spatial learning (self-learning) |
| Ambient light | Binary (Bright / Dim) | Lux value with calibration offset |
| MCU | EFR32MG22 (Silicon Labs) | TLSR8656 (Telink) |
| Power input | 5V/1A, USB-C | 5V/0.5A, USB-C |
| Price | $17.90 | $24.90 |
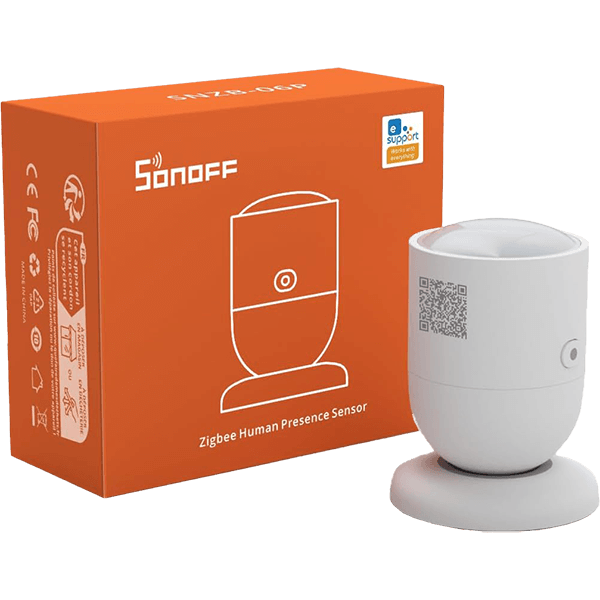
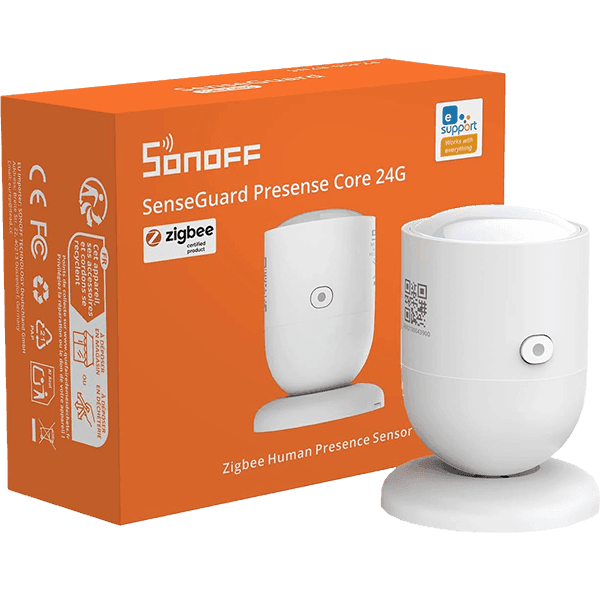
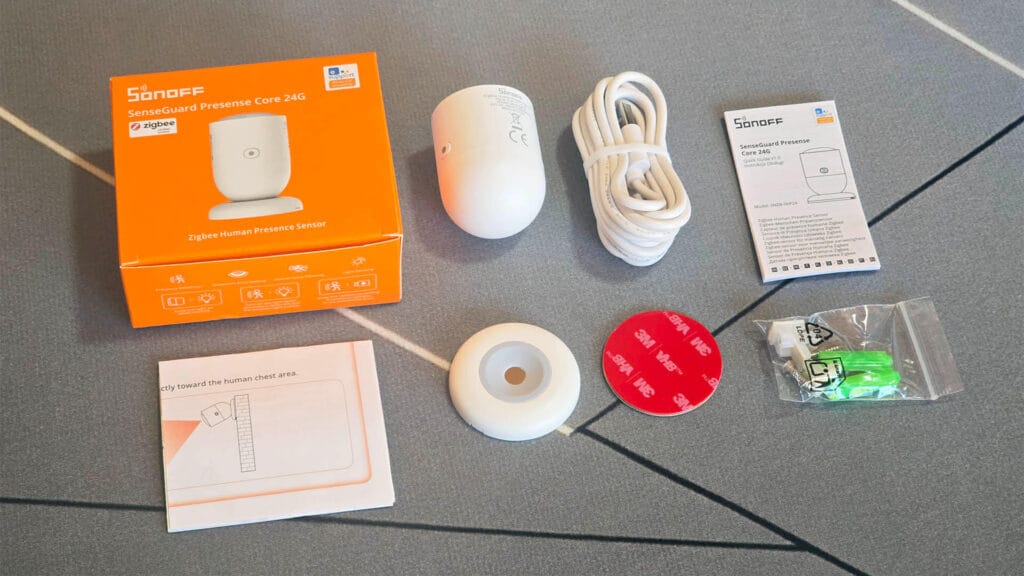
Packaging and Contents
The SNZB-06P24 arrives in SONOFF’s recognizable orange retail box. Inside you get the sensor, the magnetic base, a USB-C power cable, a set of screws, a set of cable clips for routing the cable after mounting, a 3M adhesive pad, and a user manual. Nothing surprising here, the box contents cover all mounting scenarios the sensor supports.
Design and Hardware
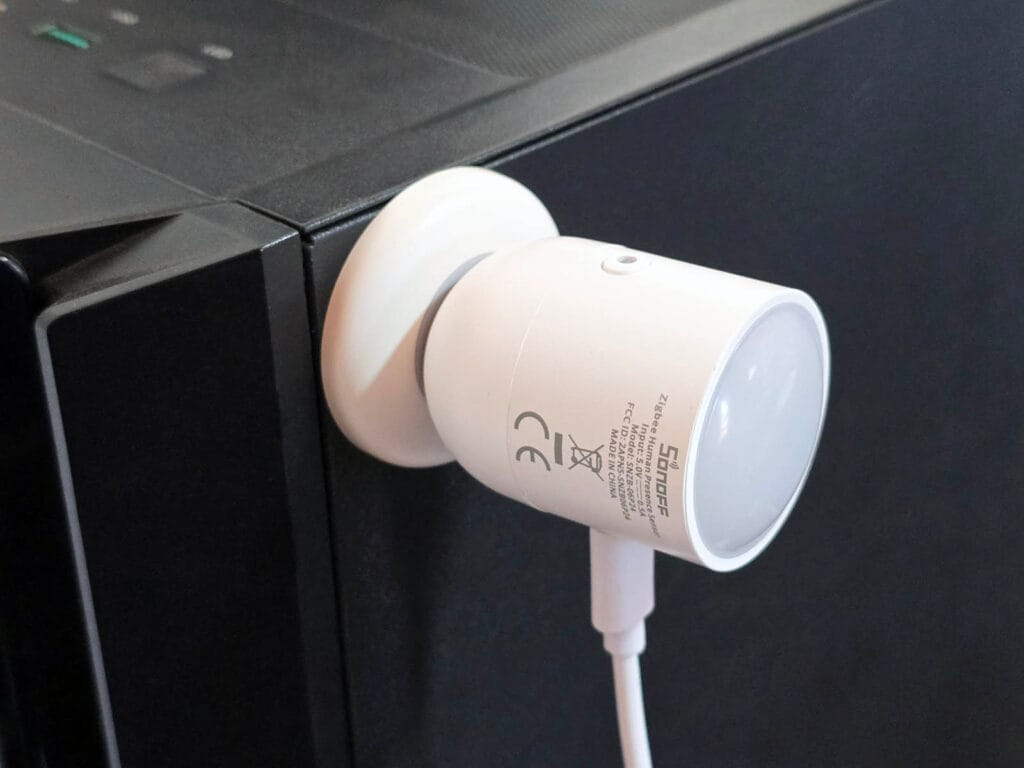
The SNZB-06P24 has the same capsule-shaped body as the original SNZB-06P. The head rotates 360° and tilts freely, which makes aiming it at a specific area of the room straightforward without having to reposition the base. The device feels very light and empty, nothing premium, but nothing that feels cheap either.
Opening the sensor requires prying the dome off, which takes some effort. Inside, the PCB sits neatly in the cylindrical housing, held in place with two small screws. What stands out immediately is the back of the dome: it has a polished metal reflector, almost like a miniature satellite dish. This acts as a radar reflector, concentrating the mmWave signal forward and improving the effective gain of the antenna in the target direction.
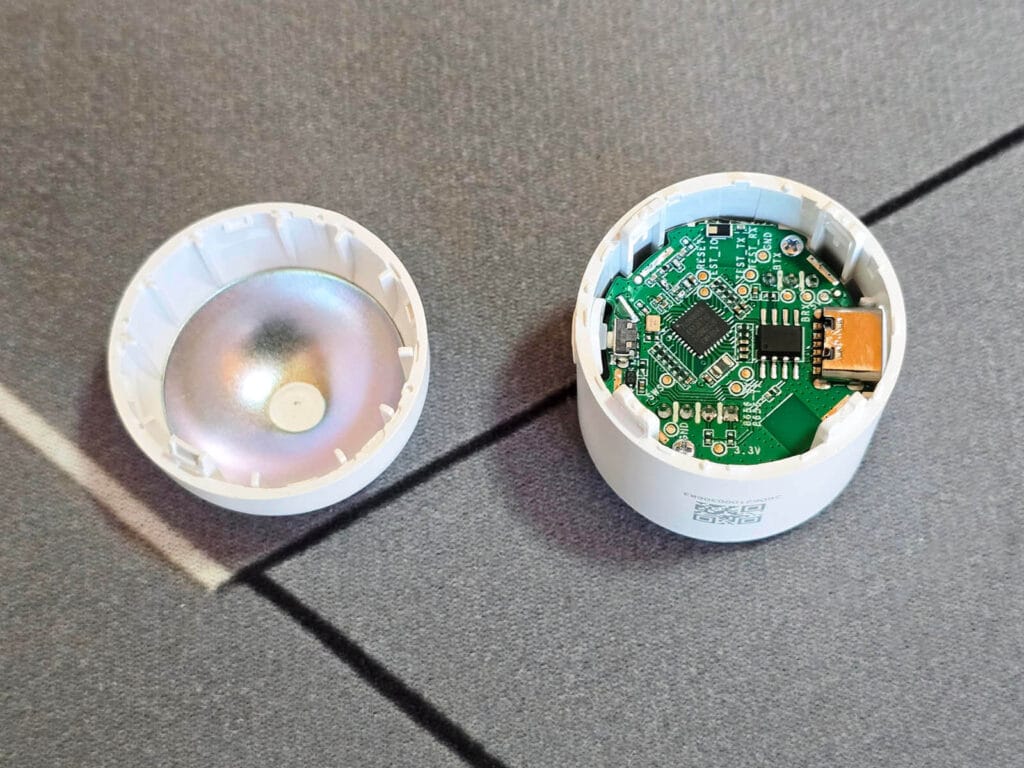
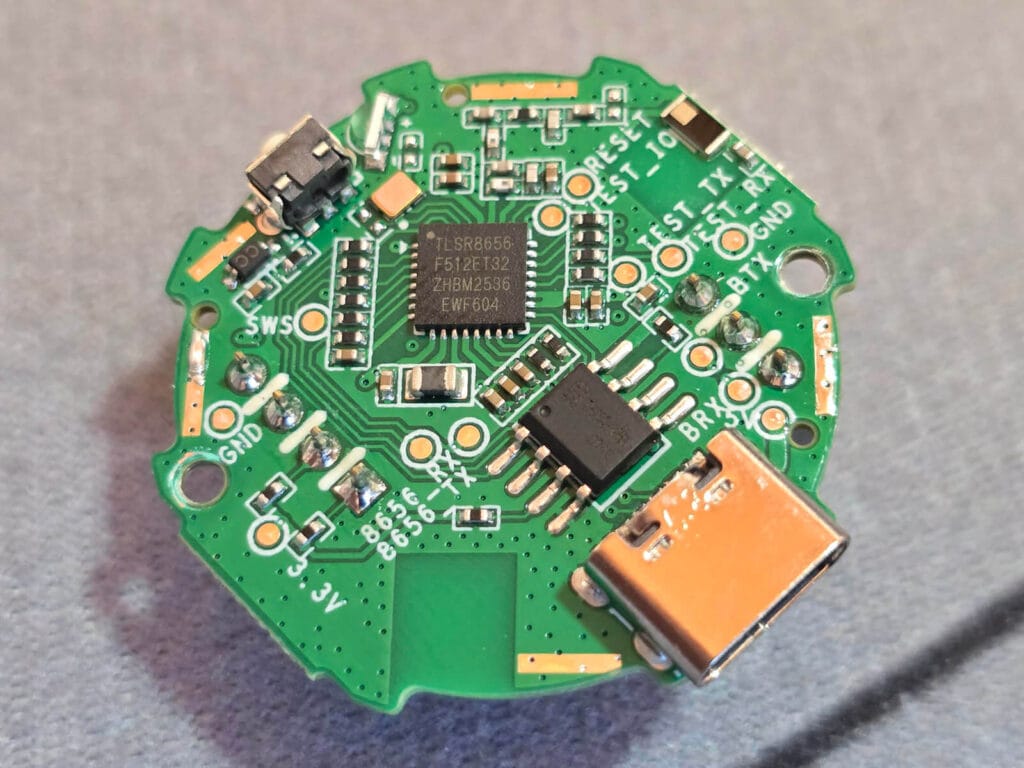
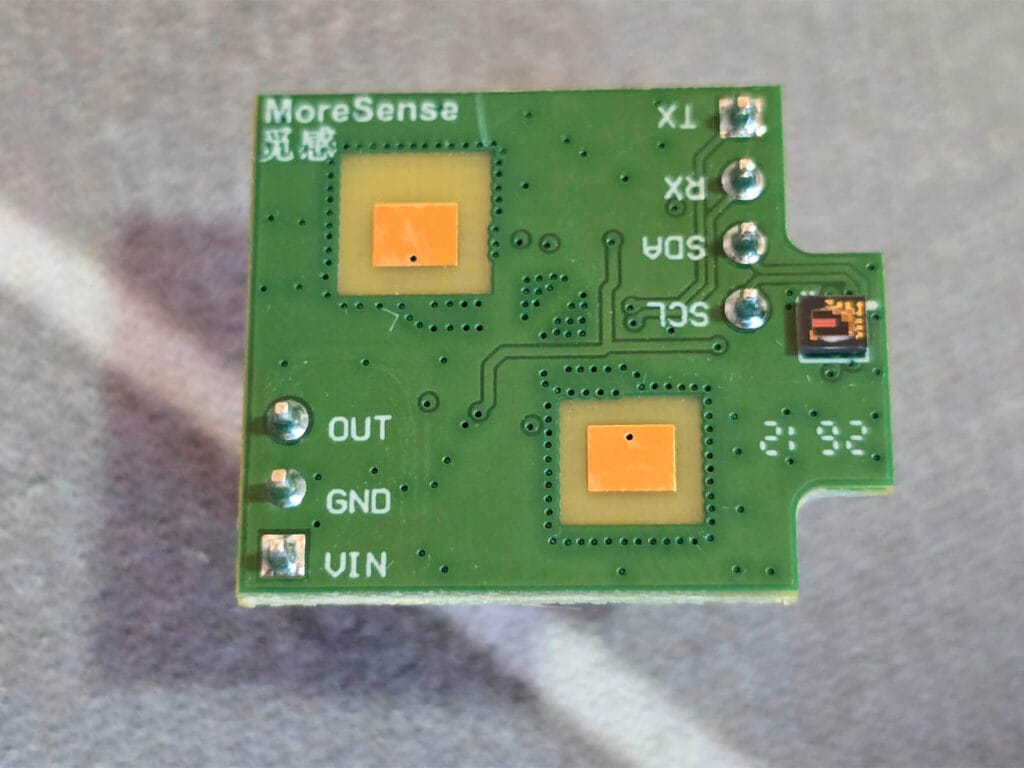
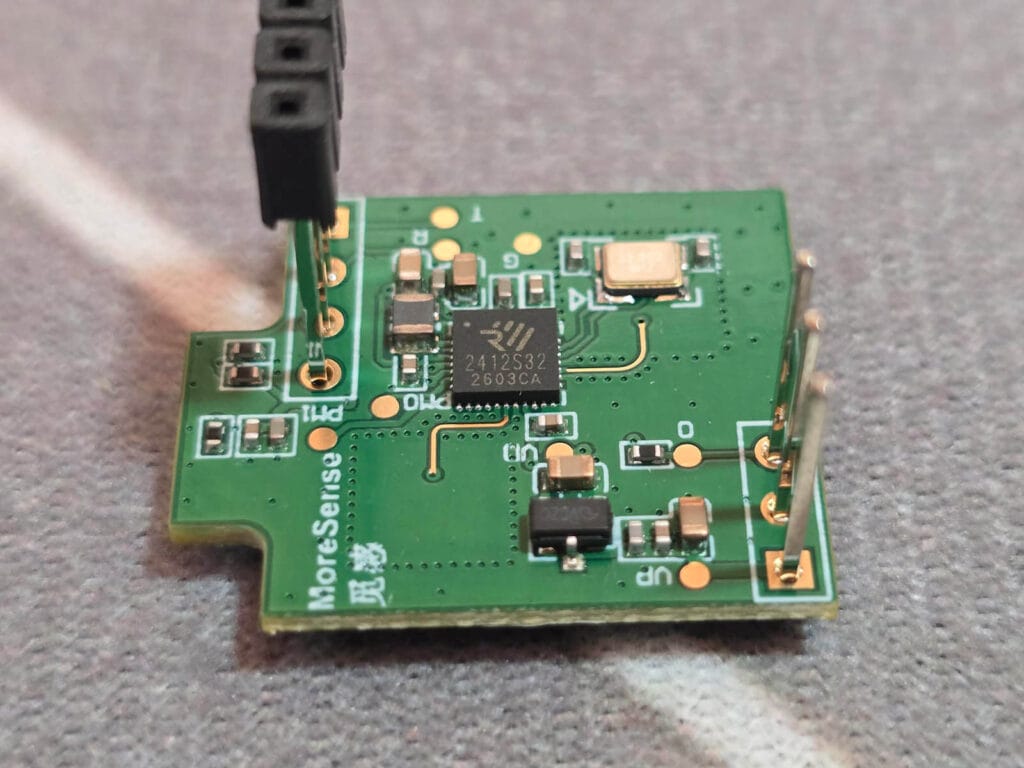
The main PCB is neat and clean. The primary chip is the Telink TLSR8656 [Datasheet], which handles Zigbee 3.0 connectivity. This is the same SoC Sonoff has been moving toward in recent releases including the SNZB-02WD and SNZB-02LD thermometers and the AirGuard TH Zigbee sensor. Next to that sits a smaller IC handling supporting functions, with the USB-C port mounted directly to the board edge.
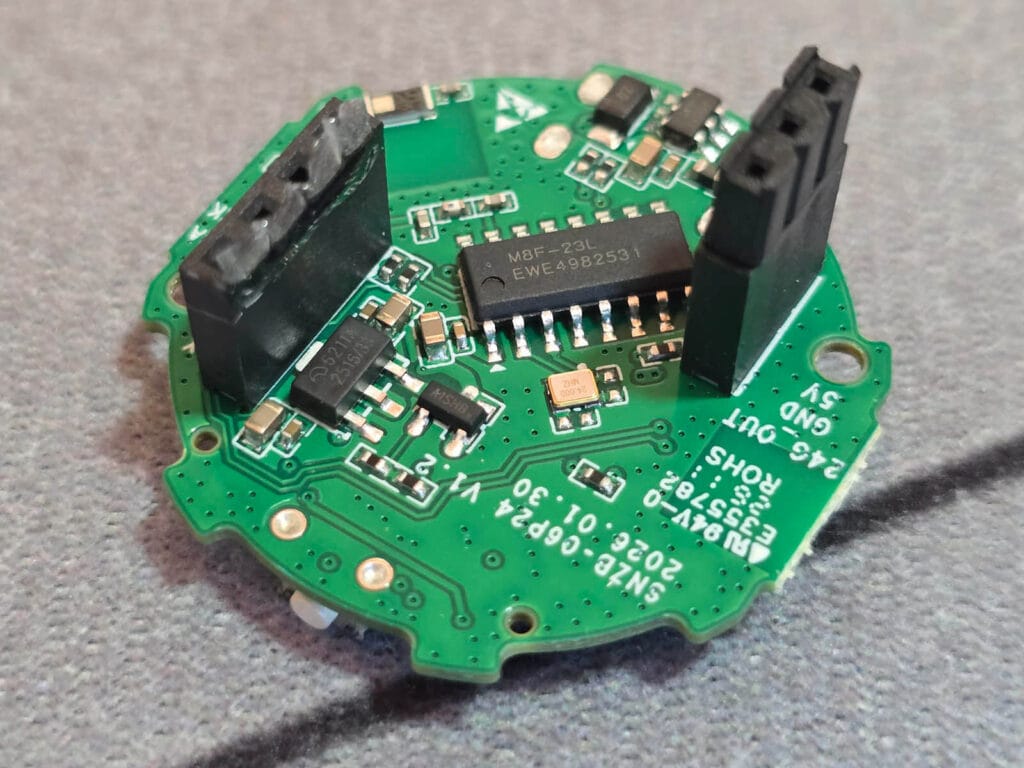
The 24GHz mmWave sensor connects to the main PCB via two pin headers. This mmWave radar is marked as model 2412S32, manufactured by Shenzhen MoreSense Technology. I discovered it’s part of their MS24 series, a module I have not come across before in any other sensor I have tested.
The front side carries the antennas, while the back houses the processing IC along with what appears to be the ambient light sensor: a small orange surface-mount photodiode sitting in the corner of the board, positioned to read light through the front dome of the sensor.
Home Assistant Integration
The SNZB-06P24 integrates with Home Assistant through Zigbee2MQTT or ZHA. I tested both on my main setup running the SMLIGHT SLZB-Ultima 3 coordinator for Zigbee2MQTT and a TI CC2652P7 coordinator for ZHA, specifically the SLZB-07P7. To put the device in pairing mode, hold the button for about 5 seconds until the LED starts flashing red.
Zigbee2MQTT
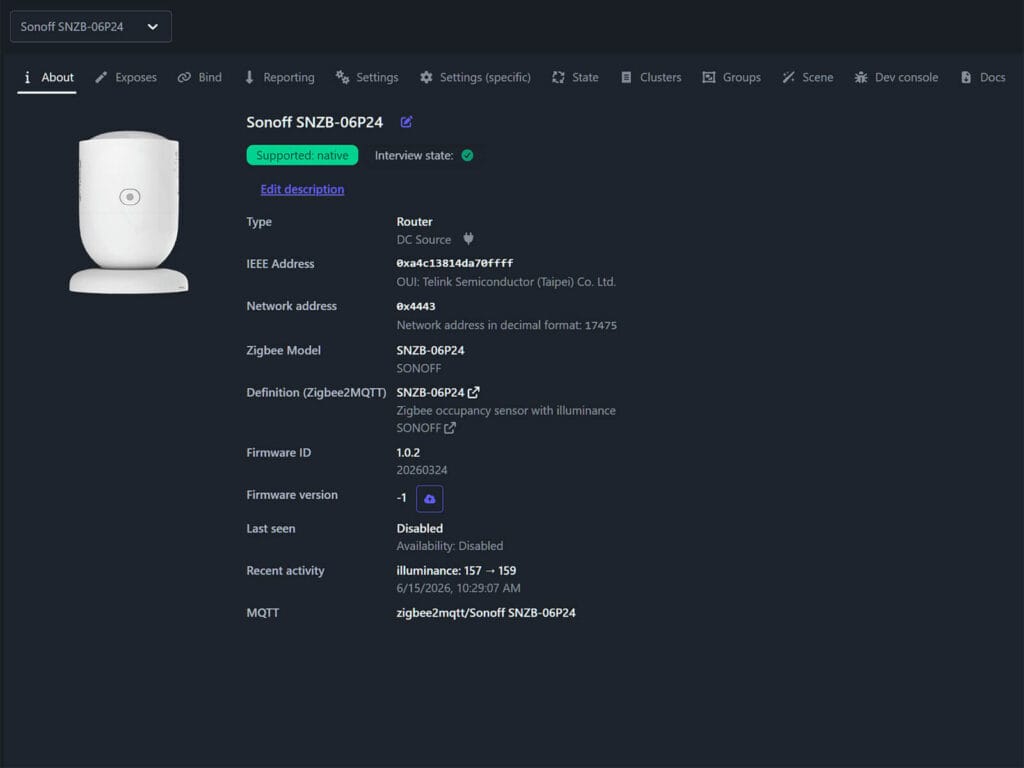
Zigbee2MQTT recognizes the SNZB-06P24 by model name and identifies the manufacturer. If you are using the new Windfront UI, it also identifies the chip manufacturer, which is Telink Semiconductor in this case. The firmware version will stay at -1 until you manually click the OTA button to check for an available update. In my case, the firmware was latest and there wasn’t one pending.
The device exposes the following entities out of the box:
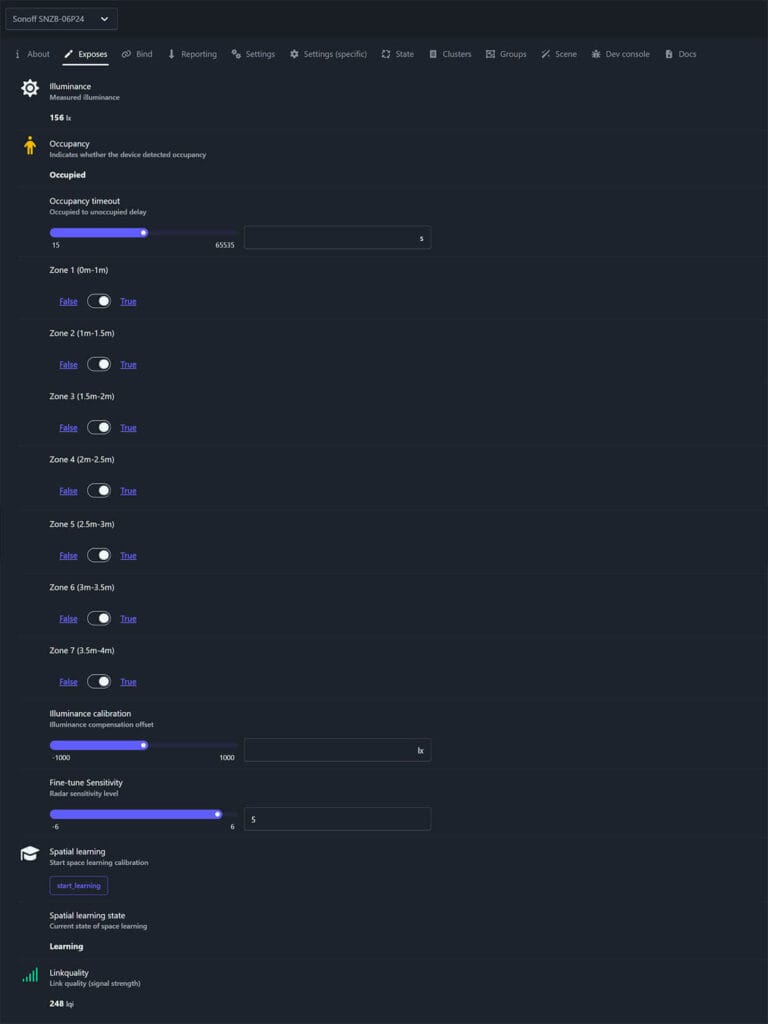
- Illuminance: measured ambient light level in lux, reported continuously
- Occupancy: binary presence state, Occupied or Clear
- Occupancy timeout: the delay before the sensor reports Clear after no presence is detected.
- Zone 1 – Zone 7 (0m-4m): individual True/False toggles for each of the seven detection zones, covering the full 4 meter range in 0.5 meter increments.
- Illuminance calibration: lux offset to correct brightness readings
- Fine-tune Sensitivity: radar sensitivity level on a scale from -6 to +6
- Spatial learning: a button that triggers the interference calibration process
- Spatial learning state: reports the current calibration status: Clear, Learning, or Failed
- Linkquality: Zigbee signal strength in LQI
ZHA
Pairing in ZHA follows the same process: hold the button until the LED flashes and the integration picks the device up. Out of the box, ZHA exposes only a basic occupancy binary sensor and illuminance. As advanced features rely on a manufacturer-specific cluster (FC11) that ZHA does not handle natively, you need to apply a custom quirk:
- Download the quirk file from SONOFF’s knowledge center and extract the ZIP.
- In your Home Assistant file system, navigate to your
configfolder and create acustom_zha_quirksfolder if it does not already exist. - Place the extracted
SNZB-06P24.pyfile inside that folder. - Edit your Home Assistant configuration.yaml file and add the following:
zha:
custom_quirks_path: /config/custom_zha_quirks- Restart Home Assistant.
With the quirk applied, ZHA exposes illumination offset, fine-tune sensitivity, spatial learning trigger, spatial learning state, and per-zone toggle switches. Zigbee2MQTT remains the more straightforward path since it requires none of this, but ZHA users who take the time to apply the quirk get access to the exact same feature set.
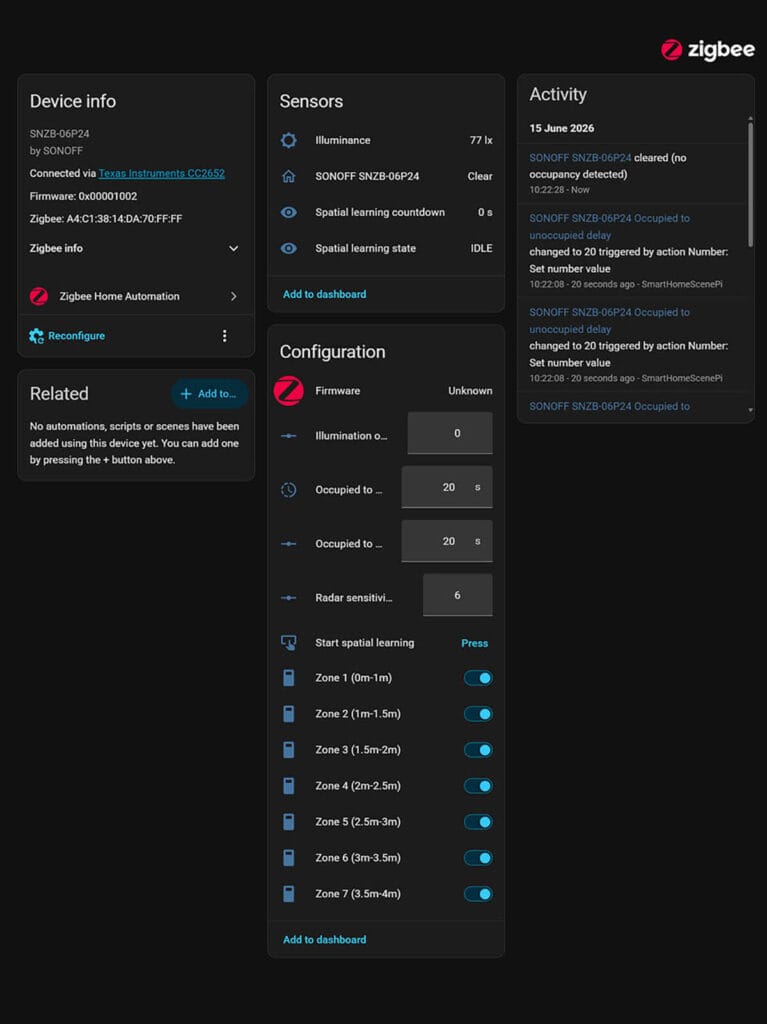
Detection Zones Configuration
The detection range is divided into seven independent zones. Zone 1 covers 0 to 1 meter, which is twice the width of every other zone. Zones 2 through 7 each cover 0.5 meter increments from there out to 4 meters.
That first meter is the close-range blind spot of the radar, where the sensor has less ability to differentiate between the target and its own case reflections, so it’s grouped into a single wider zone rather than splitting it. In practice this means you lose some granularity right in front of the sensor, but it rarely matters since you would not typically want to exclude only part of that near-field zone anyway.
The linear zone principle is the same as what the Apollo MSR-2 uses: zones are stacked along a single axis outward from the sensor, rather than mapped to a physical floor plan like the Aqara FP2. Basically, you define which distance segments are active, not which areas of the room.
You can enable or disable any zone individually, which makes it practical to exclude areas of the room that are not relevant or that contain interference sources. For instance, if your desk sits at 1.5 to 2 meters and your fan is at 3 meters, you can disable zone 6 and let the sensor focus on the zones that matter. Each zone maps to a toggle in Zigbee2MQTT or a switch entity in ZHA with the quirk applied.
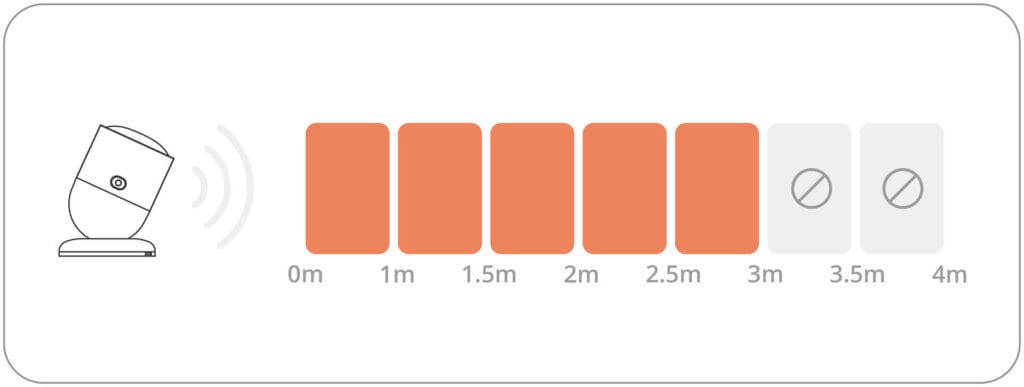
Sensor Calibration and Spatial Learning
Spatial learning is an advanced interference filtering tool. When enabled, the device scans the detection area, learns the movement patterns of interference sources like fans, air conditioners, or washing machines, and filters them out of its occupancy logic. The process requires you to leave the detection area while the calibration runs. The sensor reports its state as learning during the process and transitions to clear on completion, or failed if something went wrong.
There are important limitations to know before relying on this feature alone. If the sensor is moved, or if any interference source changes position, spatial learning must be run again from scratch. Non-fixed sources such as pets and robot vacuums cannot be filtered at all. For those situations, the best approach is to adjust the mounting angle so that pet activity areas fall outside the detection coverage, or to disable the zones where they tend to be.
The radar sensitivity can be fine-tuned on a scale of -6 to +6. Sonoff explains that the sensitivity adjustment only takes meaningful effect after spatial learning has been completed, so the recommended sequence is to run calibration first and then adjust sensitivity to dial in the detection threshold for your specific space.
Ambient Light Sensing
The SNZB-06P24 includes a built-in ambient light sensor that reports illuminance in lux. This is a step up from the original SNZB-06P, which only reported a binary dim or bright state and only updated when presence was detected. The SNZB-06P24 reports actual lux values and updates continuously.
The illuminance calibration offset allows you to correct for environmental factors or mounting angle differences. SONOFF notes that orientation affects brightness readings, so fixing the sensor position before calibrating is important for consistent results. The calibration range is plus or minus 1000 lux, which is wide enough to correct for most real-world discrepancies.
For Home Assistant automations, the illuminance entity combines naturally with the occupancy state to build conditionals like turning lights on only when presence is detected and lux is below a set threshold. I personally consider illuminance-based automations overrated, as there are always better ways to achieve the same condition. But to each their own.
Detection Performance
I mounted the SNZB-06P24 on top of my PC case overlooking the office, the same position I use for all mmWave presence sensors I test. Spatial learning was run before testing with no interference sources in the room, and the calibration completed in about 35 seconds.
The response time of the SNZB-06P24 is instant. As it is a USB-powered device, the sensor is always on with no sleep or wake cycle to work through. Waving a hand or entering the room changes it to occupied in about half a second. The occupancy timeout is also very precise. The lowest you can go is 15 seconds, which clears at exactly 15 seconds. I also tested 30 and 60 seconds, and the state cleared at exactly the set interval each time, confirming the parameter is properly written and applied from Zigbee2MQTT.
To test zone masking, I disabled zones 1, 2, and 3, covering the 0 to 1.5 meter range in front of the sensor, and sat at my desk within that area. The sensor correctly reported clear the entire time, with no false positives. Re-enabling those zones restored normal detection, but I did have to move in and out of the zone first.
Static detection performance up to around 3.5 meters is excellent. Sitting still at 2 meters and then at 2.5 meters with sensitivity set to 5 produced no false negatives at all. Moving out to 3 to 3.5 meters, performance remained reliable even with the 15 second timeout. The sensor held the occupied state consistently without any issues.
Past 3.5 meters things get less reliable. Sitting completely still at 4 meters produced occasional false clears, and I reproduced this across two different mounting positions aimed at that area of the office. One position was more prone to it than the other, which I figured comes down to the pivot angle of the sensor head rather than interference, since the room has none.
Boosting sensitivity to 5 or 6 helps at this range, but it should be done with caution. If you adjust sensitivity after spatial learning, run the calibration again. The learning is tuned to the sensitivity level at the time it ran, so changing it afterward can undermine what was filtered out.
And as a practical rule, reliable static presence detection tops out at around 3.5 meters for a completely still target. Overall, the SNZB-06P24 is a very solid presence sensor, especially for a Zigbee device with this level of configurability.
Verdict
The SNZB-06P24 is definitely a meaningful upgrade over the SNZB-06P. The move to 24GHz mmWave radar, the seven configurable detection zones, and the spatial learning calibration make it a considerably more capable device than its predecessor.
Further, the $24.90 price keeps it in budget territory for a Zigbee presence sensor with this feature set. Zigbee2MQTT support is complete out of the box with full entity exposure and OTA updates. ZHA works well once the custom quirk is applied, though that extra step is worth noting.
If you are already running the SNZB-06P and it covers your space adequately, the upgrade case depends on whether the zone control and interference calibration would solve real problems in your environment. If you are starting fresh or the original sensor fell short in a larger or more complex room, the SNZB-06P24 is the better starting point. For a broader look at how it compares to other options across protocols and price points, the best presence sensors for Home Assistant article covers the current options.

Also on AliExpress, Amazon UK, Amazon NL, Amazon FR, Sonoff Store, and Domadoo.


That’s so cool to see Sonoff provide a complete quirk for ZHA compatibility.
One issue I had with the previous model was that the sensor is so light and the magnetic base so weak that the provided stiff USB cable prevented holding the sensor at various orientations. It’s much easier to use with a floppier cable.
This one is also very light.
They acknowledged the problem and provided cable clips, at least to secure it to something.
I hope they have managed to resolve the occupancy function theat frequently gets stuck. I have written an automation that toggles the occupancy sensitivity without which the device remains in an occupied state.
I’d love to know how chatty this is on the Zigbee network. The original model was great from that point of view, compared to most Tuya zigbee sensors which can overload the network. The fact that this new model ‘continuously’ updates the lux sensor value sounds ominous.