With SwitchBot announcing they are making the jump to Matter with their Hub 2 release, I took a deep dive in their smart home ecosystem, testing some of their devices, onboarding process and app usage.
I was pleasantly surprised by the way their system is setup, their app is very intuitive and the process of device deployment is seamless and easy. If you decide you don’t want to use proprietary apps or hubs (like me), SwitchBot devices are still easily controllable through Home Assistant.
In my previous review, I left out the SwitchBot Blind Tilt on purpose, explaining it’s a more complex device requiring a closer and deeper look at things. I like to cover my grounds, so this is a complete disassembly and review of the SwitchBot Blind Tilt and it’s Home Assistant Integration.
The SwitchBot Blind Tilt is used to control tilt & turn type blinds or Venetian blinds by mechanically rotating the blind wand with a driver motor. It you have roller shades on a bead that you want to automate, I also did a review on the Aqara E1 Roller Shade Driver, so you can check that one out too.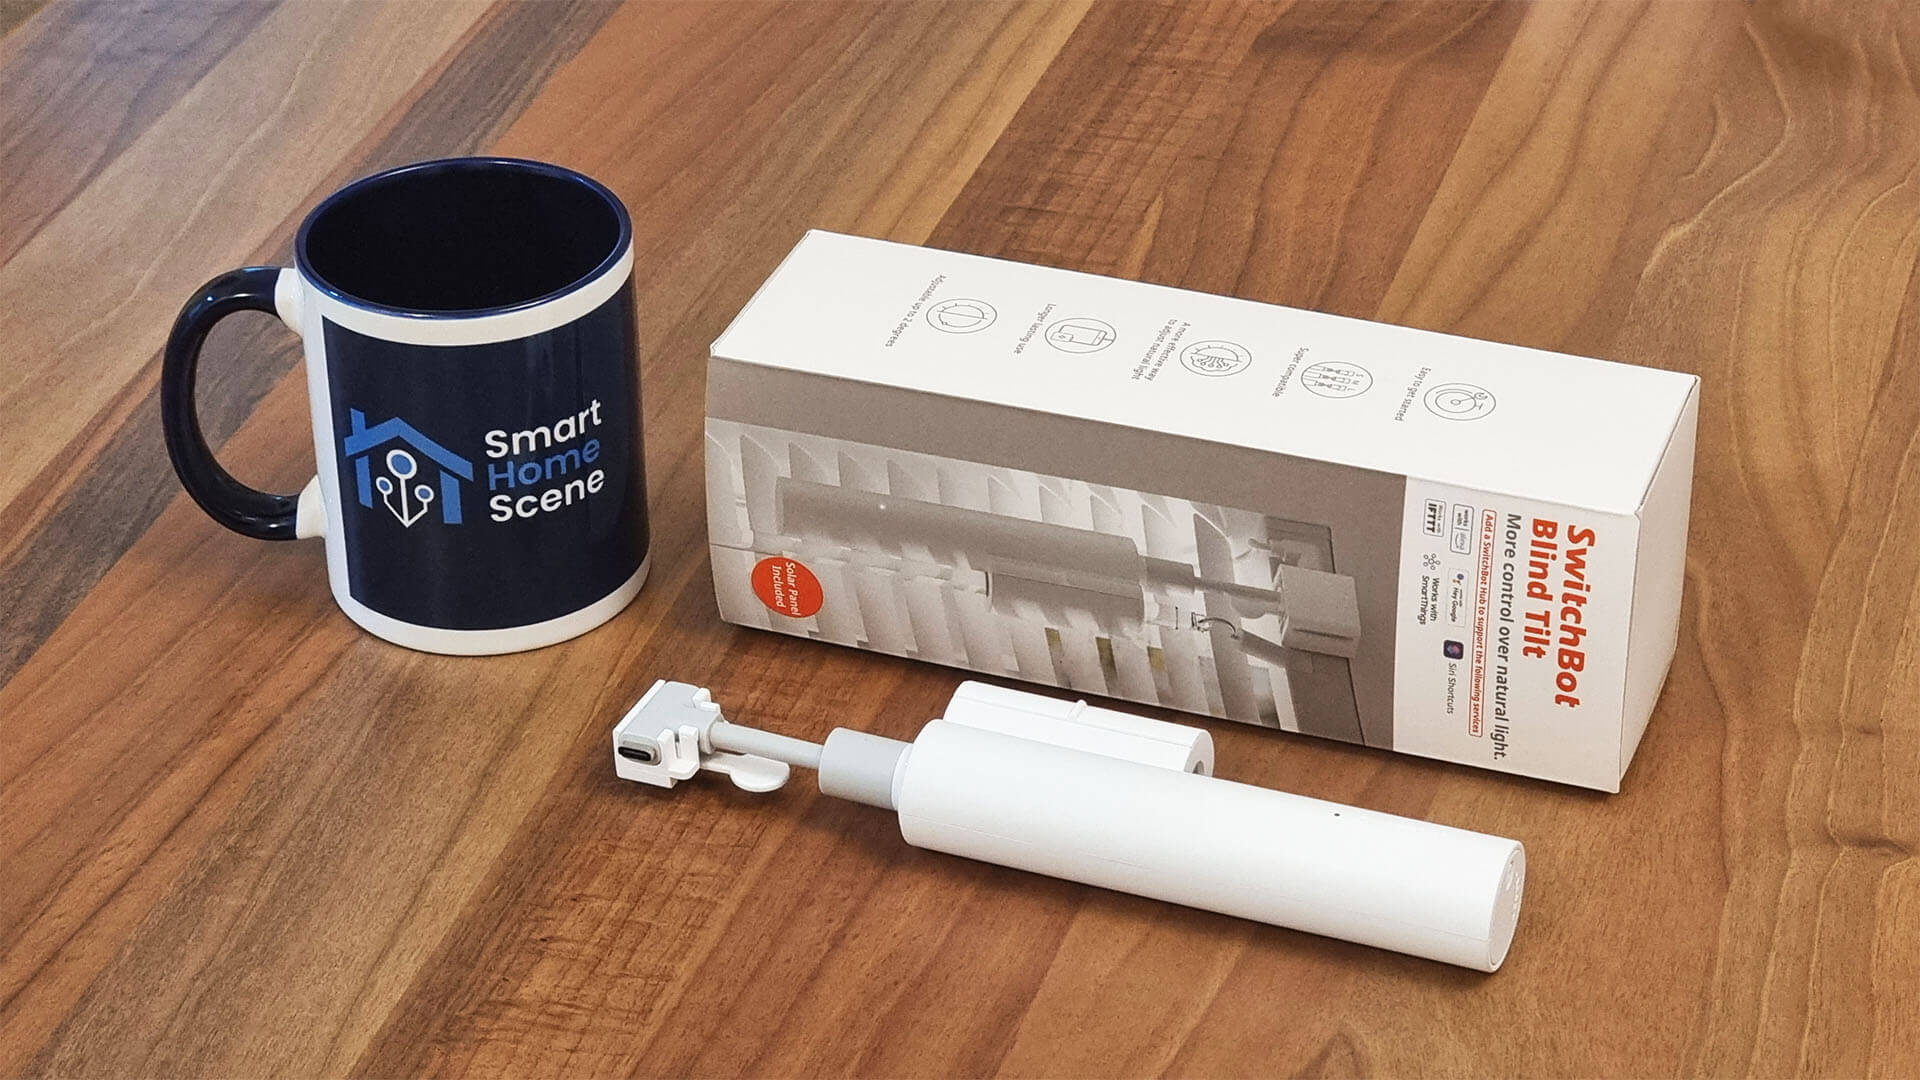
The Blind Tilt can be currently purchased from SwitchBot’s Official or Amazon Stores for $69.99, you can use smarthomescene’s exclusive code 15HOMESCENE for 15% off which also works for any other product in their stores.
SwitchBot Blind Tilt – $69.99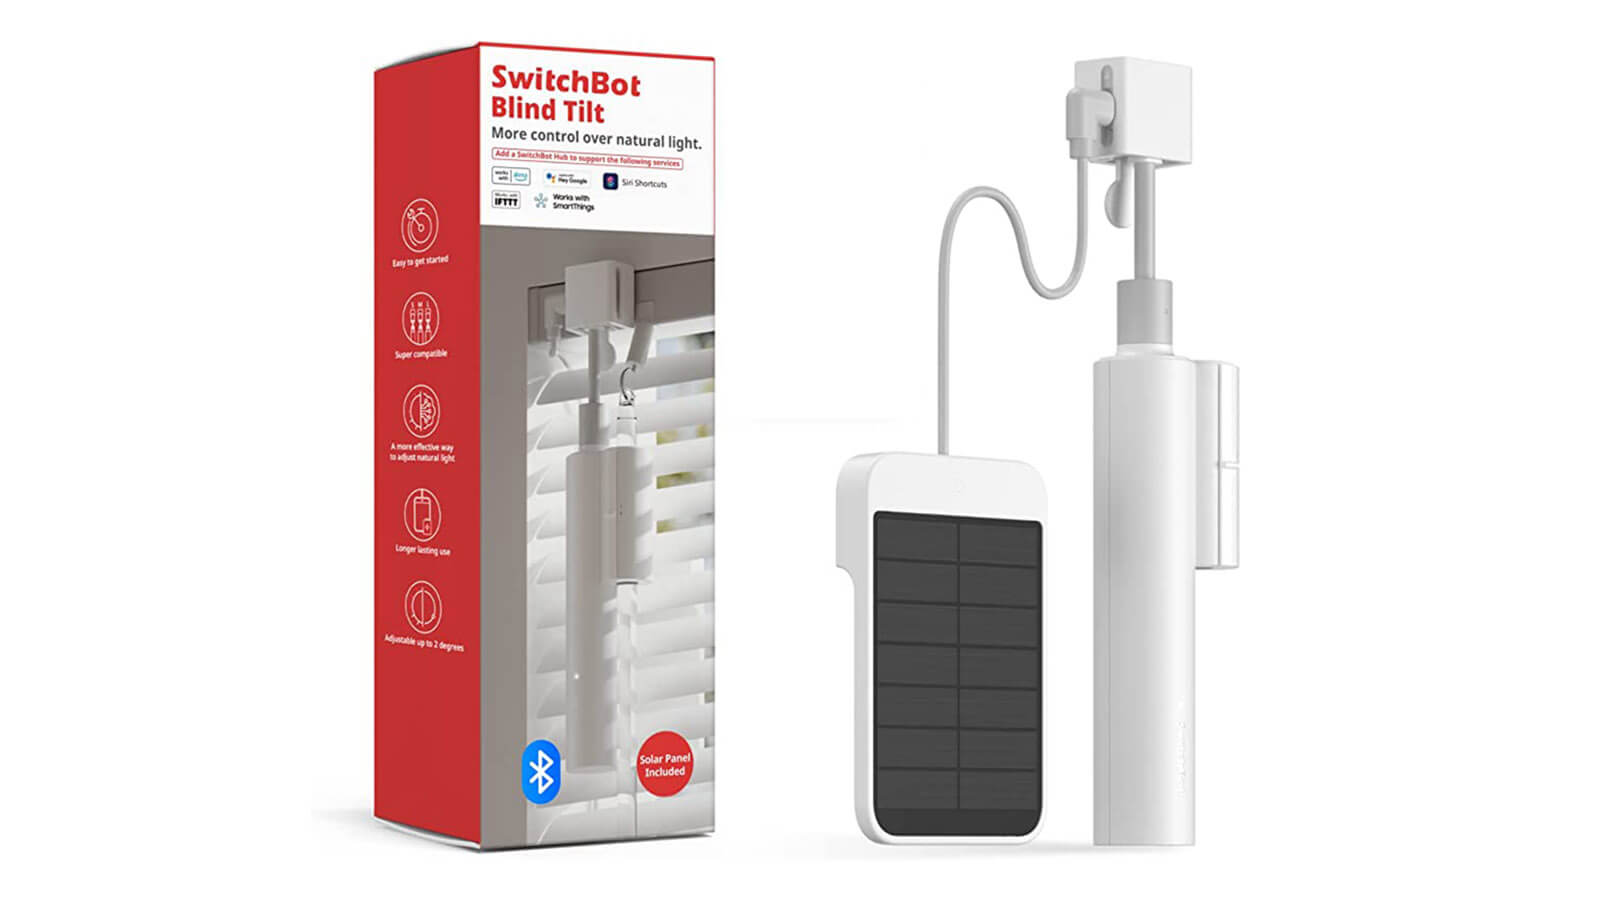
Amazon Store: 10HOMESCENE for 10% OFF
SwitchBot Store: 15HOMESCENE for 20% OFF
SWITCHBOT OFFICIAL STORE
SwitchBot Blind Tilt | Blind Tilt Combo![]()
United States | Canada | United Kingdom
Germany | Netherlands | Sweden | Spain
France | Italy | Poland | Australia
*If links fail to open, try disabling your AdBlocker.
FULL DISCLOSURE: The SwitchBot Blind Tilt is part of a testing package the company sent me, which I’ve disclosed in my previous review. Like I informed their PR person in the first email, this will in no way affect, sway or influence my opinion of their products and will be just my honest review as usual.
Technical Specification
- Color: White
- Material: ABS+PC with UV Resistant Coating
- Size: 48.8×29.2x210mm (1.9×1.1×8.3 in.)
- Weight: 130g (4.6oz.)
- Power Supply: 5V1A, USB-C
- Battery Type: 3.7V 2000mAh lithium
- Battery Life: Approximately 10 months on a single charge
- Operating Temperature: -10°C to 45°C (14°F to 113°F)
- Operating Humidity: 10% to 95% RH
- Torque Strength: ≤ 1kgf.cm
- Connectivity: Bluetooth 5.0
Disassembly
The SwitchBot Blind Tilt came neatly and compactly packed in a recognizable and branded box, just like their other products. Contents inside included the Blind Tilt, a charging Solar Panel, a USB-A to USB-C charging cable and a bunch of mounting accessories. These are there to cover different types of Venetian blinds, you will not be using all of them. They can seem complex to understand, but in reality the installation process is very simple.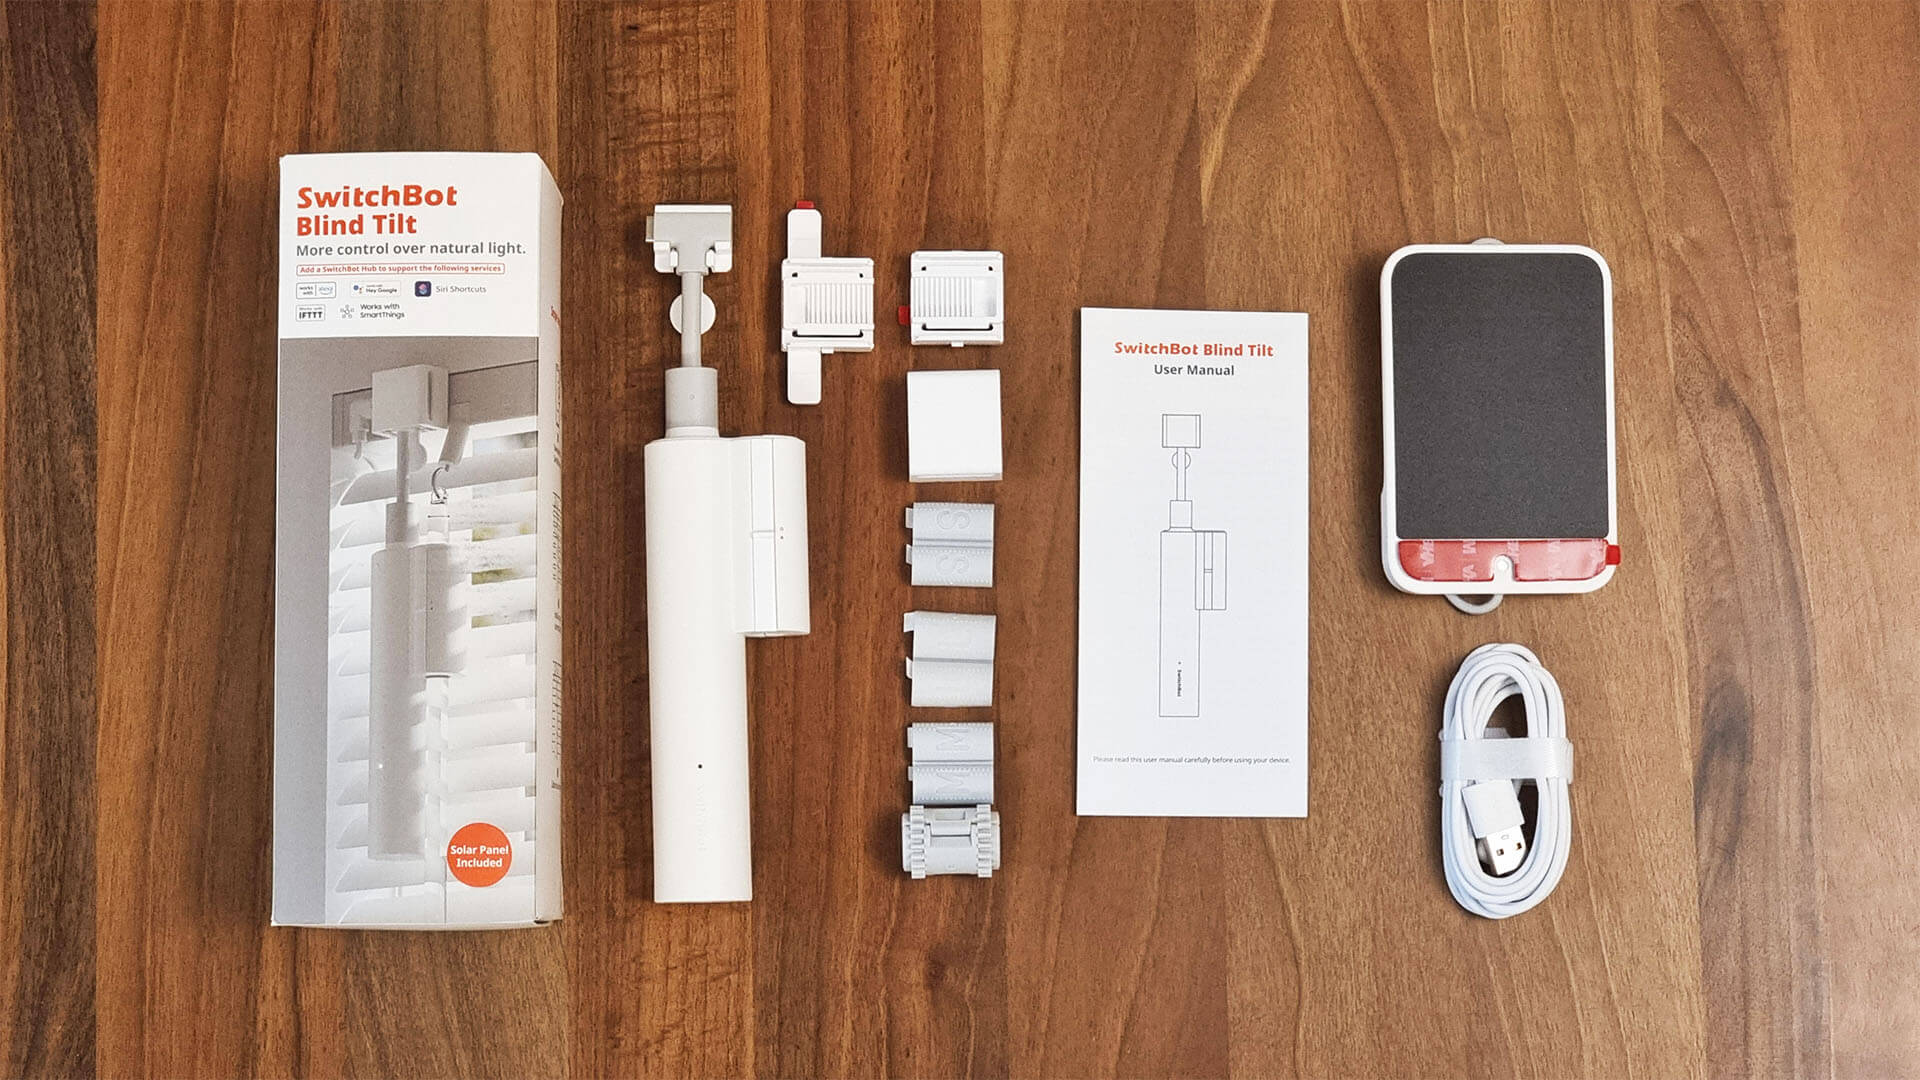
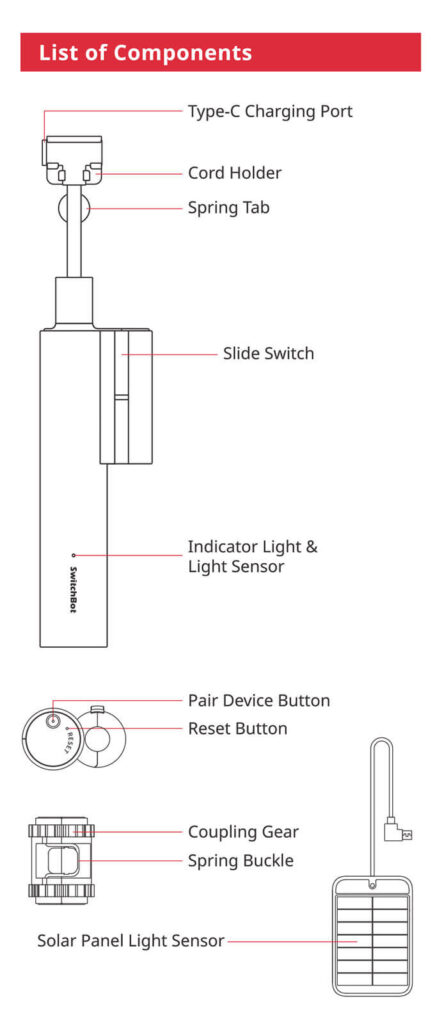
Starting with the disassembly, first I took off the cord holder. The USB-C at the top of it was connected to a small PCB underneath it’s base by a 6-pin JST connector. The neck of the holder is bendable, so you can adjust it slightly to the side when installing it place.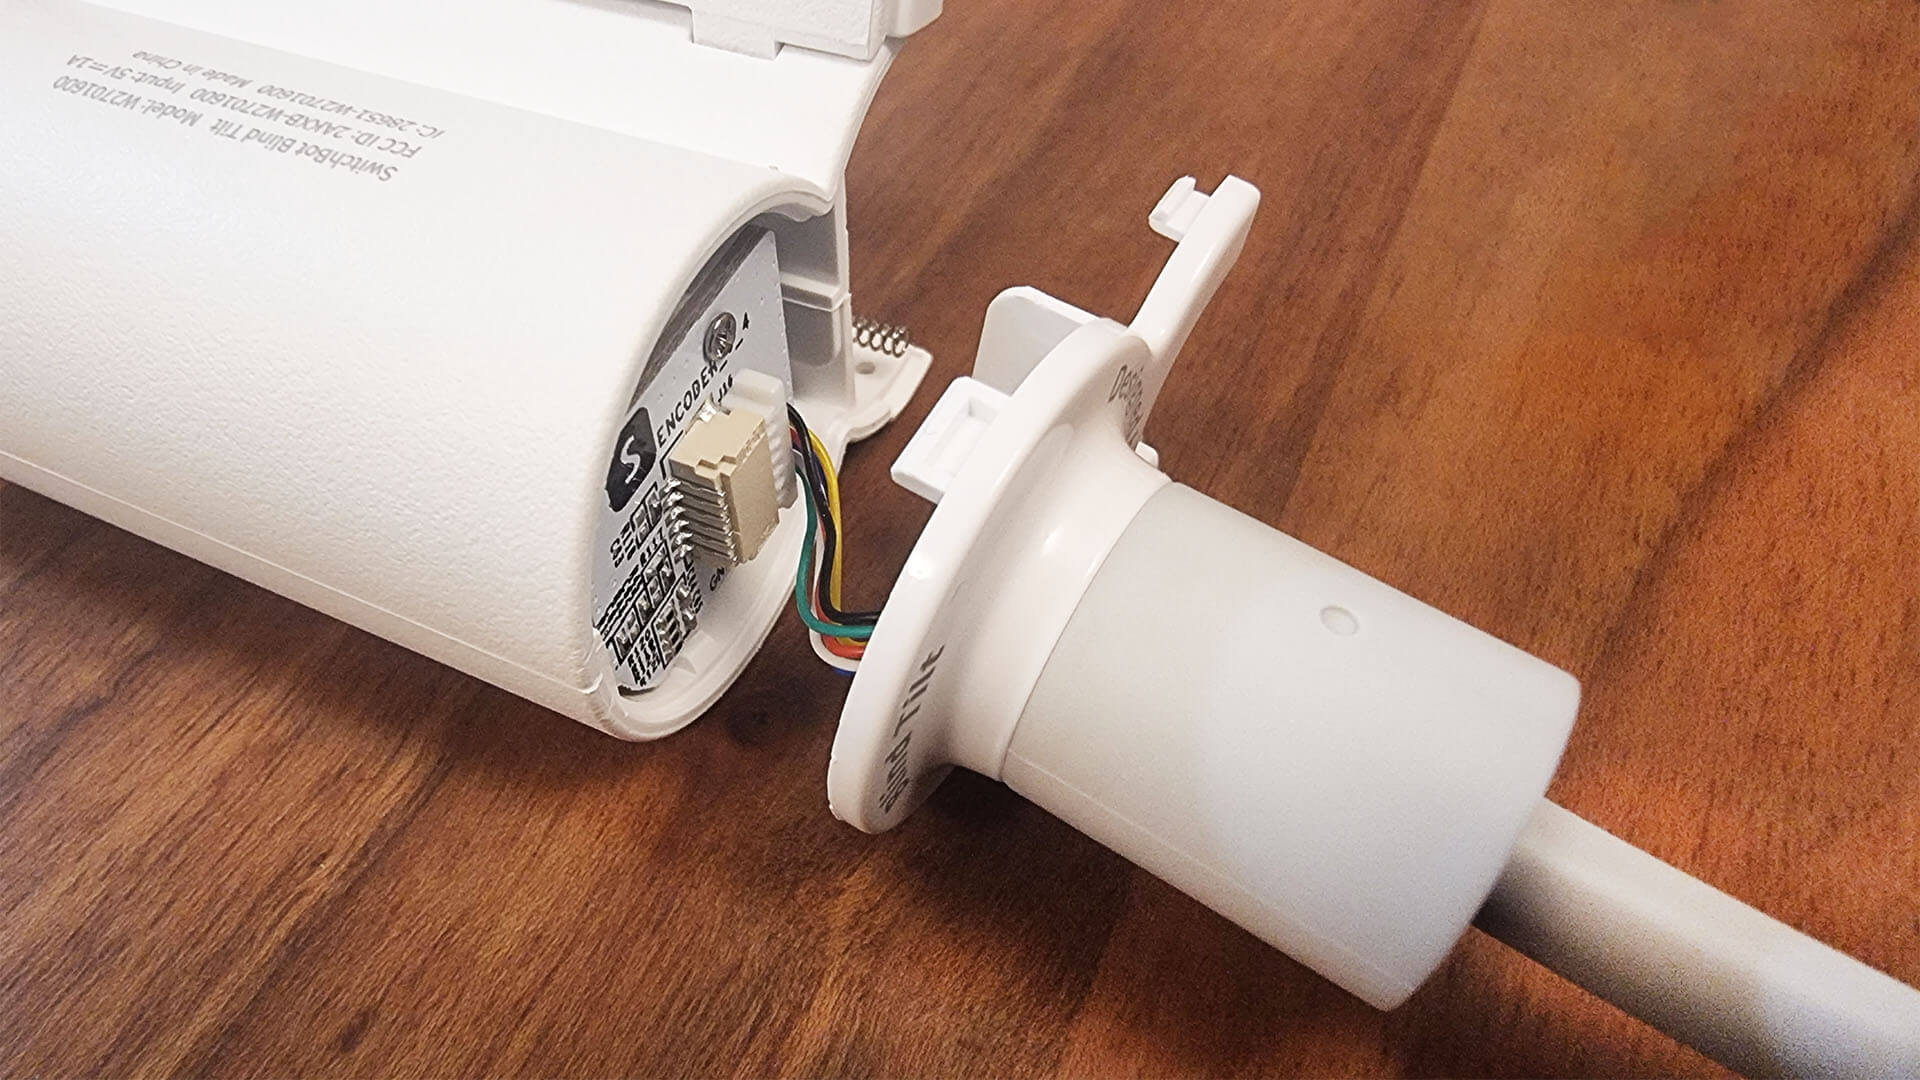
A close look of this PCB reveals its labelled as ENCODER_0_4, which means this PCB contains the rotary encoder used to gauge the position of the blinds on the bottom of it. A rotary encoder is a type of position sensor which is used for determining the angular position of a rotating shaft, used in this case to note the position of the blind (20%, 50%, 100% etc.).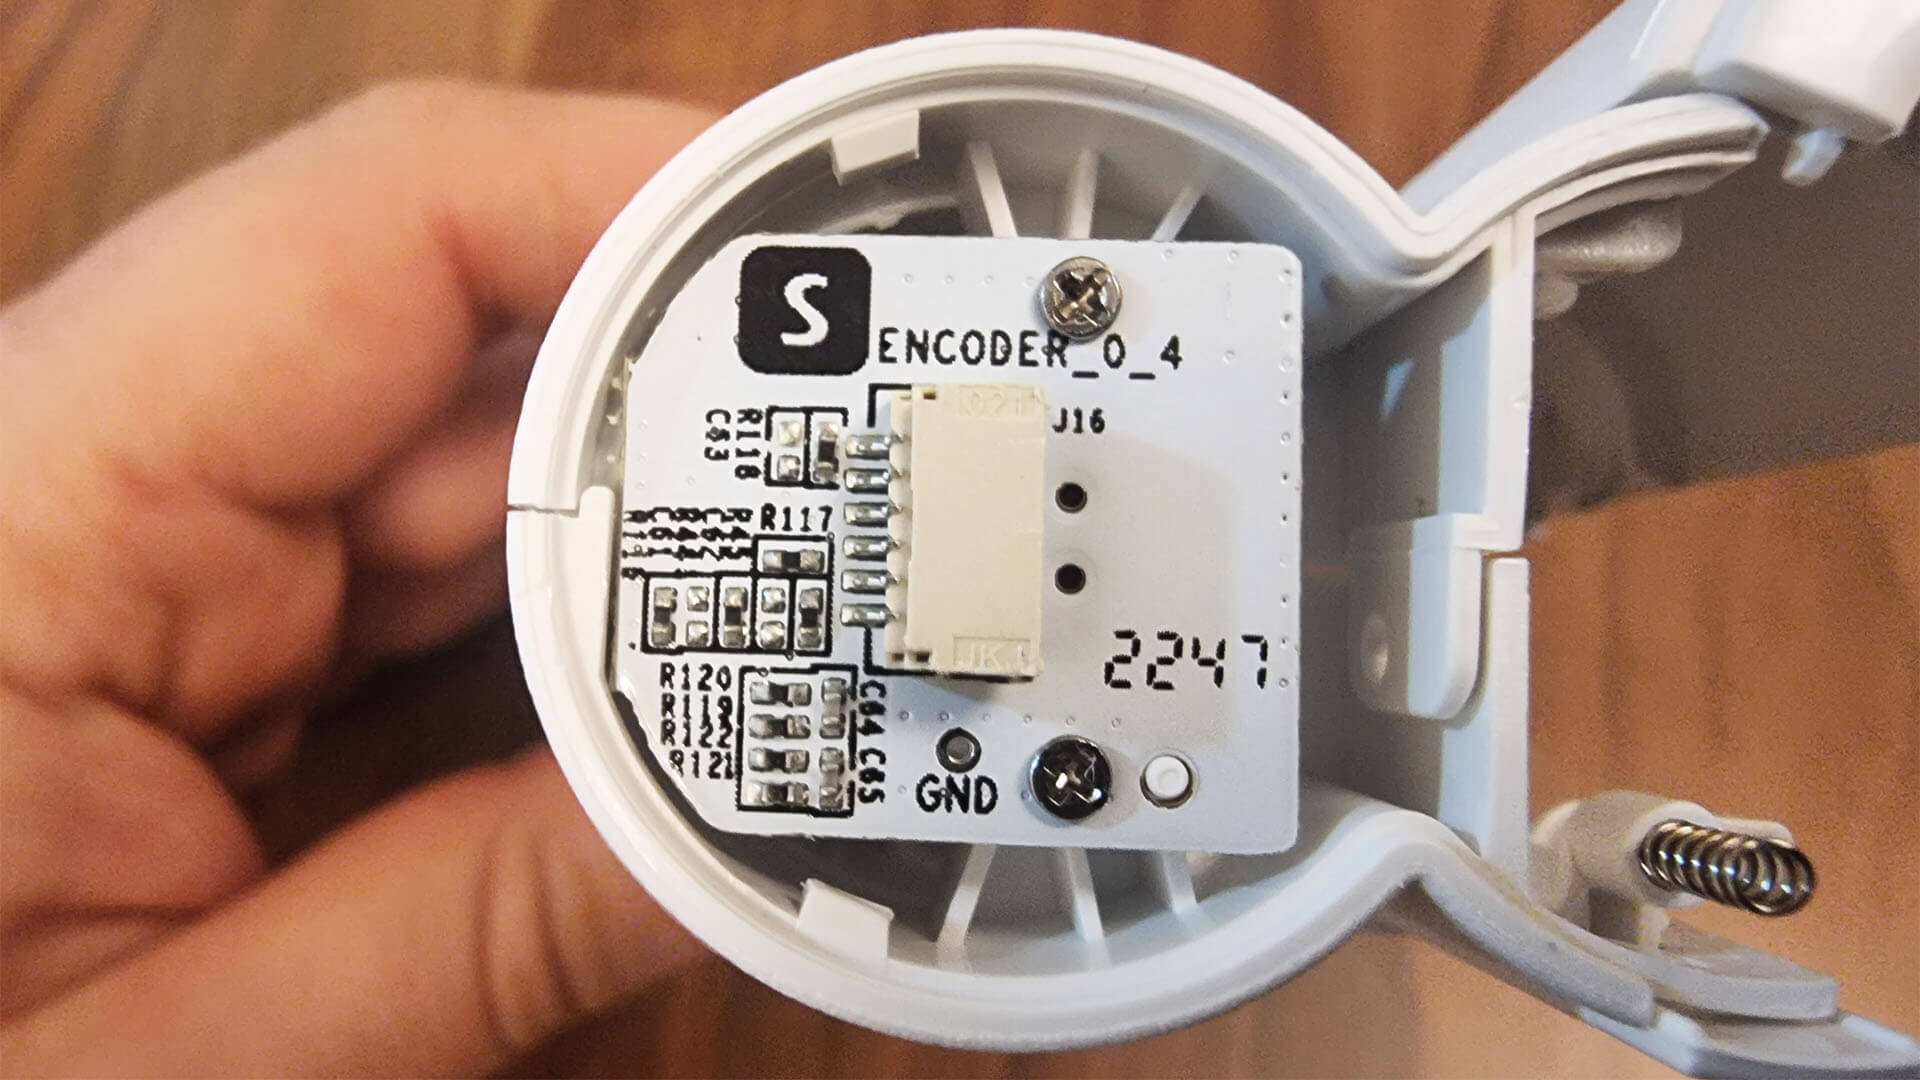
Further opening up the device was a bit of challenge, because I tried not to damage anything. Starting from left to right, we can see the rotary encoder, the driver motor and a large 2000mAh 3.7V battery. This battery is charged by the Solar Panel included in the package, but can be replaced if needed.
The battery was glued to the main PCB underneath, removing it reveals the labelling BlindTilt_0_4. You can see the small pairing button protruding at the bottom, which is reachable with a pin included in the package. The driver motor and battery are both connected to the PCB with 2-Pin JST connectors.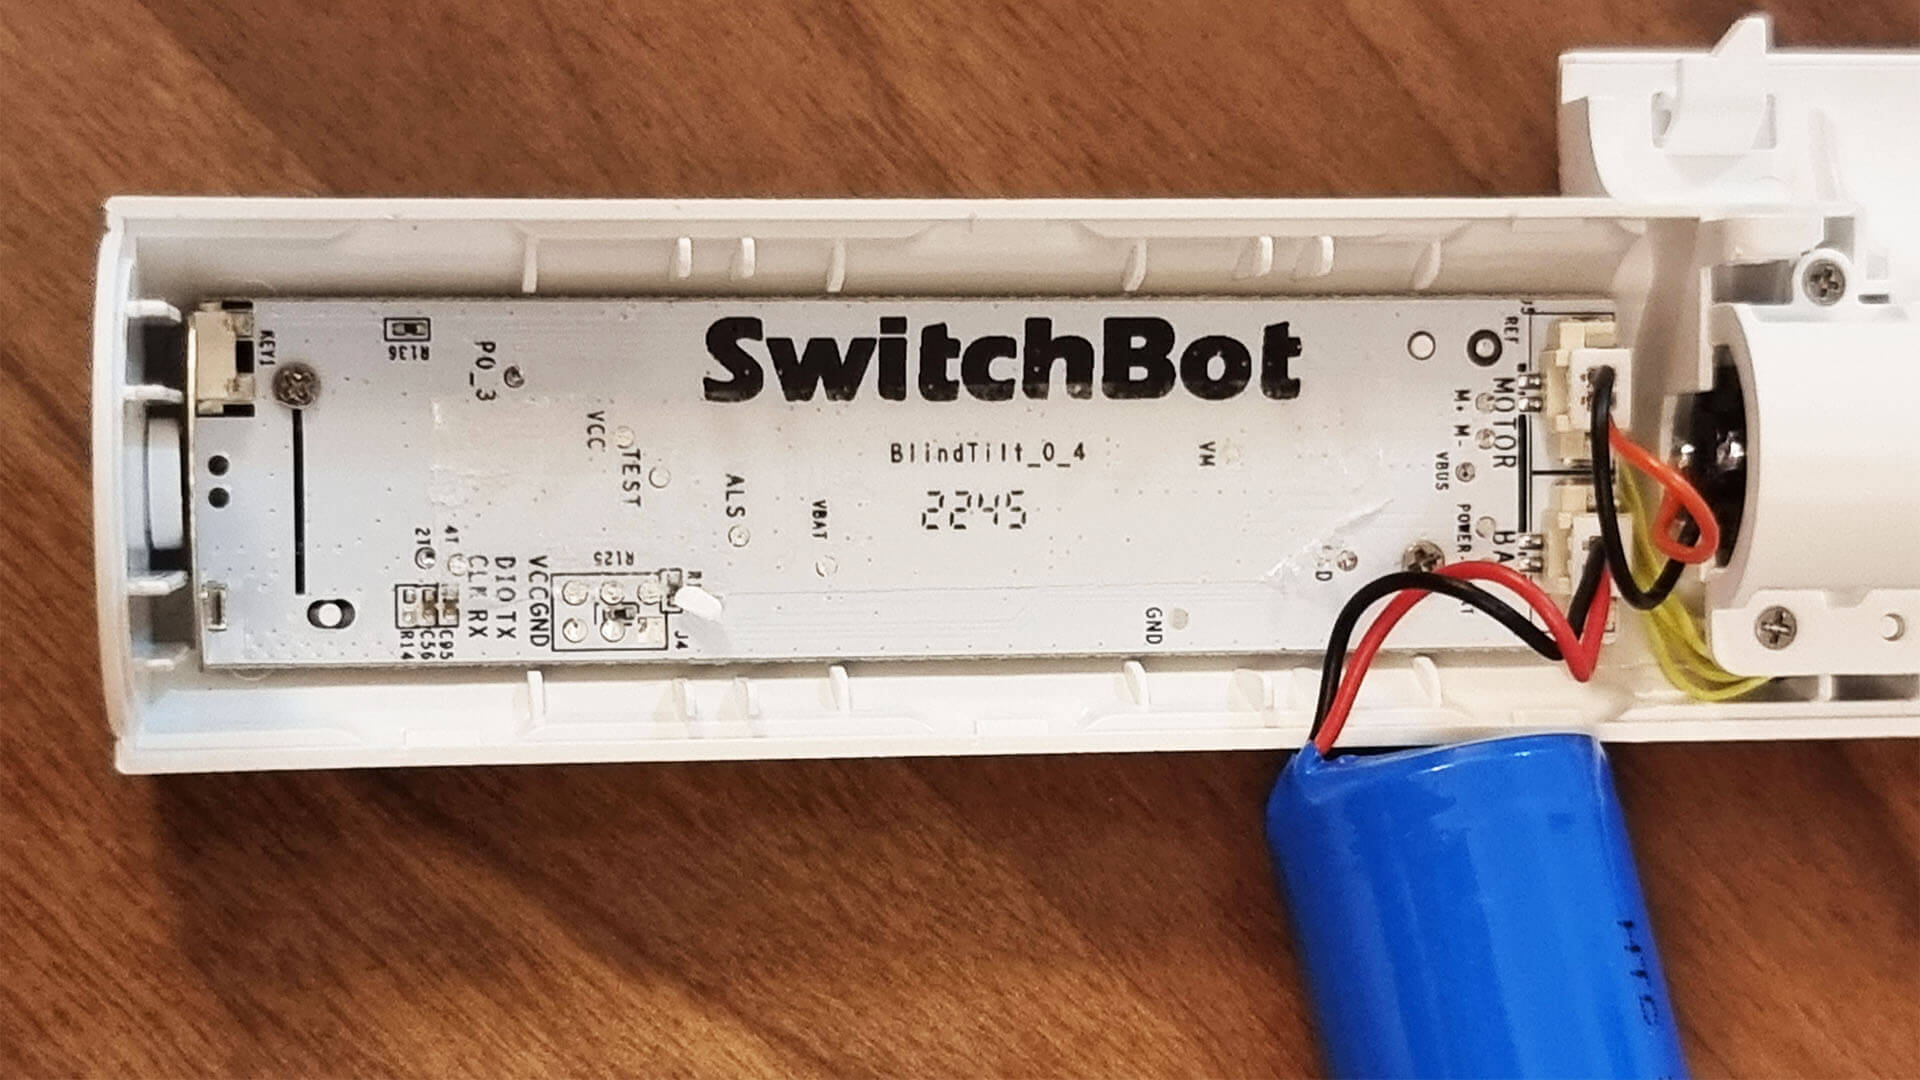
Removing the PCB reveals some standard electrical components, like diodes, transistors and a battery charging module (TC4056A). Like all of SwitchBot’s devices, communication is handled through a BM-8762CMF Bluetooth 5.0 BLE Module [Datasheet], manufactured in China by a company called CC&C Technologies. 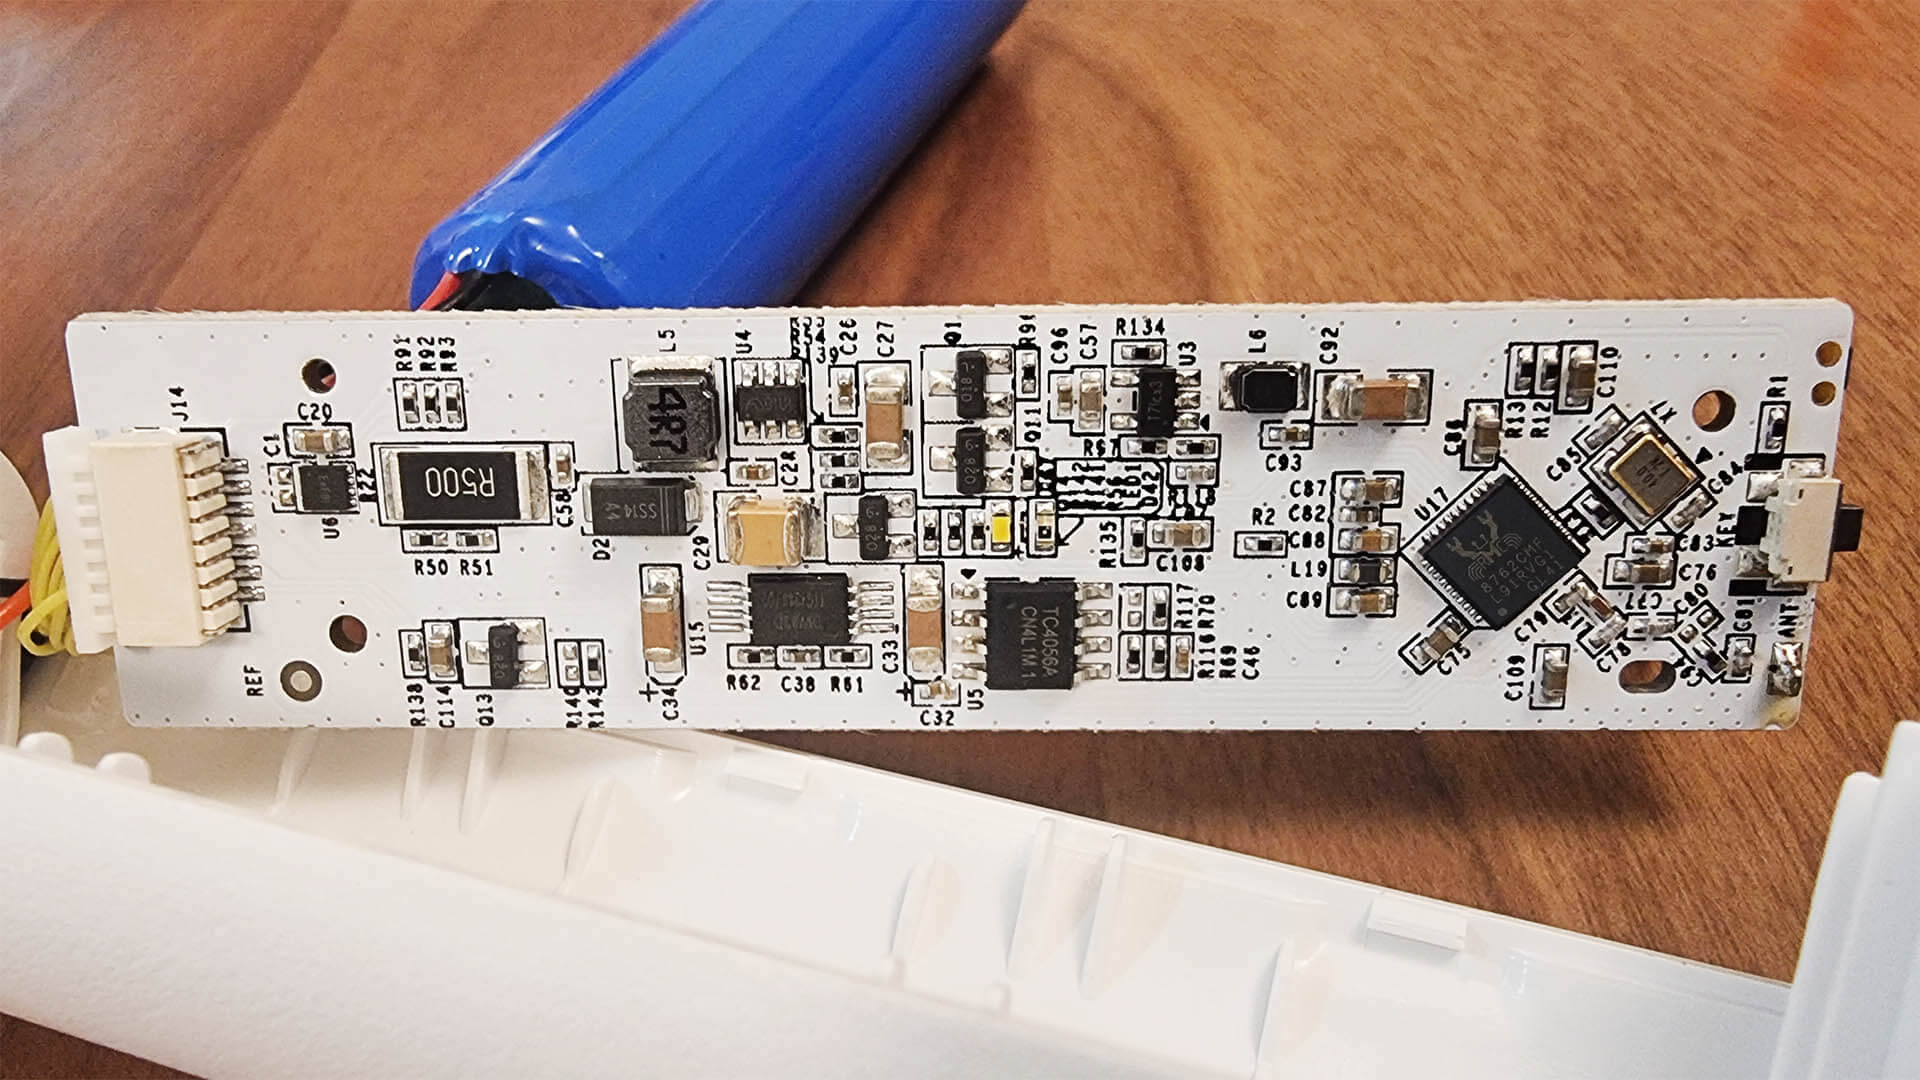
The driver motor was unlabeled, so I could not find any specification for it. It was sealed with glue, so disassembling it further possibly meant destroying the gears or the protective plastic underneath. It quiet when it’s spinning though, and has a really short step which you can distinctly hear if you try. 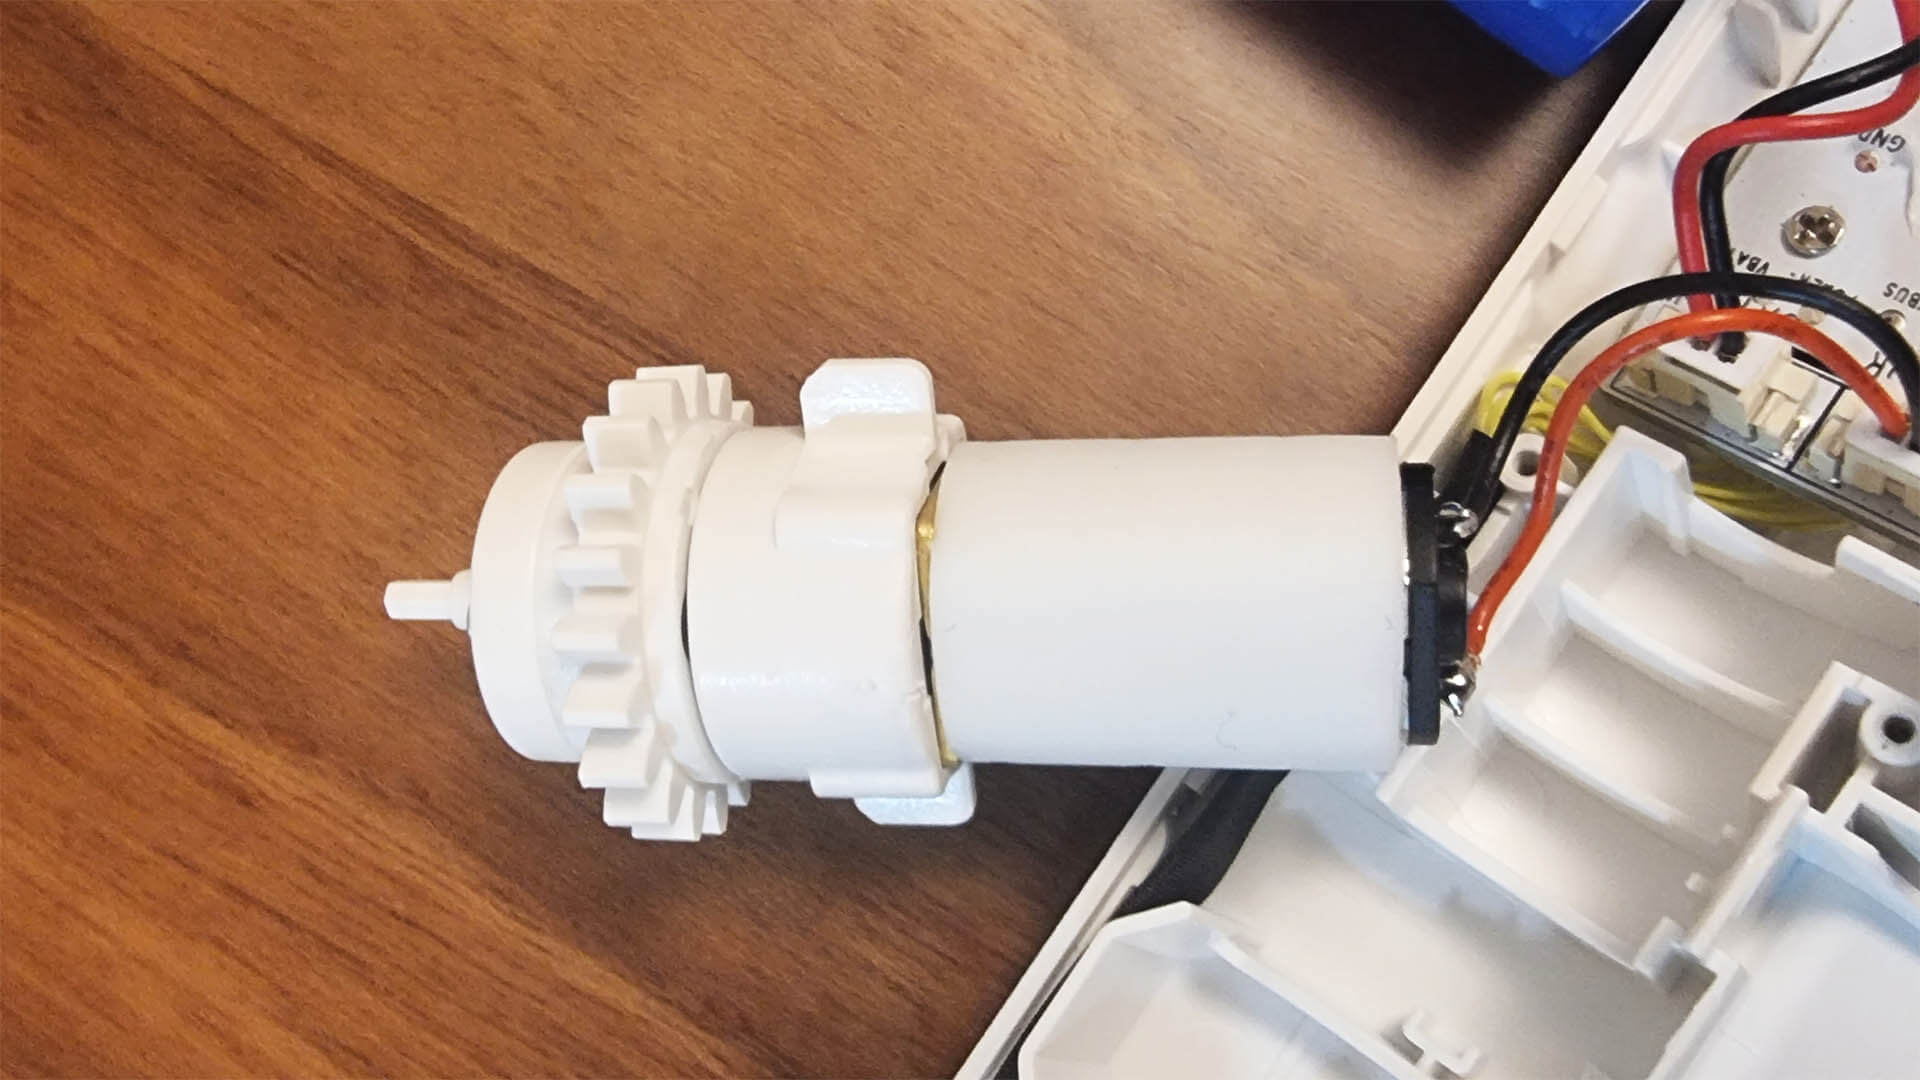
The solar panel has a pre-applied sticker as well, so you can install it straight away. What’s also an advantage is the USB-C connector being angled at 90°, which will make cabling neater and easier to hide out of sight.
SwitchBot claims about 6.5 hours are needed to fully charge the battery with the solar panel, which should last up to 10 months on a single charge. An illuminance level of at least 6lux is needed to achieve this charging time.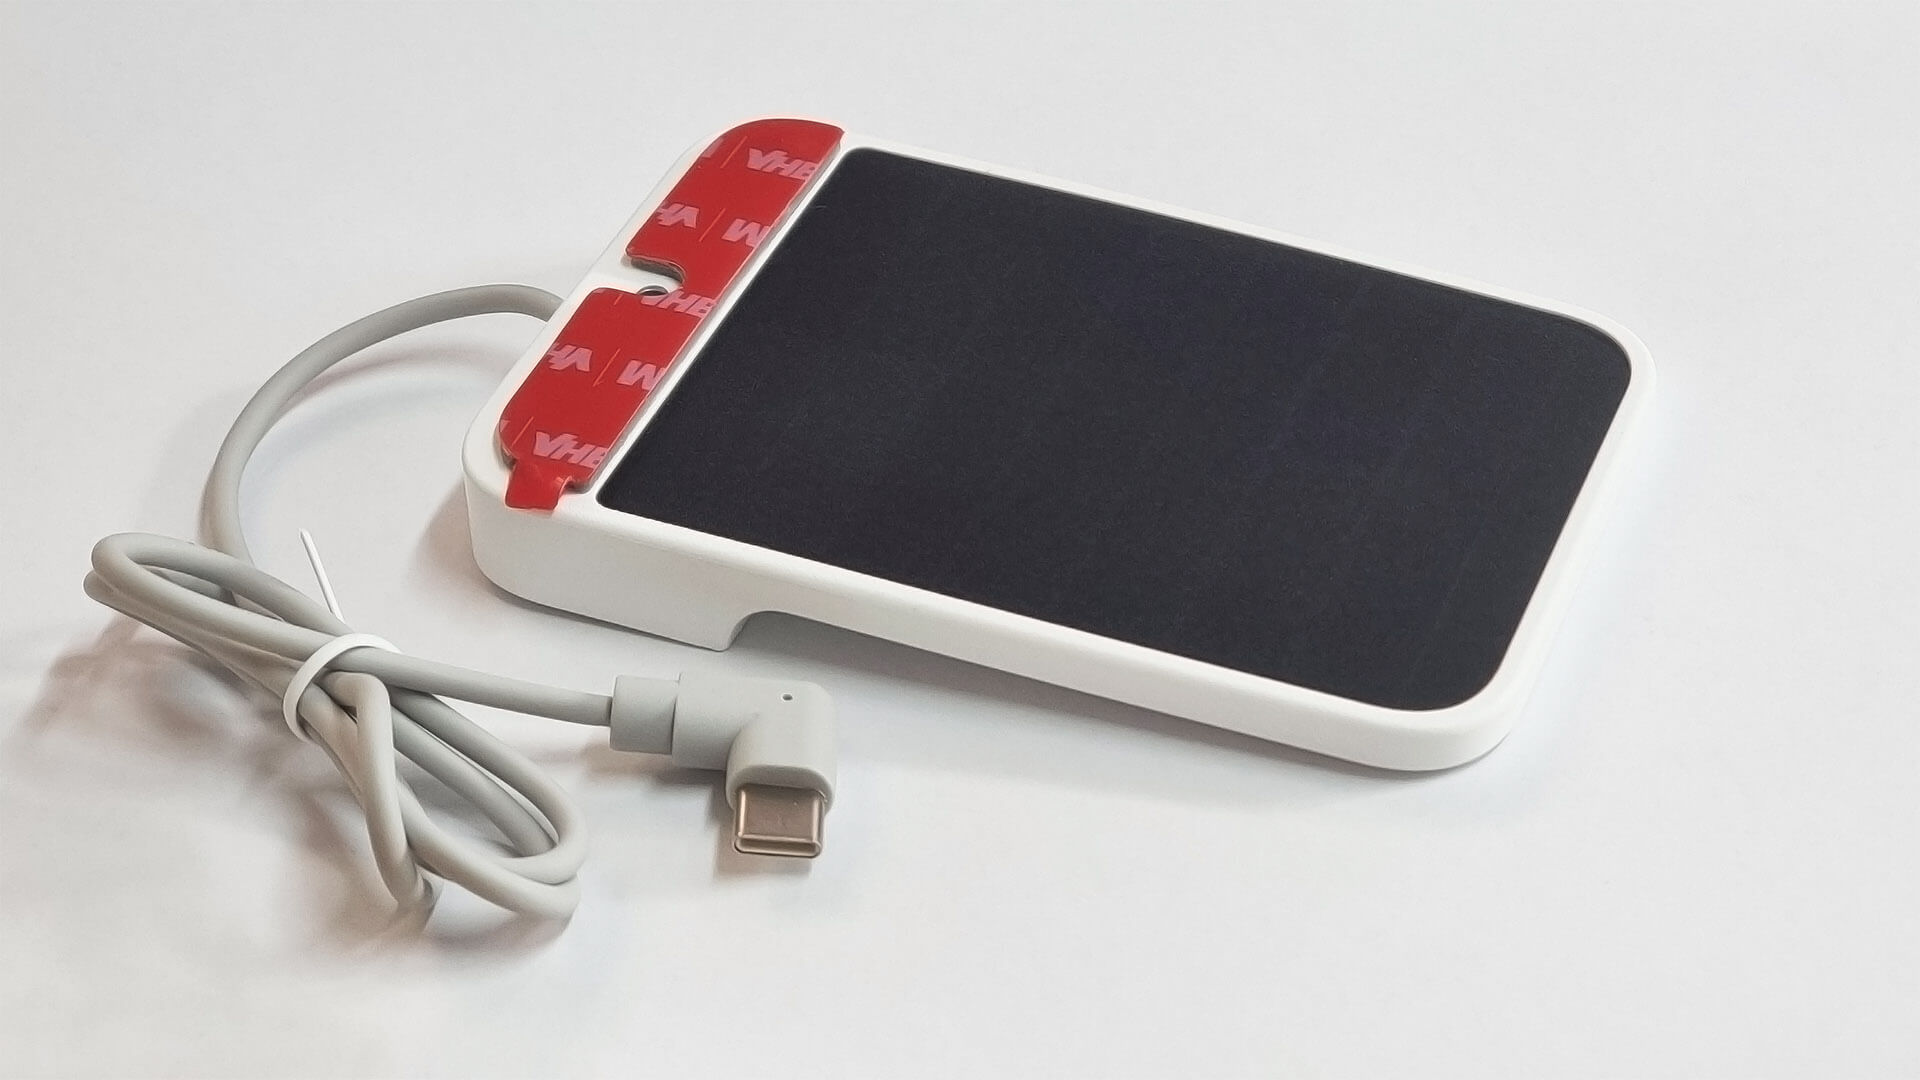
Installation
When I first opened up the package, I was a little overwhelmed by the amount of accessories that are included inside. SwitchBot did an excellent job with their manual, explaining which is which and what goes where. I am going to share screenshots of the manual itself and well as some installation tips I noted while mounting the Blind Tilt myself.
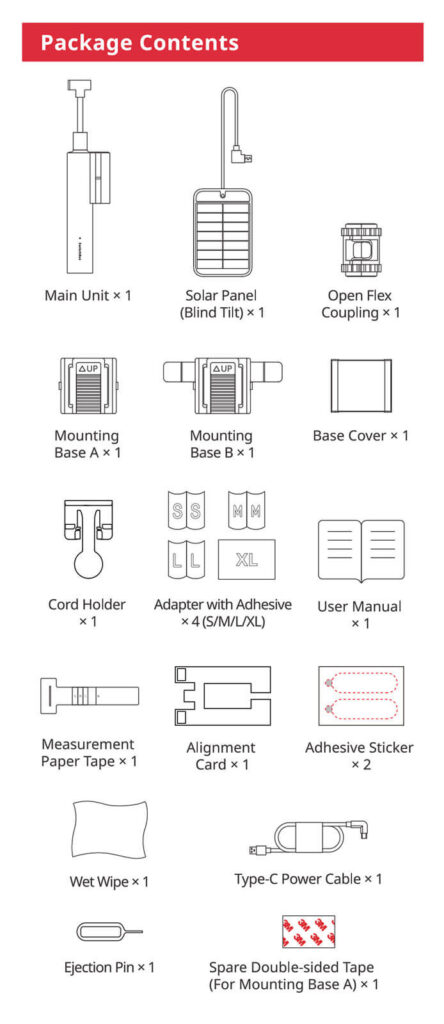
Starting with the package contents, you a get an idea of what each thing is how it’s used. Two different mounting bases are included, for a better grip on your blind top frame. The adapters for the blind wand come in 4 sizes (S, M, L, XL) to fit a bunch of different blinds from various manufacturers. The measuring tape and alignment card are very useful tools for deciding which adapter to use and at what position.
To start with installation, first you need to clean up the frame with the wet wipe included in the package:
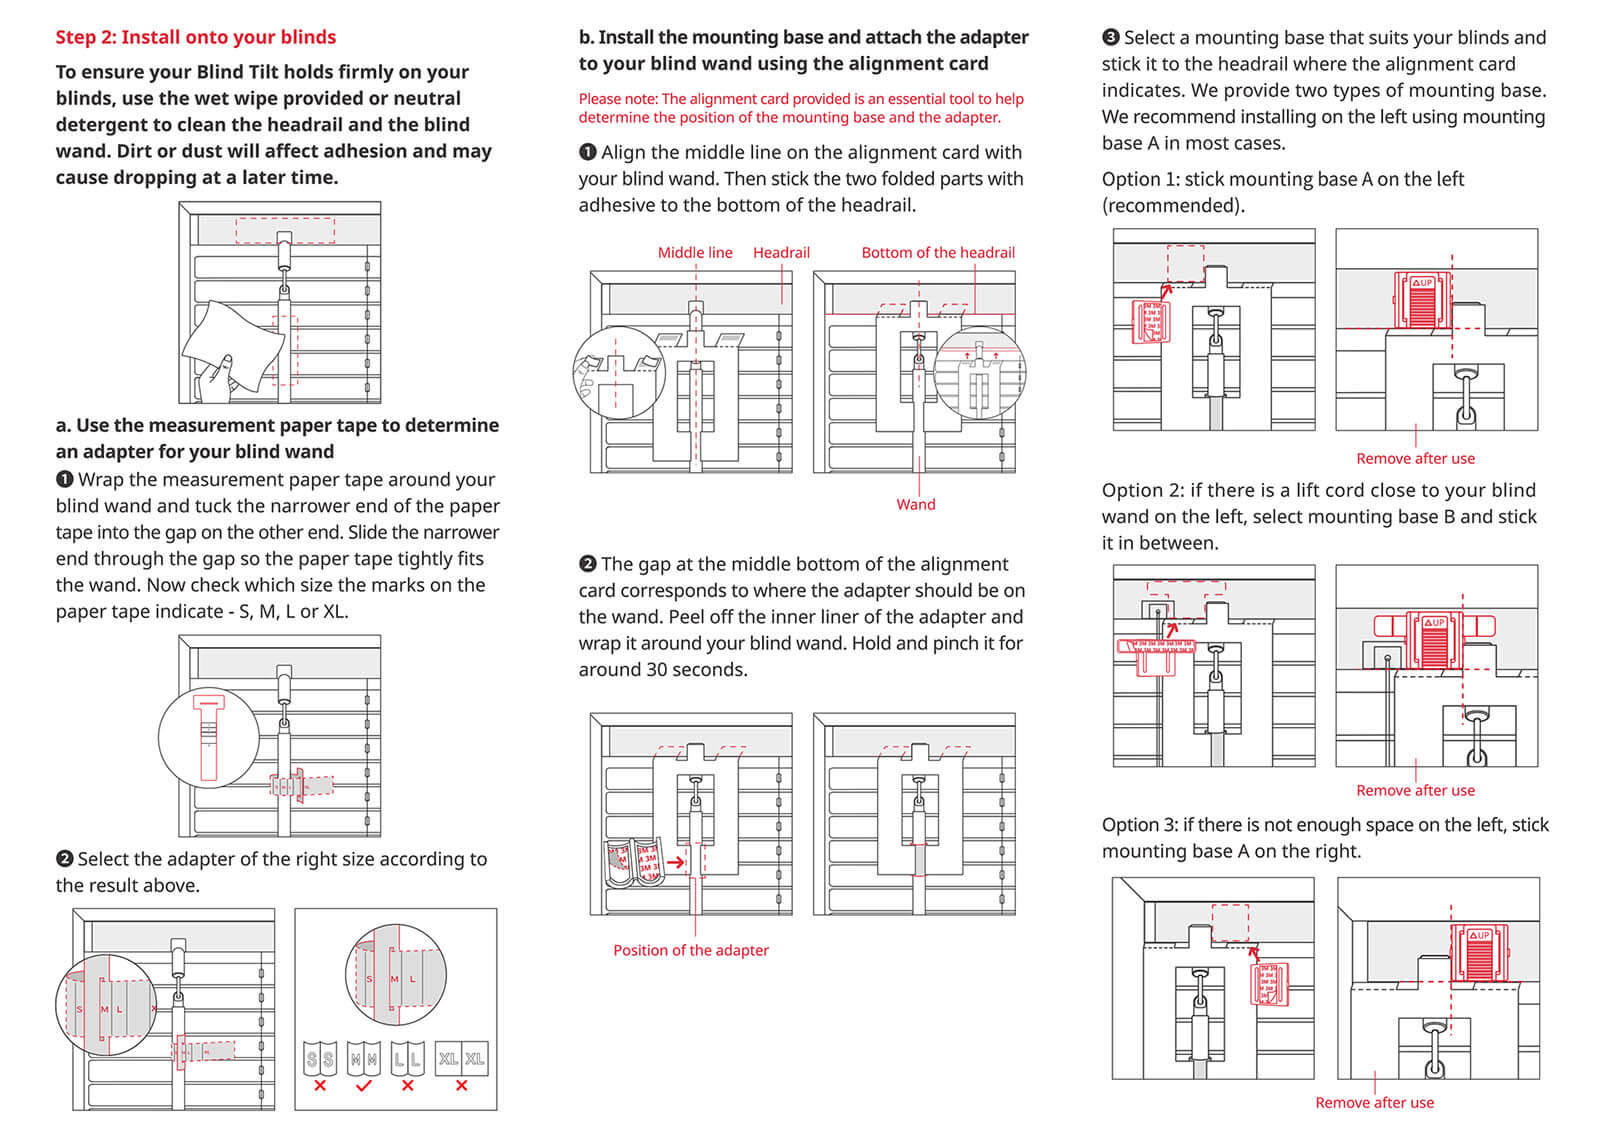
1. Using the tape, measure the dimeter of your blind wand. Make sure it grips tight, so it doesn’t slide and ruin the pre-applied stickers inside the adapter.
2. Using the alignment card, measure the position at which you need to apply the appropriate adapter. The gap in middle of the card corresponds to where the adapter should be placed on the wand.
3. From the included mounting bases, pick one that is suitable for your frame above the blinds. Try to stick the base at the left of the wand, if there isn’t enough room place it on the right side or in the middle.
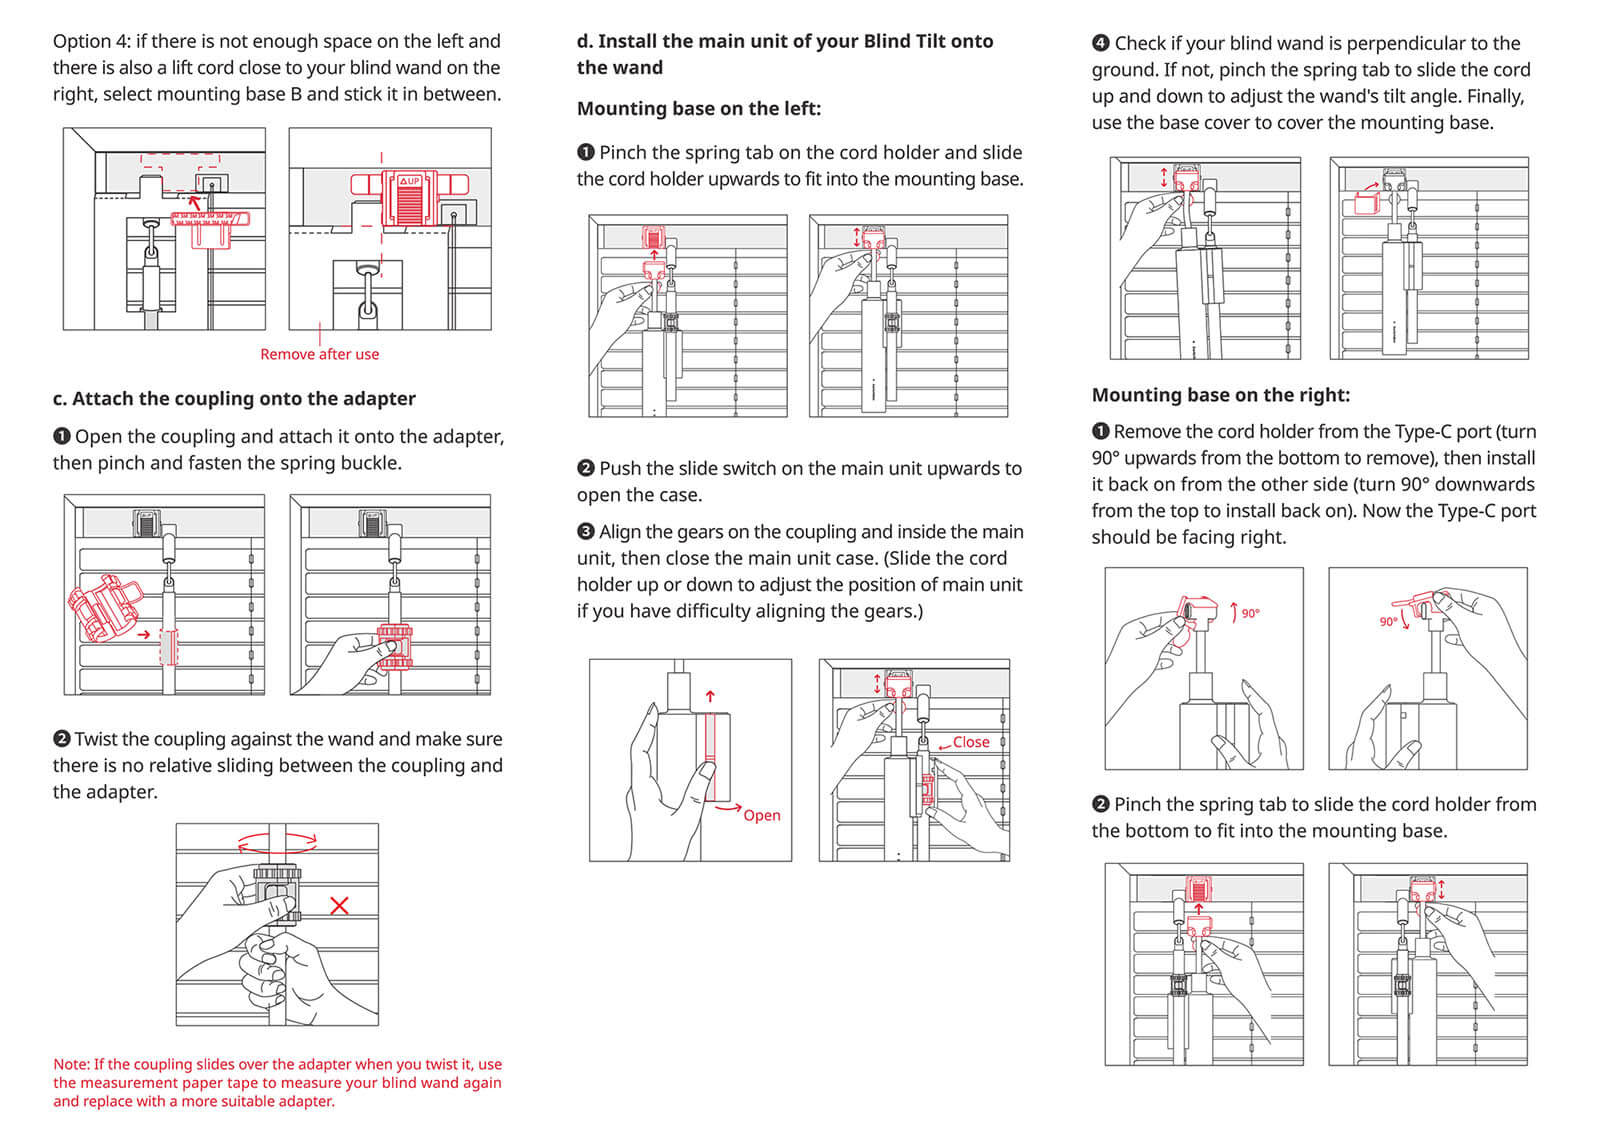
4. Attach the coupling onto the adapter you just installed. There is a small latch that you need to push into place, so it grips it firmly. The driver motor rotates the coupling, which in turn rotates the adapter, which rotates your blinds wand.
5. Install the Blind Tilt onto the mounting base at the top by pinching the small cord holder adapter, clicking it in place.
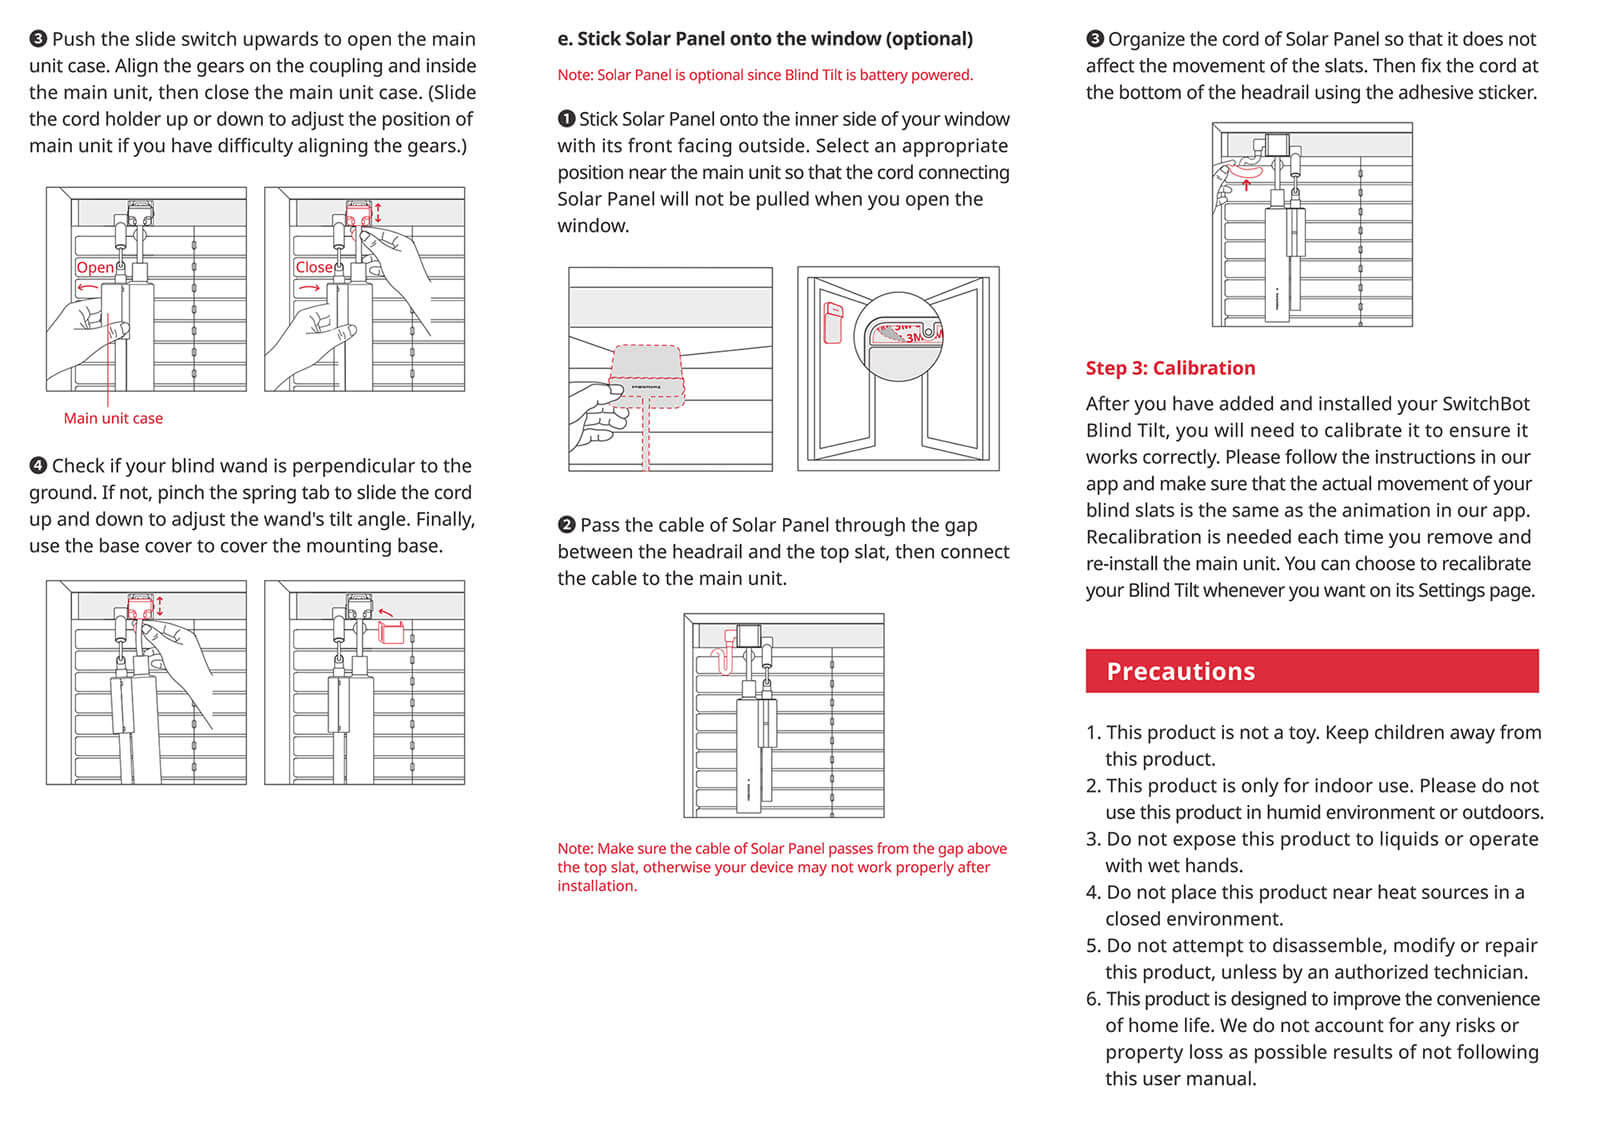
6. Install the Blind Tilt onto the want by sliding the side switch door to open it. Make sure you align the gears of the motor with those on the coupling. You can slide the the cord holder up or down to adjust the gears position.
7. If you are installing the Blint Tilt on the right side of the wand, remove the cord holder from the type C port and rotate it complete so its facing the other way around.
8. Repeat the same procedure to adjust the gears position to their correct alignment, sliding the cord holder up and down
9. Pick a mounting position for the Solar Panel, where it will get a lot of sunshine during the day and install it with the included sticker
10. Connect the USB-C port to the Solar Panel
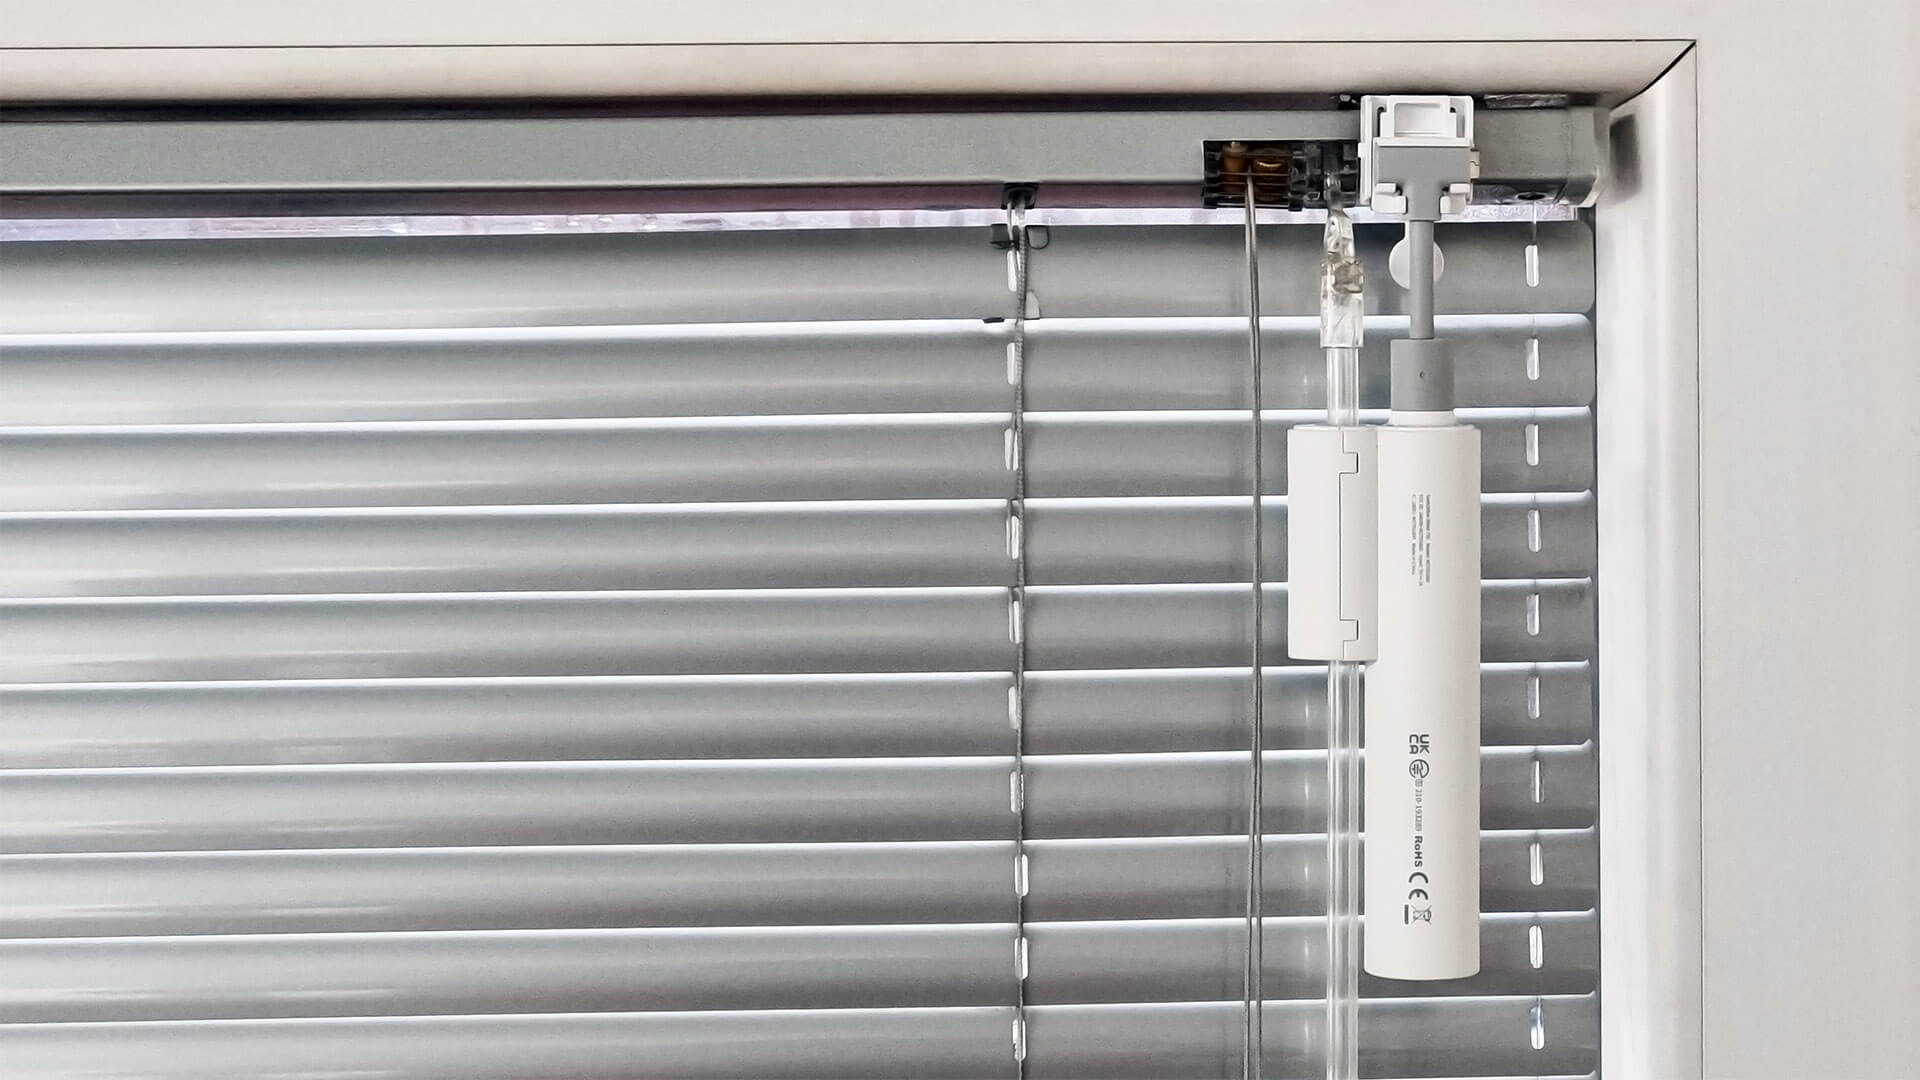
I installed my SwitchBot Blind Tilt on a office window Venetian blinds, on the right side of the blinds wand. I used the smaller mounting bracket and the M-sized wand adapter. Here a few tips that may help you mount the device more easily:
- On some blinds, the top aluminum frame is tilted by a couple of degrees
- The adapter must remain firmly glued to the top frame
- Gently bend the cord holder to align the device completely parallel to the wand
- Make sure it doesn’t wobble when you turn it on, if it does straighten it up again
- The device is heavier than you would expect, so to avoid any issues:
- Make sure the surface of the frame is properly cleaned
- Make sure the sticker of the mounting bracket is firmly applied
- Use the adapter with the longer arms and sticker if you can
- Before installing the adapter on the wand, press the pre-applied stickers with your fingers
- They are installed on the inside of the adapter, which is round so you want to make sure they are firmly placed
- If you mount the bracket on the right side of the wand, make sure you flip the cord holder
- The Solar Panel can be installed on the inside of your window
- Rotate the USB-C to the nearest frame of the window, so you don’t have cables dangling
- Once you are done, organize the cable so it doesn’t affect the movement of the blinds
- Download the Full Manual PDF so you can follow on your PC
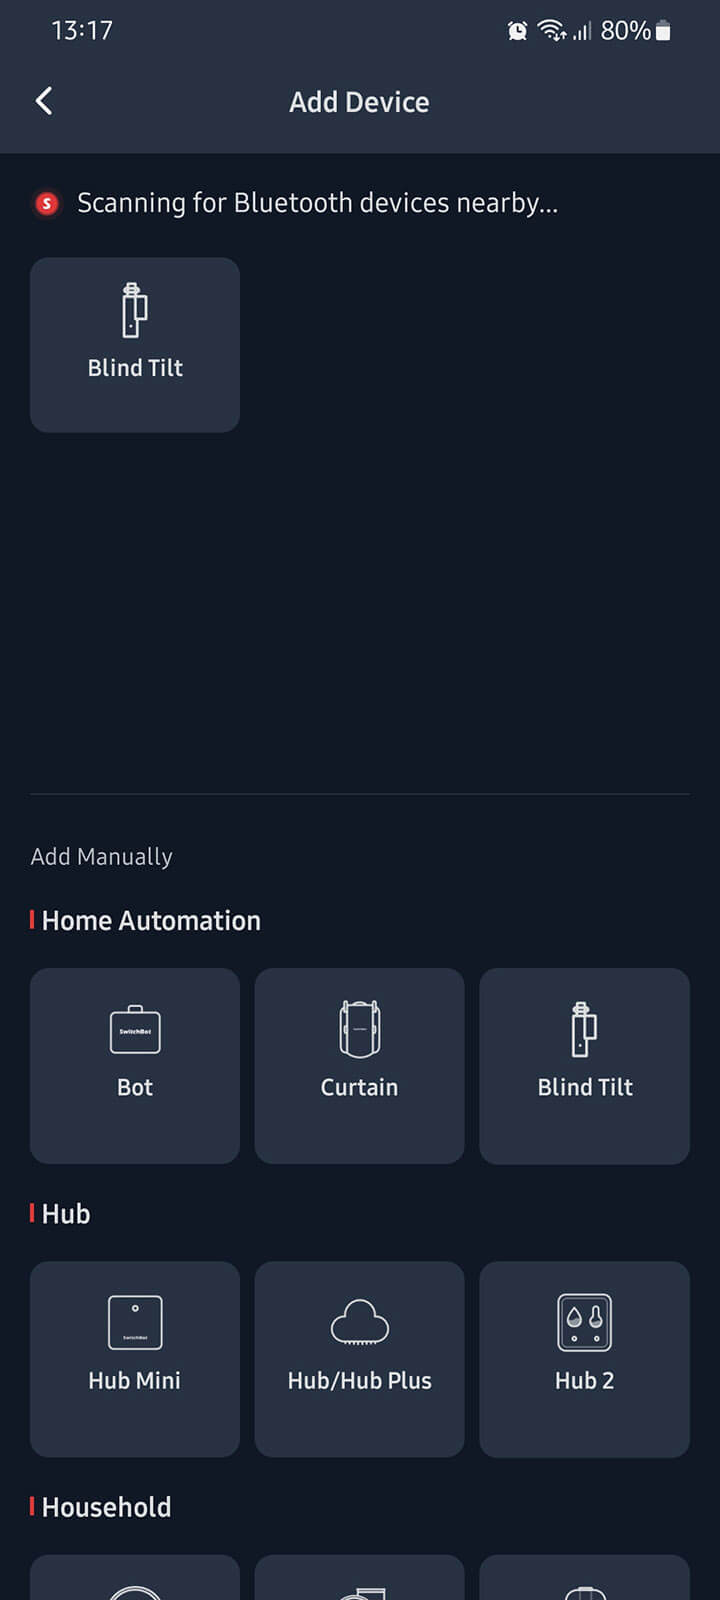
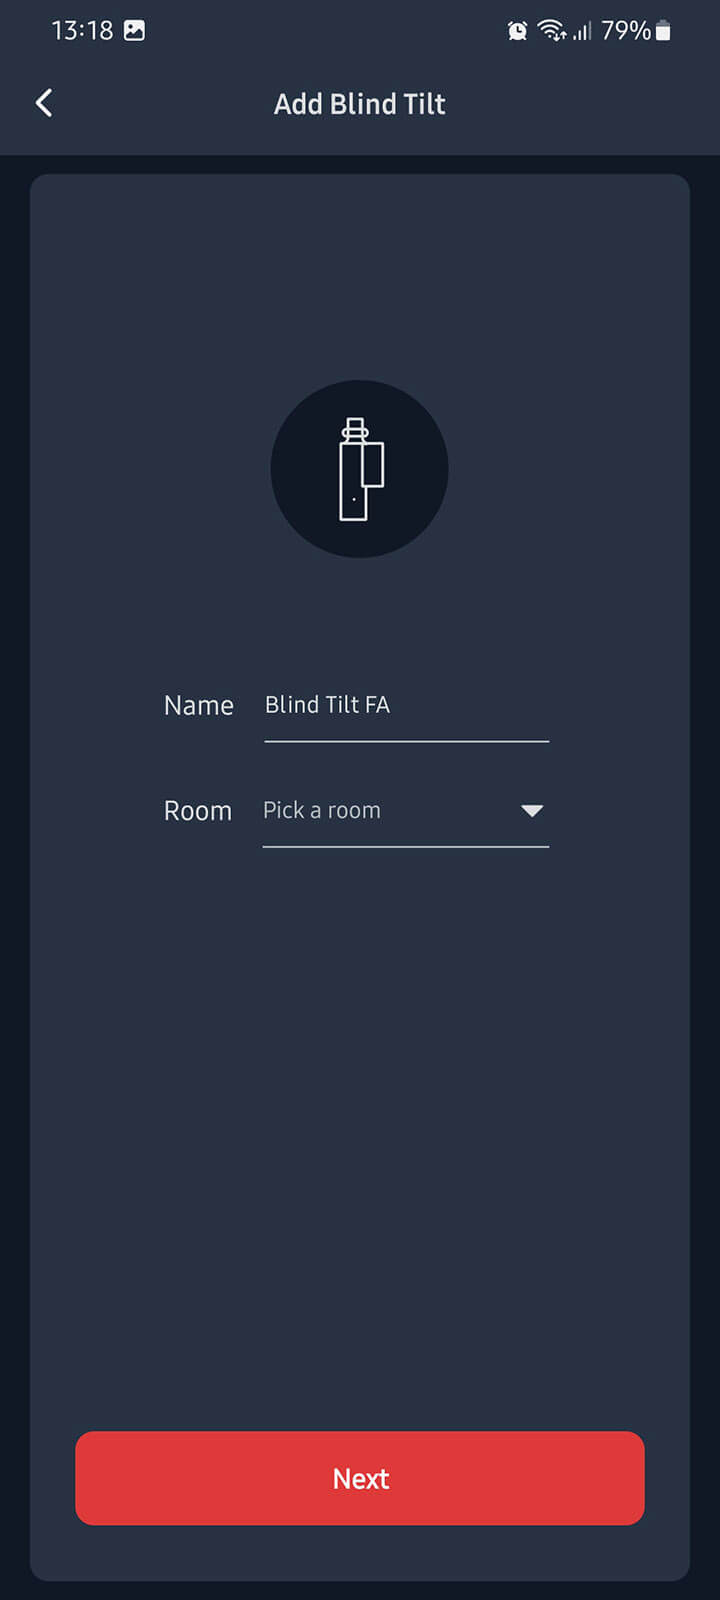
SwitchBot App Setup
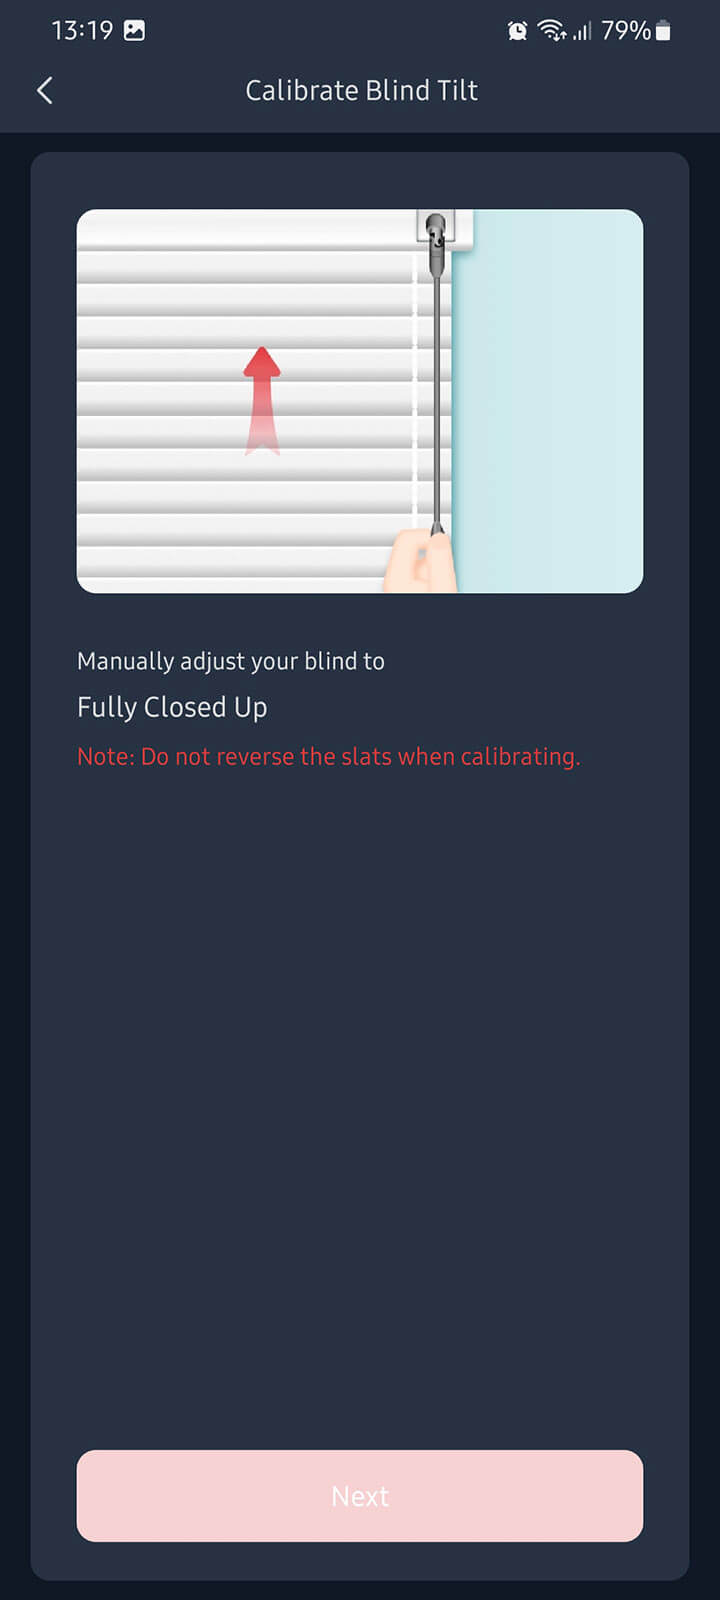
Adding the SwitchBot Blind Tilt in their app is an easy and seamless process. First, tap the + in the corner and follow the process on screen:
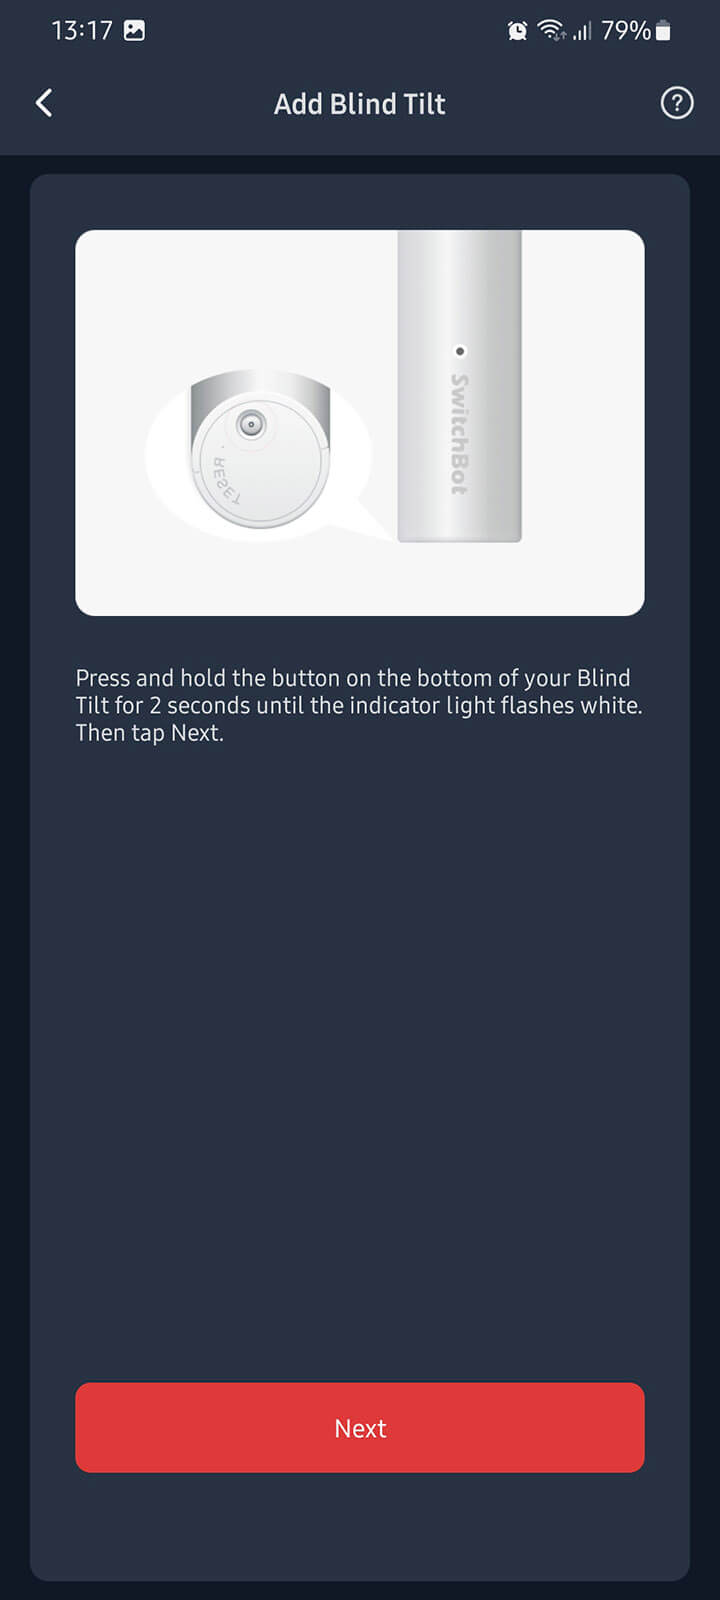
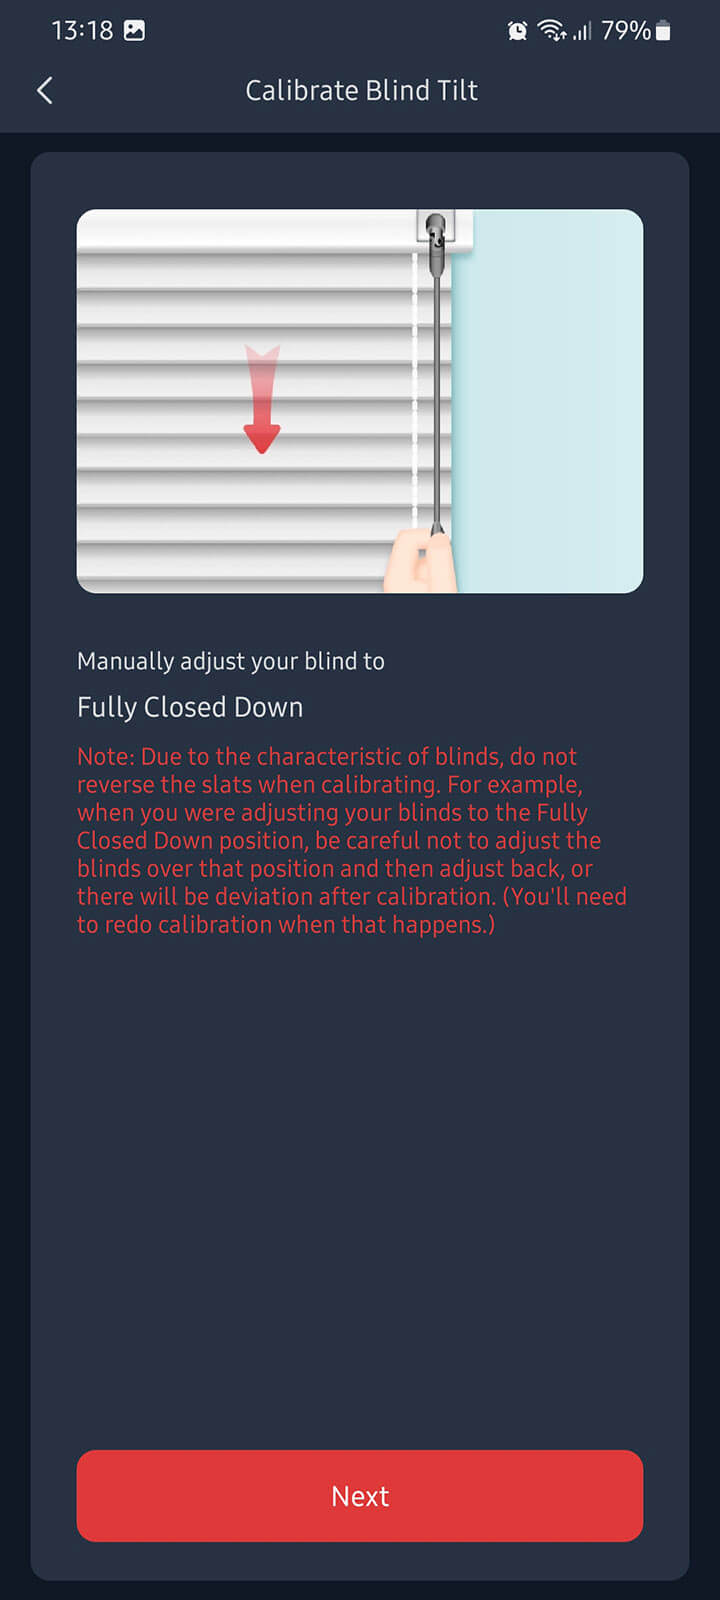
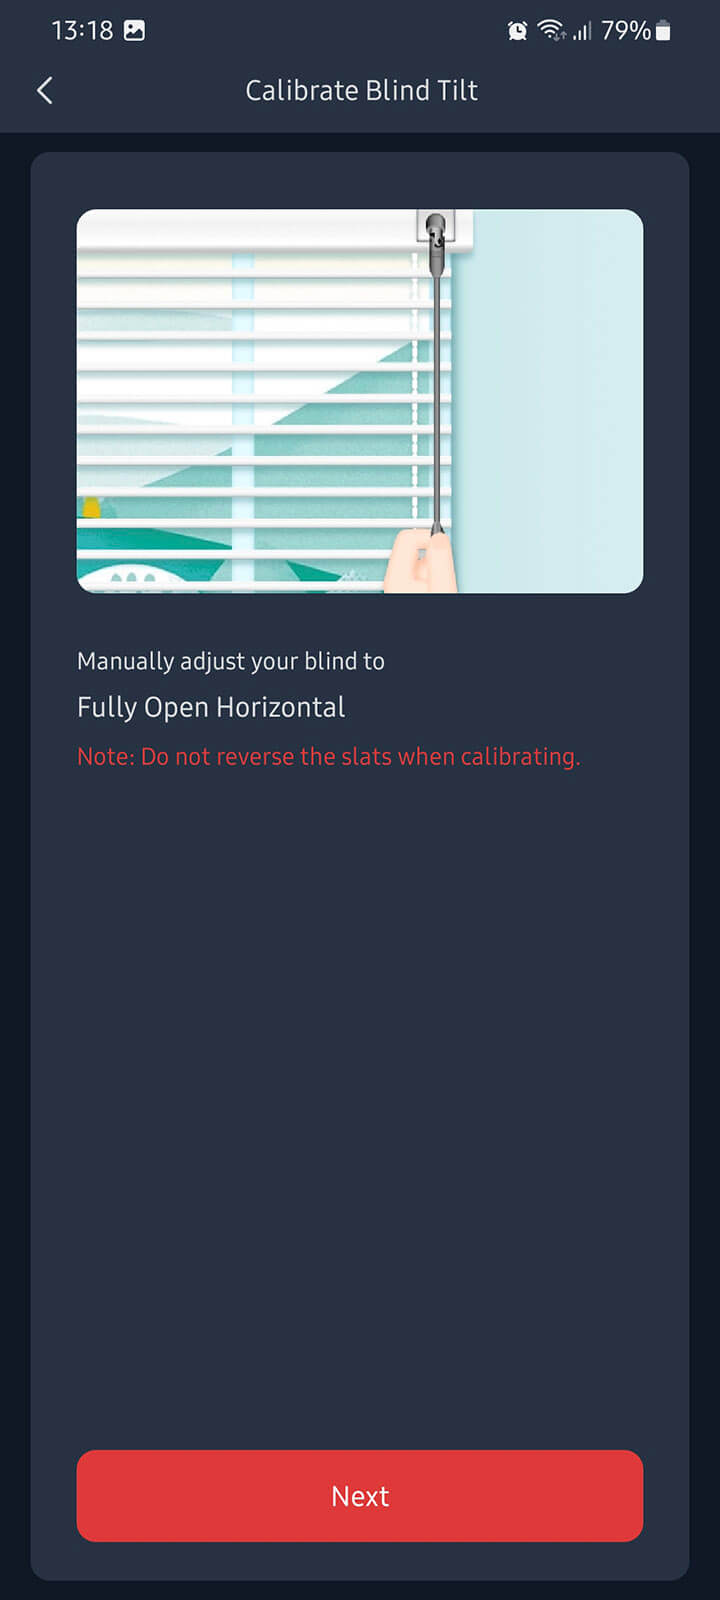
During the setup, the app will prompt you to calibrate the Blind Tilt. This is very important step, so don’t skip it. Home Assistant exposes a sensor which tells you whether the device has been calibrated or not. If you accidentally rotate the wand in the opposite direction during calibration, the app will prompt you to start again.
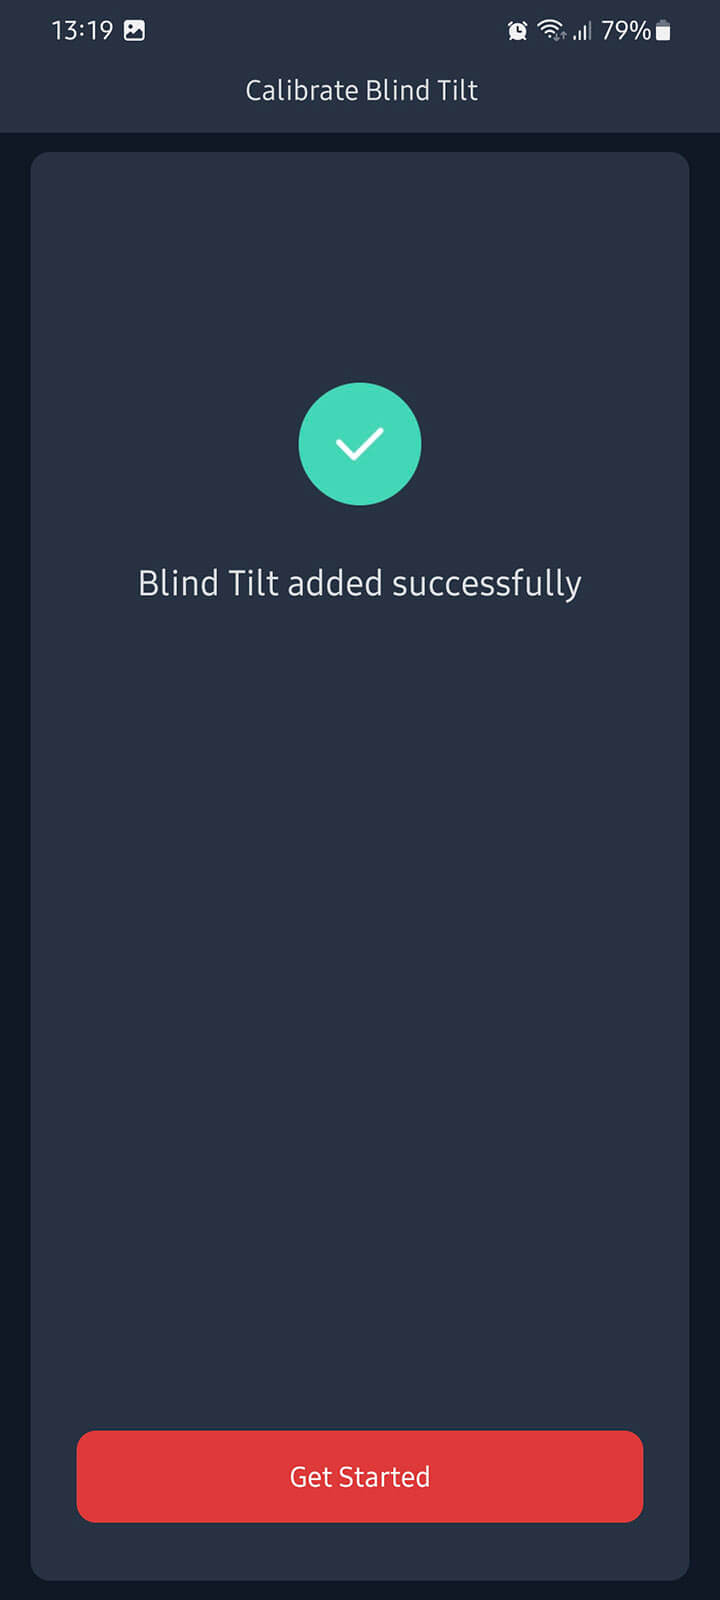
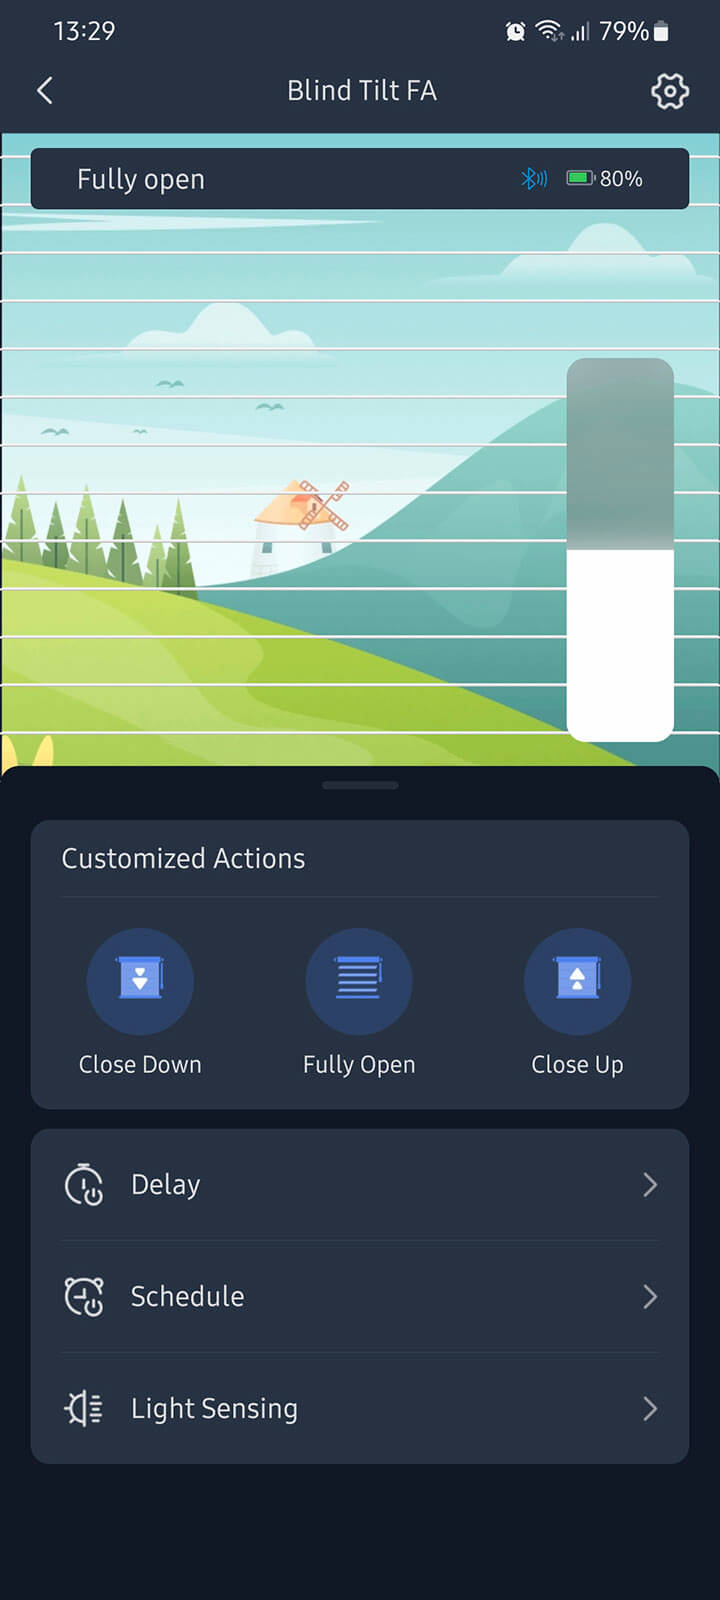
After the device is added, you can easily control it through the SwitchBot App by dragging the slider up/down or by simply pressing the buttons. If you open the Settings menu, you can add some customized buttons on the dashboard, e.g. open at 30%, for quick toggling from the Home screen. Recalibration can be also achieved in the Settings menu.

Home Assistant Integration
The SwitchBot Blind Tilt was added to the official SwitchBot Integration with version 2023.3.0. You will need to update your instance if you want to control the Blind Tilt natively with Home Assistant.
The official integration requires working Bluetooth set up on the device running Home Assistant. If you are using a Raspberry Pi for your Home Assistant server, you can use the built-in Bluetooth module to discover and control SwitchBot devices. If not, you are going to have to add a Bluetooth dongle to your setup.
If you have the Bluetooth Integration active in Home Assistant, the SwitchBot Blind Tilt will get auto-discovered. Simply click Configure and confirm the dialog prompt to add the device to HA which will auto-enable the SwitchBot integration.
If you do not have the Bluetooth integration setup, follow the official documentation to enable it. Subsequently, navigate to Settings > Devices & Services > + Add Integration and search for SwitchBot. This will prompt you to add and configure the bot. Once setup, it exposes the following entities to Home Assistant: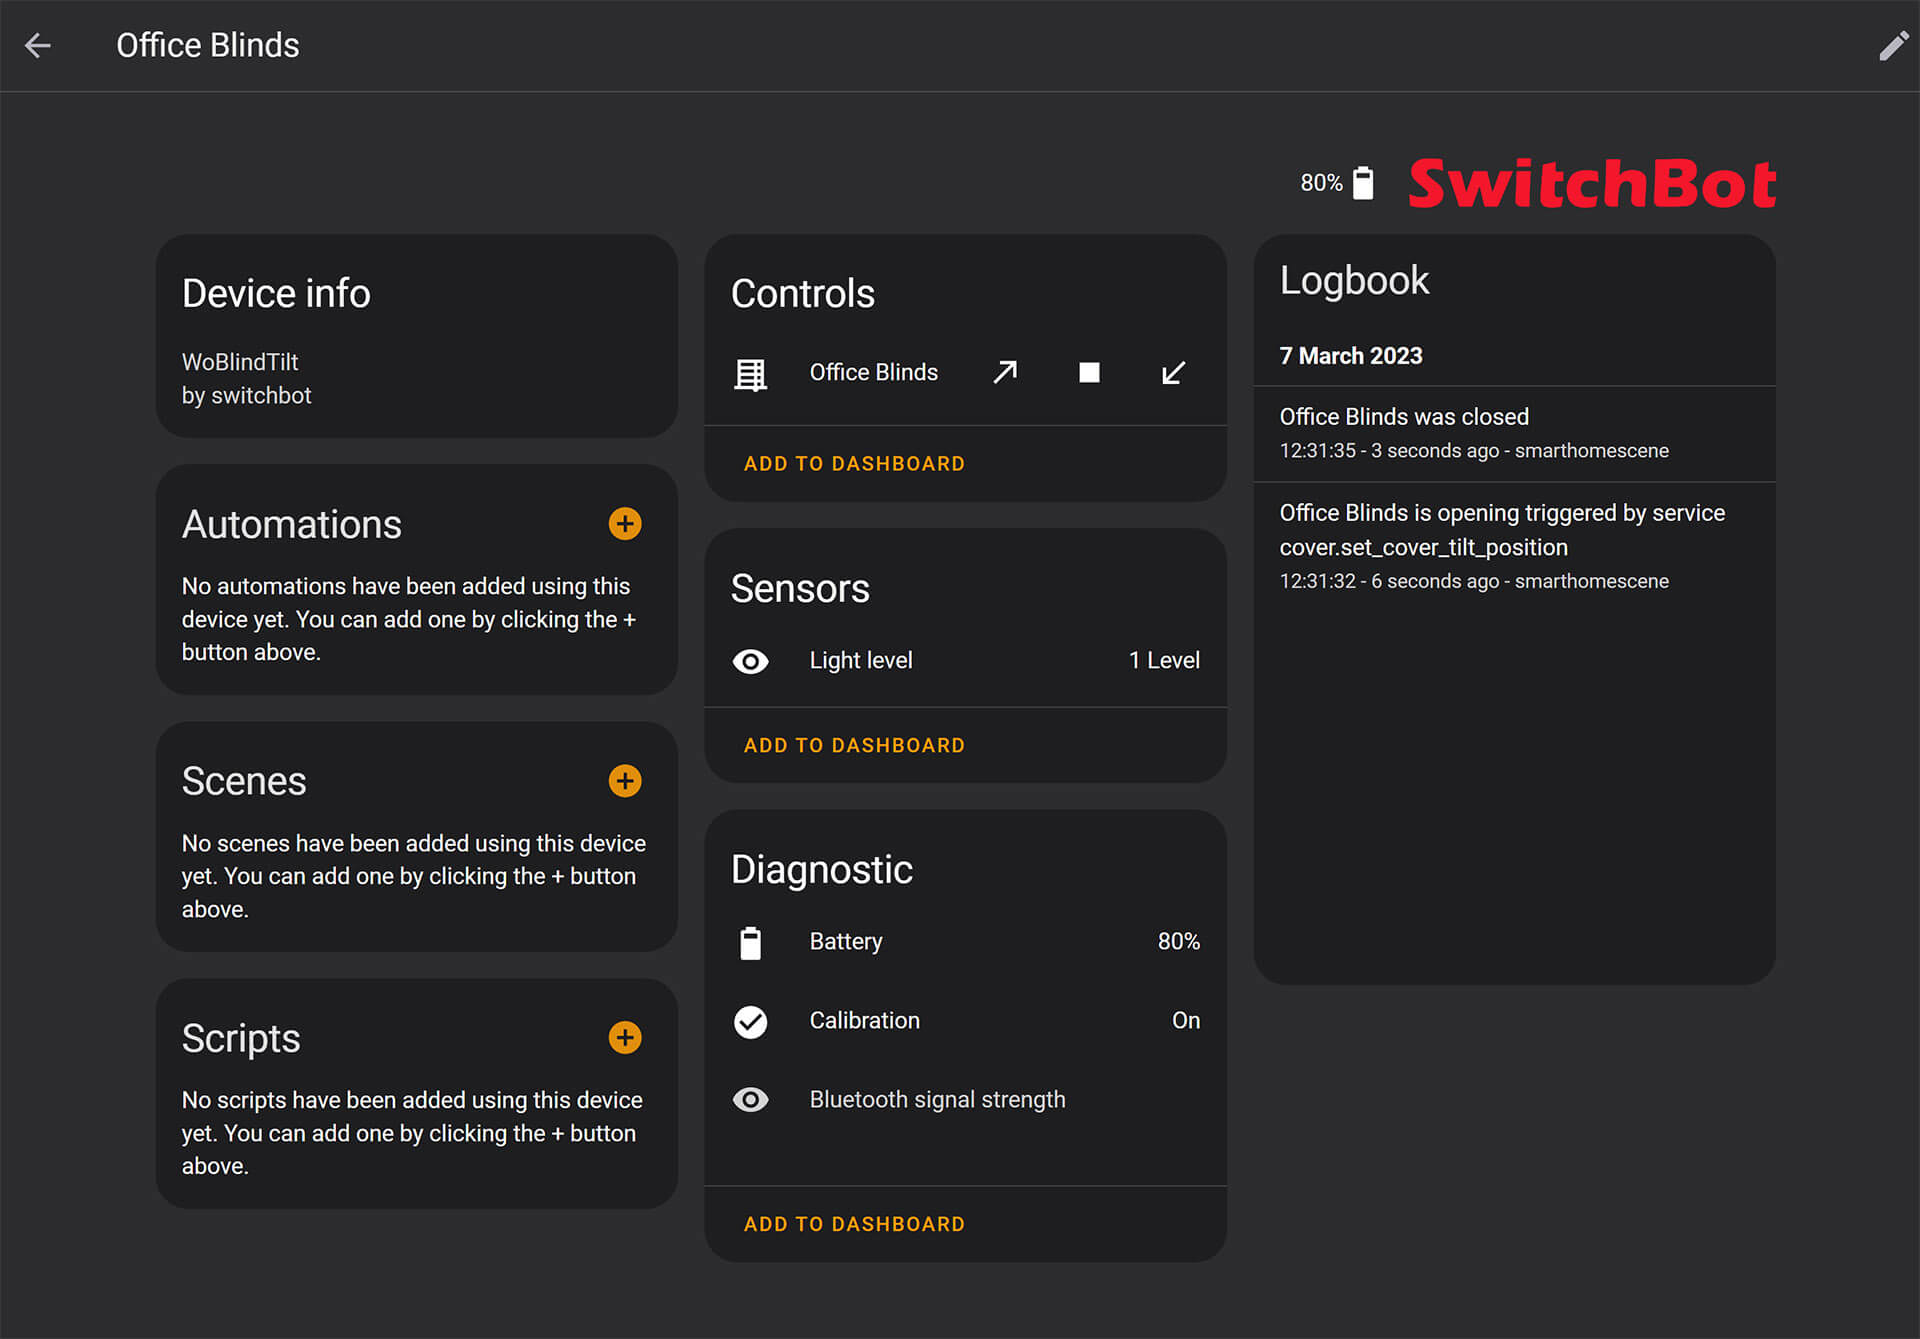
Light level is a brightness indicator, very useful in knowing the lux value so you have an idea of whether the Solar Panel is getting enough sunlight to charge the Blind Tilt.
The blind tilt is exposed as a cover entity with control of the tilt position only, which uses the following operation logic:
– 100% – Closed Up
– 50% – Fully Open
– 0% – Closed Down
The close button will close the blinds to the nearest closed position from it currently is (either 0% or 100%), and defaults to closing down if the blinds are fully open. Because Home Assistant believes 100% is open, the default cards will disable the open button when the tilt is at 100%, but the service call will still work and open the blind to 50%.
Some integrations or cards (eg. Mushroom Cover Card) may expect from your SwitchBot Blind Tilt that 100% is open and 0% is fully closed. Using a Cover Template, a proxy entity can be created which will be open at 100% and closed at 0%. This template entity is limited to closing in one direction, but works wonderfully.
#Example Template Cover configuration.yaml
cover:
  - platform: template
    covers:
      office_blinds_simple:
        device_class: blind
        friendly_name: Office Blinds (Simple)
        open_cover:
          service: cover.set_cover_tilt_position
          data:
            tilt_position: 50
          target:
            entity_id: cover.office_blinds
        close_cover:
          service: cover.set_cover_tilt_position
          data:
            tilt_position: 0 #Change to 100 if you want the blind to close up instead of down
          target:
            entity_id: cover.office_blinds
        position_template: >
          {{ int(states.cover.office_blinds.attributes.current_tilt_position)*2 }}
        set_cover_position:
          service: cover.set_cover_tilt_position
          data:
            tilt_position: "{{position/2}}"
          target:
            entity_id: cover.office_blinds
When using the newly created entity, Home Assistant and any cover cards will always treat the OFF (Closed) position as 0% and ON (Open) as 100%. Adding the entity in card, will now look proper: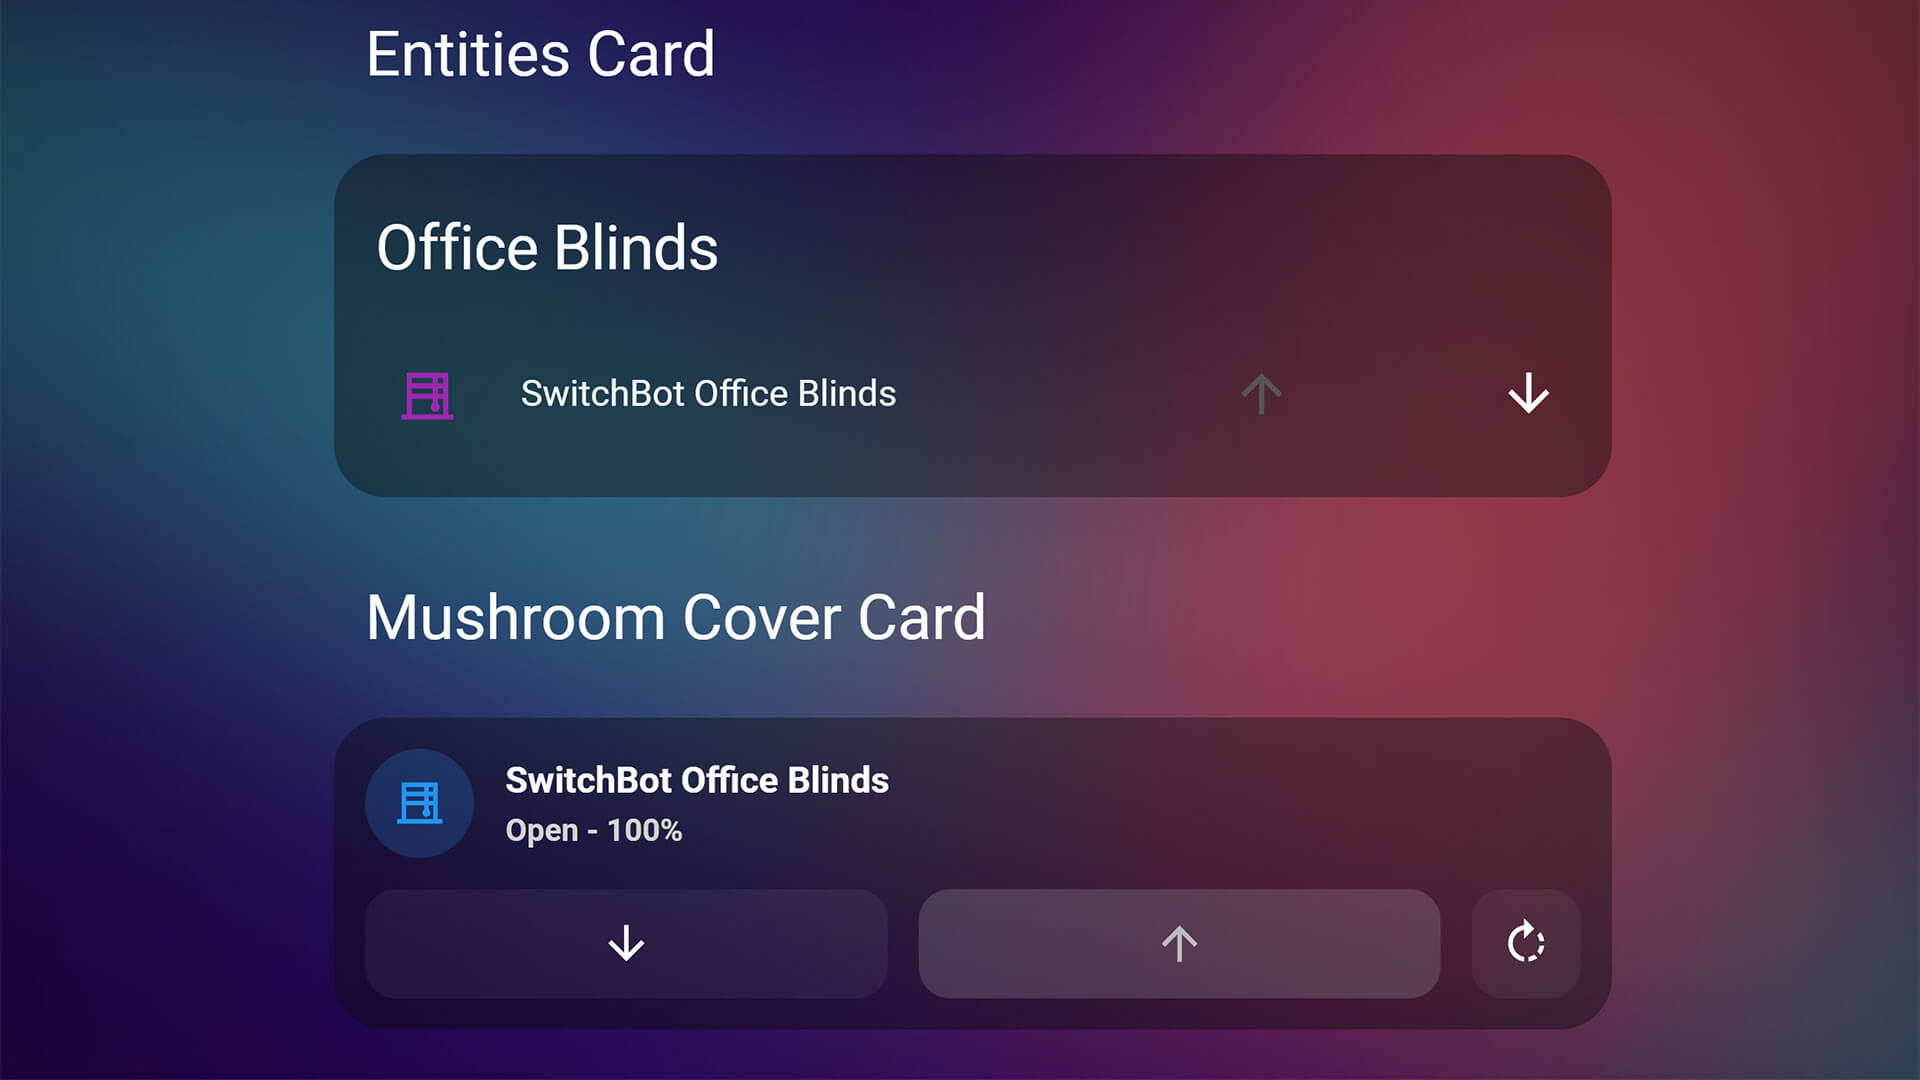
Verdict
The SwitchBot Blind Tilt is an excellent tool if you have tilt & turn blinds that you want to automate. It surprised me in many aspects while disassembling and testing the device. Build quality is superb and installation is easy thanks to the really well written user manual. If you are a fidgety person though, you can get a little overwhelmed by all the accessories and adapters included in the package. You need to relax and follow the manual point by point.
Ever since installing the SwitchBot Blind Tilt on my office blinds, I’ve been tinkering with it’s operation in Home Assistant. If you have Venetian blinds, this is the device to get. Here’s my experience in a summary:
Pros
- High quality build
- Silent driver motor
- Versatile installation options
- Solar Panel included
- USB-C connector
- Can be charged by any 5V1A
- Long battery life
- App is very intuitive to use
- Seamless Home Assistant Integration
- No hub needed
- Matter support with a future update via their Hub 2
Cons
- Bluetooth communication
- Requires Bluetooth dongle or adapter on your Home Assistant server
- Installation can be overwhelming
- Installing more devices can get pricy
- Window has to get enough sun to charge via the Solar Panel
The only thing I really didn’t like is the Bluetooth connection, which I consider to be the weakest communication protocol when It comes to smart home deployment and usage. SwitchBot lists it’s specs as “Proprietary power-saving BLE with mesh support“, which means additional devices will be able to form a mesh network and talk to each other and their mother hub. However, it’s still a noisy communication method subject to interference to anything from the 2.4GHz spectrum.
Buy
The SwitchBot Blind Tilt is currently sold on their official website store and Amazon for $69.99. You can use smarthomescene’s exclusive discount code 10HOMESCENE for 10% OFF on the Amazon Store and 15HOMESCENE for 10% OFF on the SwitchBot official store:
SwitchBot Blind Tilt – $69.99
Amazon Store: 10HOMESCENE for 10% OFF
SwitchBot Store: 15HOMESCENE for 15% OFF
SWITCHBOT OFFICIAL STORE
SwitchBot Blind Tilt | Blind Tilt Combo![]()
United States | Canada | United Kingdom
Germany | Netherlands | Sweden | Spain
France | Italy | Poland | Australia
*If links fail to open, try disabling your AdBlocker.
SwitchBot Smart Home Products
Amazon Store: 10HOMESCENE for 10% OFF
SwitchBot Store: 15HOMESCENE for 15% OFF
SWITCHBOT OFFICIAL STORE
Hub Mini | Hub 2 (Matter) | Plug Mini (HomeKit)
Bot | Meter Plus | Remote | Blind Tilt | Curtain![]()
United States | Canada | United Kingdom
Germany | Netherlands | Sweden | Spain
France | Italy | Poland | Australia
*If links fail to open, try disabling your AdBlocker.


