In the past few months, I reviewed and tested the Sonoff SenseGuard Presence Sensor SNZB-06P24, its Matter sibling the Sonoff SNWF-06P24 and the battery-powered Zemismart ZPS-Z1. With today’s article, it’s safe to say I am getting back into testing presence sensors, as they have always been my favorite device type to tinker with.
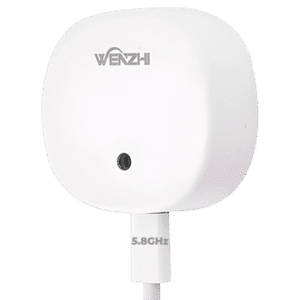
In this review, I am testing the Wenzhi 5.8GHz Zigbee Presence Sensor, labelled as model MTD085-ZB. This is a small, USB-C powered mmWave radar sensor that also measures illuminance and target distance, and works with Home Assistant.
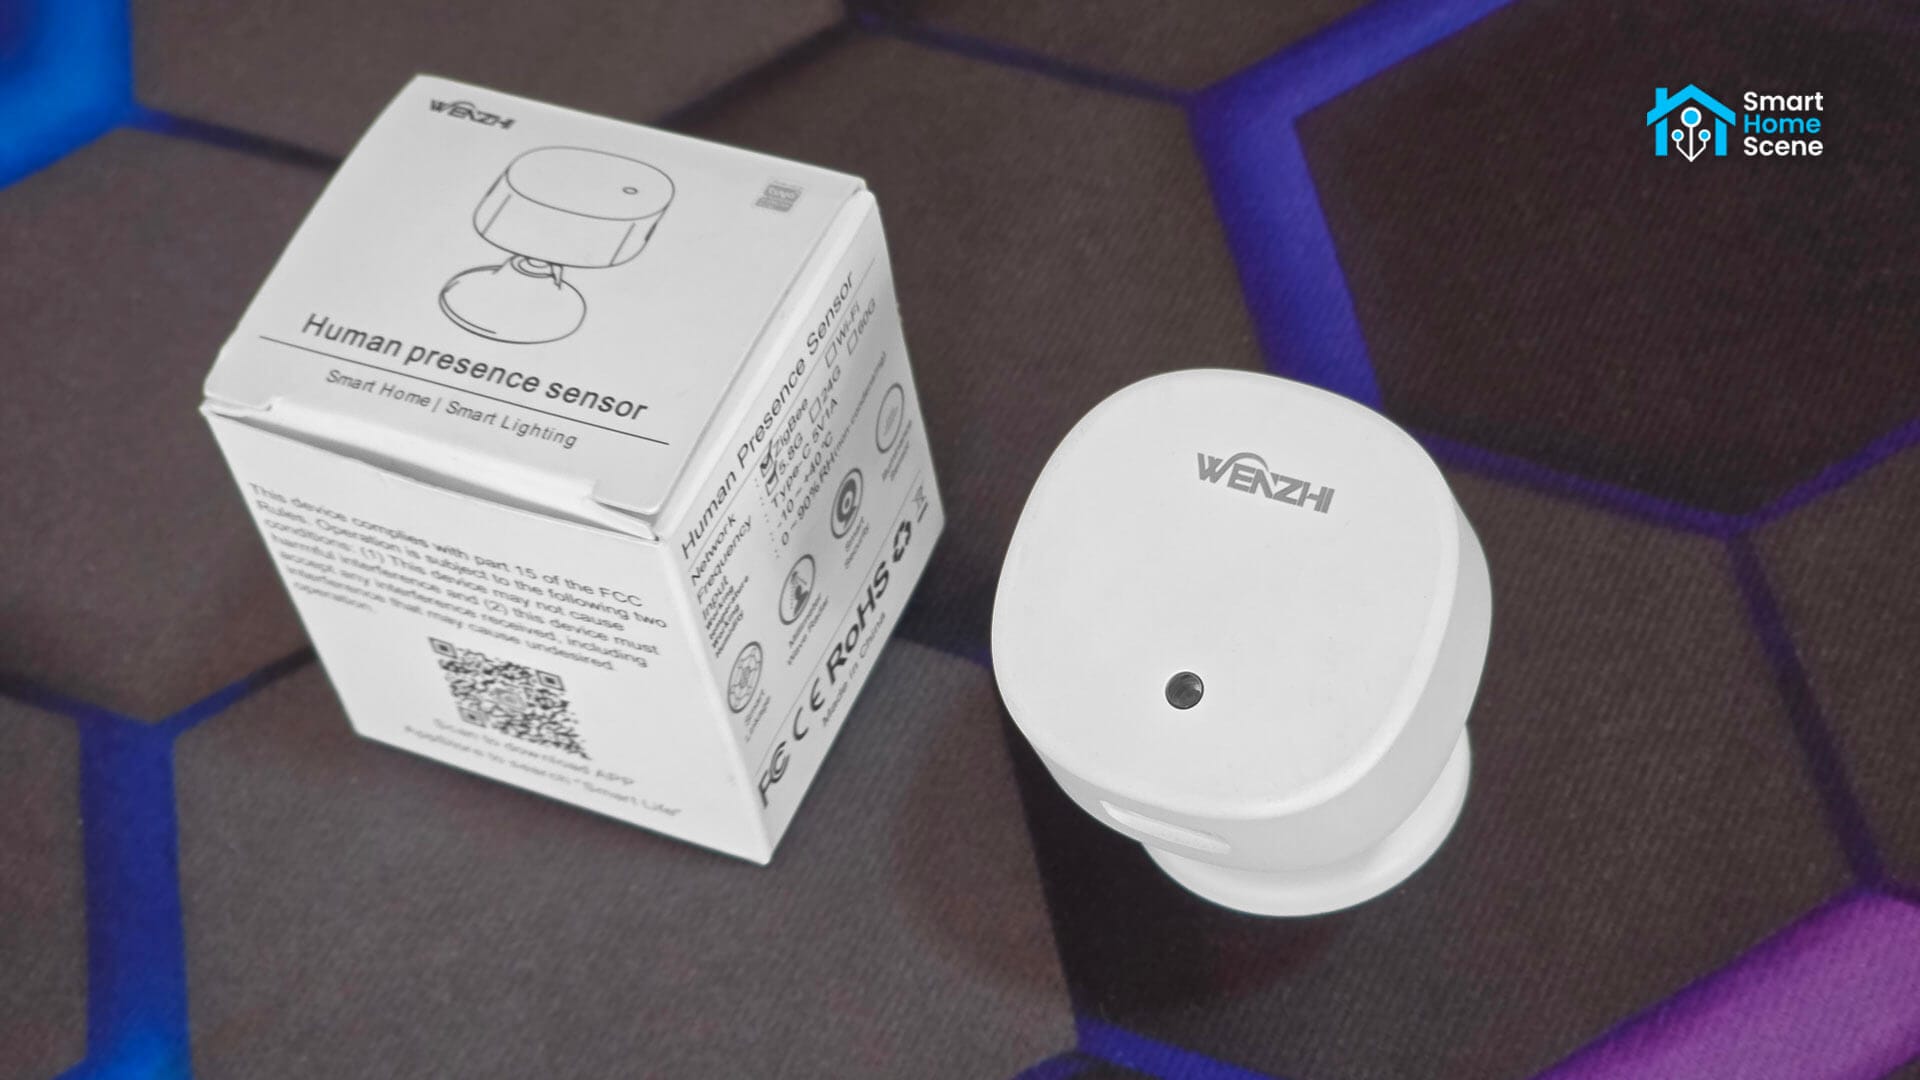
The sensor is natively supported in Zigbee2MQTT and works as a Zigbee router. More importantly, it is one of the few Tuya radar sensors I have tested that does not flood the Zigbee network. For my fellow ZHA users out there, I decided to create a custom quirk that exposes all of its features, so the device is now fully functional in ZHA as well. More on this below.
At a glance
Wenzhi 5.8GHz Presence Sensor MTD085-ZB
A budget 5.8GHz radar that reports occupancy, lux and distance without spamming your network. Very sensitive out of the box, but fully tunable in Zigbee2MQTT and ZHA.
Best for
Home Assistant users who want a cheap, tunable Zigbee presence sensor without the usual Tuya network spam.
Skip if
You would rather not tinker with settings, as this sensor needs some patient tuning before it can work well.
Wenzhi 5.8 vs 24GHz Presence Sensor
Wenzhi sells this sensor in two radar versions that share the same housing, bracket and Zigbee platform. The 5.8GHz version is the cheaper one and has simpler settings. The 24GHz version adds range gates, a noise calibration option and a faster trigger, according to the seller. Here is how the two Zigbee versions compare on paper:
| Specification | 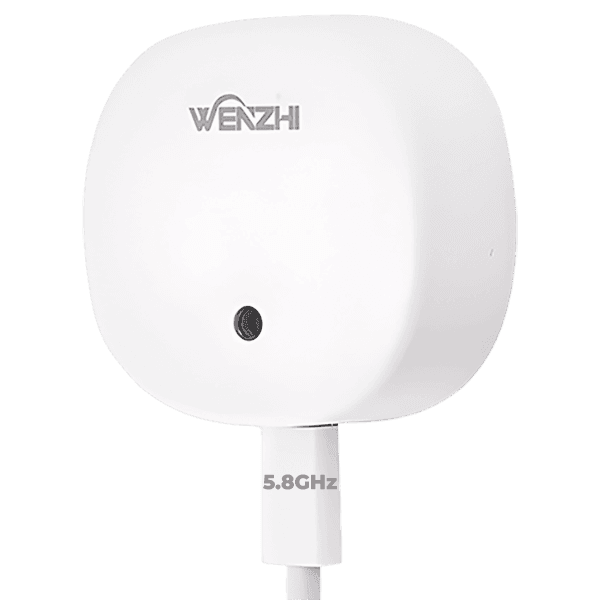 MTD085-ZB | 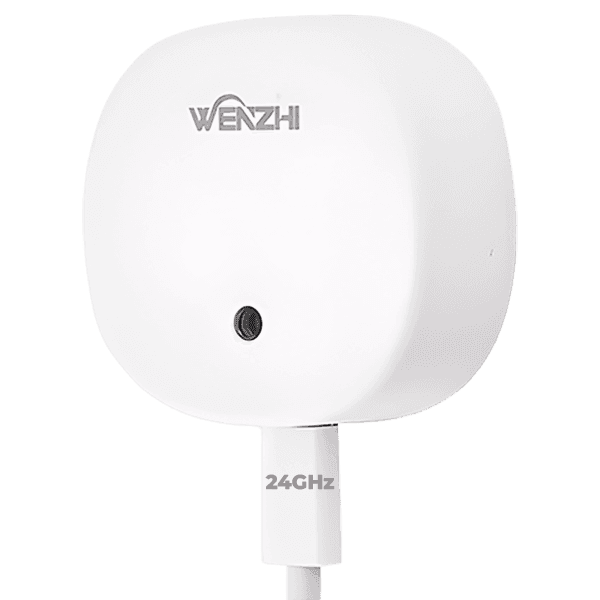 MTD285-ZB |
|---|---|---|
| Radar | 5.8GHz | 24GHz |
| Protocol | Zigbee 3.0 | Zigbee 3.0 |
| Power | USB-C, 5 V 1 A | USB-C, 5 V 1 A |
| Detection Angle | 120° × 120° | 100° × 100° |
| Detection Range | 0 to 8 m | 0 to 8.4 m |
| Detection Sensitivity | 10 to 100% | Low, Medium, High, Custom |
| Clear Cooldown | 5 to 7200 s | 5 to 3600 s |
| Entry Filter Time | 0 to 0.5 s | N/A |
| Block Time | 0 to 10 s | 0 to 10 s |
| Detection Gates | N/A | 11 gates, adjustable |
| Target Tracking | Yes, distance | Yes, distance and speed |
| Calibration | No | Yes, automatic |
| Illuminance | 0 to 9999.9 lx | 0 to 9999.9 lx |
| Dimensions | 48 × 48 × 20 mm | 48 × 48 × 20 mm |
| Price (AliExpress) | US $14.81 | US $18.53 |
Wenzhi advertises a 10 m detection range for the 5.8GHz version, but this number needs some context. According to the coverage diagram on the product page, a ceiling mounted unit detects motion up to 10 m, micro motion up to 7 m and static presence up to 5 m. My review covers the 5.8GHz Zigbee version only.
Teardown and Package Contents
The Wenzhi MTD085-ZB sensor ships with a mounting bracket, a USB cable, a pair of stickers and a user manual. There is no power adapter included in the box, so you need to supply your own 5 V 1 A USB charger.
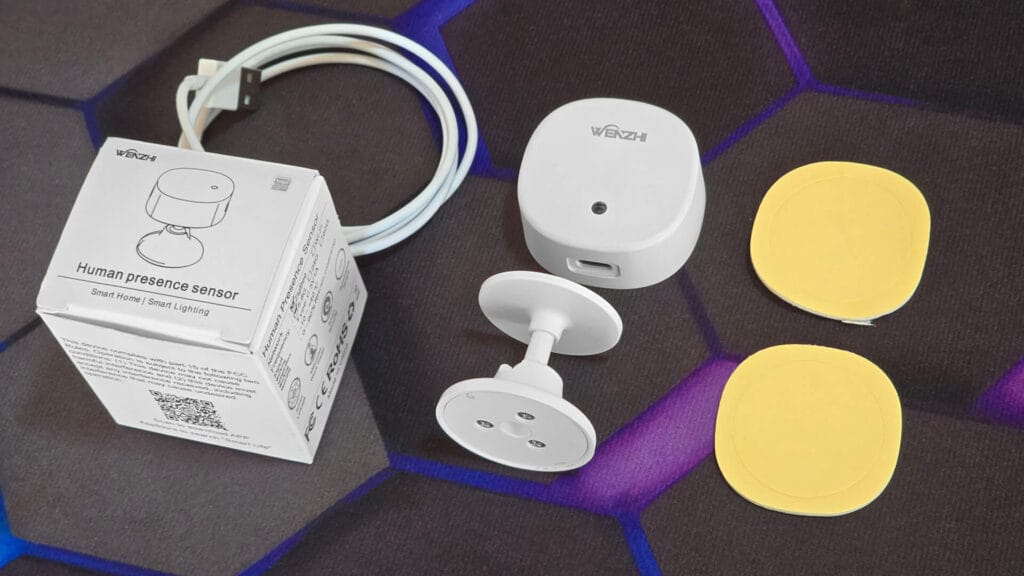
The sensor itself measures 48 × 48 × 20 mm and has a magnet in its back, so it sticks directly to any steel surface, such as a table leg or a metal frame. The included bracket has a metal plate on top, which lets the sensor snap onto it and tilt toward the area you want to cover. The bracket also has a sticker that holds the sensor in place, so it does not slide or sag when the cable pulls on it. The USB-C port sits on the bottom of the sensor, opposite the reset button at the top.
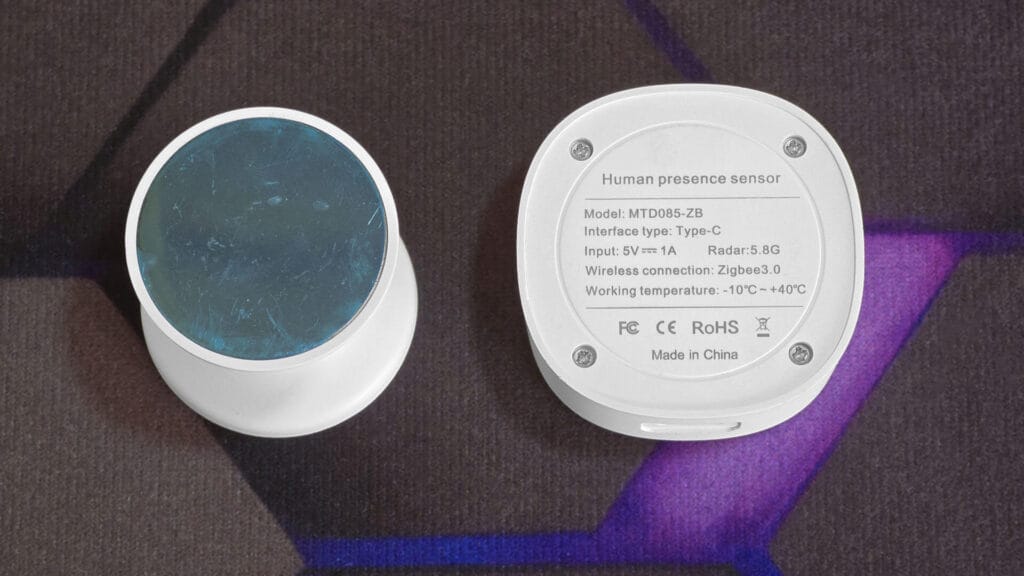
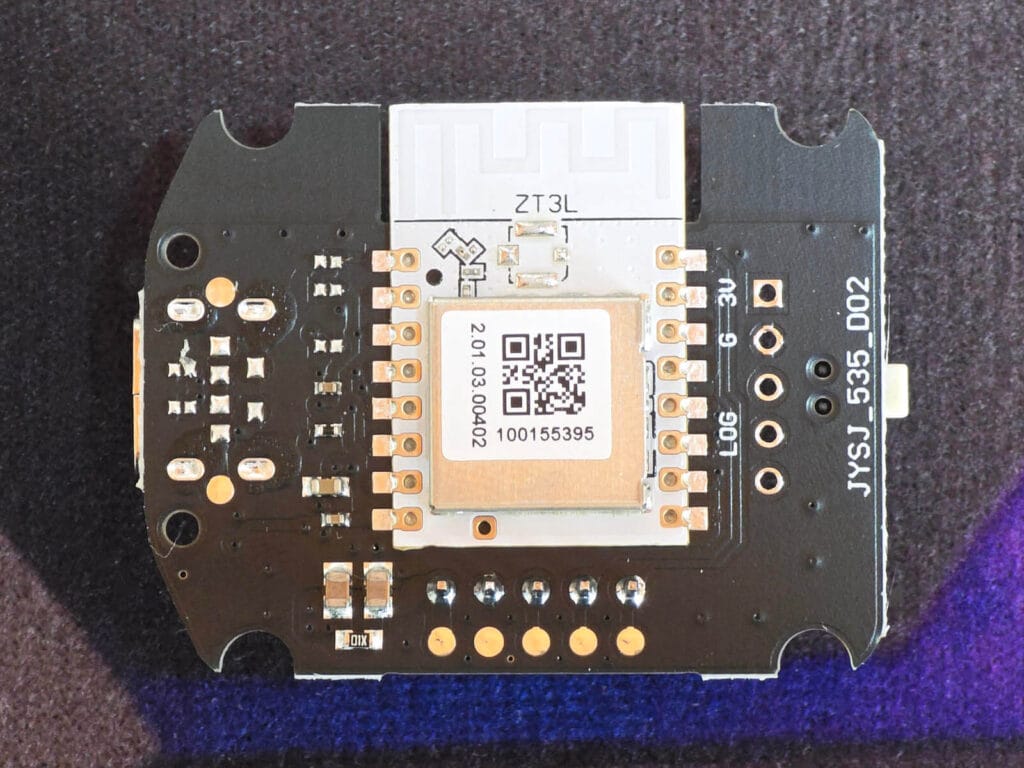
The sensor is held together by four screws, so it is easy to open and take apart. Unlike some of these sensors, nothing is glued shut. Once I opened it up, I found four small magnets instead of the single one I expected, which gives the sensor better stability when mounted. The PCB inside is black and very neat, with only the MCU sitting in the middle on the bottom side.
The MCU is a Tuya ZT3L module [Datasheet], which is based on the Telink TLSR8258 chip. This also explains the Telink Semiconductor prefix in the device IEEE address. The last time I encountered this module was in the Tuya ZRF01 Zigbee RF Cloner, a great Zigbee-operated cloner and emitter for 310 to 580 MHz RF codes. I highly suggest you check out that review as well.
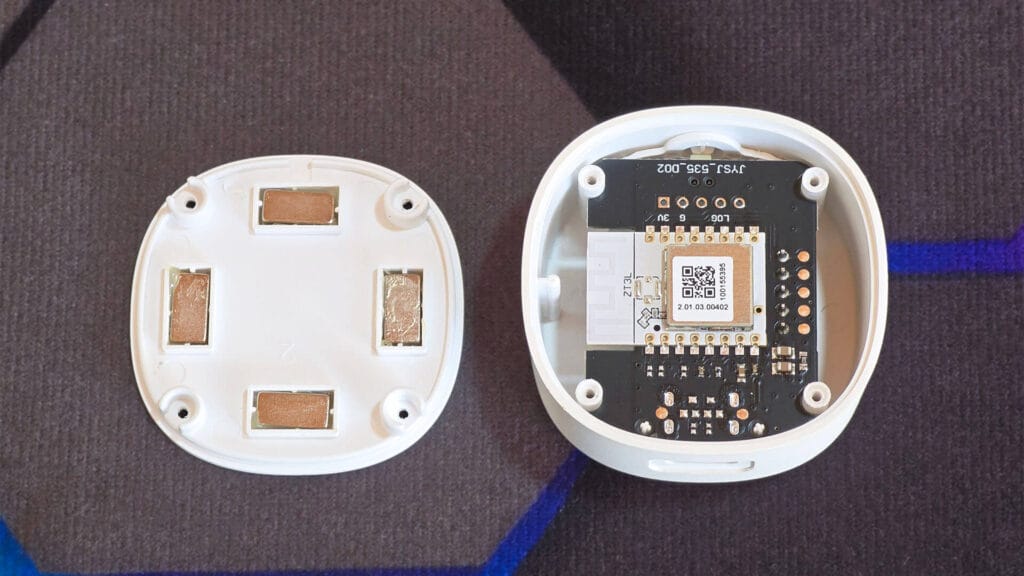
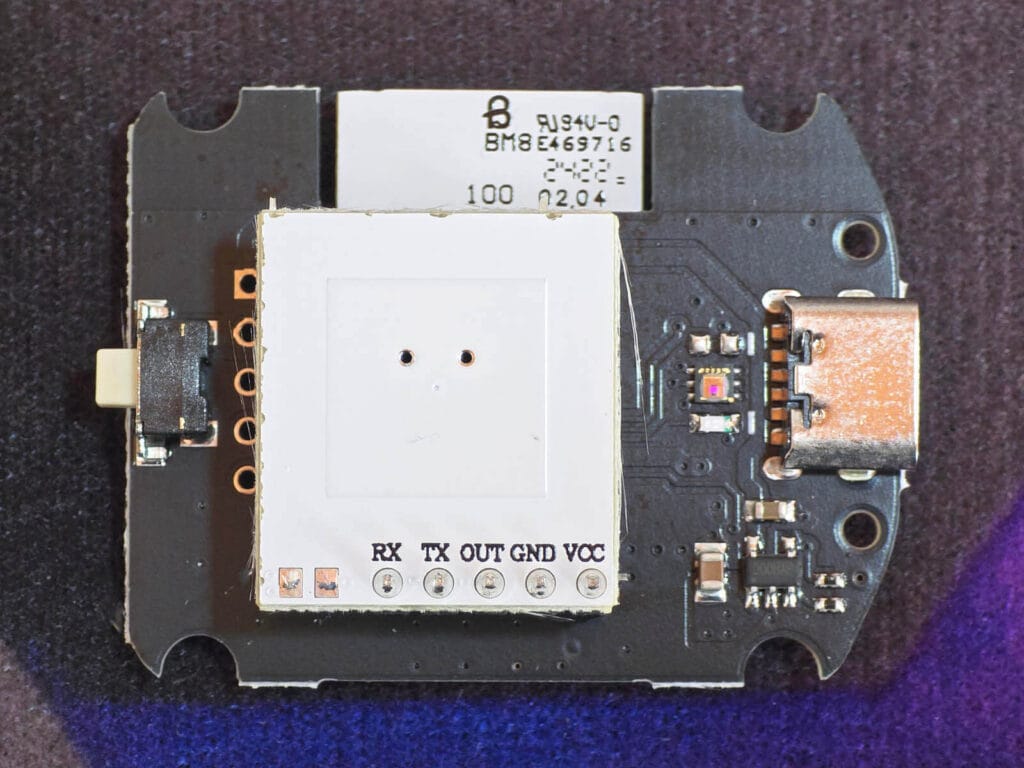
The mmWave radar this device uses is made by LeapMMW and marked with JYSJ_5807_A01. This is the LeapMMW MR5G21 [Datasheet], a micro-motion presence module that transmits both FMCW and CW waves. The FMCW part allows it to measure distance, which is where the target distance in Home Assistant comes from. It has a 120 × 120° beam and uses the standard five-pin layout with VCC, GND, OUT, TX and RX.
Home Assistant Integration
The Wenzhi MTD085-ZB and MTD285-ZB are fully supported in Zigbee2MQTT out of the box. In ZHA, the sensor only shows occupancy without any configuration or sensing entities exposed. To fix this, I made a custom quirk based on the Z2M converter that exposes every sensor and setting in ZHA as well. To pair the sensor, hold the reset button for about 5 seconds until the LED starts blinking blue.
Zigbee2MQTT
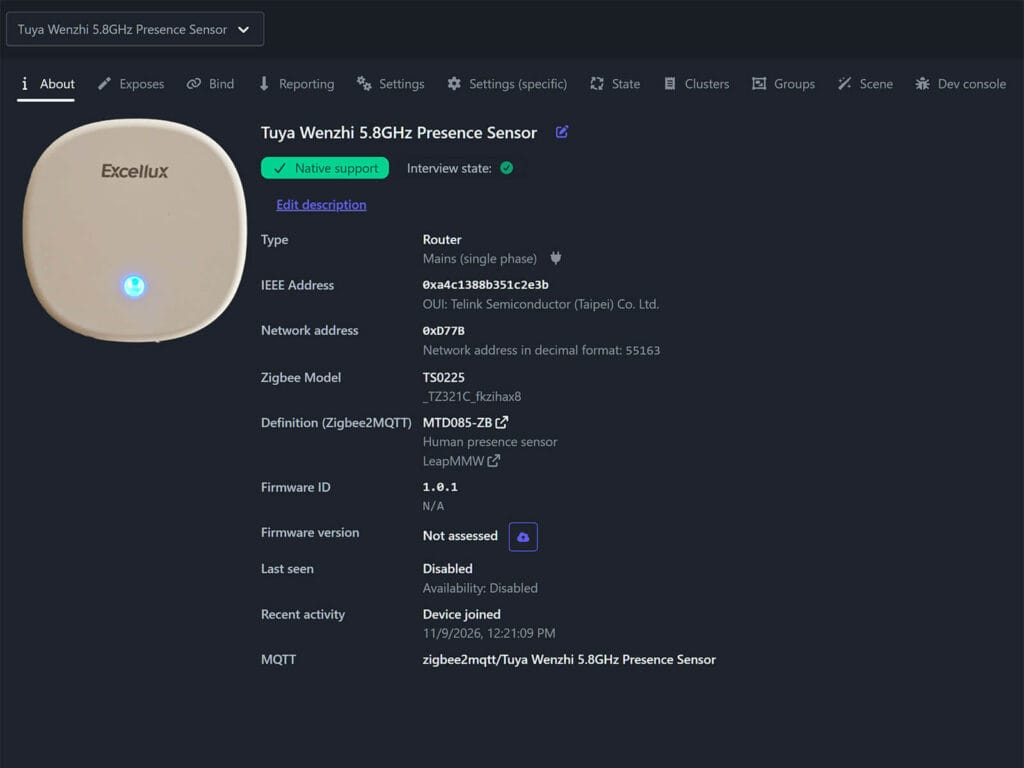
Once paired, Zigbee2MQTT identifies my 5.8GHz version as model MTD085-ZB by vendor LeapMMW, with Zigbee model TS0225 and manufacturer _TZ321C_fkzihax8. It is mains powered, so it also works as a router and relays traffic for other Zigbee devices.
The sensor exposes three sensing entities, two diagnostic entities and a long list of settings. Here are the read-only values it reports:
- Occupancy shows if the room is occupied or clear
- Illuminance reports the ambient light level in lux
- Target Distance reports the distance to the detected person in meters
- Debug Distance reports the real time distance to the target in debug mode
- Debug Countdown shows the seconds left before the sensor clears occupancy in debug mode
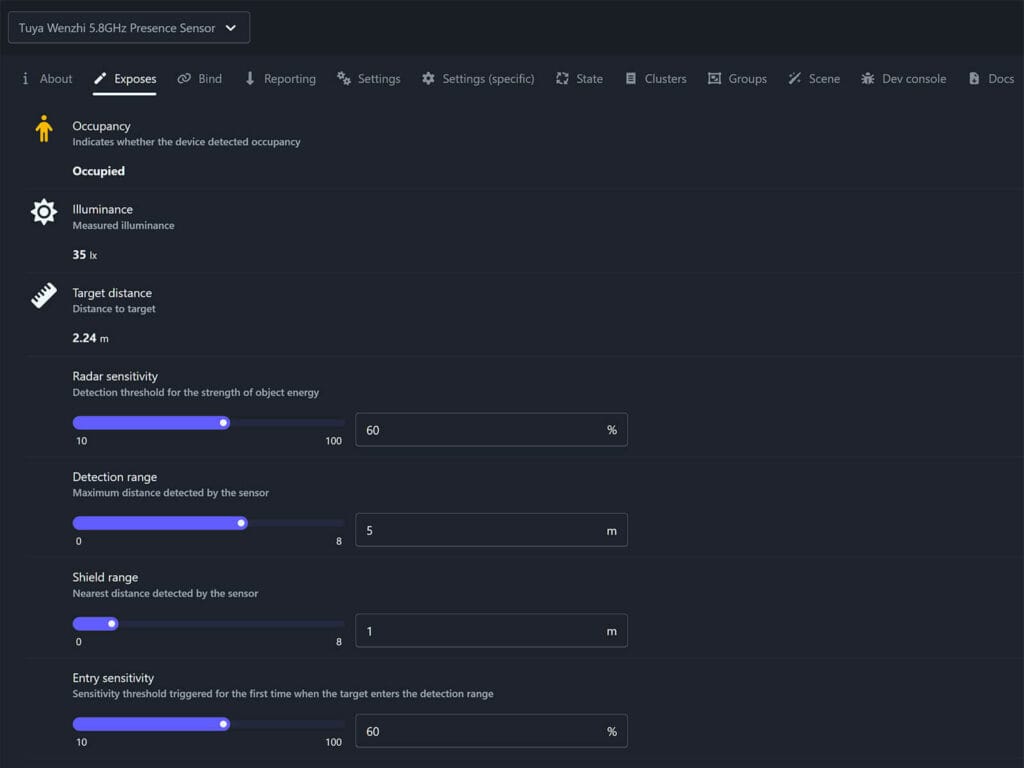
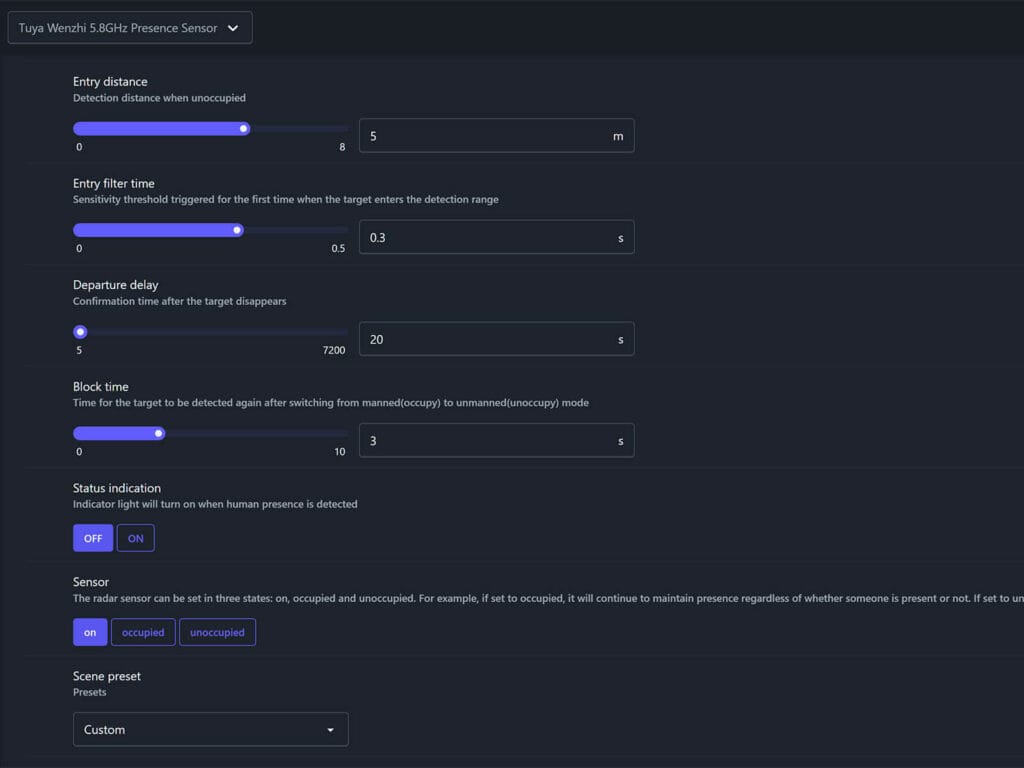
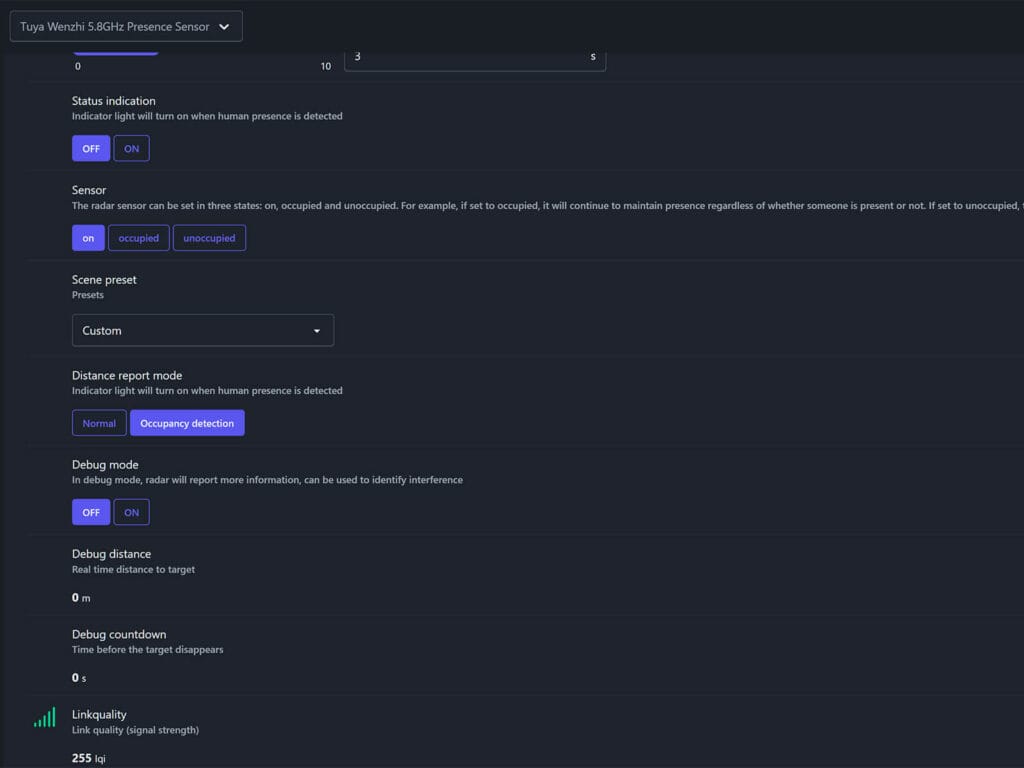
Occupancy is a single binary state. There is no separate motion and static presence state, no movement speed and no energy data per range gate. The 24GHz version reports some of these, but the 5.8GHz version keeps things simple.
ZHA
Without a quirk, ZHA identifies the sensor as TS0225 by _TZ321C_fkzihax8 and only creates an occupancy entity. Illuminance, target distance and all the settings are missing. This is because they travel over Tuya datapoints, which ZHA does not understand on its own.
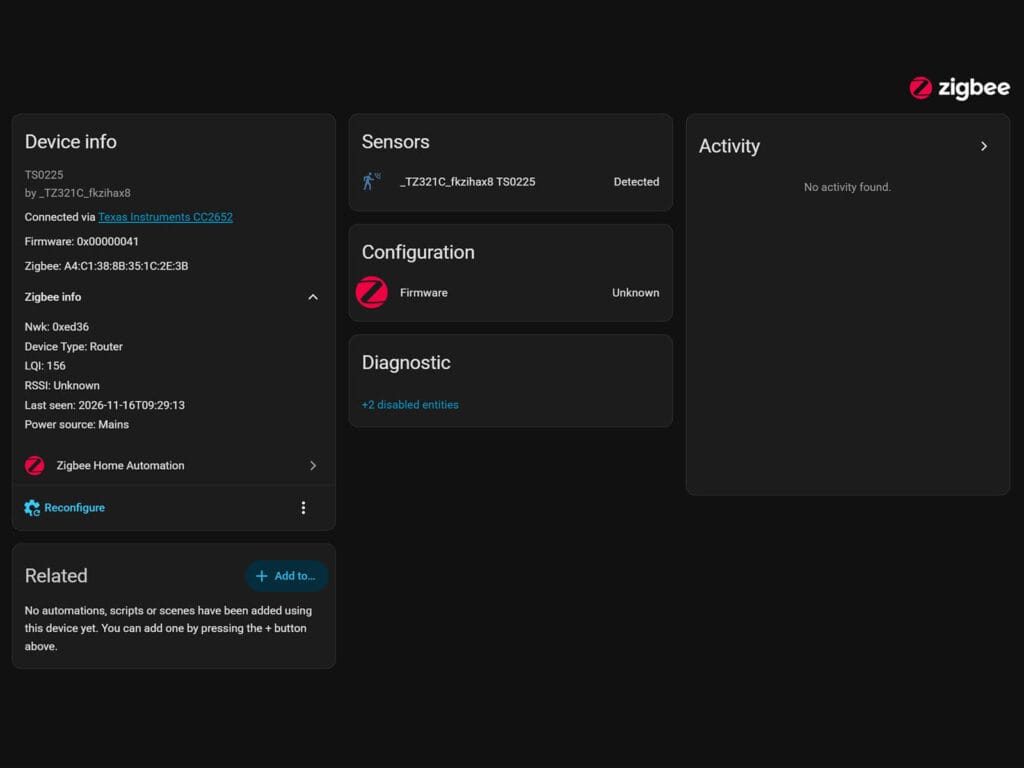
To fix this, I made a fully working custom quirk based on the converter in Zigbee2MQTT, like I did before for the Zemismart ZMP1. I tested it on my unit and all features work fine, exactly as they do in Zigbee2MQTT. With the quirk applied, ZHA exposes illuminance, target distance and every configuration setting. Debug Distance and Debug Countdown show up as diagnostic entities.
Keep in mind that you need to configure each setting once before its data comes through. Until you set a value, the sensor entities stay empty. A few entities also use standard ZHA names, so Departure Delay shows as Fading time. Similarly, Detection Range and Shield Range show as Maximum range and Minimum range.
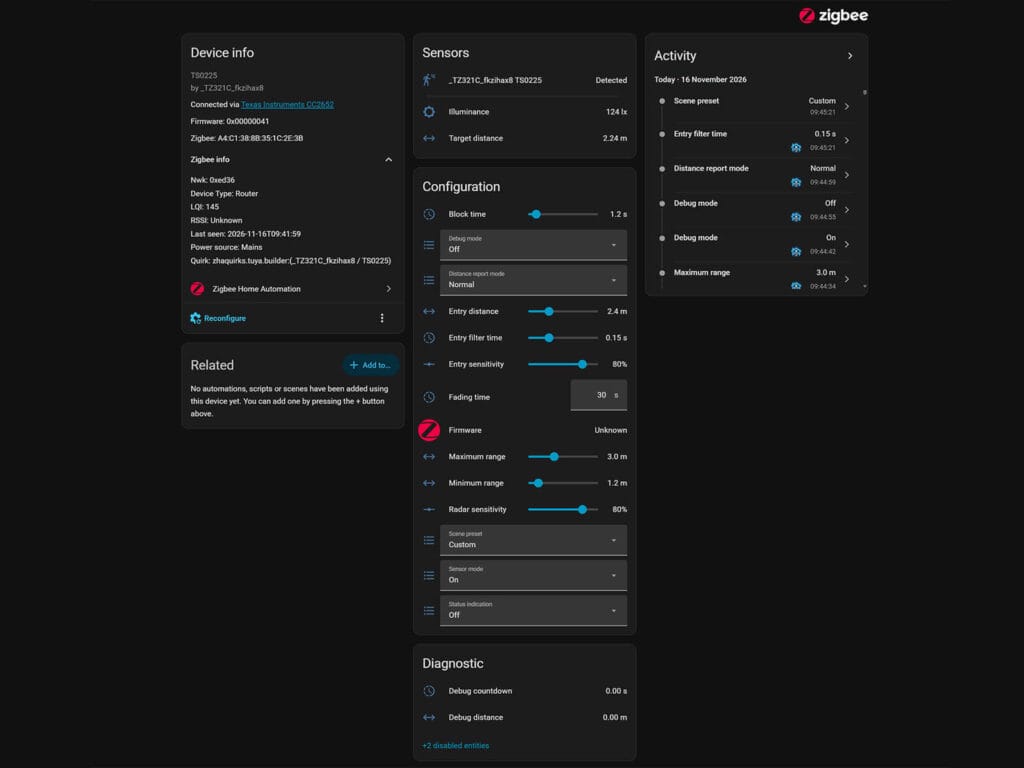
The quirk requires Home Assistant 2026.7 or newer. To install it, follow these steps:
- Save the code below as a .py file inside your
/config/custom_zha_quirks/folder - Make sure
enable_quirksandcustom_quirks_pathare set underzhain yourconfiguration.yaml - Restart Home Assistant
- Pair the device
zha:
  enable_quirks: true
  custom_quirks_path: /config/custom_zha_quirks/
Custom Quirk for Wenzhi MTD085-ZB Presence Sensor (ZHA)
"""Wenzhi MTD085-ZB 5.8GHz mmWave human presence sensor (TS0225).
Custom quirk Made by SmartHomeScene.com
Requires ZHA / zha-quirks 2.0.0 or newer (Home Assistant 2026.7+).
"""

import math

from zigpy import types as t

from zhaquirks.builder import EntityType, NumberDeviceClass, SensorDeviceClass
from zhaquirks.tuya import TUYA_SEND_DATA
from zhaquirks.tuya.builder import TuyaQuirkBuilder


class MTD085ScenePreset(t.enum8):
    """Scene presets (DP 111)."""

    Custom = 0x00
    Toilet = 0x01
    Kitchen = 0x02
    Hallway = 0x03
    Bedroom = 0x04
    Living_room = 0x05
    Meeting_room = 0x06
    Factory_default = 0x07


class MTD085SensorMode(t.enum8):
    """Sensor state override (DP 112)."""

    On = 0x00
    Occupied = 0x01
    Unoccupied = 0x02


class MTD085DistanceReportMode(t.enum8):
    """Target distance reporting mode (DP 120)."""

    Normal = 0x00
    Occupancy_detection = 0x01


class MTD085OnOff(t.enum8):
    """Enum based on/off datapoint (DP 108, DP 114)."""

    Off = 0x00
    On = 0x01


def _illuminance_to_zcl(value: int) -> int:
    """Convert DP 107 (lux x 10) to ZCL MeasuredValue (10000 x log10(lux) + 1)."""
    lux = value / 10
    return int(10000 * math.log10(lux) + 1) if lux >= 1 else 0


(
    TuyaQuirkBuilder("_TZ321C_fkzihax8", "TS0225")
    .applies_to("_TZ321C_4slreunp", "TS0225")
    # Sensing
    .tuya_illuminance(dp_id=107, converter=_illuminance_to_zcl)
    .tuya_sensor(
        dp_id=119,
        attribute_name="target_distance",
        type=t.uint16_t,
        divisor=100,
        device_class=SensorDeviceClass.DISTANCE,
        unit="m",
        translation_key="target_distance",
        fallback_name="Target distance",
    )
    # Detection: hold stage
    .tuya_number(
        dp_id=115,
        attribute_name="radar_sensitivity",
        type=t.uint16_t,
        min_value=10,
        max_value=100,
        step=10,
        unit="%",
        translation_key="radar_sensitivity",
        fallback_name="Radar sensitivity",
    )
    .tuya_number(
        dp_id=117,
        attribute_name="detection_range",
        type=t.uint16_t,
        min_value=0,
        max_value=8,
        step=0.1,
        multiplier=0.01,
        unit="m",
        device_class=NumberDeviceClass.DISTANCE,
        translation_key="detection_distance_max",
        fallback_name="Detection range",
    )
    .tuya_number(
        dp_id=116,
        attribute_name="shield_range",
        type=t.uint16_t,
        min_value=0,
        max_value=8,
        step=0.1,
        multiplier=0.01,
        unit="m",
        device_class=NumberDeviceClass.DISTANCE,
        translation_key="detection_distance_min",
        fallback_name="Shield range",
    )
    # Detection: entry stage
    .tuya_number(
        dp_id=101,
        attribute_name="entry_sensitivity",
        type=t.uint16_t,
        min_value=10,
        max_value=100,
        step=10,
        unit="%",
        translation_key="entry_sensitivity",
        fallback_name="Entry sensitivity",
    )
    .tuya_number(
        dp_id=102,
        attribute_name="entry_distance",
        type=t.uint16_t,
        min_value=0,
        max_value=8,
        step=0.1,
        multiplier=0.01,
        unit="m",
        device_class=NumberDeviceClass.DISTANCE,
        translation_key="entry_distance",
        fallback_name="Entry distance",
    )
    .tuya_number(
        dp_id=104,
        attribute_name="entry_filter_time",
        type=t.uint16_t,
        min_value=0,
        max_value=0.5,
        step=0.05,
        multiplier=0.01,
        unit="s",
        device_class=NumberDeviceClass.DURATION,
        translation_key="entry_filter_time",
        fallback_name="Entry filter time",
    )
    # Timing
    .tuya_number(
        dp_id=103,
        attribute_name="departure_delay",
        type=t.uint16_t,
        min_value=5,
        max_value=7200,
        step=1,
        unit="s",
        device_class=NumberDeviceClass.DURATION,
        translation_key="fading_time",
        fallback_name="Departure delay",
    )
    .tuya_number(
        dp_id=105,
        attribute_name="block_time",
        type=t.uint16_t,
        min_value=0,
        max_value=10,
        step=0.1,
        multiplier=0.1,
        unit="s",
        device_class=NumberDeviceClass.DURATION,
        translation_key="block_time",
        fallback_name="Block time",
    )
    # Behaviour
    .tuya_enum(
        dp_id=111,
        attribute_name="scene_preset",
        enum_class=MTD085ScenePreset,
        translation_key="scene_preset",
        fallback_name="Scene preset",
    )
    .tuya_enum(
        dp_id=112,
        attribute_name="sensor_mode",
        enum_class=MTD085SensorMode,
        translation_key="sensor_mode",
        fallback_name="Sensor mode",
    )
    .tuya_enum(
        dp_id=120,
        attribute_name="distance_report_mode",
        enum_class=MTD085DistanceReportMode,
        translation_key="distance_report_mode",
        fallback_name="Distance report mode",
    )
    .tuya_enum(
        dp_id=114,
        attribute_name="status_indication",
        enum_class=MTD085OnOff,
        translation_key="led_indicator",
        fallback_name="Status indication",
    )
    # Debug
    .tuya_enum(
        dp_id=108,
        attribute_name="debug_mode",
        enum_class=MTD085OnOff,
        translation_key="debug_mode",
        fallback_name="Debug mode",
    )
    .tuya_sensor(
        dp_id=109,
        attribute_name="debug_distance",
        type=t.uint16_t,
        divisor=100,
        device_class=SensorDeviceClass.DISTANCE,
        unit="m",
        entity_type=EntityType.DIAGNOSTIC,
        translation_key="debug_distance",
        fallback_name="Debug distance",
    )
    .tuya_sensor(
        dp_id=110,
        attribute_name="debug_countdown",
        type=t.uint16_t,
        device_class=SensorDeviceClass.DURATION,
        unit="s",
        entity_type=EntityType.DIAGNOSTIC,
        translation_key="debug_countdown",
        fallback_name="Debug countdown",
    )
    .tuya_enchantment()
    .add_to_registry(mcu_write_command=TUYA_SEND_DATA)
)
I also opened a pull request for adding this device officially in ZHA #5728.
Configuring the Sensor in Zigbee2MQTT
The Wenzhi MTD085-ZB is a very sensitive presence sensor in general. Whatever values you think works for other sensors, it doesn’t for this one. You need to lower the values more than usual to find the sweet spot. The good news is that every setting is exposed in Zigbee2MQTT and ZHA with my quirk, so you can tune it properly.
The settings of this sensor follow what I like to call a two stage logic. One group of parameters decides when an empty room becomes occupied, and another decides how long the sensor holds the occupied state. Once you understand this split, tuning the sensor becomes much easier. Keep in mind, these settings apply only to the 5.8GHz version as I haven’t tested the 24GHz variant yet.
Radar and Entry Sensitivity
Entry Sensitivity and Radar Sensitivity are both sensitivity settings for the radar. An mmWave radar measures the energy reflected from an object to tell if someone is present. The Radar Sensitivity setting tunes how sensitive the sensor is to targets while the room is occupied.
Entry Sensitivity does the same thing, but only for the initial trigger event. In other words, it applies when the first target enters the field of view of the sensor. Both range from 10 to 100% in steps of 10, but as you will find later, you won’t need to go over 60% for Radar Sensitivity.
Detection, Shield and Entry Distance
Detection Range sets the farthest distance the sensor detects presence, while Shield Range sets the nearest. Shield Range simply masks a zone in front of the sensor so it is ignored. It goes up to the full 8 m range, so you can use it to remove nearby obstacles, like a curtain or fan moving 1 m in front of the sensor.
Entry Distance is the detection distance when the room is unoccupied. Together with Entry Sensitivity, it decides how far away a person can be to trigger the sensor from a clear state. All three distance settings range from 0 to 8 m in steps of 0.1 m.
Departure Delay and Block Time
Departure Delay is the presence clear cooldown. Calling it departure delay is weird to me, but I guess it’s understandable enough. It sets the time it takes for the sensor to go from occupied to clear once there is no presence. You can set it anywhere from 5 seconds to 2 hours. It works nicely and the values are respected, as long as you take the time to configure the sensor properly.
Block Time is a simple filter that blocks detection for several seconds after the sensor moves from occupied to clear. This prevents quick re-triggers right after the room clears. It ranges from 0 to 10 seconds.
Sensor State, Status Indication and Filter Time
The Sensor setting has three states, on, occupied and unoccupied. When set to on, the sensor works normally. The other two lock the occupancy state to occupied or unoccupied on demand, regardless of what the radar sees. I’m not sure why this exists exactly. It works as a manual override, which makes more sense in the Tuya app I guess, where users cannot easily pause their linked scenes. In Home Assistant, I found little use for it, since disabling an automation does the same job.
Status Indication controls the LED light. When enabled, the LED turns on when presence is detected. When disabled, the LED stays fully off. I always like to turn off all status lights for my devices, so good thing this device has this feature.
Entry Filter Time is the time the sensor takes to confirm a target before it reports the occupied state. It ranges from 0 to 0.5 seconds. Zigbee2MQTT shows the wrong description for this setting, as it repeats the Entry Sensitivity text.
Debug Mode
Debug Mode is a tuning tool. When you turn it on, the sensor starts reporting Debug Distance and Debug Countdown in real time. Debug Distance shows where the radar sees a target, which helps you find interference sources such as a fan or a moving curtain. You can then cut them out with Shield Range or Detection Range.
Debug Countdown shows how many seconds are left before the sensor clears occupancy. The countdown starts when the radar loses the target, so you can watch the Departure Delay run live. The LED also lights up whenever someone is detected while debug mode is on.
Debug Mode is the only setting that makes the sensor report distance continuously. I suggest turning it off once you finish tuning.
Scene Presets
The sensor has six scene presets for different rooms, plus a factory default option. When you select a preset, the sensor rewrites its own settings and reports each change back to Zigbee2MQTT. A full preset applies in about 2 to 4 seconds. I captured the values each preset writes from the Zigbee2MQTT logs:
| Preset Name | Entry Sensitivity | Entry Distance | Radar Sensitivity | Detection Range | Shield Range | Departure Delay |
|---|---|---|---|---|---|---|
| Toilet | 60% | 1.8 m | 80% | 2.5 m | 1.2 m | 30 s |
| Kitchen | 80% | 2.4 m | 80% | 3.0 m | 1.2 m | 30 s |
| Hallway | 80% | 1.8 m | 80% | 2.5 m | 0.6 m | 15 s |
| Bedroom | 80% | 5.4 m | 90% | 6.0 m | 0.6 m | 60 s |
| Livingroom | 80% | 6.4 m | 80% | 7.0 m | 1.2 m | 60 s |
| Meetingroom | 80% | 6.4 m | 90% | 7.0 m | 1.2 m | 90 s |
Interestingly, all presets keep Entry Filter Time at 0.1 seconds and Block Time at 3 seconds. Small rooms like the toilet, kitchen and hallway use a 2.5 to 3 m range and clear in 15 to 30 seconds. Larger rooms use a 6 to 7 m range and hold presence for 60 to 90 seconds. The bedroom and meeting room presets also raise Radar Sensitivity to 90%, which makes sense for larger rooms where people sit or lie still.
The Custom preset does not write any values. It is simply the state the sensor is in after you change the settings yourself. Switching to Custom kept the values from the previous preset in my test, so it works as a save-state entity for your pre-configured settings.
The Factory Default option does not work in Zigbee2MQTT at the moment. Selecting it returns an error, because the converter expects the value “Default” while the interface sends “Factory default”:
Publish 'set' 'scene_preset' to 'Tuya Wenzhi 5.8GHz Presence Sensor' failed: 'Error: Key 'Factory default' not found in: [Custom, Toilet, Kitchen, Hallway, Bedroom, Livingroom, Meetingroom, Default]'Distance Reporting and Network Traffic
The Distance Report Mode setting has the wrong description in Zigbee2MQTT. It reads “Indicator light will turn on when human presence is detected”, which has nothing to do with what this setting does.
This mode is highly useful. It is a software toggle for distance reporting, which is the culprit behind the Zigbee network flood on almost all mains-powered Tuya presence sensors. When set to Occupancy Detection, the sensor does not report distance continuously. Instead, it reports it only once or twice on detection and clear events. The product page calls this mode “report at trigger”.
When set to Normal, the sensor reports distance every couple of seconds. The great news is that this still does not flood the network, so you can use it comfortably without worrying that it will crash your Zigbee network. Still, it is good to know that you have a switch to turn it off.
The next thing I was worried about was illuminance, but it behaves well too. The sensor only sends it along with occupancy events, so it does not add any extra traffic. Overall, the Wenzhi 5.8GHz presence sensor is quite tame and does not flood your Zigbee network, especially if you take the time to configure it properly.
Testing and Performance
I installed the Wenzhi MTD085-ZB in my office, where it overlooks an area of about 4 meters. I mounted it on the side of my PC case using the magnetic bracket, which works great by the way. It holds the sensor firmly at an angle, and only sags a bit when the cable is tugging on it hard.
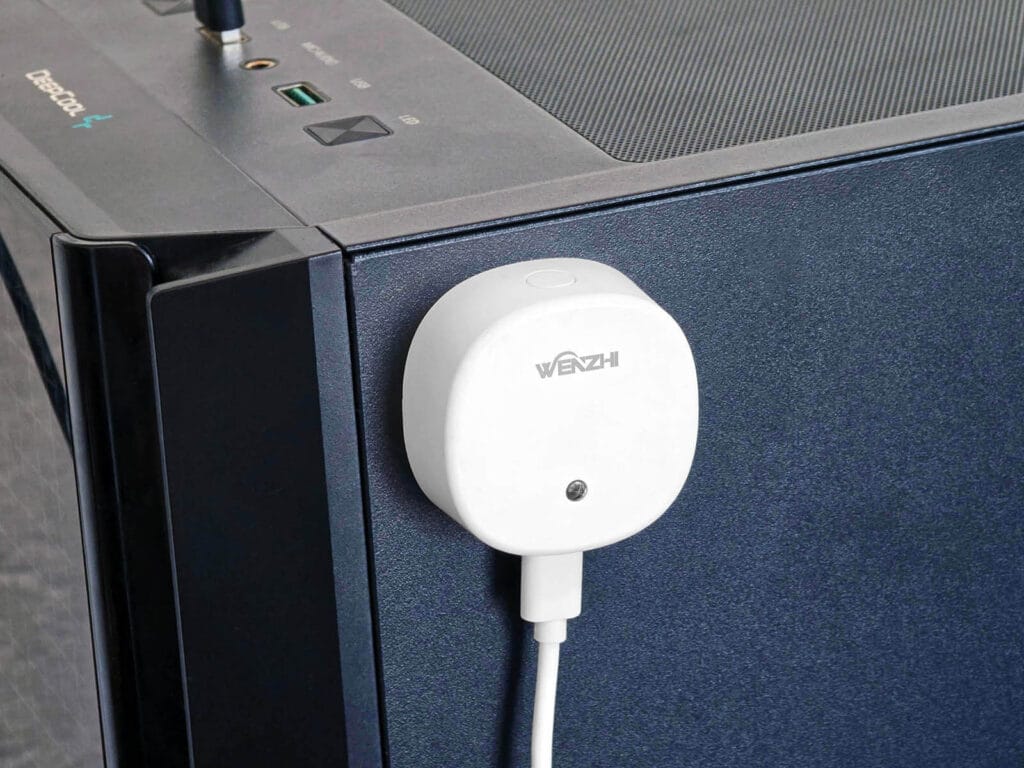
As I mentioned earlier, the sensor is very sensitive out of the box. After some tinkering, I found the sweet spot for my office at 60% Radar Sensitivity with a 5 m Detection Range. Keep in mind that a 5.8GHz radar passes through thin walls more easily than a 24GHz one. This is one more reason to start with lower values than you normally would.
Entry and Triggering
For testing the initial trigger response, I set Entry Sensitivity to 80%. At this value, the sensor catches me immediately as I walk into the room, without any noticeable delay. You need to be careful with this number, as it can produce false positive triggers if you go too high.
I also set Shield Range to 0.5 m, so the sensor ignores the zone right in front of it. There are no fans or moving curtains near it, so this is mostly a precaution. Still, it costs nothing and removes one possible source of false triggers.
I turned the status LED off completely. It lights up every time someone is detected, which I found annoying and not very discreet for a sensor that sits in plain sight.
Static Presence and Clearance
To test static presence, I moved to an office sofa at the other end of the room, about 3.5 m from the sensor. I sat there scrolling on my phone, with no sudden movements or waving, and the sensor detected me reliably the whole time. There were no false triggers either.
For Departure Delay, I settled on 30 seconds. This gives the sensor some breathing room before it clears the room. When I set it lower, the sensor seemed to get confused and occasionally cleared the room while I was still in it. For this reason, I suggest not going under 30 seconds.
I also set Block Time to 1 second, but in practice it made no difference. Block Time only ignores new detections in the short window right after the room clears. With a 30 second Departure Delay, nobody has been detected for half a minute by that point, so a re-trigger within that 1 second is very unlikely. Quick on and off triggers are what motion sensors are for anyway.
Target Distance and Debug Mode
The target distance sensor is very accurate, but with a caveat. It is only accurate when there is an actual person in front of the sensor. With Distance Report Mode set to Normal and nobody in the room, the sensor reported a bogus 2.5 m value and stayed there.
I guess this is somewhat expected, since the radar keeps looking for something to measure and finds no reliable target. Once I stood in front of it at about 2 m, the value floated around 2 m. As I moved closer, it decreased properly. The best thing about this is that you can stop the continuous reporting completely by switching Distance Report Mode to Occupancy Detection.
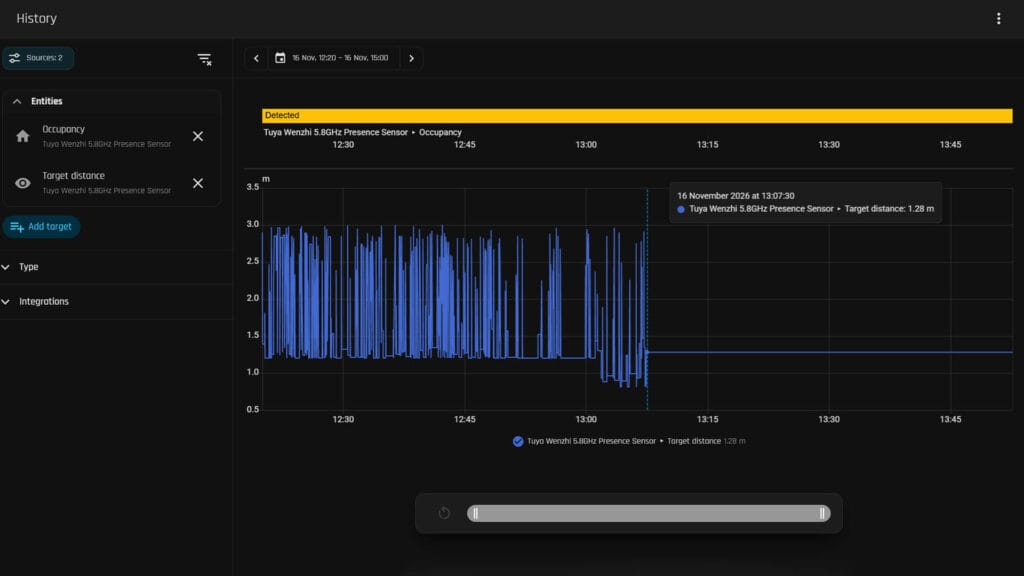
You can see this clearly in the history graph above. With Distance Report Mode set to Normal, the target distance updated every few seconds. At 13:07, I switched it to Occupancy Detection and the continuous reporting stopped instantly, leaving the last value flat on the graph. Occupancy stayed detected the whole time, so turning off distance reporting has no effect on presence detection.
Debug Mode is very useful for all of this. When you turn it on temporarily, Debug Distance and Debug Countdown update live with what the sensor sees. This helps you understand how the radar works and how sensitive it is, based on real events you create. I highly suggest tinkering with this mode a lot before you settle on any values.
Verdict
The Wenzhi MTD085-ZB is a simple 5.8GHz presence sensor that gets the basics right. It works as a router, reports occupancy, illuminance and distance, and does not flood the Zigbee network. It also works fine in ZHA with my custom quirk. The Distance Report Mode toggle and the Debug Countdown are features I rarely see on sensors in this price range.
On the other hand, it needs patience to tune because it is very sensitive out of the box. It also reports a single occupancy state, with no split between motion and static presence, if that’s important to you. The Zigbee2MQTT support has a few rough edges too, including two wrong descriptions and a broken Factory Default preset, all of which are not crucial to the operation of this sensor.
If you want more control, Wenzhi also sells a 24GHz version in the same housing for only a few dollars more. I have not tested it myself, but on paper it adds separate presence and motion states, 11 range gates and automatic noise calibration. It also trades some range for a narrower detection angle, so it suits smaller rooms and setups where you want to tune detection zone by zone.
All in all, this is a great presence sensor, but you will spend more time fine tuning it than you would with sensors like the Sonoff SNZB-06P24. Once you get it right, it works right every time. Whether that is worth it is a very individual decision, so you will have to decide for yourself.
Verdict
4.4/ 5Wenzhi 5.8GHz Presence Sensor
Pros
- 5.8GHz radar with a 120° angle
- Live debug mode for tuning
- Two-stage tuning with room presets
- Works with Z2M and ZHA (quirk)
Cons
- Very sensitive, needs patient tuning
- ZHA needs a custom quirk
Where to buy
Verdict
NOT TESTEDWenzhi 24GHz Presence Sensor
Pros
- More precise 24GHz radar
- Automatic noise calibration
- 11 range gates for manual tuning
- Separate presence and motion states
Cons
- Narrower 100° detection angle
- ZHA needs a custom quirk
Where to buy
Similar presence sensors I have tested: