About two years ago, I wrote a DIY guide for creating your very own smart pressure sensor by using a cheap door sensor and a simple seat pressure sensor. The guide is still relevant today, as the method is the same and the components even cheaper. You can even use an Aqara Water Leak sensor instead of a door sensor and simply attach the wires to the sensor on the bottom.
In this article, I am sharing my experience and setup process for an off-the-shelf solution for a pressure sensor. This device is known as the Xiaomi Linptech PS1BB Pressure Sensor. It’s designed to go under your office chair, sofa, bed and detect whether there is a person present. It uses Bluetooth to communicate and is available in several lengths, with the shortest band priced at about $27 on AliExpress.
Technical Specification
- Name: Xiaomi/Linptech Pressure Sensor
- Model: PS1BB
- Connectivity: Bluetooth Low Energy (BLE)
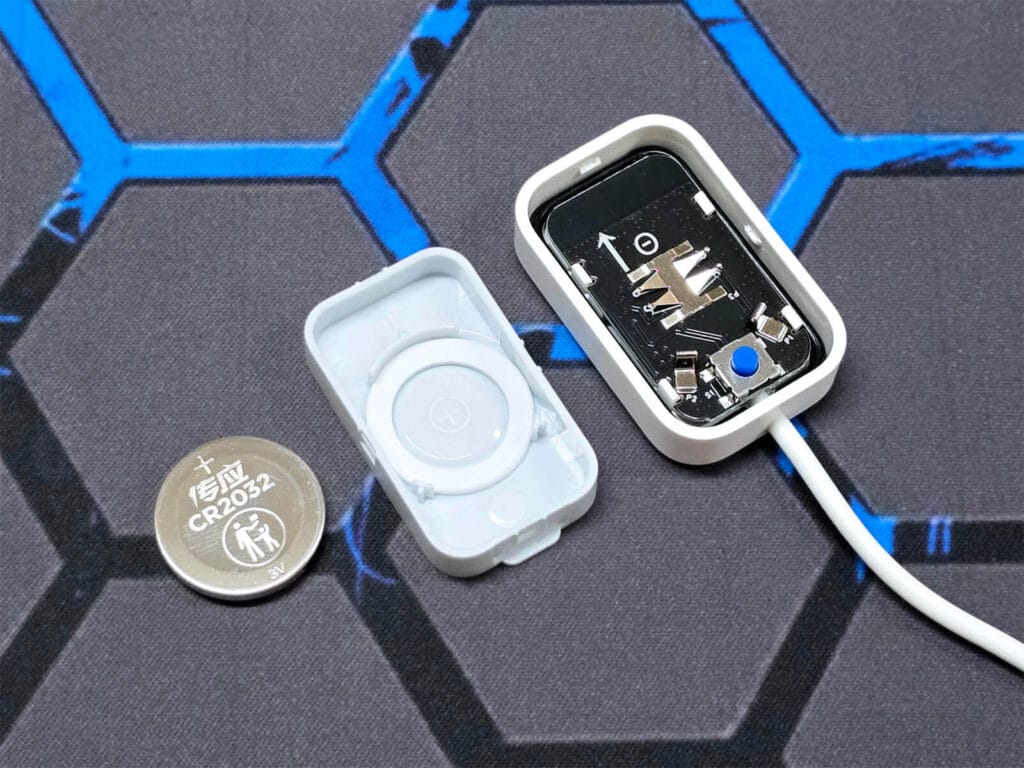
- Battery: 1xCR2032
- Battery Life: 3 years
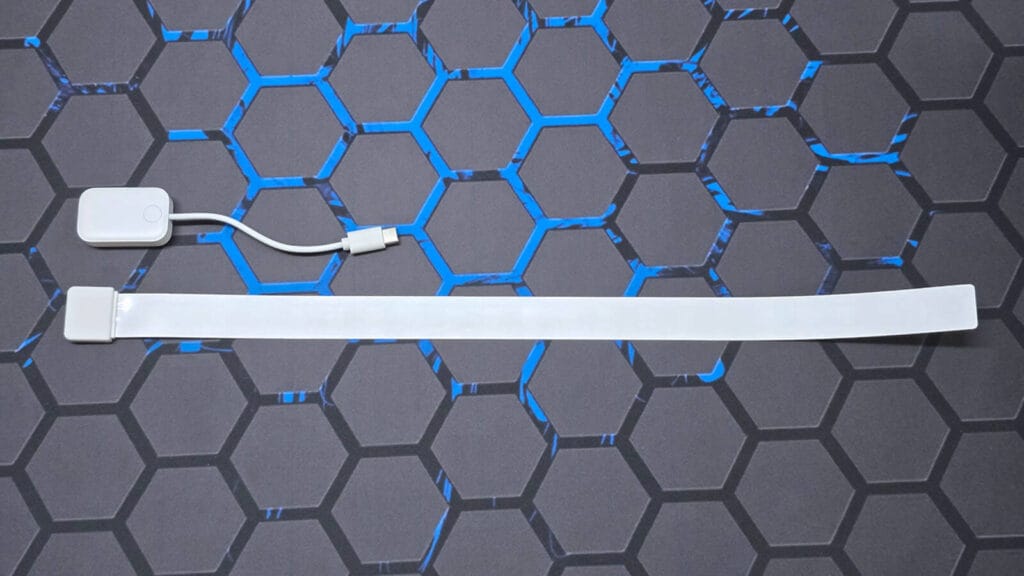
- Controller Size (with cable): 134x26x11mm
- Pressure Band Length: 40cm/120cm/180cm
- Price: $27.55-$41.14 AliExpress
Package Contents and Disassembly
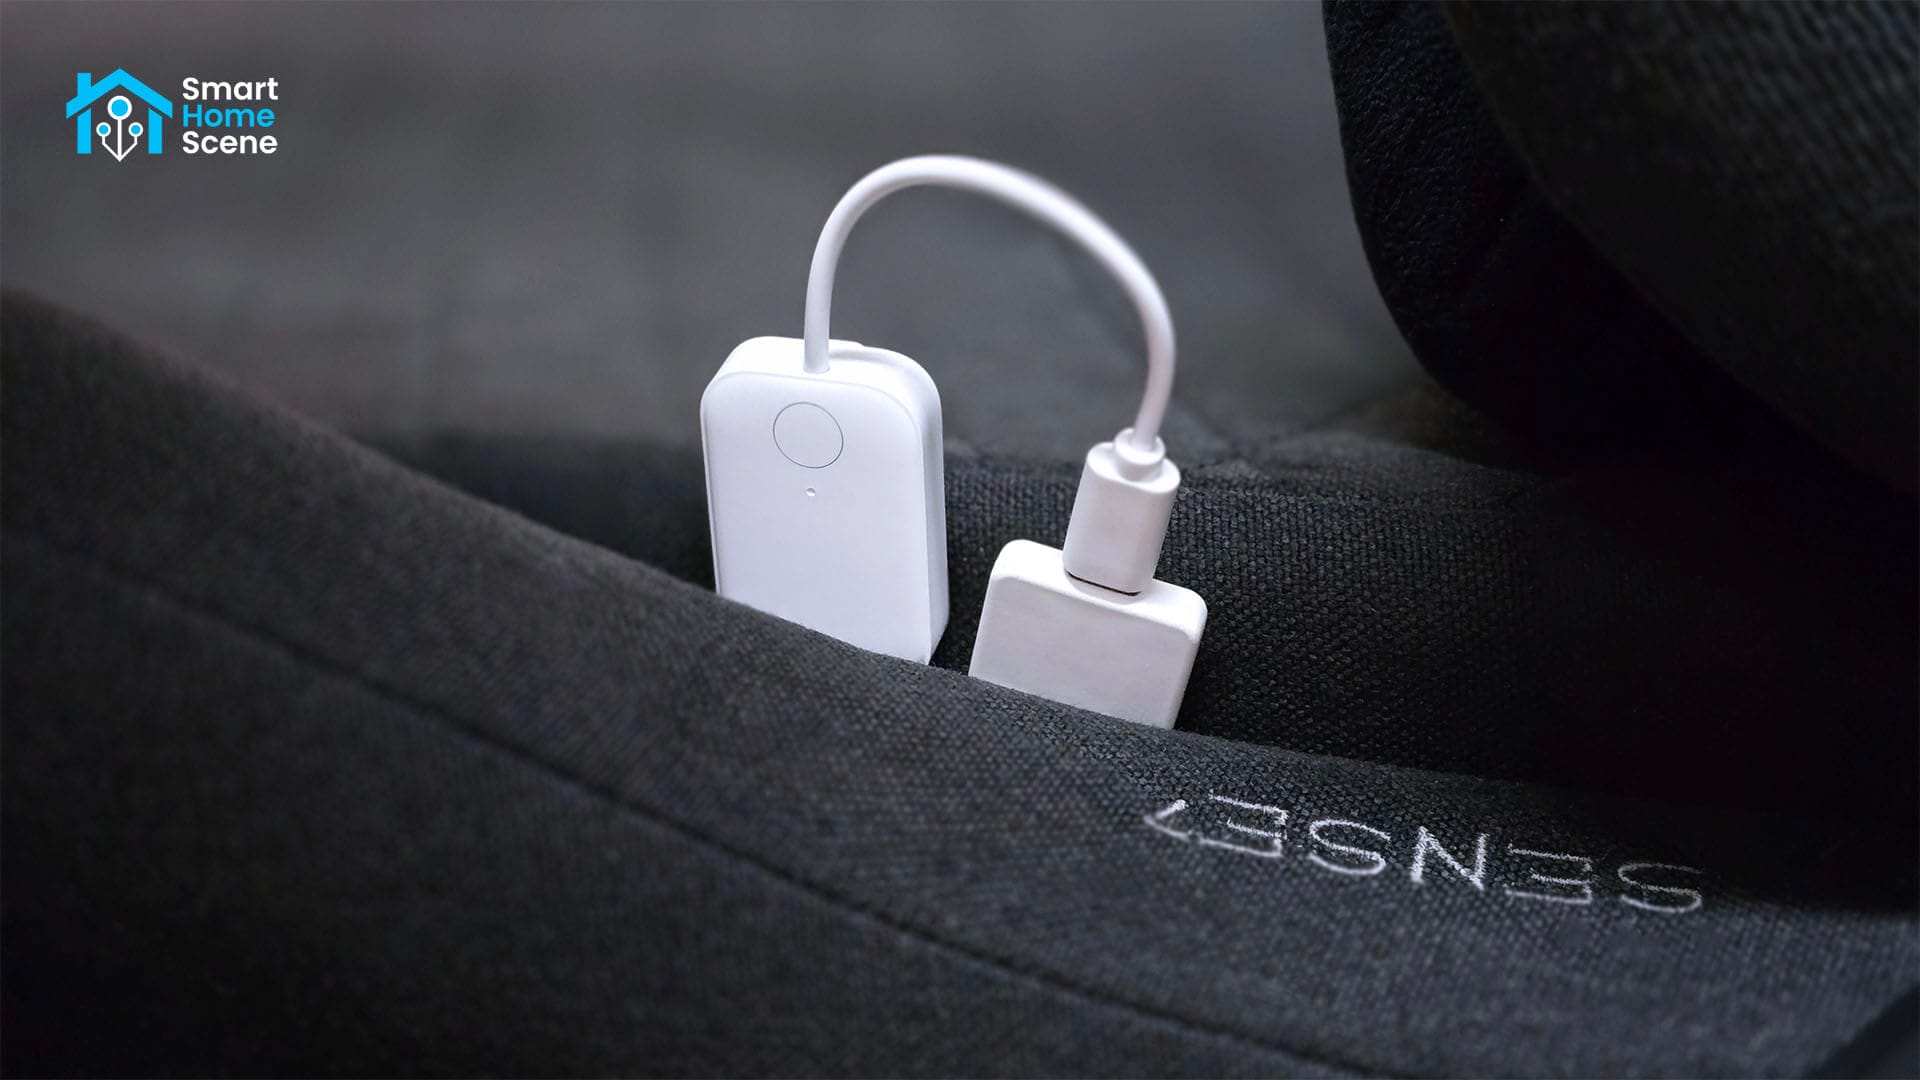
The Linptech PS1BB Pressure Sensor came in a large square box containing the pressure band, controller and a user manual. The battery is preinstalled, protected with a small foil to prevent contact and drainage. The box was completely banged up from shipping, but the device remained intact. I bought the 40cm band version, to test in my office chair.
The controller cover is easily removed by pulling it upwards. The device is powered by a single CR2032 battery with a life of 3 years. There’s a small pairing button next to it, which is quite clicky and responsive. This button requires a press for connecting the device to the app anytime you need to make configuration changes.
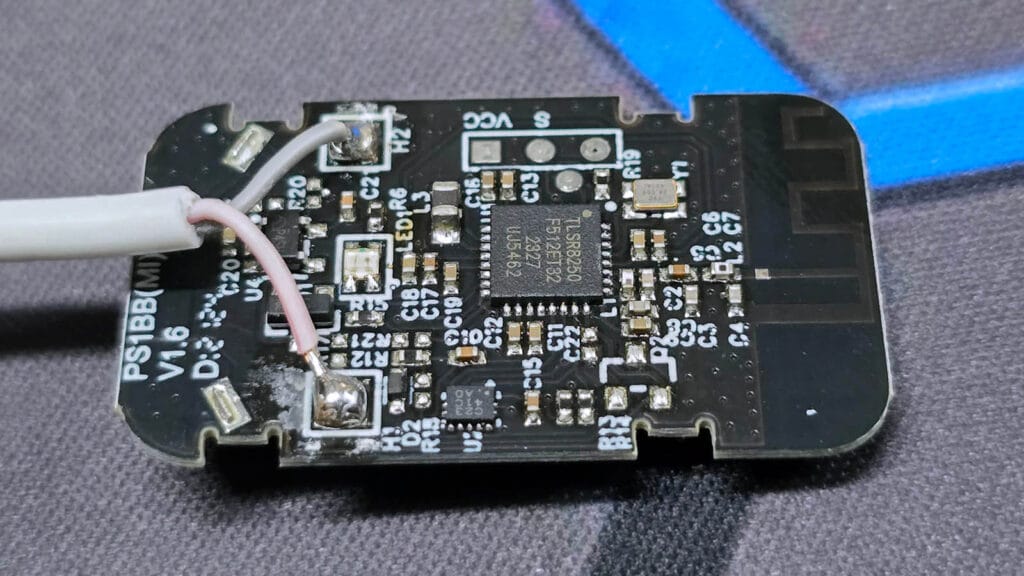
The Linptech PS1BB Pressure Sensor is powered by the TLSR8250 [Datasheet] Bluetooth module, commonly found in many Xiaomi devices. This is a very customizable chip, more notably known for the option to be converted to Zigbee. For example, check out how to convert the Xiaomi LYWSD03MMC and Qingping CGDK2 temperature sensors.
There is no custom Zigbee firmware for the PS1BB at the moment. Operating as a BLE module, it’s very low power, which is what allows this device to have a 3 year battery life on such a small coin cell battery.
Home Assistant Integration
The Xiaomi/Linptech PS1BB Pressure Sensor is not supported natively in Home Assistant. It is also not supported in ESPHome’s Xiaomi BLE component, so it requires other ways to add it to Home Assistant. As with all things Home Assistant, there is no such thing as cannot be integrated. After a lot of trial and error, I found you can use this device with HA in two ways:
- Passive BLE Monitor: Custom component for Home Assistant that passively monitors many different BLE devices of several different brands. The Linptech PS1BB is supported and can be easily integrated after obtaining the bind key OR
- MIOT BLE Platform: Custom component for ESPHome that follows the Mi protocol specification, with quite a different implementation from ESPHome’s Xiaomi platform. It can integrate almost any MI device, by automatically obtaining the bind key. Just like any ESPHome device, it requires creating custom sensors for Home Assistant in the configuration.
The Passive BLE Monitor component is quite capable and reliable, with a huge library of devices. If you are not tech savvy user, I suggest you use this integration as it’s easier, simpler and can be installed from HACS. The sensor works flawlessly with this component.
As I like to keep third-party integrations in Home Assistant to a minimum, I decided to use ESPHome and simply attach the MIOT BLE platform as an external component. Before the device can be added through any integration, the Mi Protocol bind key is required.
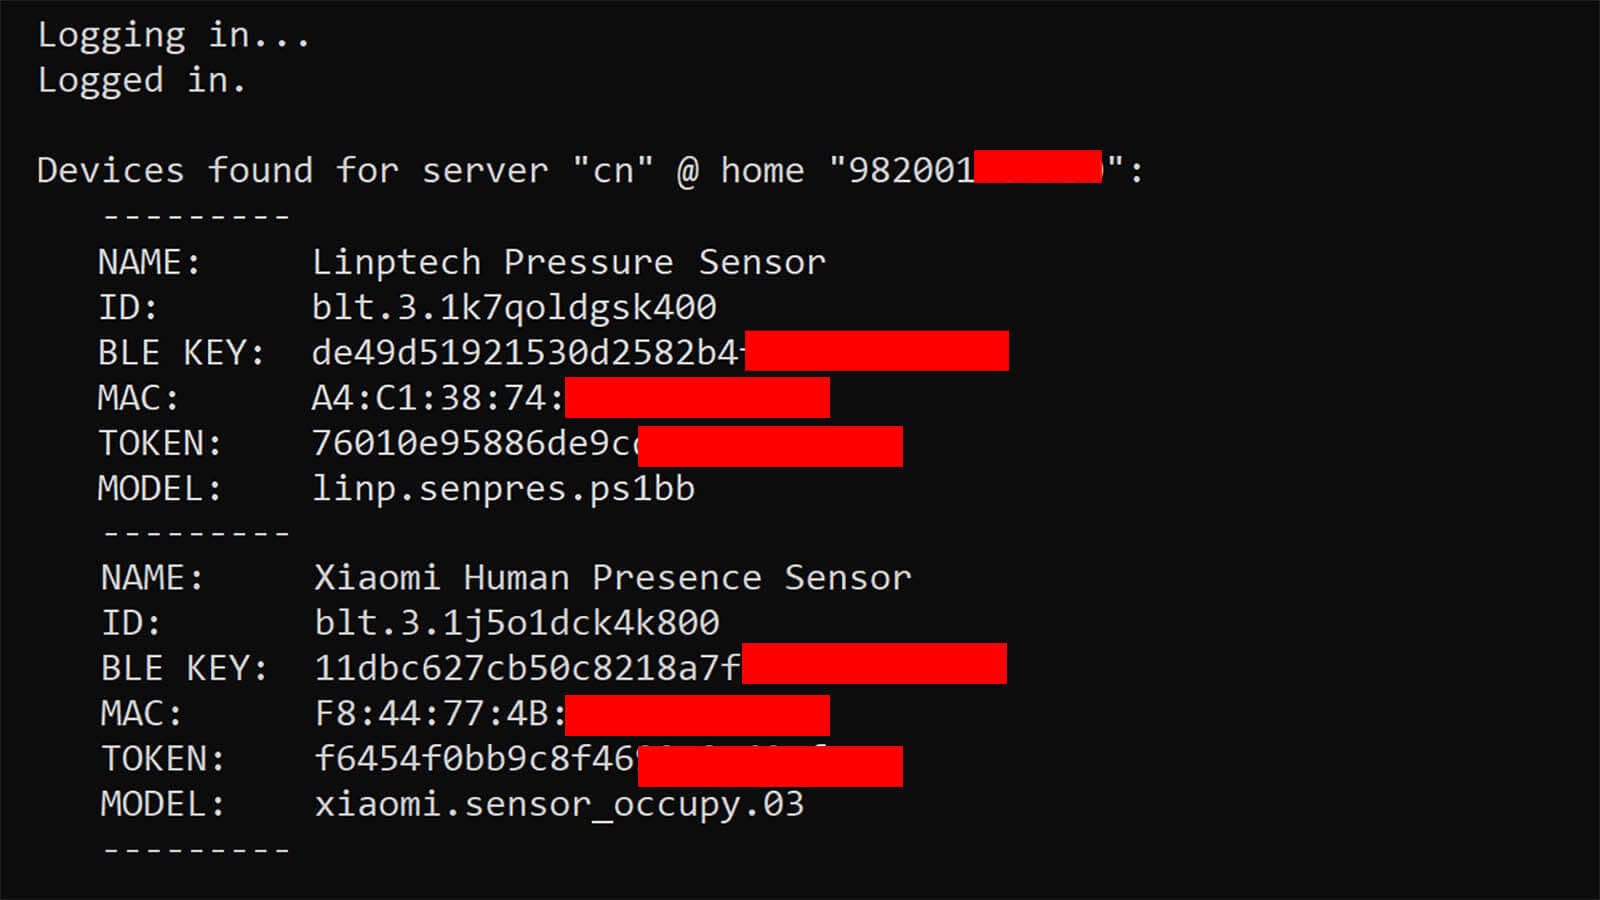
Obtaining the bind key
Every Xiaomi device is encrypted, so for a receiver to understand the packets a device sends, it first needs to decrypt them. This requires a 32-character hexadecimal (16-byte) key to effectively decrypt the BLE data. There are several ways to obtain the Xiaomi bind key for your device. I like to use the token extractor tool, a method I’ve shared in my Xiaomi Battery Presence Sensor review. For the general user, this method is the simplest way of obtaining the bind key. It works nicely for the PS1BB too:
- Download the Mi Home app from the App Store | PlayStore
- Make an account and set the server to Chinese Mainland (important!)
- Since there is confusion about this: You do NOT need to create an account by picking China during registration. You only need to change the REGION inside the app once you’ve made your account in your own country.
- I highly suggest you use a throwaway e-mail account, as you won’t be using this device with the Xiaomi app anyway (hopefully)
- Pair the Xiaomi/Linptech Pressure Sensor via Bluetooth and add it to the app
- On your computer, download and run the token_extractor tool
- Windows: token_extractor.exe
- Linux terminal:
bash <(curl -L https://github.com/PiotrMachowski/Xiaomi-cloud-tokens-extractor/raw/master/run.sh)
- Enter your Mi Home login credentials in the terminal window
- Leavy the server field empty and press enter to check all servers
- The tool will print the BLE KEY in the terminal:

- Copy and save all device info in .txt file somewhere
- Done!
Creating an ESPHome config
In my own smart home, I like to use ESP32 boards scattered around to capture BLE packets. This allows such great flexibility in terms of range and positioning, that would not be possible with a built-in adapter. Bluetooth is notoriously short ranged and prone to interference, so using ESP32s mitigates these issues to an extent.
As of January 2024, ESPHome is not capable of passing BLE keys to unsupported devices. This is possible for devices supported in the official Xiaomi BLE component only, but not others. Therefore, the BLE key needs to be passed upon request back to the device via the custom MIOT component I mentioned earlier.
If there is a way to pass 16-byte BLE keys to unsupported devices natively with ESPHome, I’d love to hear it! Please share your thoughts in the comments bellow.
After testing several configurations, I found this is the code that works great for using this device in Home Assistant via ESPHome with the MIOT external component:
esphome:
  name: esp32-ble-tracker
  friendly_name: ESP32 BLE Tracker
esp32:
  board: esp32dev
  framework:
    type: arduino
# Enable logging
logger:
# Enable Home Assistant API
api:
  encryption:
    key: "XXXXXXXXXX"
ota:
  - platform: esphome
    password: "XXXXXXXXXX"
wifi:
  ssid: !secret wifi_ssid
  password: !secret wifi_password
  ap:
    ssid: "esp32-ble-tracker"
    password: "XXXXXXXXXX"
captive_portal:

external_components:
  - source: github://dentra/esphome-components
miot:
  on_miot_advertise:
    mac_address: "A4:C1:38:74:59:E0"
    bindkey: "de49d51921530d2582b4f5XXXXXXXXXX" #REPLACE KEY
    then:
      - lambda: |-
          if (x.id == 0x483C) {
            bool pressure_present = (x.data[0] == 1);
            id(pressure_state).publish_state(pressure_present);
          }
          if (x.id == 0x4C03) {
            if (x.data.size() == 1) {
              uint8_t battery = x.data[0];
              id(battery_level).publish_state(battery);
            }
          }
binary_sensor:
  - platform: template
    name: "Pressure State"
    id: pressure_state
    device_class: occupancy
sensor:
  - platform: template
    name: "Battery Level"
    id: battery_level
    unit_of_measurement: "%"
    icon: "mdi:battery"
About the available sensors
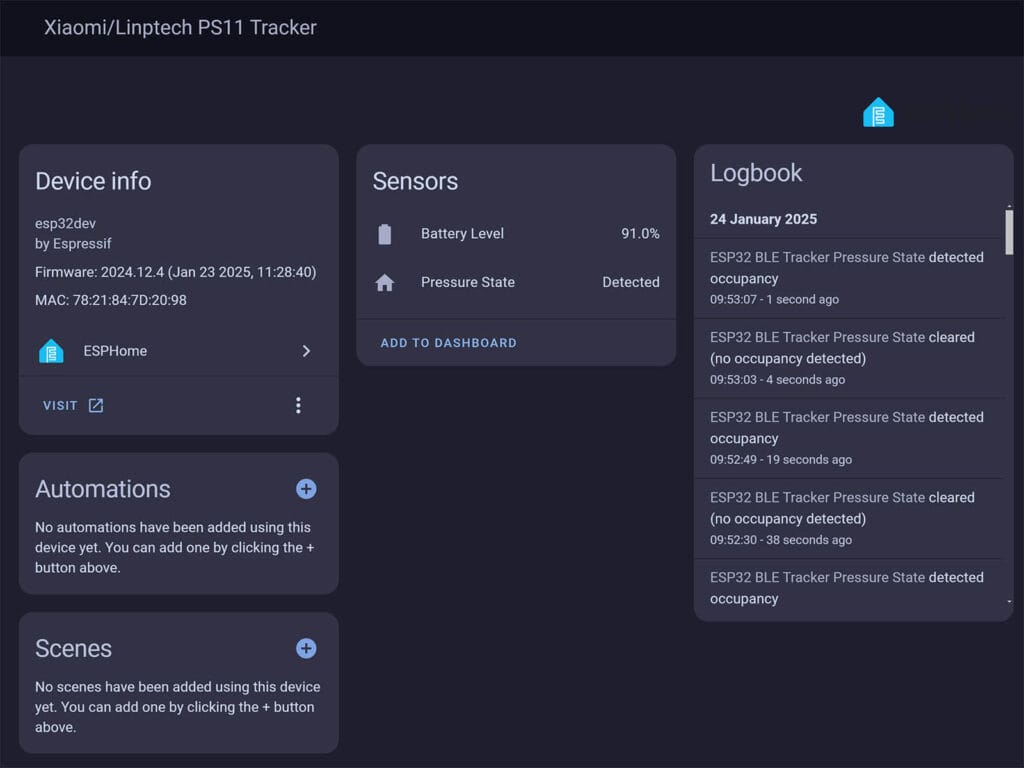
Once the device was added to Home Assistant, the two sensors I’ve configured became available immediately in Home Assistant. I’ve managed to add the main pressure detect entity and the battery level. Here’s how it looks like in Home Assistant.
Now, the Xiaomi app has several more sensors available for the Linptech PS1BB pressure sensor. Most of these are arbitrary, and simply include internal time counters for triggering automations within the Xiaomi Home app. These are advertised as packets and available in the Passive BLE Monitor integration, but I see no reason to include them via ESPHome. Here’s my logic as to why.
- Pressure Detected Timer: Simple timer delay in seconds for the ON state (detected) before automations are triggered in the Xiaomi app. Can be done natively within Home Assistant.
- Pressure Not Detected Timer: Simple timer delay in seconds for the OFF state (not detected) before automations are triggered in the Xiaomi app. Can be done natively within Home Assistant automations.
However, there are a few sensors available in the app that can be useful, yet are not advertised via the BLE packets of the Linptech PS1BB. It is also possible I am missing something, I just don’t know how. I sniffed all data and all that I’m getting are those sensors, along with the two I already created. The Passive BLE Monitor integration also has only those, and is missing the following:
- Current pressure: Measures the applied pressure on a scale from 0-15. In the app, it seems to work correctly and can be a fun in automations. Unfortunately, it is not advertised anywhere in any BLE packets as far as I can see.
- Pressure Trigger Threshold: The app also allows you to set the pressure trigger threshold, which is unfortunately not possible with the Passive BLE monitor or the MIOT component. Needs to be set in the app (default: 6)
- Pressure Confirmation Time: Simple timer before the sensor changes state from OFF to ON. Needs to be set in the app (default: 0)
- No Pressure Confirmation Time: Simple timer before the sensor changes state from ON to OFF. Needs to be set in the app (default: 10)
- Indicator light: The ability to turn ON or OFF the small indicator light on the controller. Needs to be set in the app.
With that said, the main pressure state entity works flawlessly in Home Assistant. Pressure is detected immediately and it remains for 10 seconds by default in a detected state.
Final Thoughts
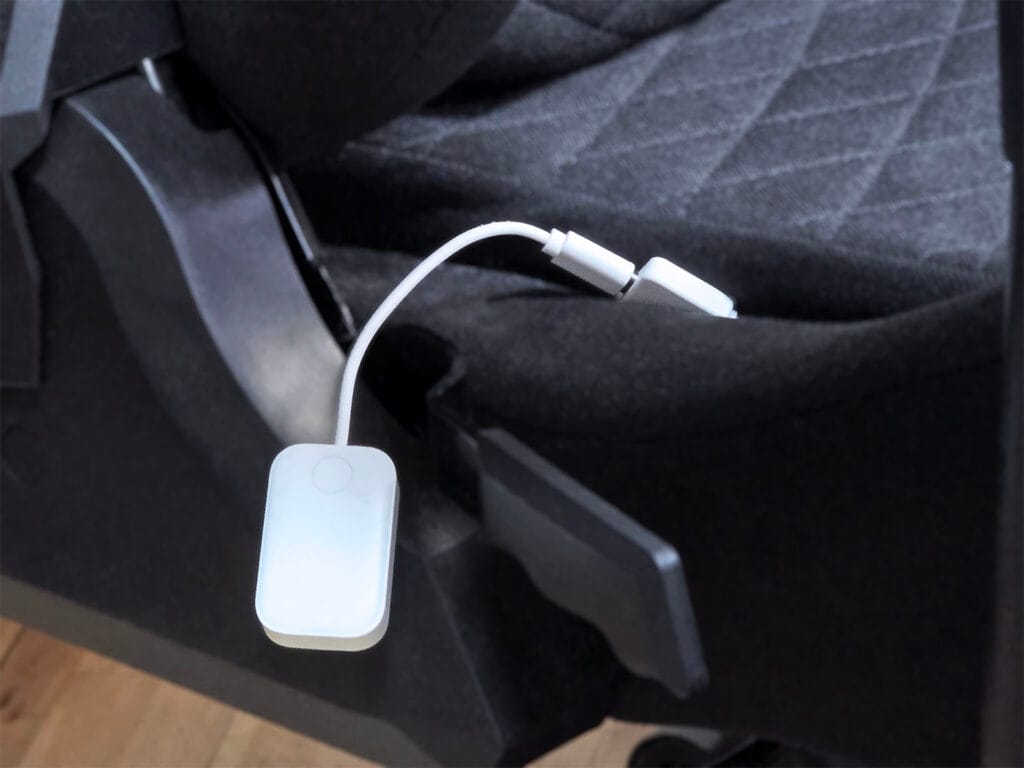
The Xiaomi Linptech PS1BB Pressure Sensor is a simple binary contact band for detecting whether or not you are sitting in your chair, sofa or laying in bed. It’s small and seamless enough to be hidden out of sight, which is very relevant for this particular application. Here’s how it looked liked under my chair cushion before I hid it from sight in the corner:
I have experienced no false triggers whatsoever with this device. I left the trigger threshold to the default value and installed it under my office chair, turning on the main PC whenever it detects me sitting down. So far, it has yet to fail.
With that said, I am inclined to note that this is a better solution for detecting a person sitting compared to my DIY guide. The sensor used in my guide appears to have a variable performance for many people and it gets easily bent out of shape, often causing false positive triggers.
If this is a device that would be beneficial to your smart home as a trigger, I can comfortably recommend the Xiaomi Linptech PS11B Pressure Sensor. It’s available on AliExpress only and costs from $27.55-$41.14, depending on the band length you choose.


Great write up as always. Love your content. I noticed a small error on the specs. The largest sensor version is 180cm vs 160cm. I just ordered this version.
Thank you, nice catch!
Fixed!
Another outstanding feature, thank you and bravo for your amazing contribution!!
While reading through the article I was thinking of another scenario that I’ve been struggling with and many others as well: door sensors and steel frames. It’s a nightmare because of the steel frames the magnetic contact doesn’t work reliably. Now I’m wondering if maybe this sensor could work as a door sensor as well? What do you think?
Thanks for the feedback!
It could work, but I’m thinking that band will get quickly worn out from a metal door slamming against it.
Maybe it needs to be cushioned somehow. I would still try my luck with different door sensors first.
Cheers
Thank you for your thoughts! The door itself is a light wooden door but the door frames in the walls are made from steel. This is something not so common anymore today I think but in older buildings this was used. When I searched online I found others struggling with the same problem that the steel frame would have an impact on the magnetic field because it magnetises itself from the door sensor magnet it seems. I haven’t investigated this further so far and indeed I was also thinking of trying more sensor/magnet combinations. My experience for now has been with the tiny Aqara door sensors only. When I find more time I will then probably also experiment with the pressure sensor and hopefully eventually find a reliable solution for my doors. One more thing I like about the pressure sensor is that – if it would work well for doors (and maybe windows also), the band from an esthetical perspective would allow to put the controller further away from the door frame.
I’m kinda changing the topic a bit, but if you ever find a smaller squarish highly-sensitive version of something of that I would be very interested in knowing so to use it as a drop-in apartment mailbox sensor.
I wish this was Zigbee and much simpler!
is it possible to pair two of this sensors to one esp32 ?
Yes, you can add 2 or more.
Depending on the baord model, you can go up to 10 I would say
Any hint how, i tried to duplicate miot part:
miot:on_miot_advertise:
mac_address: "A4:C1:38:74:59:E0"
bindkey: "de49d51921530d2582b4f5XXXXXXXXXX" #REPLACE KEY
then:
- lambda: |-
if (x.id == 0x483C) {
bool pressure_present = (x.data[0] == 1);
id(pressure_state).publish_state(pressure_present);
}
if (x.id == 0x4C03) {
if (x.data.size() == 1) {
uint8_t battery = x.data[0];
id(battery_level).publish_state(battery);
}
}
With 2 differnt mac adresses, but this doesnt work 🙁
Thanks a lot
Are you sure you are using the correct key and MAC?
You need to use only MAC address of the device, why two?
because I want to use two of this sensors with one esp32 as esp home bridge. But I can’t define the miot block twice with with different addresses.
Thanks a lot
Oh, you need to have only one
miotand two individualon_miot_advertisewith their subsequent configurations.Hi, thank you so much for all the information and reviews (I have bought several devices since I found your reviews).
I’m trying to add to devices to one ESP devices. I tried to duplicate the whole on_miot_advertise (leaving only one miot) but during the validation its says Duplicate key “on_miot_advertise”. Any tips for this?
Thanks in advance
As the error tell you, you need to add both configurations under a single
miotandon_miot_advertiseblock.The correct config is like this:
miot:on_miot_advertise:
- mac_address: "XX:XX:XX:XX:XX:XX" # MAC address of your first device
bindkey: ....
- mac_address: "XX:XX:XX:XX:XX:XX" # MAC address of your second device
bindkey: ....
Thank you very much, that’s exactly what I was looking for… but by placing it under the bed mattress, how can I adjust the “sensitivity” so that it doesn’t detect the weight of the mattress as a presence, but only when someone is on the mattress?
The strip itself is designed for using it under a mattress, it won’t trigger.
Also, you can adjust the sensitivity in the app.
Thank you
Is there now custom Zigbee firmware for the PS1BB already? Would it be possible to convert to Zigbee? IF no, where can I make a request?
There isn’t a custom Zigbee firmware. Your best bet would be to ask here:
https://github.com/pvvx/ZigbeeTLc
Hi, I just got this device after reading your review and added it to Home Assistant with MIOT like you.
It works, but I don’t have a battery percentage, it’s “unknown”.
Is it that I’ll only see a value when the battery level drops for the first time when no longer at 100% ?
I also wished I could get the pressure level value, that would indeed be useful to know if laying down or sited in bed. Hopefully we will get that in the future.
Thanks
Battery takes a while to report, maybe a few days.
tysm for the guide, the other values would be nice to have but already great to have it in my HA now! I would have never come up to change the region, I thought it doesn’t work.
I have trouble setting it up. How to get the device to work and broadcast via BLE?
For me even the Mi Home app never shows a presence, only when I go into Sensor configuration I can see it updating
Hi, first of all thank you for the article.
I got this device and I’m really happy with how it works, your guide was a great help.
I added the MIOT configuration in the ESP yaml of my Bluetooth proxy, but by doing so, the entities from this sensor show up together with the others from the Bluetooth proxy.
Maybe a silly question, I’m new to the ESPHome world, is there a way to have everything separated (so, a dedicated Home Assistant device showing only the sensors from this one), like in the image you shared?
Thanks so much for your support!
I’m not sure I follow. The
bluetooth_proxyis just a simple passive BLE proxy. It does not create any sensors on its own. Instead, it relays BLE advertisements to HA and if those are from a supported device, the integration gets auto-discovered. If you are defining manual sensors in the ESPHome config, like for this device, than they will all be under the same device since it’s a single ESP32 board.I think I’m missing something…
I’m using an SMLight SLZB-06m as a Bluetooth proxy (the loaded package includes the following configuration):
esp32_ble_tracker:
scan_parameters:
interval: 1100ms
window: 1100ms
active: true
bluetooth_proxy:
active: true
I’ve added the configuration for this sensor in the YAML as follows:
external_components:
– source: github://dentra/esphome-components
miot:
on_miot_advertise:
mac_address: “A4:C1:38:2C:49:6A”
bindkey: “e7b79687d1b3e29775f9f5609xxxxxx”
then:
– lambda: |-
if (x.id == 0x483C) {
bool pressure_present = (x.data[0] == 1);
id(pressure_state).publish_state(pressure_present);
}
if (x.id == 0x4C03) {
if (x.data.size() == 1) {
uint8_t battery = x.data[0];
id(battery_level).publish_state(battery);
}
}
binary_sensor:
– platform: template
name: “Bed Pressure Sensor – State”
id: pressure_state
device_class: occupancy
sensor:
– platform: template
name: “Bed Pressure Sensor – Battery Level”
id: battery_level
unit_of_measurement: “%”
icon: “mdi:battery”
With this configuration, everything works perfectly; however, the sensors appear grouped under a single device.
What am I doing wrong?
Thanks a lot for your help.
Ok, so I have spend several hours and cannot figure this out. Here is the information I got so far according to your guide. I already have a bed sensor using ESP32 and want to combine that same ESP2 to do dual duty and work for this Bluetooth sensor following your code:
Devices found for server “cn” @ home “847001775591”:
———
NAME: Linptech Pressure Present or Not Sensor
ID: blt.3.1mjs0ob0gck00
BLE KEY: 8e757518109b788a67656c47146XXXXX
MAC: A4:C1:38:51:XX:XX
TOKEN: 905bd451a206c6fb2b0852bc
MODEL: linp.senpres.ps1bb
———
——–ESP HOME code————-
substitutions:
name: office-bed-pressure-sensor
friendly_name: Office bed pressure sensor
esphome:
name: ${name}
friendly_name: ${friendly_name}
name_add_mac_suffix: false
project:
name: esphome.web
version: ‘1.0’
esp32:
board: esp32dev
framework:
type: arduino
# Enable logging
logger:
# Home Assistant API
api:
encryption:
key: “5TO1kvILO6JnCY/9AkEH9RaBDL6oB4N/jqF69zkXXXXX”
# OTA updates
ota:
– platform: esphome
password: “0dbedd3e631982b6c6fe0b1267aXXXXX”
# Wi-Fi credentials
wifi:
ssid: !secret wifi_ssid
password: !secret wifi_password
# Fallback hotspot if Wi-Fi fails
ap:
ssid: “Office-Bed-Sensor”
password: “fallback1234”
# External component for MiOT BLE
external_components:
– source: github://dentra/esphome-components
# MiOT BLE integration for Linptech PS1BB
miot:
on_miot_advertise:
mac_address: “A4:C1:38:51:XX:XX”
bindkey: “8e757518109b788a67656c47146XXXXX”
then:
– lambda: |-
ESP_LOGI(“miot”, “PS1BB advert: id=0x%04X, size=%u, data:”, x.id, x.data.size());
for (int i = 0; i pressure_present = %d”, pressure_present);
}
if (x.id == 0x4C03) {
if (x.data.size() >= 1) {
uint8_t battery = x.data[0];
id(ble_battery_level).publish_state(battery);
ESP_LOGI(“miot”, ” -> battery = %u”, battery);
}
}
binary_sensor:
# GPIO bed mat sensors
– platform: gpio
pin:
number: 13
inverted: True
mode:
input: True
pullup: True
name: “Office bed sensor outside”
device_class: occupancy
filters:
– delayed_on: 5s
– delayed_off: 5s
– platform: gpio
pin:
number: 12
inverted: True
mode:
input: True
pullup: True
name: “Office bed sensor inside”
device_class: occupancy
filters:
– delayed_on: 5s
– delayed_off: 5s
# BLE template sensor
– platform: template
name: “Office chair pressure sensor”
id: ble_pressure_state
device_class: occupancy
sensor:
– platform: template
name: “Office chair battery level”
id: ble_battery_level
unit_of_measurement: “%”
icon: “mdi:battery”
——————–
The original ESP32 bed sensors are working fine, but the new Linptech Seat Pressure Sensor PS1BB I want to use for my office chair keeps showing as “unavailable”. I also tried Passive BLE monitor integration that sees is, but for some reason does not want to add it. What I am doing wrong. I am getting really really frustrated!!
thank you
I see nothing wrong with your code, perhaps they changed the ID 0x101C where the lambda fetches data.
Can you flash something like this and monitor the logs, to see if the ID matches the one in my code?
miot:
on_miot_advertise:
mac_address: “A4:C1:38:51:XX:XX”
bindkey: “8e757518109b788a67656c47146XXXXX”
then:
– lambda: |-
ESP_LOGI(“miot_debug”, “Received advertisement from device.”);
ESP_LOGI(“miot_debug”, “–> Event ID: 0x%04X”, x.id);
ESP_LOGI(“miot_debug”, “–> Data Size: %u”, x.data.size());
// Log the raw data bytes
std::string data_hex = “”;
for (uint8_t b : x.data) {
char hex_byte[4];
sprintf(hex_byte, “%02X “, b);
data_hex += hex_byte;
}
ESP_LOGI(“miot_debug”, “–> Raw Data: %s”, data_hex.c_str());
// Your original logic (for comparison, can be commented out)
if (x.id == 0x101C) {
ESP_LOGI(“miot_debug”, “Found pressure event ID 0x101C!”);
}
if (x.id == 0x4C03) {
ESP_LOGI(“miot_debug”, “Found battery event ID 0x4C03!”);
}
I give up, i have waisted 2 days I dont progress cant seem to make it work. Is there a Zigbee custom firmware already or any other workaround? I am so so frustrated… I dont give up easily, I got over 200 devices in my home but this is driving me nuts!!! Sorry :((
Well, your ESPHome instance is not downloading the
miotcomponent. The code after is irrelevant, since it needs to use it to fetch data and it’s not there.Make sure you have this correctly setup before the
miotline:external_components:- source: github://dentra/esphome-components
ESPHome add-on needs to fetch it first, so monitor the logs when you upload. If there is an error, paste it here.
Does not work,
I also tried `Passive BLE monitor`, which works a bit but is very unstable, not usable. The device would pick up pressure, but then would stay in the on state forever.
a bit disappointed, similar to others in the comments.
Don’t waste your time, this device apparently is very tricky to make work, maybe somebody will come up with a working solution at some point.
DEBUG from the component
“`
[15:04:54][D][miot.automation:009]: Product ID: 3F4C
[15:04:54][D][miot.automation:010]: Frame Control:
[15:04:54][D][miot.automation:011]: is_encrypted : NO
[15:04:54][D][miot.automation:012]: mac_include : YES
[15:04:54][D][miot.automation:013]: capability_include: NO
[15:04:54][D][miot.automation:014]: object_include : NO
[15:04:54][D][miot.automation:015]: mesh : NO
[15:04:54][D][miot.automation:016]: registered : YES
[15:04:54][D][miot.automation:017]: solicited : NO
[15:04:54][D][miot.automation:018]: auth_mode : 2
[15:04:54][D][miot.automation:019]: version : 5
[15:04:54][D][miot.automation:020]: Frame Counter: 71
[15:04:54][D][miot.automation:023]: MAC address: a4:xx:xx:xx:xx:xx
“`
I’ve tried to set up mine and like others, it’s been impossible. Even in the app, I’m not getting any data, I can only see something when I enter the sensor configuration.
Try changing the battery, these sensors don’t announce a dead battery reliably and pretend everything is okay.
This is almost always the issue.
I tried to change the battery, but no luck, thanks for replying and all the content you share!
This sensor is now natively supported in Xiaomi BLE integration
Unfortunately it does not support the battery level