If you are into crypto, you’ve probably heard of Helium. Helium is a blockchain network that leverages a decentralized global network of Hotspots, defined as the “People’s Network”. By deploying special hotspots (miners), which extend the network coverage and spread the helium ecosystem, miners get rewards (HNT) which can be converted into almost anything on a crypto exchange. This is Helium in a nutshell.

Now, if you are also into Helium mining, and have installed a couple of hotspots, you might want to actively keep track of them and react when something goes wrong. We are going to use Home Assistant to bring data from the blockchain into HA itself, create notifications and design a couple of overview cards for the hotspots.
Prerequisites
For this tutorial, we are going to leverage a couple of things.
- Running Home Assistant Server
- Helium Blockchain Integration – HACS
- Helium Hotspot
- Helium Wallet
- ( Optional ) Custom cards for displaying the data
Installing the Helium Blockchain Integration
The Helium Blockchain Integration is developed by rsnodgrass and is available in HACS.
- Open HACS > Integrations
- Click + Explore and download repositories
- Search for Helium
- Click Download this Repository with HACS
- Restart Home Assistant
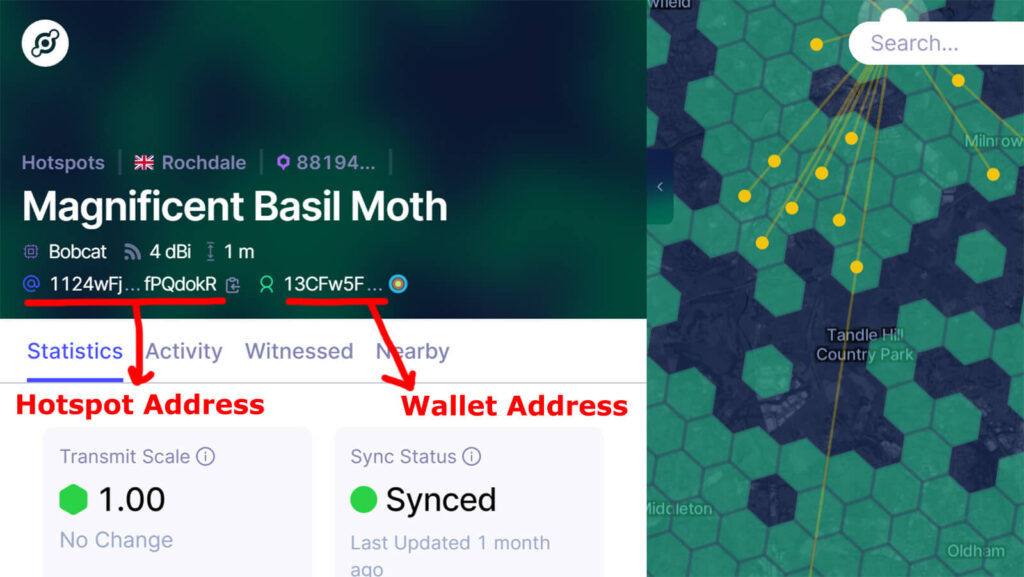
Obtaining your Wallet & Hotspot address
NOTE: For the purpose of this tutorial, we are going to select two random hotspots deployed on the blockchain.
To configure the Helium Blockchain Integration, we need to obtain two things: your helium wallet address and your hotspot(s) address.
- Open explorer.helium.com
- Navigate to your area and open your hotspot
- Copy your Hotspot and Wallet Address and save them in a .txt file
Configuring the Helium Blockchain Integration
Once Home Assistant has booted back up, open your configuration.yaml file and add the following under the sensor line:
Note: If you use !includes, feel free to adjust your configuration accordingly. We are adding it directly under sensor: in configuration.yaml to be easier for beginners.
sensor:
  - platform: helium
    scan_interval: 120
    wallets:
      #My Wallet
      - 13CFw5FGr2fqKLBjWqWFKvZ3YKcNUjiJPNPUe6guhyWgHwdPCvU
    hotspots:
      #Magnificent Basil Moth
      - 1124wFj8Zu4qGJUiKfFRDU4pgtkjKNUxmCGxxMk5oUVymfPQdokR
      #Late Marigold Squirrel
      - 11xcQRvHAN1x3U4GhNmEjYiNXMYwjj7ub4jQfS8PkAYJXsaFWsX
You can add as many wallets or hotspots as you want, all arrayed in a list like in the example. Once done, save the file and restart Home Assistant.
When HA is back online, you will notice a couple of new entities created:
- Wallet Entity containing your full HNT balance
- Hotspot Entity tracking online status for each hotspot
- HNT Price entity showing current price from Oracle
Tracking Hotspot Status
By adding the Helium Blockchain Integration, hotspot connectivity status is automatically tracked and updated in the appropriate entity in HA. Considering this integration queries the Helium API for information, data is not real-time and is often behind.
Tracking Hotspot Status Using the Ping Integration
A simple way to track hotspot connectivity is to utilize the ping integration, which will ping the IP of the hotspot periodically and update the entity in Home Assistant.
binary_sensor:
    - platform: ping
      host: 95.180.xx.xxx
      scan_interval: 60
      name: 'Magnificent Basil Moth Ping'
(Optional) Tracking SenseCAP Hotspot in Realtime
For people who own a SenseCAP miner, you can use their cloud dashboard to query the hotspot and obtain real-time information. This is the most accurate way for acquiring live data. It is possible other hotspot makers have their own cloud platform/API, but considering we don’t own any other makers we cannot test this.
To add your SenseCAP miner to Home Assistant, you need to setup a few things first:
- Open https://status.sensecapmx.cloud
- Register and add your hotspot
- Click + Add new hotspot
- Login to the Helium app on your phone
- Use the app to scan the QR code on the screen
- Grant view permission to the Helium App
- Select and add the hotspot to the SenseCAP Dashboard
- On the left side of the dashboard, click Account
- Under the HTTP tab, you will find your API key
- Copy it in a text file, we will need it to query the SenseCAP API
In Home Assistant, create a new REST platform template sensor:
sensor:
  - platform: rest
    name: Magnificent Basil Moth SenseCap
    method: GET
    json_attributes:
      - data
    resource: "https://status.sensecapmx.cloud/api/openapi/device/view_device?sn=xxx99163xxxxxxxxxx&api_key=xxxxxxxxxxrlaa879ciwso8307i73cxxxxxxxxxxxxxxxxxxxx"
    value_template: "{{ value_json.data.networkStatus }}"
    scan_interval:
      seconds: 30
Replace the device serial number sn=<HotspotSN> and your api_key=<YourAPI> in the resource field to correctly query SenseCAP’s API. This config will create a template sensor, with networkStatus as the main state (Healthy/Unhealthy). All other SenseCAP provided information will be available as attributes in the entity.
Tracking Mining Rewards
Tracking Total HNT earnings
To track your daily HNT earnings as a sum, we will create a couple of utility meter sensors on which we will base our dashboard data representation. In your configuration.yaml file, add the following lines under utility_meter:
Again, feel free to use !include for a more tidied up configuration.
utility_meter:
  helium_wallet_daily:
    source: sensor.helium_wallet
    cycle: daily
  helium_wallet_weekly:
    source: sensor.helium_wallet
    cycle: weekly
  helium_wallet_monthly:
    source: sensor.helium_wallet
    cycle: monthly
This will create three separate entities which will record data for the corresponding timeframe: daily, weekly and monthly.
Tracking Total HNT earnings per hotspot
At the time of writing of this tutorial, the Helium Blockchain integration is unable to track earnings per individual hotspot. This is on the dev’s to-do list, and will hopefully streamline the process in the near future.
In the meantime, we can query the Helium API for data and use that to display hotspot earnings in the dashboard. To achieve this, we are going to utilize the rest integration to create some template sensors:
Adding 24h earning sensor per hotspot
sensor:
  - platform: rest
    resource: "https://api.helium.io/v1/hotspots/1124wFj8Zu4qGJUiKfFRDU4pgtkjKNUxmCGxxMk5oUVymfPQdokR/rewards/sum?min_time=-1%20day"
    method: GET
    name: Magnificent Basil Moth HNT 24h
    device_class: monetary
    value_template: "{{ value_json['data']['total'] }}"
    unit_of_measurement: "HNT"
    scan_interval: 450
    headers:
      User-Agent: Mozilla/5.0 (X11; Ubuntu; Linux x86_64; rv:96.0) Gecko/20100101 Firefox/96.0
Replace your hotspot address in the resource field, after hotspots/<hotspot address>/rewards. Leave the User-Agent under headers as is, otherwise the Helium API may refuse the connection.
Visualizing the data
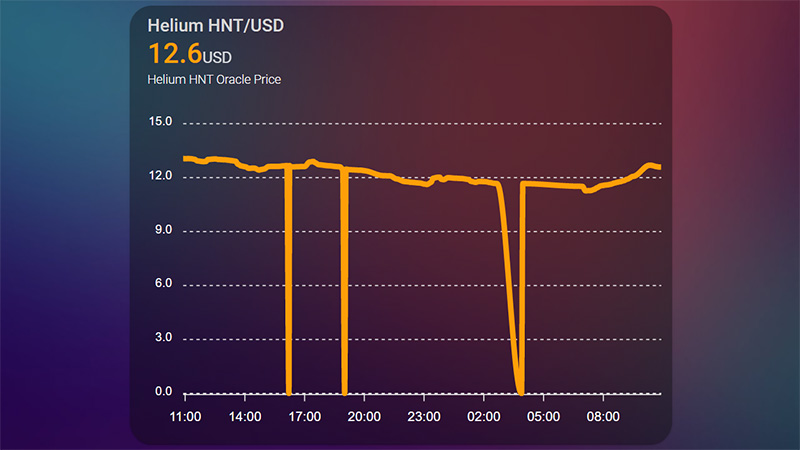
Creating Helium Price Line Chart
We can track Helium HNT price in USD, by adding the oracle entity in an apexcharts-card.
type: custom:apexcharts-card
header:
  show: true
  title: Helium HNT/USD
  show_states: true
  colorize_states: true
series:
  - entity: sensor.helium_hnt_oracle_price
    type: line
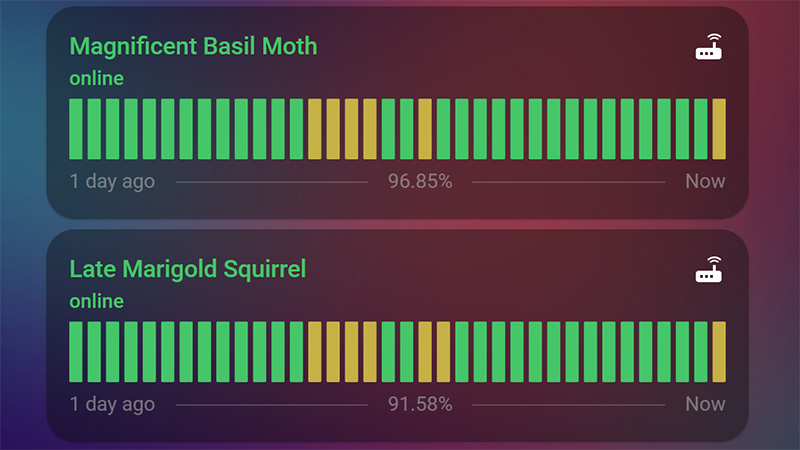
Creating Uptime Cards for each hotspot
To track hotspot connectivity status neatly in the dashboard, we are going to use uptime-card by dev dylandoamaral.
type: vertical-stack
cards:
  - type: custom:uptime-card
    entity: sensor.helium_magnificent_basil_moth
    icon: mdi:router-wireless
    ok: online
    ko: offline
    ko_icon: mdi:router-wireless-off
    hours_to_show: 24
    status_adaptive_color: true
    color:
      icon: white
    show:
      icon: true
      status: true
      timeline: true
      average: true
    title_adaptive_color: true
  - type: custom:uptime-card
    entity: sensor.helium_late_marigold_squirrel
    icon: mdi:router-wireless
    ok: online
    ko: offline
    ko_icon: mdi:router-wireless-off
    hours_to_show: 24
    status_adaptive_color: true
    color:
      icon: white
    show:
      icon: true
      status: true
      timeline: true
      average: true
    title_adaptive_color: true
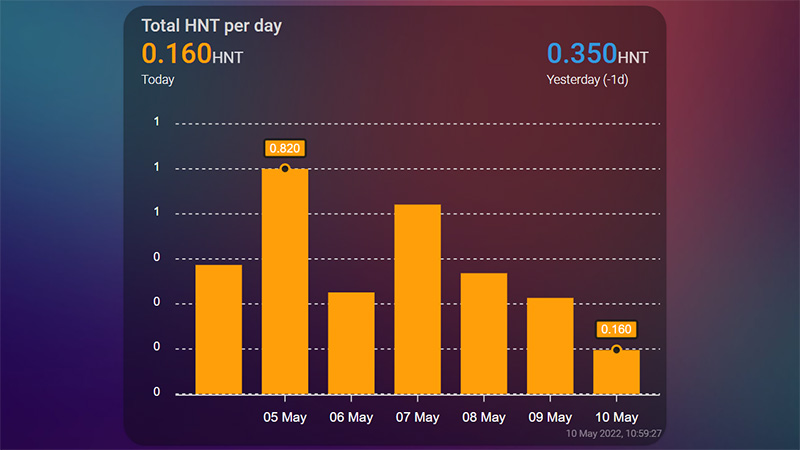
Creating Daily Total Earnings Graph
Total wallet earnings can be displayed in an apexchart column graph, by using the offset variable in the card itself:
type: custom:apexcharts-card
all_series_config:
  float_precision: 3
apex_config:
  yaxis:
    - seriesName: HNT
      decimalsInFloat: 0
    - seriesName: Helium
      show: false
  tooltip:
    x:
      format: ddd dd MMM - HH:mm
experimental:
  color_threshold: true
graph_span: 7d
span:
  end: day
show:
  last_updated: true
header:
  show: true
  show_states: true
  colorize_states: true
  title: Total HNT per day
series:
  - entity: sensor.helium_wallet_daily
    show:
      header_color_threshold: true
      extremas: true
    type: column
    name: Today
    group_by:
      func: last
      duration: 1d
  - entity: sensor.helium_wallet_daily
    name: Yesterday
    offset: '-1d'
    show:
      in_header: true
      in_chart: false
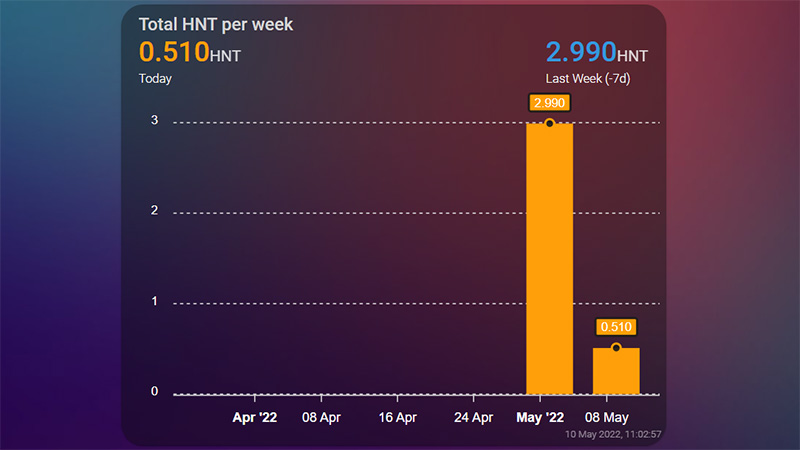
Creating Weekly Total Earnings Graph
Similarly, we can display weekly earnings in a column graph:
type: custom:apexcharts-card
all_series_config:
  float_precision: 3
apex_config:
  yaxis:
    - seriesName: HNT
      decimalsInFloat: 0
    - seriesName: Helium
      show: false
  tooltip:
    x:
      format: ddd dd MMM - HH:mm
experimental:
  color_threshold: true
graph_span: 49d
span:
  end: isoWeek
show:
  last_updated: true
header:
  show: true
  show_states: true
  colorize_states: true
  title: Total HNT per week
series:
  - entity: sensor.helium_wallet_weekly
    show:
      header_color_threshold: true
      extremas: true
    type: column
    name: Today
    group_by:
      func: last
      duration: 7d
  - entity: sensor.helium_wallet_weekly
    name: Last Week
    offset: '-7d'
    show:
      in_header: true
      in_chart: false
Creating Ultimate Hotspot Overview Card
To create the ultimate Helium Hotspot overview card, we are going to use the custom button-card by dev RomRider. This is the single, most powerful and versatile custom card you can add to Home Assistant. We will further style the card by removing borders and background using card-mod by thomasloven.
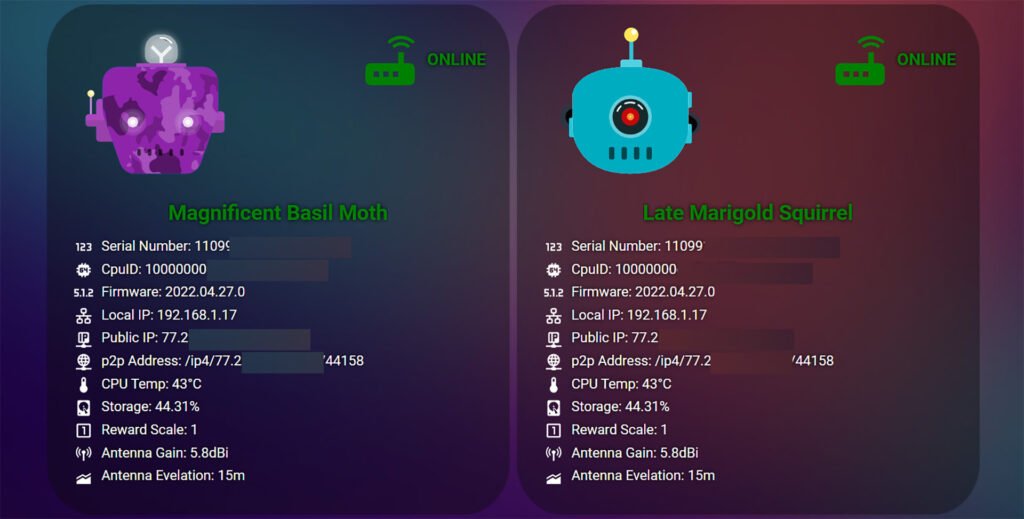
A little description of this card: Its based on our two newly created entities, the Helium Blockchain Integration hotspot status entity and the SenseCAP live data dashboard REST entity. These two feed data in Home Assistant, which is used by calling the appropriate attribute in the button-card itself. To setup this card for yourself, you need to replace the entity name in every field!
Eg: sensor.helium_magnificent_basil_moth_sensecap > sensor.your_sensecap_hotspot_entity
The picture used in the card is downloaded from hottspotty.net.
type: custom:button-card
entity: sensor.helium_magnificent_basil_moth
aspect_ratio: 1/1.1
name: Magnificent Basil Moth
entity_picture: /local/images/magnificent-basil-moth.svg
show_entity_picture: true
styles:
  entity_picture:
    - width: 70%
  card:
    - border-radius: 10%
    - padding: 5%
    - font-size: 80%
    - text-shadow: 0px 0px 5px black
  grid:
    - grid-template-areas: >-
        "i state" "n n" "sn sn" "cpuid cpuid" "firmware firmware"
        "localip localip" "publicip publicip" "p2p p2p" "cputemp cputemp" "storage storage" "rewardscale rewardscale" "gain gain" "elevation elevation"
    - grid-template-columns: 1fr 1fr
    - grid-template-rows: >-
        1fr min-content min-content min-content min-content min-content
        min-content min-content min-content min-content
  name:
    - font-weight: bold
    - font-size: 200%
    - color: >-
        [[[ if (states['sensor.helium_magnificent_basil_moth'].state ==
        'online') return "green"; else return "orange" ]]]
    - align-self: middle
    - justify-self: middle
    - padding-bottom: 3%
  img_cell:
    - justify-content: start
    - align-items: start
    - margin: none
    - padding-bottom: 3%
    - padding-top: 3%
    - padding-left: 10%
  icon:
    - width: 70%
  custom_fields:
    state:
      - font-weight: bold
      - text-transform: uppercase
      - align-self: start
      - justify-self: end
      - font-size: 160%
      - "--text-color-sensor": >-
          [[[ if (states['sensor.helium_magnificent_basil_moth'].state ==
          'online') return "green"; else return "orange" ]]]
      - "--icon-color-sensor": >-
          [[[ if (states['sensor.helium_magnificent_basil_moth'].state ==
          'online') return "green"; else return "orange" ]]]
    sn:
      - padding-bottom: 1%
      - align-self: middle
      - justify-self: start
      - font-size: 130%
    cpuid:
      - padding-bottom: 1%
      - align-self: middle
      - justify-self: start
      - font-size: 130%
    firmware:
      - padding-bottom: 1%
      - align-self: middle
      - justify-self: start
      - font-size: 130%
    localip:
      - padding-bottom: 1%
      - align-self: middle
      - justify-self: start
      - font-size: 130%
    publicip:
      - padding-bottom: 1%
      - align-self: middle
      - justify-self: start
      - font-size: 130%
    p2p:
      - padding-bottom: 1%
      - align-self: middle
      - justify-self: start
      - font-size: 130%
    cputemp:
      - align-self: middle
      - padding-bottom: 1%
      - justify-self: start
      - font-size: 130%
    storage:
      - align-self: middle
      - padding-bottom: 1%
      - justify-self: start
      - font-size: 130%
    rewardscale:
      - align-self: middle
      - padding-bottom: 1%
      - justify-self: start
      - font-size: 130%
    gain:
      - align-self: middle
      - padding-bottom: 1%
      - justify-self: start
      - font-size: 130%
    elevation:
      - align-self: middle
      - padding-bottom: 1%
      - justify-self: start
      - font-size: 130%
custom_fields:
  state: |
    [[[
      return `<ha-icon icon="mdi:router-wireless" style="width: 70px; height: 70px; color: var(--icon-color-sensor);"></ha-icon>
              <span style="color: var(--text-color-sensor);">${states['sensor.helium_magnificent_basil_moth'].state}</span>`
    ]]]
  sn: |
    [[[
      return `<ha-icon icon="mdi:numeric" style="width: 30px; height: 20px; color: var(--icon-color-sensor);"></ha-icon>
              <span style="color: var(--name-color-sensor);">Serial Number:</span>
              <span style="color: var(--state-color-sensor);"> ${states['sensor.helium_magnificent_basil_moth_sensecap'].attributes.data.sn}</span>`
    ]]]
  cpuid: |
    [[[
      return `<ha-icon icon="mdi:cpu-64-bit" style="width: 30px; height: 20px; color: var(--icon-color-sensor);"></ha-icon>
              <span style="color: var(--name-color-sensor);">CpuID:</span>
              <span style="color: var(--state-color-sensor);"> ${states['sensor.helium_magnificent_basil_moth_sensecap'].attributes.data.cpuId}</span>`
    ]]]
  firmware: |
    [[[
      return `<ha-icon icon="mdi:surround-sound-5-1-2" style="width: 30px; height: 20px; color: var(--icon-color-sensor);"></ha-icon>
              <span style="color: var(--name-color-sensor);">Firmware:</span>
              <span style="color: var(--state-color-sensor);"> ${states['sensor.helium_magnificent_basil_moth_sensecap'].attributes.data.version.firmware}</span>`
    ]]]
  localip: |
    [[[
      return `<ha-icon icon="mdi:lan" style="width: 30px; height: 20px; color: var(--icon-color-sensor);"></ha-icon>
              <span style="color: var(--name-color-sensor);">Local IP:</span>
              <span style="color: var(--state-color-sensor);"> ${states['sensor.helium_magnificent_basil_moth_sensecap'].attributes.data.ipEthLocal}</span>`
    ]]]
  publicip: |
    [[[
      return `<ha-icon icon="mdi:ip-network" style="width: 30px; height: 20px; color: var(--icon-color-sensor);"></ha-icon>
              <span style="color: var(--name-color-sensor);">Public IP:</span>
              <span style="color: var(--state-color-sensor);"> ${states['sensor.helium_magnificent_basil_moth_sensecap'].attributes.data.ipPublic}</span>`
    ]]]
  p2p: |
    [[[
      return `<ha-icon icon="mdi:wan" style="width: 30px; height: 20px; color: var(--icon-color-sensor);"></ha-icon>
              <span style="color: var(--name-color-sensor);">p2p Address:</span>
              <span style="color: var(--state-color-sensor);"> ${states['sensor.helium_magnificent_basil_moth_sensecap'].attributes.data.p2pAddress}</span>`
    ]]]
  cputemp: |
    [[[
      return `<ha-icon icon="mdi:thermometer" style="width: 30px; height: 20px; color: var(--icon-color-sensor);"></ha-icon>
              <span style="color: var(--name-color-sensor);">CPU Temp:</span>
              <span style="color: var(--state-color-sensor);"> ${states['sensor.helium_magnificent_basil_moth_sensecap'].attributes.data.cpuTemperature}</span>°C`
    ]]]
  storage: |
    [[[
      return `<ha-icon icon="mdi:harddisk" style="width: 30px; height: 20px; color: var(--icon-color-sensor);"></ha-icon>
              <span style="color: var(--name-color-sensor);">Storage:</span>
              <span style="color: var(--state-color-sensor);"> ${states['sensor.helium_magnificent_basil_moth_sensecap'].attributes.data.sdPercentage}</span>%`
    ]]]
  rewardscale: |
    [[[
      return `<ha-icon icon="mdi:numeric-1-box-outline" style="width: 30px; height: 20px; color: var(--icon-color-sensor);"></ha-icon>
              <span style="color: var(--name-color-sensor);">Reward Scale:</span>
              <span style="color: var(--state-color-sensor);"> ${states['sensor.helium_magnificent_basil_moth_sensecap'].attributes.data.rewardScale}</span>`
    ]]]
  gain: |
    [[[
      return `<ha-icon icon="mdi:antenna" style="width: 30px; height: 20px; color: var(--icon-color-sensor);"></ha-icon>
              <span style="color: var(--name-color-sensor);">Antenna Gain:</span>
              <span style="color: var(--state-color-sensor);"> ${states['sensor.helium_magnificent_basil_moth_sensecap'].attributes.data.gain}</span>dBi`
    ]]]
  elevation: |
    [[[
      return `<ha-icon icon="mdi:elevation-rise" style="width: 30px; height: 20px; color: var(--icon-color-sensor);"></ha-icon>
              <span style="color: var(--name-color-sensor);">Antenna Evelation:</span>
              <span style="color: var(--state-color-sensor);"> ${states['sensor.helium_magnificent_basil_moth_sensecap'].attributes.data.elevation}</span>m`
    ]]]
Summary
If you are a Helium enthusiast and posses a fleet of hotspots, you will come to realize tracking them all easily can be quite tricky. The Helium explorer can be laggy, slow or completely unresponsive for large durations of time. Unfortunately, this also means that our template sensors which rely on Helium’s API are also going to lag behind.
This is why it is great to have a maker-available dashboard, such as the SenseCAP cloud, which will constantly feed data to your HA instance for real-time hotspot tracking.
Based on this information, we advise you create simple automations to notify you when something has gone wrong with your Helium hotspot. If you have unanswered questions, please post them bellow, we are happy to help!
Interesting AliExpress Finds
Standing Desk
Contact Sensor 1
Contact Sensor 1
Contact Sensor 1
Contact Sensor 1
Contact Sensor 1
Contact Sensor 2


How can i create and use hotspots ?
need i create for only using it ?
i am midle beginner 😀
can you email me?
thy
Hi there. Love the cards here. Any chance this can be updated for the post-Solana migration?
The original Helium Blockchain HACS integration no longer works