By default, Home Assistant records and keeps history in an SQLite database (/config/home-assistant_v2.db) for 10 days, committing changes every 5 seconds and automatically purging every night to keep the file size from growing infinitely.
These setting are okay when you are just starting out with HA, but when you start to deep dive and add a bunch of devices, integrations and addons than tweaking the recorded is needed for a variety of reasons.
Some data, you want to keep indefinitely. You want to come back to it a year later and explore. Other data, you do not need recorded at all. Who cares what your Pi’s CPU usage was 3 months prior?
I’ve already written a detailed guide for setting up MariaDB as the default SQL database in Home Assistant and running InfluxDB in parallel for long-term data retention. Perhaps the most useful tip from that article is to actually optimize your database by excluding entities from being recorded in the first place.
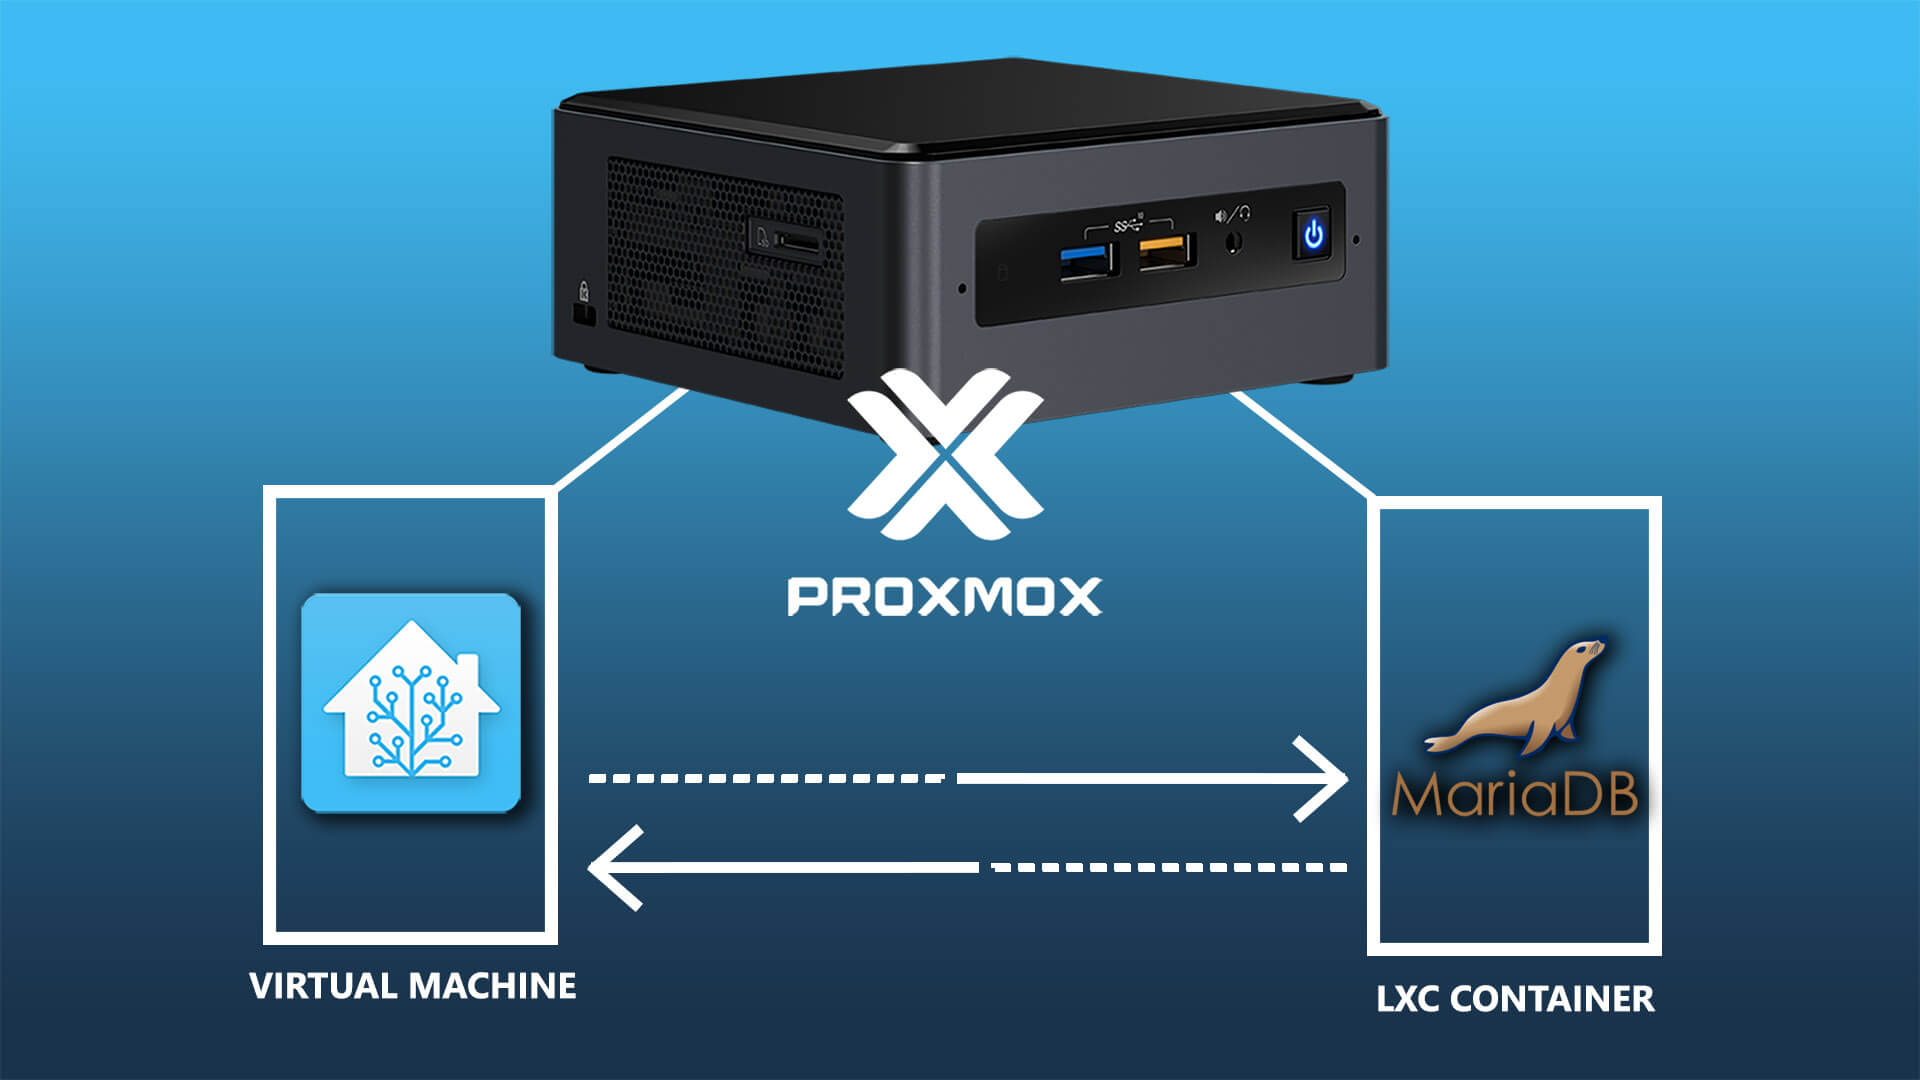
In this guide, I’m going to show you how you can move Home Assistant’s database entirely and self-host it on Proxmox as a MariaDB LXC container. This will allow you to always have a backup of your database in a safe place, detached from Home Assistant.
Benefits and Drawbacks of Self-Hosting MariaDB
Separating the database from Home Assistant and self-hosting it in VE has a couple of possible benefits and drawbacks that you need to be aware of. If you think of any other besides those listed, feel free to share them in the comments.
Benefits:
- Significantly reduced Backups size in Home Assistant
- If are using any cloud-based backup strategy (Google Drive, One Drive etc.), separating the database will significantly lower file size since it won’t be included in the backup
- If you are using the MariaDB add-on withing Home Assistant, the database is included in the backup by default
- Creating separate backups and snapshots strategy for MariaDB LXC
- You can create a separate backup or snapshot strategy in Proxmox for the MariaDB LXC container. This gives you more flexibility for saving and moving around your database
- Independent from Home Assistant
- If you are recording important data with Home Assistant, the database will be unaffected by Home Assistant updates, breaking changes and other failures
- Troubleshooting
- Identifying potential issues is easier when the database is separated from Home Assistant
- You can use tools like Adminer for browsing through the DB
Drawbacks
- Maintenance and manual updates
- Each container and VM now need to be updated manually and separately. There are tools available for automating the process (Webmin), however you still need to be aware of breaking changes, just like in HA
- MariaDB LXC crashing
- If the database comes crashing down, Home Assistant will produce a bunch of error that you will need to diagnose.
- MariaDB LXC not started before Home Assistant
- If the database is not reachable when Home Assistant starts, you will get recorder, history and logbook errors. To get around this issue, we can set boot order priority and start up delay
Installing MariaDB LXC on Proxmox
For the purpose of this guide, I’m going to deploy MariaDB as an LXC container in Proxmox using tteck‘s helper script. These are now developed by the community since tteck has sadly passed away. This is the easiest method of installing MariaDB on Proxmox and subsequently configuring the instance.
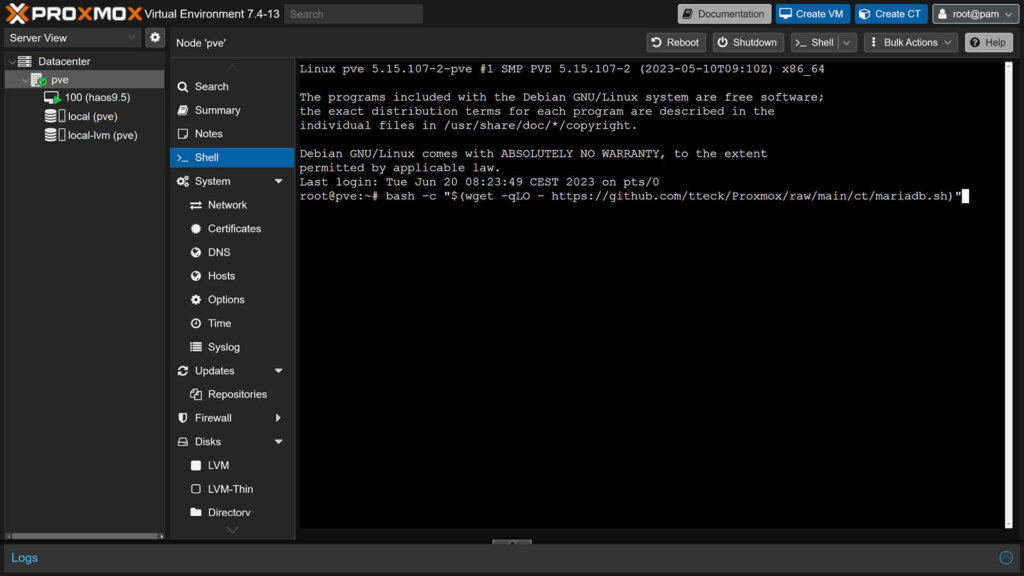
- Open Proxmox’s Web UI
- Select your Node from the left menu and click Shell in the middle column
- Paste the following command and hit enter:
Updated:
bash -c "$(curl -fsSL https://raw.githubusercontent.com/community-scripts/ProxmoxVE/main/ct/mariadb.sh)"You will get a confirmation prompt telling you that “This will install a new MariaDB LXC”, hit enter to proceed. The installer will prompt you again for choosing installation settings:
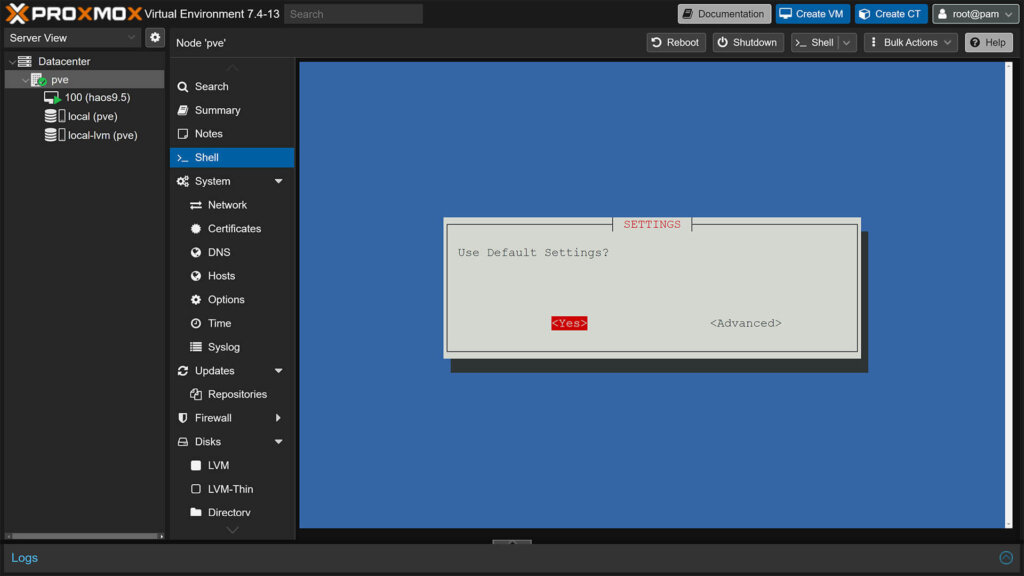
If you choose Default, it will install MariaDB LXC with the following settings: 1GB RAM – 4GB Storage – 1vCPU. If you choose Advanced, you will have the ability to tweak the following parameters:
- Distribution:
- Debian (default)
- Ubuntu
- Debian Version:
- Bullseye 11 (default)
- Bookworm 12
- Container Type:
- Unprivileged (default)
- Privileged
- Set Root Password (for SSH Access)
- Automatic Login (default)
- Set Container ID
- Incremented from your list (default)
- Set Hostname
- mariadb (default)
- Set Disk Size in GB
- 4GB (default)
- Allocate CPU Cores
- 1 (default)
- 1024 (default)
- Allocate RAM in MiB
- 1024 (default)
- Set a Network Brigde
- vmbr0 (default)
- Set a Static IP Address
- DHCP (default)
- Disable IPv6
- Disabled (default)
- Set Interface MTU Size
- Default
- Set DNS Search Domain
- Host (default)
- Set DNS Server IP
- Host (default)
- Set MAC Address
- Default
- Set VLAN
- Default
- Enable Verbose Mode
- No (default)
The default settings are proper for a standard MariaDB database container so I suggest leaving them as they are. If you need tweak something, feel free to do so. Depending on your needs, you can increase the allocated disk size for the LXC.
During the installation process, the script will prompt you to install Adminer, a full-featured database management tool. If want to browser the database you can input Y and access Adminer later at IP_Address/adminer/
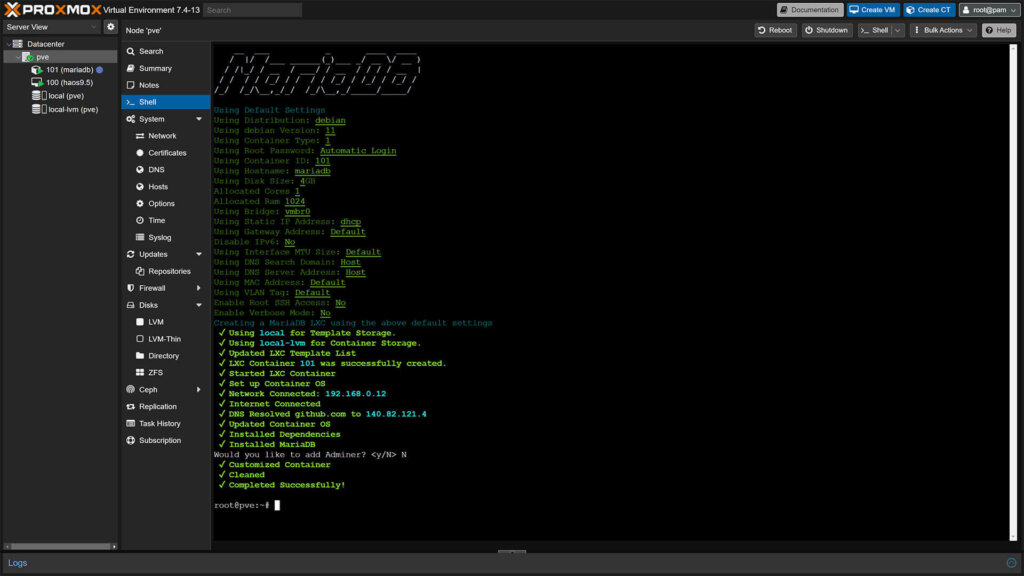
After the installation process has finished, a Completed Successfully! message will appear in the shell and you can continue to configure MariaDB and Home Assistant.
Configuring MariaDB LXC Container
Before you can connect Home Assistant to MariaDB, certain settings needs to be changed. For starters, listening for remote connections needs to be enabled which is off by default. Further, a user with proper permissions need to be created which we will use in Home Assistant to access MariaDB. And finally, we can create a dedicated database for Home Assistant.
Enabling Remote Connections
To enable remote connections to MariaDB, we need to edit the default .cnf file. In Proxmox, select the MariaDB container from the left menu, click Console in the middle column and execute the following command:

#Edit MariaDB LXC defaults file
nano /etc/mysql/my.cnf
This will take you to the nano text editor with my.cnf file open.
Uncomment the line port=3036 (remove the # sign), so it looks like in the image bellow:
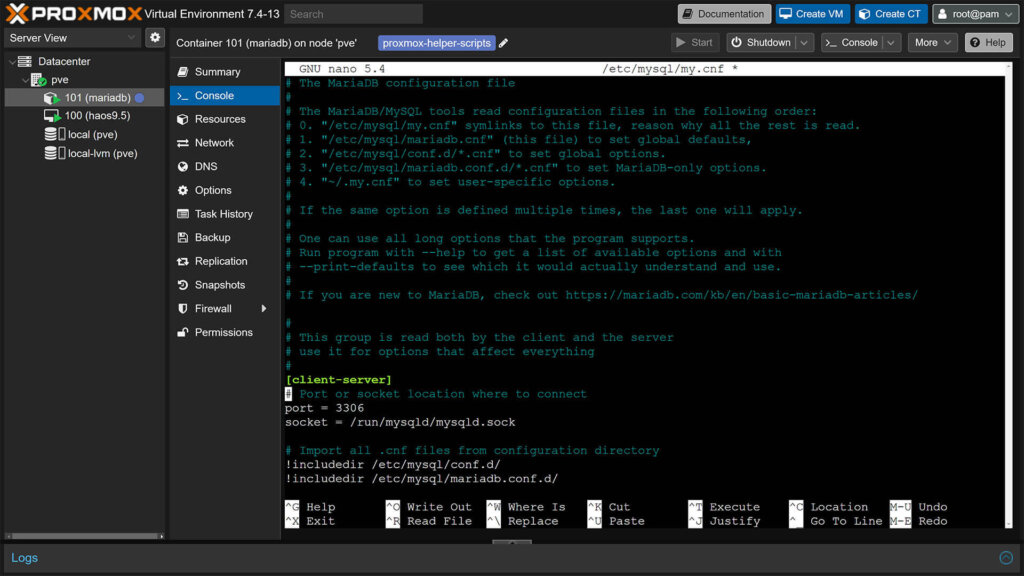
Save the file by pressing CTRL+O, which will prompt you for confirmation. Press Enter and a “Wrote XX lines” message will appear. Exit the editor with CTRL+X. Back in the console, execute a second command which will open another .cnf file:
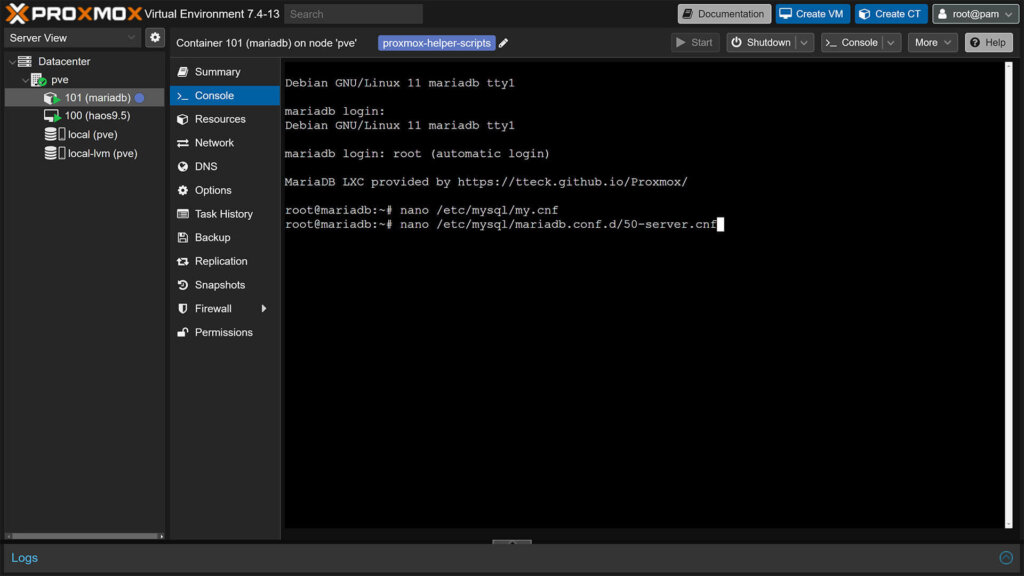
#Edit MariaDB LXC server file
nano /etc/mysql/mariadb.conf.d/50-server.cnf
In this file, comment the line bind-address = 127.0.0.1 so it’s removed from the cnf file. It should look like in the image bellow:
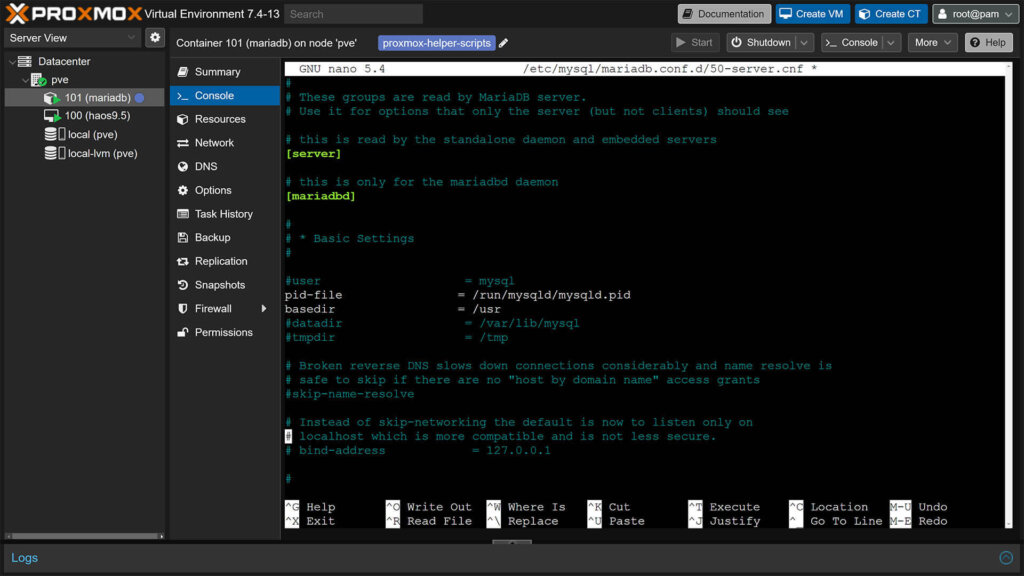
Save the file by again pressing CTRL+O, confirming with Enter and exiting with CTRL+X.
Securing the MariaDB Database
The next step in preparing the MariaDB LXC container for Home Assistant is to block remote root logins, delete the test table and remove unused database users. We can do this using MariaDB’s built-in security script by executing it in the console with the following command:
#Run MariaDB Security Script
mariadb-secure-installation
The script will ask you a couple of questions, where you need to answer with either Y/N. It will also give you explanation about what each settings does and recommend what you should respond. Secure the MariaDB by answering to the questions like this:
- Enter current password for root (enter for none): enter
- Switch to unix_socket authentication [Y/n]: y
- Change the root password? [Y/n] n
- Remove anonymous users? [Y/n] y
- Disallow root login remotely? [Y/n] y
- Remove test database and access to it? [Y/n] y
- Reload privilege tables now? [Y/n] y
You will get a confirmation “Your MariaDB Installation should now be secure!“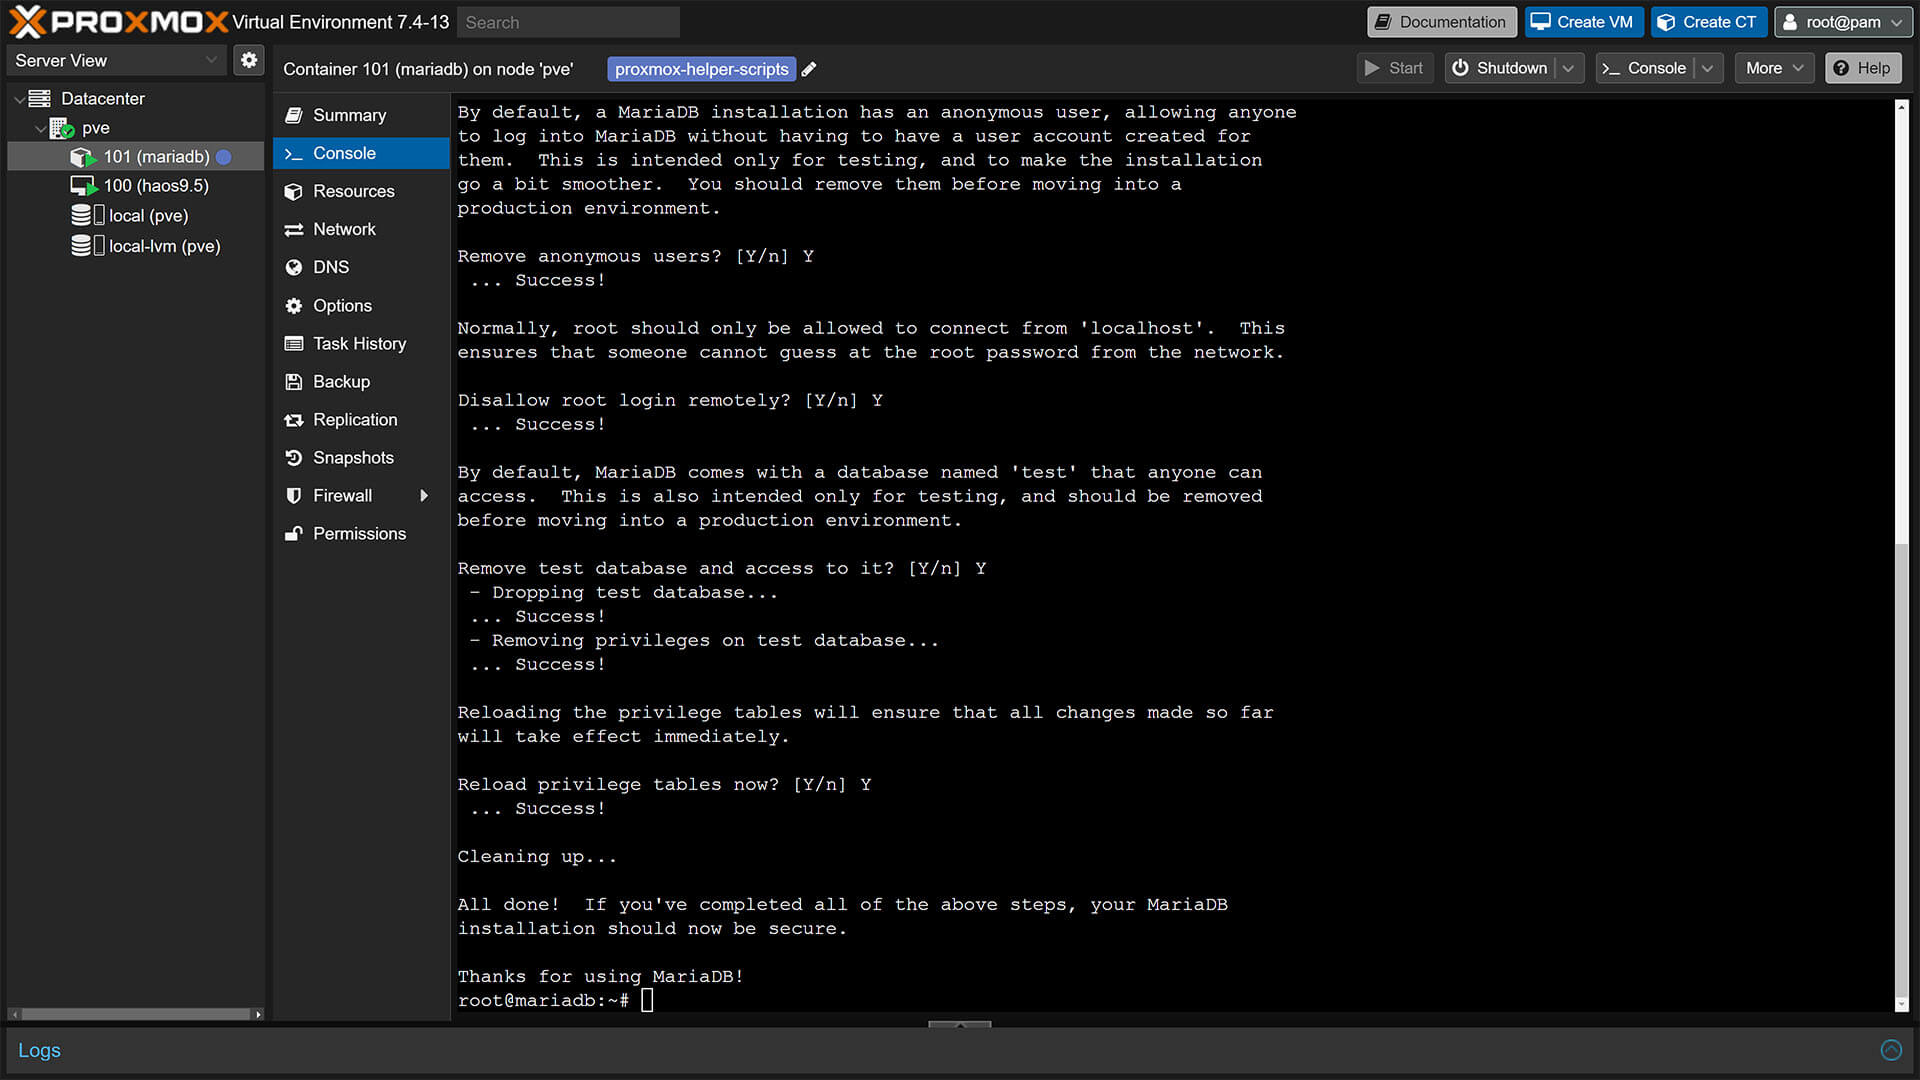
Creating a new User
The next step is to create a user specifically for Home Assistant, which will have all the privileges as a root user but with password authentication. In the console of MariaDB, execute the following command:
#Create a new user
/usr/bin/mariadb
The prompt in the console will change to MariaDB [(none)]>
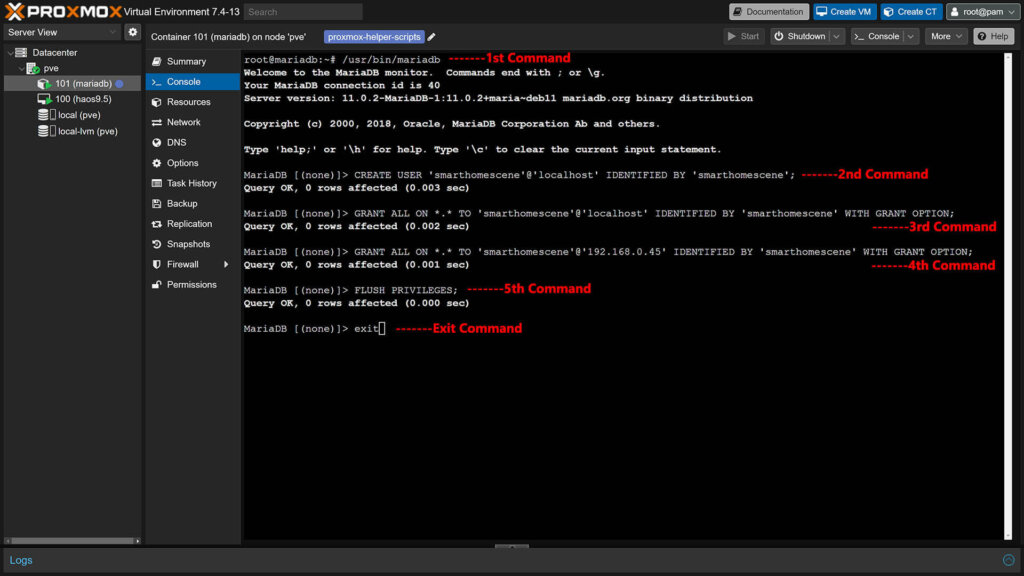
Create a new and local administrator with the desired username and password with the following command:
#Change username and password
CREATE USER 'smarthomescene'@'localhost' IDENTIFIED BY 'password';
Grant local admin root privileges with the following command:
#Change username and password
GRANT ALL ON *.* TO 'smarthomescene'@'localhost' IDENTIFIED BY 'password' WITH GRANT OPTION;
Execute the following command to grant root privileges to your username that can connect from your local network within the preset subnet. In my case, this is 192.168.0.XXX for the whole subnet. You can input your HA address instead, to allow access ONLY to HA:
#Change username, password and subnet mask
GRANT ALL ON *.* TO 'smarthomescene'@'192.168.0.%' IDENTIFIED BY 'password' WITH GRANT OPTION;
Flush Privileges to make sure they are applied for the current session with the following command:
FLUSH PRIVILEGES;Finally, exit the MariaDB console by typing exit. Your window should look something like this if you did everything correctly:
Creating the Database
The final step before connecting Home Assistant to MariaDB is to login and create the actual database. In the Console of MariaDB, execute the following command replacing my username with yours:
/usr/bin/mariadb -u smarthomescene -pInput your password and hit Enter. The prompt will change to MariaDB [(none)]>, paste the following command to create the database:
#Change to whatever name you want
CREATE DATABASE homeassistant;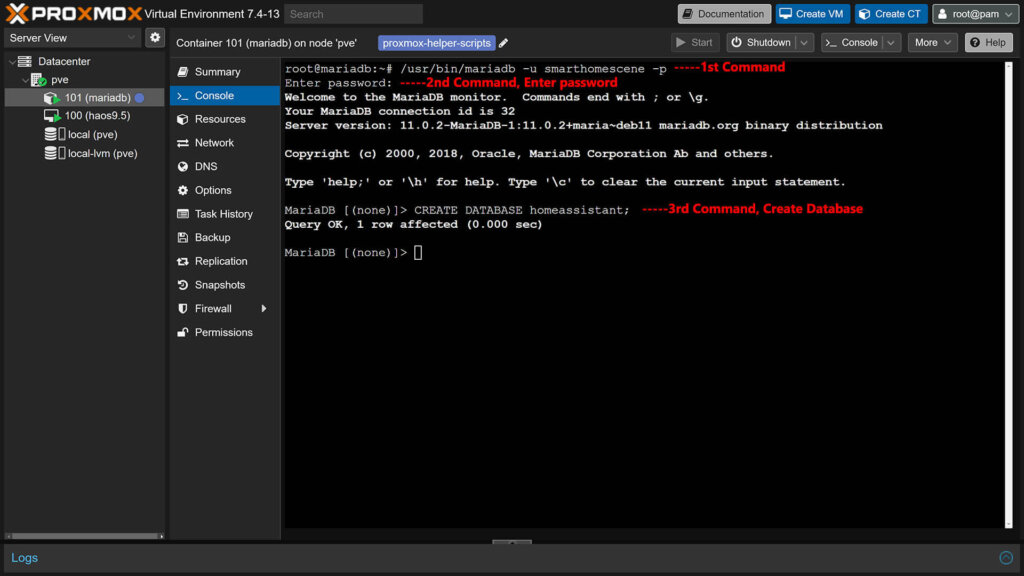
Finally, restart the LXC container by select Reboot from the dropdown menu in the top right corner. Once it comes back up, you can check the status of the database with the following command, which should say active (running):
#Check MariaDB Status
systemctl status mariadb
If you’ve made everything correctly, you are ready to configure Home Assistant and feed data to your new database.
Connecting Home Assistant to MariaDB
The final step to connect your Home Assistant instance to your new database is to actually connect the two. Don’t be confused, you do not need to install the MariaDB Add-on in Home Assistant. Open HA’s configuration.yaml file with your File Editor or Visual Studio Code and add the following:
#Basic database configuration
recorder:
  db_url: mysql://smarthomescene:password@192.168.0.45:3306/homeassistant?charset=utf8mb4
Change the username, password and database to match yours as well as the IP Address. If you’ve set a static IP during installation, input it here along with the port. If you’ve left the DHCP auto-setting, you are going to need to find out MariaDB’s IP address from your router. Save the file and restart Home Assistant.
I highly suggest you tweak the recorder configuration and exclude entities you don’t need from being logged in the database. Read this article [Optimize Your Home Assistant Database] for a proper way to do this.
Delaying Container Startup Time
If Home Assistant starts before MariaDB is reachable on your local network, it will produce a bunch of different recorder, logbook and history integration errors. Which makes perfect sense, since it won’t be able to connect to a database and record history.
To get around this issue, we can simply create boot priority order for the two containers in Proxmox. MariaDB needs to be started first followed by Home Assistant. Here’s how you can do this:
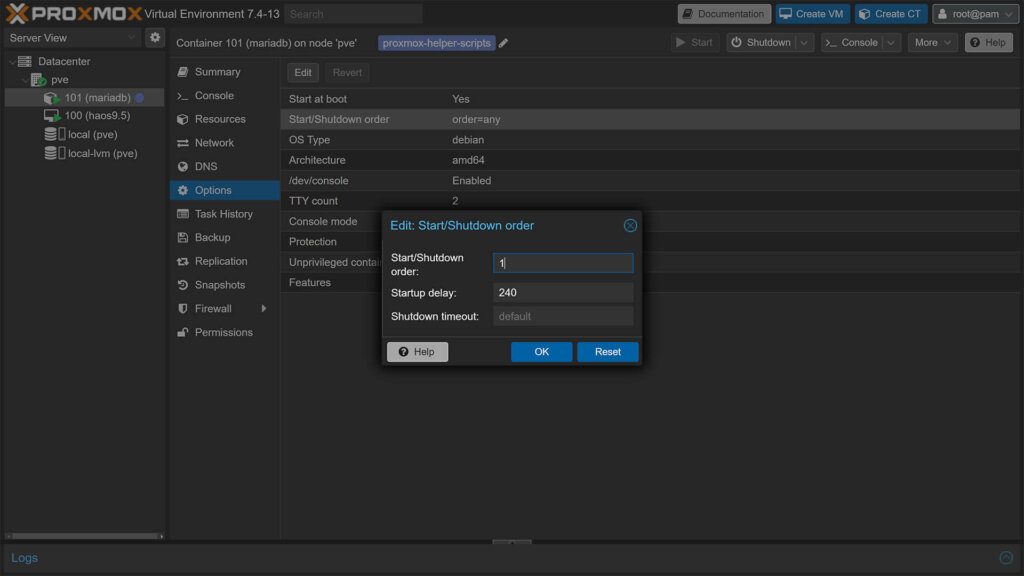
- Select the MariaDB container on the left
- Click Options in the middle column
- Double click Start/Shutdown order
- Set Start/Shutdown order: 1
- Set Startup Delay: 240
This setting essentially tells Proxmox that the MariaDB LXC needs to be started before any other VMs or Containers. It also sets a 240 seconds delay for starting subsequent containers. LXCs without a Start/Shutdown order parameter will always start after those where the parameter is set.
This way you ensure Home Assistant can always connect to the database, which be will up and running when HA starts.
Setting Static IP Addresses
If you haven’t done it already, it’s good practice to set static IP addresses to servers and services (like a Proxmox VE with individual containers and VMs) running on your local network.
Routers are known to cycle DHCP leases after a reboot or power outage, so any configuration you’ve made that included an IP address (such as MariaDB’s config) will render the service unreachable since it’s no longer present at the initial IP address.
To avoid this issue, always set a static IP address in your router’s DHCP settings for MariaDB. If you are unsure how to do this, you can google your router model for instructions.


thanks for this article, very simple to follow
After doing all steps, and verified everything is working, is it reccomended to delete the HA DB in config folder?
Only the home-assistant_v2.db file, right?
What about doing a daily backup of the new Proxmox Mariadb container?
Thanks
You can safely delete home-assistant-v2.db at any time.
Regarding backup in Proxmox, see this article:
https://smarthomescene.com/guides/how-to-backup-home-assistant-in-proxmox/
You can create different backup/snapshot strategies for MariaDB.
An old article but I am amazed over how often I see writer with limited knowledge of Linux commandline commands
EX
Enter current password for root (enter for none): enter
Switch to unix_socket authentication [Y/n]: y
Change the root password? [Y/n] n
Remove anonymous users? [Y/n] y
Disallow root login remotely? [Y/n] y
Remove test database and access to it? [Y/n] y
Reload privilege tables now? [Y/n] y
All these questions except the third one could be answered by Enter, not y. Because Linux Commandline rule is that if an alternative y/n has one alternative as a Capital letter [Y/n], that is the default and can be answered by pressing enter.
But I see this in hundrerds of guides like this and on YT
Okay, thank you. Does it really matter?
“I see writer with limited knowledge of Linux commandline commands”… interesting (and rude ?) to assume that from the writer.
IMHO, it is much easier for the reader, to understand that typing ‘y’ is accepting the proposal.
What happens with old data, that is already on the HomeAssistant, when doing this? Is it transfered automatically to MariaDB?
No, it is not.
If you want to keep any old data, you can use database migration tools although that’s easier said than done.
Like ESF Database Migration Tool
Hi I have try to make it work but it’s work don’t want to work.
I got when I start my ha this.
Invalid config
The following integrations and platforms could not be set up:
recorder (Show logs)
logbook (Show logs)
history (Show logs)
energy (Show logs)
default_config (Show logs)
Please check your config and logs.
Recorder
The recorder could not start, check the logs
my config look like this
I have removed the username and ip from it
recorder:
db_url: mysql://username:password@ip:3306/homeassistant?charset=utf8mb4
I am able to connect with adminer
thank 🙂
Hello,
Assuming your credentials, IP address and port are correct, you are most likely starting Home Assistant before the Database is online.
Meaning, Home Assistant can’t reach it and produces those errors.
Try adding a delay (it’s in the guide).
Cheers
Really good guide thank you. I followed it with no issues.
Regarding the Adminer tool (I choose to install it): If I want to browse the database to see that HA has actually written to the newly created database, how do I log in?
The Adminer UI asks for “Server” which says localhost but we disabled that in the guide.
I’ve tried adding root access from my workstation with the following command:
GRANT ALL ON *.* TO ‘root’@’192.168.1.X’ IDENTIFIED BY ‘password’ WITH GRANT OPTION;
This gives me closer, but I get “No route to host” on Adminer
Hy!
I see that you create one VE per software (1 for MariaDB, 1 for influxDB, …). Knowing that each of them is in fact a Debian olus the installation of a dedicated software.
Does it make sense to just install Debian on 1 VE then to install all these software on it ?
Yes, you can do this no problem.
Proxmox is a Debian-based VE, so ultimately you would be achieving the same thing.