On our AliExpress Reviews channel, we test many devices from the Moes brand. This is because as far as cheap smart home hardware goes, most of them turned out to be of good build, solid quality and will not break your bank. Today we are looking at a smart thermostat sold by Moes, the BHT-002.
As usual, we are going to pry it open, check the quality of the components, integrate it in Home Assistant and talk about its pros and cons. Let’s get to it!
Technical Specification
- Sensor: NTC3950
- Accuracy: ±1°C
- Power Consumption: < 1.5W
- Timing Error: <1%
- Power Supply: 95 ~ 240VAC, 50 ~60Hz
- Current Load:
- 3A(water heating, water/gas boiler),
- 16A(electric heating)
- Ambient Temp.: 0-45°C,5-95%RH (Non-condensing)
- Storage Temp.: -5-55°C
- Set Temp. Range: 5-35°C
- Room Temp. Range: 5-99°C
- Shell material: PC+ABS (flame retardant)
- Dimension: 86x86x13.3mm
- Installation: 60mm box
What’s Inside?
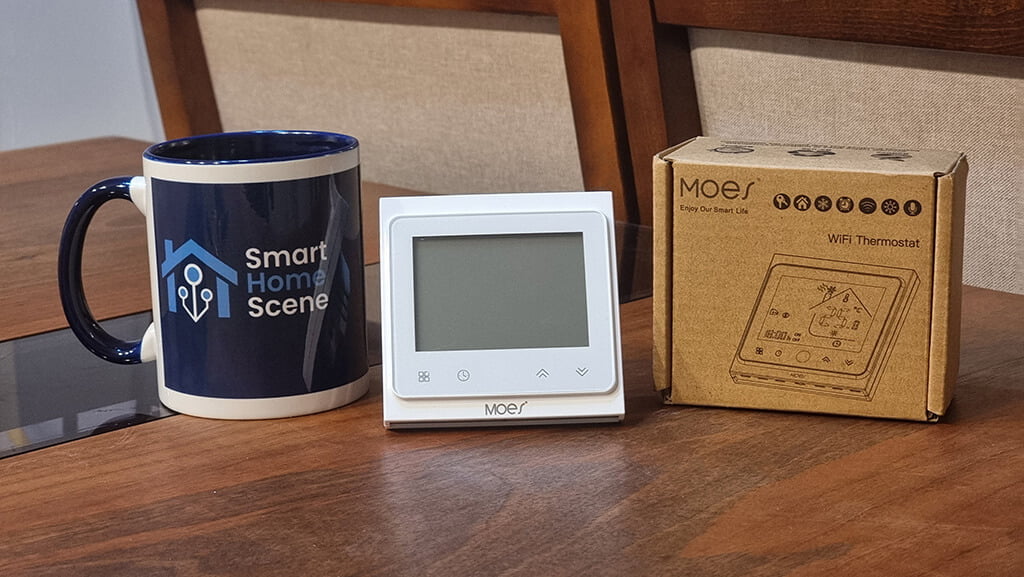
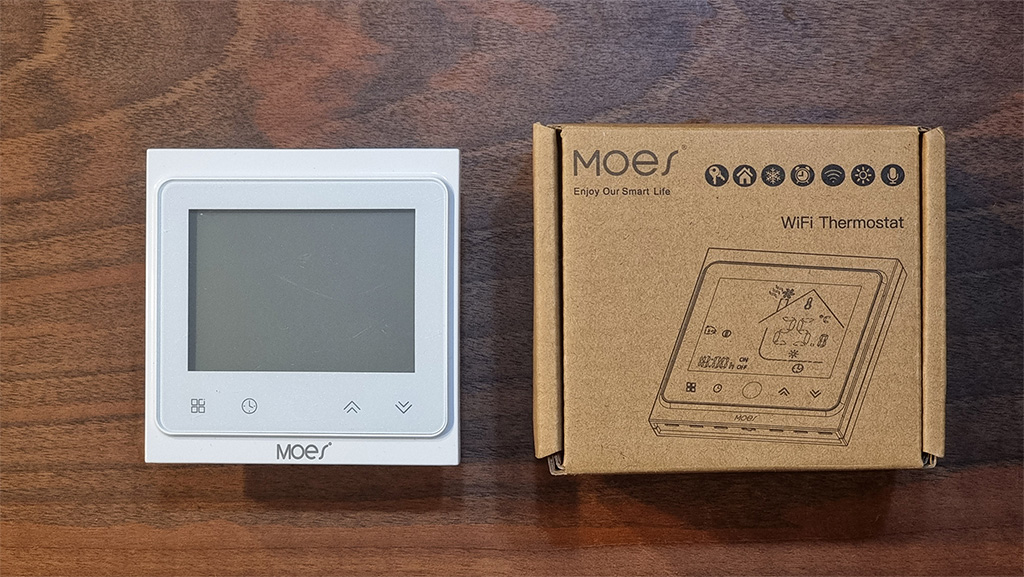
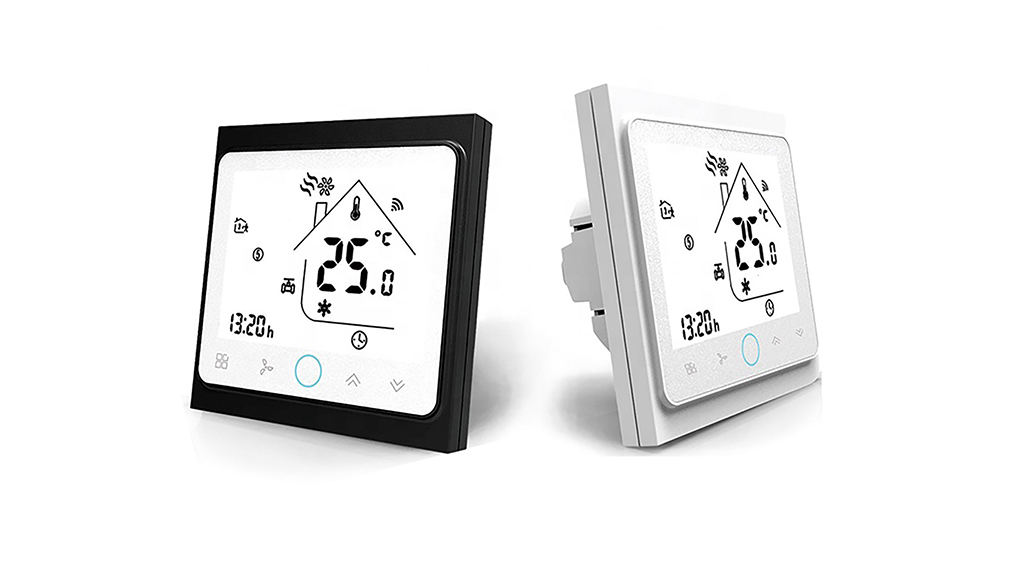
The Moes ZigBee Smart Thermostat arrives neatly packed in a cardboard box, containing the thermostat, the manual of operation and some screw for mounting it on a wall. Its label says “WiFi Thermostat”, even though it’s the ZigBee version. This is probably done to save on packaging costs, so don’t have a small heart attack when you unpack it first.
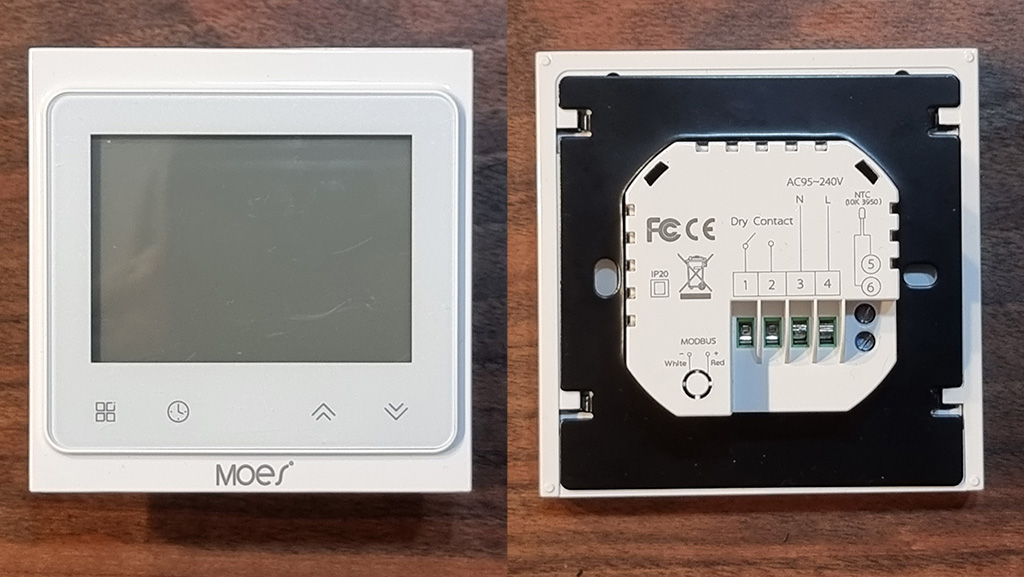
On the front plate, the display frame is neatly placed together with a few capacitive touch buttons. We suspect your main operation of this device will be automated or controlled via Home Assistant, but nevertheless they are nice to have.
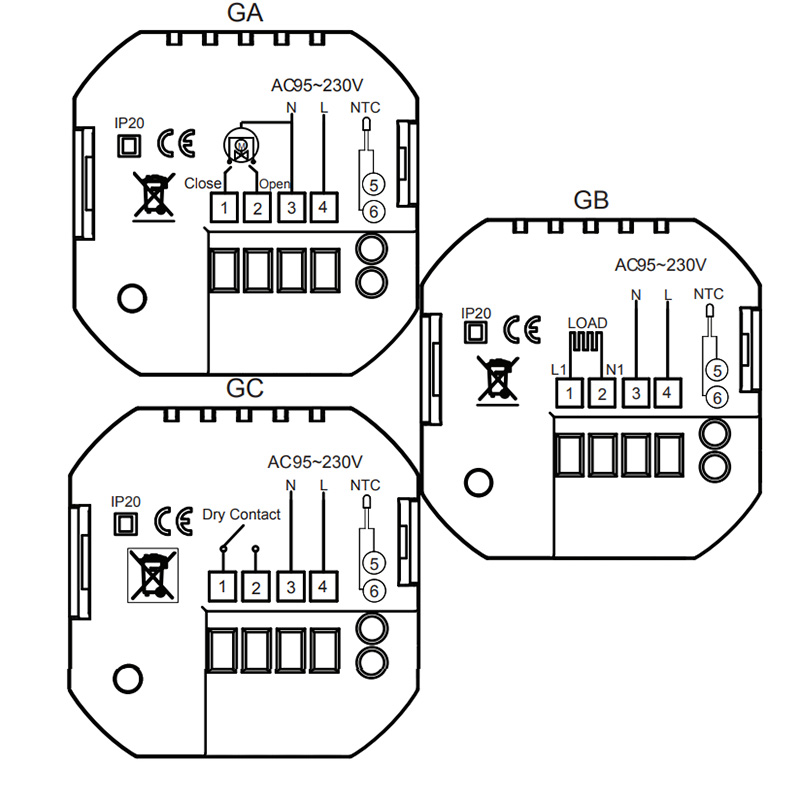
On the back plate, four main terminals are placed together with some labeling. Two of those are used to connect it to mains power, N and L, and the other two are used to connect your heating/cooling entity. This particular model is for a water boiler, which requires Dry Contact to simply complete the circuit and start the boiler.
Next to the main terminals, are two smaller terminals labeled NTC 10k 3950. These two are used for connecting an external temperature probe or thermistor. This connector is used to add a second external sensor, we explain further bellow.
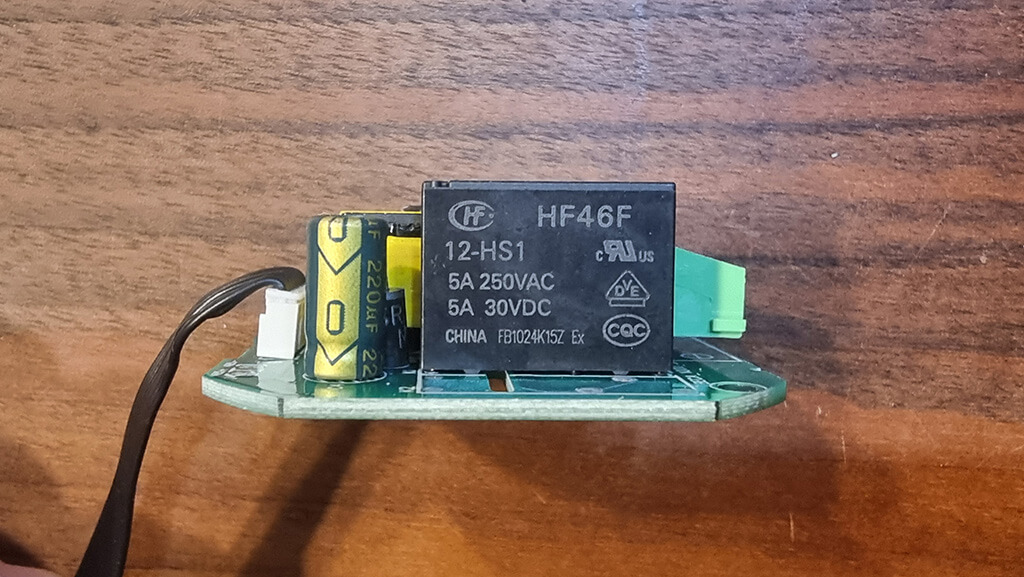
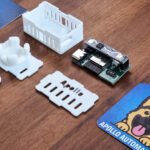
Once we remove the backplate, we can see the main PCB is connected to the terminals and relay with a flat cable. A protective PVC foil separates the two, two prevent accidental short circuits and heat conduction.

The backplate PCB contains the 4 main terminals, as well as the 2 temperature sensor terminals on the side. The backside components are fairly standard, such as resistors, diodes and are soldered properly by a machine instead of some student in a factory somewhere.
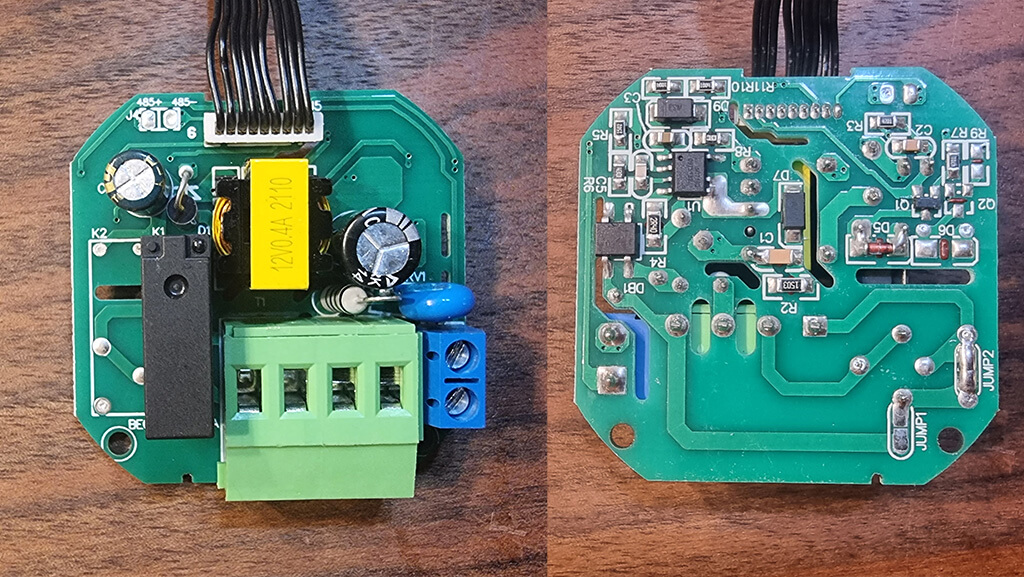
The relay HF46F is rated for 5A, considering this is the water boiler version (16A is electric heating). Its manufactured by Hongfa Technology, a Chinese industrial relay manufacturer based out of Xiamen-Zhangzhou. HONGFA boasts more than 30 subsidiaries worldwide, and its business covers more than 120 countries and regions.
Nevertheless, a distinct click can be heard when the relay is triggered, indicating a solid build quality. Quiet relays tend to be either very weak or of bad quality.
Note: If you ordered the Electric Heating version, this would be replaced by a 16A relay.
The front panel of the thermostat, contains the communication chip (in this case ZigBee) as well as the screen. The WiFi version of the thermostat would contain a WiFi communication module instead.
The built-in temperature sensor is mounted at the bottom of the metal plate sticking out of the body of the thermostat. It’s a NTC 10k 3950 thermistor sensor, which might need calibration after installation.
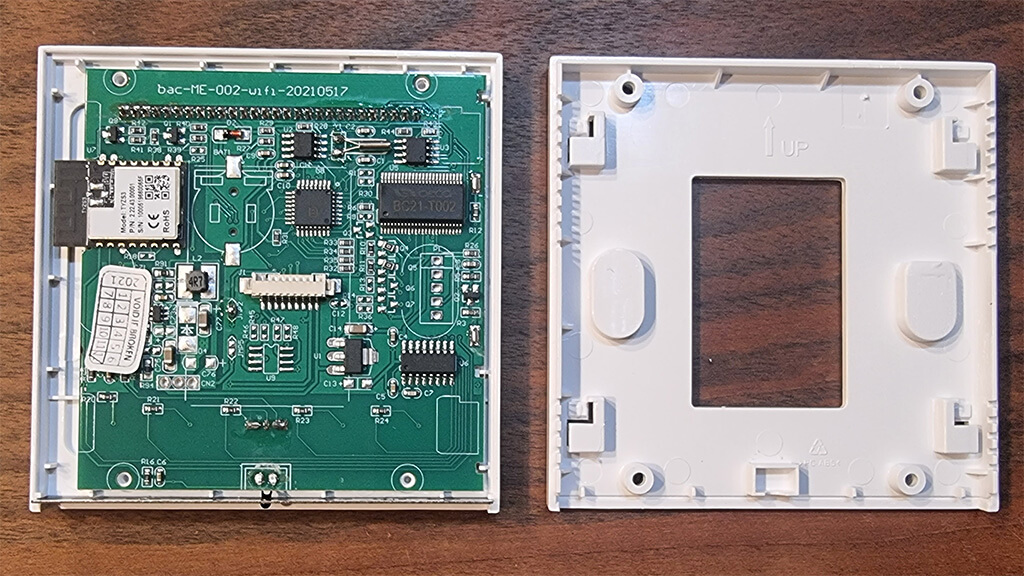
The chip itself is a Tuya model TYZS3 embedded with a low power-consumption 32-bit ARM Cortex-M4 core, 512-KB flash memory and 64-KB RAM. It’s fit for its purpose, and considering the nature of ZigBee it’s completely local.

Different Model Versions
Perhaps the most important part of this review, is to understand the differences between the model variants of the Moes Smart Thermostat. This would ensure you order the right version for your heating installation.
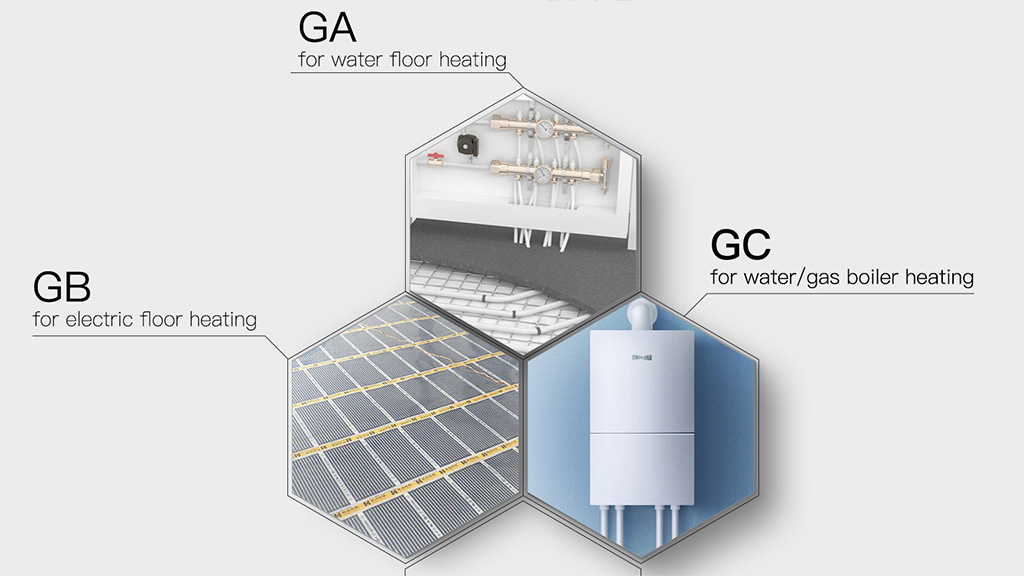
In general there are three main models in which this switch is produced:
This further breaks down by connectivity, giving us a total of 9 different models.
- Standard (No Wi-Fi or ZigBee)
- BHT-002-GA: 3A Water Heating
- BHT-002-GC: 3A Water/Gas Boiler
- BHT-002-GB: 16A Electric Heating
- ZigBee:
- BHT-002-GALZ: 3A Water Heating
- BHT-002-GCLZ: 3A Water/Gas Boiler
- BHT-002-GBLZ: 16A Electric Heating
- Wi-Fi:
- BHT-002-GALW: 3A Water Heating
- BHT-002-GCLW: 3A Water/Gas Boiler
- BHT-002-GBLW: 16A Electric Heating
Picking The Right Model
IMPORTANT: The following explanation is just a general guideline and description! Do not take this advice exactly as written, if you are unsure ALWAYS consult with a certified electrician/HVAC installer.
Main Models: This may confuse some readers, but it’s fairly simple to distinguish:
- If you use an electric heating system (floor heating coil, electric radiators, quartz heaters, any kind of electric heaters), where larger amount of current needs to pass through the relay than the GB model is probably for you.
- If you use water heating, water boiler, gas boiler, pellet burners or similar where either small or no amount (dry contact) of electricity needs to pass through the relay, than the GA/GC model is probably for you
Connectivity: As usual, we advise you stay away from the Wi-Fi version as it is Tuya based. If you use ZigBee, than that’s the version for you (ending in LZ). You can also order the standard variant, without any connectivity whatsoever. The Moes Smart Thermostat is more than capable of working as a standalone HVAC controller. You can program it, schedule it by days, week, and adjust its system settings from the built-in menu (see further bellow).
Wiring and Installation
The Moes Smart Home Thermostat BHT-002 is fairly easy to install. Considering most residential homes in need of a thermostat already have some sort of wires installed in a switchbox or maybe an old (dumb) thermostat.
- Connect the two wires from your heating appliance (water boiler, electric heating coil etc.) to terminals 1 and 2
- Connect the N-Neutral wire to the N-terminal of the thermostat, terminal 3
- Connect the L-Live wire to the L-terminal of the thermostat, terminal 4
- If you are installing an additional temperature sensor/probe, connect it to terminals 5 and 6
Features and Operation
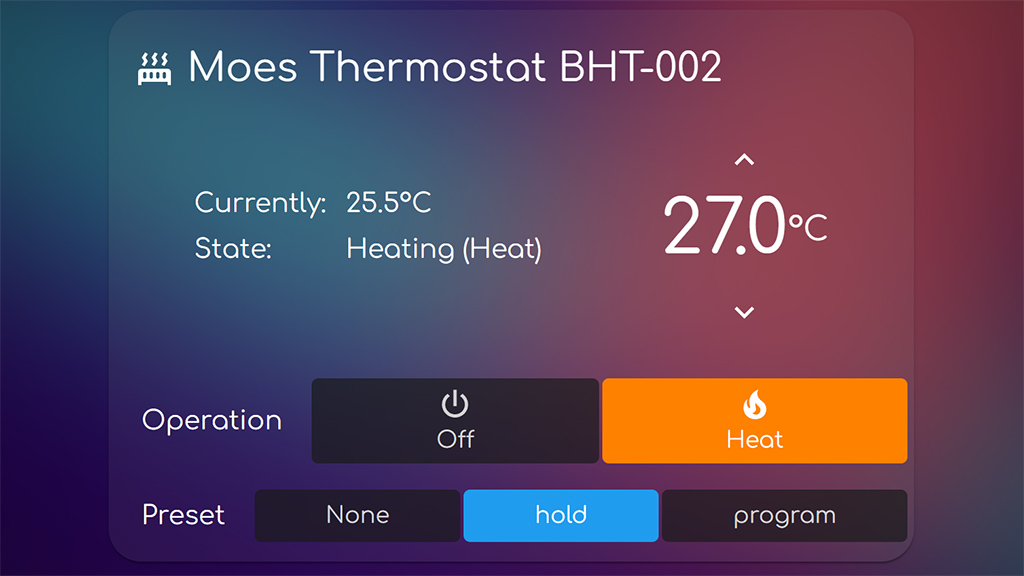
This Moes Smart Thermostat is packed with features, capable of automating your heating system all by itself. It’s fully programable and with some interesting capabilities for calibration and control. First, refer to the image bellow to understand the basic features of the display:
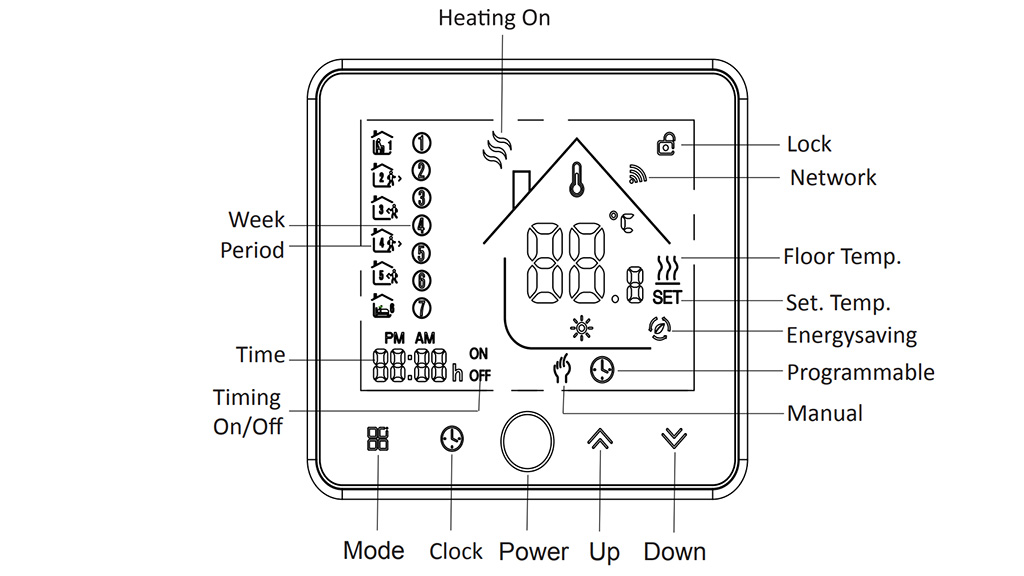
The programable options are pretty self explanatory and available on almost any thermostat. This is a fairly standard set of features also found in traditional (dumb) thermostats. What’s interesting is, the thermostats system setting can be adjusted right from the control display using the buttons without the need of an app/hub/integration.
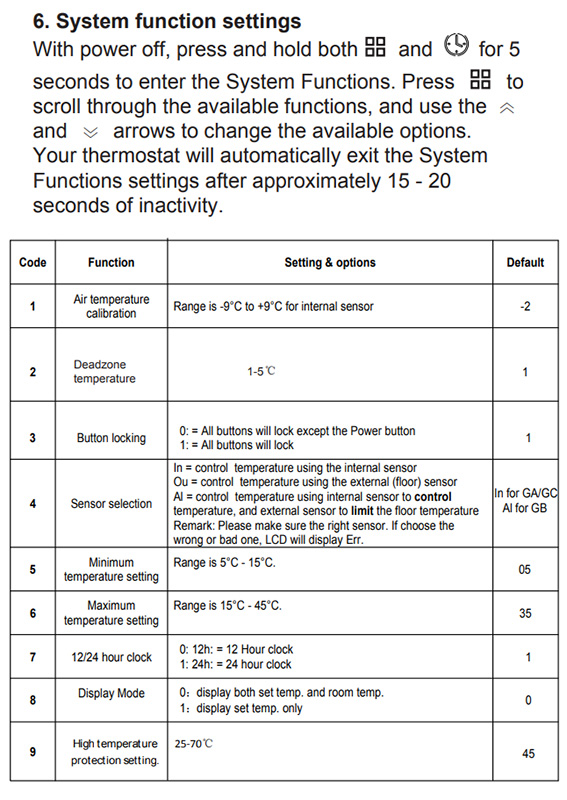
You can calibrate the sensor temperature, lock the buttons on the thermostat and set a minimum and maximum temperature setting. Settings like 12/24hour clock can also be changed as well as cycle between two display modes. Switching from C-Celsius and F-Fahrenheit is also an option.
Most of these setting are directly accessible through your ZigBee integration, so no need to bother to adjust them from the built in settings menu. The Sensor Selection is one important adjustment you must do to ensure proper operation for your use case (this is also available in Z2M).
Correct Sensor Selection
Upon initial installation of the thermostat, a default sensor type will be selected automatically for the appropriate model of the device:
- IN – GA/GC (Water Heating/Water or Gas Boiler
- AL – GB (Electric Heating)
To use an external sensor, you need to change the selection to EX. You can change this setting in one of two ways:
- Using your ZigBee integration in Home Assistant
- Using the settings menu on the Moes Smart Thermostat (See Picture Above!)
Whichever method you choose, three options will be available:
- IN – Only Internal sensor used – To control or limit the temperature
- EX – Only External sensor used – To control or limit the temperature
- AL – Both Internal and External sensor used – Internal sensor to control the temperature, External sensor to limit the temperature
IMPORTANT: If you decide to connect an external sensor, you need to change the setting to EX or AL. Otherwise the thermostat will display an Err on the display and will not work!
Integration Compatibility
The Moes Smart Home Thermostat BHT-002 is officially supported in all three major ZigBee integrations, ZHA, Zigbee2MQTT and Deconz.
To pair it, first switch the thermostat off. Press and hold the temperature down button for +- 8 seconds to enable the pairing mode (display lights up and a Wi-Fi-like icon is blinking). After a successful interview with the coordinator you can turn the thermostat on again.
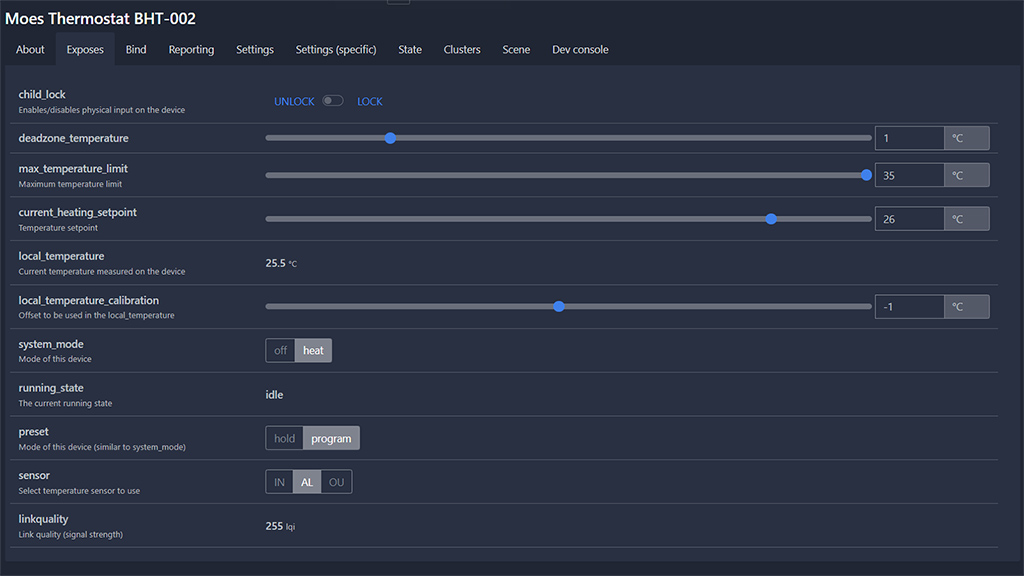
Once paired to your coordinator, the thermostat exposes a bunch of entities for settings and control:
- Lock Entity: For locking the touch control buttons
- Number Entity: Deadzone Temperature – The delta between local_temperature and current_heating_setpoint to trigger Heat
- Number Entity: Maximum Temperature Limit – Used to set the maximum temperature allowed
- Number Entity: Temperature Calibration – Used to calibrate the temperature reading of the sensor
- Select Entity: Used to select the sensor (IN, EX and AL)
- Climate Entity:
- current_heating_setpoint: Temperature setpoint
- local_temperature: Current temperature measured by the sensor
- system_mode: Main mode of the device (Off, Heat)
- preset: Preset mode of the device (Hold, Program)
- running_state: The current running state (Idle, Heat, Cool)
- local_temperature_calibration: Offset calibrate the sensor temperature (local_temperature)
- Linkquality: Link quality (signal strength)
Usage
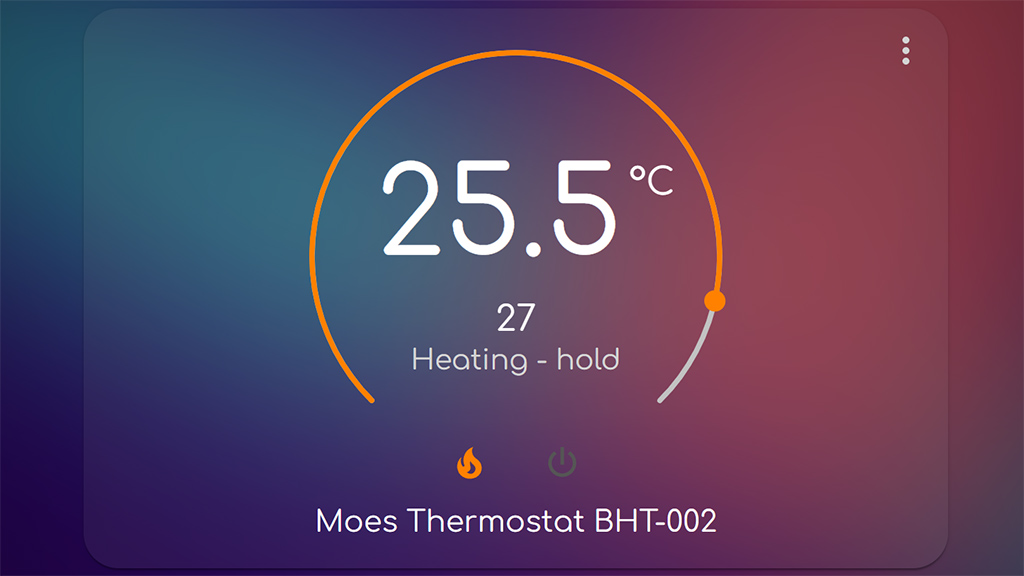
You can use the Moes Smart Thermostat right after integrating it in Home Assistant without any further setup. The climate entity contains all the basic functions you would need to start controlling you heating system. In this section, we are going to suggest a way to supercharge its function – the Scheduler Card by dev nielsfaber.
As an alternative to the built-in thermostat card, we suggest using the custom Simple Thermostat Card by nervetattoo. It’s highly customizable, contains many configuration variables and you can make it very compact and style it to your liking.
Scheduler Card & Component
The easiest way to setup programs, schedules and thermostat rules we are going to use the Scheduler Component and Scheduler Card. This particular custom card (works on top of the component!), has a very easy and user friendly UI when setup. It’s capable of creating schedules and rules on the go, so lets see it in action.
Assuming you have already installed the custom component and custom card (preferably via HACS), we can go ahead and create our card in Lovelace:
#Scheduler Card for Moes Thermostat BHT-002
type: custom:scheduler-card
include:
  - climate.moes_thermostat_bht_002
discover_existing: false
title: Moes Thermostat Schedule
This will create a small card with a master switch for your schedules and rules. Triggering this switch, entirely disables anything you have created within the card. Once done, click Add and select Make Scheme than click Next:
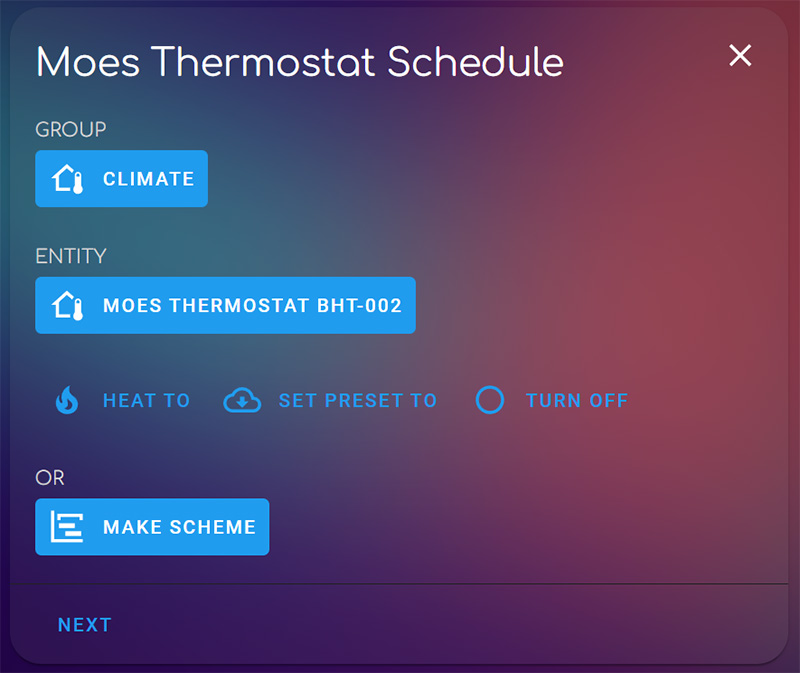
This will take you to the next screen, where you can create custom schedules by time, days, workdays, weekends etc. The Scheme bar in the middle is a time frame of 24hours, to which you can add additional hour frames to by using the ADD button.
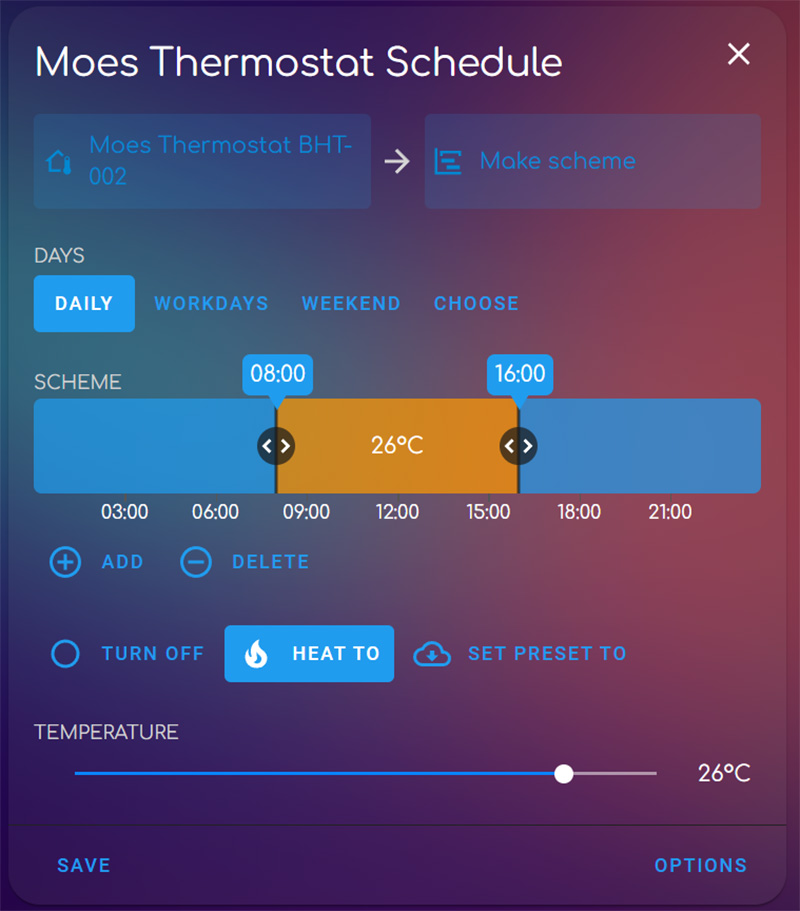
Here you can select a bunch of different options and set the thermostat to Heat accordingly. The scheduler card will control the Thermostat according to your rules and schedules. If you want to discover all the options this component/card combo offers, read our guide. Once you are done, hit save. The card collapses and is shown simply as a small list.
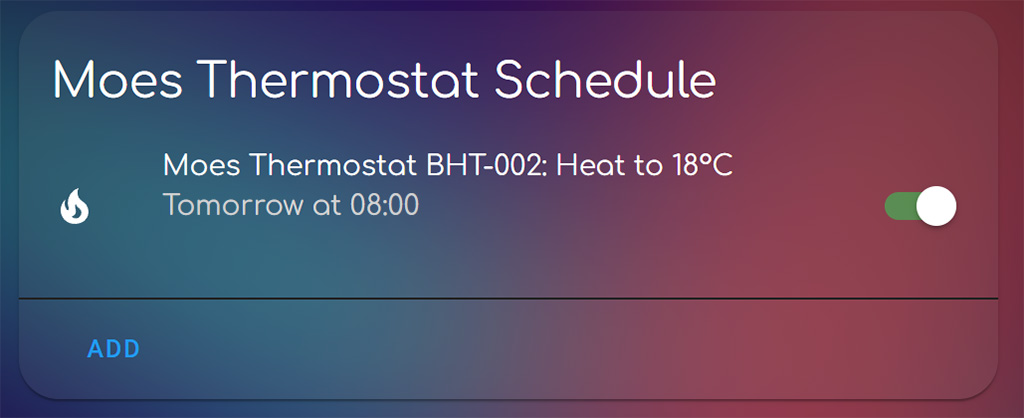
You can edit you schedule anytime by clicking its name, make any changes and additions or toggle the master switch for quick turning off/on.
Verdict
The Moes Smart Thermostat BHT-002 is a very capable and versatile small thermostat. It looks good mounted on a wall, it’s cheap and can be easily integrated in Home Assistant. There are a few cons we didn’t like though, so lets summarize:
- PROS
- Cheap
- Home Assistant Compatible
- Major ZigBee Integrations Compatible
- Built-in Touch Buttons for quick control
- Built-in System Settings for setup without connectivity
- Additional Terminals for External Sensor
- Automatic Screen Timeout
- Child Lock
- Easy wiring and installation
- CONS
- Screen is too bright
- Screen content fades when looking at it from top or bottom (weirdly not from left or right!)
- Wi-Fi Version is Tuya based
- Built-in Temperature Sensor needs calibration
- -2°C in our case
- External Temperature Sensor needs calibration
- -1°C in our case
This smart gadget will control your HVAC without issues. Considering it’s easily brought into to Home Assistant, its functions and potential is supercharged. If you would like to test it out for yourself, consider ordering through one of our affiliate links bellow.
Moes Smart Thermostat BHT-002
*N/A links will be added when available


Maybe I miss it somehow, but, regarding the external sensor, does it need to be 10k too like built-in sensor or…?
Guess it does not come in package.
No, you would have to supply the external sensor yourself. The thermostat only offers “an option” for an external sensor. You can plug in any temperature probe and it will work
Is 3A water underfloor version also relay based and clicky or is it modulating TRIAC based?
Hello,
They all have good relays. The version I currently have is 3A. Works good and has a good clicky relay.
Cheers
Good relays, I hope for dead silent relays suitable for bedroom.
Hello,
We have a central heater in the building. My apartment has 3 wires coming out of the wall. The 2 are N and L (AC) and the third gives the order to the heater to turn on and off. I connect N to number 3 and L to number 4. Where do I connect the third cable, 1 or 2? Thank you
Hello,
Central heating can mean a lot of things. Is it a water boiler? Is it a floor heating system?
Since you only have 3 wires, I would first make sure what their loads are with a multimeter.
After that, take a look at the wiring image above, especially the wiring for version GA.
You would probably have to bridge the neutral wire and connect it to terminal 2 and connect the remaining wire to terminal 1. However, you need to make sure first with a multimeter.
Where do those wires connect? What is the exact heater type?
If you send me some more details at admin@smarthomescene.com I’ll be happy to help.
Cheers
Can the screen be dimmed?
Nope, I don’t think so.
It has a really short cooldown though, so the backlight turns off when not used.
anyone else find the internal clock on this drifts out of sync over time?
makes the built in scheduler fairly useless.
still happy with the unit tho, zigbee on a budget and i can take care of the scheduling via HA.
Hello,
very nice review. Actually one of the kind I would say. I have also a dummy question. I am having a heating floor so I use the variant (BHT-002-GALZ the ZigBee one). Everything looks to work probably fine except that the display goes on randomly at night but I don’t know why. Could you please tell me what I did wrong?
Yours sincerely,
Hans Dieter
Hello,
I am experiencing no such issues with the BHT-002. It is sleeping most of the time, it only lights up when I use the buttons on the control panel. Do you have any other idea what might trigger it?
Cheers
Hello SHS,
maybe the sensor settings. I believe in all of them where on both internal and external reading the problem. I need to speculate it today and I am going to give you a feedback tomorrow. The other thing are the electronic valves that they Co operate with the Sensors. Maybe they are giving a pulse or something as feedback every time they reach the maximum temperature or something.
Yours sincerely,
Hans-Dieter
Same here with the light. Did you find a solution?
backlight goes on if also when some settings are changed remotely (via app or ZigBee) – in my case it lights up every time when I change temperature set point via Zigbee2Mqtt
Hello again,
I could not fix it, can it be the ZigBee gateway? Should I set them offline? Can I have connected them actually on the valves wrong? They light up random times at the night and the light is ofc not dimmbar…
Can these valves give the wrong info back?
https://www.straub.de.com/index.php?path=products%7Cego
Yours sincerely,
Hans-Dieter
Hi Hans-Dieter,
i have the same Proble with 4 of BHT-002-GALZ 🙁
I use this with Home Assistant and Z2M
Every working fine, except this 🙁
My gas run HVAC system has 5 wires, mapped to RH, C, Y, W and G on my current thermostat. Would this Moes unit be compatible?
Question So does this have 6 period 2 required+ 2 optional, is the schedule settable by z2m?
The Thermostat itself has a bunch of different schedule programs built it, however I suggest using the Scheduler Component and Card Combo to create schedules. For this purpose, its easier and more seamless than creating automations in HA.
Thanks for the detailed review! A couple follow-up questions please:
– I’m having issues accessing the System Function settings by holding the mode and clock buttons for 5 seconds…perhaps I’m doing something wrong?
– in the article, it mentions an option to change from C to F for temperature display units…how is this done exactly? Can it be done via the controls on the unit itself, or through Z2M (I’m not seeing this setting anywhere?)
hi. ZigBee version, working well with zha?
I saw some comments about offset temperature problems
You can calibrate the temperature offset
How? Even with the ts0601_electric_heating.py quirk it is not possible. Another problem that still does not work is displaying the correct time in the panel. Any idea why?
I have 7pcs installed around the house for electric heating. Internal sensor is set for the temperature control. Every time when device is ON, it heats up itself, which results in incorrect temperature measurement by internal sensor (+3…5deg in 30min) . Changing to EX sensor is not an option because I need to control the room air, not floor temperature.
Solution I have found is to install separate standalone temperature sensor in the room and use that readings to calibrate the thermostat (adjust offset) in HA. Works just fine!
When I try to pair this device with MQTT2
(“Switch the thermostat off. Press and hold the temperature down button for +- 8 seconds to enable the pairing mode (display lights up and a WiFi-like icon is blinking). After successful interview turn the thermostat on again.” Source: https://github.com/Koenkk/zigbee2mqtt.io/blob/master/docs/devices/BHT-002-GCLZB.md )
the device still does not show up on the frontend. What should I do?
Silly question, did you click Permit Join (All) at the top to allow new devices to join your network?
Are you getting a green popup in Zigbee2MQTT in the top right corner?
Hi, am I missing something here? I have the ZigBee Boiler version working with ZHA, but the only entities exposed are:
– climate.heating_controller_thermostat
– sensor.heating_controller_hvac_action
I can change the heating mode, but nothing else.
Also, the system settings are not available in ZHA or on the device itself ie by pressing the mode and clock buttons at the same time?
This one:
https://www.amazon.co.uk/MOES-Thermostat-Compatible-Google%E3%80%90Only-Available%E3%80%91/dp/B095HYFFML/ref=mp_s_a_1_3?crid=3T2GV53EKOTWC&keywords=moes+zigbee+thermostat&qid=1695719822&sprefix=moes+zigbee+ther%2Caps%2C141&sr=8-3
Any thoughts?
The climate entity contains everything this device exposes to ZHA.
Target temperature, modes, presets.
The only thing missing is the local temperature sensor?
Hello! Indeed this thermostat (Zigbee) is perfect for my home but I don’t know how to find the local temperature sensor in HA? There are configurated in Z2M and the HA native card for thermostats working. But I can’t find the local temperature to build histories in HA and use it with another components.
Thank you
The temperature sensor is automatically exposed to Home Assistant under the sensor domain and device name.
E.G.
sensor.[device_name]_local_temperatureor
sensor.moes_thermostat_local_temperatureCheers
Hello,
I recently purchased a Zigbee Series 006 GA thermostat for water underfloor heating.
My boiler can heat the water in winter and also cool the water in summer.
I would like to know if there is any possibility for these thermostats to be able to change the parameter from heating mode to cooling mode.
I see in the promotional images that the device has the icon (blue snowflake) and the software development, in my opinion, would be easy to implement. The relay actuator should only be changed when it exceeds the target temperature.
This is exactly what a thermostat does, no?
If you are talking about keeping another built-in thermostat wired after this one, than no, I would suggest not doing that.
Otherwise yes, what you are describing is exactly how this device functions.
I have 3 of the BHT-002-GCLZB connected to a Sonoff ZBdongle-P coordinator running Z2M (v1.33.1-1). I am having terrible problems with the local_temperature_calibration. When I try to change the value in Z2M using the slider, there is some kind of overflow error that makes it jump between random values in the order of -15767960 and 149202536. This completely messes up the local temperature temperature value, so it’s either showing something like -50.4 C or +125 C and makes the unit unusable. I’ve tried to set the local_temperature_calibration value using a different tool like MQTT explorer but it yields the same result (it can correctly set other values of the thermostat). These thermostats worked last winter when I installed them and I don’t remember having any problems with the local_temperature_calibration back then. I assume the problem is to do with a later version of Z2M or something else. Any tips what else might be able to try?
Hey Phil,
I’ve never encountered this error before, maybe you should open an issues on github?
I’ve seen that too. I persevered and got there in the end. I try to avoid touching them now!
this happens because the device accepts only INT values. If FLOAT is sent, it goes crazy…
Hi, Thanks for the review! The WiFi versions of these thermostats only provide temperature measurements in 0.5°C increments, which really isn’t that great. I wonder is this still an issue with the Zigbee version?
Yes, same with the Zigbee version.
I’ve had 2 Moes thermostats (Zigbee), one like this one and a latter version with a better looking front glass panel.
The original one just didn’t work properly when I mounted it on the wall. It seemed that it was getting random button presses that made the set temperature just go up and up!
So after a few months I tried again with the more modern looking version and that worked fine. Well it did for 6 months or so when the heating just came on and stayed on. The display showed everything was normal but clearly the relay had stuck in the on position!
I then changed the relay board with the board from the original thermostat (same design and plug connector) and got a few more months out of it before that relay stuck! Not sure what to do now. Either the relays are very poor quality or my boiler is massively inductive or something causing arcing and the contacts to fuse. Funnily enough, I can still here a click when when the relay should be turning off but not on! I might buy a 16A version. Can’t find any other manufacturer doing a zigbee thermostat.
Seems like maybe you are over the rating on the relay or like you said, something is causing the relay to fuse.
I would check the wires with a multimeter before taking any other actions.
I had an unused Sonoff Basic lying around so I flashed it with Tasmota and wired it into the CH/HW distribution box. Home assistant knows when the Moes thermostat wants the boiler on so I added an automation to turn the Sonoff basic on and off accordingly.
Neat and simple. Thanks for sharing.
Have installed 7pcs during 2 years. Actively looking around but didn’t find anything better for electric heating (using ZigBee version).
PROS: very low price, good functionality, nice design, slim&compact, all functions/settings available via z2m.
CONS: internal temperature sensor is warmed up during thermostat operation; small issues with backlight; round on/off button stays always green (could change to red if thermostat is ON); thermostat works with INT numbers only via zigbee.
Hello everyone, I have 2 Moes thermostats (BHT-002-GA for water-based underfloor heating with Zigbee) and both have a problem with spikes in the temperature measurement in Home Assistant. At irregular intervals, the TARGET temperature jumps very briefly (just 1 second) to e.g. 1.112.956.182 °C or even just 1.233 °C. This destroys the history diagram so that I can no longer recognise anything on it.
Does anyone know how I can stop this behaviour?
This behaviour does not occur with other thermostats (e.g. for radiators) in Home Assistant.
Does anyone know of a way to display only the current temperature as a graph in Home Assistant?
Hello, great info here. Having trouble, may be someone can assist. The zigbee coordinator (using ZHA) finds the device no problem but the interview completes instantly and there are no attributes – blank. I tried delete and repair many many times. any thoughts?
You are either running a really old version of Home Assistant/ZHA.
Or your device needs a custom quirk. Share the model and manufacturer from ZHA
Thanks, My HA is up to date everything. Here is the device info:
“manufacturer”: “_TZE204_aoclfnxz”,
“model”: “TS0601”,
“class”: “zigpy.device.Device”
You are in the right path I think the device was purchased in Nov and they may have changed something and it seem ZHA did not find the right quirk.
You device is not getting the proper custom quirk from ZHA.
Here’s how to add it for this thermostat:
https://community.home-assistant.io/t/popular-moes-thermostat-not-showing-entities-after-zha-pairing/641041/12
Works now, Thank you !