Over a year ago, I reviewed and tested a pretty solid 3-phase clamp energy meter from Tuya, labelled as model PC321-Z-TY. As all things Tuya I review, this is a Zigbee device, with an external antenna for better reception and clamps that can go up to 500A per transformer. I still use it to this day as the main energy meter in my home and I’ve found it to be very accurate.
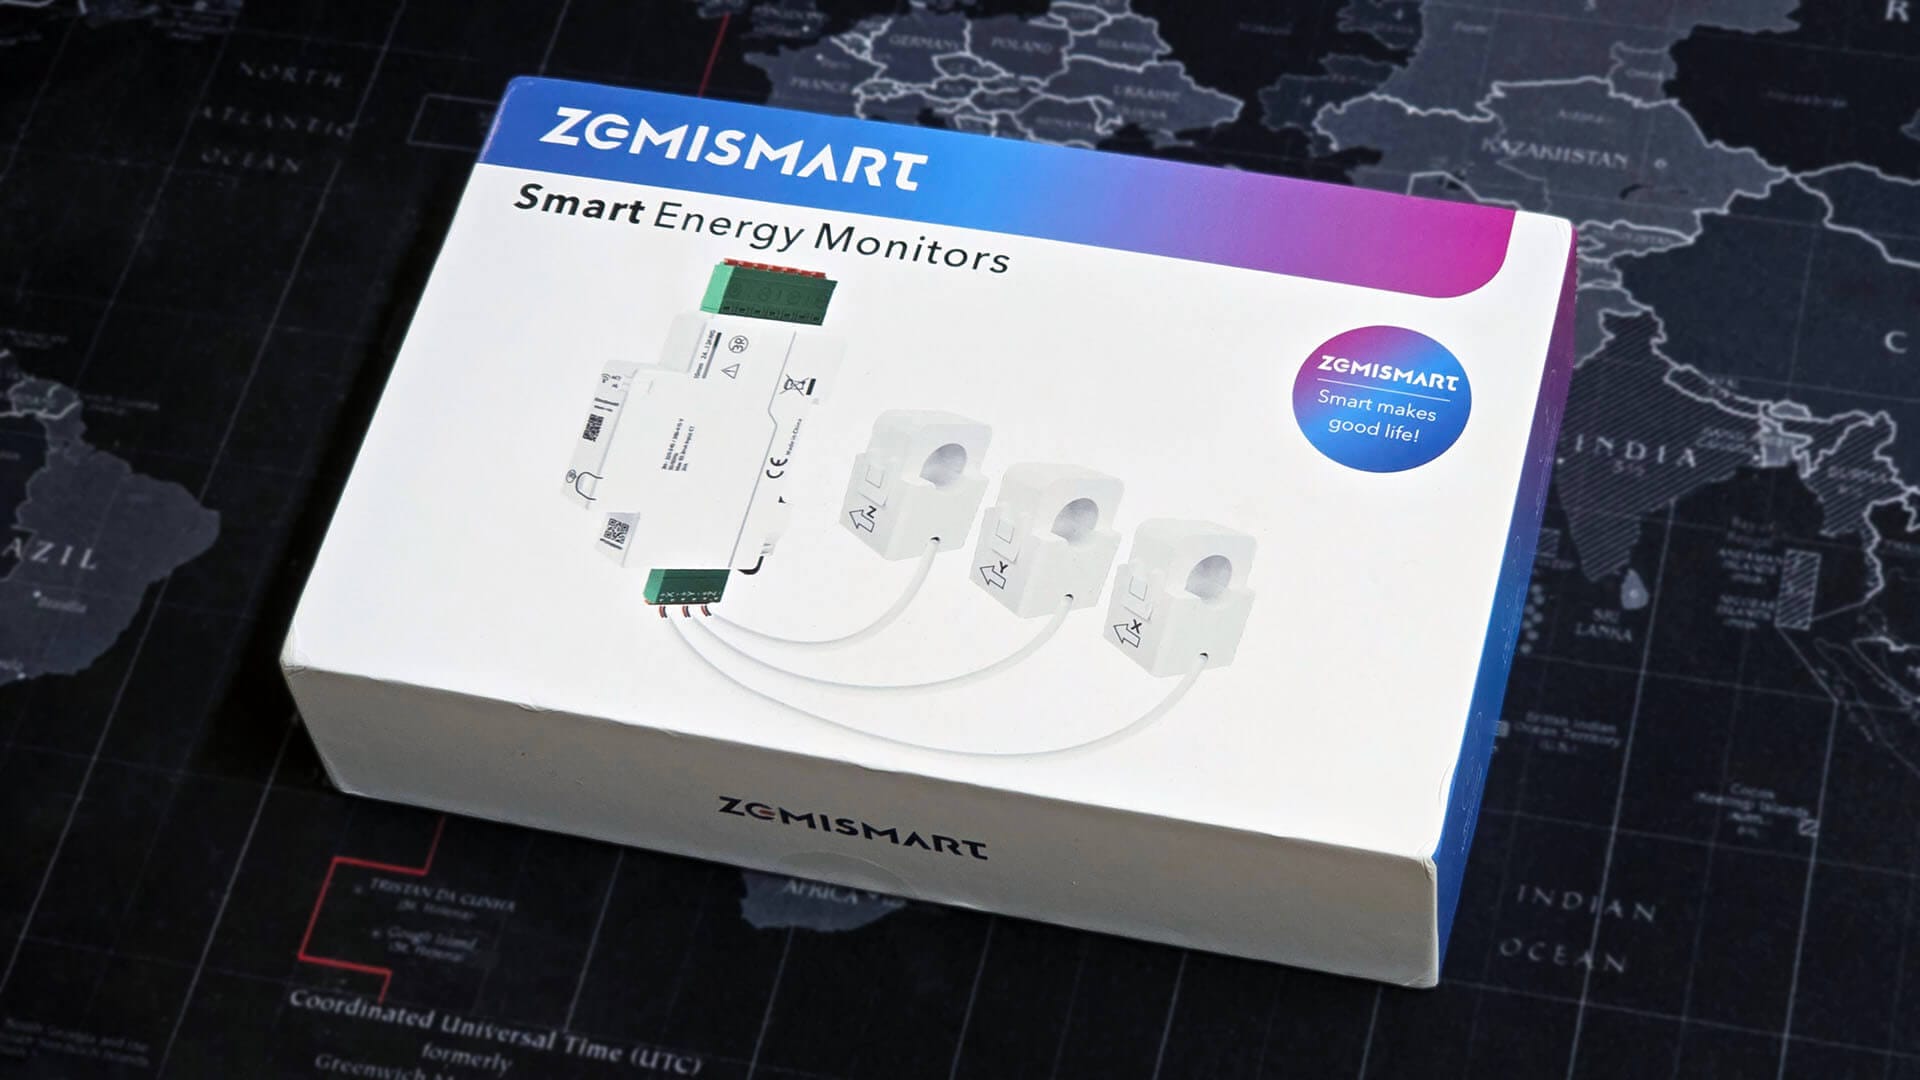
In this article, I am testing and reviewing a similar device from Zemismart. This is also a 3-phase Zigbee clamp energy meter, labelled as model SDM01-TZ0. The device is designed to be DIN-rail mounted and ships with 120A clamps. I got it off AliExpress for less than $80.
Technical Specification
- Name: Zemismart 3-Phase Energy Meter
- Model: SDM01-TZ0
- Connectivity: Zigbee 3.0
- Current Transformers: 3x120A
- Measurement Accuracy: 1%
- Input: 120-240V AC, 50/60Hz
- Bi-directional: Yes
- Dimensions: 113.7×65.9x18mm
- Price: $77.57 AliExpress | AliExpress
Package Contents and Teardown
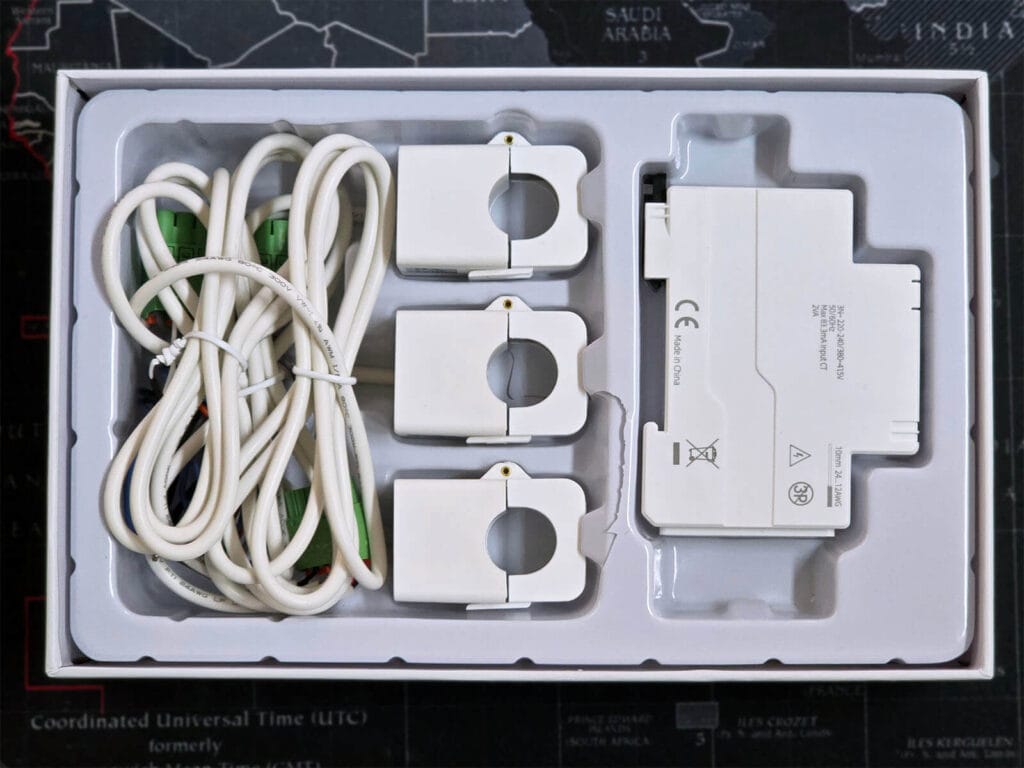
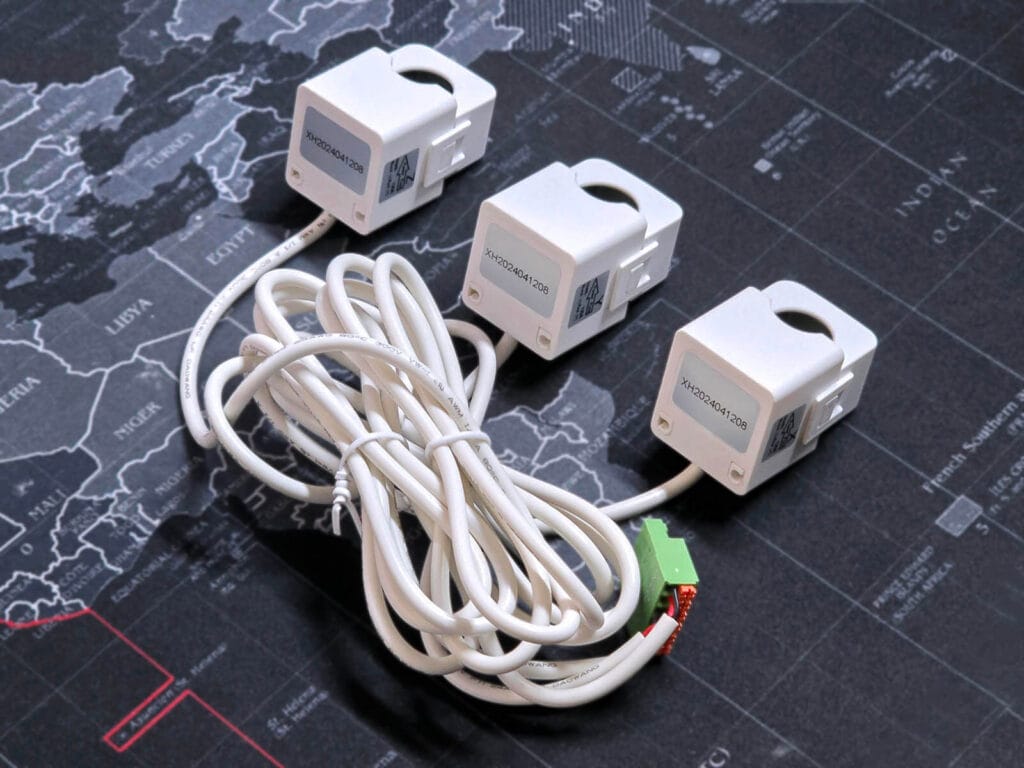
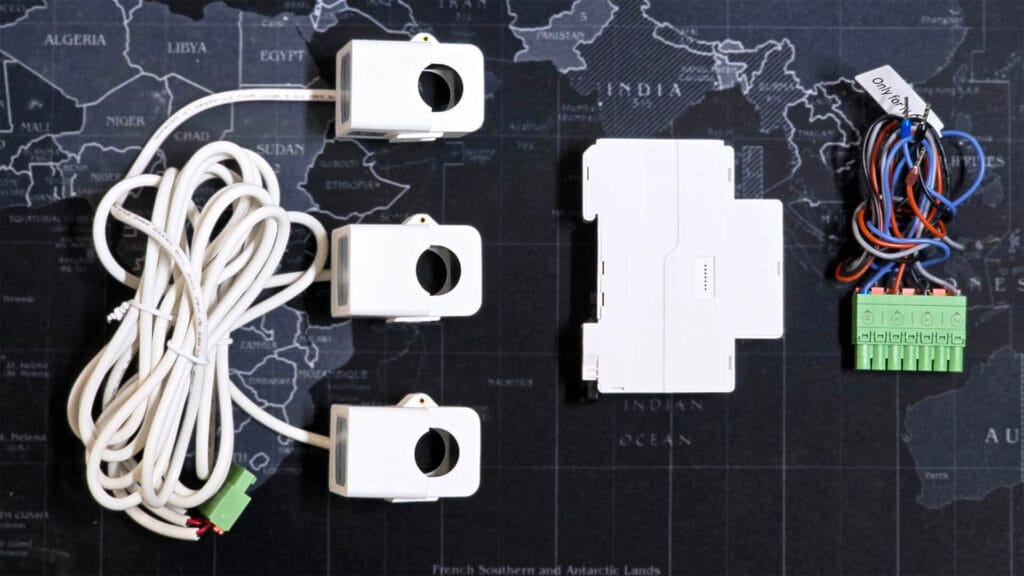
The Zemismart SDM01 Energy Meter came in a high-quality box made from thick carton, containing the device, three CT clamps with connectors and a user manual. Everything is neatly packaged and protected from shipping damage.
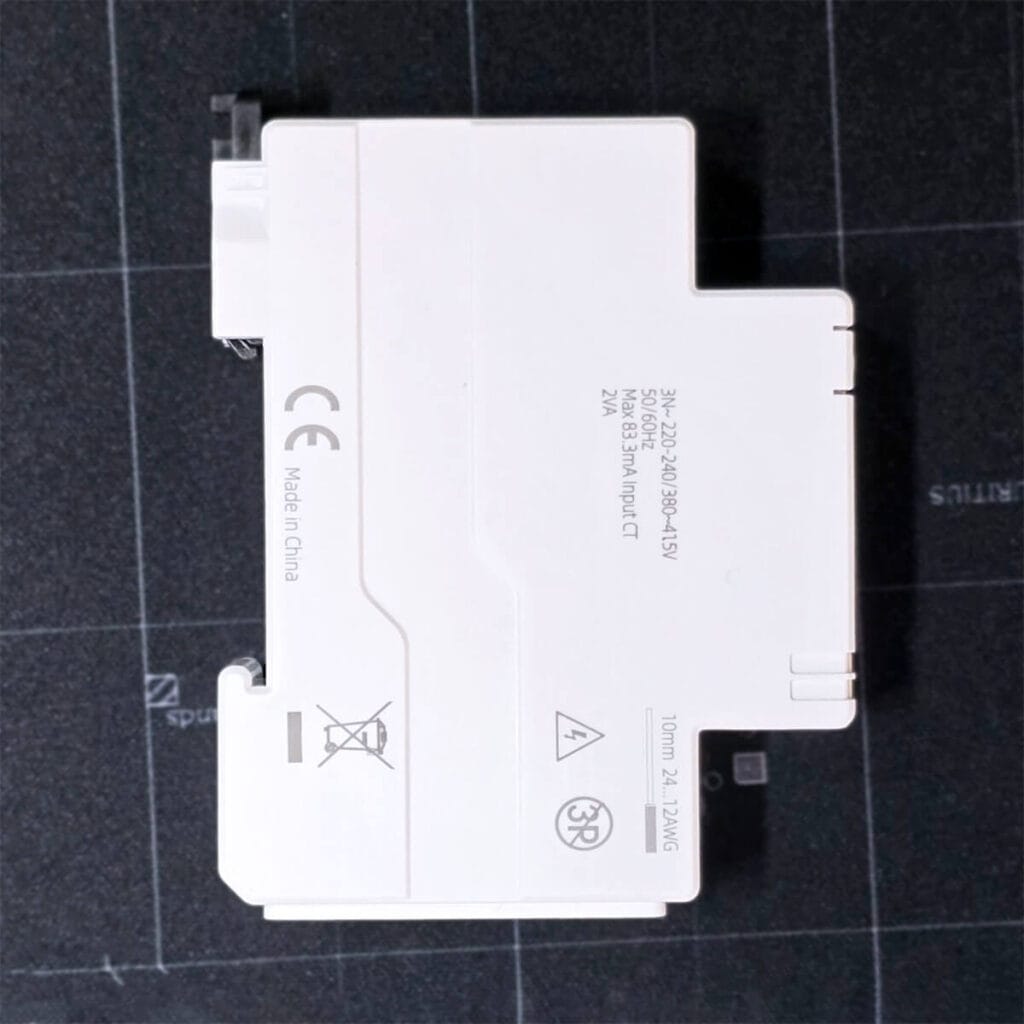
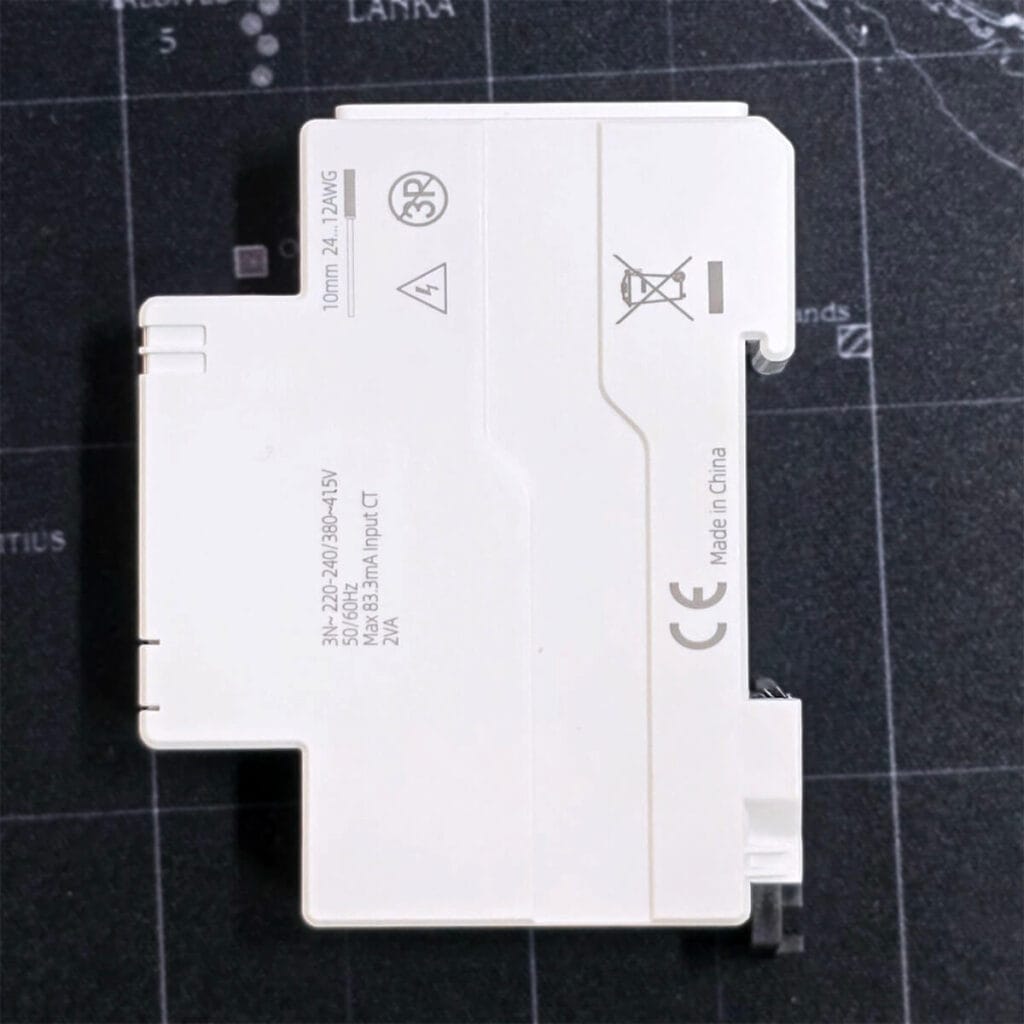
The device has a size of 113.7mm x 65.9mm with a thickness of 18mm. It’s designed to be installed on standard DIN rails and includes a safety clip on the bottom. The device feels compact and well-built when handled, but not heavy. On both sides, some basic device info is printed, notably the input voltage.
On the top side of this device, goes the terminal block connector with all input wires. This contains the three phases and the neutral, which is required for powering the device and obtaining the voltage reading. It’s a large, well-made terminal block with all wires pre-attached. The other ends of the wired are crimped, so you have an easier time connecting them to your installation.
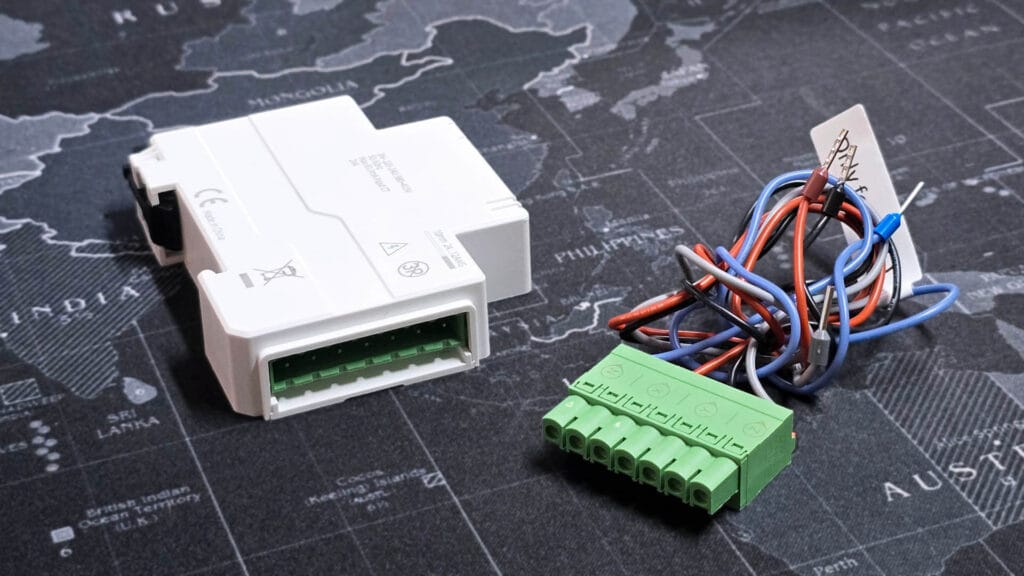
On the bottom side of the device, the three CT clamps are connected. These also use a terminal block connector that slots nicely in place. If you need to shorten or extend the wires, they can be easily released from the block by pressing the quick couplers.
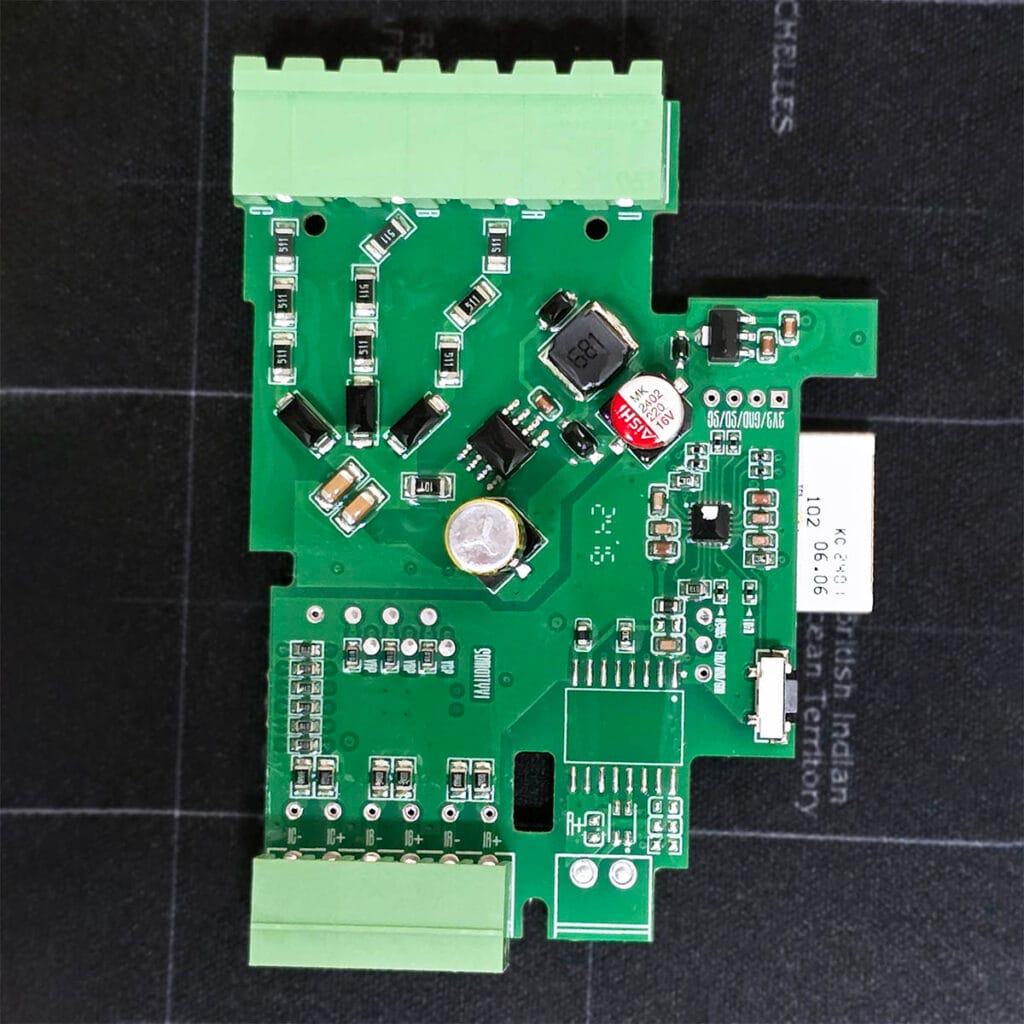
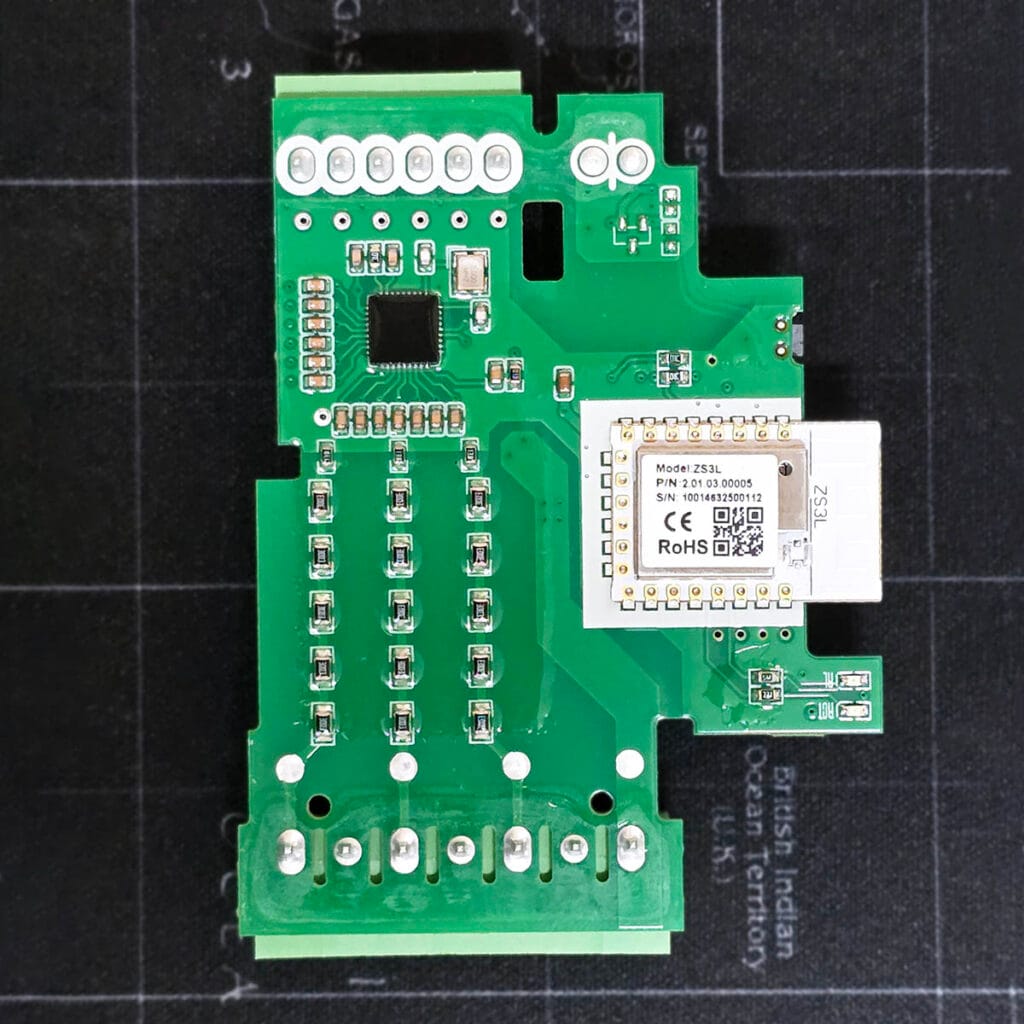
The Zemismart SDM01 was relatively easy to pry open. Once open, I was impressed by the layout and extremely clean PCB. The solder and traces were super clean and everything was so neatly arranged. I did not notice anything I didn’t like inside the Zemismart SDM01.
The device uses the Tuya ZS3L [Datasheet] module for connectivity, which is one of the most frequent SoCs I discover in Tuya devices. It’s found in the Moes ZSS-LP-HP02 Occupancy Sensor, this new Tuya HC-T010 Thermostat and most recently the Zemismart 4-Channel Wireless Scene Switch. It operates well and is quite reliable.
Once I assembled the device back together, everything was ready to be connected and installed. Since I already have the Tuya PC321-Z-TY installed and in use, I will be comparing their data throughout the rest of this article. For reference, I’ve had both installed for quite some time gathering energy data in Home Assistant.
Installation and Wiring Diagrams
The wiring and installation of the Zemismart SDM01 is quite involved. Even though not difficult to understand, it does require attaching wires, clamps and actually mounting the device on your DIN rail. If you are unsure in your ability to install the SDM01, do not attempt it yourself and hire a professional.
Zemismart offers official wiring diagrams that very well laid out:
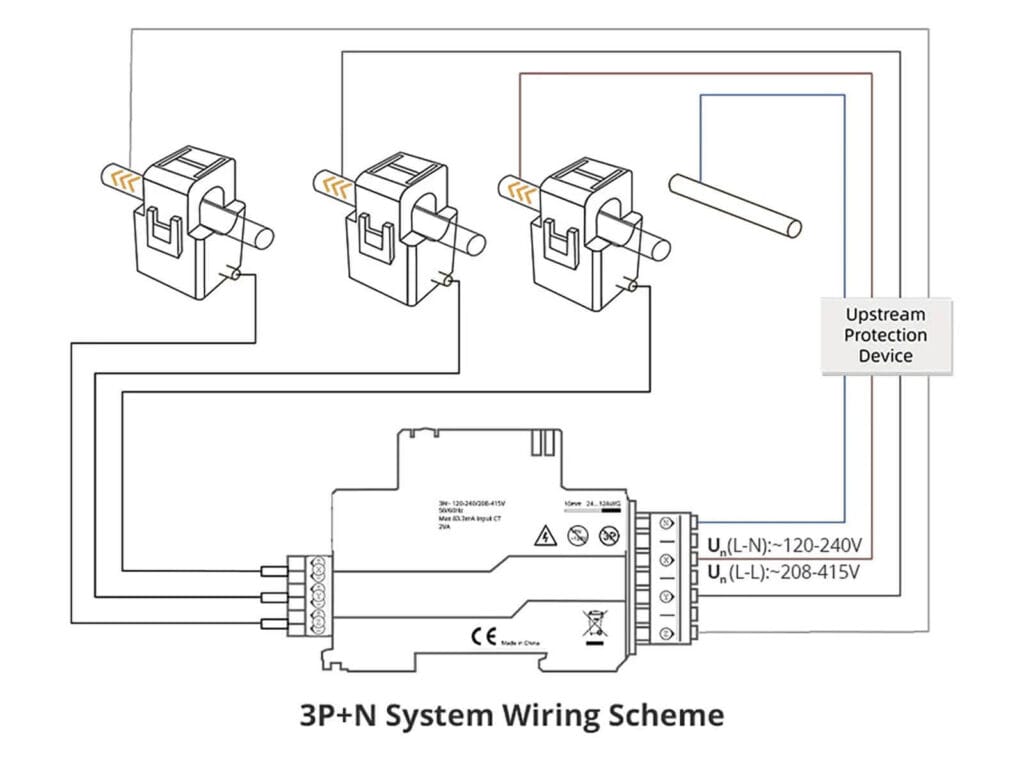
This wiring is for a 3-phase system with a neutral (3P+N), typically used in industrial and commercial applications as well as many residential installations in Europe. To wire it, connect the three phases (L1, L2, L3) and plug in the terminal block connector. Then, connect the current transformers (CTs) to the device and attach them to each phase. Ensure the CT clamps are correctly oriented, as indicated by the arrows on the diagram, to measure the current flow accurately. The neutral wire (N) is directly connected to the energy meter, completing the circuit.
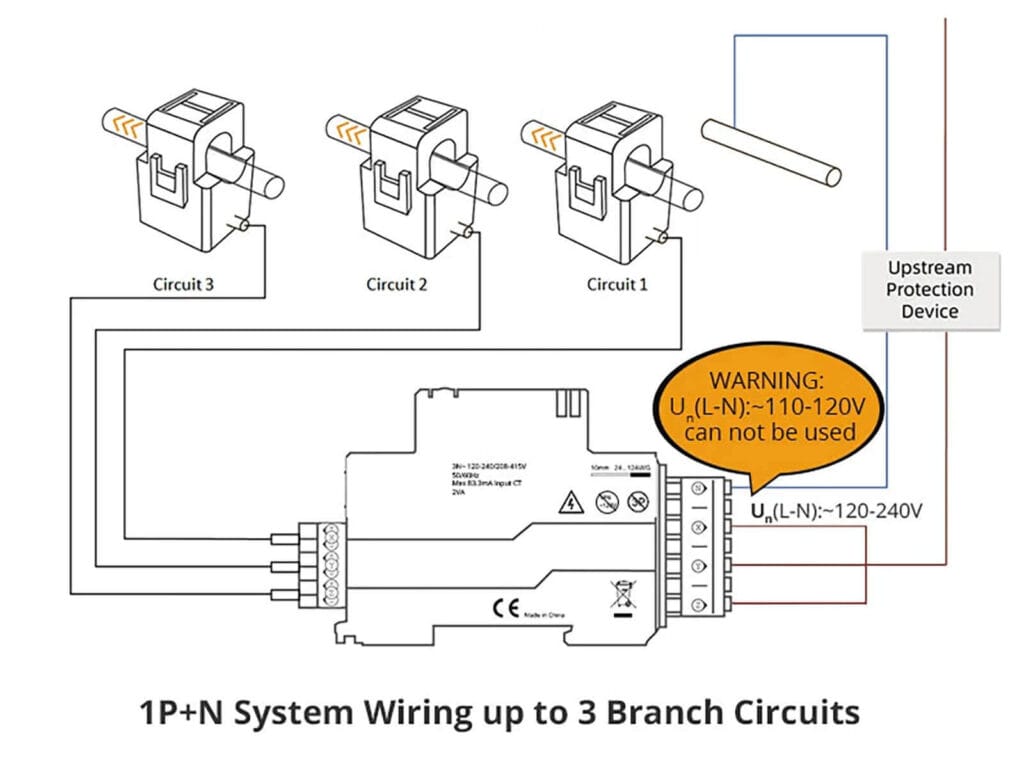
This wiring is for a 1-phase system with a neutral (1P+N), commonly used in residential and small commercial properties worldwide. To wire it, connect the single live phase (L) to the energy meter’s input terminal and bridge it to all three. Each branch circuit (Circuit 1, Circuit 2, Circuit 3) passes through its respective CT for current measurement. The neutral wire (N) is also connected directly to the energy meter. Ensure that the CTs are placed around the live wires of each branch circuit and oriented properly to ensure accurate readings. Note that this configuration requires a minimum voltage of 120-240V and cannot be used for 110-120V systems.
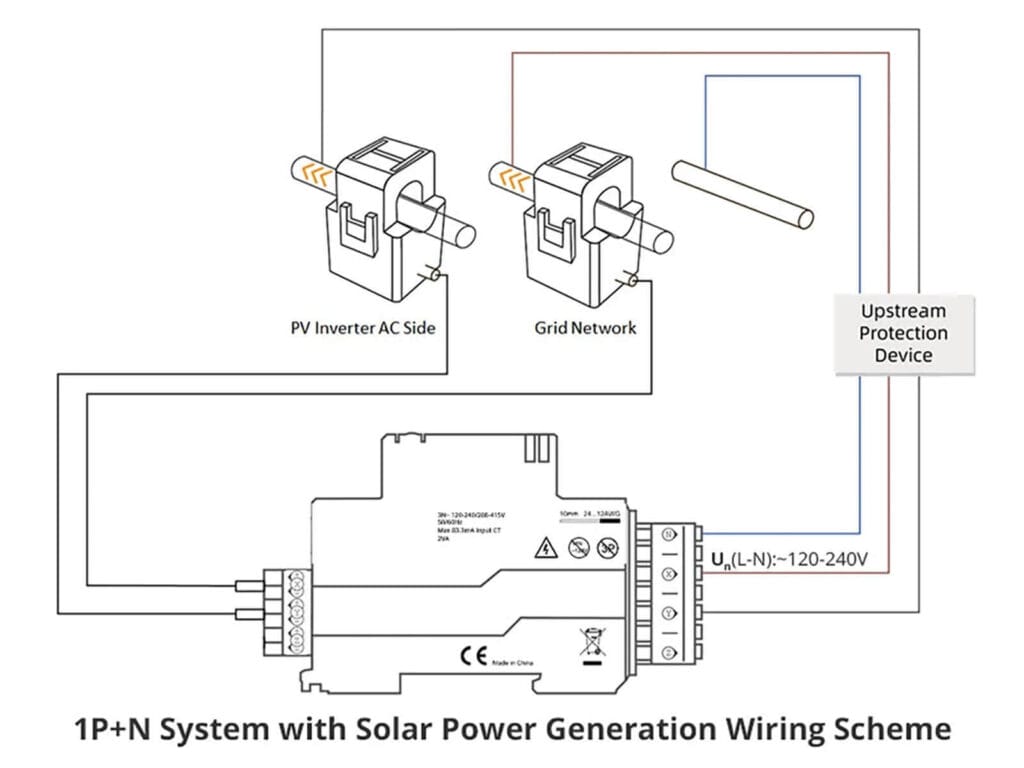
This wiring is for a 1-phase system with a neutral (1P+N), designed for solar power generation systems commonly found in residential properties with photovoltaic (PV) setups. To wire it, connect the live phase (L) and neutral (N) from the grid network to the energy meter. Attach one CT around the live wire of the PV inverter’s AC side to measure solar energy output and the other CT around the live wire from the grid to measure imported or exported energy. Ensure the CT clamps are properly oriented and securely placed. This configuration allows for accurate monitoring of both energy production and grid usage in hybrid solar systems, as the SDM01 is a bi-directional meter.
Home Assistant Integration
The Zemismart SDM01-TZ0 3-Phase energy meter is compatible with Home Assistant only through Zigbee2MQTT. To pair it, press and hold the button until the LED starts blinking and the device is discovered in Zigbee2MQTT.
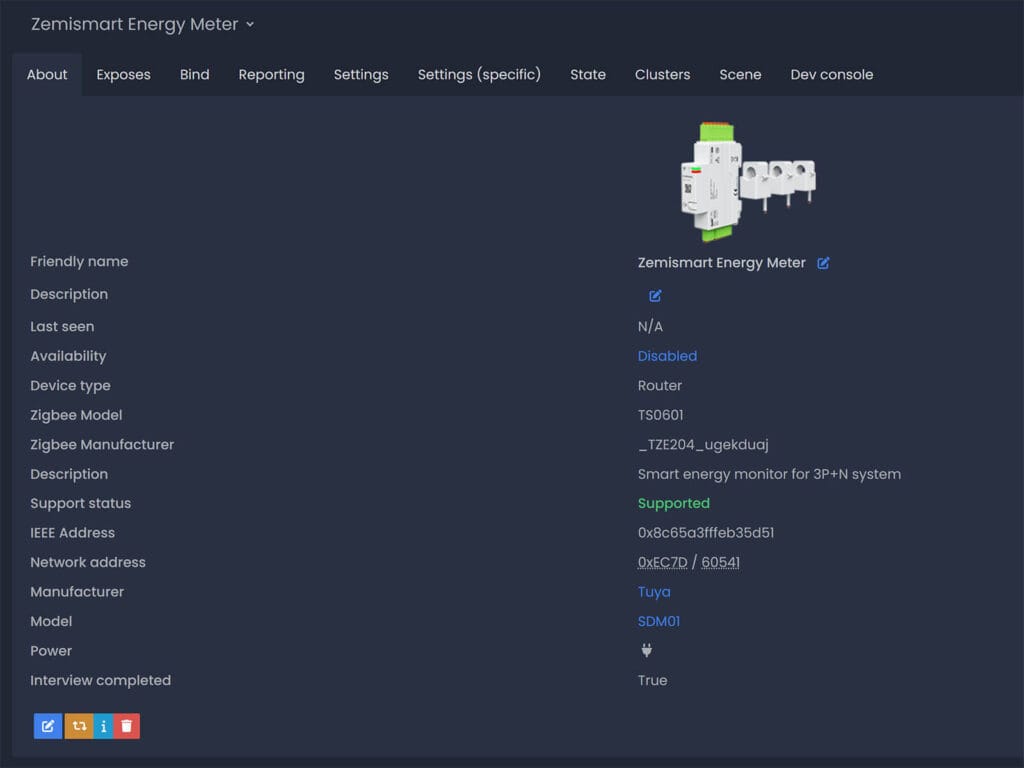
Once paired, the device is correctly identified as model SDM01 by manufacturer Tuya. It’s Zigbee model is set as TS0601 with Zigbee manufacturer ID _TZE204_ugekduaj. The photo and description are correct, as this device was added to the library a couple of months ago. It operates as a Zigbee router in the mesh network and exposes the following entities in Home Assistant:
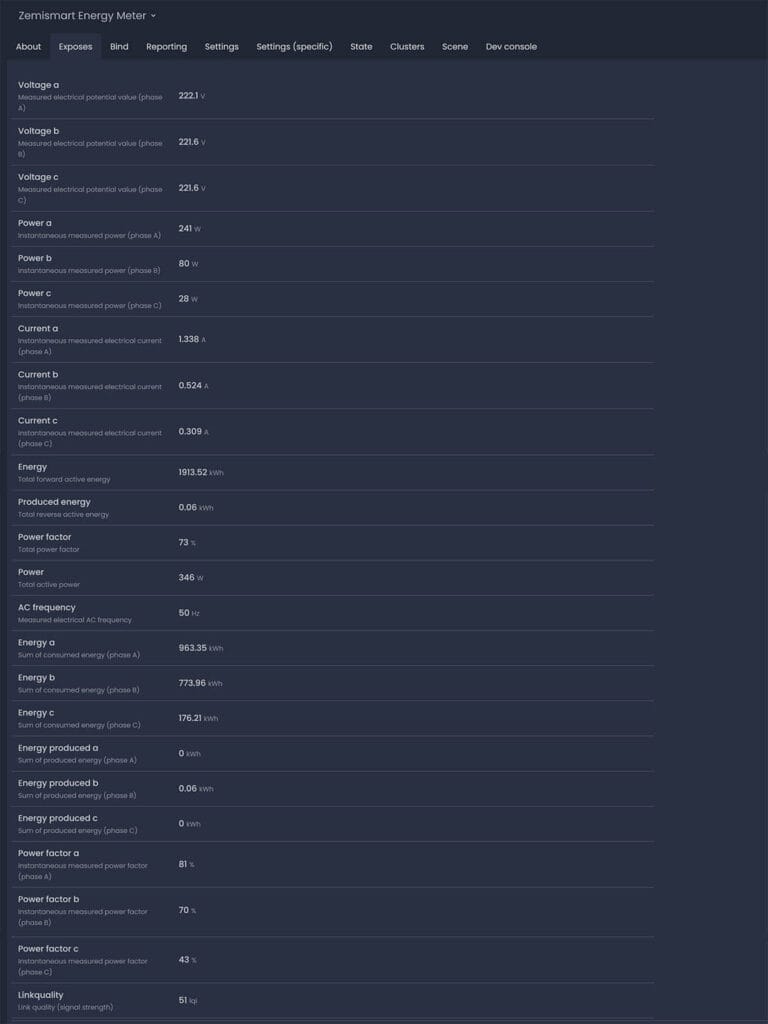
It exposes so many entities in Home Assistant, that it’s almost overwhelming to look at. But hey, that’s what we signed up for. The thing is, I would consider most of these sensors as having a diagnostical purpose as opposed to actual usability. If this is your first energy meter, you will discover that only few of these are actually needed.
- Voltage a, b, c: Measure the electrical potential for phases A, B, and C in volts (V).
- Power a, b, c: Instantaneous power consumption for phases A, B, and C in watts (W).
- Current a, b, c: Display the electrical current for phases A, B, and C in amperes (A).
- Energy a, b, c: Total consumed energy for phases A, B, and C in kilowatt-hours (kWh).
- Energy produced a, b, c: Total produced energy for phases A, B, and C in (kWh).
- Power factor a, b, c: Power factor efficiency for phases A, B, and C as a percentage (%).
- Power factor: Shows the overall power factor of the system as a percentage (%).
- Energy: Displays the total forward active energy across all phases in kilowatt-hours (kWh).
- Power: Shows the total active power consumption across all phases in watts (W).
- AC frequency: Indicates the system’s electrical frequency in hertz (Hz).
- Linkquality: Zigbee signal strength of the device in (LQI).
To integrate the Zemismart SDM01 in your Home Assistant energy dashboard, you would use only the main energy entity. It’s a sum of all phases totaling the amount used. It’s also possible to use this device as an individual meter, by monitoring 3 individual phases. In that case, you can add each phase as an individual energy meter in the dashboard. One example that comes to mind for this use case is monitoring a server room, along with your main PC and let’s say, a 3D printer.
Testing and Energy Benchmark
As I mentioned earlier, I would be comparing the Zemismart SDM01 with the Tuya PC321-Z-TY, both installed on the same three phases. It’s worth noting that I’ve verified the accuracy of the Tuya PC321 many times, comparing it to data from my utility provider. It’s very accurate overall, with a positive difference of 2% on average.
For the purpose of these benchmarks, I reset the Tuya PC321 before starting the data recording. I am also using the Power Flow Plus Card for visualization in Home Assistant’s dashboard. For start, here’s how the instantaneous power measurement per phase looks like on both:

You will notice both devices give the same exact reading across all three phases. In the image, Phase B shows a difference of 1W, reporting lower on the SDM01 versus the PC321. This difference is repetitive across all phases at times, but I’ve seen it keep within 2W at the most. It is not enough to create a tangible difference in the total energy data, especially since sometimes the SDM01 reads more and other times the PC321 does.
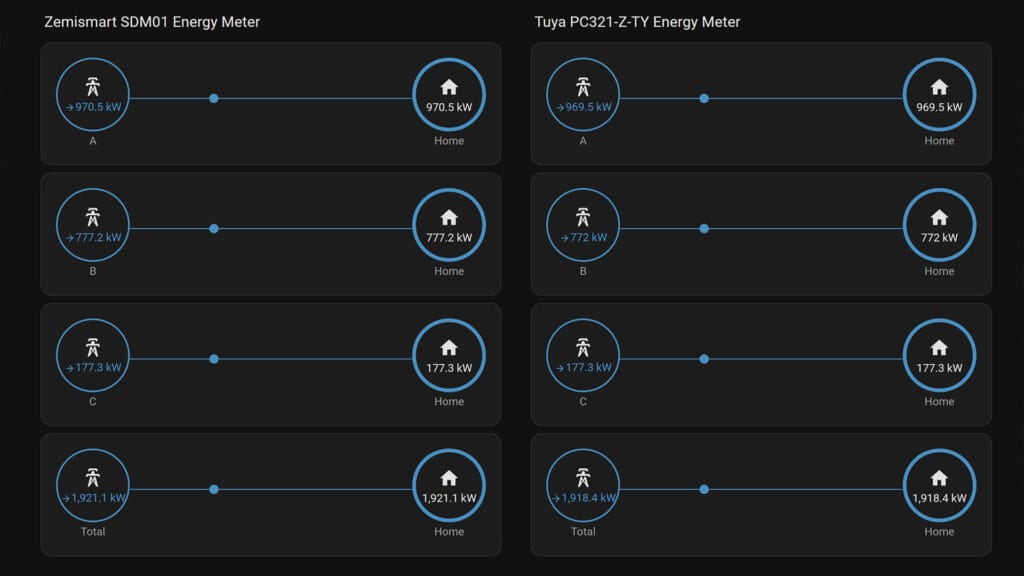
After collecting data for several months, it gave me the results above. There is a difference of 1kWh more on the SDM01 on phase A, a difference of 0.2 kWh on phase B, with phase C remaining identical in both. This difference is reflected in the total energy sum of all phases, with 1921.1 kWh on the SDM01 and 1918.4 kWh on the PC321. However, to put it into perspective, this is a difference of approximately 0.15% only. It’s very low and negligible.
Summary
Looking at all other stats across both devices, I arrived at the conclusion that they are both very accurate with miniscule differences between them. Voltage, current, power, energy – per phase or in total – are reported within decimals of each other in Home Assistant.
I would like to note here again that in my comparison of the Tuya PC321 to my utility provider data, I noticed about a 2% positive monthly difference. Which would, in turn, mean that the Zemismart SDM01 is also reporting 2% more than the real number. As the number is positive and not negative, and I highly doubt my utility provider is cutting my bill, it just tells me that these two readers are accurate within 2%.
There is another important difference to note between these devices: the reporting interval. The Zemismart SDM01 pushes it’s state every 5 seconds with the PC321 publishing every 30-45 seconds. This does not create a difference in the total energy reported. However, it does create a noisier Zigbee network, as the latter consolidating data first and publishing it in a single payload. It’s worth mentioning that running both on a SLZB-06M coordinator with a bunch of other devices did not produce any issues whatsoever in my setup.
Overall, both these energy meters are very accurate, reliable and quite good. As I do not have solar panels, I was unable to test their bi-directional capability, so keep that in mind if you are making a purchasing decision.
Both meters are available on AliExpress, here are some links from reputable sellers:


For anyone in the UK – the difficulty with using Zigbee (or anything wireless) for this kind of thing is that modern consumer units tend to be made from steel, which isn’t very friendly to wireless signals 🙁 Shelly make their DIN-mountable monitors with Ethernet ports, which is what I’ve used. But then that’s a different pain, as you also can’t just drill a hole in the side of your consumer unit to let the cables out, you have to have a conduit which has to follow other rules – such a faff!
Fair enough, that’s a solid consideration.
However, the Tuya PC321 has an external antenna which you can freely attach outside the switchbox and have no connectivity issues whatsoever.
It’s a really well made device as well, so maybe that’s more suitable for metal units.
i wonder how long are the power cables that go to N and the 3 phases.
I order myself one for insall it on our system
Doubting between both devices, the Zemismart high reporting frequency make me wonder if my ZB Network Will hold…