OpenHardwareMonitor for Home Assistant is a simple integration for monitoring local network systems based on the open source project of the same name. This integration is able to provide real-time data about CPU and GPU load, temperature, usage as well as storage stats, motherboard and memory stats, fan speeds and voltage information.
You can install it on Windows and Linux machines and get an overview in Home Assistant of your host or other computers on your local network.
In this tutorial, I’m going to show you how to setup OpenHardwareMonitor and manage it’s sensors in Home Assistant, as well as display the information in a Lovelace dashboard.

Installing OpenHardwareMonitor
OpenHardwareMonitor is completely free and open source and supports most hardware chips found on todays computers. To install it on your host machine, open https://openhardwaremonitor.org/.
- Click Download Open Hardware Monitor
- In the next window, click Download Now
- Open the ZIP file and extract it
- In the folder, you will find a few files one of which is OpenHardwareMonitor.exe
- Right-click and run it as an Administrator
This will open the application and we can continue to configure it:
Configuring OpenHardwareMonitor
In the the app, you will immediately see a list of hardware your system is running on. These are expanded from a collapsible list and organized into categories: motherboard, processor, memory, graphics card and storage.
From the menu of Open Hardware Monitor, we want to change a few things:
- From the Options tab, enable the following
- Start Minimized
- Minimize to Tray
- Minimize on Close
- Run on Windows Startup
- Change the Temperature unit if you need to (°C or °F)
- Click Remote Web Server and select Run
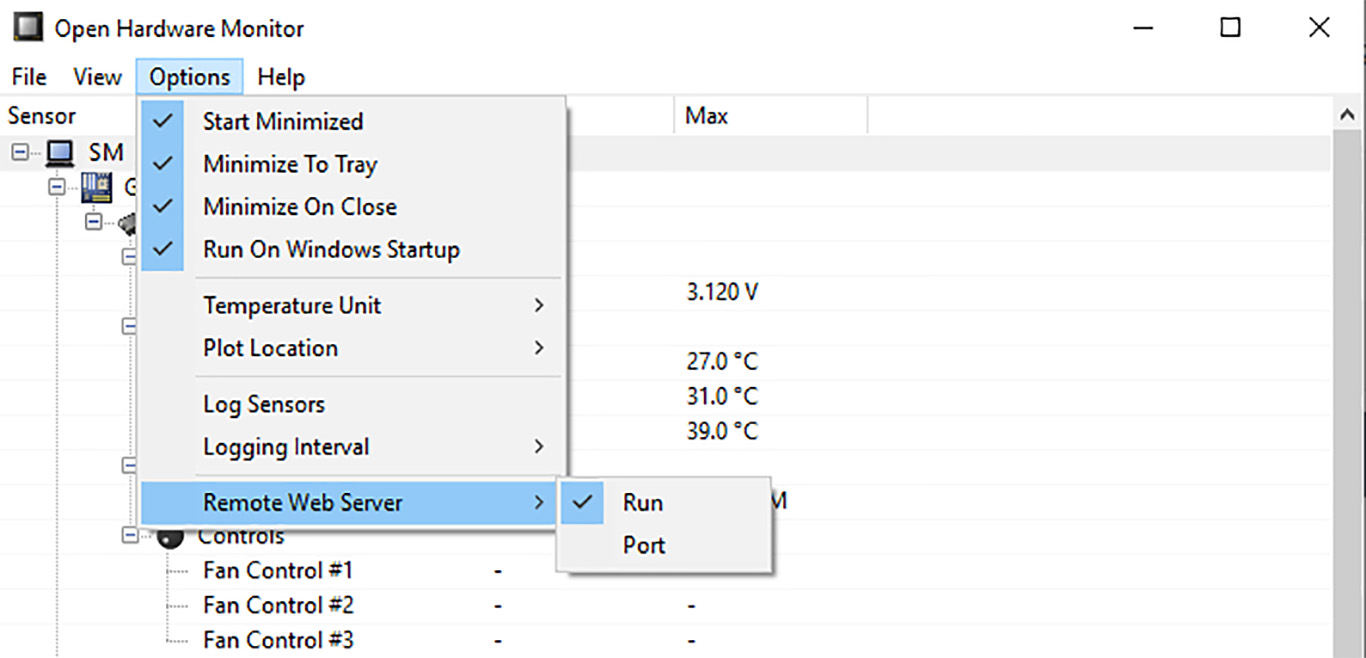
The port for the remote web server can also be changed if you need to from this menu, default is 8085 which we will use in this tutorial. This will setup Open Hardware Monitor to always run minimized whenever the system is started. Obviously, the app must be running in order to send data to Home Assistant.
Configuring Host System
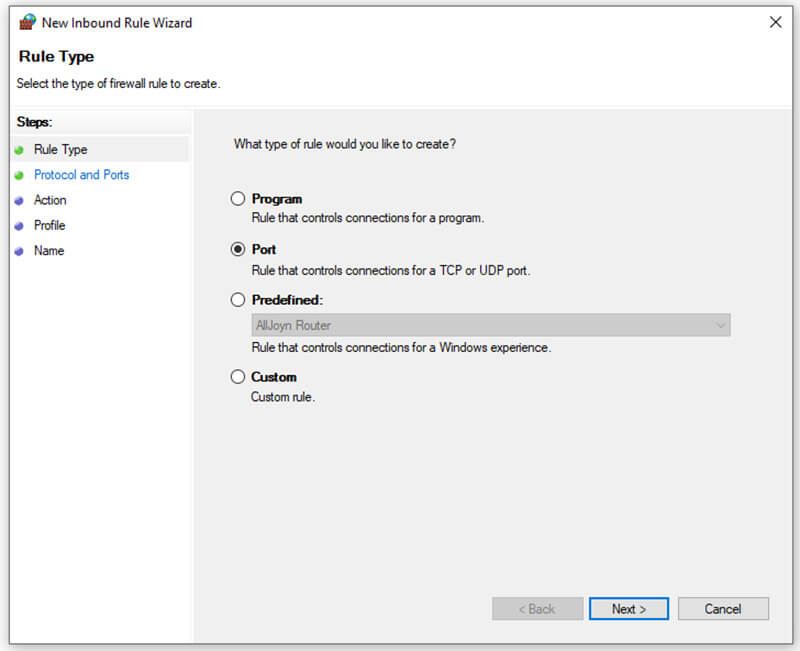
Before sensor data can be pushed to Home Assistant, we need to configure the host machine to allow inbound connections on port 8085, which is default port Open Hardware Monitor uses.
- On Windows, Press the Windows + R key
- Input control firewall.cpl
- Alternatively, open Windows Defender Firewall from Control Panel
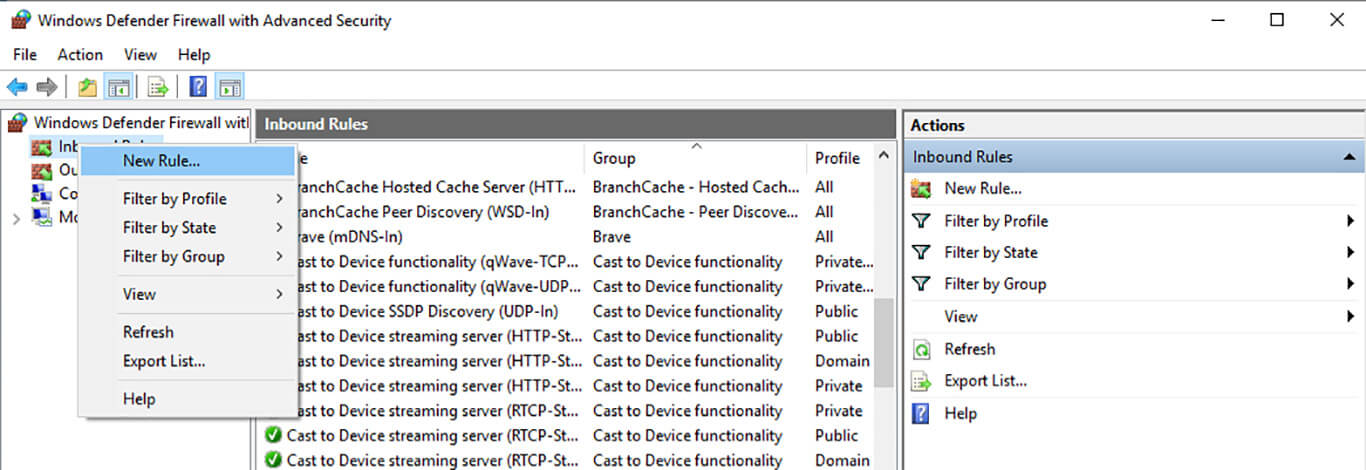
- From the side menu, click Advanced settings
- This will open a new window:
- Windows Defender Firewall with Advanced Security
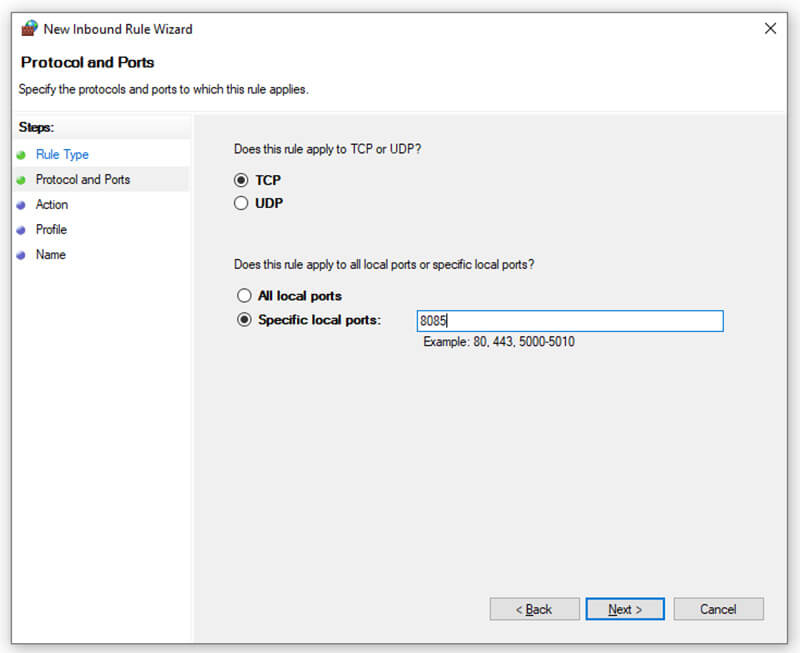
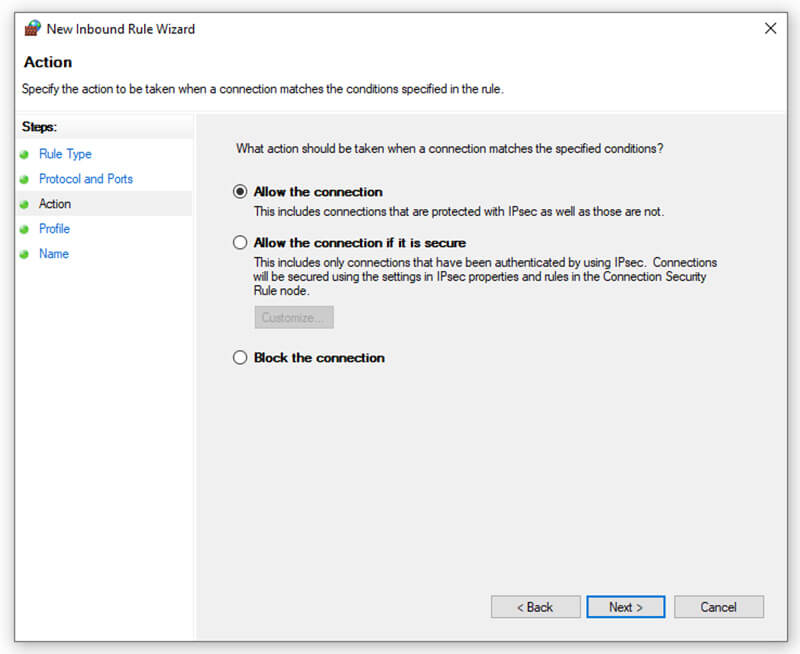
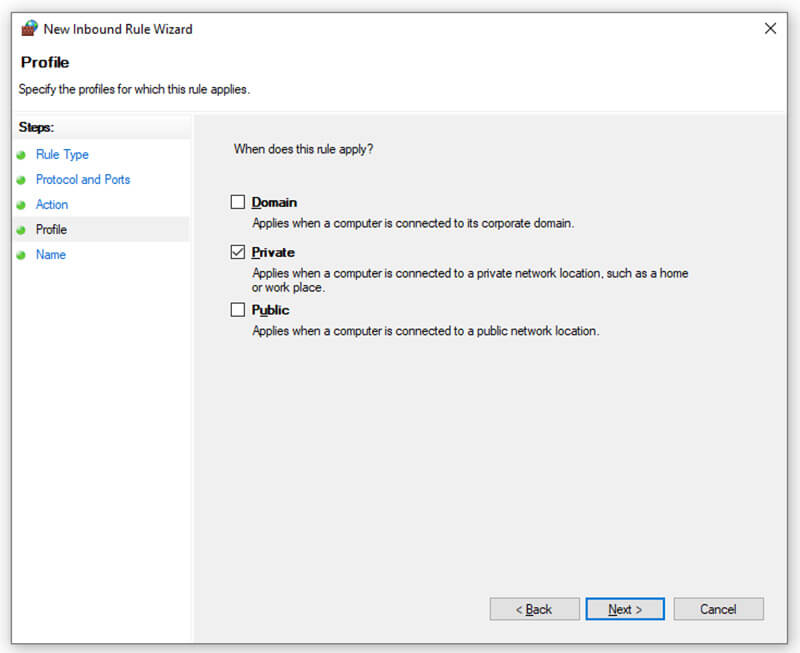
Give it a Name and a Description (Optional) and click Finish. You have successfully created an inbound traffic firewall rule for your local network on port 8085.
For Linux, run the following command to open port with firewalld:
sudo firewall-cmd --permanent --add-port=8085/tcp
sudo firewall-cmd --reload
Note: It’s also important you set a static IP address for your system. Routers can cycle DHCP addresses and render the Open Hardware Monitor integration useless. The integration will not be able to find the host system on the IP address you have setup in configuration.yaml and remove the sensors. To set a static IP address on your router, see this guide.
Configuring OpenHardwareMonitor in Home Assistant
The Open Hardware Monitor Integration cannot be configured through the UI, only through YAML. To setup the integration, add the following to your configuration.yaml file and restart Home Assistant:
sensor:
  - platform: openhardwaremonitor
    host: 192.168.xxx.xxx
    port: xxxx (Optional, defaults to 8085. Change if you used another port)
Once Home Assistant has restarted, a bunch of sensors will be exposed pushing different data from the Open Hardware Monitor app.
To select which sensors you want shown in HA, open the app on the host system and click the File tab > Hardware. From here check or uncheck any sensors you don’t want to be pushed to Home Assistant. To verify everything is working correctly, including your firewall inbound rule open your IP address including the port in the browser, for example:
http://192.168.0.16:8085/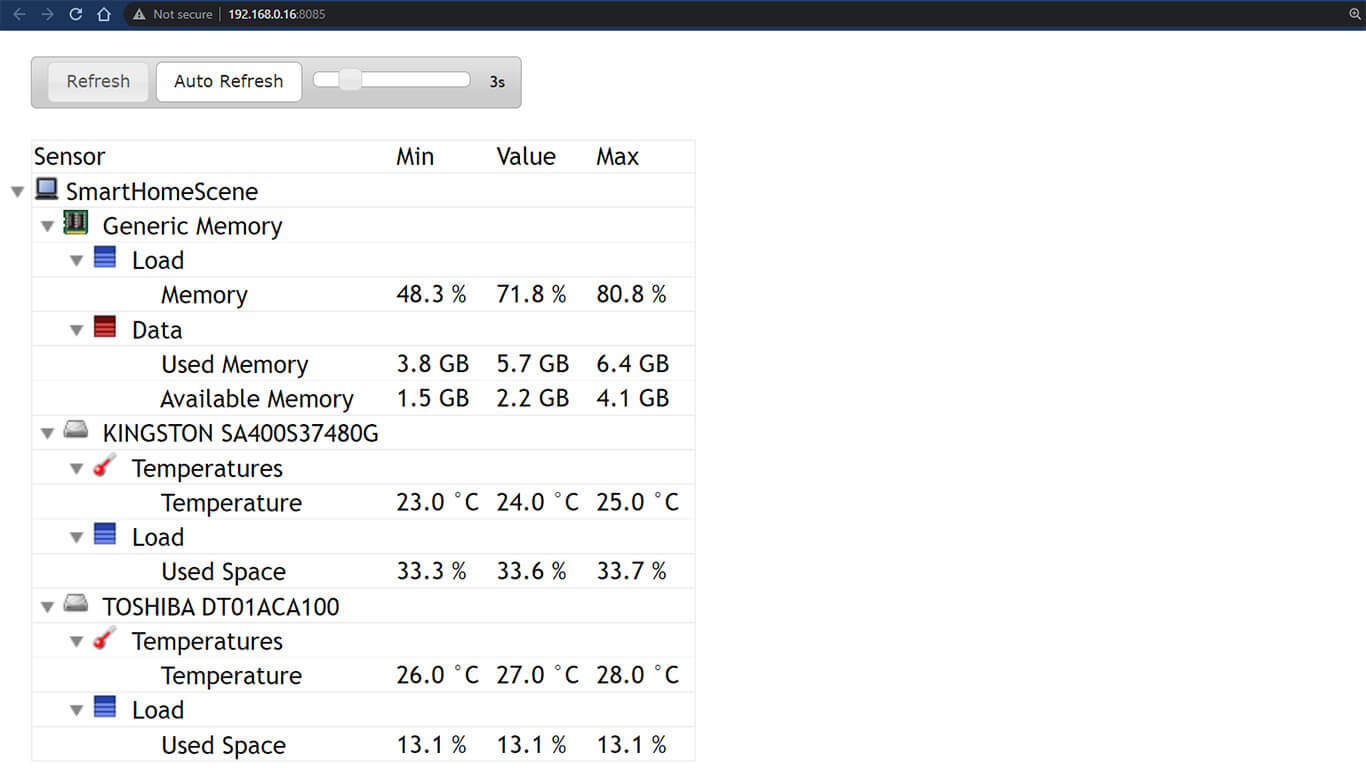
Exclude Entities from the Database
Open Hardware Monitor will create a bunch of entities from the sensor domain containing a bunch of data. It’s good practice to exclude most of them from the recorder database, as it will create too many read/write cycles and shorten the lifespan of your storage medium. This is especially true when you are using Home Assistant on a Raspberry Pi with an SD Card.
To exclude an entity from the database, follow the following example:
recorder:
  exclude:
    entities:
      - sensor.processor_temperature
Add any entities you do not wish tracked as a list here and restart Home Assistant.
You can read our full tutorial for optimizing the Home Assistant database, as there is more to it than just excluding an entity.
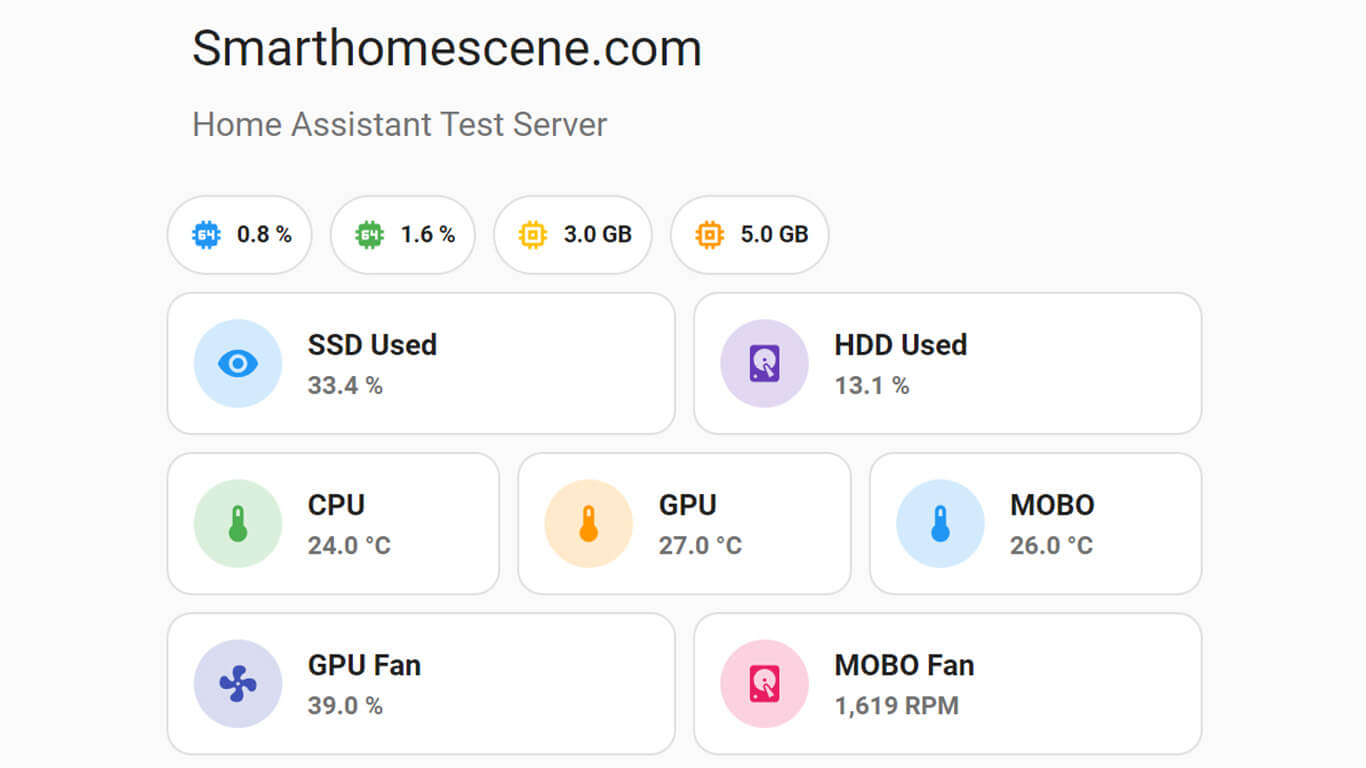
Displaying Data in Dashboard
As an example, we are going to create a Mushroom Cards layout to display the available data in a Lovelace Dashboard. You can read our full Mushroom Cards Tutorial here [Part1, Part2]
type: vertical-stack
cards:
  - type: custom:mushroom-title-card
    title: Smarthomescene.com
    subtitle: Home Assistant Test Server
  - type: custom:mushroom-chips-card
    chips:
      - type: entity
        entity: sensor.smarthomescene_intel_pentium_g4560_load_cpu_core_1
        icon_color: blue
        icon: mdi:cpu-64-bit
      - type: entity
        entity: sensor.smarthomescene_intel_pentium_g4560_load_cpu_core_2
        icon_color: green
        icon: mdi:cpu-64-bit
      - type: entity
        entity: sensor.smarthomescene_generic_memory_data_available_memory
        icon: mdi:memory
        icon_color: amber
      - type: entity
        entity: sensor.smarthomescene_generic_memory_data_used_memory
        icon: mdi:memory
        icon_color: orange
  - type: horizontal-stack
    cards:
      - type: custom:mushroom-entity-card
        entity: sensor.smarthomescene_kingston_sa400s37480g_load_used_space
        name: SSD Used
      - type: custom:mushroom-entity-card
        entity: sensor.smarthomescene_toshiba_dt01aca100_load_used_space
        name: HDD Used
        icon: mdi:harddisk
        icon_color: deep-purple
Summary
Open Hardware Monitor is a nice and simple way to bring your system data in Home Assistant. Installation and setup are very easy, streamlined for beginners.
By installing the software, you can monitor Windows or Linux machines in real-time and push sensor data in Home Assistant. Available sensors for processor, graphics card, motherboard, memory and storage are from a few domains, such as temperature, load, voltage, fan speed, clock speed.
Please note, there are other alternatives for monitoring system on your home network, some of which offer control on top of sensor data, such as Glances, IOT Link or HASS.agent. Open Hardware Monitor is the simplest to setup and configure at perfect for beginners.


Greetings,
I have issues when windows is logged-off (either before login, or after log-out) it doesn’t work. Looks like windows kills it, or it doesn’t start as system startup (before login). Otherwise it’s OK.
I even put it on “Task Scheduler” to open at start-up. No success.
Also tried to make it a service, works for a few seconds, then windows kills it (since windows thinks it has not started or does not return success).
Any suggestion?
Thanks.
It’s possibly a bug, OpenHardwareMonitor has been discontinued.
Use LibreHardwreMonitor, a fork that is well maintained.
I wrote a guide for it too:
https://smarthomescene.com/guides/how-to-setup-librehardwaremonitor-in-home-assistant/