UPDATE: Part 2 is here: Mushroom Cards Part 2: Room Layout and Card Combinations
If you have never wanted to pull your hair out tinkering with Home Assistant, you have not explored its true potential. Configuring the Lovelace UI using custom cards is one of those things. The community has offered a wide variety of custom cards with different uses throughout the years, but setting them up can be extremely time consuming to say the least.
You see all those beautiful minimalistic dashboard designs and think you are never going to make something similar. Because, well, you hate YAML and you simply don’t have the time.
Well, developer Piitaya has developed a set of beautiful minimalistic cards which include an easy built-in UI editor, which streamlines Lovelace configuration. All credit goes to the dev.
Features & Card List
Features:
- Built-in UI editor for all card and options (no need for YAML)
- Independent: No need to install more cards
- Icon picker
- Color picker
- Based on Material UI Colors
- Light and Dark themes support
- Optional theme customization
- Internationalization
Cards:
- Alarm card
- Chips card
- Cover card
- Entity card
- Fan card
- Light card
- Person card
- Title card
- Template card
Installation
HACS
Mushroom is available in HACS (Home Assistant Community Store).
- Open HACS
- Go to “Frontend” section
- Click button with “+” icon
- Search for “Mushroom”
Manual
- Download mushroom.js file from the [latest-release].
- Put mushroom.js file into your config/www folder.
- Add reference to mushroom.js in Lovelace. There’s two way to do that:
- Using UI: Configuration → Lovelace Dashboards → Resources Tab → Click Plus button → Set Url as /local/mushroom.js → Set Resource type as JavaScript Module.
Note: If you do not see the Resources Tab, you will need to enable Advanced Mode in your User Profile - Using YAML: Add following code to lovelace section
resources:
    - url: /local/mushroom.js
      type: module
Card Configuration & Examples
These collection of cards can easily be used to create a beautiful and clean minimalist dashboard in Home Assistant. Every card has its own built-in UI editor, almost all of their features are configurable through it. Nevertheless, in this tutorial I will be presenting the cards with YAML, so you can copy-paste it to your config and go from there.
Title Card
Simple Title Card block, used to separate a section of cards or name your dashboard.
type: custom:mushroom-title-card
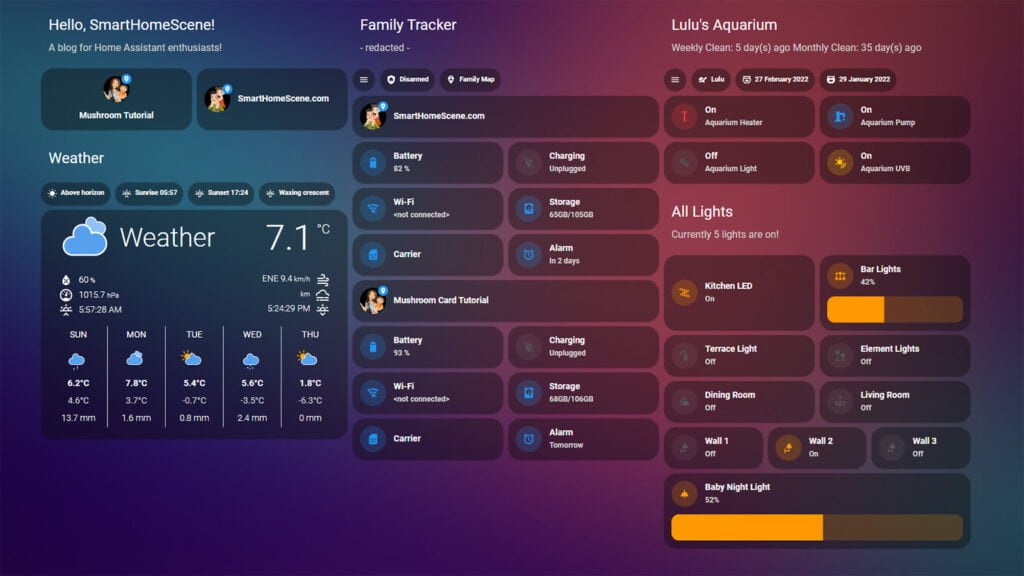
title: Hello, SmartHomeScene!
subtitle: A blog for Home Assistant enthusiasts!Title card supports templating both in the tittle and subtitle field:
type: custom:mushroom-title-card
title: Hello, SmartHomeScene!
subtitle: >-
  Currently {{ states.light | selectattr('state','eq','on') | list | count }}
  lights are on!
Chips Card
The Chips Card includes several small types of chip-cards whose main purpose is to display small information at the top of your dashboard layout. It includes the following cards:
- Action Chip: Allows you to perform any Home Assistant action (navigate, call-service)
- Alarm Control Panel Chip: An entity chip that allows you to display alarm info.
- Back Chip: Allows you to perform a back action.
- Conditional Chip: Allows you to display another chip based on chip state.
- Entity Chip: Allows you to display any entity state.
- Light Chip: Allows you to display light state.
- Menu Chip: Open the HA side menu.
- Weather Chip: Displays weather info.
- Template Chip: Cook your own chip!
Chips Card nested in a vertical-stack with a map card showing person entity location. Conditional card shows up, when baby light is on.![]()
type: vertical-stack
cards:
  - type: custom:mushroom-chips-card
    chips:
      - type: menu
      - type: entity
        entity: alarm_control_panel.apartment
      - type: entity
        entity: person.person1
        icon: mdi:face-man
      - type: entity
        entity: person.person2
        icon: mdi:face-woman
      - type: conditional
        conditions:
          - entity: light.kids_room_l1
            state: 'on'
        chip:
          type: template
          content: Baby light is On
          icon: mdi:lightbulb-on-outline
          icon_color: yellow
  - type: map
    entities:
      - device_tracker.phone1
      - device_tracker.phone2
    dark_mode: true
Chips Card nested in a vertical-stack with a weather card showing Sun and Moon information. Templating is used for the sunrise and sunset chips.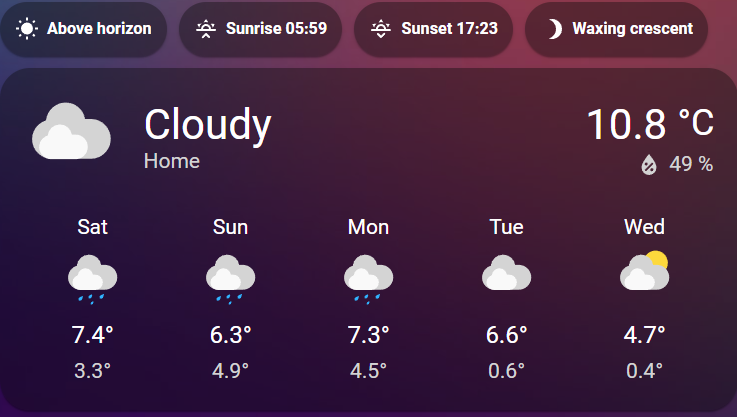
type: vertical-stack
cards:
  - type: custom:mushroom-chips-card
    chips:
      - type: entity
        entity: sun.sun
      - type: template
        content: >-
          Sunrise  {% if states.sun.sun %} {{
          (as_timestamp(states.sun.sun.attributes.next_rising)) |
          timestamp_custom(('%H:%M') )}} {% endif %}
        icon: mdi:weather-sunset-up
      - type: template
        content: >-
          Sunset  {% if states.sun.sun %} {{
          (as_timestamp(states.sun.sun.attributes.next_setting)) |
          timestamp_custom(('%H:%M') )}} {% endif %}
        icon: mdi:weather-sunset-down
      - type: entity
        entity: sensor.moon
  - type: weather-forecast
    entity: weather.home
    secondary_info_attribute: humidity
    show_current: true
    show_forecast: true
Alarm Card
The alarm panel card can be used to control your alarm_control_panel entity. Three layouts are available, default, horizontal, vertical.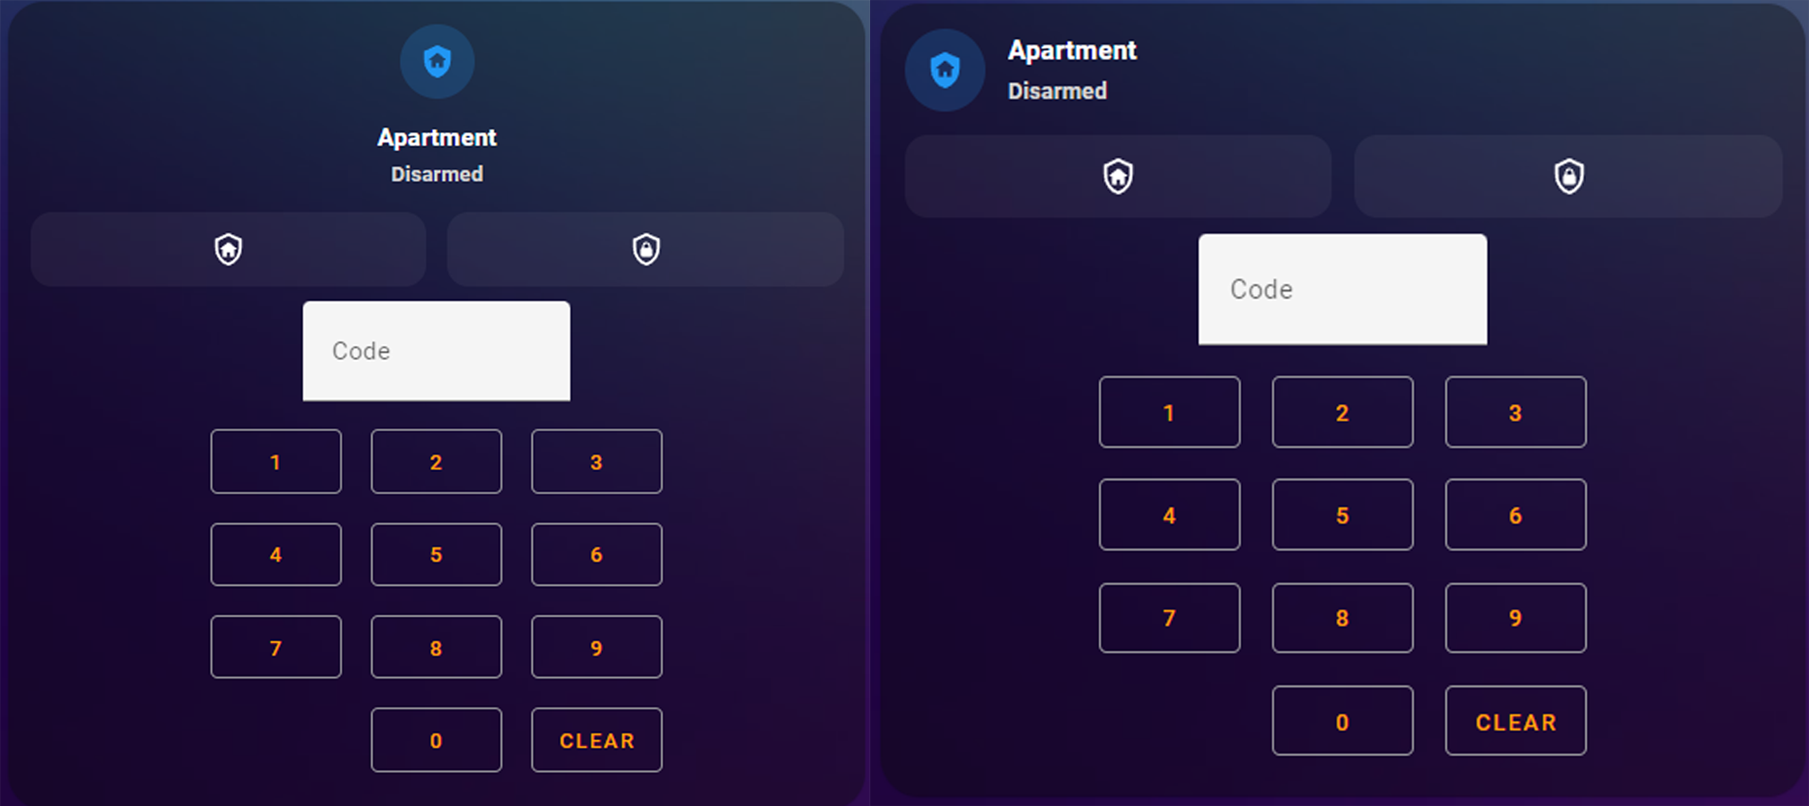
type: custom:mushroom-alarm-control-panel-card
entity: alarm_control_panel.apartment
states:
  - armed_home
  - armed_away
name: Apartment
icon: mdi:shield-home
layout: vertical
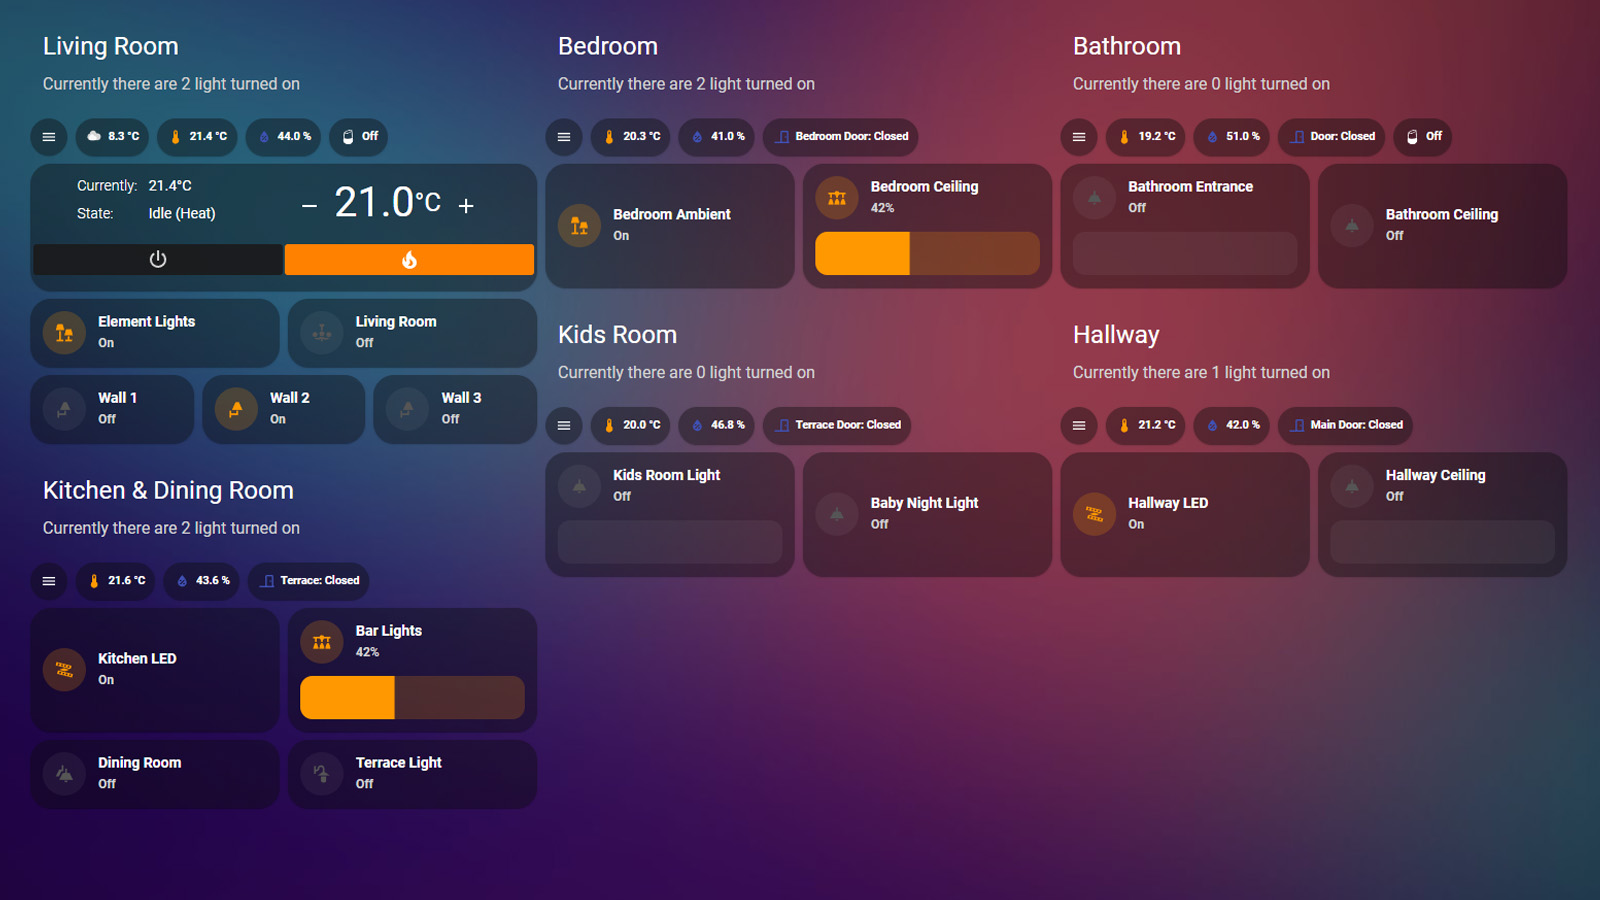
Light Card
A bunch of light entities with or without brightness control, nested within a vertical-stack and five horizontal stacks. Three layouts are available, default, horizontal and vertical. Brightness temperature and color control are available only if your entity supports them.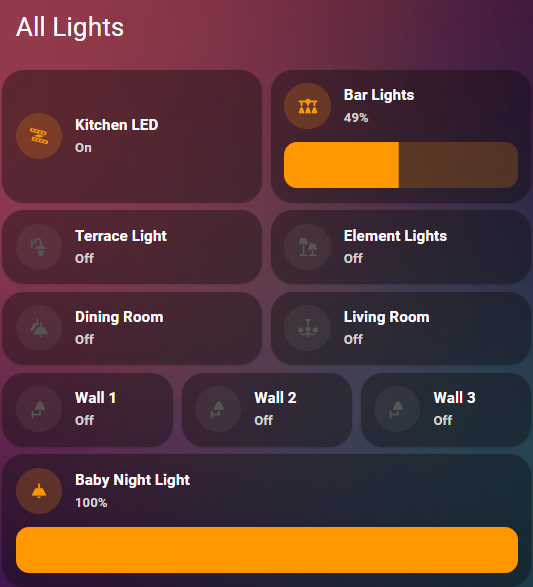
Note: My dimmable LED lights are controlled through MoesHouse ZigBee Touch Dimmer. Its an excellent and beautiful dimmer device.
type: vertical-stack
cards:
  - type: custom:mushroom-title-card
    title: All Lights
  - type: horizontal-stack
    cards:
      - type: custom:mushroom-light-card
        entity: light.kitchen_led
        use_light_color: true
      - type: custom:mushroom-light-card
        entity: light.bar_lights
        show_brightness_control: true
  - type: horizontal-stack
    cards:
      - type: custom:mushroom-light-card
        entity: light.terrace
      - type: custom:mushroom-light-card
        entity: light.element_lights
  - type: horizontal-stack
    cards:
      - type: custom:mushroom-light-card
        entity: light.dining_room
      - type: custom:mushroom-light-card
        entity: light.living_room
  - type: horizontal-stack
    cards:
      - type: custom:mushroom-light-card
        entity: light.wall_1
        name: Wall 1
      - type: custom:mushroom-light-card
        entity: light.wall_2
        name: Wall 2
      - type: custom:mushroom-light-card
        entity: light.wall_3
        name: Wall 3
  - type: horizontal-stack
    cards:
      - type: custom:mushroom-light-card
        entity: light.kids_room_l1
        name: Baby Night Light
        use_light_color: true
        show_brightness_control: true
        show_color_temp_control: true
        show_color_control: true
Person Card
Used to display your person entity in a vertical or horizontal layout. Custom actions can be applied to one tap, double tap, hold.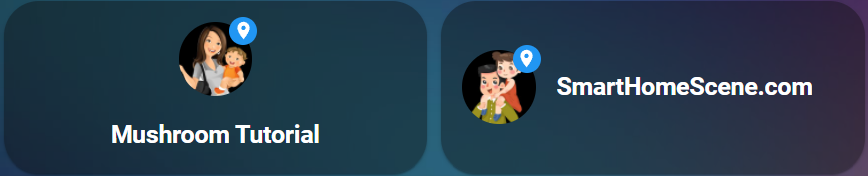
type: horizontal-stack
cards:
  - type: custom:mushroom-person-card
    entity: person.person1
    use_entity_picture: true
    name: Mushroom Tutorial
    layout: vertical
    hide_state: true
  - type: custom:mushroom-person-card
    entity: person.person2
    name: SmartHomeScene.com
    use_entity_picture: true
    hide_state: true
Entity Card
The Mushroom Entity card can be used to display and control any kind of entity. You can set the layout, set icon, name, primary and secondary information shown, and choose color from a dropdown menu. Custom actions can be specified for tap, double tap and hold. Example:
Mushroom Title Card, Chips Card, and entities card inside a vertical stack and a couple of horizontal stacks. Templates are used in the subtitle of the title card, to calculate days remaining to next partial and full clean of the aquarium.
You can check out my full guide of how I automated my aquarium with a Sonoff 4CH Pro HERE. The Sonoff is wired through a TuYa Smart Plug to monitor power consumption.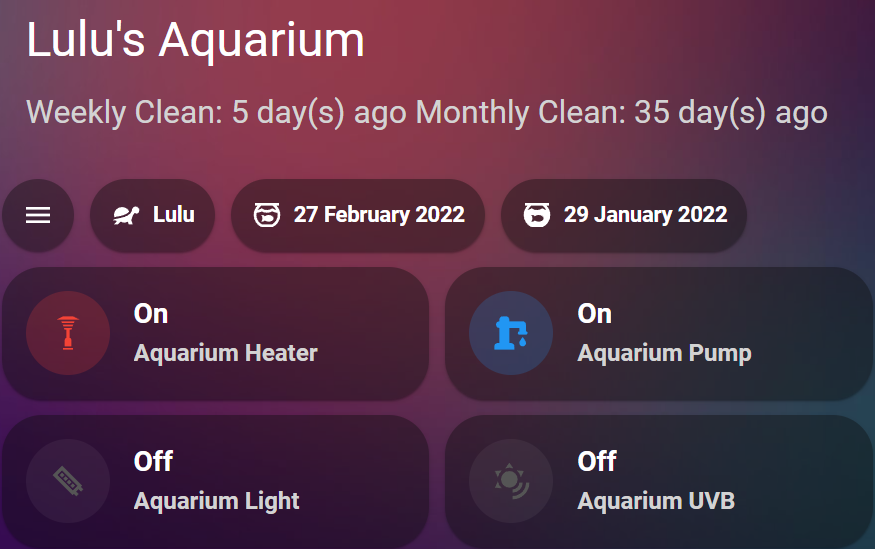
type: vertical-stack
cards:
  - type: custom:mushroom-title-card
    title: Lulu's Aquarium
    subtitle: >-
      Weekly Clean:  {% if states.input_datetime.aquarium_weekly_clean %}
      {{(((as_timestamp(now())-states.input_datetime.aquarium_weekly_clean.attributes.timestamp))
      | int(0) /60/1440-1) | round(0) }} day(s) ago
      Monthly Clean: {{
      (((as_timestamp(now())-states.input_datetime.aquarium_monthly_clean.attributes.timestamp))
      | int(0) /60/1440) | round(0) }} day(s) ago  {% endif %}
  - type: custom:mushroom-chips-card
    chips:
      - type: menu
      - type: template
        content: Lulu
        icon: mdi:tortoise
      - type: entity
        entity: input_datetime.aquarium_weekly_clean
        icon: mdi:fishbowl-outline
      - type: entity
        entity: input_datetime.aquarium_monthly_clean
  - type: horizontal-stack
    cards:
      - type: custom:mushroom-entity-card
        entity: switch.sonoff_aquarium_heater
        icon_color: red
        primary_info: state
        secondary_info: name
      - type: custom:mushroom-entity-card
        entity: switch.sonoff_aquarium_pump
        primary_info: state
        secondary_info: name
  - type: horizontal-stack
    cards:
      - type: custom:mushroom-entity-card
        entity: light.sonoff_aquarium_light
        primary_info: state
        secondary_info: name
        icon_color: amber
        tap_action:
          action: toggle
      - type: custom:mushroom-entity-card
        entity: light.aquarium_uvb
        primary_info: state
        secondary_info: name
        icon_color: amber
Template Card
The Mushroom Template Card allows you to use HA templating to display any kind of information or entity. icon, icon_color, primary and secondary are templatable fields which can customize. 
type: custom:mushroom-template-card
primary: Hello, {{user}}
secondary: |
  Location: {% if is_state('device_tracker.phone1', 'home') %}
    Home
  {% elif is_state('device_tracker.phone1', 'Work') %}
    Work
  {% elif is_state('device_tracker.phone1', 'Bar') %}
    Bar
  {% else %}
    Away {{ states('device_tracker.phone1') }}.
  {% endif %}
icon: |
  {% if is_state('device_tracker.phone1', 'home') %} mdi:home-account
  {% elif is_state('device_tracker.phone1', 'work') %} mdi:desktop-classic
  {% elif is_state('device_tracker.phone1', 'Bar') %} mdi:beer
  {% else %} mdi:home-search
  {% endif %}
entity: person.person1
icon_color: |
  {% if is_state('device_tracker.phone1', 'home') %} green
  {% elif is_state('device_tracker.phone1', 'work') %} red
  {% elif is_state('device_tracker.phone1', 'Bar') %} orange
  {% else %} cyan
  {% endif %}
Note: To be able to use location zones, you need to first define them in Home Assistant. To do that, head to Configuration > People & Zones > Zones > +Add Zone. Also, location tracking must be enable in the Home Assistant companion app on your mobile device.
Summary & Screenshots
Considering this collection of cards has its own UI editor, it is very beginner friendly and easy to configure. On the other hand, it supports Jinja2 templating to many of its important fields so it can be heavily customized . What you can eventually display in your dashboard is limitless considering the nature of Home Assistant templates.


Hi, great article.
What theme is that?
Thank you
Hello, Its the iOS Dark and Light Theme collection. Look for it in HACS
Great write up
Thank you!
Hi,
One the second screen you used very interesting climate card. I can’t see it in mushrooms repository. Can you share what it is?
Hello Mateusz, that one is not part of Mushrooom Cards. Its the Simple Thermostat Card by nervetatto. You can look for it in HACS. Cheers!
https://github.com/nervetattoo/simple-thermostat
any chance you can share the config for the thermostat card, that is a nice setup and I cant figure out how to do it.
Hello, this is the code for the simple thermostat card. I use card-mod to style the card to match the mushroom layout:
type: custom:simple-thermostatstyle: |
ha-card {
--st-font-size-xl: 40px;
--st-spacing: 3px;
--st-font-size-m: 25px;
--st-font-size-sensors: 14px
}
entity: climate.living_room
step_size: 0.1
header: false
layout:
step: row
mode:
names: false
headings: false
icons: true
control:
- hvac
Hello Piitaya 👋
What is the point of using Mushroom compared to Minimalist ? (https://github.com/UI-Lovelace-Minimalist/UI/)
The phrase “All credit goes to him!” made me laugh
Hello Thomas,
Thank you for the question.
We feel like you misinterpreted that the original dev, piitaya wrote this guide. This is not the case, we are a team of home automation enthusiasts with a passion for Home Assistant.
To answer your original question, Minimalist UI is configured only through YAML and allows full customization and utilization of custom cards. Mushroom Cards adapts a lot of those cards and makes them completely configurable through the Lovelace UI Editor.
This smooths out the difficulty curve and allows beginners to build a clean and minimalistic UI without writing YAML.
Great write up, thanks for introducing me into Mushroom. One question: how do you get 3 columns? Im trying it with horizontal-stack and than vertical-stack, 3 times, but they’re still below each other…
Thanks!
Hello Robert,
To achieve a stack you need to nest several horizontal-stack within a vertical-stack.
type: vertical-stack
cards:
– type: horizontal-stack
….cards:
– type: horizontal-stack
….cards:
– type: horizontal-stack
…..cards:
You use mushroom cards within the horizontal-stacks. Cheers!
Looks nice! This inspired me to spruce up my dashboard. Do you know if there’s a way to increase the size of the chips card? They look fine on my PC, but on mobile they’re pretty small.
Cannot find how to find the file mentioned in step 1:
“Download mushroom.js file from the [latest-release]”
I’m trying to use Mushroom on my Home-Assistant running on Synology/docker.
Really great write up. I think I need to check this out.
Thanks for pointing us to the thermostat card, although it looks like there’s one on the way on the Mushroom repo. But the one thing I kinda can’t live without, is the ability to have a simple webpage card that I can iframe my weather radar into.
Mushroom doesn’t appear to support a card like this, but is there a way to mix and match a little? A couple of the cards you are using would appear to be custom cards, but maybe I have this all wrong.
Hi, great work!
One question, how do you set that background on the dashboard? Looks pretty good!
Hello Luciano,
Those backgrounds come with the themes. However, you need to add background: var(–background-image) to your lovelace-ui.yaml file in order for them to work.
Hi. Where can I get the background image that you use on this tutorial?
Thanks a bunch! very good tutorial and I learnt a fair bit.
I’m using the same theme with mushroom cards, however the text on my cards is gray. How can I change the card text to white like in your examples?
It would be nice to have a thermostat card. Same as the lights one that I can included a slider and define min and max to the slider. Should be pretty easy for you to implement….
missing: weather.home entity, where do i find this?
Hi Bob,
That is the default weather entity in Home Assistant. If for some reason you have it disabled, please see here
https://www.home-assistant.io/integrations/weather/
Would you be willing to provide the YAML for the Home page so that we can use it as a template?
Hello,
I’ve since dismantled that particular homepage, because I do tutorials constantly. Please tell me what you need, I’ll see if I can send you some code.
Cheers
Love this dashboard. I’m coping the weather card(s) but how do I specify 12hr time format?
Hi Rich,
This is the generic weather forecast card that comes with HA. You need to change you Home Assistant time format to 12hr. This is done in Settings > System > General.
Cheers!
Hey Guys, since update 2022.11 there is a white frame around the cards….
Anyone can take a look?
Actually it’s jsut a quare rectangle on Chip cards.
Nevermind, after updating Mushroom theme all good.
Hi,
I just came across this article, and this is a great introduction. I am planning to use the upcoming holidays to re-do my fugly cobbled together setup, with a more cohesive mushroom based UI.
That said, can ypu please share how you are switching between the various dashboard views ?
I’d love to have a main dashboard that gives me high level controls to major functions within the home, but also love how you have a per-room grouping to drill into functions within each room.
Thanks !
Hello,
We’ve covered room layout in Part 2 of our Mushroom Cards Tutorial
https://smarthomescene.com/guides/mushroom-cards-part-2-room-layout-and-card-combinations/
Cheers!
Good job!
How I can change the background theme color or picture design?
Thanks!
Hello Ivan,
To change color, the easiest way would be to edit the theme file.
See this guide:
https://smarthomescene.com/guides/mushroom-cards-part-2-room-layout-and-card-combinations/#styling-using-mushroom-themes
Cheers
Looking Good!
How did you create the backup cards?
Also, how did you create the chip for “Family Map”?
Thanks!
Hello,
The family tracker chip is simply a map of the person’s corresponding device location.
Each person has their own dedicated device and when clicked, it shows a map of where each person is located.
Cheers
Ok. Thanks!
hello excellent work. I would like to know what them you use and how do you make each chip card have the same size?
Hello Randall,
The Mushroom Chips Cards have the same size by default.
Cheers
If you look at this part of the template code:
icon: |
{% if is_state(‘device_tracker.phone1’, ‘home’) %} mdi:home-account
{% elif is_state(‘device_tracker.phone1’, ‘work’) %} mdi:desktop-classic
{% elif is_state(‘device_tracker.phone1’, ‘Bar’) %} mdi:beer
{% else %} mdi:home-search
{% endif %}
The device_tracker (in this case) has to be defined in 3 different places, and also in the color section if you want to use color. Is there a way to define the sensor ONE time in the template card, and then refer to the sensor entity by variable/reference in the different lines?
This would also be a great way of doing it if you have many different template cards, for different entities, you can then copy/paste from one, and just change the entity itself once pr template.
Thanks!
Yes you can, see the Decluttering Card tutorial.
https://smarthomescene.com/guides/home-assistant-decluttering-card-tutorial/
Cheers
Hi, very cool and helpful article.
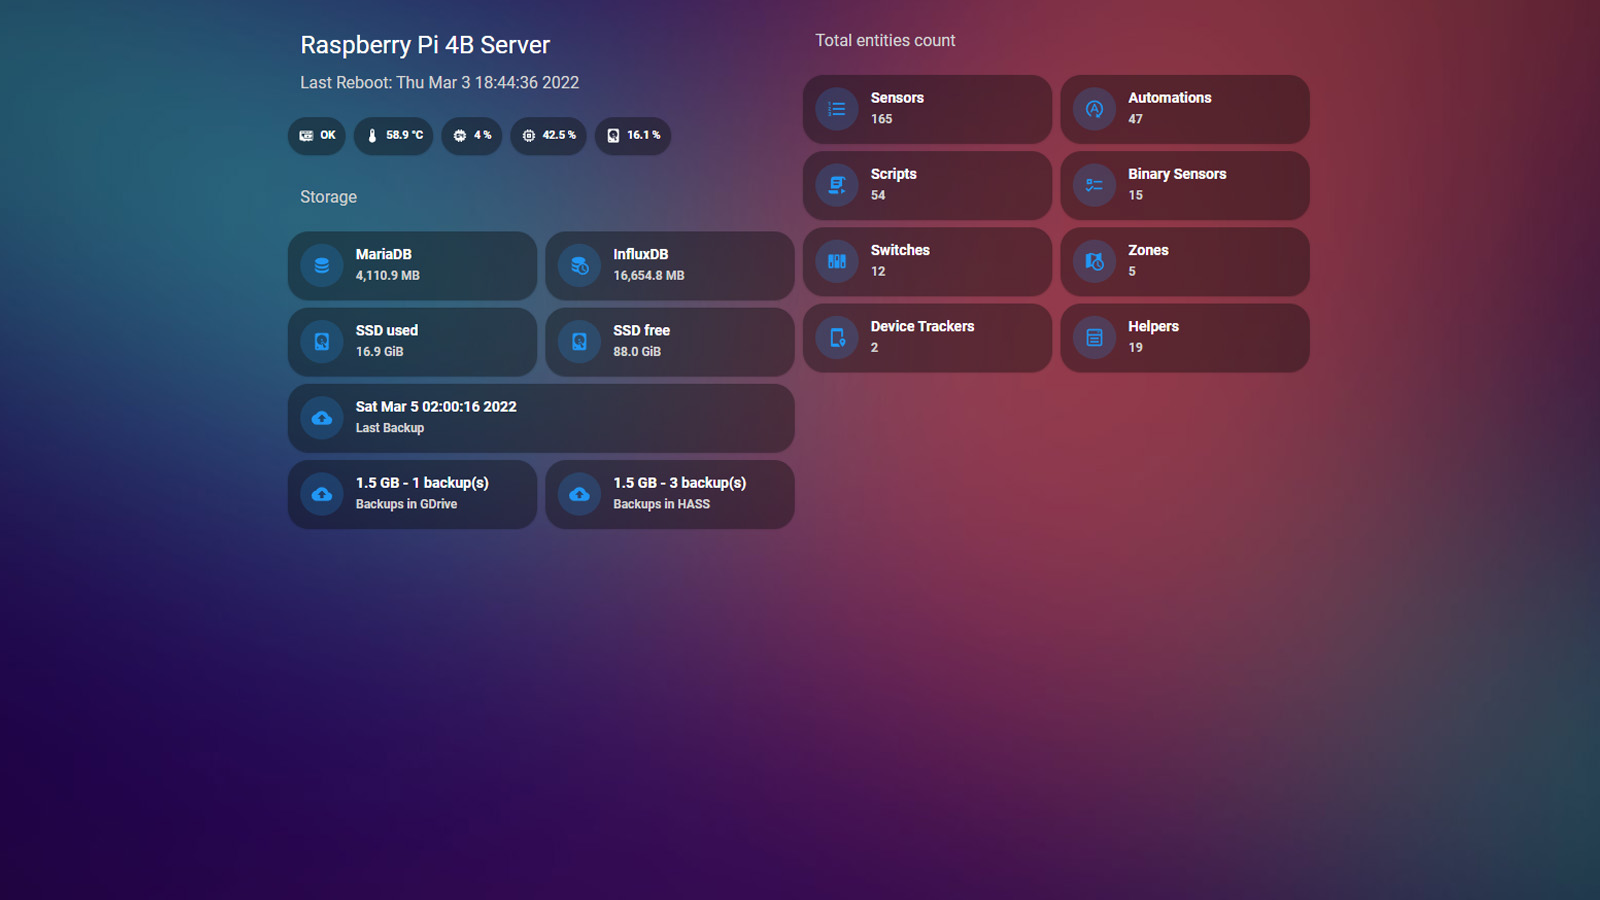
Could you please describe how you created the Server Overview?
I was able to integrate the sensors already, currently, I´m hanging to get the Last reboot Information as a variable into the header….
Hey,
I don’t have this layout anymore but the Last Reboot is just a template pulled from the Uptime integration as I remember
https://www.home-assistant.io/integrations/uptime/